SEARCH FINESCALE.COM

Enter keywords or a search phrase below:

Third Annual Berny Memorial Group Build

96101 views
1373 replies
1 rating 2 rating 3 rating 4 rating 5 rating
  • Member since
    November 2010
  • From: Lafayette, Indiana
Posted by Son Of Medicine Man on Monday, September 29, 2014 7:26 PM

jimbot58

Tonight was a rough start in model world. It started off bad when i had decided I had a taste for some Fettuccine Alfredo with chicken, walked to Walmart to get the ingredients, returned home and began to prepare it when the power went out. Thank goodness  I have a gas stove, a battery powered lantern, and flashlights. I was able to complete and enjoy dinner as best I can, but everything else was off the board. It was off for about 2 hours.

Finally, lights on and I could head back to do a little work.

More details to the F-8 cockpit, though I don't know if you can tell what I did. I can barely see the parts I added.

It turns out that the tablet may have some use after all. I wanted to see some details of a Flanker cockpit (no, I still haven't really started it! Really!) typed in a search and I was quickly able to view photos without going all the way to the far side of the house to use the desktop.

Seats:

Maybe this free thing might be worth it's non-cost after all!

And no, I'm not starting on the Flanker! I am not cutting seat and cockpit parts from their sprues. ...Well, maybe just a little......

Well, better be off to bed. My alarm clock says it's 12:00.....12:00.....12:00.. ..12:00

Jim

Hi Jim,

The F-8 cockpit looks fantastic!  Yes  Yes 

I have been seeing on the news about the bad weather you have been getting.  And it looks like you are going to get more tonight! Stay safe.

And yes, it looks like you are getting a lot more than what you paid for in that tablet!  Smile

Ken


  • Member since
    November 2010
  • From: Lafayette, Indiana
Posted by Son Of Medicine Man on Monday, September 29, 2014 7:44 PM

Rob Sherman

That cockpit looks epic Jim...very cool.

I made a bit more progress on the Lightning. The fuselage went together well with only a few CA glue fills needed. For those who know Airfix plastic, it's very soft and sands and polishes well. I was sort of confused as to why Airfix made the 'bulge' in the belly of the plane a two-part construction? Anyway, it was a bit of a challenge to close up and seal the gaps. I think it would have been better molded as part of the entire fuselage, but, maybe they did that for a future version.

Anyway, the fuselage and wings are done. I am seriously contemplating painting the fuselage before fixing the wings in place. The Lightning's wings are SO swept back, that the trailing edges are so close to the fuselage sides, that, it will be difficult to get in there with the airbrush. Now, my big concern is the wing roots leave a substantial gap, so, filling with painting already being done...sheesh..I dunno yet.

The canopy and windscreen needed a bit of persuasion, sanding and filling to fit. That was surprising, but, they settled in. I will mask them both with bare metal foil this eve:

Back at it tonight.

Hi Rob,

You are really moving along.  Everything looks really great!  Yes  Yes  Sounds like you are doing a lot of careful planning.  And thanks for giving us the detailed steps you are taking.

Ken

  • Member since
    November 2010
  • From: Lafayette, Indiana
Posted by Son Of Medicine Man on Monday, September 29, 2014 7:48 PM

jimbot58

Gamera

Jim: You just can't seem to catch a break can you- sheeeesshhh.......

Still very nice work there Jim & Rob, very cool!

Yes, never a break! My phone went of early this morning-it was a recorded message informing me that my power was restored...last night! Thanks guys! Now I only had to wait another hour and a half for the alarm to go off!

I think I already figured out that the power was back on! The lights  now working was my first clue!

Jim

Wow Jim, I would be so mad!  What an idiotic thing!  What is the purpose of calling everyone to tell them their power is back on?  Especially at that time?

Ken

  • Member since
    January 2014
  • From: Toronto
Posted by Rob S. on Monday, September 29, 2014 8:47 PM

Thanks Ken, I like to be thorough for sure.

______________________________________________________________________________


On the Bench: Nothing on the go ATM

  • Member since
    September 2010
  • From: California
Posted by mikeymize on Thursday, October 2, 2014 10:36 PM

Son Of Medicine Man

Wow Jim, I would be so mad!  What an idiotic thing!  What is the purpose of calling everyone to tell them their power is back on?  Especially at that time?

Ken

  I'll go out on a limb and say it must be due to another mind-numbing, illogical government regulation somewhere.

"Time you enjoy wasting is not wasted time".


  • Member since
    June 2009
Posted by jimbot58 on Thursday, October 2, 2014 11:59 PM

mikeymize

Son Of Medicine Man

Wow Jim, I would be so mad!  What an idiotic thing!  What is the purpose of calling everyone to tell them their power is back on?  Especially at that time?

Ken

  I'll go out on a limb and say it must be due to another mind-numbing, illogical government regulation somewhere.

Either that or some over-paid executive in the PR dept. thought this was a good idea. After all, it is difficult for your average consumer to discern when they do or don't have power.

*******

On my workbench now:

It's all about classic cars now!

Why can't I find the "Any" key on my keyboard?


  • Member since
    September 2010
  • From: California
Posted by mikeymize on Friday, October 3, 2014 10:08 AM

Good point Jim, they have to justify their salary every now and then. The classic: Look what I did; I initiated this new totally needless customer service program. Now, about that raise......."

"Time you enjoy wasting is not wasted time".


  • Member since
    June 2009
Posted by jimbot58 on Sunday, October 5, 2014 4:00 AM

Hey all!

In spite of another 6-day, and nearly 60 hour work week, I have managed here and there to do a little hobby work.

More PE parts for the SU-27 cockpit;
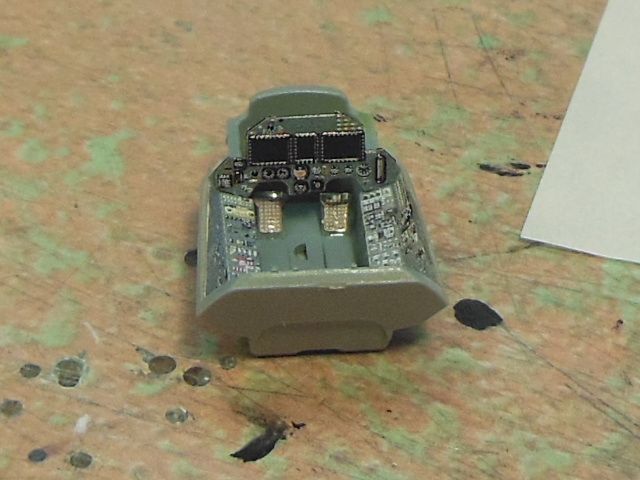
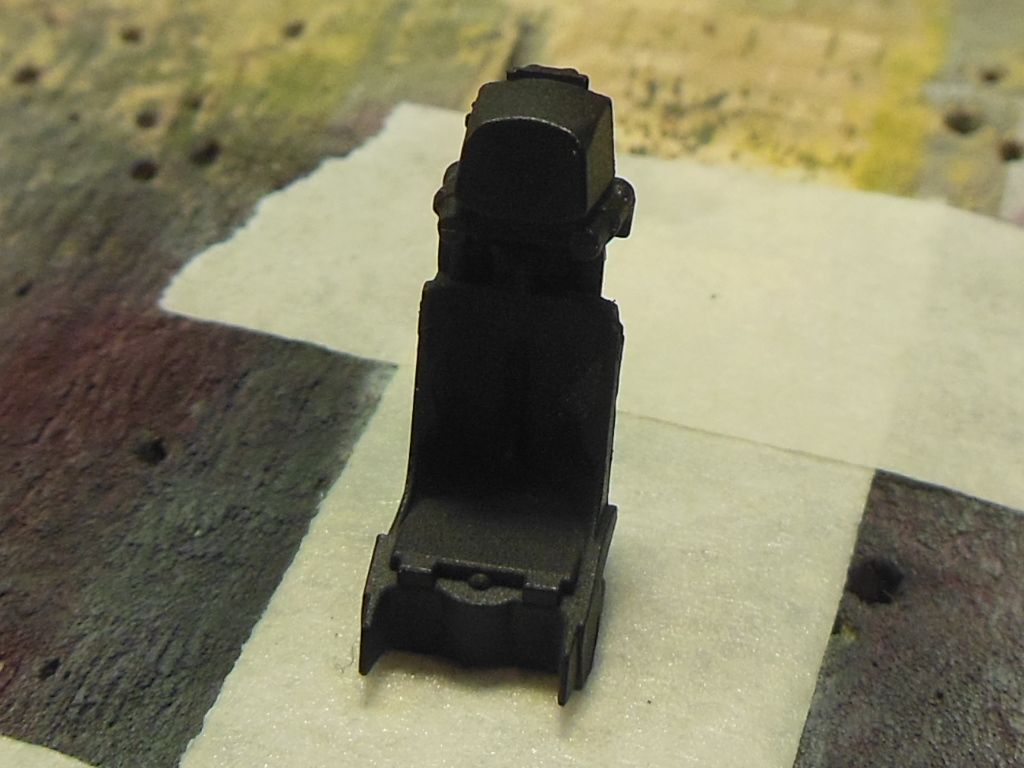
Total madness is going to be the seat. I count 13 PE parts to go on it! I need to have my head examined!

A little ways to go before it gets closer to the F-8E cockpit.

Hard to see, but the Crusader had a control stick now.

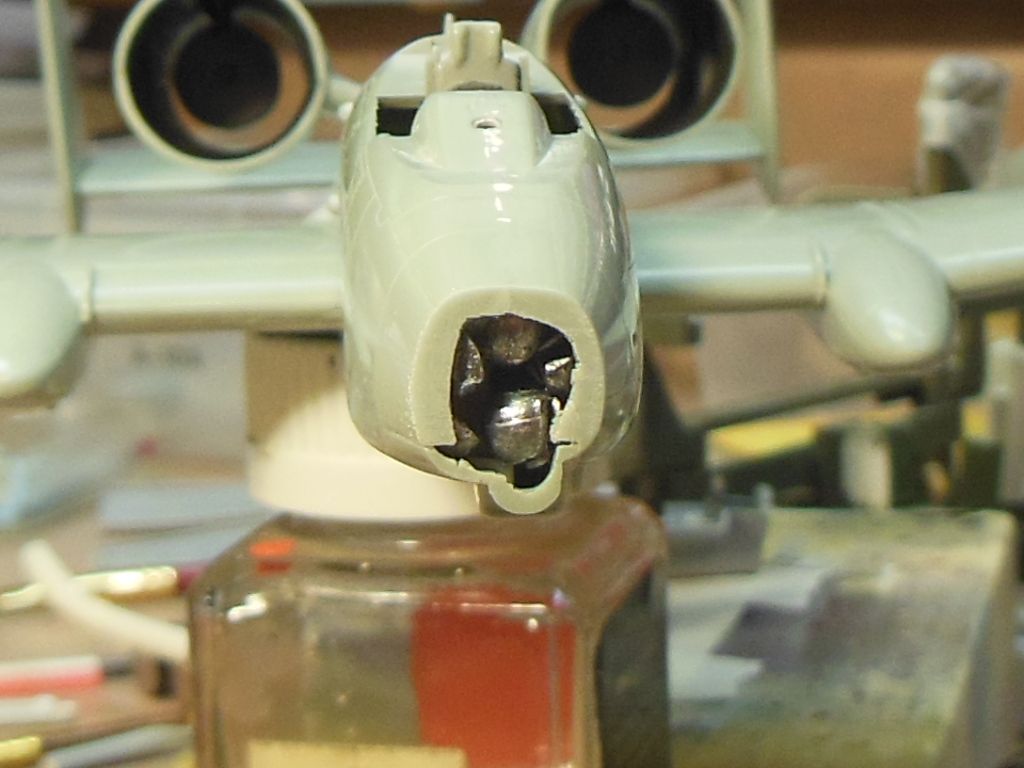
A bit of a panic on the A-10! A little checking revealed my Warthog was destined to be a tail dragger! I added weight during assembly, but it seems to be not enough! Fortunately, I didn't have the nose piece on yet, so I was  able open the front and cut up some fishing weights to stuff in there. I think I got enough, but I might be able to add another weight behind the seat. The kit didn't come with a bulk head behind the pilots seat. I wish I had added one because you can see clear into the body of the plane! I might try and add one though it will probably be a pain!

I'm also a bit dis-satisfied with my A-10 cockpit. I know I thought of out-of-box, but there are no seat harnesses or nothing. I'm considering getting a PE kit I found which was made for an Italeri-Revell kit, but thought maybe I could adapt it to the Academy kit....

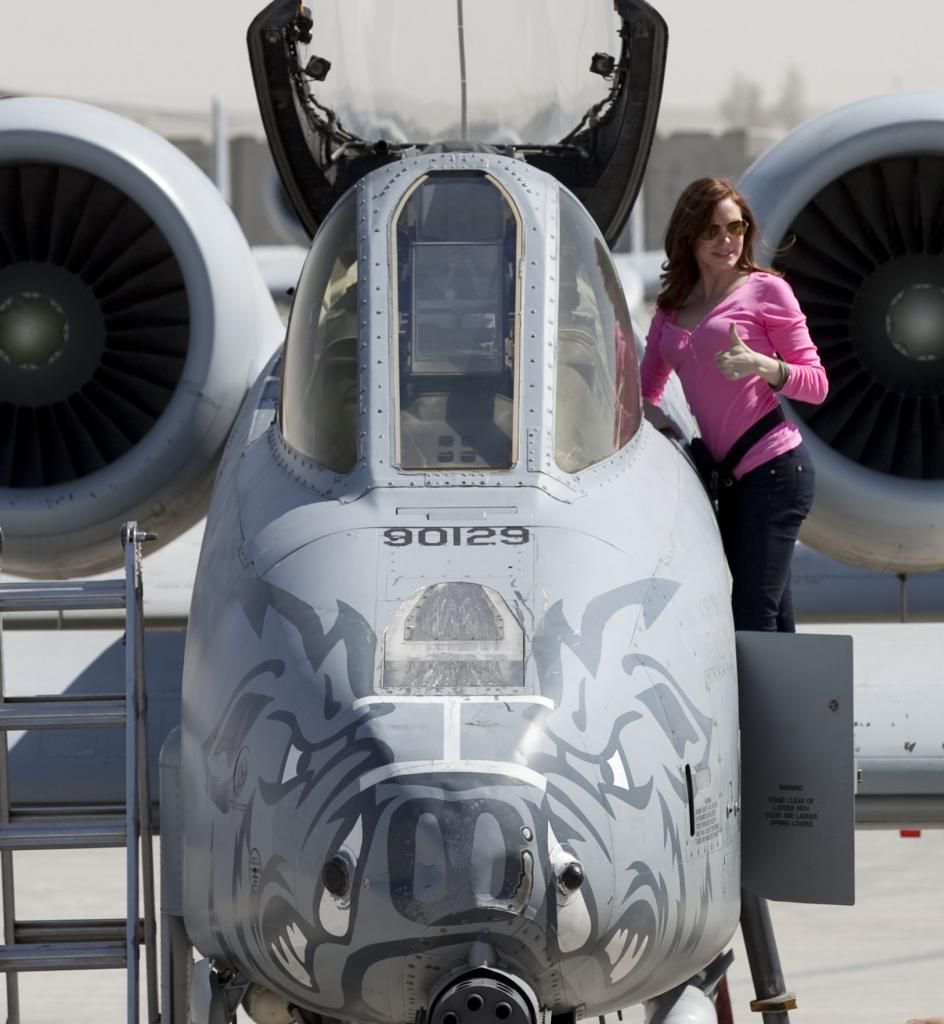
Lastly, I found a picture of an A-10 and wondered if the AF has changed who is going to fly the planes...

Jim

*******

On my workbench now:

It's all about classic cars now!

Why can't I find the "Any" key on my keyboard?


  • Member since
    November 2009
  • From: SW Virginia
Posted by Gamera on Sunday, October 5, 2014 9:30 PM

Jim: Looks great- that PE really dresses up the cockpit.

"I dream in fire but work in clay." -Arthur Machen


  • Member since
    November 2010
  • From: Lafayette, Indiana
Posted by Son Of Medicine Man on Monday, October 6, 2014 5:46 AM

jimbot58

Hey all!

In spite of another 6-day, and nearly 60 hour work week, I have managed here and there to do a little hobby work.

More PE parts for the SU-27 cockpit;
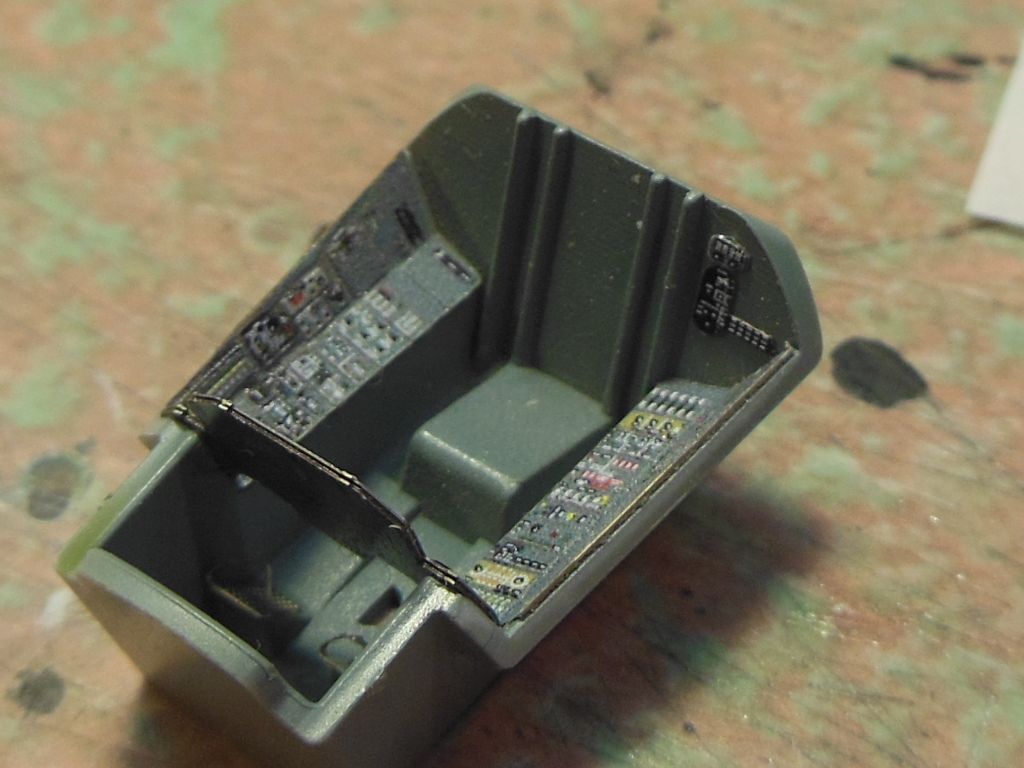
Total madness is going to be the seat. I count 13 PE parts to go on it! I need to have my head examined!
A little ways to go before it gets closer to the F-8E cockpit.
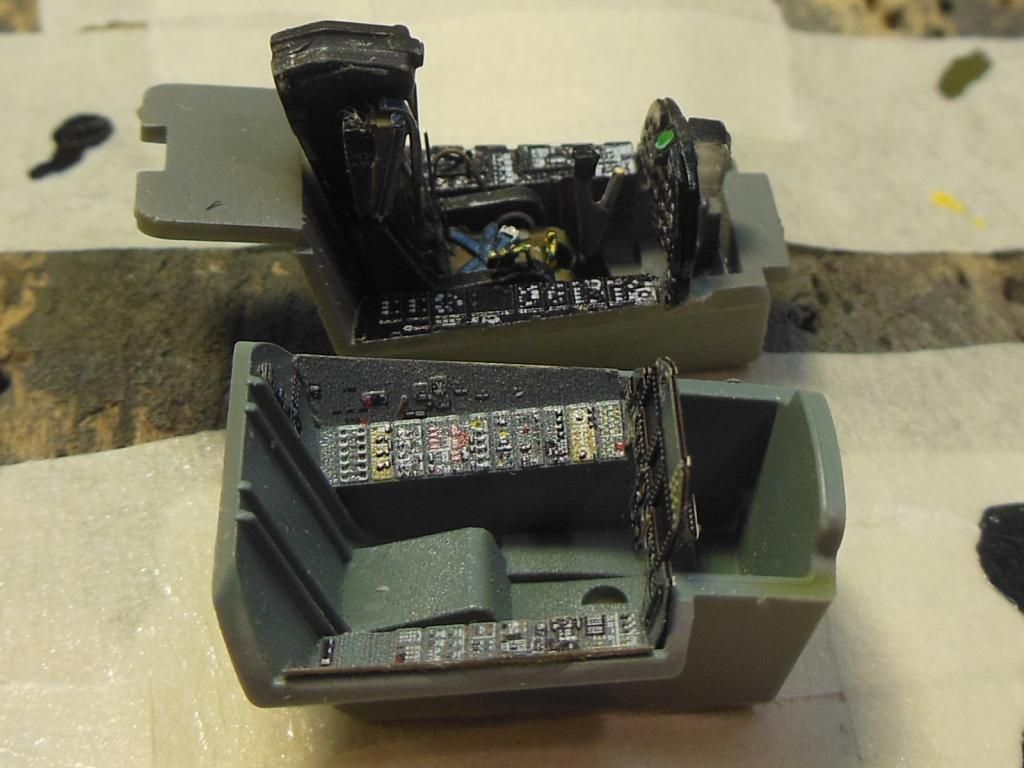
Hard to see, but the Crusader had a control stick now.

A bit of a panic on the A-10! A little checking revealed my Warthog was destined to be a tail dragger! I added weight during assembly, but it seems to be not enough! Fortunately, I didn't have the nose piece on yet, so I was  able open the front and cut up some fishing weights to stuff in there. I think I got enough, but I might be able to add another weight behind the seat. The kit didn't come with a bulk head behind the pilots seat. I wish I had added one because you can see clear into the body of the plane! I might try and add one though it will probably be a pain!
I'm also a bit dis-satisfied with my A-10 cockpit. I know I thought of out-of-box, but there are no seat harnesses or nothing. I'm considering getting a PE kit I found which was made for an Italeri-Revell kit, but thought maybe I could adapt it to the Academy kit....

Lastly, I found a picture of an A-10 and wondered if the AF has changed who is going to fly the planes...
Jim

Hi Jim,

Great work on both of those cockpits!  Yes  Yes  Great detail.  And nice save on getting those weights in there!  Very glad to see you recover from that one!  Smile 

Ken

  • Member since
    January 2014
  • From: Toronto
Posted by Rob S. on Monday, October 6, 2014 6:17 PM

Great progress thus far Jim!!

I managed to eek out some work. Too busy with other stuff this weekend..anyway, the wings on the Lightning went on way better than I thought. It's that super soft plastic. Once the Tamiya extra Thin hits it, it certainly caused things to seal up nice, not a single speck of filler needed:

As the entire undercarriage will be NM (prob Tamiya NM or maybe Vallejo Alumium..not sure yet), I decided to mount all the fiddly bits for the landing gear. It'll all get painted at the same time and I can hand brush other metallic details, plus, it'll be super strong as I'm letting it all set up overnight. Also mounted the missile rails, had to do some 'persuading' to get one of the rails to 'unbend' but, the extra thin did the job:

Masked off canopy with bare metal foil:

Thank goodness for the weight in front...she's not a tail-sitter:

______________________________________________________________________________


On the Bench: Nothing on the go ATM

  • Member since
    November 2009
  • From: SW Virginia
Posted by Gamera on Monday, October 6, 2014 6:32 PM

Very nice work Rob!

"I dream in fire but work in clay." -Arthur Machen


  • Member since
    November 2010
  • From: Lafayette, Indiana
Posted by Son Of Medicine Man on Monday, October 6, 2014 7:59 PM

Rob Sherman

Great progress thus far Jim!!

I managed to eek out some work. Too busy with other stuff this weekend..anyway, the wings on the Lightning went on way better than I thought. It's that super soft plastic. Once the Tamiya extra Thin hits it, it certainly caused things to seal up nice, not a single speck of filler needed:

As the entire undercarriage will be NM (prob Tamiya NM or maybe Vallejo Alumium..not sure yet), I decided to mount all the fiddly bits for the landing gear. It'll all get painted at the same time and I can hand brush other metallic details, plus, it'll be super strong as I'm letting it all set up overnight. Also mounted the missile rails, had to do some 'persuading' to get one of the rails to 'unbend' but, the extra thin did the job:

Masked off canopy with bare metal foil:

Thank goodness for the weight in front...she's not a tail-sitter:

Wow Rob, you are really moving along on your build!  Looks great!  Yes  Yes

So that metal foil must work pretty good for you?  Is it because it is so thin that it makes it easier to make it conform to the shape of the canopy?  And I am guessing that you carefully cut off what needs to be exposed with a razor knife?

Ken

  • Member since
    January 2014
  • From: Toronto
Posted by Rob S. on Monday, October 6, 2014 8:03 PM

Exactly Ken, the stuff is, IMO, the best masking material. The only issue, and it's not an issue really, it leaves adhesive residue behind, BUT, GooGone takes it off completely and I've never had an issue. Been using it for many years.

______________________________________________________________________________


On the Bench: Nothing on the go ATM

  • Member since
    September 2010
  • From: California
Posted by mikeymize on Monday, October 6, 2014 9:08 PM

That is one wicked looking aircraft Rob. From the top it reminds me of a MiG-21; looks fast just sitting there. Great job so far mate!

"Time you enjoy wasting is not wasted time".


  • Member since
    June 2009
Posted by jimbot58 on Tuesday, October 7, 2014 5:32 AM

Rob Sherman

Exactly Ken, the stuff is, IMO, the best masking material. The only issue, and it's not an issue really, it leaves adhesive residue behind, BUT, GooGone takes it off completely and I've never had an issue. Been using it for many years.

Rob, it's interesting that you add all the "fidley" bits before painting. I do the opposite and paint it all before putting it all together. Mostly that's due to the fact that I suck at brush painting.

No hobby work last night as I went to bed as soon as I got home. Soooooo tired! Now I'm up at 3 a.m.

Previous night though was a little work on the Flanker. The top half of the fuselage is split into 2 parts. A review I read somewhere said that it would be best to attach the two before mating top and bottom halves as the seam is a bit uneven and difficult to repair as the engraved panel lines are so fine. (A good thing as panel lines are almost way overdone on many 1/72 scale kits!) I had to add a thin shim between the two as there was a sort of shelf on the rear that the front section sits on and the two were close but not perfect. Then it was sand a bit, test fit, sand, test, and so on. Once it was where I wanted it, I carefully added cement as I wanted to avoid that "ooze" that we normally try to get when joining parts. Other than that, it's amazing just how well the two parts fit together!

I only have the lower fuselage clamped on here as a platform to stabilize the the two pieces while the cement sets. Seam? What seam? Well done Zvezda, although a one piece fuselage would have been nicer....! It's really only noticeable as the color and grain are slightly different between the two parts and will disappear under paint.

*******

On my workbench now:

It's all about classic cars now!

Why can't I find the "Any" key on my keyboard?


  • Member since
    January 2014
  • From: Toronto
Posted by Rob S. on Tuesday, October 7, 2014 5:39 AM

Jim, gluing all the landing gear in place prior to painting is actually rare for me. I normally do just as you do, it's just that the whole underside, including the gear doors and actuators will all be NM, so, in the interest of strength (not having to scrape paint to add glue), I went this way. A bit of an experiment.

______________________________________________________________________________


On the Bench: Nothing on the go ATM

  • Member since
    November 2010
  • From: Lafayette, Indiana
Posted by Son Of Medicine Man on Tuesday, October 7, 2014 5:53 AM

Rob Sherman

Exactly Ken, the stuff is, IMO, the best masking material. The only issue, and it's not an issue really, it leaves adhesive residue behind, BUT, GooGone takes it off completely and I've never had an issue. Been using it for many years.

Cool Rob.  I will have to give it a try.  Thank you for the tip!

Ken

  • Member since
    November 2010
  • From: Lafayette, Indiana
Posted by Son Of Medicine Man on Tuesday, October 7, 2014 5:56 AM

jimbot58

Rob Sherman

Exactly Ken, the stuff is, IMO, the best masking material. The only issue, and it's not an issue really, it leaves adhesive residue behind, BUT, GooGone takes it off completely and I've never had an issue. Been using it for many years.

Rob, it's interesting that you add all the "fidley" bits before painting. I do the opposite and paint it all before putting it all together. Mostly that's due to the fact that I suck at brush painting.

No hobby work last night as I went to bed as soon as I got home. Soooooo tired! Now I'm up at 3 a.m.

Previous night though was a little work on the Flanker. The top half of the fuselage is split into 2 parts. A review I read somewhere said that it would be best to attach the two before mating top and bottom halves as the seam is a bit uneven and difficult to repair as the engraved panel lines are so fine. (A good thing as panel lines are almost way overdone on many 1/72 scale kits!) I had to add a thin shim between the two as there was a sort of shelf on the rear that the front section sits on and the two were close but not perfect. Then it was sand a bit, test fit, sand, test, and so on. Once it was where I wanted it, I carefully added cement as I wanted to avoid that "ooze" that we normally try to get when joining parts. Other than that, it's amazing just how well the two parts fit together!

I only have the lower fuselage clamped on here as a platform to stabilize the the two pieces while the cement sets. Seam? What seam? Well done Zvezda, although a one piece fuselage would have been nicer....! It's really only noticeable as the color and grain are slightly different between the two parts and will disappear under paint.

Good job Jim!  Your patience and attention to detail pay off again!  Yes  Yes 

Ken

  • Member since
    November 2009
  • From: SW Virginia
Posted by Gamera on Tuesday, October 7, 2014 7:24 AM

Looks good to me Jim!

"I dream in fire but work in clay." -Arthur Machen


  • Member since
    January 2014
  • From: Toronto
Posted by Rob S. on Tuesday, October 7, 2014 8:01 AM

Yup...big fan of Russian aircraft..looks great!

______________________________________________________________________________


On the Bench: Nothing on the go ATM

  • Member since
    January 2014
  • From: Toronto
Posted by Rob S. on Tuesday, October 7, 2014 7:26 PM

A bit of progress...pre-shading:

Will move in to principal painting tom night.

______________________________________________________________________________


On the Bench: Nothing on the go ATM

  • Member since
    November 2010
  • From: Lafayette, Indiana
Posted by Son Of Medicine Man on Wednesday, October 8, 2014 5:57 AM

Rob Sherman

A bit of progress...pre-shading:

Will move in to principal painting tom night.

Looking good Rob!  Yes  Yes 

Ken

  • Member since
    November 2009
  • From: SW Virginia
Posted by Gamera on Wednesday, October 8, 2014 7:27 AM

Indeed, nice work on the pre-shading there.

"I dream in fire but work in clay." -Arthur Machen


  • Member since
    June 2009
Posted by jimbot58 on Sunday, October 12, 2014 3:52 AM

Hello friends!

Finally have a whole weekend off!

Some work around the house, but not as much as I would have liked. Hard to motivate myself right now, feeling a little down and a trip to Wal-mart didn't help: they already have their Christmas stuff out! I took a step to seek out an eviction lawyer to get a consultation. I want to hire someone as I want to detach myself emotionally from the act. My last contact with the "family" left me battered and bleeding as I was given a verbal assault that I still haven't fully recovered from. I think it best if I have as little contact as possible.

Did sit down at the hobby desk a bit here and there.

Some PE work done on the Flanker. Looks kind of messy, but this camera picks out everything- plus don't forget this is 1/72 scale. Those parts are barely a quarter inch long or so. And yes, the instructions show the 2 parts aligned as they are. 

8

The exhaust for the F-8 The back end of the nozzle gets chopped off and PE parts added.

Have to stop on the PE until I get over to Hobby Clown... er, I mean Town...

Anyway, my thin CA is beginning to age and has reached the consistency of gap-filling glue and no longer flows. Needs to be replaced.

The other thing was that I began closing up the F-8. I had to 'persuade' a part into alignment using Mr rubber band as it didn't want to behave. It wasn't the kits fault-I didn't quite line up the parts inside as i should have. I had decided to glue all the assemblies into one side of the fuselage, but probably should have waited to do that until now.

Close up of the cockpit. There are still a few PE parts to do, but that will wait until after painting day. I don't want to take a chance of knocking things loose such as the HUD and the loops for the ejection seat that hang over the pilots head. There is also a U-shaped part that covers the deck behind the pilot, and covers the side rails. I don't want that to get damaged either.

I also have to fill that gap you see here. The original HUD was a clunky solid clear plastic thing that I had to cut away. You see a stub of it still there. I left it there thinking it would fill the gap. Obviously I was wrong.

Jim

*******

On my workbench now:

It's all about classic cars now!

Why can't I find the "Any" key on my keyboard?


  • Member since
    June 2003
  • From: Rowland Heights, California
Posted by Duke Maddog on Sunday, October 12, 2014 10:34 AM

That is looking good! Keep up the great work Jim and wise choice; seeking out an eviction lawyer.

I have finally gotten started on a model for this Group Build. I'm building the 1/72 scale Tamiya/Italeri F-35 to be done in 33rd TFW markings. I got a little work done on it over this weekend at Hobby Day. I'll post the box and pics up later today or tomorrow.

  • Member since
    June 2003
  • From: Rowland Heights, California
Posted by Duke Maddog on Sunday, October 12, 2014 7:43 PM

Okay, I'm finally able to start this Group Build! here is the box for the model I started for this:

This is the 1/72 scale F-35; I started with the usual suspects: cockpit, then engine, then I closed everything up inside the fuselage. Later I realized that, again; I'd forgotten to take some additional pics. Here is where it was after all that:


You'll note that it is sitting on it's nose. That is because they require you to assemble the main landing gear in the main landing gear bays first; then install the bays inside the fuselage. Otherwise; adding the landing gear later would be considerably more difficult. You'll also note that the cockpit isn't painted yet. That is because it is so open that I can easily do that later.

I did go ahead and add the nose gear to the front to let it sit straight:


This actually went together quite well, except for the internal parts for the air intakes. One side didn't want to cooperate no matter how much I tried to get it right, so I had to resort to Mr. Surfacer 500:

Okay, that's all for now. Thanks for looking in; I hope to have more done later.

  • Member since
    January 2011
  • From: Commonwealth of Virginia
Posted by Tal Afar Dave on Sunday, October 12, 2014 10:04 PM


Well finally getting to my ancient 1965 Revell F-4B Phantom II.  Kits don't get much simpler than this one.  I remember building this kit as the Blue Angels 'diamond formation' kit of the 70s and 80s. Also issued, with some slight modification, as the Thunderbirds kit.  This won't be too detailed as it will be mostly out of the box.  I did cut out some of the excessive plastic around the cockpit ejection seats and instrument panels.  I may throw a little effort into detailing it up a bit.  But the cockpit is pretty spartan.


Due to it's age, the fuselage parts had some significant warping to them.  I began gluing the halves together beginning at the tail and working forward to the nose.  I had to add some sprue rods just in front of the exhaust nozzles to force the fuselage haves open so that they would fit the lower wing area without creating a large gap.  I'll work on the cockpit a bit before closing it up and dealing with the fuselage warpage at the nose, as seen here:

http://i1228.photobucket.com/albums/ee446/wallymcgee/Revell%201-72nd%20Scale%20F-4B%20Phantom%20II/IMG_20141012_174642_829.jpg

More progress soon.....

TAD

2022 New Year's Resolution:  Enter 1 group build and COMPLETE a build this year!!  Why Photobucket did you rob me of my one Group Build Badge???  Must be part of the strong anti-Monogram cartel!!!

 ]

  • Member since
    January 2011
  • From: Commonwealth of Virginia
Posted by Tal Afar Dave on Sunday, October 12, 2014 10:13 PM

Wings and cockpit assembled.  Fuselage tacked together with intake strakes mounted.  They had to be filed down at an angle so that the intakes could be properly fitted.

TAD

Sorry about the sloppy pic posting.....trying to remember again how to properly add them!Embarrassed

2022 New Year's Resolution:  Enter 1 group build and COMPLETE a build this year!!  Why Photobucket did you rob me of my one Group Build Badge???  Must be part of the strong anti-Monogram cartel!!!

 ]

  • Member since
    June 2009
Posted by jimbot58 on Sunday, October 12, 2014 11:14 PM

Duke Maddog

Okay, I'm finally able to start this Group Build! here is the box for the model I started for this:

This is the 1/72 scale F-35; I started with the usual suspects: cockpit, then engine, then I closed everything up inside the fuselage. Later I realized that, again; I'd forgotten to take some additional pics. Here is where it was after all that:


You'll note that it is sitting on it's nose. That is because they require you to assemble the main landing gear in the main landing gear bays first; then install the bays inside the fuselage. Otherwise; adding the landing gear later would be considerably more difficult. You'll also note that the cockpit isn't painted yet. That is because it is so open that I can easily do that later.

I did go ahead and add the nose gear to the front to let it sit straight:


This actually went together quite well, except for the internal parts for the air intakes. One side didn't want to cooperate no matter how much I tried to get it right, so I had to resort to Mr. Surfacer 500:

Okay, that's all for now. Thanks for looking in; I hope to have more done later.

Quick work there! I also have an F-35A kit, but opted for the Academy brand. To bad I don't have time to build it now as we could compare the two. Both kits reviewed well, with pros and cons for each, but I don't remember what they were.

Hasegawa has also released an F-35A, and I understand it does not feature open weapons bays. No doubt we will see more and more releases as the plane goes into service. Just look how many F-22 kits we have now.

Jim

*******

On my workbench now:

It's all about classic cars now!

Why can't I find the "Any" key on my keyboard?


JOIN OUR COMMUNITY!

Our community is FREE to join. To participate you must either login or register for an account.

SEARCH FORUMS
FREE NEWSLETTER
By signing up you may also receive reader surveys and occasional special offers. We do not sell, rent or trade our email lists. View our Privacy Policy.