SEARCH FINESCALE.COM

Enter keywords or a search phrase below:

Airliner Group Build 2014-2015

24110 views
219 replies
1 rating 2 rating 3 rating 4 rating 5 rating
  • Member since
    May 2014
Posted by SubarooMike on Monday, November 3, 2014 4:34 PM

Sorry I am a little late.  I have been quite busy! 

Here is my offering -- thanks to ModelCrazy and his generous donationBig Smile  He gave me the second part of his two-part kit.  He built the MD-82 out of the kit so I will be building the MD-87.    Hasegawa 1/200 MD-87 in American Airlines livery (beautiful!) 

  • Member since
    July 2014
Posted by modelcrazy on Sunday, November 2, 2014 1:00 PM

Fly,

The 727 is an 1/200 Hasegawa, I have a few other GB's that just started, but I'm so excited to build the 727 that I may just go ahead and start on it early.

jelliott,

No, I just went with the acrylic gloss black first. Next time I'll defiantly start with an enamel primer prior to the acrylic gloss black. I like the look of the Alclad with the acrylic undercoat, besides, I don't think (don't know for sure) the acrylic has as much chance for a reaction to the lacquer as an enamel base.

Steve

Steve

Building a kit from your stash is like cutting a head off a Hydra, two more take it's place.


http://www.spamodeler.com/forum/

  • Member since
    January 2014
  • From: Nampa, Idaho
Posted by jelliott523 on Sunday, November 2, 2014 11:21 AM

Looks like the DC-10 is coming along nicely.  Looks like it is a fairly good size kit even in 1/200 scale.

On the Bench:  Lots of unfinished projects!  Smile

  • Member since
    December 2006
  • From: Phoenix, AZ
Posted by Fly-n-hi on Sunday, November 2, 2014 8:27 AM

Steve, what scale and kit will the Braniff be?  1/200 Hasegawa?  1/144 Airfix?  You might have said already but I missed it.

  • Member since
    January 2014
  • From: Nampa, Idaho
Posted by jelliott523 on Sunday, November 2, 2014 7:59 AM

Steve, nice looking MD-80!  Just curious, did you only coat the plastic with an acrylic base prior to spraying the black gloss undercoat?  I'm by far no expert when it comes to this, but I've had problems before using acrylics as a base layer first without using some sort of enamel primer that will actually "bite" into the plastic. (just a thought)

I'm actually getting ready for my first step towards using Alclad.  I'm going to be painting the leading edge surfaces on my 787 with a couple different colors of Alclad.

Looking forward to seeing the 727 finished in the Braniff blue jellybean scheme.

On the Bench:  Lots of unfinished projects!  Smile

  • Member since
    July 2014
Posted by modelcrazy on Saturday, November 1, 2014 10:30 PM

This is the Braniff I'm planning on building.

Steve

Building a kit from your stash is like cutting a head off a Hydra, two more take it's place.


http://www.spamodeler.com/forum/

  • Member since
    April 2014
Posted by B_one fixer on Saturday, November 1, 2014 9:12 PM

Well I think it turned out awesome even if you ran into alclad problems. Well done !

  • Member since
    December 2006
  • From: Phoenix, AZ
Posted by Fly-n-hi on Saturday, November 1, 2014 7:46 PM

MC, sorry that the first Alclad paint job didn't stick but the end result is still excellent!  You didn't waste any time, either!  I'll copy it to the finished post on page one some time soon.

I feel like a slacker now.

  • Member since
    July 2014
Posted by modelcrazy on Saturday, November 1, 2014 7:24 PM

Here's my first offering for this GB, I'll do my second (Braniff 727) as a crossover from my "Boeing Group Build" starting in June.

Well, when I was ready for paint I sprayed gloss black acrylic as a base for the Alclad, then sprayed the Alclad. It looked awesome! I started masking the fuselage for the gray, lifted the tape (Tamiya masking tape) to move it slightly, and lifted the Alclad and the black base coat. Apparently the acrylic base didn't adhere to the plastic. So I removed the paint and started over. This time I started with the light grey enamel and then sprayed the Alclad. This time it came out blotchy, with areas of dull and shinny spots. So then decided to go old school. The silver is Testers silver enamel with Testers MM light grey enamel.

Steve

Building a kit from your stash is like cutting a head off a Hydra, two more take it's place.


http://www.spamodeler.com/forum/

  • Member since
    January 2014
  • From: Nampa, Idaho
Posted by jelliott523 on Saturday, November 1, 2014 12:22 PM

Here is where I am so far with the 787.  I've primed and fine sanded the fuselage and attached the main wings.  I was able to get out most of the wing warping by dunking them in boiling water for a couple of seconds.  Next I will be priming with another coat of white primer and then working on the United colors.

I ordered my decals from 26decals, they may take awhile to get here, but that just gives me more time to get everything nice and smooth.

On the Bench:  Lots of unfinished projects!  Smile

  • Member since
    December 2006
  • From: Phoenix, AZ
Posted by Fly-n-hi on Friday, October 31, 2014 9:21 AM

Thanks, B-one!  Have you figured out what airline your -200 is gonna be...or did I miss it in a previous post?

My first flight at America West was in a 737-200!  It was a pretty bad landing, too!  I really slammed it on.

  • Member since
    April 2014
Posted by B_one fixer on Friday, October 31, 2014 1:30 AM

Fly that 767 looks awesome! Here is where I at so far. I got the first coat of primer prayed to see where I needed to fill that I missed on the first go. Got the wings and motors installed. Still more sanding to do and another coat of primer. I still have no idea on what livery I will apply.

  • Member since
    December 2006
  • From: Phoenix, AZ
Posted by Fly-n-hi on Friday, October 31, 2014 12:41 AM

jelliott523
I've found the United Airlines decals that I want to use...a little spendy but they look really nice. ..

I'm looking forward to this.  I think the 787 looks good in United (Continental) colors.  I'm also looking forward to seeing the 787 kit go together.  I think I'll get one at some point.

  • Member since
    December 2006
  • From: Phoenix, AZ
Posted by Fly-n-hi on Thursday, October 30, 2014 11:56 PM
  • Member since
    December 2006
  • From: Phoenix, AZ
Posted by Fly-n-hi on Thursday, October 30, 2014 11:47 PM

Lostagain, if you  are able to find the time we'd love to have you join!  You can definitely include that Sikorsky S-40 in this GB!  In any event feel free to loiter around and contribute in the conversations.Yes

  • Member since
    July 2014
Posted by modelcrazy on Sunday, October 26, 2014 10:58 AM

Lastagain,

That looks like a VERY fun and tough build. I'm a little scared off by vacuform kits so your a better man than me.

That  Sikorsky S-40 would make a excellent addition to ANY collection. I hope you continue with it. I would be excited to see the WIP.

Steve

Steve

Building a kit from your stash is like cutting a head off a Hydra, two more take it's place.


http://www.spamodeler.com/forum/

  • Member since
    April 2014
  • From: Australia
Posted by lostagain on Sunday, October 26, 2014 3:07 AM

G'day all,

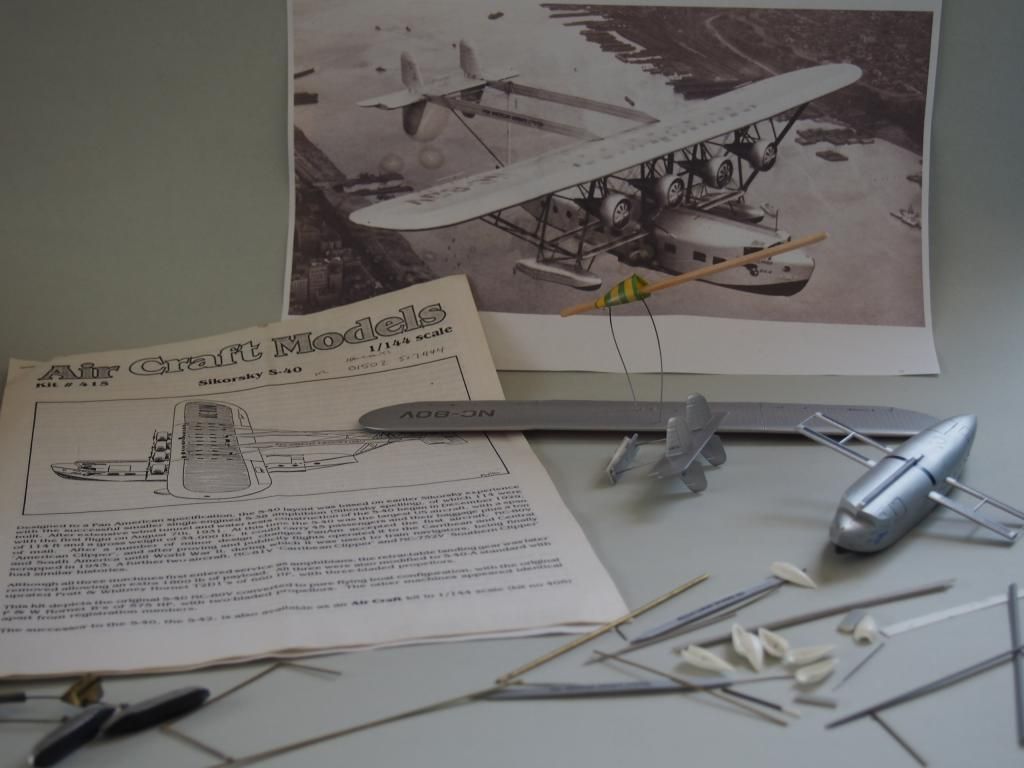
I am keen to join the airliner GB, as it will give me the focus to finish one of my models rather than leaving it in the too hard basket. BUT, as you can see from the photo, it is a way through the construction already, so I am after a ruling as to whether I will qualify.

Estimates of how far vary, due to the complexity (for me) of the remaining stages.

This is a vacform model of the Sikorsky S-40. I have done the 'easy' bits of putting the wings and fuselage together. Now all the wing, float, tail and engine supports need to be made and mounted up, all from airfoil plastic and brass strut. As I had never done anything like this before, I got to this stage two years ago, then chickened out.

I may have added to the complexity, I seem to have misplaced the white metal castings of the engines and props - keep on searching...

I won't be getting back into it until I have mostly finished my offering for the Automobile GB. So later on in the year.

Please let me know
  • Member since
    January 2014
  • From: Nampa, Idaho
Posted by jelliott523 on Saturday, October 25, 2014 6:49 PM

So a little update on the wing warping situation.  I've glued the tops and bottoms of the wings together and it took care of some of the warping.  I'll probably go ahead and still do a quick dunk in the hot water to see if I can get the rest of it out.

I've found the United Airlines decals that I want to use...a little spendy but they look really nice.  Probably going to shoot some dark grey on the interior tomorrow and install the windows.  Then I'll get her sealed up and start filling the sink marks along the bottom of the fuselage.  I'll hopefully get some pictures taken of the process.

Steve, your build is looking good so far.

On the Bench:  Lots of unfinished projects!  Smile

  • Member since
    July 2014
Posted by modelcrazy on Saturday, October 25, 2014 12:00 AM

To be more precise, getting finished with my MODEL KITS so fast. Embarrassed

And about the badge, too True, can do. Yes

Steve

Building a kit from your stash is like cutting a head off a Hydra, two more take it's place.


http://www.spamodeler.com/forum/

  • Member since
    December 2006
  • From: Phoenix, AZ
Posted by Fly-n-hi on Friday, October 24, 2014 11:35 PM

modelcrazy
Besides, My wife is getting a little tired with my getting done with everything so fast...

I thought you were going somewhere else with thisPropeller

modelcrazy
Plus I can't wait to earn that awesome badge.

Dude, you can put the badge in you sig now!  I see it as a participation badge.  Plus, its good advertisement that this GB exists.

  • Member since
    July 2014
Posted by modelcrazy on Friday, October 24, 2014 11:02 PM

I'll slow down. I have a lot of other stuff to do. It's a very easy build, but fun, and it'll take a little while to get the paint right, plus I may just start my Braniff 727 afterward.

Besides, My wife is getting a little tired with my getting done with everything so fast and not having anyplace to put them.  Wink

Plus I can't wait to earn that awesome badge.

Steve

Building a kit from your stash is like cutting a head off a Hydra, two more take it's place.


http://www.spamodeler.com/forum/

  • Member since
    December 2006
  • From: Phoenix, AZ
Posted by Fly-n-hi on Friday, October 24, 2014 10:54 PM

B_one fixer

Wow you are scooting right along ! I am still sanding and filling. Looking good though !

No kidding!  He's gonna be done before the official start date!

  • Member since
    April 2014
Posted by B_one fixer on Friday, October 24, 2014 7:52 PM

Wow you are scooting right along ! I am still sanding and filling. Looking good though !

  • Member since
    July 2014
Posted by modelcrazy on Friday, October 24, 2014 7:46 PM

Ok, here's my update,

I built the kit up so fast in one evening, I forgot to take any pictures of the WIP. So here is the MD-82 after the first coat of grey. I need to do some touch-up (left engine nacelle reversers need some gap filling), wet sanding and apply another coat.
Then comes the dreaded masking for the Alclad.

Steve

Steve

Building a kit from your stash is like cutting a head off a Hydra, two more take it's place.


http://www.spamodeler.com/forum/

  • Member since
    December 2006
  • From: Phoenix, AZ
Posted by Fly-n-hi on Friday, October 24, 2014 9:43 AM

I actually have started my DC-10-10.  I've finished up the builds that I had been working on for this upcoming show so I've got the time now.

Here's my favorite part of any airliner build...the gazillion small wheels.   Well, 10 in this case.  They are glossy now but I'll be giving them a flat coat:

  • Member since
    December 2006
  • From: Phoenix, AZ
Posted by Fly-n-hi on Friday, October 24, 2014 9:38 AM

The doors on that 737-200 remind me of the doors on the Airfix kits.  None of them ever fit right.

  • Member since
    April 2014
Posted by B_one fixer on Friday, October 24, 2014 1:47 AM

Well I started the kit tonight. I am waiting on window and door decals. As far as livery goes I still have no idea what she will build up into. The last time I have built this kit I was 8 years old. 

The doors have some fit issues.

There are some seams and sink marks that will need to be filled

JOIN OUR COMMUNITY!

Our community is FREE to join. To participate you must either login or register for an account.

SEARCH FORUMS
FREE NEWSLETTER
By signing up you may also receive reader surveys and occasional special offers. We do not sell, rent or trade our email lists. View our Privacy Policy.