SEARCH FINESCALE.COM

Enter keywords or a search phrase below:

Japanese Group Build Part IV

47895 views
721 replies
1 rating 2 rating 3 rating 4 rating 5 rating
  • Member since
    November 2009
  • From: SW Virginia
Posted by Gamera on Wednesday, November 18, 2015 7:42 PM

BTW, spent today touring the USS Wisconsin, same class as the USS Missouri where the Japanese surrender was signed:

This area of the deck is where the surrender was signed on her sister ship:

"I dream in fire but work in clay." -Arthur Machen


  • Member since
    December 2003
  • From: 37deg 40.13' N 95deg 29.10'W
Posted by scottrc on Wednesday, November 18, 2015 8:15 AM
I agree, that engine is going to look really nice. Hope you have use of your finger soon. Scott

  • Member since
    November 2009
  • From: SW Virginia
Posted by Gamera on Tuesday, November 17, 2015 5:42 PM

Nice work on the wiring there. Good luck with your finger, you get more modeling done with nine fingers than I do with ten!

"I dream in fire but work in clay." -Arthur Machen


  • Member since
    October 2008
  • From: italy
Posted by bsyamato on Monday, November 16, 2015 10:28 AM

Nice save Scott :)


Heres few update about the rufe engine, after this i had a problem with the left middle finger that don't allow me to work fine for now. Also found a print decals service and waiting for correct decals for kate tail :)


With stretched sprues added endine bars and with copper wire staerted to put ignition wires 


More to come as the finger will be back in operative mode :)

  • Member since
    November 2009
  • From: SW Virginia
Posted by Gamera on Wednesday, November 11, 2015 4:19 PM

Looks pretty darn good to me from the photo, nice recovery!

"I dream in fire but work in clay." -Arthur Machen


  • Member since
    December 2003
  • From: 37deg 40.13' N 95deg 29.10'W
Posted by scottrc on Wednesday, November 11, 2015 3:15 PM

Thanks, Here is the results so far.  Just a small crack that developed in front of the cockpit.  The rest is coming along ok

  • Member since
    November 2009
  • From: SW Virginia
Posted by Gamera on Sunday, November 8, 2015 4:28 PM

Scott: Well, if you can fix it with flat you're not doing too bad. As to stupid stuff I've done:

1). Went to spray a model with DullCote and found out the hard way it was actually a can of silver paint.

2). Sprayed DullCote too heavy and had it melt and discolour the Tamiya paint underneath.

3). Mixed two brands of paint assuming that as both were acrylic they were compatable- they weren't- ended up with one shade sprayed all over the model in polka-dots.

Trust me, you're doing fine Wink

Bsyamato: Nice work! I love the machine gun!

"I dream in fire but work in clay." -Arthur Machen


  • Member since
    October 2008
  • From: italy
Posted by bsyamato on Saturday, November 7, 2015 6:54 PM

Thanks Scott, waiting for zero updates :) 


About the Kate:


Painted the white squares on fuselage after thinned glossy layers 


Decals , after more glossy layers


Scratchbuilded the MG


and a test fitting with the canopy 


At the next!

  • Member since
    December 2003
  • From: 37deg 40.13' N 95deg 29.10'W
Posted by scottrc on Friday, November 6, 2015 10:22 AM

Ditto on paiting the walkway stripes.  Ruff is looking great.

My update is this, I had an accident on my canopy on the Zero where my mask has bled.  But other then that, the painting went ok.  I say ok for I used the wrong thinner and I ended up with super runny, super gloss.  Funny how Testors uses the same color label on the bottle but changes the fine print distinquishing between airbrush thinner and brush thinner.  It does make a difference on some of there paints.   I'd show pics but I am still wallowing in shame for not checking my bottle closer.  But nothing a coat of flat won't cure.  I just dont like glossy planes but it will be good for the decals.

Regards,

Scott

  • Member since
    October 2008
  • From: italy
Posted by bsyamato on Friday, November 6, 2015 8:37 AM

Sounds good Cliff :)

Easily i will finish the Rufe and probably the Kate too for the GB. Others will be continued on the next round :)


Gamera

Nice! I like how you painted the walkway stripes, I keep saying I'm going to try it but always use the decal. And helicoptor decal numbers, I guess numbers are numbers right!?!

 ..


Yes :) i used others referencies than the instructions markings :D

  • Member since
    November 2009
  • From: SW Virginia
Posted by Gamera on Friday, November 6, 2015 7:38 AM

Nice! I like how you painted the walkway stripes, I keep saying I'm going to try it but always use the decal. And helicoptor decal numbers, I guess numbers are numbers right!?!


Guys, I think I'm going to post the sign-ups for Japanese Group Build V sometime in the next few weeks. We still have a couple of people still working here, I don't want to give the impression that I'm shutting this one down so you guys keep at it please! 

"I dream in fire but work in clay." -Arthur Machen


  • Member since
    October 2008
  • From: italy
Posted by bsyamato on Friday, November 6, 2015 4:50 AM
  • Member since
    November 2009
  • From: SW Virginia
Posted by Gamera on Thursday, November 5, 2015 11:29 AM

Thanks! And the Rufe is looking good! 

"I dream in fire but work in clay." -Arthur Machen


  • Member since
    October 2008
  • From: italy
Posted by bsyamato on Thursday, November 5, 2015 10:33 AM

Thanx for comments guys Bow Down


Cliff the kit is the Fujimi 1/72, Mitstubishi F1M2  Pete :)


Here more about the Rufe:

Partially cleaned the canopy from excess paint , glossy layer on the rest and almost all decals on (left the numbers in the tail). Cowling not glued 


At the next!

  • Member since
    November 2009
  • From: SW Virginia
Posted by Gamera on Wednesday, November 4, 2015 7:26 PM

Bsyamato: Ok, just got you posted, hope the photo is ok by you. By that way, what company was the model? I'm sure you told me but somehow I forgot and don't want to go back though the entire thread.

"I dream in fire but work in clay." -Arthur Machen


  • Member since
    April 2006
  • From: ON, Canada
Posted by jgeratic on Wednesday, November 4, 2015 11:50 AM

Bsyamato, great job on the Pete floatplane.  I really like the b/w photo, very atmospheric and the stone wall it's sitting on could virtually pass as ocean surf - well done! Yes

------------------------

Scott, that sucks big time, but at this early stage it's easy fix if any - mostly is down time to get the airbrush repaired.

regards,

Jack

  • Member since
    November 2009
  • From: SW Virginia
Posted by Gamera on Wednesday, November 4, 2015 7:23 AM

She looks great Bsyamato! I'll see about getting you posted tonight.

Scott: Ouch, I hate it when stuff like that happens. At least here it shouldn't be too tough to paint over, really maddening when you're finishing up the camo and the brush suddenly lets fly with a big blob right in the middle of your perfect paint job. 

"I dream in fire but work in clay." -Arthur Machen


  • Member since
    December 2003
  • From: 37deg 40.13' N 95deg 29.10'W
Posted by scottrc on Wednesday, November 4, 2015 7:18 AM

Excellent pictures of your Pete.

Well, I'm off to the races and in the process of pre-shading until an o-ring went bad on my airbrush.  Hope to get paint on it soon.

  • Member since
    October 2008
  • From: italy
Posted by bsyamato on Wednesday, November 4, 2015 6:07 AM

Yes Cliff :)

Heres the final outdoor pictures:


more here

https://www.flickr.com/photos/28892362@N03/albums/72157659314007269/page2


Soon will back with the Rufe, on the finish way

At the next!

  • Member since
    November 2009
  • From: SW Virginia
Posted by Gamera on Tuesday, November 3, 2015 7:15 AM

They look great Bsyamato! I assume you want to get some outdoor photos for the Pete before I post them? 

"I dream in fire but work in clay." -Arthur Machen


  • Member since
    October 2008
  • From: italy
Posted by bsyamato on Tuesday, November 3, 2015 5:16 AM

Thanks guys :)

Heres some indoor finished pictures, outdoor pictures will come asap.. Also need to fix the ogive with dark brown 


The Rufe on the way.. more postshading , also in the bottom


At the next!

  • Member since
    December 2003
  • From: 37deg 40.13' N 95deg 29.10'W
Posted by scottrc on Friday, October 30, 2015 3:37 PM

 Nice work on the Pete.

  • Member since
    November 2009
  • From: SW Virginia
Posted by Gamera on Friday, October 30, 2015 7:36 AM

Sucks about the paint peeling up but looks like you fixed it without much of a problem. THe rigging looks good! Looking forward to seeing her all finished up. 

"I dream in fire but work in clay." -Arthur Machen


  • Member since
    October 2008
  • From: italy
Posted by bsyamato on Thursday, October 29, 2015 11:08 AM

jgeratic

John, cool work on the flying bomb.


bsyamato, all kinds great work on the various subjects.


------------------


Decalling is complete, followed with some detailing.  Using aluminum foil (the kitchen variety), added some strips to the landing gear supports, and same deal with the pitot tube on the port wing strut.  That whole contraption was scratch built as nothing was provided in the kit.

This was my go to reference for that particular detail:

regards,

Jack


fjs3

Hello Folks!!

I did a litle bit of work on my build of Nichimo's Ki-45, "Toryu", or Nick. 


Overall, my first impressions of the kit are favorable, my only complaint would be the lack of interior detail inside the cockpit and wheel bays.  That's why I am using Lone Star Model's, detail sets for these areas.  Otherwise, the kit is well done, with nice surface detail.  The fit of all the major components also is spot on. 

The Lone Star sets, at least with the cockpit, are a wee pit troublesome with the installation.  First two pictures, are of the port and starboard sides of the fuselage, after the side consoles were attached.
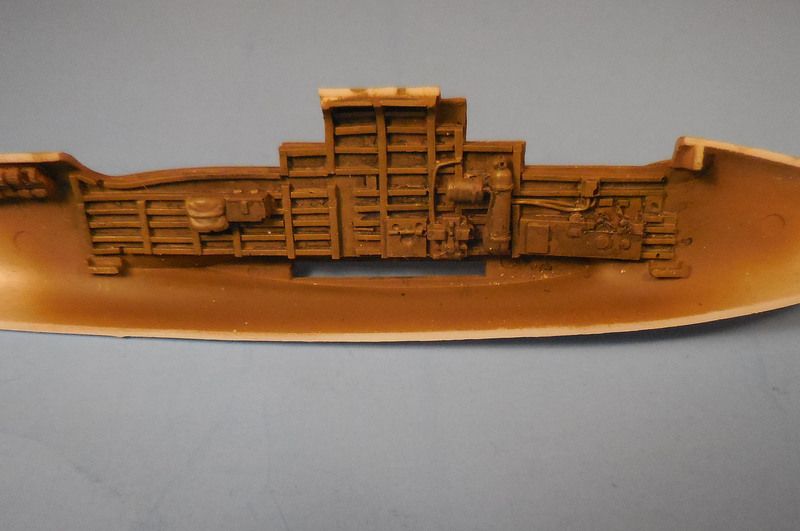
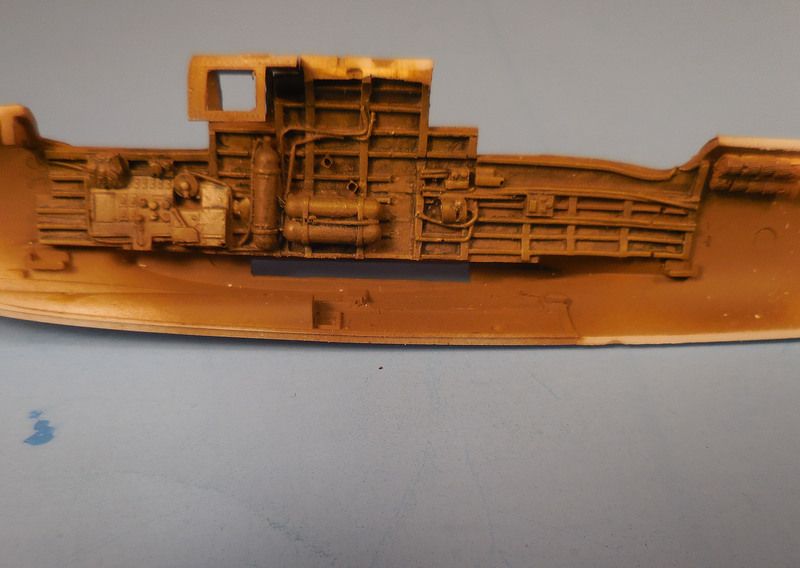
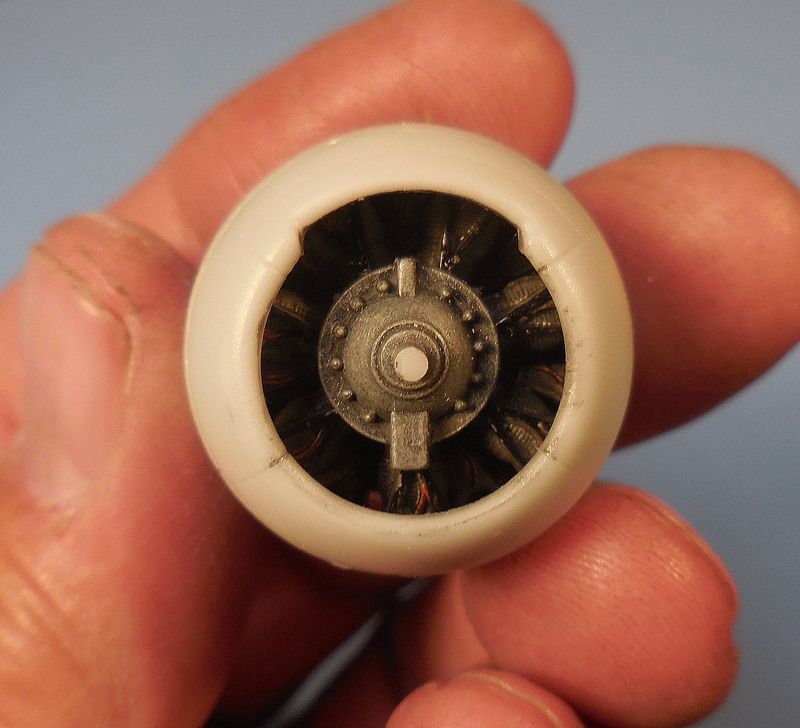
The engines that come with the kit are very well done.  I attached these to the resin firewall, and test fitted them to the kit's cowling.  The rear of the engine is on the rear of the firewall, and is visable up through the wheel well.  When I get these wings together with the wheel wells installed, I'll post pictures of them.  Right now however, I have to get this fuselge buttoned up first.  As I weather and detail these, there will be more pictures, so stay tuned!!

Regards,

Freddie from LI


LOL i was convinced that last updates of the group was in the previous page Angel


Excellent works guys!!!


the nick.. i have one in the stash, will take notes Camera

  • Member since
    November 2009
  • From: SW Virginia
Posted by Gamera on Saturday, October 24, 2015 9:57 PM

Freddie! Good to hear from you again! And the cockpit detail and engine there look terrific. I picked up one of those Nichimo kits for cheap now that the Tamiya one is out. Really nice model, Nichimo did a great job on it, excellent considering the age of it. Now I just need the time to build the darn thing.

Jack: Looks cool, interested in hearing how the Uschi brand rigging works out. I'd never even heard of them.

"I dream in fire but work in clay." -Arthur Machen


  • Member since
    August 2005
  • From: Long Island, New York, USA
Posted by fjs3 on Saturday, October 24, 2015 1:31 PM

Hello Folks!!

I did a litle bit of work on my build of Nichimo's Ki-45, "Toryu", or Nick. 


Overall, my first impressions of the kit are favorable, my only complaint would be the lack of interior detail inside the cockpit and wheel bays.  That's why I am using Lone Star Model's, detail sets for these areas.  Otherwise, the kit is well done, with nice surface detail.  The fit of all the major components also is spot on. 

The Lone Star sets, at least with the cockpit, are a wee pit troublesome with the installation.  First two pictures, are of the port and starboard sides of the fuselage, after the side consoles were attached.

The engines that come with the kit are very well done.  I attached these to the resin firewall, and test fitted them to the kit's cowling.  The rear of the engine is on the rear of the firewall, and is visable up through the wheel well.  When I get these wings together with the wheel wells installed, I'll post pictures of them.  Right now however, I have to get this fuselge buttoned up first.  As I weather and detail these, there will be more pictures, so stay tuned!!

Regards,

Freddie from LI


"I'm gonna build all these models one kit at a time!

  • Member since
    August 2005
  • From: Long Island, New York, USA
Posted by fjs3 on Saturday, October 24, 2015 1:13 PM
Great looking stuff here!! It's time to get off my ***, and get busy on mine now. Thank you for the inspiration!!

"I'm gonna build all these models one kit at a time!

  • Member since
    April 2006
  • From: ON, Canada
Posted by jgeratic on Saturday, October 24, 2015 10:32 AM

Thanks guys!

I'm briefly putting this one on the backburner while I await the shipment of some EZ line to complete the rigging.  Actually it is a different brand called Uschi and is 0.05mm in size.

regards,

Jack


JOIN OUR COMMUNITY!

Our community is FREE to join. To participate you must either login or register for an account.

SEARCH FORUMS
FREE NEWSLETTER
By signing up you may also receive reader surveys and occasional special offers. We do not sell, rent or trade our email lists. View our Privacy Policy.