SEARCH FINESCALE.COM

Enter keywords or a search phrase below:

Metal masters GB 2016 (1Feb to 31 July)

12851 views
250 replies
1 rating 2 rating 3 rating 4 rating 5 rating
  • Member since
    April 2010
Posted by Theuns on Monday, June 6, 2016 11:26 PM

cool no worries :-)

  • Member since
    January 2014
  • From: Nampa, Idaho
Posted by jelliott523 on Monday, June 6, 2016 5:45 PM

Theuns

Cool explenation, thanx. Will you be posting another pix of your mig for the pic page or can I use one in your post?


Theuns


Theuns, Yes, I will be getting another shot of the Mig for the front page. I've been extremely busy the past couple of weeks. My middle daughter graduated high school, I became another year older, and work has been exhausting. I'll try to get a shot tonight and get it added.

On the Bench:  Lots of unfinished projects!  Smile

  • Member since
    June 2013
Posted by bvallot on Monday, June 6, 2016 1:47 PM

So I've been trying to put this together for a while but being a new dad makes it a bit more cumbersome. It's a little less professionally pulled off than I intended but it does provide a benchmark from which to work and plan your painting. I did encounter a small hiccup with regards to the highshine Alclads Airframe Aluminum and Stainless Steel. I was painting these rather quickly (as time as been a luxury) and my quick clean method seems to have begun to fail towards the fourth or fifth color. My Airframe Aluminum swab came out cloudy...only to find it was just a residue that rested on top during painting. I first thought it wasn't dry, but come to find out it rubbed right off to reveal the actual paint...curious huh. This was the actual first time I painted with the Airframe Aluminum as well even though I'm aware of how it should appear. Thus...the test. =]

I also found the Polished Aluminum to be a bit cloudier than I've seen in the past...just a quick note. Over the Gloss Black it will shine a pop a bit more than seen here. So here we go:

I tried to combine these to consolidate the photos to keep from being picture heavy. I hope they're not too small now. I may repost if it doesn't read well.
 Untitled by Britt Vallot, on Flickr

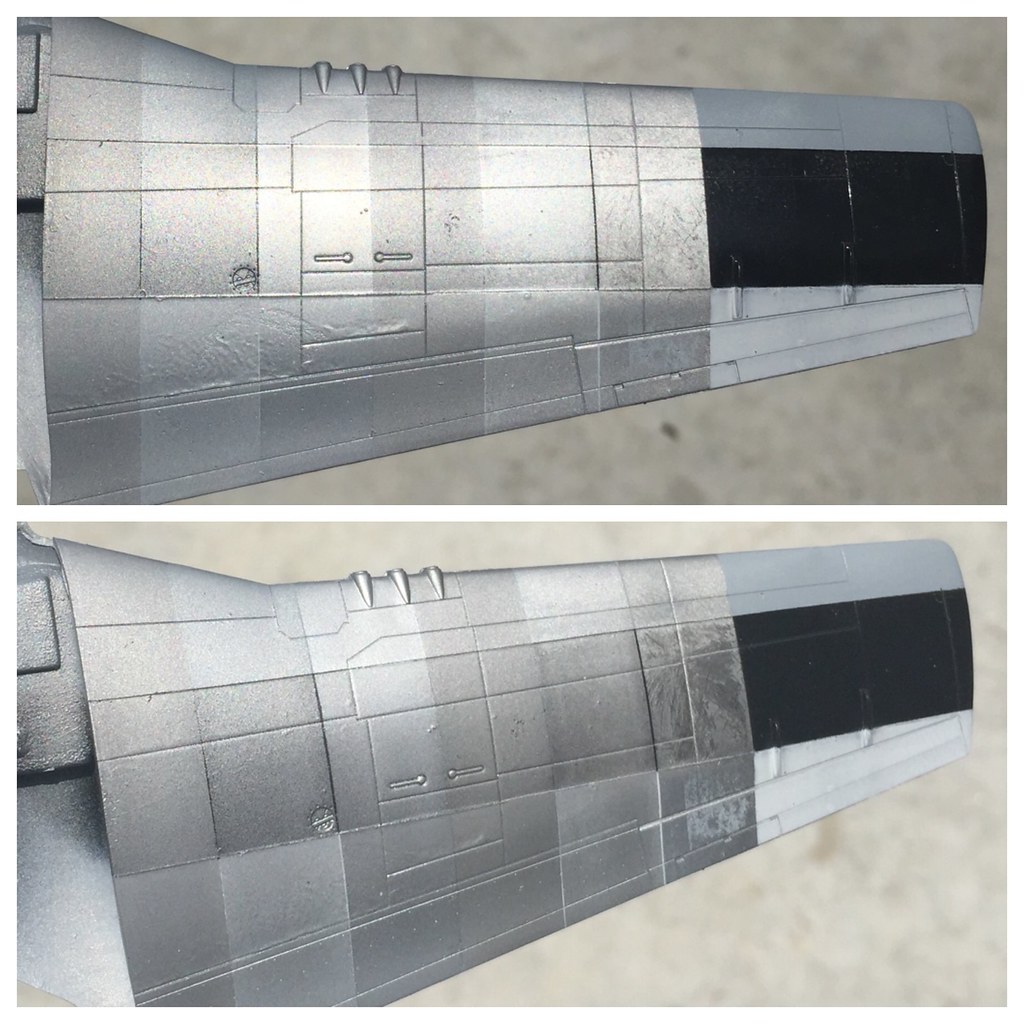
So from left to right you're looking at Dark Aluminum, Aluminum, White Aluminum, Duraluminum, Polished Aluminum, and Airframe Aluminum (pre-residue rubbed off). This is outside in natural light, fairly sunny, and they appear over the Alclad Grey primer, Gloss Black primer, and Tamiya Fine White primer. I kept the coats somewhat in the middle...about three to four solid passes with my airbrush.

In all noticed that the Semi-Matte resisted shine the most, then the Duraluminum, and Dark Aluminum next. The Airframe shines brightest and Polished Aluminum next brightest. The tones are obvious to see next to one another. There will be more of an apparent difference between the Grey primer and Gloss Black primer when viewed from different angles especially.  
 Untitled by Britt Vallot, on Flickr

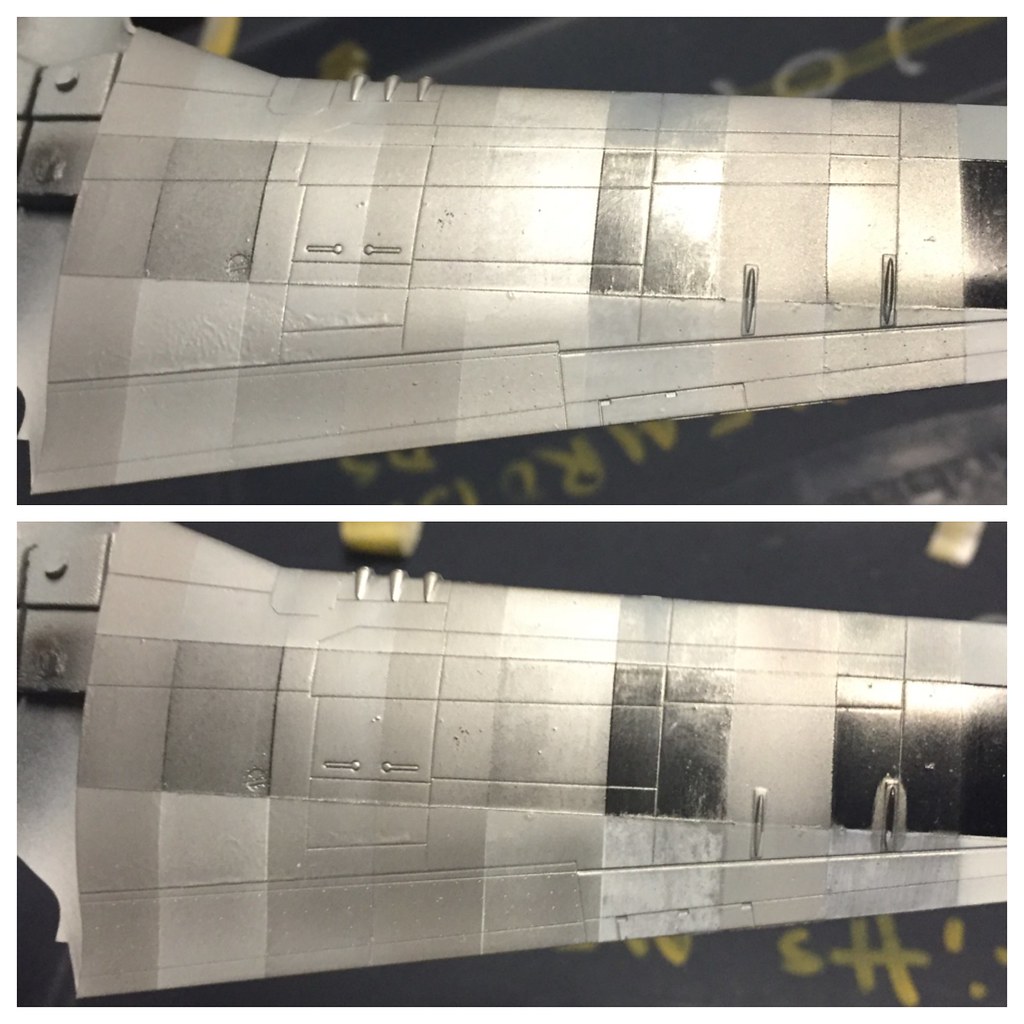
The next one includes the Semi Matte, and Stainless Steel. The Airframe shines bright here. The lighting is from a flourscent bulb in my gargage. The white primer seems to give a more weathered and beaten look to the metal if that is what's desired. However, I think the grey primer is better suited at giving the builder more control over the process and ultimately more depth to what can be achieved. Just my thoughts on that.
 Untitled by Britt Vallot, on Flickr

 Untitled by Britt Vallot, on Flickr
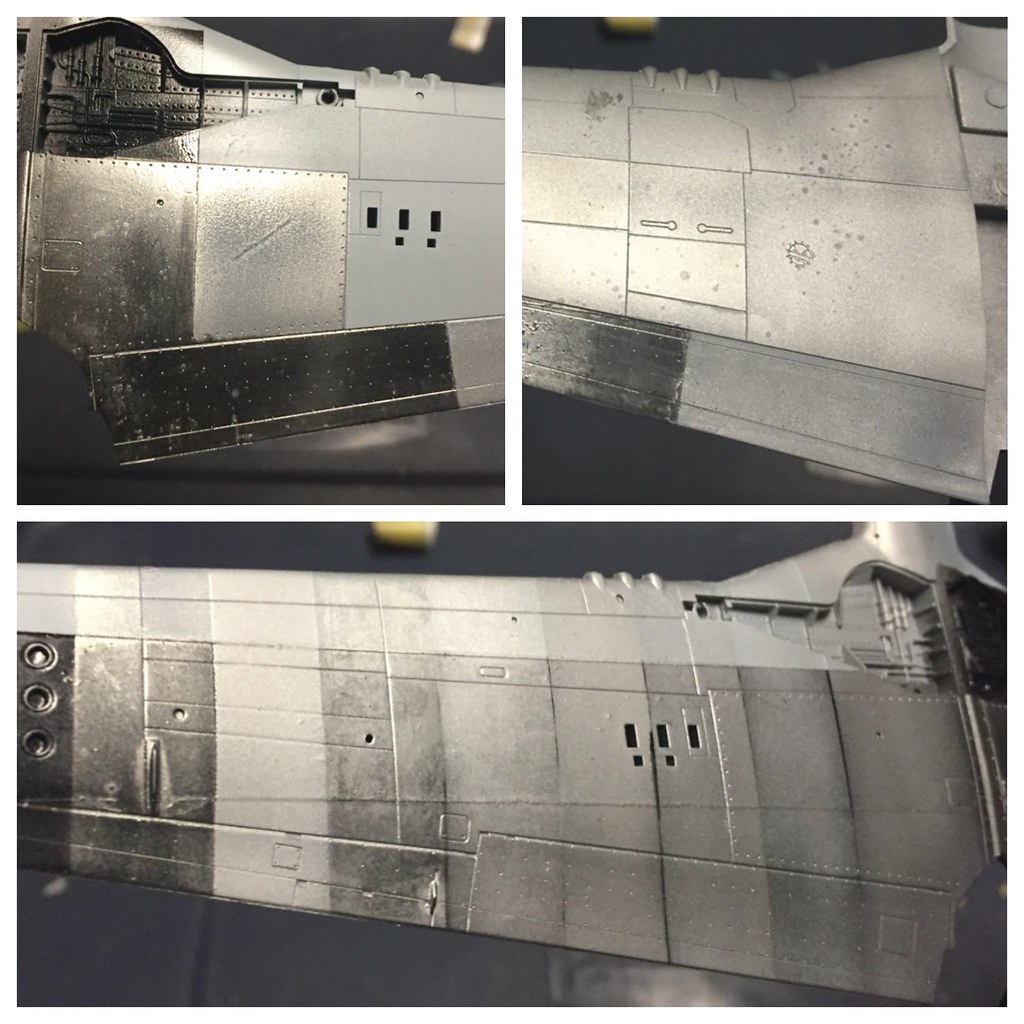
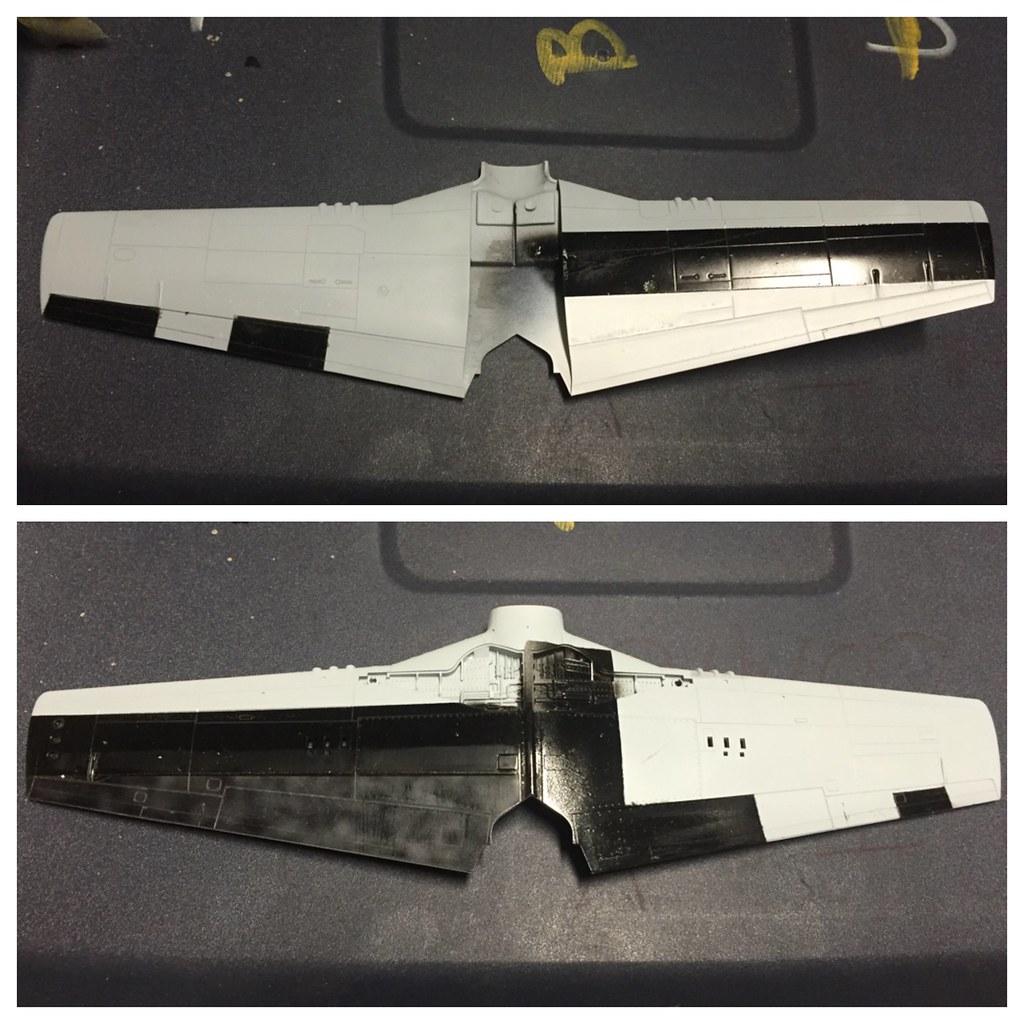
In this last two pics, I apologize again at how rushed these were, you're looking at the layout of the primers, and in the second pic the top two frames show some test pieces to see how some buffing would affect the outcome. Originally, on the undersurface, I started as before with the Grey on top, Gloss Black on the bottom, but on the bottom half I sanded with a fine sanding stick to buff the surface, and below that I used a trick I saw from Doog's playbook by marbling in some Tamiya Dark Grey. Ultimately didn't see the success I was hoping for. Limiting factors may include the narrow surfaces with which I was working as well as needing to be a little more diligent with cleaning my airbrush. I think these would help the high shine alclads better than the rest of the line up though based on how the angles of viewing allow the paints to perform. In the second pic, the left pic shows the Duraluminum on the top portion of the wing with Dark Aluminum on the ammo doors. This was all lightly sanded with the extra fine sanding stick. The dots you see are from overspray that occurred from me rushing the priming of the wing, but they help to show you how this light sanding appears from different angles. The right top frame shows the Airframe Aluminum was painted over both the Gloss Black and Grey primers and then lightly buffed with an extra fine sanding stick in the same manner. Since Larry already provided an example of how this looked I thought I would explore buffing the surface after the fact since I wasn't getting quite what I had intended to see with the ease I wanted. I really liked how both sides came out. Very reassuring. I'll likely repeat this on the underside for this panel with my Mustang.

That's all I have time for at the moment. I hope this generates some dialogue. I would love to hear what others think and outcomes you've had (successes v failures).

=]

On the bench:  

Tamiya F4U-1  Kenneth Walsh


  • Member since
    July 2013
Posted by lzdaily@comcast.net on Friday, May 27, 2016 1:08 PM

Hello, everyone.

Sorry to be away so long, but I had eye surgery several weeks ago and am just getting back to the point that I can see well enough to model or look at a computer screen. It's going to take me awhile to get caught up on what everyone is doing, but it looks like there's a lot of good stuff going on. Britt, what you're doing with your F-6 is amazing. I will definitely be referring back to your build when I start my F-6.

When last I posted, I was looking for a combination of paints that looked right to me for replicating a NMF. I think I finally have one that I like. You can see it in the photos of my latest test wing. I primed the whole thing with Alclad Black, except for the center section, which got Alclad Gray Primer. That center section then got Airframe Aluminum, while the rest of the wing got plain old Alclad Aluminum. The ailerons got Semi Matte Aluminum. The contrast between the Airframe Aluminum (even toned down a bit by the gray primer) and the Aluminum still seemed to great, but then I had a thought. I masked off a couple of panels and sprayed Airframe Aluminum over the Aluminum. I think it looks about right. I converted the image to grayscale to see how it compared to prototype photos and I still think it looks about right. So, I'm painting this thing very soon.

Best to all,Larry

  • Member since
    April 2010
Posted by Theuns on Wednesday, May 25, 2016 11:22 PM

Cool explenation, thanx. Will you be posting another pix of your mig for the pic page or can I use one in your post?


Theuns

  • Member since
    January 2014
  • From: Nampa, Idaho
Posted by jelliott523 on Tuesday, May 24, 2016 2:07 PM

bvallot

Jelliot, I can't believe I missed this last night. I copied and pasted from the Mustang GB and went to bed.

This MiG looks fantastic!! Very nicely captured. =D I love seeing a Cold War MiG come together. SO MUCH METAL!! Could you recap a little about some of the specifics about the techniques you used from AK Extreme Metals and MiG acrylic Metal colors?

BK, thanks. It's fun seeing her take shape. =]


bvallot, thank you for the comments. So a little about the painting and the mixed use of metallics. I started off by priming with Stynylrez grey, then I did an complete coat of AK Xtreme Metal Polished Aluminum. Then I picked out a couple different panel areas on the fuselage and tail. I used Alclad Duraluminum on a panel near the rear, just below the tail. I used Alclad Pale Burnt Metal for the engine area and then highlighted with AK Jet Exhaust. The inner portion of the tailpipe was sprayed with Ammo Metallic Steel and a light coat of Ammo Titanium then some AK Jet Exhaust over the top. The darkened panel just behind the cockpit and the two panels on the tail are AK Dark Aluminum. They actually show up a lot darker in the photos than they do in real life. I normally dont do much with panel lines, but I had a light mishap with the decals (as you can see the numbers on the front look worn) I didnt have a good enough coating of clear over the decals and it lifted parts of them off, I actually thought it made it look a bit more worn, so I decided to weather things a bit more than usual.

On the Bench:  Lots of unfinished projects!  Smile

  • Member since
    June 2013
Posted by bvallot on Tuesday, May 24, 2016 9:56 AM

Jelliot, I can't believe I missed this last night. I copied and pasted from the Mustang GB and went to bed.

This MiG looks fantastic!! Very nicely captured. =D I love seeing a Cold War MiG come together. SO MUCH METAL!! Could you recap a little about some of the specifics about the techniques you used from AK Extreme Metals and MiG acrylic Metal colors?

BK, thanks. It's fun seeing her take shape. =]

On the bench:  

Tamiya F4U-1  Kenneth Walsh


  • Member since
    June 2014
Posted by BrandonK on Tuesday, May 24, 2016 8:52 AM

bvallot

Back with some more folks. Still don't have my new work bench up yet but I have been working from the dinner table (excuse these lousy pictures). Still working on getting to a point where I can close up the fuselage...getting closer. I knocked out the tail gear which I decided to fix up a bit. I think I'll continue to do it this way when the tail gear is set up and molded as such. Much more gratifying and definitely an improvement over the original kit part.

It starts out with cutting off the wheel and trimming away the wheel spindle. Next, I drill a tiny hole into the housing for the tail wheel spindle to receive a small brass rod that I've sized to fit. Once that's measured and ready, I file down the inside portion of the new spindle, make my appropriate bends and then snip it when I'm ready. A drop of CA sets it into place and Voila! =] Easy. I dressed up the rest of the tail gear assembly with some pulleys and will later fit up some EZ line. I also put on the tail wheel steering part.

 Untitled by Britt Vallot, on Flickr

 Untitled by Britt Vallot, on Flickr

And here it is painted...apologies about the pics. My white balance is way off with these mats.

 Untitled by Britt Vallot, on Flickr

Next, I turned my attention to the K-24 camera that was used in reconnainsance for the F-6 Mustangs. A few various bits of plastic strip, rods, clear sprue for the lens, and some lead foil was used to get this banged out. Here's the gest of it. It is just a little bit off scale...probably about 1.5 times bigger than it ought to be, but it'll have to do this time. I currently have it primed and drying over night so it'll be ready to paint tomorrow.

 Untitled by Britt Vallot, on Flickr

 Untitled by Britt Vallot, on Flickr

And here's a quick view of it sitting in the camera bay and how it will generally look.

 Untitled by Britt Vallot, on Flickr

That's that for now...getting closer. =]


Sir,  you are really throwing the details at this one. This is gonna be a really nice build. Love it.!

BK

On the bench:

A lot !! And I mean A LOT!!

2024 Kits on deck / in process / completed   

                         14 / 5 / 2  

                              Tongue Tied

  • Member since
    April 2010
Posted by Theuns on Tuesday, May 24, 2016 5:13 AM

That is what a MiG is supose to look like, somewhat weatherd and used, well done.

As sson as you send me a nice "backgroundless" pic I will update the front page for you.


Thanx for taking part.


Theuns

  • Member since
    June 2013
Posted by bvallot on Monday, May 23, 2016 11:54 PM

Back with some more folks. Still don't have my new work bench up yet but I have been working from the dinner table (excuse these lousy pictures). Still working on getting to a point where I can close up the fuselage...getting closer. I knocked out the tail gear which I decided to fix up a bit. I think I'll continue to do it this way when the tail gear is set up and molded as such. Much more gratifying and definitely an improvement over the original kit part.

It starts out with cutting off the wheel and trimming away the wheel spindle. Next, I drill a tiny hole into the housing for the tail wheel spindle to receive a small brass rod that I've sized to fit. Once that's measured and ready, I file down the inside portion of the new spindle, make my appropriate bends and then snip it when I'm ready. A drop of CA sets it into place and Voila! =] Easy. I dressed up the rest of the tail gear assembly with some pulleys and will later fit up some EZ line. I also put on the tail wheel steering part.

 Untitled by Britt Vallot, on Flickr

 Untitled by Britt Vallot, on Flickr

And here it is painted...apologies about the pics. My white balance is way off with these mats.

 Untitled by Britt Vallot, on Flickr

Next, I turned my attention to the K-24 camera that was used in reconnainsance for the F-6 Mustangs. A few various bits of plastic strip, rods, clear sprue for the lens, and some lead foil was used to get this banged out. Here's the gest of it. It is just a little bit off scale...probably about 1.5 times bigger than it ought to be, but it'll have to do this time. I currently have it primed and drying over night so it'll be ready to paint tomorrow.

 Untitled by Britt Vallot, on Flickr

 Untitled by Britt Vallot, on Flickr

And here's a quick view of it sitting in the camera bay and how it will generally look.

 Untitled by Britt Vallot, on Flickr

That's that for now...getting closer. =]

On the bench:  

Tamiya F4U-1  Kenneth Walsh


  • Member since
    July 2014
Posted by modelcrazy on Monday, May 23, 2016 9:28 AM
That turned out outstanding Jeremy!!! The panel lines look prefect to me, fantastic job mate. Bow DownBow DownBow Down

Steve

Building a kit from your stash is like cutting a head off a Hydra, two more take it's place.


http://www.spamodeler.com/forum/

  • Member since
    January 2014
  • From: Nampa, Idaho
Posted by jelliott523 on Monday, May 23, 2016 9:24 AM

The Mig is complete. I had a lot of fun with this one. Practicing with using Alclad and AK Xtreme Metals and Ammo of Mig Acrylic Metal Colors. I've still got some things to learn, but I'm having fun and that's what counts. I'll take some other photos without all of the stuff in the background and you can decide which to use on the front page.

On the Bench:  Lots of unfinished projects!  Smile

  • Member since
    June 2014
Posted by BrandonK on Saturday, May 21, 2016 11:20 AM

modelcrazy
 Is that the Hasegawa kit?
 

No sir, it is the Tamiya kit. Lovely kit to build, fit is excellent and details are quite nice.

BK

On the bench:

A lot !! And I mean A LOT!!

2024 Kits on deck / in process / completed   

                         14 / 5 / 2  

                              Tongue Tied

  • Member since
    April 2010
Posted by Theuns on Thursday, May 19, 2016 11:15 PM

I replaced the pic with the one you want but now cant get the other one deleted ....


Theuns

  • Member since
    June 2014
Posted by BrandonK on Thursday, May 19, 2016 3:43 PM

The first photo works for me. Thanks

BK

On the bench:

A lot !! And I mean A LOT!!

2024 Kits on deck / in process / completed   

                         14 / 5 / 2  

                              Tongue Tied

  • Member since
    April 2010
Posted by Theuns on Thursday, May 19, 2016 11:47 AM

Brandon that is a very slick looking pony you got there, well done! I will update the pix pag, thanx for taking part.


Theuns

  • Member since
    July 2014
Posted by modelcrazy on Thursday, May 19, 2016 11:44 AM
BK,
That is a great looking Stang. Is that the Hasegawa kit?

Steve

Building a kit from your stash is like cutting a head off a Hydra, two more take it's place.


http://www.spamodeler.com/forum/

  • Member since
    June 2013
Posted by bvallot on Thursday, May 19, 2016 11:42 AM

Nice job Brandon. Good to see a clean one every once in a while. =]

Which picture would you like to see up front? Don't forget your badge.

On the bench:  

Tamiya F4U-1  Kenneth Walsh


  • Member since
    June 2014
Posted by BrandonK on Thursday, May 19, 2016 10:35 AM

Sorry, I haven't been on as much as usual; I've had a lot of other things getting in the way. My build had progressed in very little bits and nothing worth taking pictures of do to the snails pace of the build. I am now complete, however. And this is certainly worth taking pictures of. All in all, it turned out pretty well. The kit is very nice and has no issues. Fit is great and details are quite nice. Once again I fought the Alclad, but I am happy with the results. Not perfect but it gets the job done for this one. Thanks for looking guys.

BK

On the bench:

A lot !! And I mean A LOT!!

2024 Kits on deck / in process / completed   

                         14 / 5 / 2  

                              Tongue Tied

  • Member since
    June 2014
Posted by BrandonK on Thursday, May 19, 2016 10:31 AM

bvallot

I managed a bit more with this camera bay. Now that I've got the bones up, I can move on to stringing up the cables for the elevators and rudder and other misc fiddly bits. Last will come the K-24 camera and "glass" for the camera ports.

 Untitled by Britt Vallot, on Flickr

 Untitled by Britt Vallot, on Flickr

I figured since I drilled a huge hole into the side of my Mustang, I might as well fill this space with everything that would've been seen. =D Glad I did.


Thats an incredible amount of detail youre adding in. I love it. It just looks so good. Really nice work.

BK

On the bench:

A lot !! And I mean A LOT!!

2024 Kits on deck / in process / completed   

                         14 / 5 / 2  

                              Tongue Tied

  • Member since
    June 2013
Posted by bvallot on Wednesday, May 18, 2016 11:35 PM

I managed a bit more with this camera bay. Now that I've got the bones up, I can move on to stringing up the cables for the elevators and rudder and other misc fiddly bits. Last will come the K-24 camera and "glass" for the camera ports.

 Untitled by Britt Vallot, on Flickr

 Untitled by Britt Vallot, on Flickr

I figured since I drilled a huge hole into the side of my Mustang, I might as well fill this space with everything that would've been seen. =D Glad I did.

On the bench:  

Tamiya F4U-1  Kenneth Walsh


  • Member since
    June 2013
Posted by bvallot on Monday, May 16, 2016 2:18 AM

Here's the last part to this. I managed to finally finish up the exterior conversions for the F-6D. Still needs to be tidied up a bit, but this is the gest of it. I had to be a little tricky trying to navigate this conical nature of this faring over the lense. Even after measuring out a pattern to cut it was still too tiny to work into shape like I needed. So I settled for cutting it into fourths and trimming a little off the end of my last piece as per my pattern. I bent them into a curve and glued them in place with Tamiya Extra Thin Cement. This helps to soften them as well and I can better tease them into shape. Not too bad. The last part is a disc I cut and glued on top with the Tamiya ETC again. This will settle overnight before I fool with it again. I want it to harden before I go over it with putty. 

 Untitled by Britt Vallot, on Flickr

Here is a dry fitting of this section all together.

 Untitled by Britt Vallot, on Flickr

Once this gets cleaned up, I'll be able to throw the interior together. With the exception of the camera, the rest ought to build up quickly and I'll be able to glue the cockpit in and close her up. =]

On the bench:  

Tamiya F4U-1  Kenneth Walsh


  • Member since
    June 2013
Posted by bvallot on Friday, May 13, 2016 1:22 PM

Okay, short update. It's brief, but I figure brief is still better than silent...keeps the dialogue going. =]

Started making some headway on things I need to tidy up before closing the fuselage halves together. I opened up the vent doors to the carb (somebody help with the terminology here--my brain just fell out) Small pinvise carefully picks out those molded "holes" provided. I removed a scoop that provides ventilation to somewhere I can't remember either at the moment right there on the left, lower cowl panel as it wasn't present on Shomo's particular block mustang. I'll go back to tighten up the sanding here later on.

 Untitled by Britt Vallot, on Flickr

Next, I've been working on trying to get these openings for the K-24 camera that was in use for reconnainsance mustangs in the PTO. There's a bit of scratch building involved and some of which does take a bit more care than in most instances I encounter. I've tightened up the radiator's anterior surface as some of this will be visible through the scoop in the front. Still requires a bit of touch up. The back end has been dressed up a little as well. I still have the actuating rod that opens and closes the door for the radiator.

 Untitled by Britt Vallot, on Flickr

Lastly for now, I began building the lower door that was made for the F-6D. It had a lid that covered the opening to protect it from debris during takeoffs and landings. A small hinge and rod will be added soon. The base is made from a plastic tube that was flattened at one end as seen in reference photos. A cover was made to fit, then the door was cut out and a lid was cut from this opening to "go back in" so as to show the subtle differences in parts. Seemed a more uneccesarily tedious way to do it, but even with a very dull No. 11 blade I made it work on the first try.  Not too bad. It just took cutting enough extra from my marks so that sanding into shape wouldn't remove too much from one side. Not too bad. =]

 Untitled by Britt Vallot, on Flickr

That's that for now. I hope to get some more done today as I get to be home playing daddy!  

On the bench:  

Tamiya F4U-1  Kenneth Walsh


  • Member since
    June 2013
Posted by bvallot on Friday, May 13, 2016 1:01 PM

Since we went there...=]

 Untitled by Britt Vallot, on Flickr


On the bench:  

Tamiya F4U-1  Kenneth Walsh


  • Member since
    February 2003
  • From: Between LA and OC, SoCal
Posted by oortiz10 on Friday, May 13, 2016 10:44 AM


I WILL get my shark-mouthed F-80 completed, but I don't know if I'll get the WIF Jugs done.  I shall try my best.

Thanks Theuns!

-O

-It's Omar, but they call me "O".

  • Member since
    July 2013
Posted by lzdaily@comcast.net on Thursday, May 12, 2016 9:24 AM

This is good news, Theuns!

Between work and eye surgery, my model building has been on hold for weeks.

Larry

  • Member since
    April 2010
Posted by Theuns on Wednesday, May 11, 2016 11:25 PM

As Professor Farnswourth from futurerama would say "Good news everone!"


I received a request to extend the dates to give some guys time to button up their builds.

The end date is now 31 July '16.


Theuns

  • Member since
    June 2013
Posted by bvallot on Monday, May 9, 2016 11:48 PM

Not to worry! I totally understand.  From October to May I'm pretty much screwed with work.  And now I just had my first baby boy this past Sunday. So I'm not really sure how I'm going to get much accomplished over the next two weeks my own self. =]

Hang in there.

On the bench:  

Tamiya F4U-1  Kenneth Walsh


  • Member since
    February 2003
  • From: Between LA and OC, SoCal
Posted by oortiz10 on Monday, May 9, 2016 9:18 AM

bvallot

O!? How's that shark mouth coming along?

 
Aw man!  I just got called out!  
 
Hey bvallot, honestly, all my projects have pretty much stalled.  I'm a teacher and this is a busy time of year for us.  I haven't had much time to do much modeling since Spring Break.  Unfortunately, my shark's mouth continues to sit and collect dust.  I see it sitting on my work bench, but I just can't get to it right now.  I know the end of the GB's right around the corner.  I'm hoping I can spend some time at the bench and get my F-80 done.  
Thanks for asking and keep up the great work with your Mustang!
 
Cheers,
-O

-It's Omar, but they call me "O".

  • Member since
    April 2010
Posted by Theuns on Saturday, May 7, 2016 12:40 AM

nice !


Theuns

JOIN OUR COMMUNITY!

Our community is FREE to join. To participate you must either login or register for an account.

SEARCH FORUMS
FREE NEWSLETTER
By signing up you may also receive reader surveys and occasional special offers. We do not sell, rent or trade our email lists. View our Privacy Policy.