SEARCH FINESCALE.COM

Enter keywords or a search phrase below:

Halftrack GB 2016/17

18645 views
468 replies
1 rating 2 rating 3 rating 4 rating 5 rating
  • Member since
    November 2009
  • From: SW Virginia
Posted by Gamera on Thursday, May 4, 2017 7:37 AM

Lol, I'd been watching the date get closer and closer till I ran over it Bish!!! 

Anyway thanks again for hosting a great GB, wish my luck had run a little better. 

In any case I applied the first wash to my halftrack last night and hopefully should drag over the finish line sometime before the end of the month (hoping nothing else goes wrong, we need a fingers crossed emocon)... 

"I dream in fire but work in clay." -Arthur Machen


  • Member since
    December 2002
  • From: Bury St Edmunds, Suffolk, England
Posted by Bish on Wednesday, May 3, 2017 6:47 AM

I must admit i had foprgotten to offically close this one.

So, a couple of days late, the GB is now offically closed, but of course if anyone is still building an HT and wants to post here, please feel free.

Thanks to all who took part, i know the armour GB's have not been that busy the last couple of years, but if just one person takes part its been worth it.

So thanks again.

I am a Norfolk man and i glory in being so


On the bench: Airfix 1/72nd Harrier GR.3/Fujimi 1/72nd Ju 87D-3

  • Member since
    April 2006
  • From: ON, Canada
Posted by jgeratic on Saturday, April 29, 2017 6:40 PM

Thanks Bish and Cliff ... yeah a month ago I thought I could get it done, but I think looking at all that still had to be tackled just made me turn away from the bench altogether - I think those 1/72nd aircraft have spoiled me. Stick out tongue

Plan right now is to put it away for spell.  Maybe towards the end of the year I will have at it again.

regards,

Jack

  • Member since
    November 2009
  • From: SW Virginia
Posted by Gamera on Saturday, April 29, 2017 6:38 PM

Looks awesome Jack, looking forward to the finished results!

I too won't be finishing on time. I just picked up a bottle of brass paint for the ammo today and am going to try to get the seats finished up. Then hopefully I can finally gloss coat this thing and start with the washes.

"I dream in fire but work in clay." -Arthur Machen


  • Member since
    December 2002
  • From: Bury St Edmunds, Suffolk, England
Posted by Bish on Saturday, April 29, 2017 5:59 PM

Thats looks good jack. Hopefuly you will be able to finish it soon, and if so please feel free to post it here. Its been a prety quiet GB anyway, would be nice to have one more on the finished table.

I am a Norfolk man and i glory in being so


On the bench: Airfix 1/72nd Harrier GR.3/Fujimi 1/72nd Ju 87D-3

  • Member since
    April 2006
  • From: ON, Canada
Posted by jgeratic on Saturday, April 29, 2017 5:54 PM

Thanks Bish for the info on convoy markings.  Unfortunatley this one won't be making the finish line.  

After the last update,  had gone ahead and sprayed  the grey base colour.  Finding the two PE frame rails at the rear were too precarious, I decided to drill out the locations in order to use longer vertical ends for sturdier attachment.  With the new frames in place, I had to make a false wall to hide the visible PE ... and that's when interest began to wane big time.  

Base paint is Xtracrylix Panzer Grey, followed by some modulation/weathering by mixing that and their German Tank Interior Cream.

A shot of Eduard's PE dash board in place.  Instrument dials were printed on paper - not the usual for Euard.

regards,

Jack

  • Member since
    December 2002
  • From: Bury St Edmunds, Suffolk, England
Posted by Bish on Monday, April 3, 2017 6:06 AM

Gamera

She looks fantastic Jack! Wish I could answer your question but I'll have to leave it to Bish.

And BTW congrads on your letter in FSM Bish, glad you put down your forum handle or I'd probably have missed it.


I mostly finished painting the M3 this weekend. It's still out of square, but frankly at this point I do not give a damn any longer. Kinda liberating to be at the point of just not giving a rip anymore, just finishing it flaws and all and then moving on to the next thing. I think I'm going to save the USMC figures for something else, adding them to this at this point would be putting lipstick on a pig.

Top photos with the Silly Putty still on the model and lower two with it removed. Sadly I really like how the paint turned out, wish the rest of the model had went half as well.
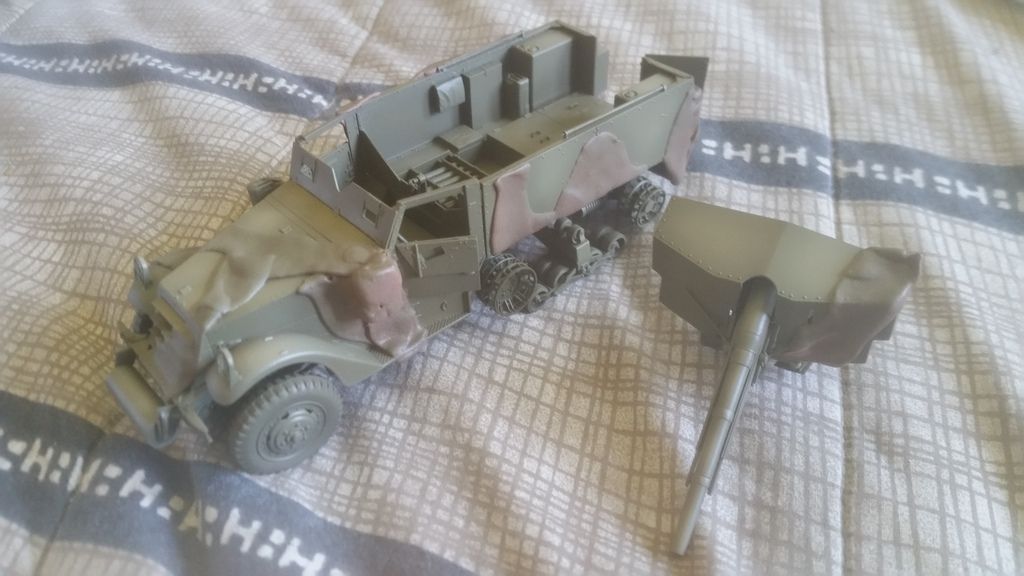
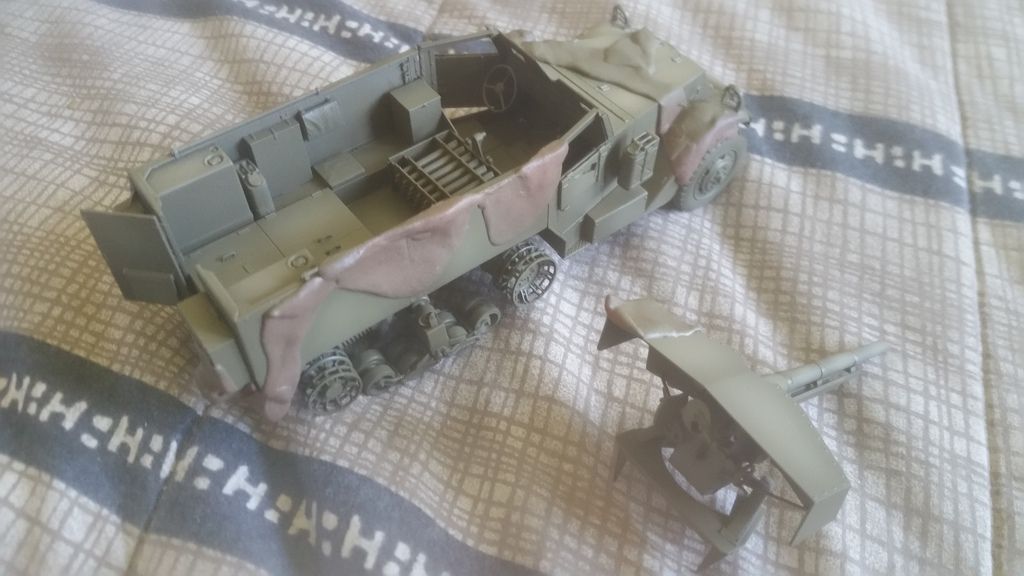


I do really like that scheme and its come out really well. Despite your issues its looking nice.

And thanks. I thought i would add my username as i often look at phorto's and letters and wounder if that is somone from the forum.

I am a Norfolk man and i glory in being so


On the bench: Airfix 1/72nd Harrier GR.3/Fujimi 1/72nd Ju 87D-3

  • Member since
    December 2002
  • From: Bury St Edmunds, Suffolk, England
Posted by Bish on Monday, April 3, 2017 5:13 AM

jgeratic

Thanks Bish.

Going for a panzer grey finish and a water/sand mixture for camouflage as seen in 1941. 

Would you know anything about white convoy paint used on the edges of the fenders?  I have a profile illustration with the white edges only at the front of the vehicle, but none on the rear - I guess the convoy light would make it redundant?

regards,

Jack


I did some checking over the weekend, and as far as i can tell, the white was only applied to the front. I am not sure why they put them on the front, but it does not seem to have lasted to long.

I am a Norfolk man and i glory in being so


On the bench: Airfix 1/72nd Harrier GR.3/Fujimi 1/72nd Ju 87D-3

  • Member since
    April 2006
  • From: ON, Canada
Posted by jgeratic on Sunday, April 2, 2017 9:13 PM

Hi Cliff, thanks for the positive comment.

Your M3 is looking great, very keen looking scheme - hope to be close to that  stage by the end of the week.

regards,

Jack

  • Member since
    November 2009
  • From: SW Virginia
Posted by Gamera on Sunday, April 2, 2017 8:06 PM

She looks fantastic Jack! Wish I could answer your question but I'll have to leave it to Bish.

And BTW congrads on your letter in FSM Bish, glad you put down your forum handle or I'd probably have missed it.


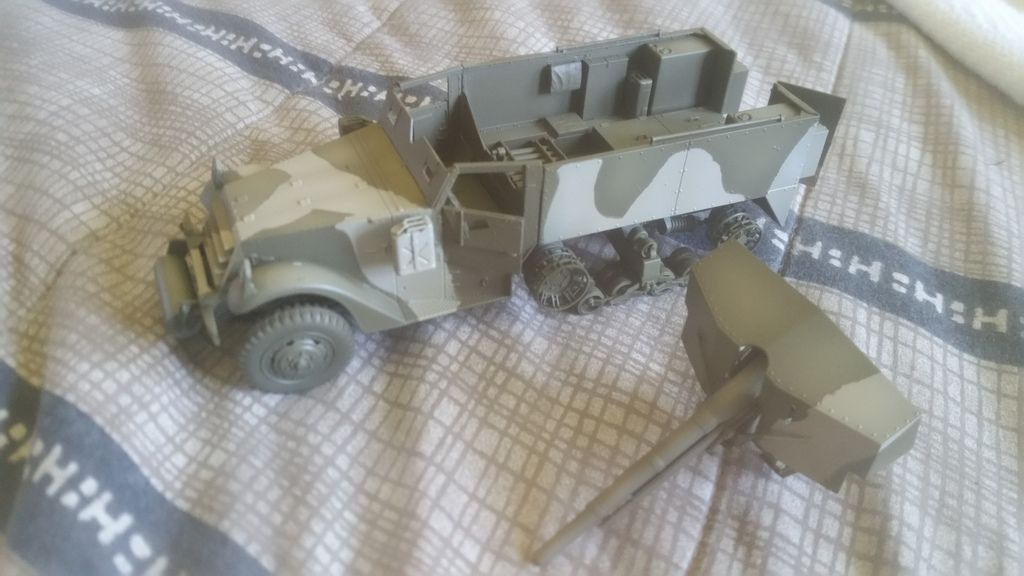
I mostly finished painting the M3 this weekend. It's still out of square, but frankly at this point I do not give a damn any longer. Kinda liberating to be at the point of just not giving a rip anymore, just finishing it flaws and all and then moving on to the next thing. I think I'm going to save the USMC figures for something else, adding them to this at this point would be putting lipstick on a pig.

Top photos with the Silly Putty still on the model and lower two with it removed. Sadly I really like how the paint turned out, wish the rest of the model had went half as well.
 

"I dream in fire but work in clay." -Arthur Machen


  • Member since
    April 2006
  • From: ON, Canada
Posted by jgeratic on Saturday, April 1, 2017 10:31 AM

Thanks Bish.

Going for a panzer grey finish and a water/sand mixture for camouflage as seen in 1941. 

Would you know anything about white convoy paint used on the edges of the fenders?  I have a profile illustration with the white edges only at the front of the vehicle, but none on the rear - I guess the convoy light would make it redundant?

regards,

Jack

  • Member since
    December 2002
  • From: Bury St Edmunds, Suffolk, England
Posted by Bish on Saturday, April 1, 2017 1:10 AM

Looks really nice there Jack, i do like those Jerrycan racks and good idea for the painting. Looking forward to some colour going on.

Into the last month of the GB guys.

I am a Norfolk man and i glory in being so


On the bench: Airfix 1/72nd Harrier GR.3/Fujimi 1/72nd Ju 87D-3

  • Member since
    April 2006
  • From: ON, Canada
Posted by jgeratic on Friday, March 31, 2017 10:50 PM

Got a coat of primer on at the beginning of the week, but still was adding some last minute details.

Initially I had made a jerrycan rack out of plastic card, but was too fragile, and reverted to brass.  Green stuff putty applied on the headlights to mimic the look of  covers.  On the figure, added some PE shoulder boards, and a *** eagle.

To facilitate the painting of the main crew cab area, I've got the model built in three componets.

Shot from the rear.  The pair of grab handles are metal from twist ties, and also added a couple frames for the canvas awning - hopeful that won't get knocked off during further painting.

regards,

Jack

  • Member since
    April 2006
  • From: ON, Canada
Posted by jgeratic on Tuesday, March 21, 2017 10:09 AM

Thanks Bish and Cliff.

I'd like to have added another figure on the passenger side, but the only one that fits from the stash is of a different brand and looks a bit odd - same scale, but noticeable size difference.

Would the driver be some form of corporal rank?

regards,

Jack

  • Member since
    November 2009
  • From: SW Virginia
Posted by Gamera on Tuesday, March 21, 2017 8:05 AM

Yeah, he looks perfect to me Jack. I complain about modding figures but end up doing a lot of it to them so I guess I enjoy it more than I'll admit. 

"I dream in fire but work in clay." -Arthur Machen


  • Member since
    December 2002
  • From: Bury St Edmunds, Suffolk, England
Posted by Bish on Monday, March 20, 2017 1:11 AM

Nice work on the figure Jack.

I am a Norfolk man and i glory in being so


On the bench: Airfix 1/72nd Harrier GR.3/Fujimi 1/72nd Ju 87D-3

  • Member since
    April 2006
  • From: ON, Canada
Posted by jgeratic on Sunday, March 19, 2017 10:01 PM

Driver figure is now all sorted out.  It's from an older tristar set:

Problem is, he was designed to sit low, such as in a Kubelwagen.  So a lot of surgery ensued:

1.) - hole cut out for seated figure

2.) - ball of putty pushed up from underneath seat, and smoothed out level.  Figure was then pushed onto this, creating a mold of his rump.

     - legs chopped off at the pants and socks, the ends built up with putty around brass rods.  The opposite ends are drilled out to form a hollow.

3.) - humpty dumpty put back together


Couple shots with driver in place, just need to curl the left hand better around the wheel.  Note too, have replaced the steering column with a brass rod, and the wheel also with some thin lead free wire.

regards,

Jack

  • Member since
    November 2009
  • From: SW Virginia
Posted by Gamera on Wednesday, March 15, 2017 11:25 AM

Jack: Ouch, you're making solid progress though. Know what you mean about burning out, one of the main reasons I don't start big projects anymore. 

"I dream in fire but work in clay." -Arthur Machen


  • Member since
    December 2002
  • From: Bury St Edmunds, Suffolk, England
Posted by Bish on Wednesday, March 15, 2017 10:05 AM

Know that feeling Jack. You get to the point where you just want it over with.

I am a Norfolk man and i glory in being so


On the bench: Airfix 1/72nd Harrier GR.3/Fujimi 1/72nd Ju 87D-3

  • Member since
    April 2006
  • From: ON, Canada
Posted by jgeratic on Wednesday, March 15, 2017 9:33 AM

Thanks Cliff, and that is unfortunate your GMC build has bogged down. 

I've had a few things break on mine as well, and some fit issues.  What I'm concerned about is burning out on this one.  Yesterday saw two hours spent whittling away at the driver seat so a figure would sit properly.  Today have to look at filling in some of that hole, and also test fit his arms to make sure they are holding the steering wheel.

regards,

Jack

  • Member since
    November 2009
  • From: SW Virginia
Posted by Gamera on Wednesday, March 15, 2017 7:45 AM

Jack: Looks great, good to see someone else moving along there. 

"I dream in fire but work in clay." -Arthur Machen


  • Member since
    December 2002
  • From: Bury St Edmunds, Suffolk, England
Posted by Bish on Tuesday, March 14, 2017 11:00 AM

Interesting. I have a few AFV kits, mostly 251's, but a couple of othersa, and not seen that before.

Good to hear terry is back, have been checking the site often so must be recent. Will take a look.

I am a Norfolk man and i glory in being so


On the bench: Airfix 1/72nd Harrier GR.3/Fujimi 1/72nd Ju 87D-3

  • Member since
    April 2006
  • From: ON, Canada
Posted by jgeratic on Tuesday, March 14, 2017 10:25 AM

Hi Bish, thanks and yes the tan parts are from the kit.

Don't know why the different colour.  Thought maybe because they have four releases of the Sd.kfz.11, the tan parts were the 'new parts' for this  type, but no this particular kit was released first before all the others.

https://www.scalemates.com/kits/115230-afv-club-af35040-leichter-zugkraftwagen-3t

Noticed too that Terry's review site (btw, looks like he is back to posting new kits: http://www.perthmilitarymodelling.com/index.html), all the parts are tan.  

He also had trouble with the rear crew area, stating the seats and adjacent storage compartments were about 1mm too long.  I did not experience this with my kit though.

http://www.perthmilitarymodelling.com/reviews/vehicles/afvclub/afv35040.htm

regards,

Jack

  • Member since
    December 2002
  • From: Bury St Edmunds, Suffolk, England
Posted by Bish on Tuesday, March 14, 2017 3:07 AM

Nice work there jack. Are those tan pieces from the kit, not seen a 2 tone AFV club kit before.

I am a Norfolk man and i glory in being so


On the bench: Airfix 1/72nd Harrier GR.3/Fujimi 1/72nd Ju 87D-3

  • Member since
    April 2006
  • From: ON, Canada
Posted by jgeratic on Monday, March 13, 2017 6:32 PM

Still moving forward, feels like snail's pace ...

Was able to find an actual chain to replace  the two dimensional PE one, draped across the rear entry.

The double doors on the tan section are for ammo storage, and these required some extra attention.  They don't quite cover the opening, so added a strip of plastic sheet down the center and the doors actually sit a bit wider now.  A row of resin rivets completes that detail.

The hinges also needed some help, and had to shim the sections attached to the body as the Eduard pieces were too short.

I'll have to scratch my own racks for jerry can stowage, as again, Eduard's  PE pieces create too small of a holder.

regards,

Jack


  • Member since
    November 2009
  • From: SW Virginia
Posted by Gamera on Thursday, March 2, 2017 9:08 AM

Thanks Bish, I'm sorry about whining but I had to vent. 

I've lost my temper more than a few times over this hobby lately but this is the first time in a good while I've been about two millimeters from flinging a kit into the wall. 

Cross your fingers I can still finish, I'm just going to cool off a little first. 

"I dream in fire but work in clay." -Arthur Machen


  • Member since
    December 2002
  • From: Bury St Edmunds, Suffolk, England
Posted by Bish on Thursday, March 2, 2017 7:44 AM

No worries G, at least you gave it a go. Somtimes we get a kit that just fights back all the way and we have to put it toone side. Hopefully you can get back to it at a later date and it will be more compliant.

I am a Norfolk man and i glory in being so


On the bench: Airfix 1/72nd Harrier GR.3/Fujimi 1/72nd Ju 87D-3

  • Member since
    November 2009
  • From: SW Virginia
Posted by Gamera on Thursday, March 2, 2017 7:42 AM

Bish: My apologies but I'm not sure I'm going to finish my entry or not. First off I want to state I do not believe in curses but I'd swear this kit is somehow jinxed. It's only rarely I've ever had so much trouble with any kit. And most of them were awful limited run stuff. This is a Dragon kit, it shouldn't be that much of an issue. It's just one of these cases where everything seems to want to go wrong. I tried to get more done over the weekend and first of this week. Well, the gun shield won't fit straight, I ripped it off and replaced it about five times and it's still not square. Then last night I tried to attach two bars that reinforce the shield. Somehow the second one caught on my finger when I picked it up, I have no idea how or what it did but it broke in half and part flew off into oblivion. I just boxed the thing back up and walked away... Bang Head

"I dream in fire but work in clay." -Arthur Machen


  • Member since
    December 2002
  • From: Bury St Edmunds, Suffolk, England
Posted by Bish on Tuesday, February 28, 2017 9:05 AM

jgeratic

lol, thx Cliff!

Yeah, kind of disappointed with the way the cab doors are molded - cast solid with the frame.  It would require some work in bringing back detail to pose them open.  I had wanted to include a figure or two standing outside the vehicle, but I think it might look odd with the doors closed?

regards,

Jack


Thats a shame they did it like that. You would have to be very careful cutting those open.

I am a Norfolk man and i glory in being so


On the bench: Airfix 1/72nd Harrier GR.3/Fujimi 1/72nd Ju 87D-3

  • Member since
    December 2002
  • From: Bury St Edmunds, Suffolk, England
Posted by Bish on Tuesday, February 28, 2017 9:04 AM

Gamera

She's coming right along there Jack. 


And black leather seats and shorts in the desert... ouch! Devil


O, ye, that wouldn'tbe good. Being in full trousers is bad enough.

I am a Norfolk man and i glory in being so


On the bench: Airfix 1/72nd Harrier GR.3/Fujimi 1/72nd Ju 87D-3

JOIN OUR COMMUNITY!

Our community is FREE to join. To participate you must either login or register for an account.

SEARCH FORUMS
FREE NEWSLETTER
By signing up you may also receive reader surveys and occasional special offers. We do not sell, rent or trade our email lists. View our Privacy Policy.