SEARCH FINESCALE.COM

Enter keywords or a search phrase below:

RAF 100th Anniversay GB

85456 views
3404 replies
1 rating 2 rating 3 rating 4 rating 5 rating
  • Member since
    October 2016
  • From: .O-H-I-O....
Posted by DasBeav on Monday, July 10, 2017 4:38 PM

Mr. Bish: The GB is lacking in InterWar aircraft. I would like to add this to the list. I paid 1 US dollar for it......Big Smile

 Sooner Born...Buckeye Bred.


  • Member since
    January 2015
Posted by BrandonD on Monday, July 10, 2017 4:37 PM

Model Crazy - it sounds hard, but it really was pretty easy. Also, this was the first time my girlfriend kept bugging me to see progress on my model kits (because she didn't think it would turn out at all).

It's more tedious than hard, and I honestly only want to build WWI now because it will let me go forward with this new, more esoteric hobby I just stumbled into.

Oh, right...rigging. Let's cross that hurdle before I forge ahead.

-BD-

  • Member since
    October 2016
  • From: .O-H-I-O....
Posted by DasBeav on Monday, July 10, 2017 4:34 PM

"That which doesn't kill, Makes us strong" Friedrich Nietzsche. One of my favorite quotes that greatly applied to building the Smer Supermarine Walrus. It came terribly close to "falling" off the table and being "accidently" stepped on. Two times in a GB would still have been a "coincidence". All in all, I actually had some fun with the build, in a masochistic sort of way. I learned quite a bit from this build...How Not to Do Things!

I would like to thank everbody for their kind comments, information, and critiques. They were gladly welcomed. There were so many and I would thank all of you by name, but to be honest, I am not scrolling through 70 pages of this thread! But in all seriousness, Thank you all.

It has been enjoyable following everybodies builds. You all do such wonderful work. I am quite envious. I hope to one day be half the modeller you people are. From Toshis Mossi to Justins Lanc dio to those Tornado and 'Cane builds, My hat is off to all of you. Again, not my intention to slight anybody by not mentioning you by name.....NOT SCROLLING THROUGH 70 pages!!

Sadly, My Walrus will not be left in my house because it is, I believe, CURSED! It is like the "Annabelle" of models. Just possessed by some unwordly spirit...

And finally a big thank you to Mr Bish. I great appreciate you accepting me into the best GB I have ever been a part of. I have enjoyed every bit of it. (Side Note: It's my first GBBig Smile) In all seriousness, it has been my pleasure to be part of this 100th Anniversary of the RAF GB. Thank you all again.

Doug....Das Beav.

P.S. I Will Never Build A Cheap Bi-Plane Model Again....Ever!

 Sooner Born...Buckeye Bred.


  • Member since
    July 2014
Posted by modelcrazy on Monday, July 10, 2017 4:26 PM

Are you kidding me BD, you made your onw prop from laminated wood? that is so cool!

Steve

Building a kit from your stash is like cutting a head off a Hydra, two more take it's place.


http://www.spamodeler.com/forum/

  • Member since
    January 2015
Posted by BrandonD on Monday, July 10, 2017 4:21 PM

Ok, so the one thing other than rigging that has always made me stay away from WWI models is replicating the look of the laminated wood propeller by painting.

So I decided to tackle the prop on my F.2B while I await the decals to arrive from the Czech Republic.

Looking from the top, the lines in the propeller should be parrallel, and looking from the front, they do some crazy twisty-turny patterns due to the shape of the prop.

I saw a guy on Facebook who carved his own, so I decided to try that out.

I started with thin walnut veneer I picked up at a local woodworking shop. $11 got me enough sheets to make about 36 1/48 walnut props, so it's pretty cost-effective.

I bought some Truebond Original wood glue at the clerk's recommendation, and I went home and cut strips of veneer with my X-acto knife.

Wooden Prop

The above strips are actually not what I ended up with, as the lighter ones were a different wood that didn't work out. Since this is an allied prop, and they didn't see the big contrast in wood types that Central Powers props did, I used all walnut (top, middle and bottom of the above). I ended up using 6 strips in the final prop.

I glued them and clamped them in a vise, then drew a rough outline of the prop on the top with pencil.
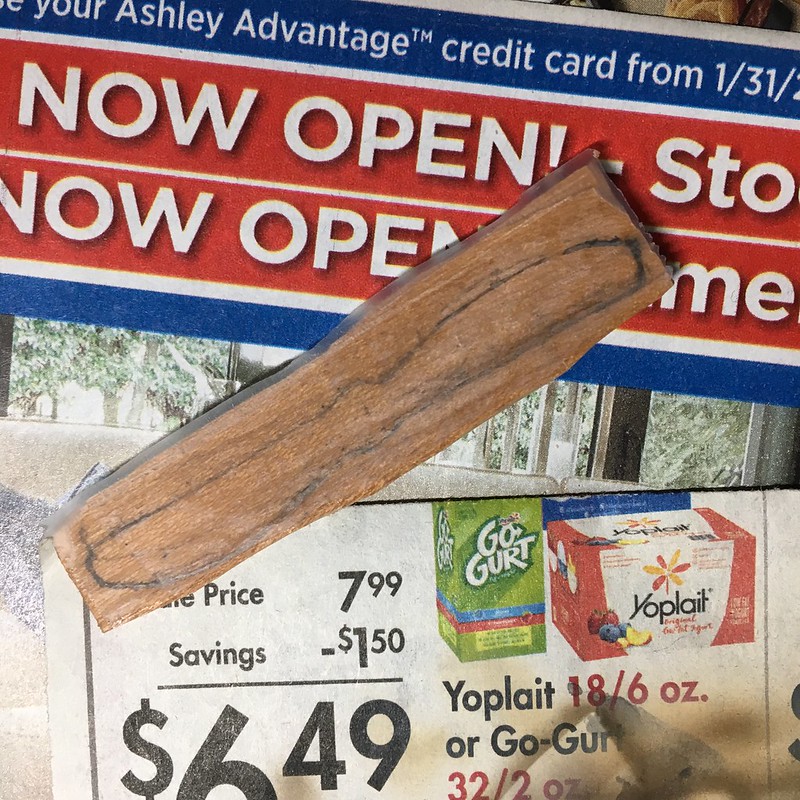
Wooden Prop

That was easy enough, so I cut it down with a razor saw and X-acto knife to get it roughly right, but still oversized.
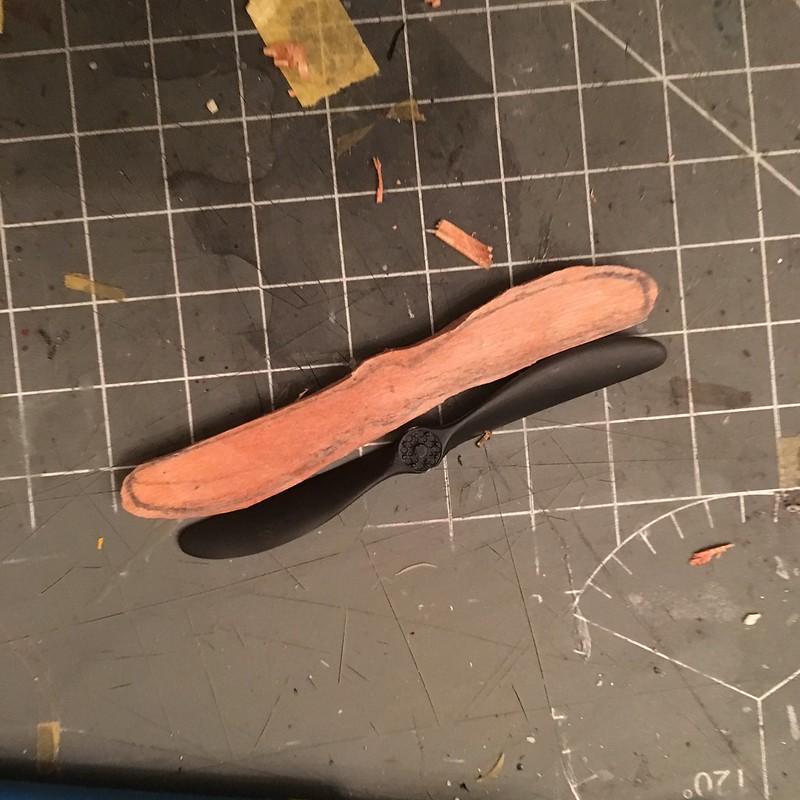
Wooden Prop

Next, I used flat, half-round and round files to shape it, then, when I had it where I wanted it, I used 600-grit sandpaper to smooth it out.
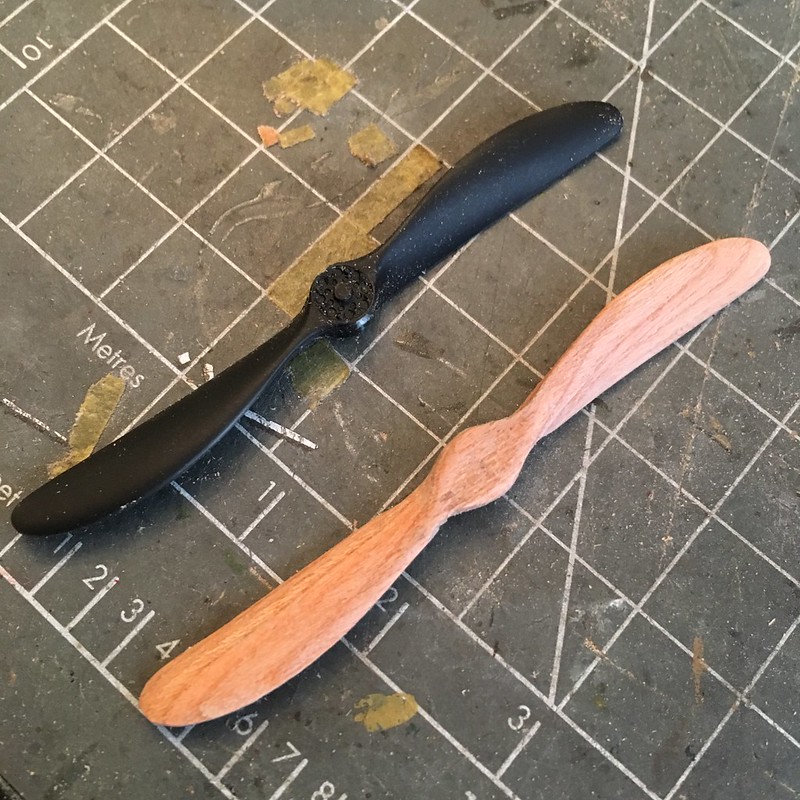
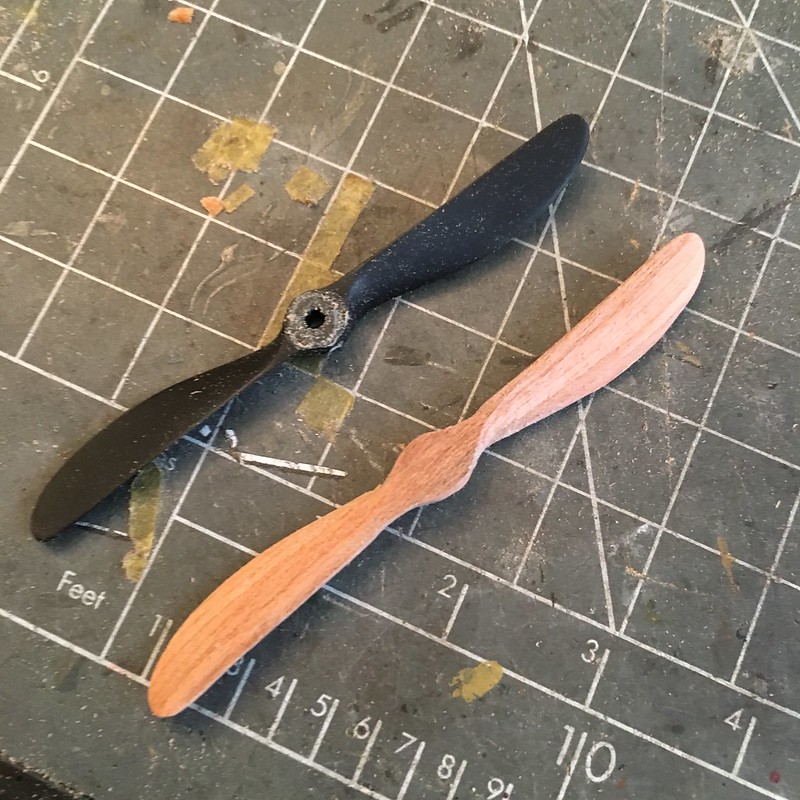
Wooden Prop

Wooden Prop

I ordered a set of Copper State Models photoetched prop bosses from Sprue Brothers just now, so I'll add that when they arrive. In the meantime, I'll spray this with Tamiya clear orange and clear yellow mixed to where I want it, drill the mounting hole and get back to the aircraft work so I'm ready to move forward when decals arrive.

-BD-

  • Member since
    January 2015
Posted by BrandonD on Monday, July 10, 2017 4:20 PM

That BOBMF Typhoon looks sweet, especially next to that Hurricane. Awesome work!

And that Walrus also looks amazing. You did a lot with what sounds like a dog of a kit. Reminds me of how I felt after completing my Mirage IIIC, which was mostly operator issues and finishing products, but I hated it until I finished it and then though, "Aww heck, it wasn't that bad, was it..?"

Is there such a thing as Stockholm Syndrome for scale models?

-BD-

  • Member since
    December 2002
  • From: Bury St Edmunds, Suffolk, England
Posted by Bish on Monday, July 10, 2017 3:59 PM

Das, a big well done. This turned out really nice and deffinetly somthing we don't see often. Really glad you stuck with it, from where i sit it was worth.

Thanks for taking part, again, 2 realy nice builds there. Front page is updated.

I am a Norfolk man and i glory in being so


On the bench: Airfix 1/72nd Harrier GR.3/Fujimi 1/72nd Ju 87D-3

  • Member since
    July 2014
Posted by modelcrazy on Monday, July 10, 2017 3:52 PM

That turnrd out very well Beav. Nice job on the weathering.

Steve

Building a kit from your stash is like cutting a head off a Hydra, two more take it's place.


http://www.spamodeler.com/forum/

  • Member since
    October 2016
  • From: .O-H-I-O....
Posted by DasBeav on Monday, July 10, 2017 3:32 PM

 Sooner Born...Buckeye Bred.


  • Member since
    October 2016
  • From: .O-H-I-O....
Posted by DasBeav on Monday, July 10, 2017 3:31 PM

 Sooner Born...Buckeye Bred.


  • Member since
    October 2016
  • From: .O-H-I-O....
Posted by DasBeav on Monday, July 10, 2017 3:30 PM

 Sooner Born...Buckeye Bred.


  • Member since
    October 2016
  • From: .O-H-I-O....
Posted by DasBeav on Monday, July 10, 2017 3:28 PM

The Smer Supermarine Walrus is finished...Thank God! Even though this kit is cursed and will be removed from my house, in retrospect, was kind of a fun build.( I must have some unconscious, masochistic tendencies)

 Sooner Born...Buckeye Bred.


  • Member since
    December 2002
  • From: Bury St Edmunds, Suffolk, England
Posted by Bish on Monday, July 10, 2017 1:39 PM

Looking forward to seeing that Hampden check.

I am a Norfolk man and i glory in being so


On the bench: Airfix 1/72nd Harrier GR.3/Fujimi 1/72nd Ju 87D-3

  • Member since
    December 2002
  • From: Bury St Edmunds, Suffolk, England
Posted by Bish on Monday, July 10, 2017 1:38 PM

Doug, thats an awsome build, i am really glad you decided to do this one for us. Great to have you as always.

I'll be interested to see what the RAF has planned for 2020 and the 80th Anniversary.

I'll update the front page shortly. And you know your more than welcome to add another.

I am a Norfolk man and i glory in being so


On the bench: Airfix 1/72nd Harrier GR.3/Fujimi 1/72nd Ju 87D-3

  • Member since
    September 2003
  • From: AandF in the Badger State
Posted by checkmateking02 on Monday, July 10, 2017 1:32 PM

Looking good, Eric and Andy.  

Doug:  really sharp looking couple there!  Very impressive seeing the pair together.  Well-done!

Finished the Hampden last night.  Now I need to set up for photos, which hopefully I'll be able to accomplish today sometime.


  • Member since
    November 2009
  • From: SW Virginia
Posted by Gamera on Monday, July 10, 2017 12:22 PM

Those look fantastic guys!!!

Doug: That is beautiful! The Eurofighter is a fine looking plane, somehow looks even better in the WWII scheme though! 

PJ: Great job masking there! 

Eric: Good luck on your masking!

Andy: Great job on masking the insignia, I've got to give that a go someday. 

DasBeav: Fantastic job on the new machine guns. Despite your issues she's really looking good. 

"I dream in fire but work in clay." -Arthur Machen


  • Member since
    July 2014
Posted by modelcrazy on Monday, July 10, 2017 10:57 AM

What a diffrence in generations. Son and Grandpappy. Good work Doug. Yes

Steve

Building a kit from your stash is like cutting a head off a Hydra, two more take it's place.


http://www.spamodeler.com/forum/

  • Member since
    September 2014
Posted by rooster513 on Monday, July 10, 2017 10:42 AM

Thanks and very nice finish Doug! Paint on both birds is great and it's cool seeing them sitting next to each other. Very well done!

-Andy

  • Member since
    October 2008
  • From: Georgia
Posted by Rigidrider on Monday, July 10, 2017 10:33 AM

Andy, Very nice paint work on the Hurricane! I like the painted on markings...

And here are the completed pictures of my project. Very cool how the RAF chose to commemerate the 75th annivesary of the Battle of Britain. When I first saw these pictured together I wanted to build them. Thanks for the opportunity to be able to do so Bish!

Well , Thank you again for the chance to buils these... I'd like to do another and after satisfying another commitment I will be back! 

Thanks all, and keep up the great work!

Doug

When Life Hands You A Bucket Of Lemons...

Make Lemonade!

Then Sell It Back At $2 Bucks A Glass...

  • Member since
    September 2014
Posted by rooster513 on Monday, July 10, 2017 7:35 AM

Bish

Great job on making those masks. With a proper compass cutter, those are going to look awsome.

I have been trying black baseing but without much luck. I think i will give this a try, less chance of over doing it.


Yeah I think it's easier (at least for me) to get a more subtle affect then when using black, whether black basing or panel line preshading.

-Andy

  • Member since
    December 2002
  • From: Bury St Edmunds, Suffolk, England
Posted by Bish on Monday, July 10, 2017 6:54 AM

Great job on making those masks. With a proper compass cutter, those are going to look awsome.

I have been trying black baseing but without much luck. I think i will give this a try, less chance of over doing it.

I am a Norfolk man and i glory in being so


On the bench: Airfix 1/72nd Harrier GR.3/Fujimi 1/72nd Ju 87D-3

  • Member since
    September 2014
Posted by rooster513 on Monday, July 10, 2017 6:44 AM

Thanks Bish. I cut the masks out of Tamiya tape using a circle template and exacto knife. Flex i file makes a compass cutter that I would like to get if I decide to keep painting roundels on my builds in the future. The circle template works ok but as you can see I got some rough edges as I had to go around a couple of times to cut through the tape. I also think it would make lining up each mask easier. I spent too much of my life trying to get each circle centered! LOL.

As far as the painting method, it's pretty easy. I thinned the white for the marbling quite a bit too so that it wasn't too stark and then just hit it with another base coat. I think it breaks it up nicely and I'm looking forward to trying it with the topside camo.

-Andy

  • Member since
    December 2002
  • From: Bury St Edmunds, Suffolk, England
Posted by Bish on Monday, July 10, 2017 6:23 AM

Nice job there Andy. Not sure if you mentioned it before, what masks are you useing for the markings.

I quite like that idea of laying down the abse colour, then marbel then a thin coat. I've not seen that before.

I am a Norfolk man and i glory in being so


On the bench: Airfix 1/72nd Harrier GR.3/Fujimi 1/72nd Ju 87D-3

  • Member since
    September 2014
Posted by rooster513 on Monday, July 10, 2017 6:16 AM

That is really coming along nicely Doug!

I was able to make some progress on the Hurricane this weekend. I've got the roundels aboun 90 percent masked and painted and was able to get the Sky color laid down on the underside. I tried a technique on the underside that I've seen a few people using, laid down the sky, then did some "marbling" with white and then went over that with a highly thinned coat of Sky again. Pretty happy with the results overall...

And with the masks removed...

-Andy

  • Member since
    January 2017
Posted by damouav on Monday, July 10, 2017 4:19 AM

Erick,

You can’t just paste the link text in the body that I am writing this in.

As mentioned, you need to paste the Google Photo image location (specifically "copy image address") it in the following manner;


 Select OK, your done.

DamiAn

In Progress
1/48 Tamiya P47-D Bubbletop
1/48 Hobby Boss TBF-1C Avenger (on hold)
Pending
1/48 Roden S.E.5a
1/48 Airfix Walrus
  • Member since
    February 2010
  • From: Berkeley CA/St. Paul MN
Posted by EBergerud on Monday, July 10, 2017 12:16 AM


First of all, thankee bish: I had no idea that was what I supposed to do - although I discovered it right before reading yours msg because IMGUR had a detaled look at all of the share formats. The problem with tutorials for bigtime online products is that a command may be there in May and not be there in June. Same thing cripples YouTube.


Flickr and Google I think will work nicely but for the time being we'll use Imgur.


Posted this last week.


Hats off to all in the GB – some fine kits are going to result.


I've finished the masking and will start painting soon. (Real world is going to interfere during July 4th week.) I've used a new technique that I think is going to work. If I were doing a tank I wouldn't bother creating masks – I'd just airbrush freehand. But as I understand it the RAF camo patterns were uniform depending upon theater and the period of war. Not usually a nut about precision, but I thought I'd try to do a proper mask particularly as this kit comes with 1:1 diagram of the aircraft with camo on it. Unfortunately the North Sea nightfighters had a different scheme, so I had to draw my own camo lines on the diagram.


For the mask itself I used a product called SureSwatch which is sold at Home Depot for $3 per 3sheets. (Tamiya makes masking paper at twice the price.) There's a picture of the stuff below. The side that has all of the text covers a plastic sheet that is adhesive on one side and coarse plastic on the other. I traced the bits of the camo pattern onto the coarse side (very easy to draw on – a smooth piece would be very hard to use a pencil or thin sharpie) and then cut them out of the plastic. There were a lot of camo sections so there were perhaps a dozen pieces. (The cut sheet shown is the remnant of the one sheet used: at least half is left) On thing nice about this procedure is that when you cut out the camo piece, the area around will act as the border of the second stage of camo painting after the first is done. It's adhesive but less so than Tamiya tape and will not remove any of the very sturdy auto lacquer primer I used. You can see what the plane looks like with the masking applied. As you can see I needed to use some tape on areas that weren't quite right. In any case, all of the unmasked black will be painted RAF Medium Sea Gray. When that's done the masking goes off and after the paint dries for a day, the reverse mask is applied and the RAF Dark Green goes on.


It's very possible that someone that's good with Tamiya tape could get good results in less time, especially if you're using that new Tamiya resin tape made for masking curves (5mm, 3mm, 2mm) which works very well.


Anyway, the next photos you see the plane should look a lot like a WWII Beaufighter. Or so I hope.


Eric


Think BBC code works for Flicker too?

 maskprep by Eric Bergerud, on Flickr


A model boat is much cheaper than a real one and won't sink with you in it.

  • Member since
    December 2002
  • From: Bury St Edmunds, Suffolk, England
Posted by Bish on Monday, July 10, 2017 12:04 AM

Eric, if useing the Share method of Flickr, you need to copy and paste the BBCode link.

 Swatch by Eric Bergerud, on Flickr

I am a Norfolk man and i glory in being so


On the bench: Airfix 1/72nd Harrier GR.3/Fujimi 1/72nd Ju 87D-3

  • Member since
    February 2010
  • From: Berkeley CA/St. Paul MN
Posted by EBergerud on Sunday, July 9, 2017 11:44 PM

flickr

https://flic.kr/s/aHskYn1Jn7


A model boat is much cheaper than a real one and won't sink with you in it.

  • Member since
    September 2003
  • From: AandF in the Badger State
Posted by checkmateking02 on Sunday, July 9, 2017 11:40 PM

DB:  fine looking Lewis guns!  Good work.  

pj:  very attractive paintwork on the Spitfire

Doug:  outstanding accomplishment!  The camouflage works great.


  • Member since
    February 2010
  • From: Berkeley CA/St. Paul MN
Posted by EBergerud on Sunday, July 9, 2017 11:33 PM

As you can see, I do have hot links but nothing that will show automatically. I don't doubt a very simple step is missing. Any idea?


A model boat is much cheaper than a real one and won't sink with you in it.

JOIN OUR COMMUNITY!

Our community is FREE to join. To participate you must either login or register for an account.

SEARCH FORUMS
FREE NEWSLETTER
By signing up you may also receive reader surveys and occasional special offers. We do not sell, rent or trade our email lists. View our Privacy Policy.