SEARCH FINESCALE.COM

Enter keywords or a search phrase below:

Pride of the Luftwaffe GB

41863 views
1268 replies
1 rating 2 rating 3 rating 4 rating 5 rating
  • Member since
    December 2002
  • From: Bury St Edmunds, Suffolk, England
Posted by Bish on Thursday, December 21, 2017 1:55 AM

Thats look great Doug, looking forward to the end result.

I am a Norfolk man and i glory in being so


On the bench: Airfix 1/72nd Harrier GR.3/Fujimi 1/72nd Ju 87D-3

  • Member since
    April 2005
  • From: Australia
Posted by taxtp on Thursday, December 21, 2017 5:48 PM

That's starting to really look the part Doug, your weathering brings it to life.

I've continued work on the 109, with an intention of getting it done this year.

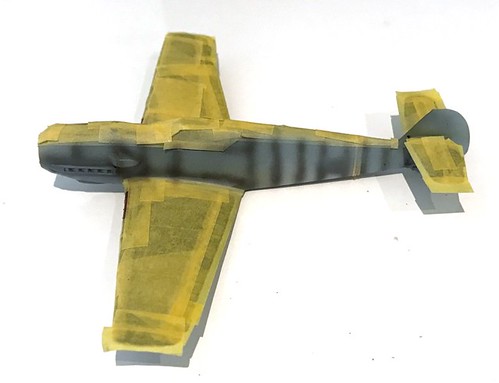
Here, I've masked it up for RLM 65.

Light coat on RLM 65 on the fuselage sides to obliterate the overspray of the camo colours.

Reinstated the pre-shading to the fuselage sides.

I must have missed photographing it at this stage, sprayed it with Gunze RLM 65, then a slightly lightened tint in the middle of each panel.

Then I've sprayed the fuselage side mottle, trying to emulate the pattern that was on the real aircraft. I think it's a reasonable copy. It's quite a different pattern on each side.

I couldn't see that the mottle overlapped much on the upper surface colours, so maybe they had masked that before they sprayed the mottle. I've gone for that look.

I've since given it a couple of coats of Future, with any luck I can finish it this weekend.

I found that spraying the RLM 65 after the topside camo was good because I had less area to mask. I didn't really come up with a downside, but I've done it both ways in the past, and probably will in the future too.

Cheers

Tony


I'm just taking it one GB at a time.

  • Member since
    October 2008
  • From: Georgia
Posted by Rigidrider on Thursday, December 21, 2017 7:22 PM

Nick, Bish,Tony... Thanks guys! I like this point of the build, Finishing up the fiddly parts and the finish is in sight!

! Tony... 109s starting to come alive... won't be long now!


When Life Hands You A Bucket Of Lemons...

Make Lemonade!

Then Sell It Back At $2 Bucks A Glass...

  • Member since
    December 2002
  • From: Bury St Edmunds, Suffolk, England
Posted by Bish on Friday, December 22, 2017 2:06 AM

Tony, that look great, i can see the neifiet of doing the top camo first. Going to do that myself.

I am a Norfolk man and i glory in being so


On the bench: Airfix 1/72nd Harrier GR.3/Fujimi 1/72nd Ju 87D-3

  • Member since
    October 2008
  • From: Georgia
Posted by Rigidrider on Friday, December 22, 2017 7:57 PM

OK... Finally got my build done this afternoon... I still dont have the replacement decal for the staffel marking but I'm sure it'll be here soon, Meanwhile, I will post these as finished for now..

Inside of the canopy done, 

Fiddly parts (antennas and such) done...

And here she is...

I know its hard to see, but I do have the antenna wire ran through the canopy and internal mechanism.

Well, thats it for this one... Like our buddy Bish might say... I'm pretty chuffed with this one! Any way, To all my fellow builders and modelers, Merry Christmas, Happy Holidays, and a very prosperous New Year to all! See you in a week or two! 

Doug

OH... PS, Sorry... Rooster, choice of finish pic is yours, and Thank you for hosting this GB and for the Great subject!

When Life Hands You A Bucket Of Lemons...

Make Lemonade!

Then Sell It Back At $2 Bucks A Glass...

  • Member since
    November 2003
  • From: Naples, FL
Posted by tempestjohnny on Friday, December 22, 2017 8:54 PM
Excellent finish Doug


  • Member since
    November 2003
  • From: Naples, FL
Posted by tempestjohnny on Friday, December 22, 2017 8:56 PM
Tony looking good on that camo


  • Member since
    April 2006
  • From: ON, Canada
Posted by jgeratic on Friday, December 22, 2017 9:49 PM

Doug, that looks outstanding! Yes

It was actually looking quite good at the start of the weathering stage.   So much so that it inspired me to pick up a 190 kit.

Merry Christmas to you, and to each and everyone of the members here.

regards,

Jack

  • Member since
    July 2014
Posted by modelcrazy on Friday, December 22, 2017 10:00 PM

Great finish Doug Yes

Steve

Building a kit from your stash is like cutting a head off a Hydra, two more take it's place.


http://www.spamodeler.com/forum/

  • Member since
    October 2009
  • From: Worcester, England.
Posted by aeroplanegripper on Saturday, December 23, 2017 4:33 AM

Thats a lovely looking 190 Doug, super finish.

Best Regards

Mark

"bis vivit qui bene vivit"


  • Member since
    September 2014
Posted by rooster513 on Saturday, December 23, 2017 8:14 PM

That turned out awesome Doug! I really like the weathering. Thanks for a great addition to the GB! I'll get your finished build on the front page shortly.

-Andy

  • Member since
    January 2016
  • From: A Galaxy Far, Far Away
Posted by Hunter on Saturday, December 23, 2017 9:24 PM

OUTSTANDING JOB Doug!! Looks great! Yes

Hunter 


  • Member since
    November 2008
  • From: Central Florida
Posted by plasticjunkie on Sunday, December 24, 2017 10:07 AM

Outstanding finish DougBeer

Love the look of the nmf tank.

Can't wait to start on my Dora.

 GIFMaker.org_jy_Ayj_O


Too many models to build, not enough time in a lifetime!!

  • Member since
    December 2002
  • From: Bury St Edmunds, Suffolk, England
Posted by Bish on Sunday, December 24, 2017 11:27 AM

So you should be Doug, very nicely done. I do like that drop tank, don't often see NMF on German subjects and it looks good with the camo aircraft, going to have to do that on myself on somthing.

I am a Norfolk man and i glory in being so


On the bench: Airfix 1/72nd Harrier GR.3/Fujimi 1/72nd Ju 87D-3

  • Member since
    October 2008
  • From: Georgia
Posted by Rigidrider on Sunday, December 24, 2017 12:58 PM

Wow... TJ, PJ, AG, MC, Rooster, Hunter... Thank you for your kind words... Like I've said before, this is a heck of a good bunch of guys, and many of us have been in Group Builds together before. and I am honored to build with such a great group of folks.

Well Jack, I am sure if anyone can do honor to the wurger, it'll be you. looking forward to it!

Bish, Yeah, I figured that maybe towards the end that they no longer bothered to paint them, They just tried to get them into service asap. I have seen pictures where they were so badly worn that they tooked NMF, but were painted at one time.

Take care all!

Doug

When Life Hands You A Bucket Of Lemons...

Make Lemonade!

Then Sell It Back At $2 Bucks A Glass...

  • Member since
    July 2014
Posted by modelcrazy on Monday, December 25, 2017 11:55 AM

Rooster,

I will be ready to start the Hasegawa 1/72 JV-44 FW-190D as soon as I can set up my bench and find some instructions for it to replace the ones I lost.

Steve

Steve

Building a kit from your stash is like cutting a head off a Hydra, two more take it's place.


http://www.spamodeler.com/forum/

  • Member since
    April 2005
  • From: Australia
Posted by taxtp on Monday, December 25, 2017 3:41 PM

That's turned out super well Doug, congrats to you. It's how a 190 should look.

Here's how a 109 shouldn't look, Hasegawa 109E-7 1/72. Hope you like it, it's taking me some time to get used to it. It helps to build me a diverse collection of 109s though.

I think I have some more entries to come in this GB, I'm really enjoying it so far.

Cheers

Tony

I'm just taking it one GB at a time.

  • Member since
    December 2002
  • From: Bury St Edmunds, Suffolk, England
Posted by Bish on Monday, December 25, 2017 3:59 PM

Thats a nice looking 109 there Tony, interesting to see it with those markings.

I am a Norfolk man and i glory in being so


On the bench: Airfix 1/72nd Harrier GR.3/Fujimi 1/72nd Ju 87D-3

  • Member since
    April 2006
  • From: ON, Canada
Posted by jgeratic on Monday, December 25, 2017 6:26 PM

Tony, excellent looking build. Yes

Looks very vibrant, and I like how the colours also double (unintentionally of course) for the holiday season.

regards,

Jack

  • Member since
    September 2014
Posted by rooster513 on Tuesday, December 26, 2017 8:16 AM

That 109 came out awesome Tony! Thanks for another great addition to the GB. Would be glad to have you back for another!

-Andy

  • Member since
    September 2014
Posted by rooster513 on Tuesday, December 26, 2017 8:28 AM

Wow...the front page is really starting to come together with all these completed builds. Thanks for the support you have all given this GB so far!

On that note, I was finally able to finish up my 190 over the weekend. I'm really not happy with the major silvering I got on the white crosses but no matter what I did I couldn't seem to get them to snuggle down. Which is a shame because I'm pretty happy with the rest of it. Here are a couple of pics...

I've already got a start on my next contribution to the GB...a 1/48 190 from Eduard and should have some pics up soon for that one!

-Andy

  • Member since
    April 2006
  • From: ON, Canada
Posted by jgeratic on Tuesday, December 26, 2017 9:40 AM

Andy, really super nice job on that. Yes

Occasionally I get some silvering where there is large clear areas.  As a last resort, I just hand paint the surface colour over top to hide it, and then spray another finish cote to tie it all together.

regards,

Jack

  • Member since
    November 2008
  • From: Central Florida
Posted by plasticjunkie on Tuesday, December 26, 2017 9:55 AM

Rooster

I hear your pain and sometimes it happens to me regardless but Solvaset seems to kill most or all of the silvering. If it shows up after the decals are dry, I use a new blade to lightly slice along the inside cross lines and re apply Solvaset to let it get under the clear film. If that doesn't work then post it notes masks the area and the air brush is used to paint and blend over the affected spots.

The silvering is not visible in the pictures but shows up when looking at the model specially at certain angles.  

 GIFMaker.org_jy_Ayj_O


Too many models to build, not enough time in a lifetime!!

  • Member since
    September 2014
Posted by rooster513 on Tuesday, December 26, 2017 10:01 AM

Thanks Jack and PJ! I never thought about hitting it with the camo colors again. I may have to get that a try. Thanks again!

-Andy

  • Member since
    April 2005
  • From: Australia
Posted by taxtp on Thursday, December 28, 2017 4:21 PM

Andy, I really like the look of your 190, the silvering isn't obvious. I also hit it with the camo colours to cover any silvering that I couldn't get rid of. I usually brush some Future over that then flat coat the whole model, to make sure you can't pick any difference in colour. For very minor silvering, I've been know to do a little paint chipping just in that spot too :)

I'm finding ways to sneak another 109E into my schedule. THis time I'm having another go at the Weekend Madness GB, but with this kit, finished as Marseille's 109E-7 trop. I'll cross it over here. It's almost a relief to actually build a German 109, ha ha.

Cheers

Tony

I'm just taking it one GB at a time.

  • Member since
    December 2002
  • From: Bury St Edmunds, Suffolk, England
Posted by Bish on Thursday, December 28, 2017 4:28 PM

Look forward to seeing that one Tony. I had not spotted it included marseilles aircraft, i am not doing that kit for this GB, but when i get to i plan on doing White 12. I think i might have to grab another and do the Trop version as well.

I am a Norfolk man and i glory in being so


On the bench: Airfix 1/72nd Harrier GR.3/Fujimi 1/72nd Ju 87D-3

  • Member since
    April 2005
  • From: Australia
Posted by taxtp on Friday, December 29, 2017 4:11 PM

Cheers Bish.

I said it was Marseille's machine from memory, but I've just checked the instructions and it doesn't say that. I must have got my wires crossed. In the end I just wanted a trop E-7 in that camo scheme, so it doesn't matter to me.

The Tamiya kit is very well engineered, the nicest of the 109E's that I've built so far.

Here's the progress so far

Cheers

Tony

I'm just taking it one GB at a time.

  • Member since
    November 2008
  • From: Central Florida
Posted by plasticjunkie on Friday, December 29, 2017 5:08 PM

Your Emil is shaping up great Tony.

I finally started on my Dora last night so here is the box image:

I will be doing Oberstleutnant Gerhard Michalski's Dora from Stab/JG4 which has a super groovy mottling scheme.

Got the pit ready for some paint.

Hasegawa gives you the option of closed or open engine vents so open they will be. I used the UMM razor saw to clean up the separations.

I also have the engine plug assembly partially together and ready for paint. This is partially visible thru the undercarriage bay and looks ok but I will be adding more wiring and plumbing to make it look busier. I was hoping for a simple OOB build but I think the fun is just beginning.

I usually don't use the pilot figure but darn, this one is VERY nice with excellent details and think it's a special feature of this particular kit issue. I did use the UMM scriber to undercut some strap and uniform details so the washes will settle better.

I grabbed this kit on ebay a while back for a really great price with free shipping and has the Eduard pit detail set and brass cannons included. Hasegawa has done a great job with the pit and the IP details so a pe replacement is an overkill in this case so I will use the Eduard set on another future build.

 GIFMaker.org_jy_Ayj_O


Too many models to build, not enough time in a lifetime!!

  • Member since
    June 2010
Posted by 5-high on Saturday, December 30, 2017 2:39 PM

Wow..guys Wow

There's alot of cool builds going on ..plasticjunky I know what you mean about the p.e set .you'd have the look down and hard to see all that ...plus like you said the kit p.i looks fine as is .I too did not use my set ..im home finally so now I'm able to get some long awaited bench time ..i have a lot to cache up on the D-9..and i still haven't started on the bucherbird yet ..as previously mentioned ill submit some wip picks to the form 

Wishing all at finescale forum ..a happy New Year!!!Toast

  • Member since
    April 2005
  • From: Australia
Posted by taxtp on Saturday, December 30, 2017 5:03 PM

That's really nice work PJ.

Here's the latest on my 1/72 Bf 109E-7 of  2./JG27

I'll try to take you through the sequence.

Primed.

White fuselage stripe painted.

Whilst the white fuselage stripe had some drying time, I masked the canopy. I used half of an Eduard masking set I had left over, and did the rest the old fashioned way with tape and masking fluid.

Preshading

RLM 79 Sandy Brown

Masked it

RLM 76

 I tried to apply the mottle in the same pattern as the diagram. It's not perfect.

Cheers

Tony

I'm just taking it one GB at a time.

JOIN OUR COMMUNITY!

Our community is FREE to join. To participate you must either login or register for an account.

SEARCH FORUMS
FREE NEWSLETTER
By signing up you may also receive reader surveys and occasional special offers. We do not sell, rent or trade our email lists. View our Privacy Policy.