SEARCH FINESCALE.COM

Enter keywords or a search phrase below:

Pride of the Luftwaffe GB

42443 views
1268 replies
1 rating 2 rating 3 rating 4 rating 5 rating
  • Member since
    January 2013
  • From: Athens, Greece
Posted by Zvezda1980 on Monday, October 15, 2018 9:41 AM

Dwayne: Excellent result, I love it

LA: I often stick and remove the tapes several times on a clean surface, to weaken their adhesive capacity. Where is the damage exactly (it is not clearly shown in the photo)?

  • Member since
    April 2014
  • From: Australia
Posted by lostagain on Monday, October 15, 2018 6:32 AM

Dwayne, the 109 looks great. Certainly got a great result with a tiny kit, could not believe it is 1/72. Nice level of weathering and very fine framing on the cockpit.

Zvezda, I like the mottle effect you have got going there. Great finishing on your 190, looking forward to the weathering stages.

Brandon, super work with a difficult scheme. The squiggles have come up so well. Hope the migraine stays well away.

I have been getting some more colour down. I got the first colour coat onto the 190, but it is not intense enough and definitely not glossy enough. I will have to sand it down a bit and recoat with a thinner coat.

On the Beetle, the green coat went on nicely, but when I took the tamiya tape off the orange, it has attacked the paintwork and I am not sure how to proceed. I left the orange to dry for six days before putting the tape on too. You can see it in the top photo, very frustrating.

  • Member since
    September 2016
  • From: Albany, New York
Posted by ManCityFan on Saturday, October 13, 2018 9:46 AM

Zvezda, your 190 is looking sharp!  Lovely decal work.


So I am calling my 109 done.  Here are the pics:

 IMG_0905 by Dwayne Munk, on Flickr

 IMG_0906 by Dwayne Munk, on Flickr

 IMG_0903 by Dwayne Munk, on Flickr

 IMG_0911 by Dwayne Munk, on Flickr

 IMG_0915 by Dwayne Munk, on Flickr

 IMG_0912 by Dwayne Munk, on Flickr

 IMG_0913 by Dwayne Munk, on Flickr

Thanks for looking.

Rooster, thank you for hosting the group build.  This was a fun kit for a great subject.  There are some goofs, but for my skill level and experience, and am overall pretty pleased with how this came out.  I like the first pic, the 3/4 view for the done picture on the front page.

Dwayne or Dman or just D.  All comments are welcome on my builds. 

  • Member since
    September 2014
Posted by rooster513 on Friday, October 12, 2018 10:18 AM

BK - That is looking really good! Looking forward to seeing it all wrapped up!

Zvezda - Those decals came out great! Really nice work.

-Andy

  • Member since
    January 2013
  • From: Athens, Greece
Posted by Zvezda1980 on Thursday, October 11, 2018 5:37 PM

On with the build, at a drunken snail's pace, I applied a coat of clear gloss and started applying decals. Since I have apparently become rusty/carelles, I destroyed the port  balkenkreuz (part of which was stuck on the fuselage irreversibly) as well as the corresponding swastika (I had my day of wrath with the German insignia), so I used some aftermarket decals available as replacements.


  • Member since
    January 2013
  • From: Athens, Greece
Posted by Zvezda1980 on Thursday, October 11, 2018 5:26 PM

SilentBob: your job is crisp and excellent, with a very nice mottling. You made your shelf and yourself happy. And indeed the kit is a joy to build. One question, should the number (7) cover the smaller (blue) stencil on the starboard site, or vice versa?

Dwayne: nice little 109 you made. Mottles can be tricky on such scales. Sometimes (when I am lazy usually) I have experimented with pastels over a flat coat with a cropped-hair thin brush.

Brandon: your painting is very nice and your squiggles are totally amazing! You should indulge in this PITA, you surely motivated me in trying it out on a 1/72 He-111 in the very near future. RLM guys were nuts!

John: That's a sheer joy to watch, I consider these paint works to be the most difficult of all, with all these definite lines & colors. If that was a 2 seater it would be a lady catcher on a Saturday night Wink

lostagain: you are a really thorough builder, this is smooth as silk!


  • Member since
    June 2014
Posted by BrandonK on Tuesday, October 9, 2018 9:13 AM

LA, the 190 looks to be ready for some camo. And I'm curious what color the VW is going to be. Those two are going to look really good together.

BK

On the bench:

A lot !! And I mean A LOT!!

2024 Kits on deck / in process / completed   

                         14 / 5 / 2  

                              Tongue Tied

  • Member since
    September 2016
  • From: Albany, New York
Posted by ManCityFan on Tuesday, October 9, 2018 8:16 AM

Looking really good, BK!  I like that camo scheme.  Sorry about the migraine.  You are very near the finish line.


Panel line wash is done on my 109, so just need to flat coat and a few finishing details, like putting the tail wheel back on since I managed to knock it off while wiping down the back wings.  Seems like a kit isn't done until I knock something off.  LOL.

Dwayne or Dman or just D.  All comments are welcome on my builds. 

  • Member since
    June 2014
Posted by BrandonK on Monday, October 8, 2018 5:59 PM

I had hoped to have this done this weekend, but one of my 3 day migrains set in and that ended that. So, anyway, here is where I sit. The decals are done and the flat coat is one and pin washed. I have some small paint work to do and a touch more weathering, then final assembly. I will have this done in time, hopefully this week. Fingers crossed.

BK

On the bench:

A lot !! And I mean A LOT!!

2024 Kits on deck / in process / completed   

                         14 / 5 / 2  

                              Tongue Tied

  • Member since
    April 2014
  • From: Australia
Posted by lostagain on Saturday, October 6, 2018 9:44 PM

Thanks Dwayne, got a bit further with some gloss white on the 190:

And the first bits of colour on the VW, not a great photo though

  • Member since
    September 2016
  • From: Albany, New York
Posted by ManCityFan on Thursday, October 4, 2018 9:12 PM

Hey Zvezda, that paint work is well done!  Mottling looks great!  Take care of that hand.

LA, good progress there.  I am always happy when all that prep work is done and you can get some paint work done.  Nice clean build!

Dwayne or Dman or just D.  All comments are welcome on my builds. 

  • Member since
    April 2014
  • From: Australia
Posted by lostagain on Thursday, October 4, 2018 7:27 PM

Hi Zvezda,

hope the hands is coming along well, gotta watch out for the Spitfires...

Very neat job on the camouflage, the mottling is great, must try it one day...

My 190 is just about finished prep, happy with the filling of panel lines and priming, so ready to go forward.

And I have got a light grey undercoat on the VW and other bits and pieces

  • Member since
    September 2011
  • From: Milaca, Minnesota
Posted by falconmod on Thursday, October 4, 2018 11:59 AM

I always the added bits,  like the brake hoses, great job!  love the camo.  I really like doing the speckling on 190's

John

On the Bench: 1/72 Ki-67, 1/48 T-38

1/144 AC-130, 1/72 AV-8A Harrier

  • Member since
    September 2014
Posted by rooster513 on Thursday, October 4, 2018 11:46 AM

Looking fantastic Zvezda! That is a very clean and well done camo job!

-Andy

  • Member since
    January 2013
  • From: Athens, Greece
Posted by Zvezda1980 on Thursday, October 4, 2018 7:46 AM

Hi to everyone. After vacation and a burn accident at work, that left one hand temporary out of service (let's say I was shot up by Spitfires, after returning from my R&R leave), I proceed with the build. All the fantastic works and models I see in this GB were surely an inspiration to carry on (thanks and thumps up to all).

Very briefly:

Canopy was masked with the aid of Eduard's masks + tamiya tape.

Lower surfaces were painted with Gunze RLM76 light blue.

Upper surfaces were painted the typical RLM 74/75 camo. RLM 75 came straight from Gunze . For the RLM 74, a mix of 1 x neutral gray + 3 x RLM 02 was used (TAMIYA). All painting & mottling was done free hand with a Grex dual action airbrush.

Lower engine cowling was masked & painted with Gunze RLM 04 yellow.

JG.1 fuselage band was masked & painted with Gunze RLM 23 red. All colors are acrylics.

Landing gears were partially assembled and a hydro line was added in each from lead wire (0,2mm).

Next will be gloss varnish & decals and I hope to catch the deadline.

PS

Lostagain: the verticality rig for the firewall was the plastic cap of an aftershave (not too scientific, but happened to be on the desk).


  • Member since
    April 2014
  • From: Australia
Posted by lostagain on Monday, October 1, 2018 6:58 AM

Looking great there Dwayne, not long to go now!

  • Member since
    February 2014
  • From: Michigan
Posted by silentbob33 on Sunday, September 30, 2018 12:54 PM
Looks really good Dwayne! Hard to tell from looking at it that it's 1/72

On my bench: Academy 1/35 UH-60L Black Hawk

  • Member since
    September 2003
  • From: Northern hemisphere - most of the time-
Posted by blkhwkmatt on Sunday, September 30, 2018 8:18 AM

Dwayne, your 109E is looking good.  Looks like the decals have settled down nicely. Thanks for sharing.

>matt

Quidquid latine dictum sit, altum videtur!!! - Anything said in Latin sounds profound!


  • Member since
    September 2016
  • From: Albany, New York
Posted by ManCityFan on Friday, September 28, 2018 9:20 PM

Latest update.  Gloss coat and on and decals added.

 IMG_0892 by Dwayne Munk, on Flickr

 IMG_0891 by Dwayne Munk, on Flickr

 IMG_0893 by Dwayne Munk, on Flickr

 IMG_0894 by Dwayne Munk, on Flickr

So just a few sessions with decal solvent to see if I can get the decals to settle into the panel lines, a little painting, a few odds and ends, and I will be nearly done.  Clear and flat coats, of course, and some light weathering.

I am really happy with how the decals came out on this kit.  Decals have been a problem area for me on past kits, but these went down very nicely, and I was able to shift them to where I wanted them to be without any issues. 

Thanks for looking.  I am pretty confident now that I can get this done by the deadline.  Big Smile

Dwayne or Dman or just D.  All comments are welcome on my builds. 

  • Member since
    September 2014
Posted by rooster513 on Monday, September 24, 2018 12:32 PM

Dwayne - That paint work is coming along nicely!

BK - Awesome work on that scheme. Must have taken some patience!

falconmod - Really nice finish on the 190! I'll get you added to the front page shortly!

lostagain - That's coming along nicely! It's always worth the extra effort up front to eliminate all those seams:)

-Andy

  • Member since
    April 2014
  • From: Australia
Posted by lostagain on Saturday, September 22, 2018 4:50 PM

Hello again Dwayne, nice work on the 109 and looks like you should finish in time. It is such a pill trying to get a good seal around knobbly bits like the air intakes. And the mottling looks good to me – I am not brave enough to try it yet – as you will see!
And if I am not brave enough for mottle, imagine what BK’s scheme would do to me! Take my hat off - that is great work of a tough scheme.
John, the A5 looks great, love a bit of colour on a bird and that is great plumage!
All my work so far is prep work, the finish is the focus of this build for me.
First up the lower wing was bent at a weird angle – from being stored in a bag not a box. Had to splint it off the top of the wing to get it to come together.
 
Gave it a shot of Tamiya primer to check on the seams, found I had missed plenty so more filling with sanding to come…

  • Member since
    September 2016
  • From: Albany, New York
Posted by ManCityFan on Friday, September 21, 2018 10:04 PM

John, that 190 is awesome!  Love the color scheme.  Really well done. 

Dwayne or Dman or just D.  All comments are welcome on my builds. 

  • Member since
    September 2011
  • From: Milaca, Minnesota
Posted by falconmod on Friday, September 21, 2018 9:34 AM

Thanks also for the kind words,  always feels good when your happy with the results. Finding out I do not like the hard metal PE for seat belts, will get brass if not the colth or paper for the next time.

Those squiggly line camo jobs scare me,  I have a ju-88 I think that has that scheme for it and I'm not sure I'll ever be ready to paint that.   

yours looks great!

John

On the Bench: 1/72 Ki-67, 1/48 T-38

1/144 AC-130, 1/72 AV-8A Harrier

  • Member since
    June 2014
Posted by BrandonK on Friday, September 21, 2018 9:06 AM

John, that 190 looks SICK ! I love that scheme. Well done.

Thanks for the kind words gentlemen, I appreciate it. I about pulled my hair out painting that one.

BK

On the bench:

A lot !! And I mean A LOT!!

2024 Kits on deck / in process / completed   

                         14 / 5 / 2  

                              Tongue Tied

  • Member since
    February 2014
  • From: Michigan
Posted by silentbob33 on Friday, September 21, 2018 9:01 AM

Looks like there's been quite a bit going on in here...

Dwayne, the paint looks pretty good to me.  I know what you mean about tip drying, happens every single time I try to spray acrylics.  

Brandon that camo looks awesome, and great tip on using the clear gloss to seal masking jobs.  I'm going to have to try it on my next build as I usually have that problem.

Falconmod I really like your 190, I like the more colorful schemes.

On my bench: Academy 1/35 UH-60L Black Hawk

  • Member since
    September 2011
  • From: Milaca, Minnesota
Posted by falconmod on Friday, September 21, 2018 7:45 AM

Done with my FW190 A-5.  I may have to dirty it up just a little more.

John

On the Bench: 1/72 Ki-67, 1/48 T-38

1/144 AC-130, 1/72 AV-8A Harrier

  • Member since
    September 2016
  • From: Albany, New York
Posted by ManCityFan on Thursday, September 20, 2018 12:35 PM

Hey BK, I think the scheme looks good.  That being said, I totally get what you are saying about the squiggles.  That is pretty advanced spraying, and I would think, tough to replicate what you have in your head as to what it is supposed to look like.

I think you pulled it off well!


Dwayne or Dman or just D.  All comments are welcome on my builds. 

  • Member since
    June 2014
Posted by BrandonK on Thursday, September 20, 2018 11:57 AM

I finally had some time of late to make some progress. I am now just about ready for decals. I painted this twice. The camo came out great each time, but the squiggly pattern over that was another matter. The first attempt was a total failure and I stopped about 3/4 through it and repainted the whole kit. The second attempt was better, but not as nice as I would have hoped. Alas, I can live with it. Needless to say I will NOT be rushing out to do another pattern like this anytime soon; it's a royal PITA.

Here's where I stand atm, hopefully decals done this weekend.

BK

On the bench:

A lot !! And I mean A LOT!!

2024 Kits on deck / in process / completed   

                         14 / 5 / 2  

                              Tongue Tied

  • Member since
    June 2014
Posted by BrandonK on Wednesday, September 19, 2018 11:07 PM

D, that 109 looks really good. If you wanna avoid bleed through, spray some gloss clear along the tape line, then paint your color and you will never have that happen again. Again, it looks really good.

BK

On the bench:

A lot !! And I mean A LOT!!

2024 Kits on deck / in process / completed   

                         14 / 5 / 2  

                              Tongue Tied

  • Member since
    September 2016
  • From: Albany, New York
Posted by ManCityFan on Wednesday, September 19, 2018 6:21 PM

Been a while since I updated, and some work has been done...so here goes:

My first shot at the camo:
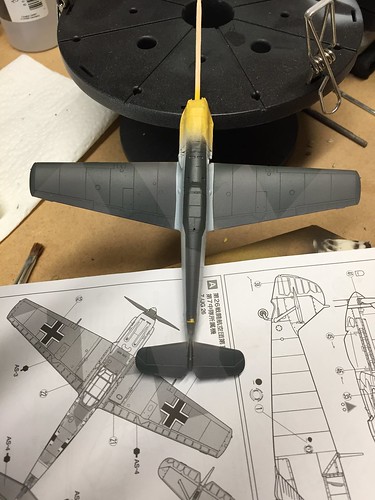
 IMG_0876 by Dwayne Munk, on Flickr

The violet-gray was too dark, and the the masking didn't look right...not close enough to the wing root. so..
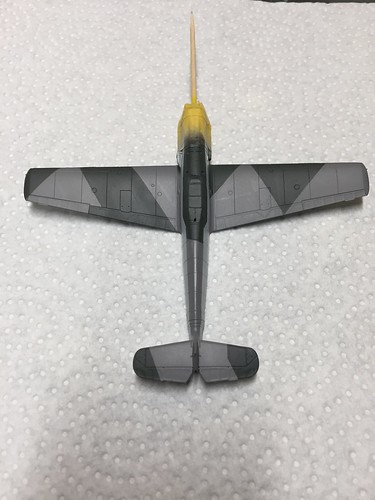
 IMG_0878 by Dwayne Munk, on Flickr

Better.

Side shot
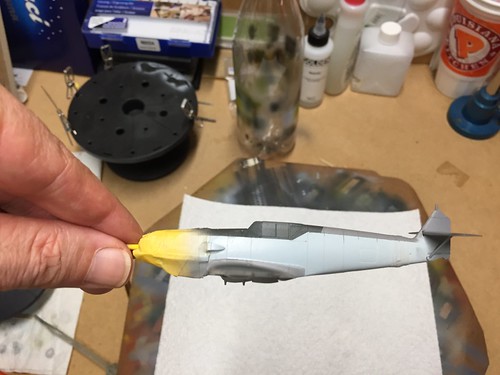
 IMG_0880 by Dwayne Munk, on Flickr

Mottling added.  Thought it came out too dark, so shot a light coat of lichtblau to dull it down a bit.  Not terribly happy with the mottling on this one.  Used Vallejo Model Air, and had a really hard time with tip dry.
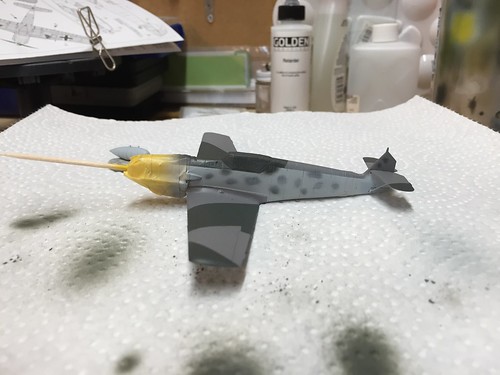
 IMG_0883 by Dwayne Munk, on Flickr

Bottom shot:
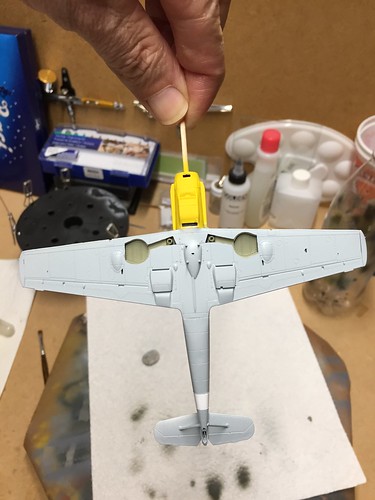
 IMG_0887 by Dwayne Munk, on Flickr

Where she stands today:
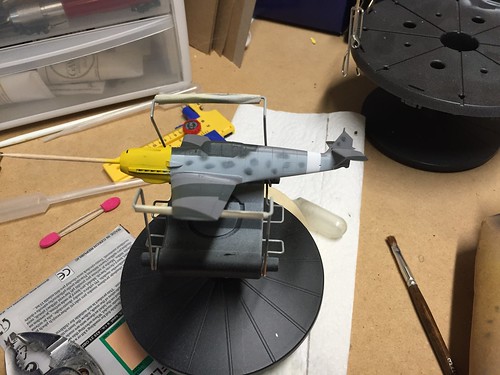
 IMG_0888 by Dwayne Munk, on Flickr

The masking of the cowl didn't work out as well as I was hoping.  Had some gray bleed under the tape, so I have some touch up to do, but then will shoot or brush the gloss coat for decals.  Hopefully will have some updates soon.  Coming down to the wire to get this done on time.

Dwayne or Dman or just D.  All comments are welcome on my builds. 

JOIN OUR COMMUNITY!

Our community is FREE to join. To participate you must either login or register for an account.

SEARCH FORUMS
FREE NEWSLETTER
By signing up you may also receive reader surveys and occasional special offers. We do not sell, rent or trade our email lists. View our Privacy Policy.