SEARCH FINESCALE.COM

Enter keywords or a search phrase below:

Shelf of Doom GB II - 2018

18352 views
377 replies
1 rating 2 rating 3 rating 4 rating 5 rating
  • Member since
    October 2009
Posted by JacknewbIII on Tuesday, May 1, 2018 11:29 PM

Bish the diorama looks awesome!!

I  decided I better make sure I could recover the mess the body was in before I started on any other parts of the kit as I have been having some struggles with the plastic lately Sad. Anyhow I think she looks good to go after more time sanding than I wan to discuss. I am trying the brake fluid method next time! I will be back with a motor on a chasis.

  • Member since
    April 2005
  • From: Australia
Posted by taxtp on Tuesday, May 1, 2018 8:00 PM

Hi Bish,

Magnificent work on the Ostwind dio, I think it's come up really well, and much better than having a damaged model on the shelf. COngrats on being the first to finish a build. I've updated page one. I've added your Tiger I and Schwimmwagen dio to the roster, please let me know if it's not right.

Hi Eric

Good to see you've started on the Hawk. I'd love to participate in or run a Matchbox GB at some stage.

Hi Bruce 

Your type 4 looks suitably toned down, I like that wash. What did you use for it, as I may use the same in future.

Hi Griffin

Your 113 complete with Ayatollah poster is looking authentic. I'm looking forward to seeing it in its completed state.

Hi John

What scale is your Esci Mirage ? I'm guessing 1/48. Anyway I've added it to the roster. Nice job on the paint for it and the egg plane.

Cheers

Tony

I'm just taking it one GB at a time.

  • Member since
    May 2013
  • From: From the Mit, but live in Mason, O high ho
Posted by hogfanfs on Tuesday, May 1, 2018 5:52 PM

A little progress on the Type 4. I applied the decals, and added a filter of Grey-Brown from Wilder. I did this to try to knock down the contrast of the camouflage. 

Next will be a dot filter. Then a pin wash. More to come...

 Bruce


 On the bench:  1/48 Eduard MiG-21MF

                        1/35 Takom Merkava Mk.I


  • Member since
    May 2013
  • From: From the Mit, but live in Mason, O high ho
Posted by hogfanfs on Tuesday, May 1, 2018 5:44 PM

@Bish,

You would never tell that Ostwind took a dive, very well done re-assembling and the Dio looks fantastic. I do have to say this, I've been following your work for about 5 years now, and your figures get better with each dio you complete. Bravo!

And, as Steve said, I'm looking forward to what you do with the Tiger.


@Griffin,

I am going to look into those Evolution figures, the detail is fantastic. 

 Bruce


 On the bench:  1/48 Eduard MiG-21MF

                        1/35 Takom Merkava Mk.I


  • Member since
    July 2014
Posted by modelcrazy on Tuesday, May 1, 2018 4:38 PM

Nice looking dio Bish, looking forward to seeing that Tiger.

Steve

Building a kit from your stash is like cutting a head off a Hydra, two more take it's place.


http://www.spamodeler.com/forum/

  • Member since
    December 2002
  • From: Bury St Edmunds, Suffolk, England
Posted by Bish on Tuesday, May 1, 2018 3:11 PM

Thanks Griffin. The eagles are Archer dry transfers, also used them for the collar and should insignia and the badge on the peaked cap. Tricky to apply but look much better than i could paint.

I am a Norfolk man and i glory in being so


On the bench: Airfix 1/72nd Harrier GR.3/Fujimi 1/72nd Ju 87D-3

  • Member since
    May 2015
Posted by Griffin25 on Tuesday, May 1, 2018 3:04 PM

Bish, great job on resurrecting that Ostwind. Well laid out simple scene. Looks great. I have to ask how did you make the eagle badge on their shirts? Is that a decal? Pretty cool. 


Griffin

  • Member since
    March 2017
Posted by Armor_Aficionado on Tuesday, May 1, 2018 2:01 PM

Finally underway on my “shelf queen,” the Hawk 200. 

https://pin.it/bsmeocndfkdtkx


  • Member since
    December 2002
  • From: Bury St Edmunds, Suffolk, England
Posted by Bish on Tuesday, May 1, 2018 1:56 PM

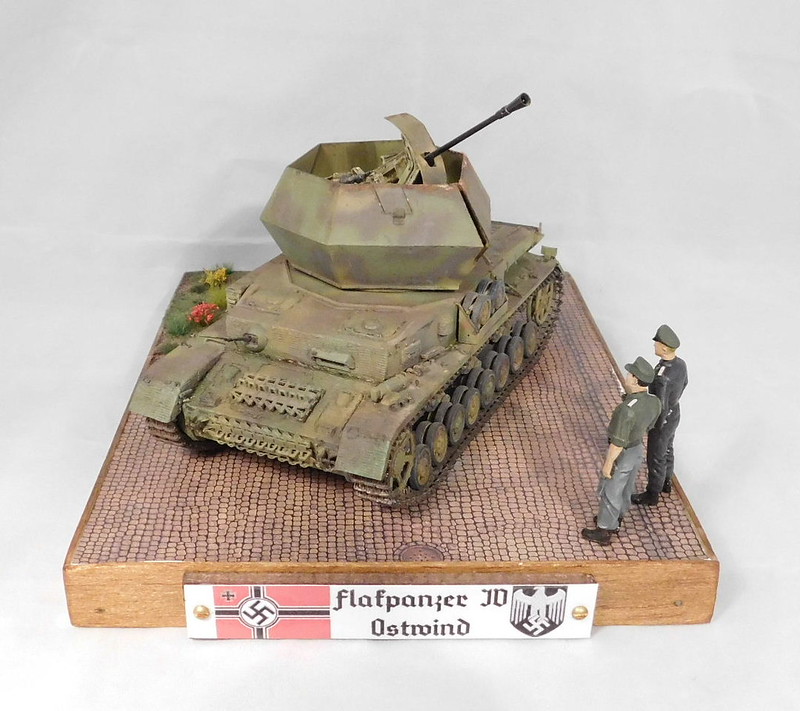
Time for those final pics. Now, don't expect to much from the dio. It was always intended to be a simple one and i decided to keep it that way. Just a couple of officers looking over the prototype vehicle.

First, the Officers. On the left a Dragon plastic figure. One the rigfht a resin Verlinden one made up with parts form a couple of figures in the same set.

And thyen to bring them and the vehicle together. Hopefully you can see the similarity with the box art. That box art is itself based on a photo of the vehicle but on the real thing there is a gun crew in position for the photo. Originally i was going to use some Verlinden resin cobbelstones which would have needed attaching one by one and then painted. But i decided to keep them for another build and got hold of the Verlinden card cobbelstones.

And there you go. Thanks for the excuse i needed to finish this. I have been trying to complete this and my other builds for years now, doing a little bit here and there while working on other stuff. But i just can't see to focus on more then one project and the only way to complete this is just to work on them as a complete build.

Please feel free to use which ever pic you wish. And while i am here, can you put me down for a second build. This is Tamiyas 35th Tiger I Mid production. This was the first kit i stared when i got back to the hobby in 2008. Like the Ostwind, the Tiger was completed and like the Ostwind, it took the dive off the shelf. But fortunatly it was not as badly damaged.

I took the Fruil metal tracks off last week, these had remained in tact, to remove a linkfrom each as they were to long. I got one set on before decideing to take the pics.

The dio should be a bit more interesting as it includes a building and Schwimmwagen. This had also been started and even painted inside for some reason even though i had not finished putting it together.

I plan to put 2 or 3 weeks ashide in August to work on this one. Until then, i look forward to sEeing what the rest of you get up to.


I am a Norfolk man and i glory in being so
 

On the bench: Airfix 1/72nd Harrier GR.3/Fujimi 1/72nd Ju 87D-3

  • Member since
    April 2005
  • From: Australia
Posted by taxtp on Sunday, April 29, 2018 5:55 PM

That really is a nice figure Griffin, thanks for the recommendation.

Good to hear Bish, that's our first model rescued from the Shelf of Doom for the year.

My Airbus is languishing. I want to buils an Australian registered aircraft, I have Ansett Airlines decals in hand but I've ordered Tiger Airways decals a few weeks back. I'd love to use them, but I'm getting impatient.

Cheers

Tony

I'm just taking it one GB at a time.

  • Member since
    December 2002
  • From: Bury St Edmunds, Suffolk, England
Posted by Bish on Sunday, April 29, 2018 1:06 PM

Nick, really nice job on the wash.

I have my Ostwind wrapped up, didn't take as long as i expected. Just need to get some pics and i'll post it up.

I am a Norfolk man and i glory in being so
 

On the bench: Airfix 1/72nd Harrier GR.3/Fujimi 1/72nd Ju 87D-3

  • Member since
    May 2015
Posted by Griffin25 on Sunday, April 29, 2018 12:56 PM

I'm going to add this guy to my diorama with the Hezbollah M113. It's from evolution miniatures. Let me say it is a superb mold with great detail and easy to put together. I highly recommend Evolution Miniatures. They are from Russia not Vietnam as previously stated. They have a big line of figures. 


Griffin

  • Member since
    November 2008
  • From: Far Northern CA
Posted by mrmike on Wednesday, April 25, 2018 9:45 PM
That wash really brought your model to life - lookin' good!
  • Member since
    April 2005
  • From: Australia
Posted by taxtp on Wednesday, April 25, 2018 6:59 PM

keavdog

Too Late to join?  I have one thats been sitting for years.  It's an ancient 1/48 ESCI KFIR I inteded to do in VMFT-401 Aggressor markings.  Somefit issues, but it is a unique addition to my aggressor collection.


Hi John,

Sorry I missed your post until now. Yes, you're very welcome to join. I've added your entry to the roster.

Cheers

Tony

I'm just taking it one GB at a time.

  • Member since
    April 2005
  • From: Australia
Posted by taxtp on Wednesday, April 25, 2018 6:57 PM

Great panel wash Nick. I do like the effect that oils give for tis.

Cheers

Tony

I'm just taking it one GB at a time.

  • Member since
    May 2015
Posted by Griffin25 on Wednesday, April 25, 2018 1:36 PM

 Nick that panel wash came out great. Can I ask what wash and how you applied it? Next time I build a plane I want it to look like that, bud. 


Griffin

  • Member since
    May 2013
  • From: From the Mit, but live in Mason, O high ho
Posted by hogfanfs on Wednesday, April 25, 2018 1:31 PM

Nick, 

The panel wash really turned out well. I like it!

 Bruce


 On the bench:  1/48 Eduard MiG-21MF

                        1/35 Takom Merkava Mk.I


  • Member since
    August 2015
  • From: the redlands Fl
Posted by crown r n7 on Wednesday, April 25, 2018 1:15 PM

did some pannel wash with artist oil paint.


 Nick.

  • Member since
    August 2015
  • From: the redlands Fl
Posted by crown r n7 on Wednesday, April 25, 2018 11:13 AM

Griffin that looks so cool !


 Nick.

  • Member since
    May 2013
  • From: From the Mit, but live in Mason, O high ho
Posted by hogfanfs on Wednesday, April 25, 2018 10:58 AM

Griffin,

The 113 looks great, and that picture of the holy man you added is fantastic. I really like how this build is turning out.

 Bruce


 On the bench:  1/48 Eduard MiG-21MF

                        1/35 Takom Merkava Mk.I


  • Member since
    May 2015
Posted by Griffin25 on Wednesday, April 25, 2018 9:46 AM

I'm getting close to finishing my Hezbollah M113 project. I need to add a few things and weather the sandbags and tracks. I also want to add a figure. I have an Evolution miniatures Arab fighter I want to put together and paint and make a dio with an old base I made a few years ago. First Evolution miniature I've bought. I think they are from Vietnam. I shrank a picture on paint to make the holy man poster.


Griffin

  • Member since
    July 2012
  • From: Douglas AZ
Posted by littletimmy on Tuesday, April 24, 2018 9:16 PM

taxtp
In keeping with last year's GB, I've based the proposed GB badge on someone's real Shelf of Doom.

I like it ! ! !

I havent even started on my "mess" yet..... life just won't leave me alone.

 Dont worry about the thumbprint, paint it Rust , and call it "Battle Damage"

  • Member since
    August 2015
  • From: the redlands Fl
Posted by crown r n7 on Tuesday, April 24, 2018 8:23 PM

Jack next time dip the body in brake fluid .

thank you for your input.


 Nick.

  • Member since
    October 2009
Posted by JacknewbIII on Tuesday, April 24, 2018 5:42 PM

Nick the photo above was before I started sanding. I did start the process last night and discovered it has an extremely thick coat of white followed by a purple, and finally a gold. I spent about an hour wet sanding and it is coming along ok. The detail in the rear where it says Bel Air is destroyed so I am going with some sort of custom hot rod (in my mind). I need to strip the chrome now as well and am studying up on recipes for that now.

I think that Wildcat looks really good. I want to learn to shade like that for sure.

  • Member since
    August 2015
  • From: the redlands Fl
Posted by crown r n7 on Tuesday, April 24, 2018 9:40 AM

Tony I like the badge.

jack cool 57 have you stripped the old paint off yet?

John nice mirage I built that kit way back good luck with landing gear.

The title of this GB is so appropriate. I should of let sleeping dogs lie 1st the paint,2nd the tamiya decals are FUBR!!! the rudder flags broke in a millon little pieces along with one roundel. 3rd no back up set of decals with all the sets I have nooo wildcats. I dug in my decal box with super scale us roundels it not accurate but I try


 Nick.

  • Member since
    September 2011
  • From: Milaca, Minnesota
Posted by falconmod on Tuesday, April 24, 2018 6:32 AM

I forgot to add my very old ESCI Mirage IIIc,  it had been sitting around for 20 years!  half painted,   now I re-painted it and got a resin ejection seat for it,  getting ready to attach the pain-in-the-butt  landing gear.

And got some paint on the egg F-16, mostly gray's so you won't notice much until I get some of the dark shades on.


John

On the Bench: 1/72 Ki-67, 1/48 T-38

1/144 AC-130, 1/72 AV-8A Harrier

  • Member since
    December 2002
  • From: Bury St Edmunds, Suffolk, England
Posted by Bish on Monday, April 23, 2018 4:12 AM

Jack, interesting subject, will be interesting to see what you do with it.

Tony, maybe they just could not decide which way round it should be so playted it safe.

I am a Norfolk man and i glory in being so


On the bench: Airfix 1/72nd Harrier GR.3/Fujimi 1/72nd Ju 87D-3

  • Member since
    December 2002
  • From: Bury St Edmunds, Suffolk, England
Posted by Bish on Monday, April 23, 2018 4:09 AM

Cheers Nick, and thats coming on well, nice job on the underside.

I am a Norfolk man and i glory in being so


On the bench: Airfix 1/72nd Harrier GR.3/Fujimi 1/72nd Ju 87D-3

  • Member since
    December 2002
  • From: Bury St Edmunds, Suffolk, England
Posted by Bish on Monday, April 23, 2018 4:09 AM

Griffin25

I'm still painting and weathering. I made the arabic script by printing it out and cutting it out with a Tamiya knife. Making a stencil. Love that knife. Making some scratch sand bags with super sculpy. Got to pop those suckers in the oven. 


Really like how thats looking Griffin. Very impresive job on the script.

I am a Norfolk man and i glory in being so


On the bench: Airfix 1/72nd Harrier GR.3/Fujimi 1/72nd Ju 87D-3

  • Member since
    April 2005
  • From: Australia
Posted by taxtp on Monday, April 23, 2018 3:34 AM

Jack, you're right, that thing IS trouble. I think they even had trouble with the box, it says it's a 

Coca Cola

1957 Chevrolet

Chevrolet 1957

It deserves to be built, I'm glad you've got plans for it. Welcome aboard. It's also our first car in this GB, although I've got a couple that I might get to later on.

Bish - Thanks for the validation on the GB badge.

Cheers

Tony

I'm just taking it one GB at a time.

JOIN OUR COMMUNITY!

Our community is FREE to join. To participate you must either login or register for an account.

SEARCH FORUMS
FREE NEWSLETTER
By signing up you may also receive reader surveys and occasional special offers. We do not sell, rent or trade our email lists. View our Privacy Policy.