SEARCH FINESCALE.COM

Enter keywords or a search phrase below:

Weekend GB: See you in November!

15660 views
403 replies
1 rating 2 rating 3 rating 4 rating 5 rating
  • Member since
    November 2004
  • From: Galloway,Ohio
Posted by Daddyman on Tuesday, November 27, 2018 9:09 PM

Mopar Madness
Seriously nice job on that hurricane.

Thanks, Chad.

I may have had some issues with paint lifting, paint getting under the masks, and paint everywhere, not to mention the first 2 decals that suffered badly, but I had fun, learned a few things, and now have the motivation to continue actively in the hobby.

No more wondering what I can do or if I should try.

You and everyone else on this group build have provided much needed inspiration and encouragement. I really do appreciate it. 

Now to figure out what to build next for this group build. 

Bill B 2.0

  • Member since
    January 2015
Posted by BrandonD on Wednesday, November 28, 2018 1:03 PM

Hmm, I am probably stuck at home this weekend with nothing to do...

I definitely want to do this, so I'll find something.

-BD-

  • Member since
    June 2008
Posted by lewbud on Wednesday, November 28, 2018 2:02 PM

BrandonD,

Welcome aboard! I have added you to the front page. When you know what you're going to build let us know.

I had planned to start the X-29 Monday after I got off work. I decided instead to finish the Mini before starting something else. I have shelved it for the moment, don't know what I'll do next.

Buddy- Those who say there are no stupid questions have never worked in customer service.

  • Member since
    September 2017
  • From: Netherlands
Posted by Sailing_Dutchman on Wednesday, November 28, 2018 6:34 PM

I began the build of Revell's 1/72 T-80 BV at 9:49 in the morning:

The first thing that I did was to fill the numerous sink holes. They were on almost every ERA brick, and a very large one on the gun:

That is it for now, I will update tomorow.


  • Member since
    March 2008
Posted by Caveman on Wednesday, November 28, 2018 11:34 PM

Wow.  That's alot of low spots to deal with..........

  • Member since
    June 2008
Posted by lewbud on Thursday, November 29, 2018 2:23 AM

SD,

Good luck! I got faith in ya!

Front page is updated with Bill's and Eagle's builds.

Buddy- Those who say there are no stupid questions have never worked in customer service.

  • Member since
    September 2017
  • From: Netherlands
Posted by Sailing_Dutchman on Thursday, November 29, 2018 10:55 PM

I have finaly finished the build:

And have it painted:


  • Member since
    June 2008
Posted by lewbud on Friday, November 30, 2018 3:07 AM

SD,

That's looking good! Do you have any pics of the finished tank?

Buddy- Those who say there are no stupid questions have never worked in customer service.

  • Member since
    September 2017
  • From: Netherlands
Posted by Sailing_Dutchman on Friday, November 30, 2018 11:59 AM

Unfortunatly, I was not able to finish in time, the build took a good bit longer than expected due to all of the filling, the face that the instructions did not match, and there were no guide pins or markings to show where the parts went. I finished most of the painting aroung midnight, and my alarm clock did not go off in the morning. I will still finish this build and will try again with a different subject when I have the time again.


  • Member since
    October 2016
  • From: .O-H-I-O....
Posted by DasBeav on Friday, November 30, 2018 5:02 PM

Well, let's do this. Don't think I've touch a model since July. Maybe this will kickstart me to finish two SoDs. My kit is a Hobby Craft 1/48th La-5 Soviet fighter.  

One...two...three...Bake!

 Sooner Born...Buckeye Bred.


  • Member since
    November 2003
  • From: Nashville, TN area
Posted by bobbaily on Friday, November 30, 2018 8:31 PM

I must say that the builds are very impressive-they all look like there's a lot more than 48 hrs invested-I've been following-just haven't posted 'real time'-sorry

I got started this evening-someone early on commented about how we used to pull Weekend Builds as kids-and in my case, it was always a race car (usually a drag racer) painted with Testors square bottle enamal w/brush & tube glue....so I picked an AMT Mustang Funny Car-built one similar 'back in the day'


Not a large part count-with some TLC it could be made into a really nice build-but not this weekend-will be following the instructions and minimizing painting.  I was able to get the body parts painted with Tamiya Primer, Testors One Coat Lacquer Gold & Clear Coat-hope to get the details on in the am followed by another coat of Clear tomorrow night.  Have the engine mostly together and parts primed, hope to paint in the am.                            

Bob


  • Member since
    June 2008
Posted by lewbud on Friday, November 30, 2018 8:48 PM

SD, 

When you get it finished, post the pics. I'll file it under refused to quit. It will have some company with my Mini.

DasBeav and Bob,

Definitely looking forward to watching these come together.

Buddy- Those who say there are no stupid questions have never worked in customer service.

  • Member since
    July 2006
  • From: San Francisco Bay Area
Posted by bufflehead on Friday, November 30, 2018 9:15 PM

bobbaily

I must say that the builds are very impressive-they all look like there's a lot more than 48 hrs invested-I've been following-just haven't posted 'real time'-sorry

Yeah, same here....been busy with other things, but I'm ready to get my build on!

Tamiya 1/35 Type 95 Ha-Go ready to start at 7:05 PM PST, Friday Nov. 30.  Let the 48 hr countdown begin!

Ernest

Last Armor Build - 1/35 Dragon M-26A1, 1/35 Emhar Mk.IV Female


Last Aircraft Builds - Hobby Boss 1/72 F4F Wildcat & FW-190A8


  • Member since
    October 2016
  • From: .O-H-I-O....
Posted by DasBeav on Saturday, December 1, 2018 1:14 AM

Finished the evening way behind schedule. I spent way too much time on the pit. I put a coat of future and a wash. And a little chipping. WTH! Why??? I have to get paint done between the Sooners game and the start of the Buckeyes. Should of picked another weekend. If they both lose I am smashing the #%*&*@ anyways.

 Sooner Born...Buckeye Bred.


  • Member since
    July 2006
  • From: San Francisco Bay Area
Posted by bufflehead on Saturday, December 1, 2018 2:50 AM

Okay, 5 1/2 hours in and about 80% of the assembly is done.  Just the little stuff to add on tomorrow (bogies will be painted separately and installed later).  I think I'm right on schedule so far!

 I'm calling it a night!  Build will resume first thing in the AM!

Ernest

Last Armor Build - 1/35 Dragon M-26A1, 1/35 Emhar Mk.IV Female


Last Aircraft Builds - Hobby Boss 1/72 F4F Wildcat & FW-190A8


  • Member since
    October 2016
  • From: .O-H-I-O....
Posted by DasBeav on Saturday, December 1, 2018 5:15 PM

Just finished painting the bottom. It is a really bright VJMA Russian Blue. Also on there pretty thick because I was in a hurry. I have to wait 'til tomorrow morning to finish the top. Off to watch the Buckeyes and hope Georgia wins. Oh, and the Committee hates 'Bama as much as the rest of America. And BTW, is it allowed to PhotoShop the decals in? Asking for a friend.

 Sooner Born...Buckeye Bred.


  • Member since
    July 2006
  • From: San Francisco Bay Area
Posted by bufflehead on Saturday, December 1, 2018 7:01 PM

Right behind you DasBeav!  I like the blue underside of the La-5!

Whew!  I WAS on schedule....who would have thought that it would take most of the day to finish the assembly of this little Ha-Go??  The tank sprues are from Fine Molds, but don't let the name fool you!  The molds are anything but fine!  Lots of flash, mold seams and sloppy fitting parts.  Still with some TLC it can turn into a fine model.

So its 4:45 PM Pacific Time and assembly is finally done and I can get it into the paint booth.  In the pic I removed the roadwheels so I could mask them for painting.

For the camouflage paint job I'm going to use this set from Mr. Hobby.  Its a lacquer based paint so I won't need to primer the model (I hopeHmm).  I've had it for a while so I figure its time it was used!

The vinyl tracks had a bit of twist in them.  To straighten them out I pinned the tracks to a piece of cardboard with a wee bit of stretch and hung them from the ceiling near my wall heater.  It gets pretty warm up there so the gentle heat should help them straighten out.

I need some dinner Smile Burger before tackling the paint job!!


Ernest

Last Armor Build - 1/35 Dragon M-26A1, 1/35 Emhar Mk.IV Female


Last Aircraft Builds - Hobby Boss 1/72 F4F Wildcat & FW-190A8


  • Member since
    June 2008
Posted by lewbud on Saturday, December 1, 2018 8:40 PM

What's that burning smell? Oh yeah, that's DasBeav burning the midnight oil to make sure his plane gets done on time!Big Smile I appreciate the asking, but no. C'mon man you can do this! I got faith in ya!

Buddy- Those who say there are no stupid questions have never worked in customer service.

  • Member since
    June 2008
Posted by lewbud on Saturday, December 1, 2018 8:42 PM

Looking good Ernest!  Just remember, primer is like pie (just not as tasty). There's always time/room for pie.

Buddy- Those who say there are no stupid questions have never worked in customer service.

  • Member since
    March 2008
Posted by Caveman on Saturday, December 1, 2018 11:59 PM

Who says primer isn't tasty?


  • Member since
    July 2006
  • From: San Francisco Bay Area
Posted by bufflehead on Sunday, December 2, 2018 2:12 AM

Ahhh...I'm officially behind schedule!Sad  I wanted to have all the camo painting done and a coat of future applied before the day ended, but all I have is a base coat and the start of the camo.  TBH, I struggled with how to apply the 3 tone camo.  Originally I planned to use Silly Putty as masking for the hard edge camo, but couldn't figure out how to do two colors with it.  All I've ever done was one two tone camo....sigh.  I'm calling it a night and will regroup in the morning.

 and I broke off one of the return roller mounting pegs!!!Angry Bang Head

The primer was a bit tasty though!!Clown


Ernest

Last Armor Build - 1/35 Dragon M-26A1, 1/35 Emhar Mk.IV Female


Last Aircraft Builds - Hobby Boss 1/72 F4F Wildcat & FW-190A8


  • Member since
    July 2014
Posted by modelcrazy on Sunday, December 2, 2018 9:46 AM

Bufflehed, for multicolor camos using Sillyputty you have to think backward. Whatever the last color they sprayed IE yellow, green etc, you spray first. Add the Sillyputty to cover that color, in the typical case of a Japanese tank perhaps the yellow stripes, Then spray the next color, perhaps green. Mask again, over the first masking and complete the process until almost the entire subject is covered. In my case, for my 1/72 Ha Go, I hand painted the yellow stripes but it was so small I could get away with it. Leave the previous mask on and apply more over it for the next color. It's a trip when you remove all of it at once.

I hope this is new information for you and it helps. In your case it looks like a yellow, brown, Lt brown, green sequence

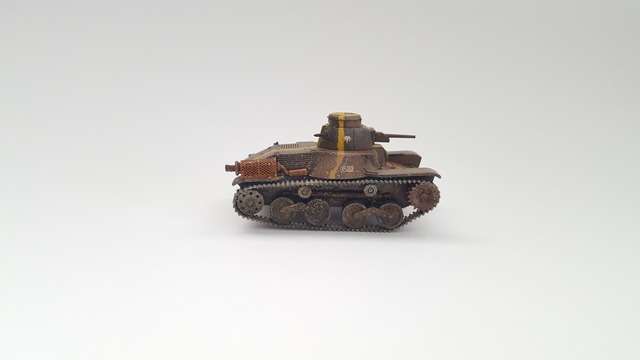
Steve

Building a kit from your stash is like cutting a head off a Hydra, two more take it's place.


http://www.spamodeler.com/forum/

  • Member since
    February 2010
  • From: New Jersey
Posted by 68GT on Sunday, December 2, 2018 11:22 AM

Okay, I have a MisterCraft AH-1G Cobra on the way.  If all goes well I should have it for the week of Christmas that I ended up taking off from work.  It is either a rebox of the Matchbox kit or maybe just a copy.

On Ed's bench, ???


  • Member since
    January 2006
  • From: California
Posted by SprueOne on Sunday, December 2, 2018 11:24 AM

Page-7 and we got Planes, Tanks, and Automobiles.  Looking good

Anyone with a good car don't need to be justified - Hazel Motes


Iron Rails 2015 by Wayne Cassell Weekend Madness sprueone

  • Member since
    October 2016
  • From: .O-H-I-O....
Posted by DasBeav on Sunday, December 2, 2018 11:41 AM

Sailing_Dutchman

Unfortunatly, I was not able to finish in time, the build took a good bit longer than expected due to all of the filling, the face that the instructions did not match, and there were no guide pins or markings to show where the parts went. I finished most of the painting aroung midnight, and my alarm clock did not go off in the morning. I will still finish this build and will try again with a different subject when I have the time again.


Still looks great to me, Dutchman,

 Sooner Born...Buckeye Bred.


  • Member since
    October 2016
  • From: .O-H-I-O....
Posted by DasBeav on Sunday, December 2, 2018 11:52 AM

Things I have learned this weekend.

1. I need new Silly Putty and more of it.

2. Masking and Air-brushing fast leads to a @#$%load of mistakes. IE: over-spray,etc.

3. Modelling fast seems extremely counter-productive, yet still fun.

4. I suck at modelling.

 Sooner Born...Buckeye Bred.


  • Member since
    January 2017
  • From: Colorado Springs
Posted by mawright20 on Sunday, December 2, 2018 12:24 PM
LOL!!! Such modesty, I love it! It's nice to know I'm not the only one!
  • Member since
    November 2004
  • From: Galloway,Ohio
Posted by Daddyman on Sunday, December 2, 2018 2:06 PM

mawright20
LOL!!! Such modesty, I love it! It's nice to know I'm not the only one!
 

Ditto that! 

Bill B 2.0

  • Member since
    July 2006
  • From: San Francisco Bay Area
Posted by bufflehead on Sunday, December 2, 2018 2:21 PM

modelcrazy

Bufflehed, for multicolor camos using Sillyputty you have to think backward. Whatever the last color they sprayed IE yellow, green etc, you spray first. Add the Sillyputty to cover that color, in the typical case of a Japanese tank perhaps the yellow stripes, Then spray the next color, perhaps green. Mask again, over the first masking and complete the process until almost the entire subject is covered. In my case, for my 1/72 Ha Go, I hand painted the yellow stripes but it was so small I could get away with it. Leave the previous mask on and apply more over it for the next color. It's a trip when you remove all of it at once.

I hope this is new information for you and it helps. In your case it looks like a yellow, brown, Lt brown, green sequence


Steve, you are a life saver!!  I knew that was the process, but I must have had brain fog last night after so much time at the bench!!Dunce  This morning I attacked the paint job with renewed vigor using your advice and the work has gone much smoother!  One last application of putty over the green so I can lay the final coat on and the camo is done!

Like DasBeav I realized some things on this build, especially about Silly Putty:

1. Silly Putty is tough to work with!  Took me many attempts to figure out how to manipulate it into the right shapes.

2. Keep your fingers OFF the putty once its on!  Even slight pressure makes it squish out of the shapes you just worked hard to establish!!

3.  Don't let the blob or roll of putty touch a the wrong spot on piece that's already on!

4.  I found two items particular handy with shaping the putty...the rubber part of an eyedropper and a bamboo BBQ skewer. 

5.  I'm not as fast or organized as I think I am!

6.  Go with your instincts.  After the Mr. Hobby khaki base coat I switched to Tamiya Acrylics for the other colors.  The Mr. Hobby paint was tough to spray, not sure why.  I originally planned to mix Tamiya acrylics to match the Mr. Hobby set, but was "swayed" by the idea of using lacquer based paints.  DOH!!

Ernest

Last Armor Build - 1/35 Dragon M-26A1, 1/35 Emhar Mk.IV Female


Last Aircraft Builds - Hobby Boss 1/72 F4F Wildcat & FW-190A8


  • Member since
    October 2016
  • From: .O-H-I-O....
Posted by DasBeav on Sunday, December 2, 2018 4:40 PM

....And with minutes to spare, I consider this build finished! For a cheap little kit I got off Ebay there were no serious fit issues. If I find another one I would build it again. You could easily make it a real nice plane. The bad part was like Dutchman's tank, no guide holes and bad instructions with arrows pointing to general area. The air ducts and prop blades may or may not be off center. I refuse to really look. I have suffered enough disappointment with this kit.

 Sooner Born...Buckeye Bred.


JOIN OUR COMMUNITY!

Our community is FREE to join. To participate you must either login or register for an account.

SEARCH FORUMS
FREE NEWSLETTER
By signing up you may also receive reader surveys and occasional special offers. We do not sell, rent or trade our email lists. View our Privacy Policy.