SEARCH FINESCALE.COM

Enter keywords or a search phrase below:

Ships of the German Flag GB 2020

28144 views
502 replies
1 rating 2 rating 3 rating 4 rating 5 rating
  • Member since
    July 2010
  • From: Tempe AZ
Posted by docidle on Monday, August 31, 2020 11:04 PM

Bish,

Outstanding work so far! Having built this kit I can now say that I wish I had drilled out all of those limber and flood holes and vents. I was trying to get it built as a Christmas gift to my younger brother. After seeing what you’re doing I might have to revisit it and put her in dry dock for an upgrade...

I really want to know who makes the metal periscopes and do they have them for the Revell 1/72 Gato? I REALLY need them for the U-Boat and Gato.

Steve


  • Member since
    December 2002
  • From: Bury St Edmunds, Suffolk, England
Posted by Bish on Monday, August 31, 2020 9:59 AM

Thanks Steve. When i started with the cheek piece i was trying to get it as neat as possable. But when i started filing down around the edge in between the rivets, i realised i was inadvertainly doing some oil canning and it looked better on the rough side. I plan on oil canning the hull anyway, so it short fit in.

This wood deck completly replaces the kit rather than go on top of it. It also has resin hatch parts. For some reason they have not done one for the Type IX, i have the eduard sets but am hoping some one will do a wood deck.

I am a Norfolk man and i glory in being so


On the bench: Airfix 1/72nd Harrier GR.3/Fujimi 1/72nd Ju 87D-3

  • Member since
    July 2014
Posted by modelcrazy on Monday, August 31, 2020 8:20 AM

Looks great Bish, brings back memories of my type IX, it was a lot of fun though. Yes, thinning the plastic on the inside helps immensely to assist in cutting out the holes. The bent PE at the bow adds some great detail. U-boats were just beat to hell during patrols. Every one had dents, dings, oil canning and any other damage you can think of. The sea and salt air, mixed with the pounding of the waves, not to mention the occasional depth charge or bullet hole would change the apperance slightly from when they came off the ways Wink

That represents much work, and now you have the other side to do. I love the tower wood. It looks quite a bit thicker than the Eduard which would represent it better.

That just gave me an idea...a model where one side is new and just out of the yards and the other is beat up after a patrol   I might have to give that some thought.

Steve

Building a kit from your stash is like cutting a head off a Hydra, two more take it's place.


http://www.spamodeler.com/forum/

  • Member since
    December 2002
  • From: Bury St Edmunds, Suffolk, England
Posted by Bish on Monday, August 31, 2020 2:29 AM

Finally time for an update on the U-Boat. I spent the first 2 weeks just working on the port side hull. It was just all drilling and sanding and filling. I am useing the Wolf Pack article by Dougie Martindale and Wink Grise that i downloaded from AMP a few years ago. These guys develope the U-Bras set now sold by WEM that corrects many of the errors on the Revell kit. The artcile also gives good detail on the flood holes on the U-552 along with other Tupe VII's.

So, starting the the front, i cut out the cheack piece and replaced that with the U-Brass part. Also the row of small round holes along the top of the hull were filled and re-drilled. The Revell ones are to big and to far forward. Also filled the 3 holes at the front of the hull as these are to bag and the pattern is wrong. But i have just noticed i still need to finish re-drilling these.

Then the forward portion of the free flooding vents. Over the whole boat, i need to fill 7 holes, drill 11 new ones and alter 2. Also filled and re-drilled the curved line of vents which drain water away from the deck gun.
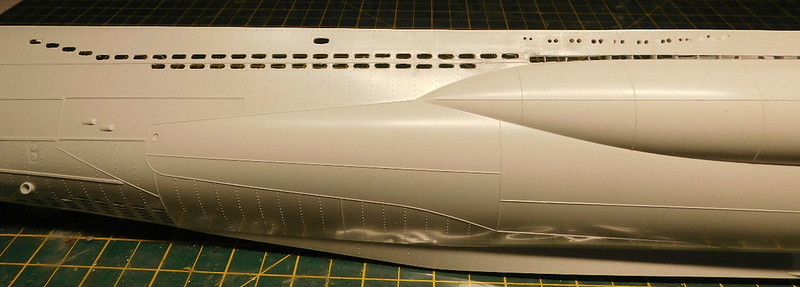
In the middle, the central drainage area, the recess running along the top of the saddle tanks, was cut out and ribs added. The brass part above can either be used as a template or replace the kit area, again, some holes needed filling.

And the rear free flooing vents alng with the 3 vents above the saddle tank. These had to be done twice as i messed up first time. I have left the exhaust as i am not sure if i should drill that or just paint it in. If its drilled, it will need somthing behind it so you can't see straight through.

The holes on the underside can be corrected with a set from Model Brass. But this is pricey and i would not need the vast majority of it. So i just drilled them out and re-shapped with a round needle file. You can see where i over did the sanding and went right through. But fortunatly that will be covered by base of the propeller shaft.

And the ones at the front.
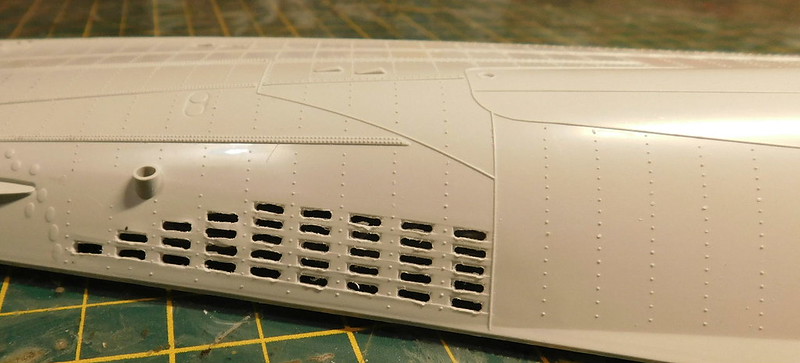
And the whole part.

One thing i learnt is that was easier to thin the plastic before drilling out the vents. I still need to do a little clean up on some of the holes. On the inside, i addd some styrene sheet to replicate the saddle tank extending into the hull. Once the hull halves are together and the ''pressure hull'' fitted, i will tidy that up.

Now i just have to repeat the whole process on the starboard side.

After 2 weeks of that, i decided i need a break so moved onto the tower. The top and bottom halves are together with the external PE added from the Eduard set. I plan to prime and paint the inside befor ethen fitting this out and getting it all together.

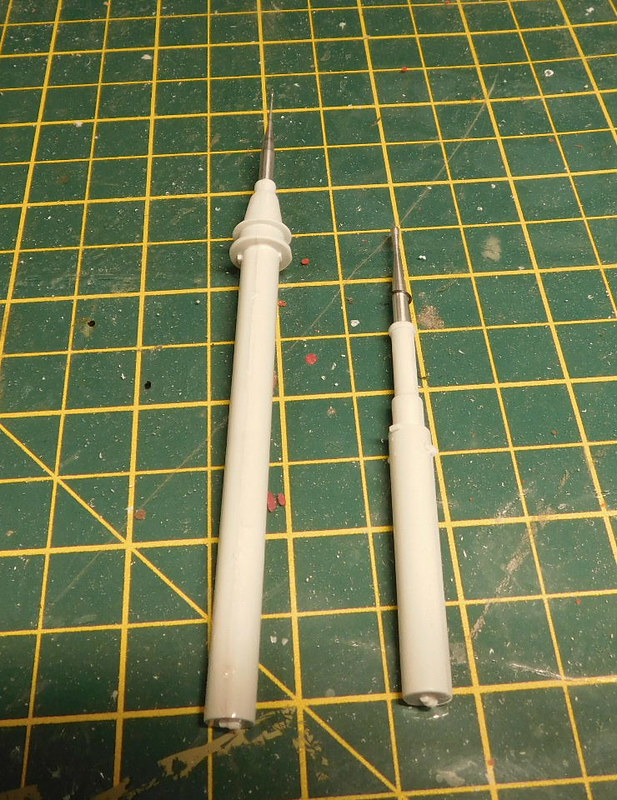
The 2 periscopes were put together including the metal parts.
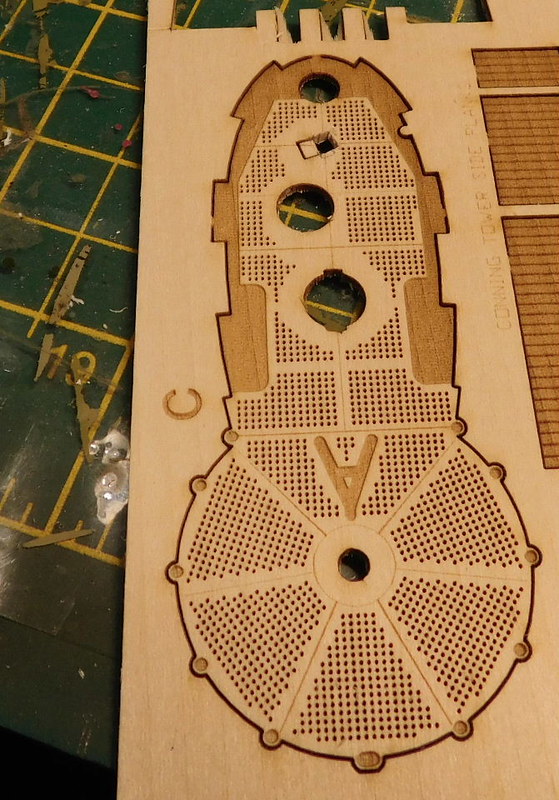
The Nautilus wood deck is based exactly on the Revell one, including errors. This includes the hole for the UZO sight. This should be in the middle, but Revell places it over the the left side.So on my piece i cut out the correct area, fortunatly the base of the UZO covers most of the area where the incorrect hole is.
And 4 more bit of AM arrived, 3D printed parts from Shapeways. Left to right, turnbuckles which i ahve kept in their little box, insulators for the antenna wire's, UZO base and sight and anchor.

Thats all for now. I plan on spending this week finishing off the tower and working on the deck gun. Then at the wekend i will start on the starboard side of the hull.

I am a Norfolk man and i glory in being so


On the bench: Airfix 1/72nd Harrier GR.3/Fujimi 1/72nd Ju 87D-3

  • Member since
    July 2014
Posted by modelcrazy on Sunday, August 30, 2020 2:13 PM

looks like a good idea Steve, looks good.

Steve

Building a kit from your stash is like cutting a head off a Hydra, two more take it's place.


http://www.spamodeler.com/forum/

  • Member since
    January 2015
Posted by TheMongoose on Sunday, August 30, 2020 11:49 AM

Docidle looks like if you can mount the tube inside where you want it, that would be the starting point. Then you can open a small hole from the ouside and make it progressively bigger. That way you don't risk having a hole bigger than the tube or that doesn't match the slanted profile that you're going to have. To me that's the hardest part about those compound curves.

In the pattern: Scale Shipyard's 1/48 Balao Class Sub! leaning out the list...NOT! Ha, added to it again - Viper MkVii, 1/32 THUD & F-15J plus a weekend madness build!

  • Member since
    September 2012
Posted by GMorrison on Saturday, August 29, 2020 8:00 PM

The base looks good, and walnut seems a nice choice.

The display is a choice many use, usually for larger ships!

It actually in no way represents how a drydock works. No worry there; it looks better than the real thing by far.

So I would think more of the same finish as the base plate, maybe one shade lighter; would look nice.

 Modeling is an excuse to buy books.


  • Member since
    July 2010
  • From: Tempe AZ
Posted by docidle on Saturday, August 29, 2020 7:42 PM

Next up are the torpedo tubes. I'm planning on drilling out holes at the forward end of the boat and then adding Evergreen tubing to replicate the tubes. I'm also planning on placing a torpedo in one of the tubes and having one being loaded in the other(see 3D additions).

The drilling of the boat doesn't have me too worried but drilling or using PE for the tubes exterior end is making me nervous.

Here is as far I've gotten. The tubes were cut and angled to fit the forward end and dry fitted to see if this crazy idea will work. I used the kit hatches to mark off the size of the hole to be drilled. I'll post more shots as I progress but any and all input would be appreciated.

Steve


  • Member since
    July 2010
  • From: Tempe AZ
Posted by docidle on Saturday, August 29, 2020 7:28 PM

Thank you all for the kudos on the base. Other than the measuring, cutting, sanding and putting it together, it wasn't that hard... Now I have to figure out what color to stain it. Since the boat is a very light Gray/White, I'm leaning towards Walnut. Part of my thinking is also to replicate creosote covered beams. Anyone have suggestions otherwise?

Steve 


  • Member since
    July 2014
Posted by modelcrazy on Saturday, August 29, 2020 11:07 AM

You got it Chad

Steve

Building a kit from your stash is like cutting a head off a Hydra, two more take it's place.


http://www.spamodeler.com/forum/

  • Member since
    November 2008
  • From: Central Florida
Posted by plasticjunkie on Saturday, August 29, 2020 6:28 AM

Thanks gents, I will have more pictures up soon.

Steve the base looks fantastic, well worth the effort.  Beer

 GIFMaker.org_jy_Ayj_O


Too many models to build, not enough time in a lifetime!!

  • Member since
    April 2015
Posted by Mopar Madness on Friday, August 28, 2020 9:56 PM

I'm in, just don't know what I'll contribute yet. 

Chad

God, Family, Models...

At the plate: 1/48 Airfix Bf109 & 1/35 Tamiya Famo

On deck: Who knows!

  • Member since
    February 2011
Posted by GreySnake on Friday, August 28, 2020 9:24 PM
Nice work PJ!
 
Docidle, really nice work on the base.
  • Member since
    September 2013
  • From: San Antonio, Texas
Posted by Marcus McBean on Friday, August 28, 2020 5:48 AM

docidle,

Nice craftmanship on creating the base.  It always seems to me that ships look more natural when sitting on these types of bases.  Easy to picture them sitting in drydock or on the ways.

Marcus Beer

  • Member since
    September 2013
  • From: San Antonio, Texas
Posted by Marcus McBean on Friday, August 28, 2020 5:43 AM

docidle

You did a fantastic job on the flood and limber holes Steve. You have got to be happy with the results. I also like the sail, very nicely done.

Steve

I second that.  Very nice work.

Marcus Beer

  • Member since
    November 2008
  • From: Central Florida
Posted by plasticjunkie on Thursday, August 27, 2020 11:48 PM

docidle


plasticjunkie


docidle

You did a fantastic job on the flood and limber holes Steve. You have got to be happy with the results. I also like the sail, very nicely done.

Steve


thanks Steve. I think you got me confused with Steve aka modelcrazy. We have similar avatars.


PJ,

I apologize profusely for my mistake. I’ll go with the mixup of the avatars.... and not me slowly losing what’s left of my mind.

Thanks,

Steve 


No apologies necessary, no biggie. It’s happened before cuz the avatars are kind of similar.

 GIFMaker.org_jy_Ayj_O


Too many models to build, not enough time in a lifetime!!

  • Member since
    July 2010
  • From: Tempe AZ
Posted by docidle on Thursday, August 27, 2020 11:05 PM

modelcrazy

Yeah, PJ and I think the same way. 

Nice job on the holes PJ. I can appreciate the time and work that has gone into that sub. Unless you've done it you have know idea, especially in that scale.

Steve. I really like that base. That's a lot of work as well.

Super job guys.

My Bismarck is still sitting in the box and will likely be there for some time. I need to complete two other massive projects before opening that beauty up...as well as spring for the detail set Indifferent


Thanks Steve... I checked twice to make sure who the heck I’m replying to!

I have to admit I “borrowed“ the idea for the base from Bish’s recent most excellent  S-100 build.

Steve


  • Member since
    July 2010
  • From: Tempe AZ
Posted by docidle on Thursday, August 27, 2020 11:01 PM

plasticjunkie


docidle

You did a fantastic job on the flood and limber holes Steve. You have got to be happy with the results. I also like the sail, very nicely done.

Steve


thanks Steve. I think you got me confused with Steve aka modelcrazy. We have similar avatars.


PJ,

I apologize profusely for my mistake. I’ll go with the mixup of the avatars.... and not me slowly losing what’s left of my mind.

Thanks,

Steve 


  • Member since
    July 2014
Posted by modelcrazy on Wednesday, August 26, 2020 9:00 AM

Yeah, PJ and I think the same way. 

Nice job on the holes PJ. I can appreciate the time and work that has gone into that sub. Unless you've done it you have know idea, especially in that scale.

Steve. I really like that base. That's a lot of work as well.

Super job guys.

My Bismarck is still sitting in the box and will likely be there for some time. I need to complete two other massive projects before opening that beauty up...as well as spring for the detail set Indifferent

Steve

Building a kit from your stash is like cutting a head off a Hydra, two more take it's place.


http://www.spamodeler.com/forum/

  • Member since
    November 2008
  • From: Central Florida
Posted by plasticjunkie on Tuesday, August 25, 2020 6:07 PM

docidle

You did a fantastic job on the flood and limber holes Steve. You have got to be happy with the results. I also like the sail, very nicely done.

Steve


thanks Steve. I think you got me confused with Steve aka modelcrazy. We have similar avatars.

 GIFMaker.org_jy_Ayj_O


Too many models to build, not enough time in a lifetime!!

  • Member since
    July 2010
  • From: Tempe AZ
Posted by docidle on Tuesday, August 25, 2020 5:14 PM

You did a fantastic job on the flood and limber holes Steve. You have got to be happy with the results. I also like the sail, very nicely done.

Steve


  • Member since
    July 2010
  • From: Tempe AZ
Posted by docidle on Tuesday, August 25, 2020 5:12 PM

I've been working on the base so that I know how I'm going to mount this boat. I usually hate the pedestals supplied by the kit manufacturers so I mount my builds in various ways. If I'm spending time on building a kit I want to make sure the presentation is worth the time and effort. 

Anyway, the keel on this Schnellboot is thin and changes width from the stern to the bow, so regular pedestals wouldn't work. Neither would thin Brass rods with nuts and bolts to hold down the rig because I was afraid that I would split the keel if I tried to drill it. Therefore I bought a plank of Red Oak and routed the edges for the base. I then picked up some Basswood square dowels for supports. After measuring and remeasuring and squaring up the whole thing I came up with the amount dowels I would need on and started cutting and sanding. You'll note the lines I drew on the base and on each dowel.

After gluing all of the first course I let it dry overnight. The next day I laid the boat down and used rubber bands to position the keel over the centerline. This was "interesting" to say the least and a pain to say the most.

Again, because of the thinness of the keel I couldn't drill holes for nuts and bolts therefore I couldn't have just one course of support. I also purchased square dowels that were half the size of the first course and fitted the depth of the keel. Again these were measured and cut, sanded and then glued down like the first course.

Starting from the stern and then the bow, I glued them on one at a time, first port then starboard until they met in the middle. Why I did it this way is so that I could place the smaller dowels up against the keel and glue them down to secure the boat.

I'm sure there is a simpler way to do this so here are the pictures as a warning for anyone thinking of mounting this model in the same fashion. Enjoy.

Steve


  • Member since
    November 2008
  • From: Central Florida
Posted by plasticjunkie on Tuesday, August 25, 2020 2:59 PM

The flood holes are finally opened after several evenings of drilling, cutting, sanding, slicing, cleaning, filing and did I say drlilling? 

The conning tower is almost completed. It just needs two tiny fittings.

I like the included base. I may do a wood grain finish for it.

I'm will be using plastic card painted black and glued to the keel so it doesn't look hollow thru the flood holes.

 GIFMaker.org_jy_Ayj_O


Too many models to build, not enough time in a lifetime!!

  • Member since
    November 2008
  • From: Central Florida
Posted by plasticjunkie on Friday, August 21, 2020 6:27 AM

TheMongoose

plasticjunkie - Impatience, nope it's me. My decal came right off the foil. I used the duller side of foil. Anything special you can think of that i need to do different?

going to experiment with canopy glue on the one i just messed up Surprise


That’s very odd. I applied my decals over the foil on both sides and had no issues. Try brushing Future on the foil and place the decal on the wet Future. This will give extra bonding power on the decal. Wait like 10 minutes and do the reverse side, Future dries fast.

 GIFMaker.org_jy_Ayj_O


Too many models to build, not enough time in a lifetime!!

  • Member since
    July 2010
  • From: Tempe AZ
Posted by docidle on Thursday, August 20, 2020 11:30 PM

GreySnake
Nice work, docidle and PJ.  
 

Thanks 


  • Member since
    April 2019
  • From: South west, PA
Posted by Tomcat on Thursday, August 20, 2020 2:08 PM

Coat the foil with Future Floor finish or any gloss paint, then apply the decal.

Mark aka Tomcat

On the workbench: Monogram 1/24 '69 Pontiac GTO and a Monogram 1/67 (box scale) B-26 Invader

  • Member since
    January 2015
Posted by TheMongoose on Thursday, August 20, 2020 11:54 AM

plasticjunkie - Impatience, nope it's me. My decal came right off the foil. I used the duller side of foil. Anything special you can think of that i need to do different?

going to experiment with canopy glue on the one i just messed up Surprise

In the pattern: Scale Shipyard's 1/48 Balao Class Sub! leaning out the list...NOT! Ha, added to it again - Viper MkVii, 1/32 THUD & F-15J plus a weekend madness build!

  • Member since
    December 2002
  • From: Bury St Edmunds, Suffolk, England
Posted by Bish on Thursday, August 20, 2020 8:02 AM

I have some fabric flags from AMP and they fold up really nicely.

I am a Norfolk man and i glory in being so


On the bench: Airfix 1/72nd Harrier GR.3/Fujimi 1/72nd Ju 87D-3

  • Member since
    July 2014
Posted by modelcrazy on Thursday, August 20, 2020 6:59 AM

I do the same if using decal. I usually print them out on an HP printer. Original HP ink doesn't run when wet so they work with water and glue.

Steve

Building a kit from your stash is like cutting a head off a Hydra, two more take it's place.


http://www.spamodeler.com/forum/

  • Member since
    January 2015
Posted by TheMongoose on Wednesday, August 19, 2020 11:04 PM

Hmmm, maybe my impatience is some of the problem Hmm I'll try a day instead of an hour. 

In the pattern: Scale Shipyard's 1/48 Balao Class Sub! leaning out the list...NOT! Ha, added to it again - Viper MkVii, 1/32 THUD & F-15J plus a weekend madness build!

JOIN OUR COMMUNITY!

Our community is FREE to join. To participate you must either login or register for an account.

SEARCH FORUMS
FREE NEWSLETTER
By signing up you may also receive reader surveys and occasional special offers. We do not sell, rent or trade our email lists. View our Privacy Policy.