SEARCH FINESCALE.COM

Enter keywords or a search phrase below:

Supermarine/Vickers GB

55521 views
671 replies
1 rating 2 rating 3 rating 4 rating 5 rating
GAF
  • Member since
    June 2012
  • From: Anniston, AL
Posted by GAF on Monday, November 15, 2021 9:05 PM

Robert and Harold,

Great work, both of you!

Gary

  • Member since
    February 2005
  • From: Nashotah, WI
Posted by Glamdring on Monday, November 15, 2021 5:53 PM

Thanks guys, it was well worth the effort.  The kit used raised lines for it rather than decals.  A more dedicated person would have shaved them off before painting, but that isn't me!

Robert 

"I can't get ahead no matter how hard I try, I'm gettin' really good at barely gettin' by"

  • Member since
    November 2009
  • From: SW Virginia
Posted by Gamera on Monday, November 15, 2021 5:29 PM

Robert: That looks great! I know what you mean about driving yourself crazy masking but the results look fantastic! 

Harold: I don't see any seams on the nose just a small one on the lower tail. You're going better than I was. I had to putty and sand the krap outta my Hasegawa Spit. I think I assembled something the wrong way, I've built the kit before and didn't have the same problem. 

"I dream in fire but work in clay." -Arthur Machen


  • Member since
    December 2002
  • From: Bury St Edmunds, Suffolk, England
Posted by Bish on Monday, November 15, 2021 9:35 AM

Those seams look good even in close. I always struggle and there is always at least one spot on an aircraft i have missed. Thats the good thing about armour.

I've built one Eduard 72nd Aircraft and it was amazing, a nice liitle Hellcat. They have earnt and very nice reputation.

I am a Norfolk man and i glory in being so


On the bench: Airfix 1/72nd Harrier GR.3/Fujimi 1/72nd Ju 87D-3

  • Member since
    December 2002
  • From: Bury St Edmunds, Suffolk, England
Posted by Bish on Monday, November 15, 2021 9:30 AM

Robert, the effort has paid off. The amrkings look really nice and i do like how you have weathered the deck.

I am a Norfolk man and i glory in being so


On the bench: Airfix 1/72nd Harrier GR.3/Fujimi 1/72nd Ju 87D-3

  • Member since
    February 2005
  • From: Nashotah, WI
Posted by Glamdring on Sunday, November 14, 2021 8:18 PM

I spent my weekend modeling time masking and painting deck lines, how about you?  Big Smile

Horizontals were on Saturday and lengthwise lines were on Sunday.  I used about a quarter of a roll of Tamiya tape masking and remasking this project thusfar.  

The end approaches though:

Not sure how well it shows given my arm shadow, but I added some neutral gray to the deck in some spots to give a mildly weathered appearance.  It's more apparent in person, and looks quite nice in person if I do say so myself.  It still needs some more tweaking though.

Robert 

"I can't get ahead no matter how hard I try, I'm gettin' really good at barely gettin' by"

  • Member since
    September 2018
  • From: Vancouver, Washington USA
Posted by Sergeant on Sunday, November 14, 2021 1:36 PM

Bish

That is looking good Harold. Doesn't look like you had any fit issues.


Thank you, Cliff, and Bish. The Eduard kit is well engineered, so there are no major problems. I think that may be the reason Jack Geratic suggested Eduards to me. Originally, I was planning to purchase Tamiya or AirFix, but now I really like the way Eduard kits are made.

Bish I have taken some closeup photographs so you and Cliff can see the seams with my first coat of primer. I had a few places along seam lines where melted plastic from the Tamiya glue had to be removed with a hobby knife. And a few places that I filled with putty, but nothing major.

I am also trying a new technique with my air brush by using the needle limit to prevent me from getting to much paint in one spot. This forces me to spray a very light coat of paint which is what Vallejo recommends (several light coats) to achieve the desired color. It takes more time, but hopefuly more detail will be visable when I'm finished.

I used the closed canopy to protect the cockpit from overspray since I intend to have the canopy opened when I'm finish. I glued the closed canopy to the fuselage with a special glue from VMS in Poland. It can easily be removed, and the surface cleaned with another VMS product called Universal Weathering Carrier without damaging the paint.

I used these VMS products on my Matador windows with no issues. The glue remains soft for several days, but is strong enough to keep the canopy in place until I finish the exterior painting.

Harold

  • Member since
    December 2002
  • From: Bury St Edmunds, Suffolk, England
Posted by Bish on Saturday, November 13, 2021 2:37 PM

That is looking good Harold. Doesn't look like you had any fit issues.

I am a Norfolk man and i glory in being so


On the bench: Airfix 1/72nd Harrier GR.3/Fujimi 1/72nd Ju 87D-3

  • Member since
    November 2009
  • From: SW Virginia
Posted by Gamera on Friday, November 12, 2021 4:45 PM

Looks sharp Harold, almost ready for paint! 

"I dream in fire but work in clay." -Arthur Machen


  • Member since
    September 2018
  • From: Vancouver, Washington USA
Posted by Sergeant on Thursday, November 11, 2021 6:19 AM

Gamera
Harold: She's lookin' great!!! Always good to get the fuselage sealed up and the wings ready to add.

Thank you, Cliff, it did feel good to close the fuselage. This is my first aircraft model in a very long time, so I am taking it slow.

I worked on the wings last night and ready to start the landing gear next.

Harold

  • Member since
    November 2009
  • From: SW Virginia
Posted by Gamera on Wednesday, November 10, 2021 4:49 PM

Harold: She's lookin' great!!! Always good to get the fuselage sealed up and the wings ready to add. 

Robert: Looks good! The bootstripping looks good from here. 

"I dream in fire but work in clay." -Arthur Machen


  • Member since
    December 2002
  • From: Bury St Edmunds, Suffolk, England
Posted by Bish on Wednesday, November 10, 2021 2:28 PM

Hull looks good Robert. Those big flat decks would deffinetly look better with some variation.

I am a Norfolk man and i glory in being so


On the bench: Airfix 1/72nd Harrier GR.3/Fujimi 1/72nd Ju 87D-3

  • Member since
    February 2005
  • From: Nashotah, WI
Posted by Glamdring on Tuesday, November 9, 2021 9:19 PM

Brilliant work on all the Spits.  I don't believe I have ever built one, even in my younger years of assembling an entire kit and then slosh some paint on it.  Or just skip the paint altogether because it was my least favorite part. 

Something new for the bucket list I guess!

The Invincible has moved forward and the initial paint coats laid down, all hand brushed.

Just had some minor bleeding along the black waterline, I must remask those spots and touch up.

I need to do something about the monotone gray flight deck, I am not terribly pleased with the way it looks.  Some subtle gray washes or dot filters should help make it look a little more visually stimulating, but depending on the reference photo the deck doesn't seem to need much added to the neutral gray.

Robert 

"I can't get ahead no matter how hard I try, I'm gettin' really good at barely gettin' by"

  • Member since
    September 2018
  • From: Vancouver, Washington USA
Posted by Sergeant on Monday, November 8, 2021 11:14 AM

Completing fuselage and starting wing assembly. Interior requires a second coat of gloss varnish, then interior decals and a seal coat of satin varnish. When the varnish is dry I can glue the fuselage together around the completed cockpit.

The main wing assembly is already glued together and ready for the fuselage, then I can add the remaining exterior parts.

Harold

  • Member since
    September 2018
  • From: Vancouver, Washington USA
Posted by Sergeant on Sunday, November 7, 2021 1:33 PM

xenon55

Harold, if you liked that movie, search for "Guy Martin's Spitfire". I came across it while searching for the movie you recommended. Its about the restoration of N3200 which is in the movie you watched. Plus, I like Guy Martin. He's a retired road racer (motorcycle) and builds/built some wicked bikes. Little bit of a nutter also lol.


I watched 'Guy Martin's Spitfire' as you suggested and it is a great story worth watching. I found it on YouTube, https://youtu.be/i7Zebpu2nS4 posted in 2014.

Some interesting facts from the film: After a difficult beginning Lord Beaverbrook got involved and at the peak of production the Spitfire and Lancaster factory at Castle Bromwich was turning out 85 Spitfires a week. The Mark I Spitfire had only enough fuel for one hour of flying time and enough ammunition for 14 seconds of continuous firing. This meant the ground crew had to be fast and they were very fast. They could reload more the 2,000 rounds of ammunition in 3 1/2 minutes.

This story is also a tribute to Geoffrey Stephenson the original pilot of N3200 that was shot down and crashed on the beach of Dunkirk in May 1940. The plane remained buried in the sand for seventy-five years and then was rebuilt over a three-year period to perfect factory specifications by the team Guy Martin was working with on the restoration.

Thank you xenon55 for recommending this outstanding documentary film. I enjoyed every bit of it, start to finish.

Harold

  • Member since
    April 2020
  • From: Central CT
Posted by xenon55 on Sunday, November 7, 2021 10:23 AM

Harold, if you liked that movie, search for "Guy Martin's Spitfire". I came across it while searching for the movie you recommended. Its about the restoration of N3200 which is in the movie you watched. Plus, I like Guy Martin. He's a retired road racer (motorcycle) and builds/built some wicked bikes. Little bit of a nutter also lol.

  • Member since
    September 2018
  • From: Vancouver, Washington USA
Posted by Sergeant on Saturday, November 6, 2021 5:43 PM

Sergeant
The Supermarine Spitfire is a well-documented aircraft, but for reasons I think I'm just begining to understand it represents more than other vintage aircraft and I wanted to know why?

I watched a documentary called Spitfire:The Plane That Saved the World, released in 2018, and directed by Anthony Palmer. The backdrop for this documentary is present day RAF Coningsby, Lincolnshire, England with original motion picture film clips of Supermarine and the RAF from 1929 to 1945. The story is focused on R.J. Mitchell, the development of the Spitfire and the Rolls-Royce engine as events in the Second World War were unfolding.

Rather than give you a review of the movie I will quote a statement made by one of the RAF pilots: "The Spitfire is emblematic of British innovation, ingenuity, determination and unwillingness to be bullied." Another statement I like: "The Spitfire was a lady in the air and a *** [not a lady] on the ground". This was a quote from an AFT woman pilot who flew Spitfires from the factory to Squadrons throughout Britain. If you are interested in watching this documentaryI found it on the Apple TV channel.

As an American farm boy growing up in the 1940's and 50's I heard a lot about the Second World War and my uncle who was an RAF fighter pilot from 1941 to 1944. I took a keen interest in my British and Canadian heritage and studied European history. In my youth boys still had real life heroes and mine was Winston Churchill, Prime Minister. I think Mr. Churchill would agree with the statements made in this documentary regarding the Spitfire and what it ment to the British people during the war.

In my opinion the British people saw the Spitfire as a fist in Hitler's face and the hope they needed to hang on in the darkest days of the war.

Harold

  • Member since
    September 2018
  • From: Vancouver, Washington USA
Posted by Sergeant on Saturday, November 6, 2021 4:57 PM

Gamera

Thanks Harold. 

I just held the template over the wing and sprayed though it. I probably should have used it to cut a mask with tape. The edges are a little fuzzy. But I was afraid I might pull up the decals already down even with a coat of varnish over them.

The Matador looks fine by me!  


Smart move Cliff to error on the side of caution.

You might recall I built three Matador's, the two later production version models never made it to the finish self. But someday I would like to build a tanker (petrol hauling) type Matador and perhaps this unfinished model will have a new paint job.

Harold

  • Member since
    November 2009
  • From: SW Virginia
Posted by Gamera on Tuesday, November 2, 2021 6:28 PM

Thanks Harold. 

I just held the template over the wing and sprayed though it. I probably should have used it to cut a mask with tape. The edges are a little fuzzy. But I was afraid I might pull up the decals already down even with a coat of varnish over them.

The Matador looks fine by me!  

"I dream in fire but work in clay." -Arthur Machen


  • Member since
    September 2018
  • From: Vancouver, Washington USA
Posted by Sergeant on Tuesday, November 2, 2021 11:40 AM

Thank you, Gary. I am starting the exterior today and hope I can do as good a job on the camouflage as you and Cliff did.

Nice save Cliff. Sounds like a lot of work but the end results look great.

Regarding the circle template, Cliff did you apply the template in direct contact with the wing surface? The reason I asked is that did not work well for me on my Matador. But I did end up using the circle template to make my own painting masks with Tamiya making tape.

Since then, I have learned there are better products on the market for making paint masks than Tamiya masking tape. I did not finish this model because I forgot to thin the Tamiya camouflage paint and it just did not look good to me.

Camouflage paint quality varied widely during the Second World War depending on whether it was done at the factory or in the field. My Nato Black camouflage looks like a field job applied with mop head instead of a spray gun.

Harold

  • Member since
    November 2009
  • From: SW Virginia
Posted by Gamera on Monday, November 1, 2021 8:27 PM

Gary: I'm glad you're feeling better. Hope back to 100% soon. Love the Spit. Great job and I love the base! 

Harold: Cockpit looks fantastic! I've got to remember to try a Bakelite seat in my next Spit. 

And I'd wondered about the funny notch in the seat. Thanks guys!!! 


Here's my latest pic, just to remind you guys I'm still in this. Added the landing gear and the guns. And didn't like how the white looked on the roundels so I sprayed them with some white paint though a circle stencil. Then I noticed somehow I'd gotten overspray on the wing. And I'd sprayed some varnish over it. So I mask the wing off again and resprayed the primary colours.

Thankfully it a small thing, not sure it's noticable on the photo. You should notice a little lighter paint on the gun blisters on the portside wing. I still need to redo the panal lines there and it should darken it back down to match everything else. Anyhow I'm going on holiday next week so hopefully I'll get the canopy done and the model finished by the end of November. 

Or that's the plan anyway... 

"I dream in fire but work in clay." -Arthur Machen


GAF
  • Member since
    June 2012
  • From: Anniston, AL
Posted by GAF on Monday, November 1, 2021 8:25 PM

Bish> Thanks!  No need to cut back on the GB's.  I think it was my own life style that contributed most!

I know what you mean about "Gary's".  There are enough to start a GB of their own!  Big Smile

Harold>  That's a beautiful pit.  Glad we've got so many scholars around who can tell what those odd objects were for!

Gary

  • Member since
    September 2018
  • From: Vancouver, Washington USA
Posted by Sergeant on Monday, November 1, 2021 4:54 PM

jgeratic

Harold that detail is the locking mechanism for the Sutton safety harness, and was also a quick release feature.


regards,

Jack


Well my friend, think maybe I should leave it there... I'm glad I asked for help.

Harold

  • Member since
    April 2006
  • From: ON, Canada
Posted by jgeratic on Monday, November 1, 2021 2:46 PM

Harold that detail is the locking mechanism for the Sutton safety harness, and was also a quick release feature.


regards,

Jack

  • Member since
    September 2018
  • From: Vancouver, Washington USA
Posted by Sergeant on Monday, November 1, 2021 1:21 PM

Bish

Harold, just looking at your pics again and have realised you have one of thopse plastic seats and i love the colour, it is a really nice match for the image that Jack posted a while back. I wounder if the depression in the bottom of the seat was for the parachute, though it seems a bit small to me for that.


Thank you Bish. My photograph makes it look a little darker because of the lighting and the varnish. I did as Jack suggested and mixed a 1:3 ratio of Vallejo #71.003 Red with #71.080 Rust. At that point it was a very close match. But then I gave the finished cockpit a coat of Vallejo #70.522 Satin Varnish which darkened the colour a bit.

I have a question; that little feature attached to the pilot's harness and marked with a red arrow... Is that supposed to be the parachute ripcord? If so, I intend to remove it because I want the cockpit open without a pilot in the seat.

Harold

  • Member since
    September 2018
  • From: Vancouver, Washington USA
Posted by Sergeant on Monday, November 1, 2021 11:50 AM

jgeratic

Yes, it was like a double cushion with the raft packed in between the pilot and parachute:
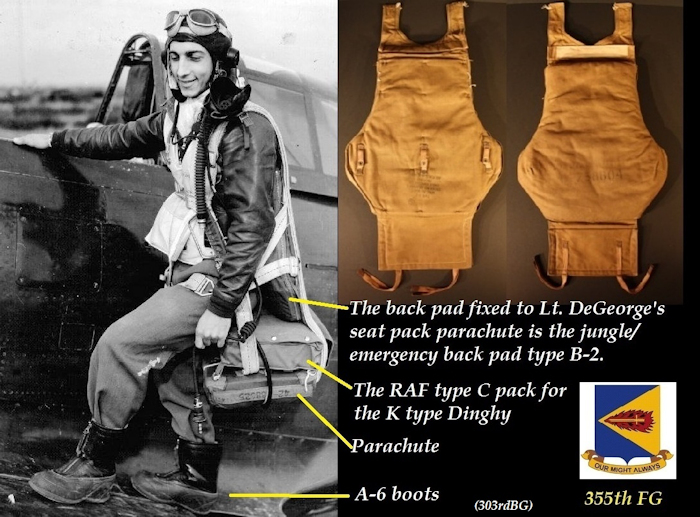
 

Not sure how the emergency dinghy was deployed, but during my searches there was mention of instances where the dingy would inflate in the cockpit, and the pilot would have to 'attack' it with a knife - wow...lol.


regards,

Jack


I think it was an American pilot who said, "you don't get into a Spitfire, you put it on". It would get a bit tight in the cockpit with that dinghy inflated.

Harold


  • Member since
    April 2006
  • From: ON, Canada
Posted by jgeratic on Monday, November 1, 2021 11:25 AM

Yes, it was like a double cushion with the raft packed in between the pilot and parachute:


Not sure how the emergency dinghy was deployed, but during my searches there was mention of instances where the dingy would inflate in the cockpit, and the pilot would have to 'attack' it with a knife - wow...lol.


regards,

Jack

  • Member since
    December 2002
  • From: Bury St Edmunds, Suffolk, England
Posted by Bish on Monday, November 1, 2021 10:20 AM

Now that would explain the shape of the depression. And if i am not mistaken, the parachute doubled as a cushion so the pilot would not have been sat on the bottle. The bottle would have been tricky to remove though i imagine.

I am a Norfolk man and i glory in being so


On the bench: Airfix 1/72nd Harrier GR.3/Fujimi 1/72nd Ju 87D-3

  • Member since
    April 2006
  • From: ON, Canada
Posted by jgeratic on Monday, November 1, 2021 9:45 AM

Bish, that is a good question about that lozenge shape depression in the pilot seat. 

After a little searching, apparently it was to accomodate the inflation bottle for the pilot's personal dinghy.  According to the late Edgar Brooks, introduction date  for this was likelly late 1940.  Up until then, pilots only had their Mae West to rely on, and have also read that during the BoB, fighter pilots were advised not to chase the Luftwaffe across the channel.

https://www.britmodeller.com/forums/index.php?/topic/234936242-lozenge-shaped-depression-in-spitfire-seat-to-accommodate-dinghy-co2-bottle/

regards,

Jack

  • Member since
    December 2002
  • From: Bury St Edmunds, Suffolk, England
Posted by Bish on Monday, November 1, 2021 7:30 AM

Harold, just looking at your pics again and have realised you have one of thopse plastic seats and i love the colour, it is a really nice match for the image that Jack posted a while back. I wounder if the depression in the bottom of the seat was for the parachute, though it seems a bit small to me for that.

I am a Norfolk man and i glory in being so


On the bench: Airfix 1/72nd Harrier GR.3/Fujimi 1/72nd Ju 87D-3

JOIN OUR COMMUNITY!

Our community is FREE to join. To participate you must either login or register for an account.

SEARCH FORUMS
FREE NEWSLETTER
By signing up you may also receive reader surveys and occasional special offers. We do not sell, rent or trade our email lists. View our Privacy Policy.