SEARCH FINESCALE.COM

Enter keywords or a search phrase below:

F-14 Tomcat Group Build idea...

63725 views
1177 replies
1 rating 2 rating 3 rating 4 rating 5 rating
  • Member since
    November 2005
Posted by Anonymous on Thursday, March 24, 2005 9:22 PM
Armorman that looks great! The subtle shading is key. My pre-shaded lines all but disappeared under the color coat! That is what I get for using Testors gloss Gull Gray! Oh well. This build has been a stress point! But everyone is looking great! Lets' get this thing done!
  • Member since
    March 2004
  • From: British Columbia,Canada
Posted by bstrump on Thursday, March 24, 2005 9:04 PM
Wow! I haven't been around in a couple of days and look what I miss! uscusn, armorman, great looking progress! A68T, wecome back and congrats on the new job! Now about the cockpit stuff, the B and D are almost the same in the back seat. If the set has the round CRT in back, then it is for an early to mid '90s non-LANTIRN B or D. They are almost the same except that the D has a slightly bigger screen above the main display. The early B RIOs office is the same as the A. The big difference is up front. The D has the two CRT s side by side on the IP. Check out this site: anft.net/f-14 and and click on "walkarounds". Hope this helps
  • Member since
    April 2003
  • From: Charlotte, NC
Posted by armorman on Thursday, March 24, 2005 5:37 PM
Are you doing the high-vis or low-vis? Those decals look great!
Next Up: 1/35 Tamiya Merkava 1/48 Tamiya King Tiger 1/35 Dragon M1A1 AIM
  • Member since
    June 2004
  • From: Oklahoma City
Posted by Zone V Afterburner on Thursday, March 24, 2005 5:28 PM
I won a set of 'D' decals on E-Bay last week and got'em in the mail today.Man they are SWEEET!!! Check'em out here:

http://www.vf-decals.com/images/decals/48-101.jpg

Very impressive stuff..So if I can't find any shots of a 'B' with the round CRT screen...then my subject will be a 'D' from VF-101...well I off to the bench to squirt some paint...Later on !!!
Only two defining forces have ever offered to die for you........ Jesus Christ......and the American soldier..... One died for your soul......... The other....for your Freedom!!
  • Member since
    June 2004
  • From: Oklahoma City
Posted by Zone V Afterburner on Thursday, March 24, 2005 12:02 PM
Thanks for the OK Chuck and Jon... I will definately have something to post this saturday.I didn't realize you guys were this close to being done !!Shock [:O] You guys are posting some excellent progress pics !! Last night I spent the evening taking out the inside of the boarding steps and replacing them with sheet plastic to make room for the resin cockpit.I should have the cockpit painted by tomorrow and hopefully completed by Sunday.I also took a real close look at my RIO's console and it looks like Aires has named their cockpit set a 'B' when it is actually a 'D' and so far I can't find any pics of 'B's' with the round CRT on the RIO'S panel.So I may end up building a 'D' if I can't get any confirmation.Anyway everyone take care! Later on....
Only two defining forces have ever offered to die for you........ Jesus Christ......and the American soldier..... One died for your soul......... The other....for your Freedom!!
  • Member since
    April 2003
  • From: Charlotte, NC
Posted by armorman on Thursday, March 24, 2005 8:55 AM
okay- more progress and a huge sigh of relief- I sprayed the Dk. Ghost Gray today over the pre-shaded top panels and Lt Ghost on the bottom. At this point I am VERY happy with the results. A little dark umber wash in the panels and this baby will be great. Has this been aggrivating? Hell Yes. Do I want to do this again? HELL YES. (Not for a while....;)
Once this dries (I'll give it 48 hours) I'll shoot the black on the canopy and spine and vert stabilizers. After that comes the coat of Future- dark umber wash- decals- seats and cockpit detail- wheels- phoenix pallets- and TADA. Lets hope that the final leg goes well. I think this calls for a Guiness- oops it's only 10am- Hell, I'm on vacation!


Next Up: 1/35 Tamiya Merkava 1/48 Tamiya King Tiger 1/35 Dragon M1A1 AIM
  • Member since
    April 2003
  • From: Charlotte, NC
Posted by armorman on Thursday, March 24, 2005 7:08 AM
Chuck- both cats look like they are coming along nicely! I know what you mean about something a bit more 'simple'. I have a Tam 1/48 P-47 that is going together like a dream. When I finish the F-14 I'll get back to it. This build has been a bit of an 'emotional' one hasn't it. Looks fantastic - can't wait to see the final product.
No problem sentry! Keep up the excellent build.
Next Up: 1/35 Tamiya Merkava 1/48 Tamiya King Tiger 1/35 Dragon M1A1 AIM
  • Member since
    November 2005
Posted by Anonymous on Thursday, March 24, 2005 6:49 AM
thansk amour, mitch ping. i just got back from outstation.

the color i use is tamiya, joscasle, XF19 medium grey mix with XF23 light blue. i just follow the color from a tamiya 32 scale tomcat. The more grey it is mix less blue, the less grey with more blue mix more blue. the front strip is light grey mix with blue and some flat white .

reojn the canopy u mentioned is it more narrow then the sitting . i try to use hair dryer to blow it to soften it and open it up a bit to fix it on. i do it to my mono cat before i slam it out. it seems ok but becareful as the hot air might damaged it. but then now sure if u have the same trouble as mine.

thanks for the site on the gear mitch.
  • Member since
    February 2005
  • From: Cincinnati, OH
Posted by MA Cooke on Thursday, March 24, 2005 5:47 AM
Chuck:

Great looking progress so far! One thing I wanted to pass along, on the Tomcats w/ GE engines (A+, B & D) the area around the afterburners is actually black. I've seen several photos that show this. Check out a couple of these sites for reference photos:

http://www.anft.net/f-14/

http://www.topedge.com/alley/alley.htm

Hope this helps. Just my My 2 cents [2c]
On Bench: AM P-51B, Tamiya 1/48 F4U-1A On Deck: Hasegawa F-14's (too many); Tamiya P-47D; Academy P-47N;
  • Member since
    November 2005
Posted by Anonymous on Thursday, March 24, 2005 12:39 AM

The windscreen was ok. If i were to display this with the canopy in the closed position I would have an issue as it doesn't sit very well. However, it will be opened and have Eduard's detail set for the various PE detail bits that will be added to the canopy and windscreen. These parts will be added after painting and decaling as part of the final finish phase.

Chuck
Fly Navy
  • Member since
    November 2005
Posted by Anonymous on Wednesday, March 23, 2005 10:30 PM
uscusn the cats are looking great! Did you have any trouble with the fit of the canaopy on the Revell kit? If so how did you fix it?
  • Member since
    November 2005
Posted by Anonymous on Wednesday, March 23, 2005 10:26 PM

My 2nd kit the Revell F-14D it about the same stage as the Fujimi, but this will be far more of a complicated build. Robbing the drop tanks out of my Fujimi 48th scale kit, since the Steel Beach resin ones are not available at this time. Also still need to do some more work on the fuselage and may have to rescribe the nose. Otherwise nothing unusual for a Monogram/Revell kit.
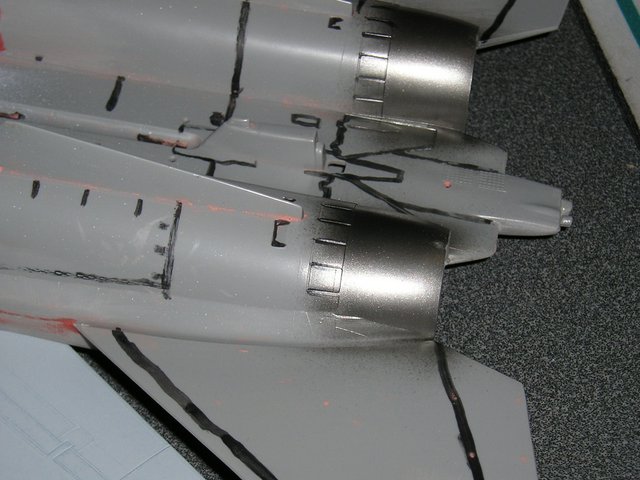
As I did with Fujimi 72nd scale Tomcat, I painted the rear nozzle area Alclad Steel, which to me looks a little too light. Looking at other Tomcat reviews and photos show this area to be much darker. For the Delta Tom.
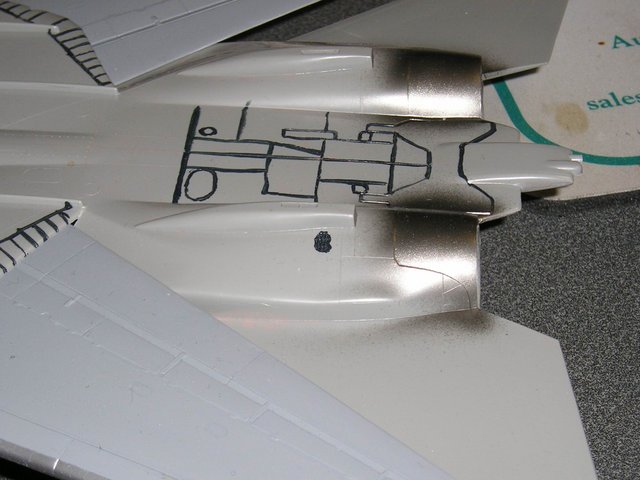

I may have to do this area with maybe Gun Metal Metalizer.
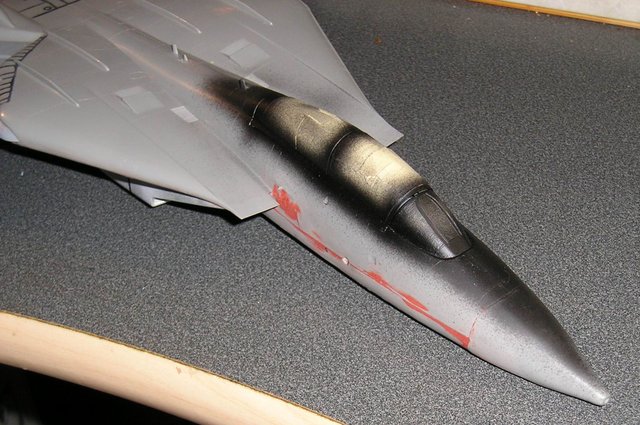
With the canopy installed, masked the framing is painted MM Flat Black.
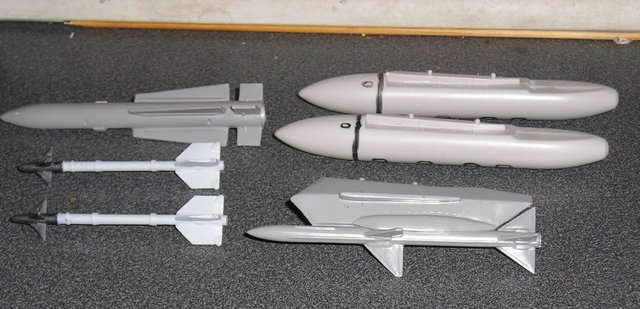
Drop tanks, Aim-54 Phoenix, Aim-7 Sparrow and a pair of Sidewinders. Need to get a Lantirn Pod and a pair of GBU's. Which means no Phoenix.

Still a ways to go with this, thank God we have till June. The Fujimi F-14 should be done hopefully by mid April. May even build one more. Love the Tomcat but it is a rather intensive build. May opt to do a simple build to relax a bit. Yeah right!

Chuck
Fly Navy
  • Member since
    November 2005
Posted by Anonymous on Wednesday, March 23, 2005 10:09 PM

Several images finally to post tonight from last weekends progress. Was able to paint the rear fuselage area Alcad Steel before installing the vertical tails.

Masked off the canopy before we go ahead and paint the black framing.


Just before installing the vertical tails I went ahead and masked off the Steel areas. Experience with this kit will make it easier to mask at this time.


Looks like a Tomcat. Finally I can see the light at the end of the tunnel with this one. The Revell F-14D well it needs a little more TLC.


Sneak peek of my Desert Storm Tornado, a much older build that I will finally get back to.

Next this weekend with Easter upon us, will hopefully will get some build in between the easter egg hunt, Easter services and the rest of this blessed holiday.

Chuck
Fly Navy


  • Member since
    November 2005
Posted by Anonymous on Wednesday, March 23, 2005 7:27 PM

Scott, as if you never left, so saddle up and finish your Tomcat!, We expect a progress report on our desktop this weekend!Cool [8D]

Chuck
Fly Navy
  • Member since
    April 2003
  • From: Charlotte, NC
Posted by armorman on Wednesday, March 23, 2005 5:56 PM
A68TRANSAM- OF COURSE!!!!!! Welcome back and congrats!
Next Up: 1/35 Tamiya Merkava 1/48 Tamiya King Tiger 1/35 Dragon M1A1 AIM
  • Member since
    November 2005
Posted by Anonymous on Wednesday, March 23, 2005 1:33 PM
Sentry!! wish colors you use for your paint?


Other question. In what configuration I can use a TARPS, i mean weapons configuration?

Thanks!
  • Member since
    June 2004
  • From: Oklahoma City
Posted by Zone V Afterburner on Wednesday, March 23, 2005 10:59 AM
Well folks, I think I was able to finagle my way out of having to move.The more I thought about it,the more I disliked the thought of moving to Memphis.So I got off my dead arse and went looking for a new job...and thank the good Lord,found one within a week.It will pay twice as much as my last job...but I will definately be gone longer.I am basically telling you all of this, because with your permission, I would like to re-join the GB. ( I know...I know, I hear you guys saying...MAKE UP YOUR MIND ALREADY !?!? Tongue [:P] Anyway...I am motivated now..more than ever,since I don't have to worry about how I am going to eat two weeks from now.So how 'bout it? It looks like alot of you have been making some really good progress on your builds and I envy you to say the least.Let me know what you think....Later on!
Only two defining forces have ever offered to die for you........ Jesus Christ......and the American soldier..... One died for your soul......... The other....for your Freedom!!
  • Member since
    April 2003
  • From: Charlotte, NC
Posted by armorman on Wednesday, March 23, 2005 8:45 AM
okay fellas, you asked the secret of attaching the Academy F-14A's wings after the fuselage has been sealed up... I found the link a little while before I started building the kit. I figured this was easier than explaining it. Darren must have an endless collection of Tomcat's. Thanks to Darren for coming up with it!
http://aircraftresourcecenter.com/Gal2/1901-2000/Gal1904_F-14_Roberts/gal1904.htm
Next Up: 1/35 Tamiya Merkava 1/48 Tamiya King Tiger 1/35 Dragon M1A1 AIM
  • Member since
    October 2003
  • From: Cape Town, South Africa
Posted by osjohnm on Wednesday, March 23, 2005 3:15 AM
Hi all

I painted the seats and cushions with a brush but I wasn't happy with the outcome so I stripped the paint. Hopefully spray them tonite, weather permitting.

The USS Truman Battle Group almost came to Cape Town. Heard today that the visit has been cancelled. Nobody knows the real reason but it seems as if my government wasn't forthcoming.

Was hoping to see some VF-32 birds flying over or possibly up close and personal.

Does anybody know which F-14 squadrons were involved in OEF and OIF or if there is a site with that info on?
John
  • Member since
    April 2003
  • From: Charlotte, NC
Posted by armorman on Tuesday, March 22, 2005 8:09 PM
Sentry!!!! Jeez, that is looking amazing! Nice job on the paint.
Pingtang- I dry fitted before closing it up and they still slip right in. I cut off the mechanism. I'll keep my fingers crossed just in case ;)
Nice work on the gear, Mitch! Looks great from here.
Well, fellas, my next build time is Thursday so I'll keep you posted.
osjohnm- SA is a beautiful place. The Drakensburg- the Amphitheatre- was beautiful. It is my favorite part of SA. Every time I am there I go hiking.
Next Up: 1/35 Tamiya Merkava 1/48 Tamiya King Tiger 1/35 Dragon M1A1 AIM
  • Member since
    February 2005
  • From: Cincinnati, OH
Posted by MA Cooke on Tuesday, March 22, 2005 12:02 PM
Sentry: nice looking paint job!

Here is a site where I downloaded a lot of photos of F-14 landing gear...that's where I saw that the lower portion of the hydraulic lines are blue:

http://www.anft.net/f-14/f14-detail-gearmain.htm

And I didn't totally do it the right way. Oh well...I'm (mostly) satisfied with it. That's what counts.
On Bench: AM P-51B, Tamiya 1/48 F4U-1A On Deck: Hasegawa F-14's (too many); Tamiya P-47D; Academy P-47N;
  • Member since
    November 2005
Posted by Anonymous on Tuesday, March 22, 2005 8:52 AM
Nice wheel mitch , it seems i paint mine wrongly as the lower part of the hydraulic is blue oh dear i better change it.
i din do anything latedly will be out of town for meeting with customers sighs may drag another 5 days.

i seen your commaches John . its nice.

Just this photo for now. i just slot in the wings and tails for a look at it. but not glue yet . later may using pastel color dilute with water to draws the lines.


  • Member since
    October 2003
  • From: Cape Town, South Africa
Posted by osjohnm on Tuesday, March 22, 2005 3:39 AM
QUOTE: Originally posted by armorman

Jeez osjohnm- I've been to Cape Town! I stayed in Camps Bay and traveled all around. My brother in law and good friend are from Jo'burg. I've spent a lot of time in SA watching rugby and drinking Windhoek!


LOL....would never have expected to here that in a modelling forum.
It really is a small world.

John
  • Member since
    November 2005
Posted by Anonymous on Monday, March 21, 2005 9:39 PM
Thanks bstrump, I think I will be doing the white tail version of the VF-41 black aces. Check the pics I sent for the decals, not very good quality but it will give you an idea. I'm on dial-up tonight and it sucks so I will sign off for now, looking real good Armorman!
  • Member since
    February 2005
  • From: Cincinnati, OH
Posted by MA Cooke on Monday, March 21, 2005 9:33 PM
Jon: I'm actually going to have three P-47's done at one time, all 1/72. Two are Hasegawa (a bubbletop and a razorback) and one is Revell of Germany (bubbletop). The Has. bubbletop I started way back before the F-14 GB, then it got shelved. I got it painted, then didn't like the look of Tamiya chrome silver for NMF. I'm going to use Swanny's method of black Krylon as primer and Alclad.

They all fit very well; I am not doing any cockpit detail. These three builds are sort of "polish up" my seam repair and painting skills. The cockpit detail on these is skimpy, anyways. I'll post pics when they're painted.

As far as the F-14, I finally got the landing gear detailed. On the main gear I used 30 GA copper wire I got from work as the hydraulic lines. The "bands" or straps around the struts are masking tape painted silver, then cut into very thin strips. Pics below.


On Bench: AM P-51B, Tamiya 1/48 F4U-1A On Deck: Hasegawa F-14's (too many); Tamiya P-47D; Academy P-47N;
  • Member since
    April 2003
  • From: NSW, Australia
Posted by pingtang on Monday, March 21, 2005 8:47 PM
Good looking progress everyone.Thumbs Up [tup]

armorman How are you gonna stick wings in? I noticed that you haven't installed them yet, do you have a special technique for doing it? I'm sort of experimenting with mine a bit at the moment, so any tips would be handy.
-Daniel
  • Member since
    April 2003
  • From: Charlotte, NC
Posted by armorman on Monday, March 21, 2005 7:32 PM
Hey Mitch ! How's the T-Bolt coming? Is the kit a good one? I've got a photo of my cockpit progress from the one I am working on, on p45.
Next Up: 1/35 Tamiya Merkava 1/48 Tamiya King Tiger 1/35 Dragon M1A1 AIM
  • Member since
    February 2005
  • From: Cincinnati, OH
Posted by MA Cooke on Monday, March 21, 2005 7:26 PM
osjohnm: those covers are usually canvas, and they vary from plane to plane. If you go to the aircraft resource center (www.aircraftresourcecenter.com) and go to "walkarounds", there's an F-14 listed with "(plenty of cockpit photos)". Go there. The one featured in this one has a boot that's actually a purple color.

I did mine in a couple of variations of olive drab mixed w/ medium green...you can do just about any color - green, tan, grey, you name it. (My 3 year-old daughter suggested pink.)

On Bench: AM P-51B, Tamiya 1/48 F4U-1A On Deck: Hasegawa F-14's (too many); Tamiya P-47D; Academy P-47N;
  • Member since
    April 2003
  • From: Charlotte, NC
Posted by armorman on Monday, March 21, 2005 7:03 PM
Jeez osjohnm- I've been to Cape Town! I stayed in Camps Bay and traveled all around. My brother in law and good friend are from Jo'burg. I've spent a lot of time in SA watching rugby and drinking Windhoek!
Next Up: 1/35 Tamiya Merkava 1/48 Tamiya King Tiger 1/35 Dragon M1A1 AIM
  • Member since
    November 2005
Posted by Anonymous on Monday, March 21, 2005 5:52 PM

Had enough sun yesterday to get some detail painting in. Bare metal area at the rear of the airframe and the black trim on the canopy framing on both Cats and while I was at it a Tornado also. Didn't have my camera with me. But will post images later today if time permits.

Chuck
Fly Navy
JOIN OUR COMMUNITY!

Our community is FREE to join. To participate you must either login or register for an account.

SEARCH FORUMS
FREE NEWSLETTER
By signing up you may also receive reader surveys and occasional special offers. We do not sell, rent or trade our email lists. View our Privacy Policy.