SEARCH FINESCALE.COM

Enter keywords or a search phrase below:

F1 Group Build

38836 views
350 replies
1 rating 2 rating 3 rating 4 rating 5 rating
  • Member since
    May 2006
Posted by F1champ on Tuesday, July 11, 2006 3:05 AM
I used the SMS CF set that's specifically for the F2001. It comes with a few pretraced pieces but most of what you see I had to cut myself minus the actual rear wing. This is actually my first experience with CF decals, I plan on making this kit again some time down the road and hopefully can improve in my CF decaling.
  • Member since
    March 2004
  • From: Paarl, South Africa
Posted by SeaBee on Tuesday, July 11, 2006 1:21 AM
Very nice detail and super CF work F1 Champ! Which (whose) CF did you use on the rear wing? I have not as yet done one with that much CF.

As for my situation - I got through the masking of the body much much better than expected. Had only one small bit of seepage, which can be corrected easily. Even though it goes under a decal, yes - not sure how tranparent the yellow decal will be.
Completed the MP4/4 cockpit, so the upper parts are basically completed (bar the antennas which will be added at the last possible moment). So next up will be to do the suspension.
  • Member since
    October 2005
Posted by gulfstreamV on Monday, July 10, 2006 11:27 PM
Very nice work F1 Champ, I'm Impressed. I need to start myWilliams F1 BMW 24 and try to do as good. Trying to develop that type of skill untill I start it...paid a few $$ for it. don't wan't to short change myself...............................Cool [8D]
Stay XX Thirsty, My Fellow Modelers.
  • Member since
    May 2006
Posted by F1champ on Monday, July 10, 2006 11:01 PM
Alright guys here's some progress with the engine/rear suspension, it needs some touch up on a few places, and I plan on adding more details but here it is as of now.


  • Member since
    March 2004
  • From: Paarl, South Africa
Posted by SeaBee on Thursday, July 6, 2006 2:02 AM
Quick update: I started with the part I dread the most (on any model!) Masking of the body has started for the dark blue areas bordering the yellow - basically over the nose and around the bottom. Not the best of missions to be on, but will hopefully complete it tonight and get the blue on over the weekend... just hoping I won't faint when I peel of that mask!

MP4/4 comiang along - might do the seatbelts over the weekend. Yes, I'm getting way to optimistic with the time I think I'll have available! Wink [;)] Let's see...
  • Member since
    April 2005
  • From: Australia
Posted by taxtp on Saturday, July 1, 2006 9:00 AM
This is my fifth F1 car, and they do take a lot of work to complete nicely, but I really like the subjects. That said, it's taken me about 15 years to get to my fifth one.


I'm just taking it one GB at a time.

  • Member since
    March 2004
  • From: Paarl, South Africa
Posted by SeaBee on Saturday, July 1, 2006 1:51 AM
After all this time I have very little to report back! At least the R25's steering wheel is almost done.

Most time was spent on the tyre decals of the MP 4/4. Don't laught, it's a multi-evening project for me! Clearcoat one side, cleacoat other side, Good Year and Eagle logo's one side, then other, next up rotation arrows on outsides, then then outside L/R markings and wheel itself. Then clearcoat over one side, then the other, which was done this morning. Still to follow will be decals on the running surfaces.


The World Cup does not help... Blush [:I]
  • Member since
    April 2005
  • From: Australia
Posted by taxtp on Saturday, June 24, 2006 12:21 AM
Thanks Seamus. I was very happy with the Socceroos yesterday.
Any thoughts on the logo, can I improve it somehow ?
No progress on the Williams, got distracted by a small scale armored car. Should be back to it shortly.
Cheers
Tony

I'm just taking it one GB at a time.

  • Member since
    March 2004
  • From: Paarl, South Africa
Posted by SeaBee on Friday, June 23, 2006 1:08 AM
Aaah man, if you know how I've been looking around for that kit.... Looks good! Will be watching closely!

BTW, congrats on reaching the knockouts of the WC! Thumbs Up [tup] Had to cheer for the Roo's last night...
  • Member since
    April 2005
  • From: Australia
Posted by taxtp on Thursday, June 22, 2006 9:05 AM
Here's a photo of my Williams FW-11, from 1986, as it currently is.

Cheers
Tony

I'm just taking it one GB at a time.

  • Member since
    April 2005
  • From: Australia
Posted by taxtp on Thursday, June 22, 2006 7:05 AM
I've never attempted a logo before, but here is my first go. You're welcome to adopt it if you want.


I'm just taking it one GB at a time.

  • Member since
    March 2004
  • From: Paarl, South Africa
Posted by SeaBee on Wednesday, June 21, 2006 3:24 AM
Tony, no there's not one. Are you artistically inclined? *hint* Not many of those of us that started the GB is still participating, but the fun part is collecting hosts of new people along the way! Wink [;)]

Il Leone - lovely little place you've got there! I build in my study, not at all as nicely set-up as your place! Nice pics - good to see you're getting up to speed again. (Go for it, prime both! Evil [}:)] )

A quick question, since you have some 1:43 experience. The decals on the wheels - what's the best way to approach that chicken-and-egg scenario? Do you apply them before adding the wheels to the body of afterwards? Do they stay stuck or how do you "seal" them on the rubber?

Had a long weekend over here, but we went away, so no building. Tried the shading of the R25 yesterday, was not the biggest success story in the history of modelling. Will retry tonight. Thank goodness for TS13 over the paint.
  • Member since
    April 2005
  • From: Australia
Posted by taxtp on Tuesday, June 20, 2006 8:47 AM

Hi Folks,

Is there a logo for this GB ?

Thanks

Tony

I'm just taking it one GB at a time.

  • Member since
    October 2005
  • From: Shoreview, MN
Posted by Il Leone on Thursday, June 15, 2006 9:32 PM
SeaBee:  Great work!  Thumbs Up [tup]  Color looks good on the McLaren and I see you are doing well on the Renault. 

At long last Blush [:I] 
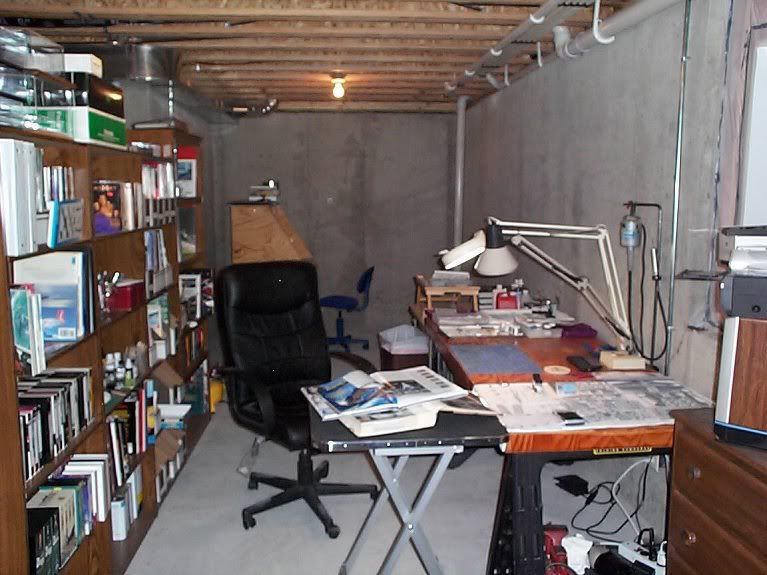
those long promised photos.  My little corner of the modeling world, or to borrow a line, my happy place.  Still need to hook up the venting on the paint booth.  When completely finished, the spray booth will be a seperate room with its own ventilation. 


And I am actually making some progress.  Well, not really.  This is actually a move backward since I sanded off the silver down to the primer.  I'm trying the make up my mind if I want to re-prime it of just take a deep breath and go for color.  Since it will likely get two color coats, probably will do that.


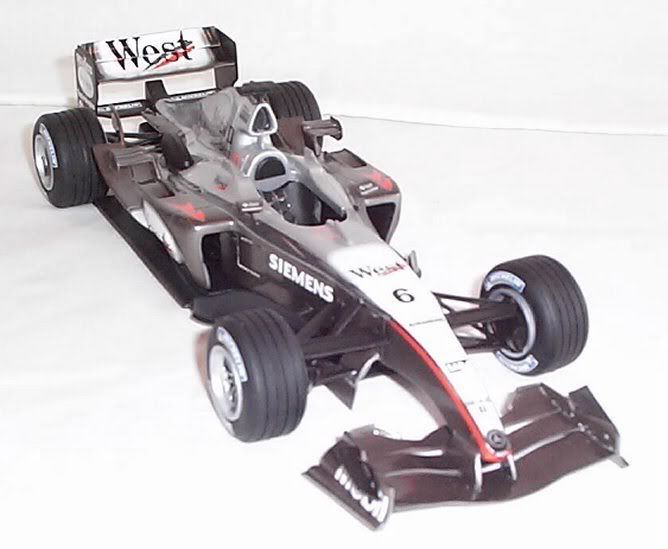
On the other hand, I did say I was starting a 1/43 McLaren.  Here is the MP4/15 I decided to start.  As you can see, making pretty decent progress on this one.  Brakes are pretty much done and it is time to paint it up.  Paint it up, let dry and glue to together.  Easy huh?  Wink [;)]  Yea, I don't think so either. Since it needs a coat of primer, could just prime the 1/20 right?  Decisions, decisions....Confused [%-)]


SeaBee, if you look on the bottom of the 1/43, you will see the seam line that is covered in primer.  I brushed some on to check the finish, also did some around the chimneys.  Nasty little devils those chimneys. 

Got a little more time, better get back to the bench. 
  • Member since
    March 2004
  • From: Paarl, South Africa
Posted by SeaBee on Wednesday, June 14, 2006 2:09 AM
Attached the mentioned comic relief. Once again I was surprised at the harshness of photography! The MP4/4 nosejob looks a rather miserable effort on the pics - IRL it actually is hardly noticable! Also added a size comparison between the two, just for fun. Don't be too harsh - my first attempt at both 1:43 and multimedia kits!

R25 Paint as it stands now


R25 As it looks now - Overview of all the bits and pieces


MP4/4 Overview


1:20 R25 vs 1:43 MP4/4 - Size does matter!


  • Member since
    March 2004
  • From: Paarl, South Africa
Posted by SeaBee on Tuesday, June 13, 2006 9:34 AM
Never too late to join, Tony!


F1Champ - I actually do have some comic relief for you guys in the sence of some progress pics. Will try to upload tomorrow. Am a bit more happy with the R25 colour now, though...
  • Member since
    April 2005
  • From: Australia
Posted by taxtp on Tuesday, June 13, 2006 9:12 AM
Hi,
Am I too late ??? I've got a Williams FW-11 about half way through. It's been one of those on again off again models and I'd really like to get it over the line this time. I can do some photos in the next day or so if you're interested.
Cheers
Tony

I'm just taking it one GB at a time.

  • Member since
    March 2004
  • From: Belgium
Posted by DanCooper on Monday, June 12, 2006 5:56 PM
Hello again guys, just here to let you know, I'm still on my F1 not all that much change though, some progress pics will follow by the end of the week (I hope), since I'm having problems with my camera.
On the camera, the pics look good, but for some reason I can't get them on my pc, even tried a new cable but doesn't work.
Anyway, since this is one of the old-school cars, meaning they show a lot of the engine and suspension details unlike the almost "paranoide" closed cars of today, I will be trying to do something special with the suspension, if it doesn't work you'll probably never hear of me again.... banzai.....

On the bench : Revell's 1/125 RV Calypso

  • Member since
    May 2006
Posted by F1champ on Saturday, June 10, 2006 6:09 PM
Yeah there aren't any replacements for the course display on the steering wheel, and so I figured it needed something there to add a little bit more realism, I'm dissapointed that the SMS decal det didn't come with a "Ferrari" decal to put under it on the wheel like it should be.

The CF on the wheel is only on the top I wasn't brave enough to do the whole face of it, so it wasn't too complicated. You have any pix of the two you're working on?
  • Member since
    March 2004
  • From: Paarl, South Africa
Posted by SeaBee on Saturday, June 10, 2006 2:03 AM
Aaah, okay. Just saw the magnyCours layout on the steering wheel and jumped to conclusions. Most likely not a decal included in replacement set. Not that it detracts from the great job though - somebody looking at it in the flesh, will not see the steering wheel that blown up anyways, esp once installed.
I've not even yet had the patience to attempt a CF steering wheel. Even on the R25, I just sprayed it metallick black to try and replicate the CF. Has a loock at it this morning and feels it shorts a bit of something - might add some clear yellow (looks yellowish on tv and my pics) and see what it looks like afterwards. Then again, not that the wheel itself is close to what the R25's wheel looked like, but I don't think you can blame the manufacturers for doing that.

Got the MP4/4's decal to look a bit better and started with the light blue on the one area on the rear wing where it is needed. Allready clad in the dark blue overall. The more I look at it, the more I feel the R25's light blue is just a tad too dark. Maybe just overly critical... will contemplate it a bit more over the weekend. Slow progress, but should be finished sometime during the F1 season, if all goes well!
  • Member since
    May 2006
Posted by F1champ on Friday, June 9, 2006 2:55 PM
I will be using the tobacco decals I got from SMS, I don't think i'm going to follow an exact GP version for this car with reguards to livery, I'll just go with what I like as far as looks. I plan on building this kit again sometime down the line with the super detail set after I have a little more experience with PE parts and then I might be a little bit more strict livery wise.
  • Member since
    March 2004
  • From: Paarl, South Africa
Posted by SeaBee on Friday, June 9, 2006 9:31 AM
Nice start on the F2001! Very nice CF on the steering wheel. Non-tobacco version I see - personally thought the Ferrari's looked horrible with those white blobs and empty noses... Even this year's effort looks much better!

R25 is clad in light blue. Might consider another layer over the weekend, but seriously doubt it. Onto finer stuff and clear coats...
The MP4/4 had a minor hickup. Strangely enough, with the decal applied and some MicroSol added, the edges decided to curl upwards instead of confirming to the "laws" and bend down towards the bodywork. Thanks to a standby call, I was not there to oversee the process and convince it which way is better. This being the fluo orange Marlboro markings ahead of the cockpit. So will have to coax it into settling.


But now... off to the 1st weekend of WC action!
  • Member since
    May 2006
Posted by F1champ on Thursday, June 8, 2006 1:19 PM
I have some pix of the F2001 i'm working on, cockpit is finished, and the body has been primed, sanded, and given a second coat.


  • Member since
    March 2004
  • From: Paarl, South Africa
Posted by SeaBee on Wednesday, June 7, 2006 2:13 AM
Seems I'm lucky, then. Whole body shell, floor pan and that's it! Keep in mind that I'm doing the "old" WCT kit, which was basically just a normal kit. Was upgraded recently to a "proper" WCT superdetail kit. Have some kits underway and will see which way they go together...

On the Red5 MP4/20 - they've allready done that. New version's been availabl for a couple of months. Replaced the all-metal body with some resin parts, added decals for later race versions, etc. I'm in no rush, anyways.... maybe waiting for a MP4/21 to be driven as beautifully as the thing looks! Have some Alclad chrome waiting for a release of that! Wink [;)]
  • Member since
    October 2005
  • From: Shoreview, MN
Posted by Il Leone on Tuesday, June 6, 2006 11:03 AM
SeaBee:  I will "try" to get the photos from last night posted today.  Ashamed [*^_^*]  If I remember right you are building the WCT version of the MP4/4?  My WCT kit for the Williams FW-11 had a PE bottom to the tub.  Very easy.  The rest of the Tameo kits come in one of two versions.  First is the seperate white metal part that glues to the bottom half of the tub  Gotta have it mated perfectly flat before you glue it in.  Also have to check the fit to the rear pan so it all lines up together.  The other version is way worse.  It has the nose part molded to the pan so you put in the seat, etc. and then glue the pan and nose bottom to the tub.  YIKES Shock [:O]  This leaves a nasty and I mean nasty gap in the front behind the wing.  The only reasonable solution I have found is to cut off the part and glue it to the tub.  (Unless you are Kamimura, then you solder it in)

The MP4/15 had the first version.  Also had chimneys on it that I decided to install now instead of later.  Makes the polishing harder, but I think the fit will be better in the end.  BTW, if you haven't seen the work of Akihiro Kamimura, you are missing the work of a true master.  His website is, "God dwells in small things"  http://www.linkclub.or.jp/~ak-model/index.htm  Look around and you can pull up his step-by-step photos of how he builds in 1/43.  If only I was so good. 

Oh, and wait on getting the Red 5 kit, they are updating a big portion of it because the quality was pure junk.  I'm debating on it still.

  • Member since
    March 2004
  • From: Paarl, South Africa
Posted by SeaBee on Tuesday, June 6, 2006 1:26 AM
Il Leone - I want that box you have!! The one you put the model in and shake - esp the 43rd ones! Wink [;)]

The R25's body (and top part of the front wing assembly) just got the first intro to paint over the weekend, will give it a wetter layer tonight after a quick scrub of the previous layer. Having gotten used to blasting away with TS paints, this is the first body I did in a while using the a/b - usually reserved for exhausts, etc. And found it a bit fine for that kinda work, so had to go about it quite carefully to get even paint distribution.

The Tameo MP4/4 got it's windshield added - part of why I want thast box! Had to do a few touch-ups with the one side not coming out to my liking. Should continue a bit on the body decalling there as well.

Where did Tameo decide to split up the McLaren body on yours, Il Leone? I was fortunate enough not to have such complications. They did make up for it (unintentionally) by short-filling the nose... Wink [;)]
On the Kimi and great races topic - I am seriously contemplating giving Red5's newer version of their MP4/20 a try to build a Japanese GP version. Talk about a race! Fortunately Spa will be back next season - allways a good race there...
  • Member since
    October 2005
  • From: Shoreview, MN
Posted by Il Leone on Monday, June 5, 2006 4:18 PM
Studio 27 MP4/19B, Kimi's Spa winner from 2 years back.  Great race, was at Spa last year and am sorry it won't be on the calendar this year. 
  • Member since
    May 2006
Posted by F1champ on Monday, June 5, 2006 3:54 PM
What brand and year is your 1/20 McLaren?
  • Member since
    October 2005
  • From: Shoreview, MN
Posted by Il Leone on Monday, June 5, 2006 10:54 AM
Ready for more painting here.  The 1/43 McLaren is doing much better than I thought after the first clean-up.  Gotta love how Tameo splits the chassis in half and you get to remove a nice seam.  Gotta love 1/43 kits.  Kinda like resin, clean them up, spray some paint, put them in a box and shake.  Out pops a finished kit!Clown [:o)]  Fingers crossed that I can get some paint sprayed this week so it can start curing out.  The humid season is upon us now.  Meanwhile the 1/20 McLaren is back ready for more silver.  Hopefully this time it will come out decent!!


  • Member since
    May 2006
Posted by F1champ on Monday, June 5, 2006 2:07 AM
I've been working on getting the F2001 started and am waiting for the SMS carbon fiber decals to arrive, looks like a fun kit. Just wondering if anyone else has made any progress in this build?

-Kyle
JOIN OUR COMMUNITY!

Our community is FREE to join. To participate you must either login or register for an account.

SEARCH FORUMS
FREE NEWSLETTER
By signing up you may also receive reader surveys and occasional special offers. We do not sell, rent or trade our email lists. View our Privacy Policy.