SEARCH FINESCALE.COM

Enter keywords or a search phrase below:

Battle of Britain GB 2006 - 1 May to 31 Oct 06

55080 views
1038 replies
1 rating 2 rating 3 rating 4 rating 5 rating
  • Member since
    July 2004
  • From: SETX. USA
Posted by tho9900 on Wednesday, June 28, 2006 6:18 PM

Karl - is that the Revell release of that kit?  I saw a review on it and you have to bring the putty in by the bucketful it looks like!!!  Good luck!

Quick question for anyone who has built the Hasegawa He-111 series kits... how did you glue the glass nose cone together?  I tried CA but it wouldn't hold, was going to try clear parts glue but I had to hold it too long and got bored... any other suggestions?  I was thinking gluing it in pieces to the frame and waiting till dry before putting the next piece on but it looks like it won't fit in as good as a one piece unit.  I CA'd it last night and slipped it on the nose and it fit beautifully!  I'm scared to try using accelerator lest it melt the canopy.  I may just opt for a vac canopy on this, it would be a first for me!  I would just hate having to mask it!

---Tom--- O' brave new world, That has such people in it!
  • Member since
    July 2003
  • From: Bicester, England
Posted by KJ200 on Thursday, June 29, 2006 6:56 AM
 tho9900 wrote:

Karl - is that the Revell release of that kit?  I saw a review on it and you have to bring the putty in by the bucketful it looks like!!!  Good luck!

Release of what kit?Wink [;)]

No progress last night, too knackered.

Karl


Currently on the bench: AZ Models 1/72 Mig 17PF

  • Member since
    July 2004
  • From: SETX. USA
Posted by tho9900 on Thursday, June 29, 2006 1:42 PM
 KJ200 wrote:
 tho9900 wrote:

Karl - is that the Revell release of that kit?  I saw a review on it and you have to bring the putty in by the bucketful it looks like!!!  Good luck!

Release of what kit?Wink [;)]

No progress last night, too knackered.

Karl


The Do-24, that's what it looks like to me...

---Tom--- O' brave new world, That has such people in it!
  • Member since
    July 2003
  • From: Bicester, England
Posted by KJ200 on Thursday, June 29, 2006 3:05 PM
 tho9900 wrote:
 KJ200 wrote:
 tho9900 wrote:

Karl - is that the Revell release of that kit?  I saw a review on it and you have to bring the putty in by the bucketful it looks like!!!  Good luck!

Release of what kit?Wink [;)]

No progress last night, too knackered.

Karl


The Do-24, that's what it looks like to me...


Damn the man is good!Thumbs Up [tup]

But you just know it's going to have FRINGE!!!!!! MUWAHAHAHA.Wink [;)]

I'll post pics when I get a chance.

Rescribed the fuselage this evening.

Karl


Currently on the bench: AZ Models 1/72 Mig 17PF

  • Member since
    July 2004
  • From: SETX. USA
Posted by tho9900 on Thursday, June 29, 2006 6:16 PM

Karl - not good, I just know how to narrow down the field from what was on the first page and Google enough modeling reviews of those kits listed to show the tail assembly!  Wink [;)]  But I really did know all along, I was just making sure no one else wanted to answer it..  ::cough:: ::cough::

Well, here's my progress of the day... it was a long winding road with much sanding but I finally got the canopy together.  I read a few reviews and they all resorted to putting the canopy on in pieces glued to the frame then to each other.  It fit fine when put on as one piece, it just didn't want to stay connected that way..  They also clued me in on how they managed to do the guns... the nose cannon they left out and just barely tacked the dome on.  The side windows they left out and placed tape on the INSIDE of the holes through the roof gunner hole and took it off when done painting then glued the windows complete with MG's into place.

I still need to put a bead of clear parts glue around the canopy frame where it touches the plasticc to seal any gaps left over.

My progress:

A shot with the upper control console that came from the Eduard set showing.  (for that alone I would have bought the set, don't know why but I like it!!)

The other side showing the 14 rolls of tape that went into masking, ok well the huge sheet of Eduard pre cut masks.. but there was a LOT of wondow to this thing!

A shot from the front showing some of the interior through the nose gunners (missing) canopy piece..

---Tom--- O' brave new world, That has such people in it!
  • Member since
    February 2003
  • From: A Spartan in the Wolverine State
Posted by rjkplasticmod on Thursday, June 29, 2006 7:30 PM

Nice work Tom.  Tedious, but nice.

Regards,  Rick

RICK At My Age, I've Seen It All, Done It All, But I Don't Remember It All...
  • Member since
    July 2004
  • From: SETX. USA
Posted by tho9900 on Thursday, June 29, 2006 8:04 PM

Rick - thanks!  Although I actually liked the masking part, even with the "relative" ease of the Eduard masks it was absorbing... it was the canopy that was giving me fits... by not gluing together CA was building up along the joins and luckily I was able to sand it off before the next try... finally the old fashioned white clear parts glue did the job... it only had a few gaps that should fill nicely with more clear parts glue...

The part I dread is coming up... finishing it!!!

BTW: nice to see ya around... haven't seen much of ya lately!!!

---Tom--- O' brave new world, That has such people in it!
  • Member since
    July 2004
  • From: SETX. USA
Posted by tho9900 on Friday, June 30, 2006 6:09 PM

ok a slight setback here... I lost the small attachment that goes on the bottom of the glass cone nose... it looks maybe like some sort of attachment for the bomsight or I dunno... it's oval in shape so I am contemplating how to fashion it from sprue.. I might try flattening a sprue some and cutting off the tip to see if I can get that oval look just right...

that is... unless someone has a hidden stash of oval diameter sprue??? 

Got the yellow for the stripe sprayed tonight, the canopies are all RLM02 in anticipation of their overcoat.. I did notice a piece under the fuselage I didn't hit with the 2000 grit so it is a little rough... I'll hit that tomorrow, gonna let the paint dry first!!

Oh... that and I need to figure out how to get the IP back in... it fell off with my trials getting the canopy to stay put and I just realized it is sitting in the kit box... oh well... I think I might be able to squeeze it through the access hatch in the top...

---Tom--- O' brave new world, That has such people in it!
  • Member since
    August 2004
  • From: Nowhere. (Long Island)
Posted by Tankmaster7 on Friday, June 30, 2006 6:29 PM
I know how that feels tom.

My IP fell off on my MiG-29 with the aires resin pit. I had to pry off the front fuselage and reattach the IP by using a toothpick with blutack stuck on th end and liberal amounts of CA where the IP was supposed to attach to. Can we say nightmare...

Can't wait to see the paint on that thing Tom.
-Tanky Welcome to the United States of America, a subsidiary of Exxon Mobil Corporation, in partnership with Halliburton. Security for your constitutional rights provided by Blackwater International.
  • Member since
    July 2004
  • From: SETX. USA
Posted by tho9900 on Friday, June 30, 2006 7:00 PM

Tanky - it looks easy enough that if worse goes to worst I can just snap the whole nose cone off... it's only held by clear part glue.  However I am afraid it will also split at the join lines for the 5 pieces that it is made of prompting another long arduous glue then let dry an hour, glue the next piece and let dry an hour etc... that's not a bad idea with the toothpick with the bluetak.  I might entertain the idea of thick (.5mm or so) wire with blue tak, bent to get it in through the access hatch.   I can CA the back of the IP and try to place it in just right.

I can definitely see me building another of these... with ALL the PE and stuff... you really can see a lot of the interior when the canopy is on.

I just ordered the PE, tires and masks for my B-25 for the Memorial Day GB, I should have ordered another set of PE then, HL is having its 40% off sale so I could have picked up another He-11 and done it in a different scheme.

I think I am doing the black lowers with splinter uppers on this one if I can find that ref pic again... it looked pretty cool!

---Tom--- O' brave new world, That has such people in it!
  • Member since
    July 2004
  • From: SETX. USA
Posted by tho9900 on Friday, June 30, 2006 7:26 PM

didn't find the one with black lowers I saw earlier but found this one... it lists as flying over England in 1940... it definitely looks different than the usual splinter!!!!

---Tom--- O' brave new world, That has such people in it!
  • Member since
    July 2003
  • From: Bicester, England
Posted by KJ200 on Saturday, July 1, 2006 4:46 AM
Tom, I'm making notes on your progress for my He 111. I'm not going to bother with the Eduard PE, though I must admit I was tempted by the pre-painted Zoom set, as having through the PE spares box, it looks like I've got enough belts etc to do this one.

Might have a go at scratching the centre console though, and build the ammo drum racks, as I've got a load of resin ammo drums in the spares box.

The camo scheme above looks great. Hope you get that IP sorted.

Karl

Currently on the bench: AZ Models 1/72 Mig 17PF

  • Member since
    July 2004
  • From: SETX. USA
Posted by tho9900 on Saturday, July 1, 2006 12:06 PM
Karl - you should be able to do the center console with styrene card stock cut into strips... I can measure the approximate width and length for you, the depth would be the hard part, I would say about 2.5mm but I can see if I can get a more sure estimate... the rest of the PE set was mainly levers and such and the belts.  There are two panels that you could easily scratch with a styrene sheet cut just right, I'll try to scan the PE instructions today so you can see where they go.
---Tom--- O' brave new world, That has such people in it!
  • Member since
    July 2003
  • From: Bicester, England
Posted by KJ200 on Saturday, July 1, 2006 12:39 PM
Tom, thanks for the offer, but the instructions are available off the Eduard website.  

I was looking at them yesterday, which convinced me that it wasn't worth forking out for the PE, when I already had plenty in the spares box that would do just fine.

I've enjoyed the little bit of scratchbuilding I've done for the Do 24, so am starting to feel brave.

Progress Update

The engine cowlings on the Do 24T straight out of the box are very different to the ones on the ones on the Do 24N I'm building, much shorter, with a more enclosed front. The shortening bit was easy, but I was dreading the cowling fronts.

In the end a trawl through the spares box produced a set of 1/32 He 162 wheels, which were just the ticket.....


....I drilled out the centres and sanded until I was left with the correct shape.

Still filling and sanding the fuselage, this thing is covered in sink holes!

This is what it should look like by the time I'm finished...


More pics tomorrow.

Karl

Currently on the bench: AZ Models 1/72 Mig 17PF

  • Member since
    August 2004
  • From: Nowhere. (Long Island)
Posted by Tankmaster7 on Saturday, July 1, 2006 3:34 PM
very innovative karl.
-Tanky Welcome to the United States of America, a subsidiary of Exxon Mobil Corporation, in partnership with Halliburton. Security for your constitutional rights provided by Blackwater International.
  • Member since
    July 2004
  • From: SETX. USA
Posted by tho9900 on Saturday, July 1, 2006 4:09 PM
Good job Karl!  yeah I forgot the instructions were on the Eduard site, guess I should start checking there to see what I could do myself before I go and buy a PE set... the two panels I spoke of would have been better in styene sheet!
---Tom--- O' brave new world, That has such people in it!
  • Member since
    July 2003
  • From: Bicester, England
Posted by KJ200 on Saturday, July 1, 2006 4:51 PM
Tom, I was about to order the Eduard PE set, when it dawned on me I had a whole load of PE left over from the Greif, and a Dornier I binned. After all I'm mainly after belts and pedals anyway, and I want to try my hand at a little more in the way of scratchbuilding. I still bought the Eduard masks though.

Tanky, thanks, I was really dreading those cowlings.

Progress Update

Some pics...

Am I the only one who thinks this looks like a whale?


This is quite a big A/C, only marginally smaller in span than the Greif, and much the same length.
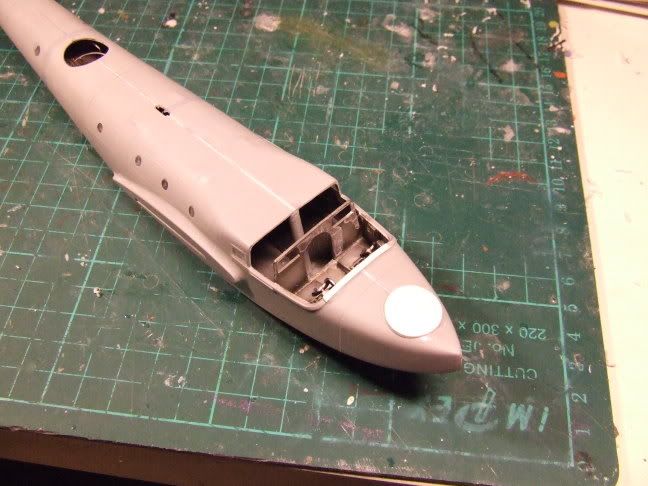


I've blanked off the forward turret with plastic card, as this machine only retained the tail turret, and even then without guns. I've also had to add some strip to the front edge of the pit, to compensate for all the material I've had to sand away.
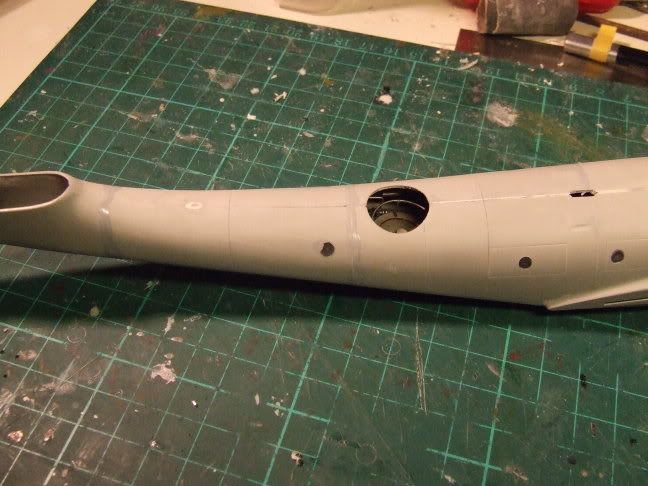


The port hole aft of the rear fuselage opening was drilled out, and a punched piece of clear plastic glued in. The grey over it is Mr Surfacer, the one on the other side has already been filled and sanded flush, as have all the other port holes.These will be polished with Micromesh cloths, then masked prior to painting

You can also see the white line of plastic card along the fuselage seam where I had to shim it make the canopy fit!

At this rate it should be ready for paint next week.

Karl

Currently on the bench: AZ Models 1/72 Mig 17PF

  • Member since
    February 2003
  • From: A Spartan in the Wolverine State
Posted by rjkplasticmod on Saturday, July 1, 2006 7:50 PM

Looking good Karl.  Nice work.

Regards,  Rick

RICK At My Age, I've Seen It All, Done It All, But I Don't Remember It All...
  • Member since
    May 2006
  • From: Oklahoma
Posted by Dave23 on Saturday, July 1, 2006 8:17 PM
 KJ200 wrote:
Am I the only one who thinks this looks like a whale?


Have to admit, there is a resemblance Smile [:)]

Great work on a very interesting looking bird Karl Thumbs Up [tup]

-dave

-d

  • Member since
    July 2003
  • From: Bicester, England
Posted by KJ200 on Sunday, July 2, 2006 9:09 AM
Rick, Dave, thanks for the encouragement.

The sponsons and horizontal stabiliser are now on, though I've ended up adding more shimming to the pit opening as it was still too large.

Karl

Currently on the bench: AZ Models 1/72 Mig 17PF

  • Member since
    July 2004
  • From: SETX. USA
Posted by tho9900 on Sunday, July 2, 2006 6:14 PM

Well got the coat of night black on the He-111 like the one in the ref pic I posted... I tried to leave a little of the yellow band showing through for some accent as this was painted after the Battle had already started.  Right now it is curing while I am running the airbrush tip through the ultrasonic... it started wanting to clog and spray drops,,,

I'd take the masks off but I still have to future it... then probably a coat of semi gloss after the decals.

All of the color WWII photos I saw showed a semi gloss to satin type finish to the He-111 I didn't see in the refs... being these are actual photos I am taking their word on it... in fact one had an almost gloss tail.  Here's some pics:

wing root:

Notice the engine cowl on this one: especially at the front

again semi gloss look:

anyway, it's what I believe it should be... it should look good on a night bomber too!


---Tom--- O' brave new world, That has such people in it!
  • Member since
    February 2003
  • From: Melbourne, Australia
Posted by darson on Sunday, July 2, 2006 8:45 PM

Tom I may have missed a post but how did you go putting in the IP?  I must admit I cringed when I read that you'd done that because I made a similar mistake with a P-47 gun sight and it was a pain in the backside to put back on the kit.

When can we see the results of the paint job by the way?

Karl the Do 24 is looking just great and the use of the 1/32 wheels for cowlings is a stroke of genius, I'm afraid I never would have thought of that in a million years.

The instructions on the Eduard site are just brilliant IMHO, I always download them when I order a PE set so I can begin construction preparation while I'm waiting for the PE fret to arrive.

Progress on the Hurricane is coming along reasonably well now, on the weekend I sprayed Alclad on the Ultracast and kit wheel well and landing gear components as well as finished off sanding away all of the extra bits and pieces from the fuselage that I don't need for a Mk.I.  Even though the fuselage on this kit is modular it's an absolute breeze to put together (as compared to the Hasegawa P-40) because the joins all fall along panel lines.  It's almost starting to look like an aircraft now rather than a collection of bits of styrene.

Cheers

  • Member since
    July 2003
  • From: Bicester, England
Posted by KJ200 on Monday, July 3, 2006 3:11 AM

Tom, can't see the pics at the moments as I'm at works, but looking forward to taking a gander when I get home.

Darren, not so much genius as pure desperation. I was even considering looking for a cheap B17 to nick the cowlings from!

Does anyone else suffer from pin holes in filled seams? I've tried Mr Surfacer 1000, which gets rid of the worst of them, but still leaves a few. Do I need some 1200 as well?

Progress Update

The main wing support struts are now mounted on the top of the fuselage, and faired in with copious amounts of Mr Surfacer, as the kit joint lacks the aerodynamic fairing. Same story with the horizontal stabiliser support struts.

I'll try and post some pics tonight.

Karl


Currently on the bench: AZ Models 1/72 Mig 17PF

  • Member since
    July 2003
  • From: Bicester, England
Posted by KJ200 on Monday, July 3, 2006 3:20 PM
Tom, that last 111 is not the real deal. It's one of the CASA built machines used in the movie BoB, note the fronts of the engine cowlings, it's Merlin powered.

Is your Hase 111 covered in a million and one ejector pin marks? I've got used to Revell's latest kits, like the Greif and the He 162 where they are all hidden away.

Darren, watch the gun inserts on the Hase Hurricane along with the landing light cover and the nav lights. I attached the landing light covers to mine after painting, terrible mistake, as the fit was awful.

Progress Update

Just tried the Mr Surfacer and cellulose thinner trick on the sponson to fuselage joint, never tried it before......

.......Wow!! [wow]

I'm hooked on Mr Surfacer, both the possibilities and the fumes....Confused [%-)]

Anyway here are some pics....


Note the state of my desk!!!!


See what a mean about whale?


I'm leaving the fins off the tailplane until after painting, as it will make masking the red bands that bit easier.

Karl


Currently on the bench: AZ Models 1/72 Mig 17PF

  • Member since
    July 2004
  • From: SETX. USA
Posted by tho9900 on Monday, July 3, 2006 6:22 PM

Karl - I figured that about the last one.. the letter codes matched the one the CAF used to have here but the pic was on one of the WWII in color sites... it still didn't look right but I left it...

The Hasegawa He-111 kit had very little ejector marks, most were hidden quite nicely.  (.i.e not a huge on on the cushion of the pilots seat like I have seen on some kits) .. all in all it's a good little kit!!! 

---Tom--- O' brave new world, That has such people in it!
  • Member since
    February 2003
  • From: Melbourne, Australia
Posted by darson on Monday, July 3, 2006 6:57 PM

Karl thanks for the heads up on the landing & nav light cover I will certainly follow your advice and fit that before painting.  I've heard from several other people that the gun inserts are a bit of a dog when it comes to fit but at least I'm expecting that now.

On the topic of great Gunze products, have a look at Mr Dissolved Putty.  It's basically the same thing as Mr Surfacer only much thicker which makes it a lot better filling larger gaps and as it is applied with a brush it is a lot cleaner than normal putty.  I've switched to it almost completely now and only use Mr Surfacer on touch-up work.

Cheers

  • Member since
    February 2003
  • From: Melbourne, Australia
Posted by darson on Monday, July 3, 2006 9:04 PM

Tom I love that WWII in color site it's got some brilliant images.  Unfortunately it's also got some shots which are not of the genuine article or are taken well after the war.  For instance there is a shot of a Dornier Do 335 Arrow which I know for a fact was taken by the Dornier engineers who restored Werk No 240102 at Oberpfaffenhofen Germany in the mid 70s.

Cheers

  • Member since
    July 2003
  • From: Bicester, England
Posted by KJ200 on Tuesday, July 4, 2006 6:16 AM

Darren, I've been using Mr White for the last couple of years, works pretty well, but a bugger to apply. Will have to give the disolved putty a go, along with Mr Surfacer 500.

Tom, I was looking at the gear struts and the wheel bays, and they look like they've got loads of pin marks.

Karl


Currently on the bench: AZ Models 1/72 Mig 17PF

  • Member since
    July 2004
  • From: SETX. USA
Posted by tho9900 on Tuesday, July 4, 2006 8:15 AM

Karl - wierd!  on mine there are two small pin marks way up high on the strut where it appears they will be inside the wheel well anyway, I'm going to test fit that before I decide if they show or not...  there were some marks in the wheel bay but there is a "box" that goes inside the wheel bay which covers anything up.  The box has a small bit of detail to make the bay a bit more interesting...

ahhhh I am glad you posed this question because I hadn't got to the wheel bay yet, but just looked and noticed there is a single ejector mark on each bay door... they look easy enough to sand off, not TOO near any detail...

---Tom--- O' brave new world, That has such people in it!
  • Member since
    July 2003
  • From: Bicester, England
Posted by KJ200 on Tuesday, July 4, 2006 9:22 AM

Tom, I've got ejector pin marks in each corner of wheel bay box. Probably won't be visible once the gear doors are on though.

I just find it annoying that you pay a hefty premium a Hasa kit over something like a new Revell kit, and yet it's the Revell kit where the ejector pin marks are hidden away!

Rant over.

Karl


Currently on the bench: AZ Models 1/72 Mig 17PF

JOIN OUR COMMUNITY!

Our community is FREE to join. To participate you must either login or register for an account.

SEARCH FORUMS
FREE NEWSLETTER
By signing up you may also receive reader surveys and occasional special offers. We do not sell, rent or trade our email lists. View our Privacy Policy.