SEARCH FINESCALE.COM

Enter keywords or a search phrase below:

Axis Aces Sep 2006 - Jun 2007

36196 views
524 replies
1 rating 2 rating 3 rating 4 rating 5 rating
  • Member since
    December 2002
  • From: Reno, NV
Posted by espins1 on Friday, June 1, 2007 10:21 AM

Officially it ends at the end of June, however if people are still building and actively involved in the build then it will continue until it's done.  Smile [:)] 

I had hoped to have two projects done for this build, but will only have time for one.  At least my G-14 will be done within a week.  Whistling [:-^]

Scott Espin - IPMS Reno High Rollers  Geeked My Reviews 

  • Member since
    December 2004
  • From: 288921 E, 5659868 N UTMz12, NAD83
Posted by jboutin on Saturday, June 2, 2007 3:48 PM

So finally the decals.  I still have the do the stenciling, maybe tomorrow?  I almost lost the starboard rudder swastika.  I was holding the tweezers too tight and they slipped out of my hand and the decal and its backing went flying!  luckily it stuck to the wet paper backing and didin't fall off though it took me 10 mins to find the darn thing.  I thought that only happens with smal bits.  I guess the carpet monster is looking to expand its diet!

JAY - fighting evil since 2:15pm, July 8,1976 -
  • Member since
    December 2002
  • From: Reno, NV
Posted by espins1 on Saturday, June 2, 2007 5:14 PM

Coming along nicely Jay!

I'm a bit stalled on my G-14 while I try to figure out how to deal with a small gap along the right side of the main cockpit which I apparently happened after I glued the canopy on.  I held it in place for quite some time, then set it down to go to bed.  The next morning this is what I found.  Shock [:O]  I'm half tempted to rip the canopy off, trim and sand the glue off, and fix whatever shape issues need to be fixed to get that thing to sit right.  Sigh [sigh]

Scott Espin - IPMS Reno High Rollers  Geeked My Reviews 

  • Member since
    December 2002
  • From: Reno, NV
Posted by espins1 on Saturday, June 2, 2007 7:10 PM

I have removed the canopy, which wasn't too difficult.  The glue (white canopy glue) peeled right up just using my thumbnail and a pair of fine tweazers. 

I took advantage of this opportunity to remove the shoulder belts and shorten them (which I should have done in the first place Banged Head [banghead], I have GOT to start listening to the voices in my head Smile,Wink, & Grin [swg]).  I did a little trimming and sanding of the canopy to get a better fit.  I'll also follow your advice Drew and do a little touch up with the RLM66 after I reattach the belts.  Thanks my friend.  Smile [:)]

I have put way too much effort into this project to let those two issues ruin it for me, so I just HAD to fix them.  Smile [:)]

Scott Espin - IPMS Reno High Rollers  Geeked My Reviews 

  • Member since
    December 2002
  • From: Reno, NV
Posted by espins1 on Saturday, June 2, 2007 8:46 PM

Here are two shots of the shoulder belts after I shortened them using the adjusting straps i.e. sprue snippers and some super glue. Laugh [(-D]  I also did a little touch up with the RLM66 to fix some of my glue issues.  Shock [:O]

Scott Espin - IPMS Reno High Rollers  Geeked My Reviews 

  • Member since
    December 2002
  • From: Reno, NV
Posted by espins1 on Saturday, June 2, 2007 9:39 PM

Here is the canopy after the adjustments were made and it was re-attached.  Smile [:)]

Scott Espin - IPMS Reno High Rollers  Geeked My Reviews 

  • Member since
    November 2003
  • From: Nashville, TN area
Posted by bobbaily on Sunday, June 3, 2007 6:11 AM

Scott-good recovery on the canopy.

Jay-your 109 is looking very nice.

Bob


  • Member since
    December 2002
  • From: Reno, NV
Posted by espins1 on Sunday, June 3, 2007 10:49 AM
Thanks Bob.  As soon as everyone is awake I'm going to spray the white winter scheme.  Smile [:)]

Scott Espin - IPMS Reno High Rollers  Geeked My Reviews 

  • Member since
    December 2002
  • From: Reno, NV
Posted by espins1 on Sunday, June 3, 2007 3:00 PM

Here are three photos right after I sprayed the whitewash.  I used about a 50/50 ratio of Tamiya XF-2 Flat white and 70% isopropyl rubbing alcohol.  Overall I'm very pleased with the results as I think I captured the spirit of what I was trying to accomplish.  Smile [:)]

Scott Espin - IPMS Reno High Rollers  Geeked My Reviews 

  • Member since
    November 2003
  • From: Nashville, TN area
Posted by bobbaily on Sunday, June 3, 2007 5:35 PM
Very nice Scott.  I hope to have a reason to build a winter wash 109 or 190 at some point.

Bob


  • Member since
    February 2003
  • From: Melbourne, Australia
Posted by darson on Sunday, June 3, 2007 8:49 PM

Nice one Scotty I think you've really nailed the white wash Thumbs Up [tup]Thumbs Up [tup]Thumbs Up [tup].  It really does look like a white washed rather than an aircraft painted white if you know what I mean. 

Great "in progress" shots by the way, it's been a lot of fun following your build.

JB the 109 is looking cool (so is the 109B in the background) and nice recovery on the decal eating carpet monster.

Cheers 

  • Member since
    December 2002
  • From: Reno, NV
Posted by espins1 on Monday, June 4, 2007 11:24 AM

Thanks guys. 

You know, I was so thrilled with how great the camo looked that I didn't notice how stark the contrast was with the canopy framing until I was looking over the pics I posted.  I neglected to pre-shade the canopy, and it shows!  Shock [:O]

I'm going to take some Q-tips and windex, carefully strip the white paint from the framing, spray them with some RLM75, then do the same treatment with the white as I did on the rest of the kit.  There is also one spot I need to touch up with the white, on the inner side of the wheel bulge on the upperside of the left wing. 

Shouldn't be too difficult to correct.... in theory  Wink [;)]

Scott Espin - IPMS Reno High Rollers  Geeked My Reviews 

  • Member since
    February 2003
  • From: Melbourne, Australia
Posted by darson on Monday, June 4, 2007 8:15 PM

Good pickup on that one Scott, I just went back and re-checked your photos and you are right.

As an other alternative, could you post shade the canopy to get the same effect?

Cheers
  • Member since
    February 2003
  • From: Melbourne, Australia
Posted by darson on Tuesday, June 5, 2007 5:30 AM

Ok you can now count as officially completed my (first) build for this GB.

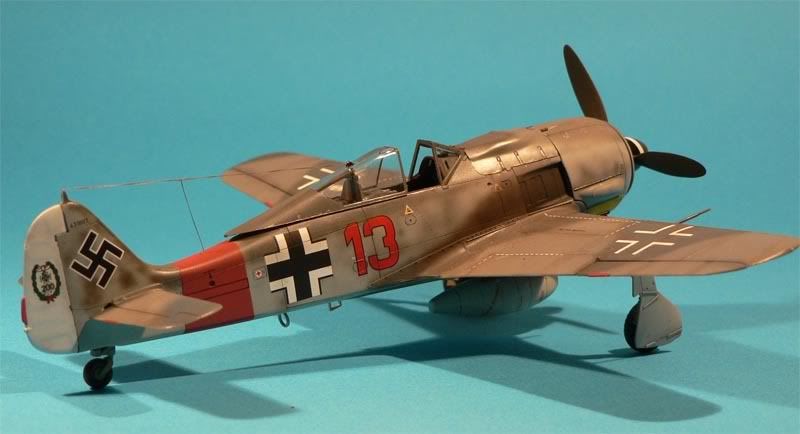
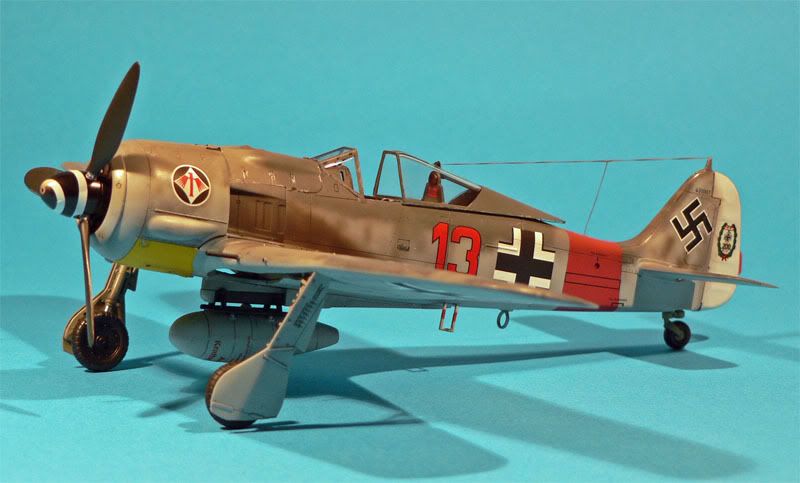
Here is Heinz "Pritzl" Bär's Fw 190A-7 which started out life as the Tamiya A-8 kit.  The modifications needed to backdate an A-8 to A-7 spec are as easy as you can get, all that was required was

  • With the introduction of the A-8 the ETC carrier was moved 8 inches forward, so I moved the rack mounting points about 2mm behind the indicated positions and shortened the rear section of the rack by the same amount.
  • The outline of the large MW50 access hatch was filled and sanded smooth on the bottom of the fuselage was filled and sanded smooth. This hatch provided access to the MW50 gear and was not present on the A-7.
  • Another panel was removed from the starboard fuselage side, the fuel filler hatch was relocated, and a further hatch filled and smoothed on the port side of the fuselage.   All the hatches were filled with Mr Surfacer 500 which really did the job nicely.
  • I filled and sanded the outer wing gun ports as my references stated that Heinz Bar preferred the extra maneuverability at the expense of extra hitting power.  I also filled and sanded the shell ejector ports for the outer wing guns as these would not have been present with no outer guns fitted.
  • The Pitot tube was relocated from its position on the wing tip to mid-wing.

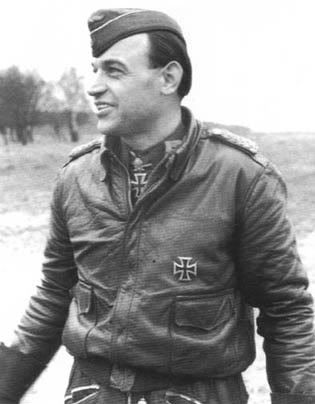
As for the man himself, Heinz Bär is the 8th ranking air Ace of all time. He fought on every German front throughout the entire duration of World War II in Europe and Africa. His 16 aerial victories acquired while he flew the Me 262A place him as the 2nd ranking jet ace of WWII.  Almost all of Heinz Bär's assigned combat aircraft were numbered "Lucky 13", as his own preference regardless of his position within a respective unit.  Postwar, Heinz Bär would eventually become an aviation consultant. In 1957, while performing aerobatics in a light plane on the anniversary date of his 200th aerial victory, Heinz Bär was killed instantly when he suddenly spun in from a low altitude.

This is a shot of Bär after his 200th victory wearing his favorite U.S. flying jacket.
Here are a couple of shots of the finished model, unfortunately I really made a hash of the lighting and the kit looks quite glossy in some of the shots, which it doesn't in real life.
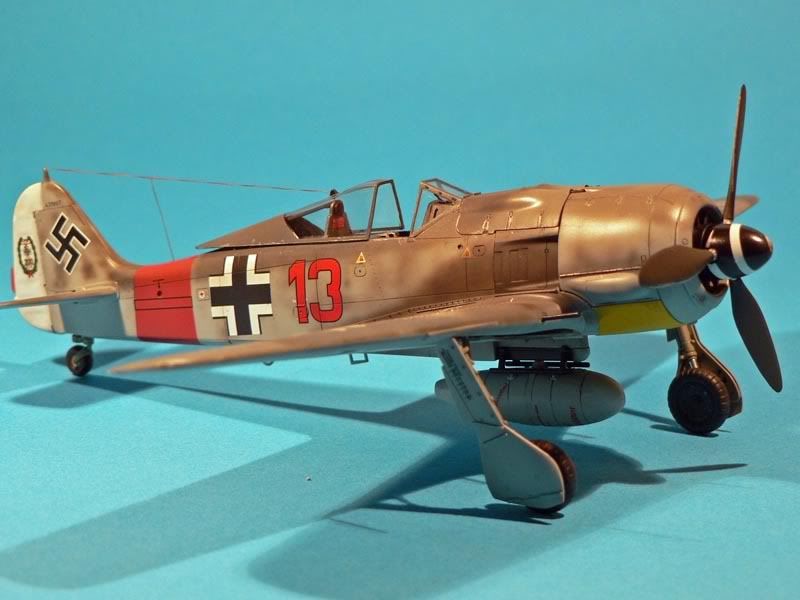
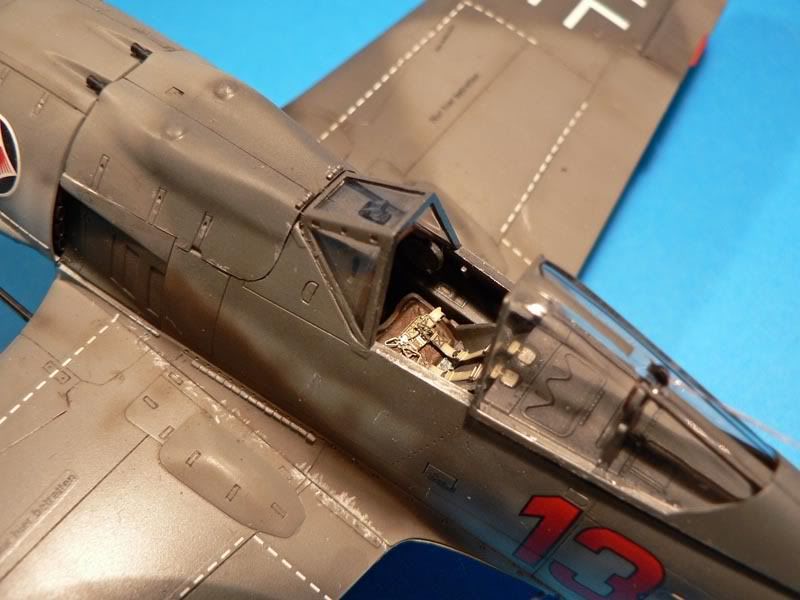
Thanks for looking
  • Member since
    December 2002
  • From: Reno, NV
Posted by espins1 on Tuesday, June 5, 2007 10:31 AM

Outstanding job Darren!  Thanks for info on Heinz Bar and for explaining what you did to back date the A-8 to the A-7, that will help many of use with future projects.  Cool [8D] Thumbs Up [tup] Thumbs Up [tup]

Nicely done!  I'll add a link to your finished build on the first page.   Smile [:)]

Scott Espin - IPMS Reno High Rollers  Geeked My Reviews 

  • Member since
    November 2003
  • From: Nashville, TN area
Posted by bobbaily on Tuesday, June 5, 2007 2:36 PM
Great build Darren.  You never cease to amaze me with your skill & ability.

Bob


  • Member since
    December 2002
  • From: Reno, NV
Posted by espins1 on Tuesday, June 5, 2007 8:53 PM

Well, I began the slow, painful process of trying to strip the paint off the canopy frame.... then after about 20 seconds of that realized that it would take forever, not to mention that I'd probably have to remask the canopy etc.  So I pulled the plug on that little venture and decided to go with a suggestion that Marc (aka Wing_Nut) made to me. Bow [bow]

I mixed up some XF-2 Tamiya Flat White with a tiny bit of RLM75, and did a mottling/postshade type effect on the canopy framing.  Much easier and it blends right in!  What do you all think?

Scott Espin - IPMS Reno High Rollers  Geeked My Reviews 

  • Member since
    December 2002
  • From: Reno, NV
Posted by espins1 on Thursday, June 14, 2007 4:00 PM

Hey guys, sorry I haven't had any updates for the past week or so.  My new job (which I absolutely love by the way) has been keeping me very busy.  By the time I get home and take care of the daily routine stuff, I am beat and just don't have the energy to go downstairs and work.

However.... things are beginning to settle down a bit so I'm hoping to spray the yellow the yellow identification panel under the cowling tonight, as well as the RLM02 on the landing gear and wheel wells.  Smile [:)]

Scott Espin - IPMS Reno High Rollers  Geeked My Reviews 

  • Member since
    December 2004
  • From: 288921 E, 5659868 N UTMz12, NAD83
Posted by jboutin on Thursday, June 14, 2007 5:02 PM
No progress on Hartman's Bf-109 as I've been trying to get my Spitfire finished.  99.9% done, All I have left for the Spit is flat coat, pastels and the canopy!  Look for pics soon.
JAY - fighting evil since 2:15pm, July 8,1976 -
  • Member since
    February 2003
  • From: Melbourne, Australia
Posted by darson on Friday, June 15, 2007 9:14 PM

Jay & Scott, I'm looking forward to seeing some more progress photos from both you guys.

Also a small piece of good news for me, my Molders Bf 190D from Ca finally arrived after being on pre-order with GMW for about three months.  Oh well now that's it's here I can hardly wait to get started on it.


  • Member since
    December 2002
  • From: Reno, NV
Posted by espins1 on Saturday, June 16, 2007 10:06 AM
 darson wrote:

Jay & Scott, I'm looking forward to seeing some more progress photos from both you guys.

Also a small piece of good news for me, my Molders Bf 190D from Ca finally arrived after being on pre-order with GMW for about three months.  Oh well now that's it's here I can hardly wait to get started on it.


Grats on the kit!  All I can say is dry fit, dry fit, dry fit......... especially for the cowling, radiator scoup and wheel wells.  I'm almost done with my write up on that kit where I point out some of the trouble spots.  I've been so busy with my new job that I haven't had time to finish it, much less work on my models.  Sigh [sigh]

Scott Espin - IPMS Reno High Rollers  Geeked My Reviews 

  • Member since
    February 2003
  • From: Melbourne, Australia
Posted by darson on Saturday, June 16, 2007 8:14 PM

Thanks a bunch for the heads up Scott Thumbs Up [tup].  Can you tell me what color you are painting your 109? I have read a lot of different stuff on the web from natural metal through to adding a couple of drops of RLM 02 into ALCLAD.

At this stage I am thinking of just straight Gunze RLM 02 for the upper surfaces and  RLM 65 for the lower, what do you think?

Cheers 

  • Member since
    December 2002
  • From: Reno, NV
Posted by espins1 on Monday, June 18, 2007 10:18 AM
 darson wrote:

Thanks a bunch for the heads up Scott Thumbs Up [tup].  Can you tell me what color you are painting your 109? I have read a lot of different stuff on the web from natural metal through to adding a couple of drops of RLM 02 into ALCLAD.

At this stage I am thinking of just straight Gunze RLM 02 for the upper surfaces and  RLM 65 for the lower, what do you think?

Cheers 

I have some good information that I can scan for you.  The trouble is that there is still a lot of controversy over the initial camo schemes of the Bf109A (not an official designation, but often times the prototypes (with V designations) that were sent to Spain were labeled as A models.  Probably more of Goebbels propaganda as part of their scheme to deceive the West.

There are many sources that believe the initial batches of early Bf109 aircraft could be any of the following schemes......

Some authors believe they were bare aluminum.  Others believe they were painted in a metallic aluminum color.  Others believe that they were bare aluminum with a protective coating painted over them which had a slightly greenish tinge to it.  And there are others who swear they were light gray or RLM02.  I'll dig up what I have and either retype or scan so you can make the determination yourself.

I haven't decided yet on the schemes for both of my Bf109A kits, however one of them I'll probably be doing as the prototype V4 in a light gray civilian scheme as it looked while undergoing testing.  I'm inclined to do the other one in a bare metel scheme similar to what Bret Green did with his Bf109A, not necessary because it's "accurate" but because I like the scheme.  Smile [:)]

Scott Espin - IPMS Reno High Rollers  Geeked My Reviews 

  • Member since
    December 2002
  • From: Reno, NV
Posted by espins1 on Tuesday, June 19, 2007 8:48 PM

Finally some progress to report!  I haven't spent any time at my work bench for at least two weeks, life has been very hectic. Boohoo [BH]

I managed to mask off the lower cowling this and I sprayed the RLM04 on the lower underside of the cowling.  I use Tamiya Acrylics, so as usual I had to mix the color I needed.  I used 10 parts XF-3 Flat Yellow, 5 parts X-20A Thinner, 1 part XF-2 Flat White and 1 part X-6 Orange.  The color looks great!  Approve [^]

Tomorrow I plan on masking off the wheel wells, spraying the RLM02, then we can move forward with decaling and weathering (with layers of Future in between everything).  Whistling [:-^]

Things have slowed down a bit so I should be able to get back on track now with all my builds.  Smile [:)]


Scott Espin - IPMS Reno High Rollers  Geeked My Reviews 

  • Member since
    December 2002
  • From: Reno, NV
Posted by espins1 on Wednesday, June 20, 2007 12:21 PM

Black Eye [B)] crap... I noticed last night as I was checking out my paint job of the RLM04 that my seamwork around the bulges on the upper wing for the larger wheels of the G-14 left much to be desired.  The left one has some cracking in the CA that I used for the seamwork which... well, lets be honest, needs to be fixed.  I'll try and fill it in, and then do a similar patch job with the whitewash like I did on the canopy. 

I've put far too much effort with this build to ignore that seam problem.  Oh well, I think in the future I'm going to prime all my aircraft so I can catch those little glitches earlier.  I unfortunately didn't notice it when I did the gray green and gray violet camo pre-shade.  Sigh [sigh]

Scott Espin - IPMS Reno High Rollers  Geeked My Reviews 

  • Member since
    July 2006
  • From: near London, UK
Posted by Pruz on Wednesday, June 20, 2007 12:34 PM

Wow Darren that 190 is VERY nice work!

Al 

If it ain't Boeing, I ain't going! Finishing off: Revell 1/48 B-1B Lancer for USAF 60th Anniversary GB In production: Revell 1/32 F-16A - C conversion
  • Member since
    December 2002
  • From: Reno, NV
Posted by espins1 on Sunday, June 24, 2007 2:15 PM

I finally got the RLM02 sprayed in the wheel wells, and on the landing gear and inner sides of the landing gear doors.  I use Tamiya Acrylics, so my mix for RLM02 used equal quanties of the following = XF-49 Khaki + XF-22 RLM Grey + X-20A Thinner 1 part.

I'll post some pics of the RLM02 and the RLM04 on the cowling underside after I remove the masking tape in a little bit. Smile [:)] 

Later today I'm going to tackle the issues around the wheel bulges on the upper wings.  I'll be ready for Future and decals as I finish up the issues around those bulges.


Scott Espin - IPMS Reno High Rollers  Geeked My Reviews 

  • Member since
    December 2002
  • From: Reno, NV
Posted by espins1 on Sunday, June 24, 2007 7:45 PM

Here is a quick photo of the lower cowling after I removed all the masking material.


Scott Espin - IPMS Reno High Rollers  Geeked My Reviews 

  • Member since
    February 2003
  • From: Melbourne, Australia
Posted by darson on Sunday, June 24, 2007 10:50 PM

Thanks for the feedback Al, I appreciate it.

Scott thanks for the info on the early 109 color schemes, I'm still a little up in the air about which scheme I go for, but one thing I have decided against is BMF.  The reference photos that I have of Spanish service 109s don't show any panel lines on the fuselage, which means they been puttied over and this putty should show up clearly on a bare metal aircraft.

Also, how do you mask the wings if paint the wheel wells after the rest of the aircraft is painted?  I'm looking forward to checking out those pics once they are posted.

Cheers

  • Member since
    December 2002
  • From: Reno, NV
Posted by espins1 on Monday, June 25, 2007 10:58 AM
 darson wrote:

Also, how do you mask the wings if paint the wheel wells after the rest of the aircraft is painted?  I'm looking forward to checking out those pics once they are posted.

Cheers

Piece of cake.  Chef [C=:-)]

This was the first time I did my wheel wells this way and I think I'm going to use this technique from now one. 

  1. I used some wide masking tape.  I put the tape on my shirt and removed it a few times to get shirt lint on the sticky side.  This will help minimize the danger of the masking tape pulling up some paint when you remove it. 
  2. I placed the strip over the wheel well making sure it was firmly and completely flat on the surface of the lower wing, nice and tight. 
  3. I then gently rubbed the wheel well area with my finger so I could easily see the edges of the wheel well from the slight creases that outlined the wheel well. 
  4. Using a sharp #11 X-acto blade I sliced the tape right along the edge of the wheel well.  You'll want the knife at a sharp angle, almost parallel to the edge with the point almost straight down and into the wheel well (thus making the handle/blade perpendicular to the surface being cut).  Slice along the edge with a downward slicing motion, pressing firmly along the edge of the wheel well, this will give you a nice, crisp edge.
  5. Mixed up the RLM02 and voila!  Nicely painted wheel wells.  Smile [:)] 

Scott Espin - IPMS Reno High Rollers  Geeked My Reviews 

JOIN OUR COMMUNITY!

Our community is FREE to join. To participate you must either login or register for an account.

SEARCH FORUMS
FREE NEWSLETTER
By signing up you may also receive reader surveys and occasional special offers. We do not sell, rent or trade our email lists. View our Privacy Policy.