SEARCH FINESCALE.COM

Enter keywords or a search phrase below:

Artillery and Field guns GB 06

11316 views
84 replies
1 rating 2 rating 3 rating 4 rating 5 rating
  • Member since
    July 2004
  • From: Northern KY
Posted by mucker on Thursday, June 1, 2006 11:27 AM

Looking really nice, Dwight!

I hope to be far enough along to post some 25 Pounder pics over the weekend.

  • Member since
    July 2003
  • From: Philippines
Posted by Dwight Ta-ala on Thursday, June 1, 2006 9:46 PM

Thanks guys.

Did some paint detailing last night but failed to get pics. Might do that this weekend.

  • Member since
    July 2004
  • From: Sonora Desert
Posted by stikpusher on Friday, June 2, 2006 6:08 PM

OK, here is my 2S1 kit as it stands today... All the plastic was built prior to my Uncle Sam sponsored paid vacation to the Balkans 10/04 thru 02/06.  The photo etch portions were added since my return home. This GB is the perfect kick in the pants to get this beast finished.


F is for FIRE, That burns down the whole town!

U is for URANIUM... BOMBS!

N is for NO SURVIVORS...

       - Plankton

LSM


  • Member since
    July 2003
  • From: Philippines
Posted by Dwight Ta-ala on Sunday, June 4, 2006 6:49 PM

Stikpusher: Looks like you are on your way there. Crisp anf clean build so far.


As for me, I started the detailing and weathering and here are the progress pics:


More on this soon...

  • Member since
    March 2006
  • From: Drummondville, Quebec, Canada
Posted by Yann Solo on Monday, June 5, 2006 7:13 AM

Dwight, your camo is awesome, I didn't had the courage to do it on mine.  And I'm a little bit shy to show my work after seeing yours but here it is:

That build is straight out of the box, and it was quite fun to build without major problem except for the operator of the gun who was very difficult to install on his seat.  I used polyfilla to simulate snow and I think the result is pretty good.  The trick is to smear a thick coat of it and wait a bit so it partially dries on the surface.  Then, you can create the foot prints and tire tracks.  The top portion will break and the inside portion simply take shape.

Any comments are welcome, this is my second diorama and certainly not the last cause it's really fun to build.


No matter where you go ....... there you are.
  • Member since
    November 2005
  • From: Somewhere over the rainbow
Posted by m1garand on Monday, June 5, 2006 7:20 AM
You guys are producing high quality stuff for this GB. 
  • Member since
    November 2005
  • From: Southwest
Posted by Chatterer on Monday, June 5, 2006 9:18 AM
Hey could I join up? I have Tamiya's 1/35 3.7cm Pak 35/36 that I would not mind taking a shot at.
David
  • Member since
    March 2006
  • From: Drummondville, Quebec, Canada
Posted by Yann Solo on Monday, June 5, 2006 9:21 AM
Sure!  Come on in!
No matter where you go ....... there you are.
  • Member since
    March 2006
  • From: Drummondville, Quebec, Canada
Posted by Yann Solo on Monday, June 5, 2006 9:26 AM
Hey Stickpusher!  Its coming along nicely, I can't wait to see that beast finished.  It is an unusual subject.
No matter where you go ....... there you are.
  • Member since
    March 2006
  • From: Drummondville, Quebec, Canada
Posted by Yann Solo on Monday, June 5, 2006 9:28 AM
Dwight, I like the wood texture you made on the tools of your Flak.  Mine looks too clean, do you mind if I do it like yours? it looks really good ... or maybe you have copyrights on this? Smile [:)]
No matter where you go ....... there you are.
  • Member since
    July 2004
  • From: Sonora Desert
Posted by stikpusher on Monday, June 5, 2006 10:27 AM
Dwight and Yann, those 88's look great! Outstanding work there!Cool [8D]


F is for FIRE, That burns down the whole town!

U is for URANIUM... BOMBS!

N is for NO SURVIVORS...

       - Plankton

LSM


  • Member since
    November 2005
  • From: Southwest
Posted by Chatterer on Monday, June 5, 2006 5:02 PM

Thanks for adding me to the list YannCool [8D]

Here is my little pop gun that I worked on today. Not the greatest fit or plans but it works

Oh and Dwight and Yann those 88 guns really great!

David
  • Member since
    July 2003
  • From: Philippines
Posted by Dwight Ta-ala on Monday, June 5, 2006 6:13 PM

Yan:


That is one awesome dio. I like it alot. The gun is nicely done, weathering and all. The snow effect is fantastic. There is nothing to be ashamed of. You did a great job. And a FAST one, too.

You can copy the wood finish on mine, too. No problem there. I used Buff (approx 70%) + Flat Earth (approx 30%) for the base color. The wash is made of heavily thinned Dark Brown + Flat Black. If you want to try it...do it on some waste plastics first. Sometimes I can't get the right color so I have to make adjustments.


Frogfoot:

It's coming out really well. Keep us updated.


Thanks for the response guys. As for me, I will be starting on the figures tonight.


  • Member since
    March 2006
  • From: Drummondville, Quebec, Canada
Posted by Yann Solo on Monday, June 5, 2006 7:33 PM

Thanks Dwight, I appreciate the comments, specially from you.  As for the the paints, I have all those in stock so I'll give it a try as soon as I can and I'll post some pics.

FrogFoot, that will be a nice little bugger!

No matter where you go ....... there you are.
  • Member since
    July 2004
  • From: Northern KY
Posted by mucker on Monday, June 5, 2006 8:32 PM
Yes, Yann, I'm impressed how quickly and easily you can turn out a stunning diorama. Are you building a few more for this GB?

  • Member since
    March 2006
  • From: Drummondville, Quebec, Canada
Posted by Yann Solo on Monday, June 5, 2006 10:40 PM

Nope!  I'm runing out of models right now.  I just started to build a Tiger I late model.  I t may take me a while to finish it cause there's approx. 1000 pieces.  And I have no idea for a diorama to go with it.  Maybe just plain rocky road???

Who knows, if I have the time to finish it before summer vacations(In Quebec, the two last weeks of July is a vacation for almost everybody), I might build my Wespe for this group build!Smile [:)]

No matter where you go ....... there you are.
  • Member since
    July 2004
  • From: Northern KY
Posted by mucker on Wednesday, June 7, 2006 3:14 PM

Ok, guys and gals. I'll do my best to approach the high standards you've put forth so far... Here is the progress of my Tamiya 25 Pdr Filed Gun...also my first official "armor" build. I've had this kit since the early 80's and everything was still on the sprues but I apparently hand brushed Desert Yellow on most of the pieces back then. I hope to have the gun portion completed his week and the ammo trailer by next. Once I get the clean paint job airbrushed, I'll need some pointers for weathering armor...


  • Member since
    July 2003
  • From: Philippines
Posted by Dwight Ta-ala on Wednesday, June 7, 2006 6:25 PM
She's coming along just fine, Mucker. Keep us updated. Some pointers will be on your way once you get to painting.

  • Member since
    March 2006
  • From: Drummondville, Quebec, Canada
Posted by Yann Solo on Wednesday, June 7, 2006 8:31 PM

 Dwight Ta-ala wrote:
She's coming along just fine, Mucker. Keep us updated. Some pointers will be on your way once you get to painting.

Sign - Ditto [#ditto] Don't worry, we'll help you out whenever you're ready.

No matter where you go ....... there you are.
  • Member since
    November 2005
Posted by Anonymous on Thursday, June 8, 2006 7:18 AM
Man, wish I was ready to get in on this.  I will be doing a 1/35th scale emplacement of a 155mm M-198 towed howitzer, complete with prime mover loaded for bear and the entire crew.  But I don't have the gun yet, and it's $90 USD from Germany (Airmodel.de).  Sad [:(]

Hopefully, I will have everything ready to go sometime next year when another GB for Guns comes up.
  • Member since
    July 2004
  • From: Northern KY
Posted by mucker on Thursday, June 8, 2006 8:18 AM

I was able to sneak undetected into the basement last night and continued progress. You can see this is still "factory fresh" paint, but the intent is to dabble in weathering.

Does anyone have any good close up photos of this gun? It would help in creating a plan of attack on weathering.

  • Member since
    March 2006
  • From: Drummondville, Quebec, Canada
Posted by Yann Solo on Thursday, June 8, 2006 9:20 AM
No matter where you go ....... there you are.
  • Member since
    July 2004
  • From: Northern KY
Posted by mucker on Thursday, June 8, 2006 12:41 PM
Thanks, Yann. I few great ideas in there. Now I have no excuses!

  • Member since
    July 2003
  • From: Philippines
Posted by Dwight Ta-ala on Thursday, June 8, 2006 7:18 PM

Mucker:


She looks good. I bet some weathering will really liven her up some more.


As for me, I have finished assembly of the figures and the ammo boxes. Might be able to paint them this weekend. The next job which is scratchbuilding the church ruins might take a little bit of time so I don't see myself completing the dio by next week but I try my best.

  • Member since
    July 2004
  • From: Sonora Desert
Posted by stikpusher on Monday, June 12, 2006 2:02 PM

Okay, with the exception of tracks and add on stuff after painting, the first stage of construction is completed... Hit a few bumps and then had to do some online photo research but overall I am quite happy with this beast. Now for the paintingWink [;)]


F is for FIRE, That burns down the whole town!

U is for URANIUM... BOMBS!

N is for NO SURVIVORS...

       - Plankton

LSM


  • Member since
    December 2002
  • From: United Kingdom / Belgium
Posted by djmodels1999 on Wednesday, June 14, 2006 1:45 PM

OK, here's a pic of my kit:

I've put the sub elements together for the benefit of the pic, but it still needs a few little things done before priming.

  • Member since
    July 2004
  • From: Northern KY
Posted by mucker on Thursday, June 15, 2006 3:42 PM
That's a pretty neat kit, DJ. She'll look awesome once primed and painted.

  • Member since
    July 2003
  • From: Philippines
Posted by Dwight Ta-ala on Sunday, June 18, 2006 6:22 PM

Work on my diorama has been very slow. So far I have only managed to assemble the fibures and some accessories. I have also started with the ruins.

Here are some pics:

The Flak crew:

The ruins:

I'll update you with the progress regularly.

  • Member since
    December 2002
  • From: United Kingdom / Belgium
Posted by djmodels1999 on Tuesday, June 27, 2006 2:48 AM
Nice work, Dwight!
  • Member since
    April 2005
  • From: Gothenburg
Posted by JohanT on Tuesday, June 27, 2006 2:37 PM

Here are some pics that could be off reference use, posted before in the Armor forum:
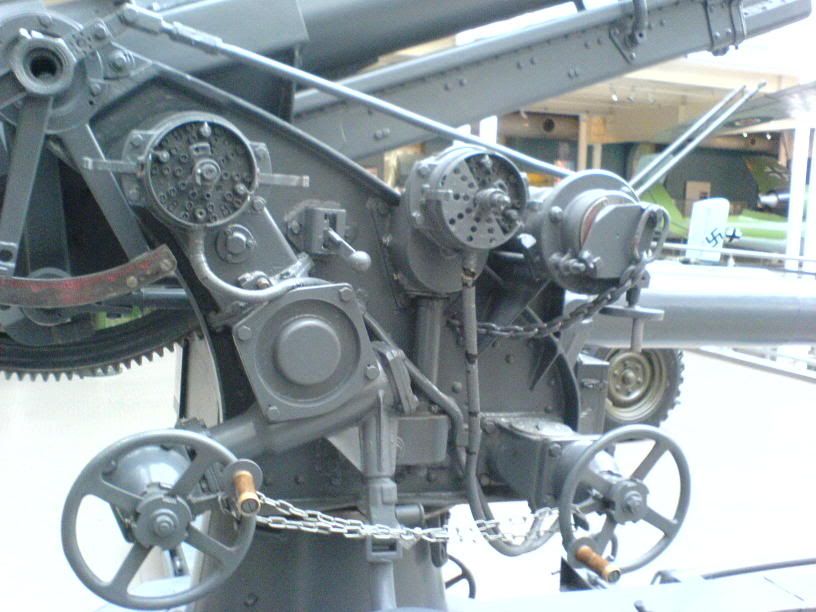

Elevation scale in polished steal, red dials, elevation control handles in wood with brass fairing.
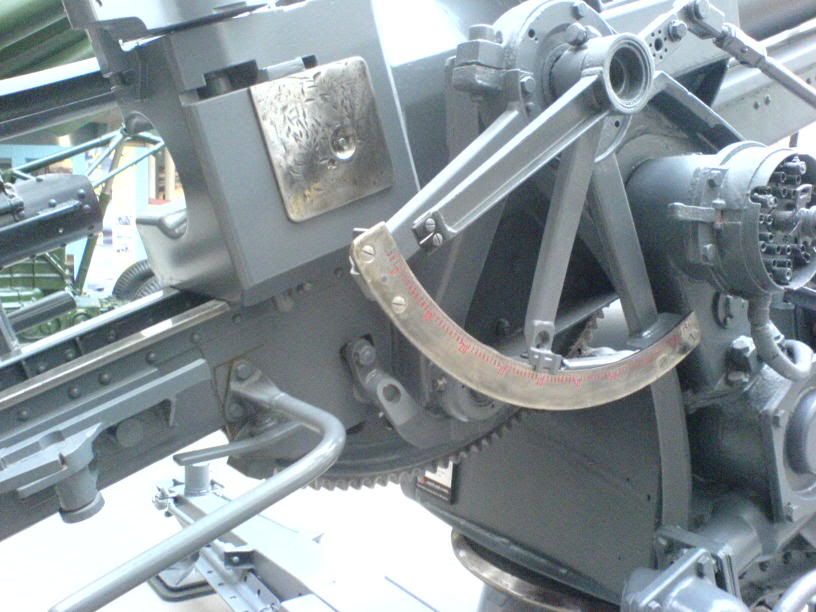

Breach, sliding rail and elevation scale, polished steel.
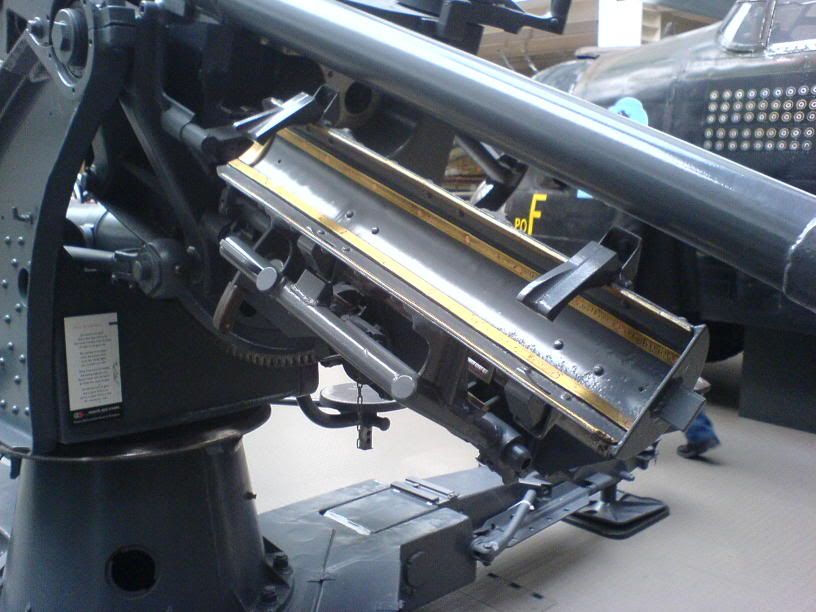

Loading bay, brass fairing, please also note 360' scale in poished steel, red dials.

All pictures where taken at the Imperial War Museum in London, November 2005.

VBR
Johan

JOIN OUR COMMUNITY!

Our community is FREE to join. To participate you must either login or register for an account.

SEARCH FORUMS
FREE NEWSLETTER
By signing up you may also receive reader surveys and occasional special offers. We do not sell, rent or trade our email lists. View our Privacy Policy.