SEARCH FINESCALE.COM

Enter keywords or a search phrase below:

Kriegsmarine GB

32429 views
254 replies
1 rating 2 rating 3 rating 4 rating 5 rating
  • Member since
    February 2006
Posted by fordboy on Thursday, May 3, 2007 1:24 PM

You maybe right Chuck but I think I have worked out a way to avoid too much putty and too much sanding.  Lets see how it works out.

Here is the hull ready for action

Here is the hull after I have removed the pegs from the bottom

Regards

Fordboy

  • Member since
    March 2007
Posted by Chuck0 on Thursday, May 3, 2007 5:09 PM
  Well I just ran into a little snag on my Tirpitz. All the paint lifted off with the masking tape on my deck. I used the exact same system as I did on my Mikasa, even the same paint. The only difference was instead of thinning with acetone I thinned with the testors acryl thinner to try and extend the dry time and get a little smoother finish and thinner layers. So about six weeks work is ruined as now I have to strip the entire thing. I'm just about all through with modelmaster paint, I NEVER had a problem with Tamiya acrylics doing this.
  • Member since
    March 2007
Posted by Chuck0 on Friday, May 4, 2007 8:48 AM

  Just to give everyone a good laugh I thought I'd post a couple pics of my "progress" **cough cough**.

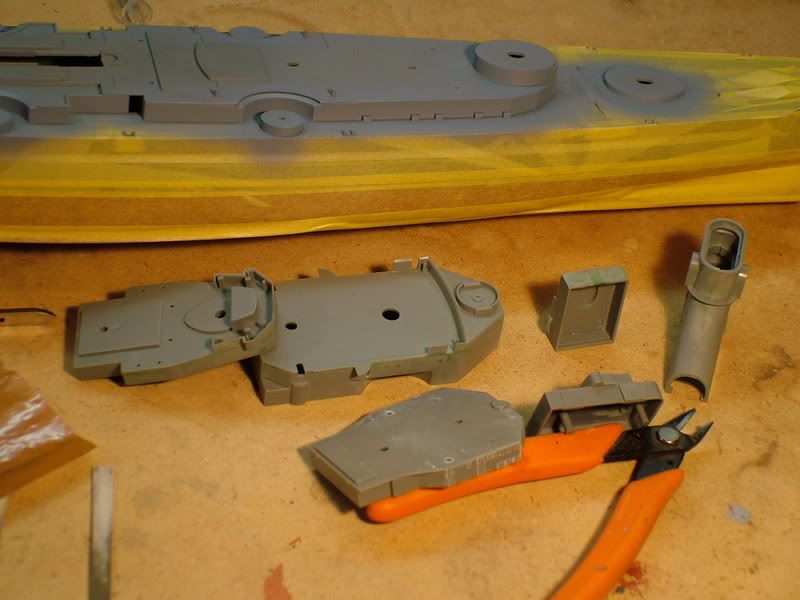
In this first image you can see my careful masking job as I paint the bulwarks on the first level, carefully masking the deck as well to keep from filling up the plank detailing with paint. In tho foreground you can see some of the sub assembly peices being prepped by filling seams and removing molded on details that will be replaced by brass:
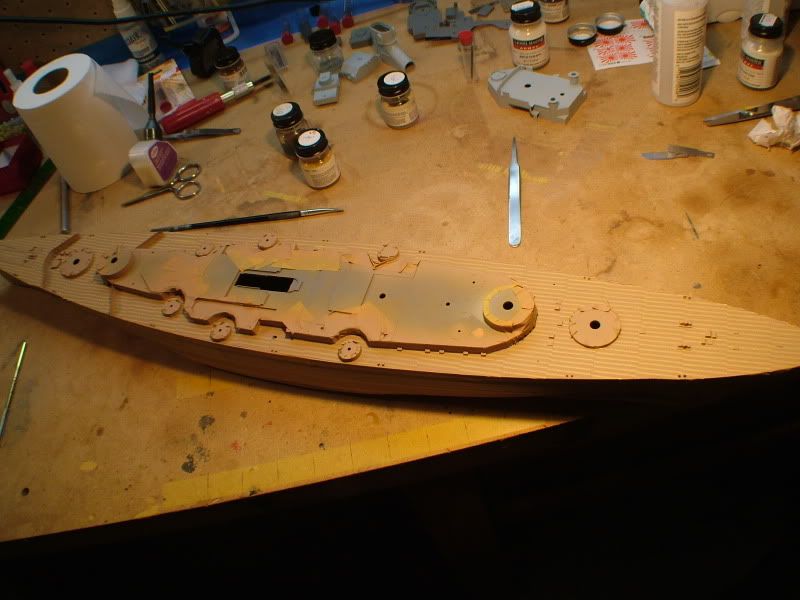
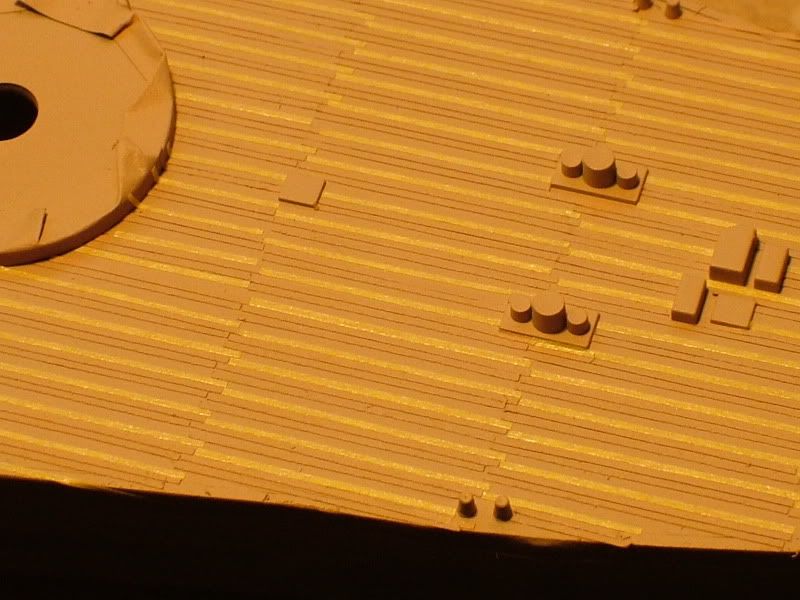
In the second picture you see the deck progress well under way, hundreds of individual tape strips replicating individual planks in four different shades of tan:
And in this final picture you can see the deck stripped of ALL paint in preperation of doing it all over again:
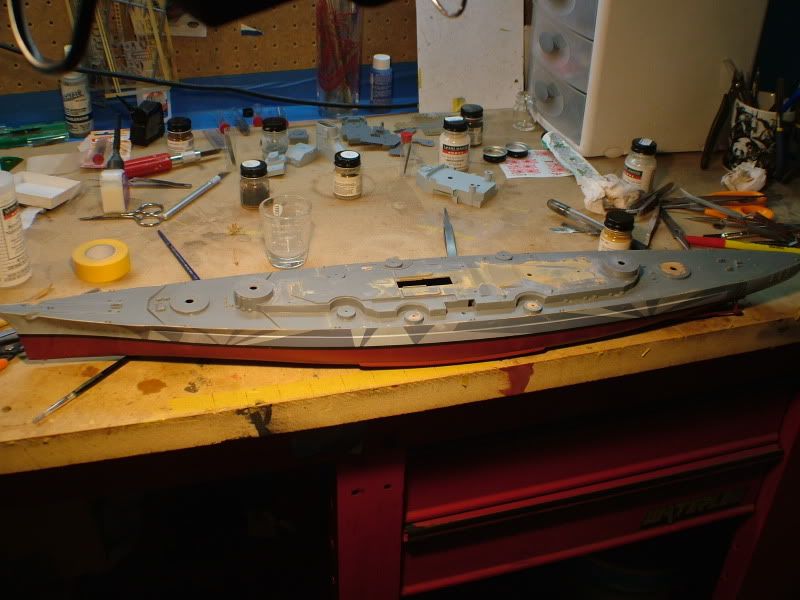
After the stripping EVERYTHING will have to be repainted, well at least the camo pattern is still visible on the hull, that will save a couple days work.

   Let the snickering commense.

  • Member since
    February 2006
Posted by fordboy on Saturday, May 5, 2007 9:22 PM

Jeepers Chuck I feel for you buddy.

Better luck with the second attempt.

A further update on my E -Boat.

Here is a picture of gluing the middle section of the hull.

Here is another picture of the front hull gap

Here is another picture of the rear hull gap 

Here is a picture of the hull drying

The next step will be gluing the rear section and stern section.

Regards

Fordboy

  • Member since
    February 2006
Posted by fordboy on Sunday, May 13, 2007 1:28 PM

Further update here are some shots of the work on the rear third of the hull and with the bow glued in.

Regards

Fordboy

  • Member since
    February 2006
Posted by fordboy on Monday, May 14, 2007 2:30 PM

A picture with the tape removed from the stern:

Regards


Fordboy

  • Member since
    February 2006
Posted by fordboy on Wednesday, May 16, 2007 12:17 PM

Here is a picture of the hull taking shape.

Regards


Fordboy

  • Member since
    February 2006
Posted by fordboy on Thursday, May 17, 2007 12:15 PM

Here are some pictures of the bow gap to be attacked:

Regards


Fordboy

  • Member since
    February 2006
Posted by fordboy on Sunday, May 20, 2007 12:33 PM

Here is a picture of the deck and portholes to be actioned.

Regards

Fordboy


  • Member since
    February 2006
Posted by fordboy on Monday, May 21, 2007 12:22 PM

The latest progress shots - the bow glued and tape etc. removed.


Regards


Fordboy

  • Member since
    February 2006
Posted by fordboy on Tuesday, May 22, 2007 12:11 PM

A picture with the portholes in place

 Regards

 Fordboy

  • Member since
    February 2006
Posted by fordboy on Wednesday, May 23, 2007 3:00 PM

Pictures of the portholes under the deck installed


Regards

Fordboy

  • Member since
    February 2006
Posted by fordboy on Sunday, May 27, 2007 1:43 PM

Here is a picture of the lower hull on the stands

Regards


Fordboy

  • Member since
    February 2006
Posted by fordboy on Monday, May 28, 2007 7:29 PM
Pictures of the deck on and taped up


Regards


Fordboy

  • Member since
    February 2006
Posted by fordboy on Wednesday, May 30, 2007 3:40 PM

Some shots with the tape removed and the deck installed.


Regards


Fordboy

  • Member since
    December 2002
  • From: Reno, NV
Posted by espins1 on Wednesday, May 30, 2007 4:00 PM

Coming along nicely Fordboy!  Smile [:)]

Sad to say, I haven't even started my Bismarck yet.  I have so many other projects going right now, and I must admit I don't feel ready yet to tackle all the PE that came with the three White Ensign Models PE sets.  Sigh [sigh]

Scott Espin - IPMS Reno High Rollers  Geeked My Reviews 

  • Member since
    February 2006
Posted by fordboy on Sunday, July 1, 2007 2:24 PM

Thanks Scott.

Here is some update shots with Deck Structures in place

 Regards

 Fordboy

  • Member since
    December 2002
  • From: Reno, NV
Posted by espins1 on Monday, July 2, 2007 10:47 AM

Looks good Fordboy!  Smile [:)]

Hey guys, I'm sorry to say I'm going to have to drop out of this GB.  I'm nowhere near being able to start on my Bismarck, heck I don't think I'd be able to start it until well after this GB is over.  I'll still monitor the thread and have been enjoying watching the other builds.  Smile [:)]


Scott Espin - IPMS Reno High Rollers  Geeked My Reviews 

  • Member since
    February 2006
Posted by fordboy on Monday, July 2, 2007 12:53 PM

Thanks Espins1

Sorry to see you drop out.

Here is a picture of the early stages in the rear gun platform.

Regards


Fordboy

  • Member since
    February 2006
Posted by fordboy on Sunday, July 8, 2007 1:44 PM

Here is a shot of the rear gun and its platform.

Regards

Fordboy

  • Member since
    December 2002
  • From: Reno, NV
Posted by espins1 on Monday, July 9, 2007 10:45 AM

I'm enjoying watching your progress fordboy, looking good!  Smile [:)]

Scott Espin - IPMS Reno High Rollers  Geeked My Reviews 

  • Member since
    February 2006
Posted by fordboy on Monday, July 9, 2007 1:49 PM

Thanks Scott

I got bored so I worked on an inflatable dinghy

I can sometime jump all over the place with instructions. LOL

Regards

Fordboy

  • Member since
    February 2006
Posted by fordboy on Wednesday, July 11, 2007 12:26 PM

The rear deck with the funnels temporarily in place.

 Regards

 Fordboy

  • Member since
    February 2006
Posted by fordboy on Wednesday, July 11, 2007 12:31 PM

Hi Dan

Am I on track buddy?

Haven't seen you on this thread for awhile.

I would value your input/opinion/tips.

Regards

Fordboy

  • Member since
    February 2006
Posted by fordboy on Thursday, July 12, 2007 1:33 PM

Here are some shots of the rear gun and deck temporarily installed:


Regards


Fordboy

  • Member since
    February 2006
Posted by fordboy on Sunday, July 15, 2007 1:01 PM
Here is a shot of the reargun deck from rear

Regards

Fordboy

  • Member since
    December 2002
  • From: Reno, NV
Posted by espins1 on Sunday, July 15, 2007 5:40 PM

Looking good Fordboy!  Smile [:)]

Scott Espin - IPMS Reno High Rollers  Geeked My Reviews 

  • Member since
    February 2006
Posted by fordboy on Monday, July 16, 2007 1:52 PM

Thanks Scott.

Here isa shot of the steering wheel

Regards


Fordboy

  • Member since
    March 2004
  • From: Belgium
Posted by DanCooper on Tuesday, July 17, 2007 2:57 PM

Hello, guys, sorry I haven't been around much lately...

Sorry to loose you on this GB, Scott, but one has to do what one has to do I guess, Fordboy, it's good to see another S-boot taking shape, you're certainly on the right track here, mate.

The reason I haven't been here much lately is this little projects I'm trying to get up and flying...


On the bench : Revell's 1/125 RV Calypso

  • Member since
    February 2007
  • From: Bournemouth UK
Posted by Luftwoller on Tuesday, July 17, 2007 3:43 PM

Looking good Fordboy. Really looking forward to these GB posts.

...Guy

..'Your an embarrassment to the human genus, makes me ashamed to call myself Homo'.
JOIN OUR COMMUNITY!

Our community is FREE to join. To participate you must either login or register for an account.

SEARCH FORUMS
FREE NEWSLETTER
By signing up you may also receive reader surveys and occasional special offers. We do not sell, rent or trade our email lists. View our Privacy Policy.