SEARCH FINESCALE.COM

Enter keywords or a search phrase below:

Fleet Air Arm Group Build

729098 views
11139 replies
1 rating 2 rating 3 rating 4 rating 5 rating
  • Member since
    August 2008
  • From: Okinawa, Japan
Posted by Evil Herc on Saturday, July 25, 2009 11:00 PM

While the rest of the crew sleeps the night away, spent time here in the mech shop searching the internet. I found Spruebrothers.com, they had my cockpit set and found decals for the Jolly Rogers.Big Smile [:D]

I would like to thank this group for there patience and understanding of a new modeler (I haven't built models since i was a teen 20yrs agoPropeller [8-]) I log on daily to keep up with the builds & have learned lots of techniques from you. Learning from the XO & Aaron I have 2 models on the bench now. I purchased a Fine molds Sky Crawler aircraft & am suprised on how well this kit is produced. this kit goes together beautifully. I still have to make runs to the LHS to get paints but my stock is growing.

I am currently putting the Fuselage together & hope to have pics up soon. Question with the use of oils for weathering, do i need to place future over the acrylics before I use the oils??

Thanks again,

Jason

Jason- (USMC Colonel/USMC SQ CO FAA/USN/FAW GB) Some people spend an entire lifetime wondering if they made a difference in the world. But, the Marines don't have that problem. Ronald Reagan, President of the United States; 1985

  • Member since
    August 2008
  • From: Okinawa, Japan
Posted by Evil Herc on Saturday, July 25, 2009 8:46 AM

Gentelman thanks for all your help and answers to my questions.

I recieved my F-14d & started putting it together. I started with the cockpit, & the seats are HorribleBanged Head [banghead] I am wondering where to purchase the Aires cockpit detail set. I looked online & could not find a US sight that sold em.

I started to put the rest of the aircraft together. I needed to adjust the wheel wells for the open spots.

thanks,

Jason

Jason- (USMC Colonel/USMC SQ CO FAA/USN/FAW GB) Some people spend an entire lifetime wondering if they made a difference in the world. But, the Marines don't have that problem. Ronald Reagan, President of the United States; 1985

  • Member since
    March 2006
Posted by simpilot34 on Saturday, July 25, 2009 6:55 AM

Cropredy, so glad you could make it over!!!! I think you will like it here!!! Looking forward to seeing your practice shots!!Thumbs Up [tup] As long as it remains fun that is what matters!!!


Cheers, Lt. Cmdr. Richie "To be prepared for war, is one of the most effectual means of preserving the peace."-George Washington
  • Member since
    March 2007
  • From: Carmel, CA
Posted by bondoman on Saturday, July 25, 2009 1:19 AM

6 bells on the second dog watch, and the crew is apparently sleeping it off. Having finished the SAC GB (please go look), Captain's now free to chock the shorelines and begin the Whitley whilst the Stranraer dries in the paint shop.

Have a good weekend; I've been served notice by the Chief of my quarters that tasks await and too much ARRGGGHHHIIINGGG will lead to a disassociation, so I'm off for a while.

Why does a little window on the upside of the lower wing allow one to see the water? Piss port, thinks me.

Cropredy don't confuse giant footsteps with multiple craters of past builds, you only get better if you build and build often. Welcome aboard, shoes are not required on deck, but as a new powder monkey you'll be required to stop smoking. For the rest of you, smoke em if you've got em and good winds off the stern!

Priss sez cheers!

Is that Greggers???


  • Member since
    June 2009
Posted by cropredy on Friday, July 24, 2009 12:25 PM

Tango1

At the request of bondoman, simpilot34, and sfcmac - and with some trepidation at following in the footsteps of giants - I'd like to participate in the Group Build.

Project:

I'm building a 1/72 Fairey Swordfish Mk I of the plane crewed by observer Tony Wray during the British attack on Taranto on November 11, 1940.  Sub Lt. Wray was my mother-in-law's wartime boyfriend (unfortunately he didn't survive the Stuka attack on the HMS Illustrious in January 1941).  So, as a small memento to my family, I thought this would be a nice subject.

Background:

The project arose because my uncle-in-law, now a shut-in, was/is a very mechanically-minded Englishman who worked in the Gloster aircraft factory during WWII. He made tools used in the manufacture of Armstrong Whitworth Albemarles and Gloster Meteors.  Since he has many car models about his home, I thought an Albemarle model would be something he'd like.  So, though I hadn't built a model since I was 15 (back in the days when I was too young to care about good ventilation), I bought the Valom 1/72 Albemarle and started doing research.  The FSM and IPMS sites (plus the detail in the Valom kit) made it obvious to me that model building was a craft requiring considerable skill, specialized tools and patience.  

So, I decided I would 'practice' on a cheaper model - the Swordfish.  I said, hey, I can get a Revell Swordfish for ~ $10 - this would be my practice model.  Well, many Swordfish books, the Airfix, Frog, Eastern Express, and Cooperativa kits, PE sets, Vector resin engine, Aeromaster decals, and weekly orders to Micro-Mark, I am now thoroughly immersed in the Swordfish project with five(5) variants to practice on.  Not to mention $$$ no longer in my wallet.   

I am thoroughly impressed with the skill levels shown in the posts/pictures which I will strive to achieve.  

cropredy

  • Member since
    March 2006
Posted by simpilot34 on Friday, July 24, 2009 7:06 AM
WOOHOO!!! You did it Aaron!!! Well done mate!!! I don't know whether it's an optical illusion or what, but it looks a bit big to me compared to the larger one in the background.My 2 cents [2c] At least it's there, that's what matters.Thumbs Up [tup]
Cheers, Lt. Cmdr. Richie "To be prepared for war, is one of the most effectual means of preserving the peace."-George Washington
  • Member since
    September 2003
  • From: South Central Wisconsin
Posted by Daywalker on Thursday, July 23, 2009 10:44 PM

I din't even see the name on the stand at first, that'll teach me not to scroll all of the way down. Dunce [D)]  Glad to see the ol' Mk.1.0 stand is still out there doing it's job. Approve [^]

Aaron- PE barrel jackets?  In 1/72?  have you gone mad? Propeller [8-]  Excellent work there, can't even imagine how you guys do it.  Dave, Richie, Aaron- my hat is off to you gentlemen. Bow [bow]

Frank 


  • Member since
    October 2004
  • From: League City, Texas
Posted by sfcmac on Thursday, July 23, 2009 3:12 PM

  Cpt Bondo, I dunno? I kinda like the look of it. Maybe they just touched up the entire panel eh?  On the Hull bottom I think you got a great look. Try to squeeze in a quick update before physical theropy today. Yuck [yuck]

 Been taking a lot of pics as I go to try to show what I am doing here. Party [party]

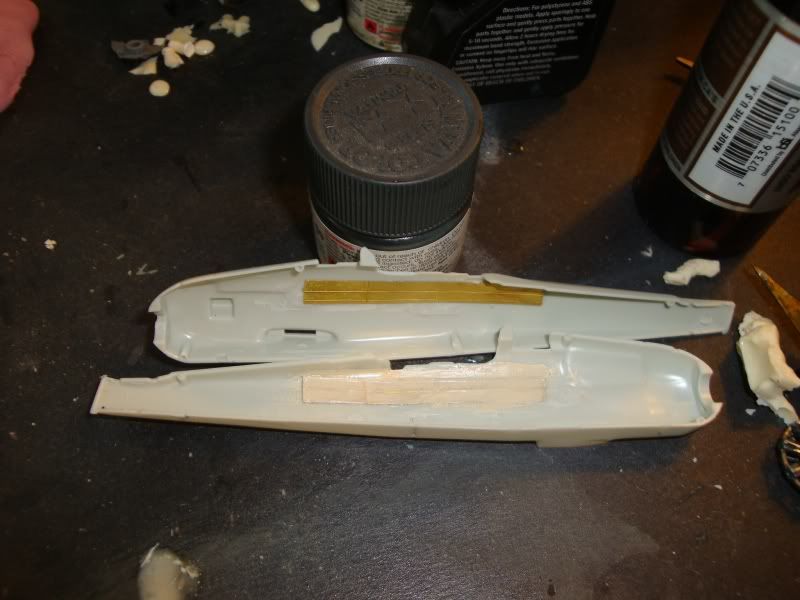
 Last thing I did before joing the fuse together was to draw and cut out the missing windows on both sides. These were used so the pilot could judge altitude during a torpedo run.

Touch up the edges with liquid cement and they look square. They are small enough to use windows window maker clear cement on when I finish as one of the last steps.

 Ok Ritchie here is my attempt on the gun that isn't there. Marked it off and cut a groove first off.

Had to add the strut pieces on top as they are attached to the side panels I needed to modify.

I then annealed(heated) the PE Barrel part. Cut the wick off the candle to get a small flame. A lighter or large flame will be to hot and warp or destroy the tiny thin part.

Left enough of the fret on so I could not only hold the part but test the metal to see if it had enough to be pliable. ( bend easy)

I then fund an old tiny broken drill bit.( Good and hard but brittle those drill bits) and thinly ca glued it to the top edge  of the part. This helped to hold it straight.

I was able to start the curve by claming it down tightly and wrapped rolled it as tight as I could. To really get ot tight though I used my sprue cutters to squeeze not cut along the entire part. In the above pic I am about 1/3 the way so you can see the diff.

Carefully cut off the excess drill bit and glue in the slot. To replicate the blister I used another one of my resin drops that had dried an odd shape and made a spot on gun blister to nmatch the other kits.

Man these things are a lotta work!  I have noticed and think you all work in 1/72 to save money on paint!  Holy cow this is small.Whistling [:-^]Make a Toast [#toast]Pirate [oX)]

  • Member since
    March 2007
  • From: Carmel, CA
Posted by bondoman on Thursday, July 23, 2009 2:31 PM
 sfcmac wrote:

 The paint finish is spiffy? What sort of paint is it? Alcad? Thumbs Up [tup]

It's Alclad II white aluminum with darker areas of dark aluminum. I find it super easy to use. I'm a little conflicted because the real a/c was silver paint, but I wanted a little variation. I may rework it a little to look paint patchy, not panelized.
  • Member since
    October 2004
  • From: League City, Texas
Posted by sfcmac on Thursday, July 23, 2009 9:27 AM

Ah Great looking finish Capt Bondo!  Pity about the camera battery, Boohoo [BH] Your videos are always very informative. Just like watching Blue's Clues! Laugh [(-D] I see you are using the DayWalker 1.0 and I am guessing you didn't hear about the recall.  Apparently it is defective due to the contracted manufacturer using regular styrofoam which is structurally damaged by paint and glue thinners and solvents. Thumbs Down [tdn] Actually the 1.0 has been banned in the State of California because of aeresol emmissions but if you purchased yours beforw 1996 it has been grandfathered so is ok. Wink [;)]

 The paint finish is spiffy? What sort of paint is it? Alcad? Thumbs Up [tup]

Oh and you are very welcome! Thumbs Up [tup]

  • Member since
    March 2006
Posted by simpilot34 on Thursday, July 23, 2009 7:54 AM

Jason, to answer your question, XF-22 is the Tamiya equivalent. This is the chart I use, it's great!!! You can click as many different brands and compare them all if you wanted too!!

http://www.paint4models.com/paintchart/paintconversionchart.html

Have fun with it! I do!Big Smile [:D]

Capt. Bondo sir!!! Your ship is looking very nice, very nice indeed!!!! Love the patchwork NMF!Thumbs Up [tup]

Cheers, Lt. Cmdr. Richie "To be prepared for war, is one of the most effectual means of preserving the peace."-George Washington
  • Member since
    November 2003
  • From: Naples, FL
Posted by tempestjohnny on Thursday, July 23, 2009 5:55 AM
Jason it depends on the aircraft you're doing.  There is a hodgepodge of different schemes.  I would just check on the particular plane you're doing.


  • Member since
    August 2008
  • From: Okinawa, Japan
Posted by Evil Herc on Thursday, July 23, 2009 5:19 AM

Bondoman great looking Natural metal finish.

XO...Myself & the mechanics below decks are scraping the first tomcat. We already have a replacement on the way, Hasegawa Divine scale F-14d tomcat with PE. I do have a question though...are the current Low Visibility Cats one color of grey or the Tri color scheme?? I want to use Tamiya acrylics only and the kit is calling for Mr. Hobby H307, is there a close color to match??

Engines to stop, Props Feathered, ECBs pulled, put her to bed, Time to go Home,
Jason

Jason- (USMC Colonel/USMC SQ CO FAA/USN/FAW GB) Some people spend an entire lifetime wondering if they made a difference in the world. But, the Marines don't have that problem. Ronald Reagan, President of the United States; 1985

  • Member since
    March 2007
  • From: Carmel, CA
Posted by bondoman on Thursday, July 23, 2009 1:23 AM
 sfcmac wrote:

 Capt Bondo you knows I loves ya like me brother!  What is the report on the Stranraer? You are probably as tired of flying boats as I am of Gray Camo! Make a Toast [#toast]

Here's the log at 2 bells of the night watch, an' dam yer eyes! I had a whole safety video regarding safe practices in the paint shop. The battery on the bleedin' camera died!

Captains log, and too bad about all those poor little aliens on Jupiter:

I've been working quite a bit on the Stranraer. All four wings assembled and the undersides doped silver. Buttoned up the fuse and painted the bottom this evening.

Aaron, thank you for the better decals.


  • Member since
    March 2006
Posted by simpilot34 on Wednesday, July 22, 2009 11:49 PM
 Daywalker wrote:

Hey, Aaron...

Where did you find those quart-size Tamiya paint jars?  Those things must be HUUUUUGE!  Either that, or your Stringbag is awfully tiny. Propeller [8-]  Looking very good so far, but I am concerned- only 6 completed builds here since 5/1/09?  Slacker... LOL

 sfcmac wrote:

Just someone please tell me again why? Confused [%-)]Pirate [oX)]

I dunno, have been asking myself that. Sigh [sigh]

Well I liken it to the adage about mountains! Because they are there, I reckon. Aaron she is really coming along well!!!! Very very nice work!!!!Thumbs Up [tup]

Cheers, Lt. Cmdr. Richie "To be prepared for war, is one of the most effectual means of preserving the peace."-George Washington
  • Member since
    September 2003
  • From: South Central Wisconsin
Posted by Daywalker on Wednesday, July 22, 2009 10:31 PM

Hey, Aaron...

Where did you find those quart-size Tamiya paint jars?  Those things must be HUUUUUGE!  Either that, or your Stringbag is awfully tiny. Propeller [8-]  Looking very good so far, but I am concerned- only 6 completed builds here since 5/1/09?  Slacker... LOL

 sfcmac wrote:

Just someone please tell me again why? Confused [%-)]Pirate [oX)]

I dunno, have been asking myself that. Sigh [sigh]

Frank 


  • Member since
    October 2004
  • From: League City, Texas
Posted by sfcmac on Wednesday, July 22, 2009 9:58 PM

 Thanks Brian!  Johnny! Good to see ya! Capt Bondo has been ancy expectin yer return!  Another reason to celebrate if you ask me! Party [party]

Ritchie it is coming together. Kinda slow because of the kit and matching up parts and having to make details that should be there but aren't. Like the forward MG is not represented at all in this kit. Just a blank wall. No windows in the sidewalls either. Not even a molded on detail to show where they go so it is pick as I go.

 The Internal detail save the crew and rear MG is nearly done.

The final verdict on that odd canvas color on the inside walls.

Adding the PE and scratch built things like a floor!

Making it all fit together and scratched a toad stool for the navigator outta dried resin drops I spilled.

With room at a premium I have split the details putting some on one side and some on the other checking the fit so it joins together and resembles the other larger 2 kits.

Paint it all up and glue in the last pilot side panels and IP. Add crew and I think I can put it together.  Can you believe there are little itty bitty bittier levers to add to the side panels?  Jeeze.


Yep this is purdy dern challenging kinda like scratch building a flea circus!  But its a fun challenge!

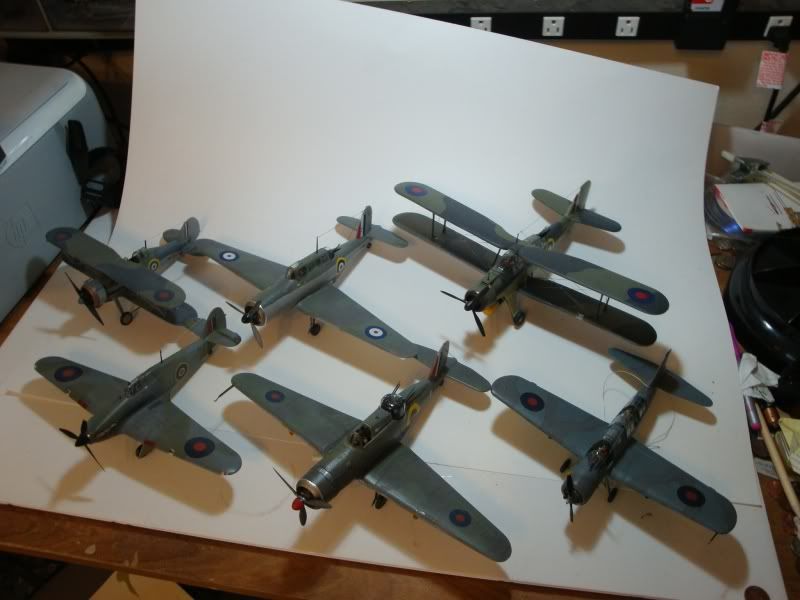
I hope to see pics of 3 Swordfish  stepped in size that compliment each other when I am done.

Just someone please tell me again why? Confused [%-)]Pirate [oX)]


  • Member since
    March 2006
Posted by simpilot34 on Wednesday, July 22, 2009 8:58 PM

Aaron, glad to see those bits going to good use!! I knew the engine would really benefit for one and can't wait to see the cockpit come together with all the bits doen properly! Looking good!!!Thumbs Up [tup] The red dope looks proper now, well done!! Stroll down memory lane with the pic of your builds, love it! We ahve seen them all come together right before us and know alot of the issues you faced with each one. Great pic!!!Approve [^]

Johnny!!! Glad your back mate!!! Let me show you to your bench and pour you a mug!

Cheers, Lt. Cmdr. Richie "To be prepared for war, is one of the most effectual means of preserving the peace."-George Washington
  • Member since
    November 2003
  • From: Naples, FL
Posted by tempestjohnny on Wednesday, July 22, 2009 7:22 PM

Hi all    I'm back again......


Aaron where do you find the time to build what you do.  I would need 50 hours a day for that.


Oh and I'm starting to get that certain plastic itch again.  I think it's time to build.


  • Member since
    December 2008
  • From: Goffstown, NH
Posted by New Hampshire on Wednesday, July 22, 2009 5:39 PM

Smashing job Aaron, simply superb.  And I mean both on the PE work AND the fine collection you have going for the group buld so far!

Brian

  • Member since
    October 2004
  • From: League City, Texas
Posted by sfcmac on Wednesday, July 22, 2009 2:21 PM

 razordws wrote:
Aaron, Franktastic job on the Hurricane!!! Thumbs Up [tup]Thumbs Up [tup]Thumbs Up [tup]  Now where are those stringbags???  Your falling behind mate!  Wink [;)]

Dave , Bondo, Buddy and Ritchie!  Your ears musta been burning off as I have been muttering things about you all and this divine scale all afternoon! Laugh [(-D]

 I make a real grumpy patient so been hiding in my room all day. Looked around and saw a whole bunch of paint stained rags and towels all over and freaked out thinking I could spontaniously combust!  So I grabbed a bag and started throwing them out! Forgot about my back and really overdid it again!  Not bending over too well just yet and I swear Capt Bondo did that on purpose!!! He is sneaky that way you know! Wink [;)]

Well here is what I am doing since you ask about it.
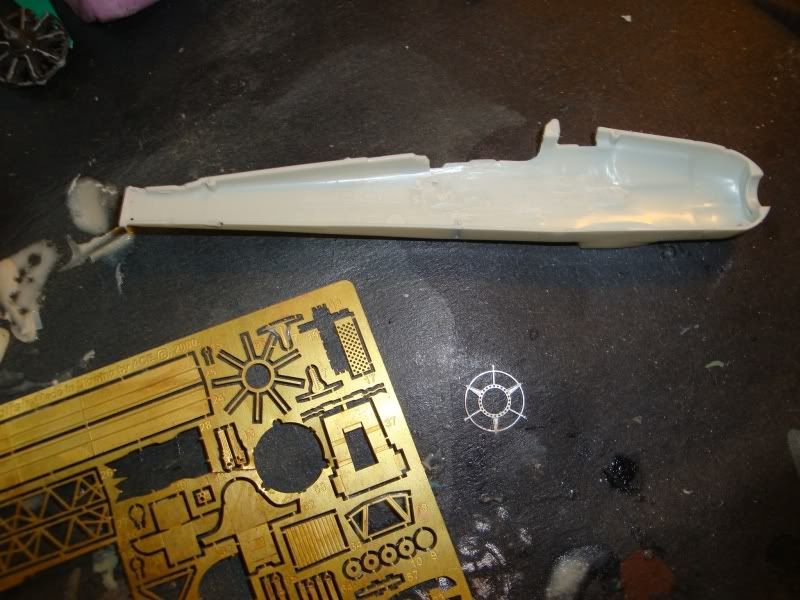
Had to grind out all the locating pins and uneven surfaces first. Kinda tricky as it can make the plastic pretty thin in areas.

Then I added the PE to the engine. Really makes a world of dif don't you think?
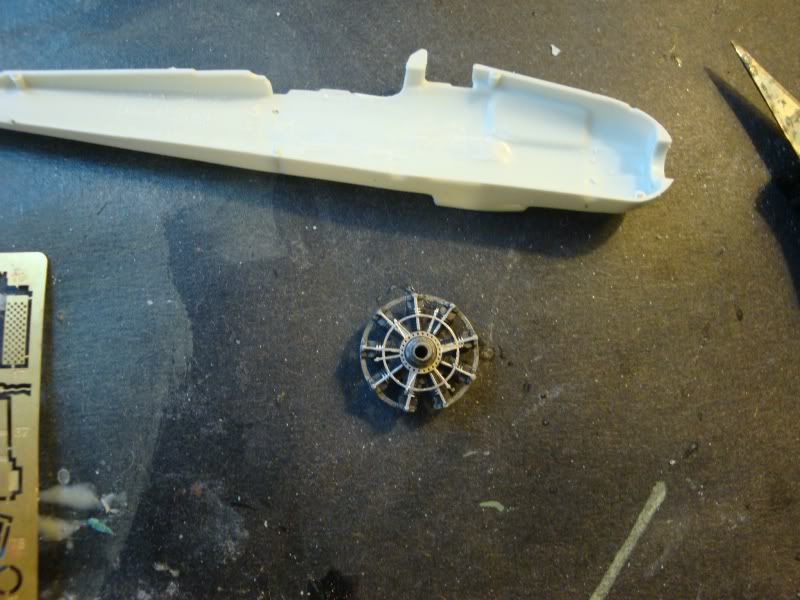
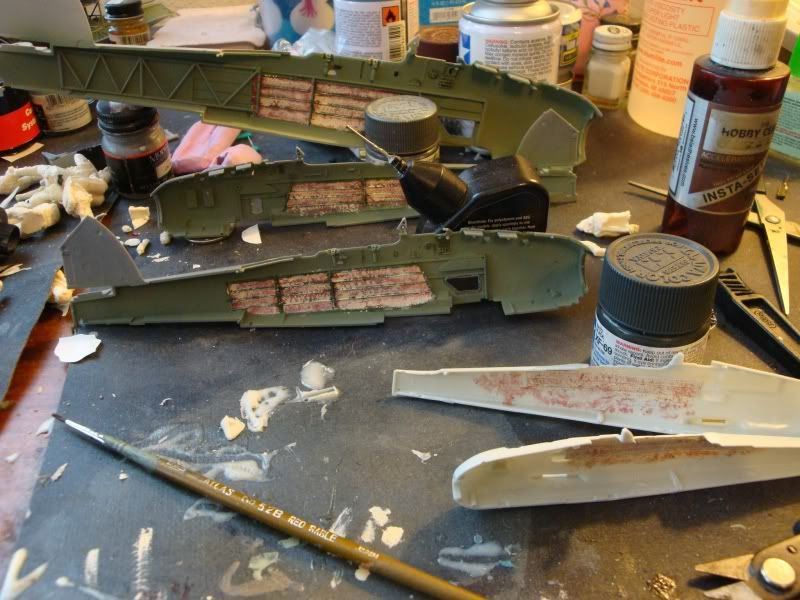
Added the PE side details. The fram is separate so should really jump out!  Painted it the canvas color and thought about that wierd brick red bleed through canvas color. I used a darker red this time. Hull red and basically dry brushed it lightly kinda with vertical jabs until it looked splotchy.

Then it dawned on me that if I used the canvas color the same way I could get a better effect on the Tamiya and trumpeter sides as well. So I gave it a go and splotched the brick red with the canvas color .

 I agree with Capt Bondo that it still looks bizarre to me but the red does look like it is from the outside now.  Did that for the Admiral! Thumbs Up [tup]

 Really I dunno know if you can see the diff but I did make an effort. Gotta retouch the side frames a bit and it will be ok me thinks.

 WHere in the world is the CAG? I just realized I got the whole crew finding a way to get me into a 1/72 PE detailing project!  I think all Y'all have had a part in it!  Well I shall put forth my best effort! Make a Toast [#toast] Here's to the lot of ya! Pirate [oX)]

Better try and get somemore progress done before the CAG shows up as Dave says I am behind!

Or did he say I was a behind? Confused [%-)]Blush [:I]

 This is all I got done in this GB so far so I had better quit loafing! Shock [:O]

  • Member since
    September 2004
  • From: Vernon, BC, Canada
Posted by razordws on Wednesday, July 22, 2009 12:57 PM
Aaron, Franktastic job on the Hurricane!!! Thumbs Up [tup]Thumbs Up [tup]Thumbs Up [tup]  Now where are those stringbags???  Your falling behind mate!  Wink [;)]

Dave

  • Member since
    September 2004
  • From: Vernon, BC, Canada
Posted by razordws on Wednesday, July 22, 2009 12:56 PM

Yowzers!!!  10,000K?

What happened to 9,000???   Must have blinked or something!

Congrats Frank!!!  Was going to send the barmaid over to help you celebrate but looks like I'm catching the tail end of the party.  Make a Toast [#toast]Party [party]Propeller [8-]Tongue [:P]Make a Toast [#toast]Make a Toast [#toast]Make a Toast [#toast]

Dave

  • Member since
    June 2008
Posted by lewbud on Wednesday, July 22, 2009 12:36 PM

In honor of the XO's 10k, Buddy's Bent Wing Bird Museum is now open for bidness.

http://public.fotki.com/lewbud/aircraft/corsair/

Y'all come by now, ya hear!

Aaron,

Those pics were taken in August last year, so they may have had time to put her right and get her away.  I'll let you know when I'm in the neighborhood.  Hobby shops and Hooters, not a bad way to spend the day.

Buddy- Those who say there are no stupid questions have never worked in customer service.

  • Member since
    October 2004
  • From: League City, Texas
Posted by sfcmac on Wednesday, July 22, 2009 10:29 AM

[ Ah Bondo the Captains voice of reason and sanity!  All too true but don't shy away from the lighter fluid because of it's name. Not like  vaporizing gasoline, or lighting your grill with it? Dead [xx(]

 Paint thinners and bother testers and Tamiya extra thin cement are both more flamable than the lighter fluid. To quote The Capt don't ask me how I know. But his point about ventilation is to be heeded. I know Herc says he has to spray outdoors so I didn't mention it.

As far as the envirornment goes the process of making styrene for models is far more polluting than anything I can pop in my Airbrush! Too funny!  Are you watching the view or something this AM Capt?  I wouldn't dump my motor oil down a storm drain but I have to be skeptical about the effects of modeling on the envirornment as oppossed to what my car burns on the drive to work.

 Don't believe me find an old lighter that still sparks and put a drop of liquid cement or thinner by the wick or vent. Flick it and see what happens but don't look to close. Black Eye [B)]

 Capt Bondo you knows I loves ya like me brother!  What is the report on the Stranraer? You are probably as tired of flying boats as I am of Gray Camo! Make a Toast [#toast]

  • Member since
    October 2004
  • From: League City, Texas
Posted by sfcmac on Wednesday, July 22, 2009 10:06 AM

 Thanks Buddy!  I forgot to thank you for the pics. They were right on time as you can see. Thumbs Up [tup]

 You know I do not remember seeing that Hurricane when I went to the Galveston Flight Museum. That was not long before IKE hit so I am sure it got away clean.  If you make it back down that way holler at me and we can meet on the way as I live right off 45 south. Thumbs Up [tup] Maybe we can find a divine scale model that fits your needs as two hobby shops are close by, and Hooters! Thumbs Up [tup]


  • Member since
    March 2007
  • From: Carmel, CA
Posted by bondoman on Wednesday, July 22, 2009 10:04 AM

If you are going to do dangerous behavior like that, be very very careful. With all due respect, "aerosoling" lighter fluid is pretty iffy, either outdoors which is tough on the environment, or indoors which is tough on the kids and the dog. Filtered fume hood a must!

Absolutely get one of these and use it, including the charcoal filter packs for organic solvents, which'll eat your brain. Don't ask how I know! But seriously, liver damage is in the future if not careful.

http://www.natlallergy.com/product.asp?pn=1176&bhcd2=1248274463

Also, get a 5 gallon steel garbage can with a very tight fitting lid and keep all your swabs, rags, dixie cup mix carafes etc. in it. Spontaneous combustion can/ will occur, and noone wants to come home to a smoking foundation.

Sorry to rant, but it's very important to be as safe as possible out there, friends.


  • Member since
    June 2008
Posted by lewbud on Wednesday, July 22, 2009 9:56 AM
 Evil Herc wrote:

Sorry for the double post.

The Tomcat I am working on is in 1/72. Why the hell do ya'll call it divine scale. as i was trying to paint the bottom shade on the cat i realized that this thing is to small to paint. I know i need alot more practice & more practice with my airbrush but i can see no managable way to paint all these little panels.SoapBox [soapbox]

Engines to stop, Props Feathered, ECBs pulled, put her to bed, Time to go Home,
Jason

Jason,

It's divine scale because what other scale would God build in?  At least that's the answer I was given when I asked.  Story has it one of the members of the club I belong to was a preacher who built 1/72.  When asked why he called it divine scale, that was his answer (maybe because 1/72 is enough to try God's patience at times).  As to your weathering probs, I can't answer because I build my a/c factory fresh. 

Aaron,

Glad to see it looks like your feeling better.  Nice job on the Sea Hurricane.  Kinda wish they did one in divine scale.Sigh [sigh]

XO,

Congrats on the 10K.Party [party]

Buddy- Those who say there are no stupid questions have never worked in customer service.

  • Member since
    October 2004
  • From: League City, Texas
Posted by sfcmac on Wednesday, July 22, 2009 9:42 AM

 Hey Jason! Spike is correct!  Go and get yourself a bottle of zippo or Ronsonol lighter fluid.  The kind that comes in the squirt bottle for zippo lighters.  Should have that at the ol PX somewhere.  Use that to clean your airbrush mixup and also to thin your enamel paints. Just don't smoke while your paintingDead [xx(]

 Your description of the issue makes me think that it is not one but a combination of 3 things. Paint thinning. Air pressure and angle of spraying/distance.  I thin acyrilics with good ol rubbing alcohol. Enamels with the lighter fluid.  They are very forgiving thinners that dry fast. I don't precisely measure nothing as the mix just mix it until it is about like milk in look and you can see the color stick on your stirring stick. ( tooth pick) Old Sprue) extc.

 Then always take your box lid inside and test it. See where you get the best spray as far as distance and adjustment to the paint/air mix on the airbrush.  Once you get the spray going how you want with the right feel of contol then hit the model. Usually holding it at a 45 degree angle when possible. Also I always spray dull coat or some matt finish on the surface of the model as a primer. This helps the paint stick and prvents it from pulling free when removing masking tape and such from it.  Doesn't take much a quick spray of rattle can flat coat will do.

Keep a q-tip handy to clean the AB tip in case of paint build up and you'll find the models get painted pretty good. Or you blow yerself up? One or the other.

 Oh yeah of note on the Acylics thinned with rubbing alcohol. This drys very faded and flat. Can be an effect used to advantage. The quick spray of rattlecan clear flat, dull coat, extc will bring the color right back to a rich and smooth look.

  • Member since
    March 2009
  • From: Wirral. UK
Posted by Spike190 on Wednesday, July 22, 2009 8:52 AM
Frank, congrats on the big 10 :-), can't imagine reaching that many, I'll be chuffed to reach 100. Aaron well done on the Hurricane, great paint job. Jason if the stringy stuff is off the tip of the brush then it's prob the result of your thinning misshap so I would just continue to give it a good clean, have you tried back washing it? Fill the cup with thinner then cover the tip with tissue and pull the trigger back, the bubbles may clearout any residue. Then spray the thinner through till clean. For more control thin more and lower your pressure, that will help avoid spider webs on the kit when spraying. Try post it notes for quick masking of those little panels.

Mike  Toast


JOIN OUR COMMUNITY!

Our community is FREE to join. To participate you must either login or register for an account.

SEARCH FORUMS
FREE NEWSLETTER
By signing up you may also receive reader surveys and occasional special offers. We do not sell, rent or trade our email lists. View our Privacy Policy.