SEARCH FINESCALE.COM

Enter keywords or a search phrase below:

Fleet Air Arm Group Build

729098 views
11139 replies
1 rating 2 rating 3 rating 4 rating 5 rating
  • Member since
    March 2007
  • From: Carmel, CA
Posted by bondoman on Wednesday, July 15, 2009 2:15 PM

Just to pick a few nits- the a/c doesn't have flaps. It uses it's ailerons as flaps, though it's hard to see how that would work, and they probably would be neutral on the ground. It does have leading edge slats, and I'd say it's a matter of choice whether those were extended.


  • Member since
    October 2004
  • From: League City, Texas
Posted by sfcmac on Wednesday, July 15, 2009 12:20 PM

 Hey Jason those even seem to be the right color. Maybe lighten up the fabric a bit. I know just where to cut out the squares too! Tongue [:P]

 Actually have a serious question for  you all regarding the Hamilton flaps on the wings.  I am guessing it is similiar to the 109 as it was free rolling but I am having a hard time finding pics of them extended. The reviews I have read bash both Tamiya and Trumpeter for molding them into the wing and not making them positionable. I have looked at builds with them shown as extended and it looks really nice but how often did they appear extended? Was it only in flight during near stall speed  and even then would both be extended evenly?

Just thinking if it is worth the effort to extend them or is it just one of those modeling fancies that really wasn't seen in the real aircraft that often.

Also finding out that Trumpeter included a really nice torpedo site.  Although not the fixed reference pegs which are easy enough to make.

Just wondering if any of you may be familiar with those aspects of this aircraft?

Maybe a really good nit picker has some ideas on this?

That was a joke Cpt Bondo! Laugh [(-D] OUCH!  Hey if those you know whats arrive please let me know as I am trying to figure out how long the mail takes. Thanks!

  • Member since
    August 2008
  • From: Okinawa, Japan
Posted by Evil Herc on Wednesday, July 15, 2009 7:30 AM
 Daywalker wrote:

 bondoman wrote:

Now, we know him; when he builds a Stringbag later this century he'll be cutting out between the ribs and using silkspan.

Now THAT is a great idea!  Thanks Cap'n for the assist, gotta remember that one. Wink [;)]

I can't believe these ladies are going to give up the silk for the stringbag!!

Ooooohhhh the all mighty powers of the XO.Bow [bow]

Konbanwa, Jason

Jason- (USMC Colonel/USMC SQ CO FAA/USN/FAW GB) Some people spend an entire lifetime wondering if they made a difference in the world. But, the Marines don't have that problem. Ronald Reagan, President of the United States; 1985

  • Member since
    March 2006
Posted by simpilot34 on Wednesday, July 15, 2009 5:52 AM
 Daywalker wrote:

Aaron- I like the comparison photo, showing all three side by side.  Really gives you an idea on the size difference between the three scales. Thumbs Up [tup]  I know what you mean about the Tamiya kit- even though they say the Tamiya PE is optional, one really should use it if possible as it looks to make quite a difference on the finished model.

 bondoman wrote:

Now, we know him; when he builds a Stringbag later this century he'll be cutting out between the ribs and using silkspan.

Now THAT is a great idea!  Thanks Cap'n for the assist, gotta remember that one. Wink [;)]

Surely you can't be serious!!!!!Wink [;)]

Cheers, Lt. Cmdr. Richie "To be prepared for war, is one of the most effectual means of preserving the peace."-George Washington
  • Member since
    September 2003
  • From: South Central Wisconsin
Posted by Daywalker on Tuesday, July 14, 2009 10:39 PM

Aaron- I like the comparison photo, showing all three side by side.  Really gives you an idea on the size difference between the three scales. Thumbs Up [tup]  I know what you mean about the Tamiya kit- even though they say the Tamiya PE is optional, one really should use it if possible as it looks to make quite a difference on the finished model.

 bondoman wrote:

Now, we know him; when he builds a Stringbag later this century he'll be cutting out between the ribs and using silkspan.

Now THAT is a great idea!  Thanks Cap'n for the assist, gotta remember that one. Wink [;)]

Frank 


  • Member since
    October 2004
  • From: League City, Texas
Posted by sfcmac on Tuesday, July 14, 2009 9:51 PM

Brian I coulda gone all day without knowing that! iTCH iTCH!  SCRATCH!  Just the thought of it fraks me out.  Man I hate bugs. Fireants lice , crabs whatever. I have been fortunate by some miracle over the years never to have suffered from any except maybe a tick but I have seen guys in the field just get infested by them. Nasty buggers!

 Well I think I may take a short break on the Swordfish. Not long maybe a week. I just wasn't happy with the  Tamiya kit just yet. I just had the kit and not the extra  PE fret they made figuring that I could do the rigging and such in a more traditional way.

 The more I look at it the more it seems that you almost have to have it. The way the kit is designed there are no other options for engine parts and the rigging has holes to drill out. It is set up more like use the Tamiya set or nothing though.  Not wanting touse nothing I ordered the Tamiya se from Sprue Bros. Actually finally found one.  Just don't want to half bake itsince they hae come this far alongad the Trupeter kit is leaving the Tamiya behind detail wise without the little extrastojazz it up.

In the mean time hile awaiting the pot man and set up the needed diversionary tactics I may try something wihout a radial engine.

  • Member since
    December 2008
  • From: Goffstown, NH
Posted by New Hampshire on Tuesday, July 14, 2009 7:27 PM
 bondoman wrote:

I think they are neato too. I'm not forgetting being called a nitpicker, and what the  hell is a nit anyways? I guess NH knows.

You know whats funny?  The first link I found to describe nitpicking was on Wikipedia and is thus:

"Nitpicking is the act of removing nits (the eggs of lice, generally head lice) from the host's hair. As the nits are cemented to individual hairs, they cannot be removed with most lice combs and, before modern chemical methods were invented, the only options were to shave all the host's hair or to pick them free one by one.

This is a slow and laborious process, as the root of each individual hair must be examined for infestation. It was largely abandoned as modern chemical methods became available; however, as lice populations can and do develop resistance, manual nitpicking is still often necessary."

I wonder if "nits" make a good base for Rum....errr, never mind.  Don't think I want to explore that option! Big Smile [:D]

Brian

  • Member since
    March 2006
Posted by simpilot34 on Tuesday, July 14, 2009 10:21 AM

Aaron, I agree with you, leave it as is!!!!!! I looked at the 'bag in that model article and he went about the same heaviness as you did and he won the class!!!! Anyways, the parts are on the way!!!! So should be there early next week maybe!!!Make a Toast [#toast]

Bill, here in Oz a nit is a lice egg.Wink [;)]

Jason, your AB looks a lot like the one I got off ebay. Mine looks like an Iwata knock-off!!! It works great!!! Has a micro air control up front really helps in getting in close and fine with the .2mm tip!! Practice, practice, practice!!! Such a small tip requires the paint to be thinner than normal and be patient, the thinner paint means you have to build the color. Looks like a lil gem!!!

Cheers, Lt. Cmdr. Richie "To be prepared for war, is one of the most effectual means of preserving the peace."-George Washington
  • Member since
    August 2008
  • From: Okinawa, Japan
Posted by Evil Herc on Tuesday, July 14, 2009 8:24 AM

AAron looking good....the scale difference can be seen well in thaat pic.

I hate this Southern Pacific weather here in Okinawa for painting models... windy and humidity is over 90% Censored [censored]. I live in a japenese sized apartment & with a 20 month old child, no painting is allowed in the houseBanged Head [banghead]. So here i sit, waiting on a improvement in weather so I can try out my new airbrush to preshade.

Anyone know anything about this airbrush???

I purchased this airbrush a while back because it is the only thing the LHS carry. It looks like a Iwata double action. After a lil bit of work, it was adapted to fit a U.S. air compressor. I am now chomping at the bit to use it.

Ltrs from The Land of the Rising Sun,

Jason

Jason- (USMC Colonel/USMC SQ CO FAA/USN/FAW GB) Some people spend an entire lifetime wondering if they made a difference in the world. But, the Marines don't have that problem. Ronald Reagan, President of the United States; 1985

  • Member since
    March 2007
  • From: Carmel, CA
Posted by bondoman on Monday, July 13, 2009 11:09 PM

I think they are neato too. I'm not forgetting being called a nitpicker, and what the  hell is a nit anyways? I guess NH knows.

Great project LtCmr. The XO put it properly, it's in the eye of the beholder. Now, we know him; when he builds a Stringbag later this century he'll be cutting out between the ribs and using silkspan.

Where the hell is that Ukrainian?

  • Member since
    October 2004
  • From: League City, Texas
Posted by sfcmac on Monday, July 13, 2009 9:32 PM

Ok I think everyone chimed in,  I believe that Admiral Jeaton is right on the money.  When I paqinted mine I was thinking more of a non penetrating coat applied from the inside and not a bleed thru from the opposite side.  Blame it on lack of sleep and probably brains.

 Capt Bondo is correct about his thoughts of the camo bleeding thru but I think that may be an earlier thing before the primers and clear coating process.  Maybe manufacturer specific.

Let me set it on the bed and see if I can get a better perpective shot.

Thought the 3 fuselage halfs side by side were kinda neato.

 Ok so I think I am just gonna leave it as is. I played around and it really looks pink if your not careful so Looking at it  even with one half the fuselage detached you can see it is dern near invisable. I kinda like the darker heavy look as it can be seen just a little at least. Doing it too finely detailed with all those crew figs is kinda a waste.

So I think I will leave it alone and move on.  Until the next time!

You fellows always start talking when I gotta go to work! Boohoo [BH] I do appreciate the input and really try to give it a go!

  • Member since
    September 2003
  • From: South Central Wisconsin
Posted by Daywalker on Monday, July 13, 2009 9:01 PM

Mike- AHA!  You cheated!!!  Having the paint demarcation right along where the parts join, how cool is that?  And, as far as the preshade goes- yours should turn out looking better than mine.  The more patchy and uneven, the better!

Aaron- Looking at those other representations, I say stick with it the way it is.  The more I look at your photos, the more I like the look you have acheived.  Too bad you can't see much of it. 

Frank 


  • Member since
    March 2007
  • From: Carmel, CA
Posted by bondoman on Monday, July 13, 2009 8:53 PM
 New Hampshire wrote:

I think it looks fine as is Aaron.  But I ain't much of a nitpicker, so..... Big Smile [:D]

Brian

Ouch...
  • Member since
    December 2008
  • From: Goffstown, NH
Posted by New Hampshire on Monday, July 13, 2009 8:31 PM

I think it looks fine as is Aaron.  But I ain't much of a nitpicker, so..... Big Smile [:D]

Brian

  • Member since
    December 2002
  • From: Northern California
Posted by jeaton01 on Monday, July 13, 2009 6:09 PM

I've seen the inside of a lot of fabric and I've never seen that much bleed through, Aaron.  It usually is just a faint coloration, though there can be local dark spots of small size.  The clear dope will run the white fabric color off from bright white as well, and some fabrics may be a little more tan than what I have used.  But if nobody knows who will see the model, and little is visible anyway, it's a Tempest in a Teapot, so to speak.

And that Blonde.  Just typical, kissing some less than handsome guy just to frustrate the rest of us, especially the Admiralty!

John

To see build logs for my models:  http://goldeneramodel.com/mymodels/mymodels.html


  • Member since
    March 2007
  • From: Carmel, CA
Posted by bondoman on Monday, July 13, 2009 5:52 PM
Admiral, PM inbound about a missing friend.
  • Member since
    October 2004
  • From: League City, Texas
Posted by sfcmac on Monday, July 13, 2009 4:19 PM

Ok searching the web here is how others have represented the interior in reviews.


Without a crew it does show.


Modelers should note that in painting the Swordfish interior, the fabric exterior was covered in red primer. Depending on how well the primer was worked into the fabric, it would be seen in the interior as blotchy red through the doped fabric, which is generally a light tan. I accomplished this by air brushing Tamiya "Buff", then "blotching" Gunze-Sanyo H-414 "RLM Rot23," a light brick-red color, which the picky-picky modelers at the Aerodrome have determined is a good representation of doped fabric. The fabric area was masked off when dry and the rest of the interior was painted with Xtracrylix "British Interior Green" with details painted with Tamiya "Semi-Gloss Black on all metal items.

 Well I am of the thought that it looks icky but that's it!  Doing the heavy handed paint as oppossed to sponging it on makes it show up when assembled. As far as the canvas showing through the primer color!


  • Member since
    March 2007
  • From: Carmel, CA
Posted by bondoman on Monday, July 13, 2009 3:47 PM
 Daywalker wrote:
LOOK WHAT I FOUND!!!
It appears that poor little Nam's remains have been found.  One of the girls I sent looking for him found his remains amongst a pile of bikini tops and empty rum bottles on a beach somewhere...

Poor lil' fella... Boohoo [BH]

 
I've heard of trophy wives, but this is riddiculus!!
  • Member since
    October 2004
  • From: League City, Texas
Posted by sfcmac on Monday, July 13, 2009 3:45 PM

 Ah Spike Pre shading. Haven't had a lotta luck with that technique but have sure seen some great results from it.  Figure I am doing something wrong as usual. 

Ok I dry fitted the string bags fuselage together and about 3 square millimeters of that color show though.  With the crew inside it is pretty well hidden from view. Maybe if you were doing a 1/2 clear version to show off the details it would be worth figuring out but I find no real need to bother you all more on something you can't see.  Seriously I could paint it purple and you could never tell.
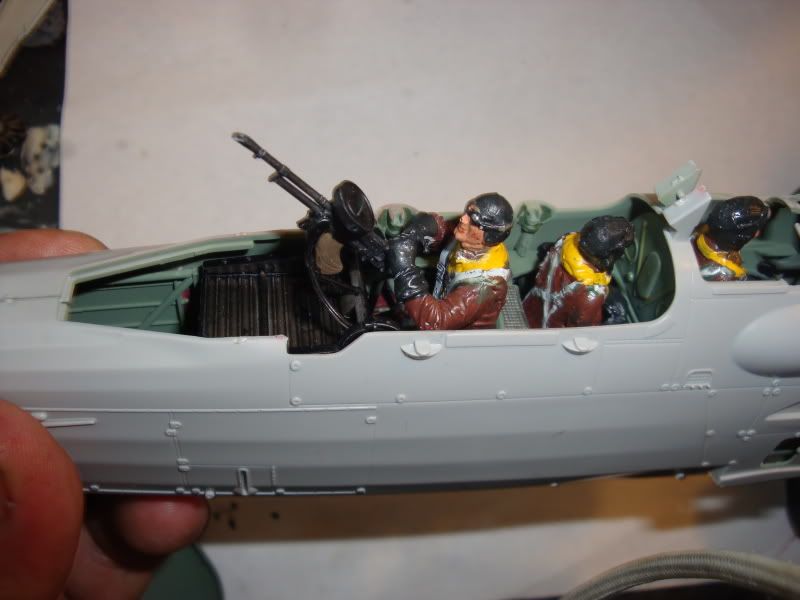
But just in case I am missing the point here. I would really like to hear what others think on the subject.  Honest answers! will it drive you crazy if left alone?

If it DIDN'T LOOK LIKE THAT THEN WHAT?  wASN'T  yelling my fingers hit the caps lock by accident. Blush [:I] 

Bondo says outside camo faintly showed . Or use red tissue christmas paper or toilet paper preferably new not used.

The tape idea has merit  but how should it be painted?  Was the red way off?

Got Bondo's take on the subject He is a man of opinions!  What is everyone elses?

 I got a bunch of options.

1 Leave it be

2 repaint it green.

3 Tamiya tape ( also could make custom decals if I knew exactly  what to make them look like)

4 ummmm i dunno that blonde smooching the remains has me all excited.

  • Member since
    October 2004
  • From: League City, Texas
Posted by sfcmac on Monday, July 13, 2009 3:21 PM
 Daywalker wrote:
LOOK WHAT I FOUND!!!
It appears that poor little Nam's remains have been found.  One of the girls I sent looking for him found his remains amongst a pile of bikini tops and empty rum bottles on a beach somewhere...

Poor lil' fella... Boohoo [BH]


Well he seems happy enough.  Has his Rum and the attentions of a red bikini what more could he ask for?

  • Member since
    March 2009
  • From: Wirral. UK
Posted by Spike190 on Monday, July 13, 2009 2:28 PM

Frank where on earth did you find that picture Shock [:O]!!

Aaron I cant think of anything better than the tamiya tape idea, how about spray inside of the fuse to clean it up again, lay out some tape and go for the finish and then cut out to fit the spaces, will take a while but should look quite trim when done, could seal it with a clear coat?

This is where I'm at,

Sorry but I cant even preshade as neat as Frank Ashamed [*^_^*]. Got the white on and I've sealed the white with some Vallejo Clear from a can just to protect or it will end up grey by the time I'm finished. Leave till Tuesday then its Blue time Big Smile [:D]

Cheers... 

Mike  Toast


  • Member since
    September 2003
  • From: South Central Wisconsin
Posted by Daywalker on Monday, July 13, 2009 2:05 PM
LOOK WHAT I FOUND!!!
 
It appears that poor little Nam's remains have been found.  One of the girls I sent looking for him found his remains amongst a pile of bikini tops and empty rum bottles on a beach somewhere...

Poor lil' fella... Boohoo [BH]


Frank 


  • Member since
    March 2007
  • From: Carmel, CA
Posted by bondoman on Monday, July 13, 2009 10:23 AM

 sfcmac wrote:

Where in the world to you get red toilet tissue? Yuck [yuck]Pirate [oX)]

Why, in Joe McCarthy's bathroom, of course! Actually I was thinking more along the lines of Christmas wrapping. I second the XO; I like the Tamiya tape idea. You could prepaint it. Now, you understand that you need to show the outside camo, faintly, in reverse.


  • Member since
    October 2004
  • From: League City, Texas
Posted by sfcmac on Monday, July 13, 2009 7:34 AM

No I could change it but it would look pretty much the same. If the effect I did is wrong.  I would just paint the tape the same way if that is how it is supposed to look.  It would give a sharper edge to the framework but then again without the camera zoom and flash you can't tel much diff there either.  I dunno may just leave it unless someone thinks of a better way/color/pattern to represent it.

Nap time for the bubba I shall sleep on it and check back to see if anyone has any thoughts.

 When I was at work last night it dawned on me.... Where in the world to you get red toilet tissue? Yuck [yuck]Pirate [oX)]

  • Member since
    September 2003
  • From: South Central Wisconsin
Posted by Daywalker on Monday, July 13, 2009 12:51 AM
 sfcmac wrote:

...the other option I considered  was strips of tamiya tape permnently placed in the recessed rectangles. That could give a texture effect and then figure out what paint effect to shoot for.

I like that idea, sounds quite feasible.  Is it too late to change it?


Frank 


  • Member since
    June 2008
Posted by lewbud on Sunday, July 12, 2009 10:30 PM
 jeaton01 wrote:

Well, maybe this should be the next contest, eh?  I took some photos last night as well, Aaron.  In my backyard about midnight, and I live in town.  Don't know where these thieves came from.  Silly cats just sat there and watched while they stole their food.  The crunching was louder than usual, so I went out to look and there were 5 of them.  They all ran up the tree when they saw me.  Later they relaxed and came down one at a time and exited stage left.  I think there were 5 of them.


Looks like you've got a Jawa infestation there Admiral.

Buddy- Those who say there are no stupid questions have never worked in customer service.

  • Member since
    June 2008
Posted by lewbud on Sunday, July 12, 2009 10:26 PM
 DeeYankeeinTexas wrote:

Aren't you supposed to be driving? How can you take pictures and drive??


He was steering with his knees again.Laugh [(-D]

Buddy- Those who say there are no stupid questions have never worked in customer service.

  • Member since
    October 2004
  • From: League City, Texas
Posted by sfcmac on Sunday, July 12, 2009 7:35 PM

Ha ha!  Frank said a mottled look and the Admiral said make it look like mildew. Ritchie's pic is all uni-colored. Hmmmm  the other option I considered  was strips of tamiya tape permnently placed in the recessed rectangles. That could give a texture effect and then figure out what paint effect to shoot for.  All in all it is in a very tight place as far as being seen when it is together.  Really almost have to overdo the effect to make it remotely visable.  I dunno.  I think I shall take a break and ask for a consensus!

Bondo sez use tp!

  • Member since
    March 2007
  • From: Carmel, CA
Posted by bondoman on Sunday, July 12, 2009 7:21 PM

It looks bad, you need to do it again. How about getting some red tissue paper and gluing it down over white?

Admiral, you found NAM!!!

  • Member since
    October 2004
  • From: League City, Texas
Posted by sfcmac on Sunday, July 12, 2009 6:00 PM

 At least yours still wait for dark Admiral! Make a Toast [#toast]Laugh [(-D]

Ok here is the first attempt at what I think you all are describing to me.  Primer red was too dark and attempts at mixing my own ended up in pink. when I added some more red and brown Io hot pink. Banged Head [banghead] I setled for using primer red lighted up a bit.

 To try to get the effect I first painted on Panzer interior buff really thick and let it dry about 80% and pressed a damp napkin down on it as well as I could. It gave a more clothy textured look. Pic stinks trying to see it though. Also I only painted in horizontal lines to get the streaks horizontal.

Then I took the lightened primer hull red color affter this had dried and just dry brushed it on very heavily.  This allowed a lot of the canvas color to show through especially in the textured recesses, but gives an overall redish tinge.

Then to bring out the framework and raised molded on details I used the interior green darkened with some french Khaki to roughly trace and outline the framework extc.

 A little toughing up and it  really will help it show up in an area where it will be hard to see anyways.  The Decking on the crew compartment really hides it and you have to be looking for it to see it.

 So what do you all think?  Close? way off?  Should I take up stamp collecting instead?

JOIN OUR COMMUNITY!

Our community is FREE to join. To participate you must either login or register for an account.

SEARCH FORUMS
FREE NEWSLETTER
By signing up you may also receive reader surveys and occasional special offers. We do not sell, rent or trade our email lists. View our Privacy Policy.