SEARCH FINESCALE.COM

Enter keywords or a search phrase below:

SPITFIRE GROUP BUILD 2007-2008

119056 views
2048 replies
1 rating 2 rating 3 rating 4 rating 5 rating
  • Member since
    December 2002
  • From: Northern California
Posted by jeaton01 on Monday, July 16, 2007 12:58 PM
That's a very well done model. Marc.  That's how I wish I could get my finishes to look, all blended in and faded just right.  The panel lines are apparent but they don't stick out.  Please do stick around and build the Mk XIV.

John

To see build logs for my models:  http://goldeneramodel.com/mymodels/mymodels.html


  • Member since
    December 2002
  • From: A secret workshop somewhere in England
Posted by TANGO 1 on Monday, July 16, 2007 12:17 PM

Mark....

Bow [bow]Bow [bow]Bow [bow]Bow [bow]Bow [bow]Bow [bow]

Asoloutely stunning! That is a real beauty mate! Completely flawless.Thumbs Up [tup]


Thank you for being part of our GB, you have certainly raised the bar for the rest of us here.Approve [^]

Now crack on with the next one...................Big Smile [:D]

Regards, Darren. C.A.G. FAA/USNFAW GB
  • Member since
    June 2006
  • From: Princeton, North Carolina
Posted by ModelMan8 on Monday, July 16, 2007 12:12 PM

Marc, dito on what has been said.  The colors, weathering, everything is just great!!Bow [bow]Bow [bow]

As for the second entry idea....GO FOR IT!!!!Smile,Wink, & Grin [swg]

Chris

gzt
  • Member since
    May 2007
  • From: Massachusetts
Posted by gzt on Monday, July 16, 2007 11:02 AM

Marc,

once again - an oustanding job ! Very nice balanced weathering - absolutely outstanding !

Greg

Flying is a thrill #2 known to mankind. Landing is #1.

http://www.rwd-6.org

  • Member since
    September 2004
  • From: Vernon, BC, Canada
Posted by razordws on Monday, July 16, 2007 10:37 AM
First class as always Mark. Unusual markings and beautiful weathering Bow [bow]Bow [bow]

Dave

  • Member since
    April 2005
  • From: Piscataway, NJ!
Posted by wing_nut on Monday, July 16, 2007 9:29 AM

I put the finishing touches on this build over the weekend.  Here is my entry to this GB.  Spitfire Mk Vc flown by Flt Sgts George Gilbert and Dudley Grinlington of &9 Sq.  The model depicts the a/c as it appeared in Aug/Sep '43, shortly after its arrival at Kiriwina Island.  It still has the original RAF SN and the Taz devil emblem was only partially completed.  For the model, the island was masked and sprayed with white then the little red devil was cut out of the decal, applied and painted over with red to remove the "detail" of the finished emblem.

There are differing opinions as to whether there was an area of middlestone paint that was left on the left rear fuselage. One historian says yes and another says no.  The photos that show this area of the plane after it flipped on landing may be mud... and it may not.  I chose to do it without the middlestone. Besides the "c" conversion, added items are Ultracast Rotol metal prop, wheels and cannons and an Eduard's PE detail and cockpit set with Super Scale decals.

Darren, thank you for hosting this GB. It was fun and I learned an enormous amount about the Spit.  I bought another Mk XIV too and may have a second entry... who knowsWhistling [:-^]

Thanks for looking and please... comments and critiques are always welcome. 

Marc  

  • Member since
    April 2005
  • From: Piscataway, NJ!
Posted by wing_nut on Monday, July 16, 2007 9:23 AM

Chris, John.... nice work on the cockpit details.

John... very nice photos on the site.  I would love to have been there for those fly-bys.

Marc  

  • Member since
    September 2003
  • From: South Central Wisconsin
Posted by Daywalker on Sunday, July 15, 2007 4:11 PM
Anytime Greg, glad to help!

Frank 


gzt
  • Member since
    May 2007
  • From: Massachusetts
Posted by gzt on Sunday, July 15, 2007 4:10 PM

Darren, Frank, John: It worked perfectly ! Big Smile [:D]

Thanks a lot. I was able to cut it clean and will use a spare door on a kit what does not have such details.

Thanks again

Greg 

Flying is a thrill #2 known to mankind. Landing is #1.

http://www.rwd-6.org

  • Member since
    September 2003
  • From: South Central Wisconsin
Posted by Daywalker on Sunday, July 15, 2007 3:53 PM

Greg-

Darren and John have the right idea.  That's exactly the way I do it.  As for the door itself, the Tamiya kit should have one to pose open (part no. A29) so you shouldn't have to worry too much about saving the door.  But, it never hurts to be careful in case you need one down the road.  I used mine as mask for the cockpit during painting, that way I could paint the open door separately for a good finish and have a mask (the cut-off door) that fit the opening perfectly.  Hope that helps!

Frank 


  • Member since
    December 2002
  • From: Northern California
Posted by jeaton01 on Sunday, July 15, 2007 3:43 PM

Greg:

To cut it from the kit part can be done, by the method desribed by Darren.  The key is to get a straight cut,and to lose as little material as possible.  That's why it is better to use a sharp exacto or a fine scribing tool coming from both sides.  I often screw up doing that way, I haven't got the steadiest hand.  The other way is to use a door from one kit and a fuselage half from another.  That sounds pretty bad except that all of the ICM kits come with a separate door, and resin doors are also available, I think I have some made by Ultracast.  By this method I just dremel out the door after marking off the boundaries with Tamiya tape.  I stop with the dremel with some material remaining, and use a file and sanding stick to carefully remove the remaining material up to the tape marking line.  I use the same method to separate control surfaces if thehinge detail crosses the parting line, as a counterweight does.

I have a pile of the ICM kits most of which I've bought for $5.00 or so from Alanger, so I don't mind using some up for the extra parts.

John

To see build logs for my models:  http://goldeneramodel.com/mymodels/mymodels.html


gzt
  • Member since
    May 2007
  • From: Massachusetts
Posted by gzt on Sunday, July 15, 2007 3:33 PM

Thanks Darren!

I am going to do it your way.

BTW: do you have any recommendations for the sribbing tool ? I may need it on my Monogram P-40B .

Thanks

Greg 

Flying is a thrill #2 known to mankind. Landing is #1.

http://www.rwd-6.org

  • Member since
    December 2002
  • From: A secret workshop somewhere in England
Posted by TANGO 1 on Sunday, July 15, 2007 3:17 PM

Greg,

thats not a stupid question at all, there are various way of getting the job done and I'm sure you will be given plenty of advice on this one. Here's how I do it.....

From the inside of the fuselage half, scribe along the two panel lines of the door, if you don't have a scribing tool a sharp blade will suffice. The point of the exercise is to draw the point of your cutting tool along the lines nice and slow just enough to score a line on each side. Keep repeating this process and you will wear away the plastic. Now do the same with the bottom of the door on both sides of the fuselage and when the plastic is thinned enough it will simply break off and there will be very little sanding to do along the door frame. Its a longer process than simply razor-sawing the door edges and snapping the plastic off, but it does leave you with a cleaner cut.


Hope this helps you out.Wink [;)]

Regards, Darren. C.A.G. FAA/USNFAW GB
gzt
  • Member since
    May 2007
  • From: Massachusetts
Posted by gzt on Sunday, July 15, 2007 2:46 PM

I've got a ... stupid question Angry [:(!]

How do you remove the door in Tamiya 1/48 Vb kit ?  What is a trick to do it right - I am worry that I will destroy the kit while cutting those out.

- drilling holes in corners first?

- cutting with a knife ??

I have a tiny blade saw (like an exacto knife kind) but what technique to use to make a cut on the horizontal portion of the door ?

GRRRRR,,,, always something new Smile [:)]

Greg 

Flying is a thrill #2 known to mankind. Landing is #1.

http://www.rwd-6.org

  • Member since
    December 2002
  • From: Northern California
Posted by jeaton01 on Sunday, July 15, 2007 2:45 PM

A nice Spitfire photo from RIAT Saturday by Andy Chritchfield:

http://www.hardpointphotography.fotopic.net/p43180460.html

John

To see build logs for my models:  http://goldeneramodel.com/mymodels/mymodels.html


gzt
  • Member since
    May 2007
  • From: Massachusetts
Posted by gzt on Sunday, July 15, 2007 2:23 PM

 jeaton01 wrote:
Thanks for the nice comments, everyone, I appreciate them. Greg, it is 1/32.  So far I doubt I could do the same detail in 1/48.  Maybe someday.

OK, it feels a bit better because for a moment I thought that I will never be able to reach the bar ... because you set it so high Smile [:)]

I decided to make a Spitfire production boost line here ... as you can see on my list Big Smile [:D]

Greg 

Flying is a thrill #2 known to mankind. Landing is #1.

http://www.rwd-6.org

  • Member since
    December 2002
  • From: Northern California
Posted by jeaton01 on Sunday, July 15, 2007 1:53 PM
Thanks for the nice comments, everyone, I appreciate them. Greg, it is 1/32.  So far I doubt I could do the same detail in 1/48.  Maybe someday.

John

To see build logs for my models:  http://goldeneramodel.com/mymodels/mymodels.html


  • Member since
    December 2002
  • From: A secret workshop somewhere in England
Posted by TANGO 1 on Sunday, July 15, 2007 1:10 PM
Just a quick update from me.......I've not had any time at all in the workshop this weekend so things are on a go-slow again. Hopefully, I'll get a little time tomorrow evening all being well.Wink [;)]
Regards, Darren. C.A.G. FAA/USNFAW GB
  • Member since
    December 2002
  • From: A secret workshop somewhere in England
Posted by TANGO 1 on Sunday, July 15, 2007 1:08 PM

John,

I really enjoyed your last post, superb work!Bow [bow]Bow [bow]Bow [bow] Thanks for those pics-inspiration indeed!!

Regards, Darren. C.A.G. FAA/USNFAW GB
  • Member since
    September 2003
  • From: South Central Wisconsin
Posted by Daywalker on Sunday, July 15, 2007 8:22 AM
Nice work John!  Good idea on the compass, gotta remember that one.

Frank 


  • Member since
    November 2003
Posted by TryintoModel on Sunday, July 15, 2007 7:50 AM
 jeaton01 wrote:

I'm probably going to redo some of the plans I have for smaller electric.  One of these days.  I love flying a floatplane on a calm evening.  My Cub on floats is great fun, the Cub flies on floats like it was born to do it.  The LC does too, but it flies well only if you add some washout to the wing.  The full scale airplane would have benefitted from that as well.  Off to the spitfirewerk.  There WILL be photos today!


Nice job so far, jeaton01!!  I need to get started on my spit.

I've gotten into electrics a little.  I have a Slowstick I've been flying for a while and have gotten pretty good with it.  I built this, but I haven't had the nerve to fly it yet.  I need to find a big enough place around where I live to get a good takeoff.  I enjoyed putting this one together and painting it.  Foam isn't the easiest thing in the world to mask, I found.  Not a bad kit, though, for $65. 


gzt
  • Member since
    May 2007
  • From: Massachusetts
Posted by gzt on Sunday, July 15, 2007 7:45 AM

John:

and it is a 1/48 scale ? Absolutely stunning !

Bow [bow]

Greg 

Flying is a thrill #2 known to mankind. Landing is #1.

http://www.rwd-6.org

jwb
  • Member since
    February 2006
  • From: Parkton, NC
Posted by jwb on Sunday, July 15, 2007 7:35 AM
That is just beautiful work, John! The compass is fabulous- first time I've seen that modeled that way, what a nice detail. Truly impressive work.

Jon Bius

AgapeModels.com- Modeling with a Higher purpose

"For I know the plans I have for you," declares the Lord, "plans to prosper you and not to harm you, plans to give you hope and a future." ~ Jeremiah 29:11

  • Member since
    December 2002
  • From: Northern California
Posted by jeaton01 on Sunday, July 15, 2007 3:09 AM

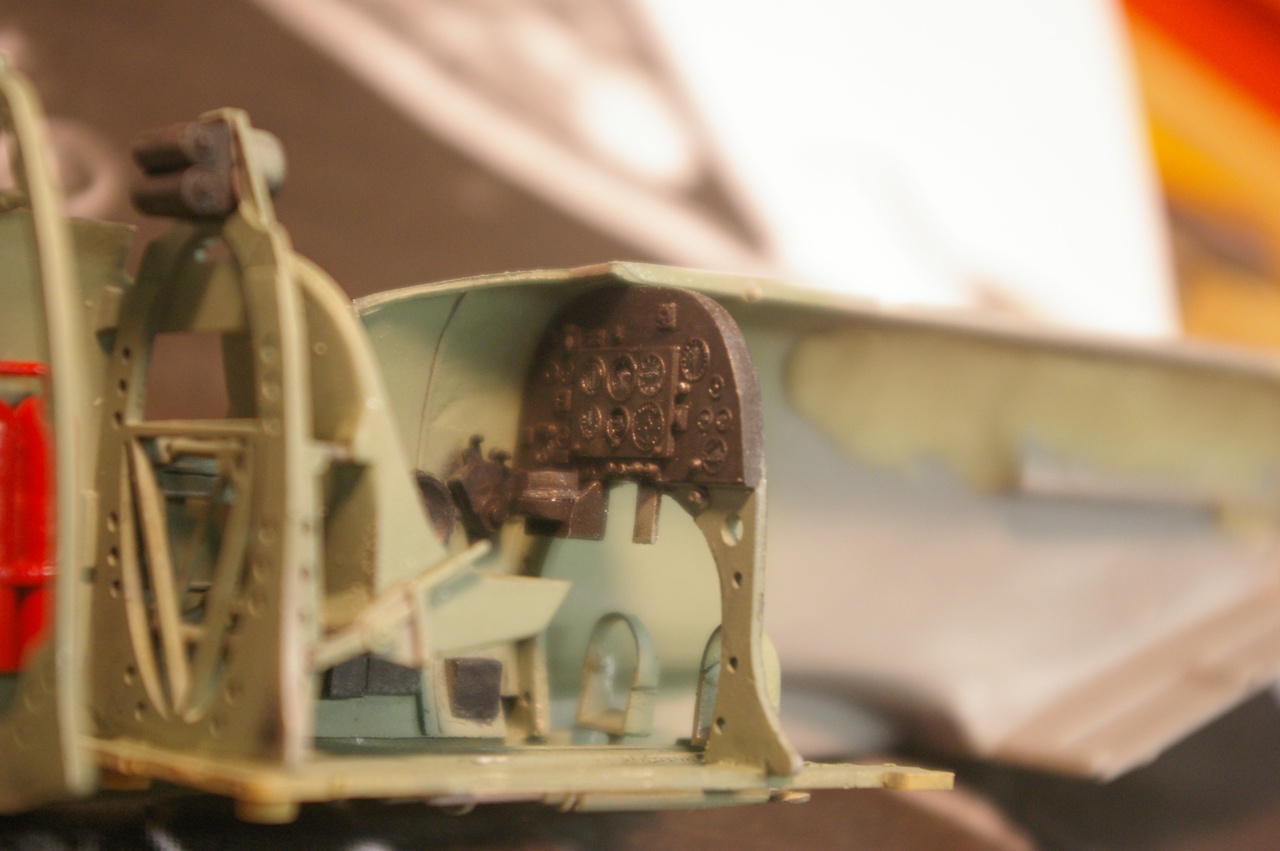
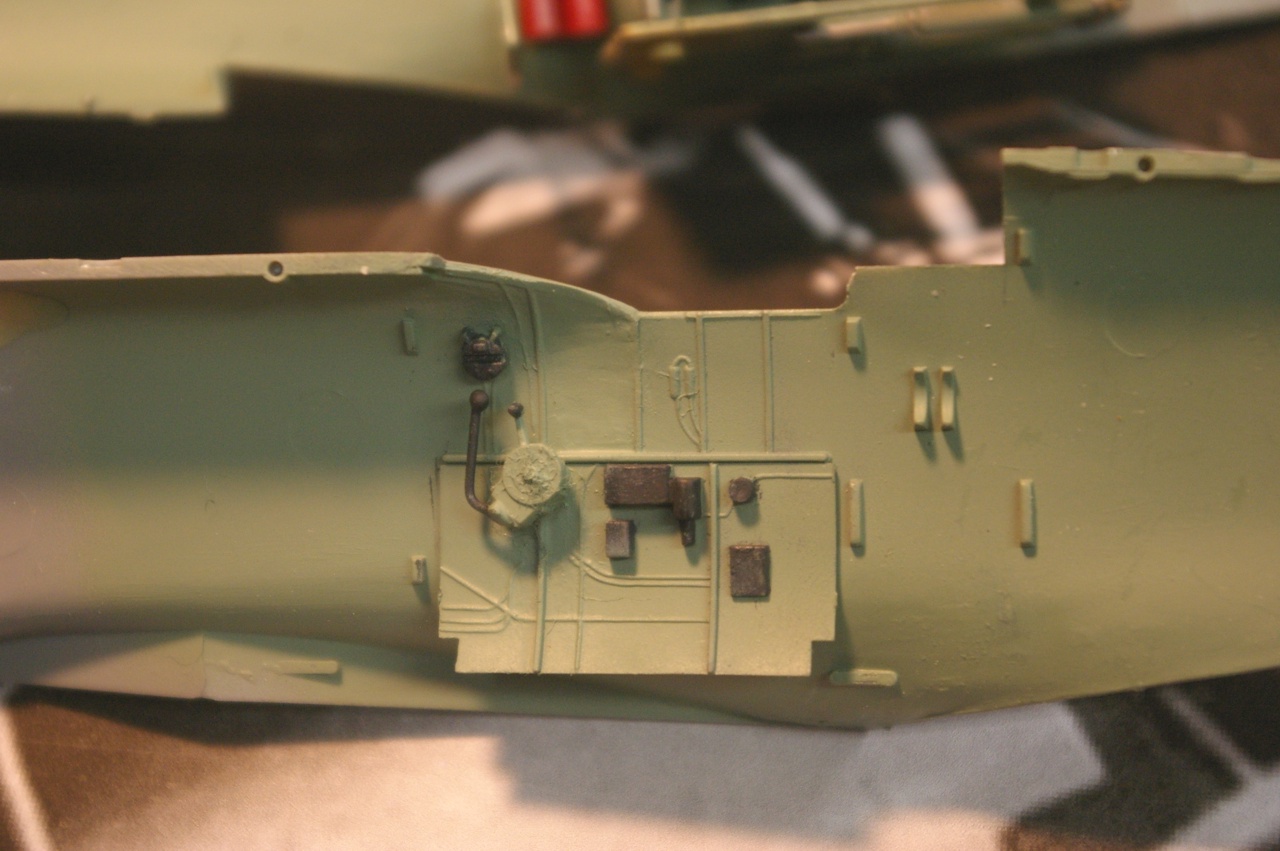
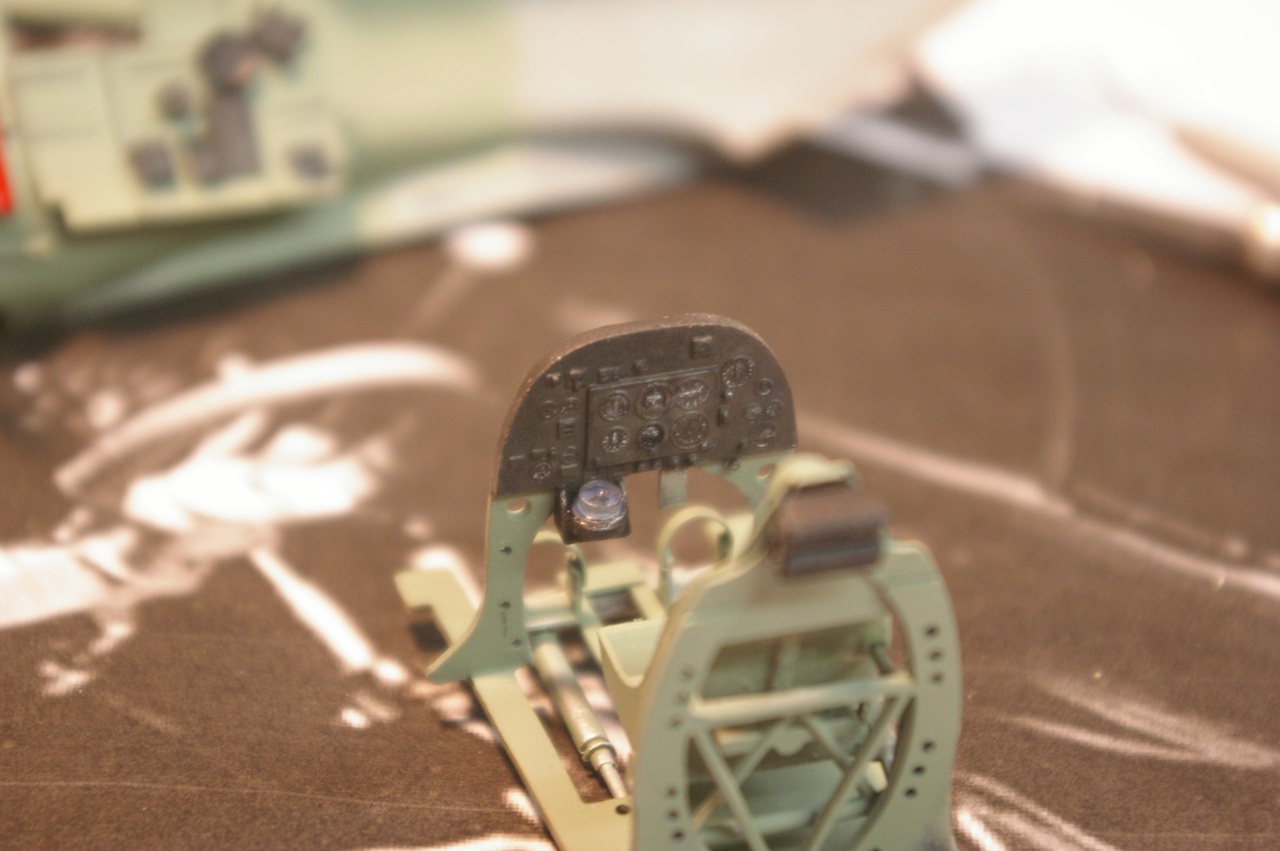
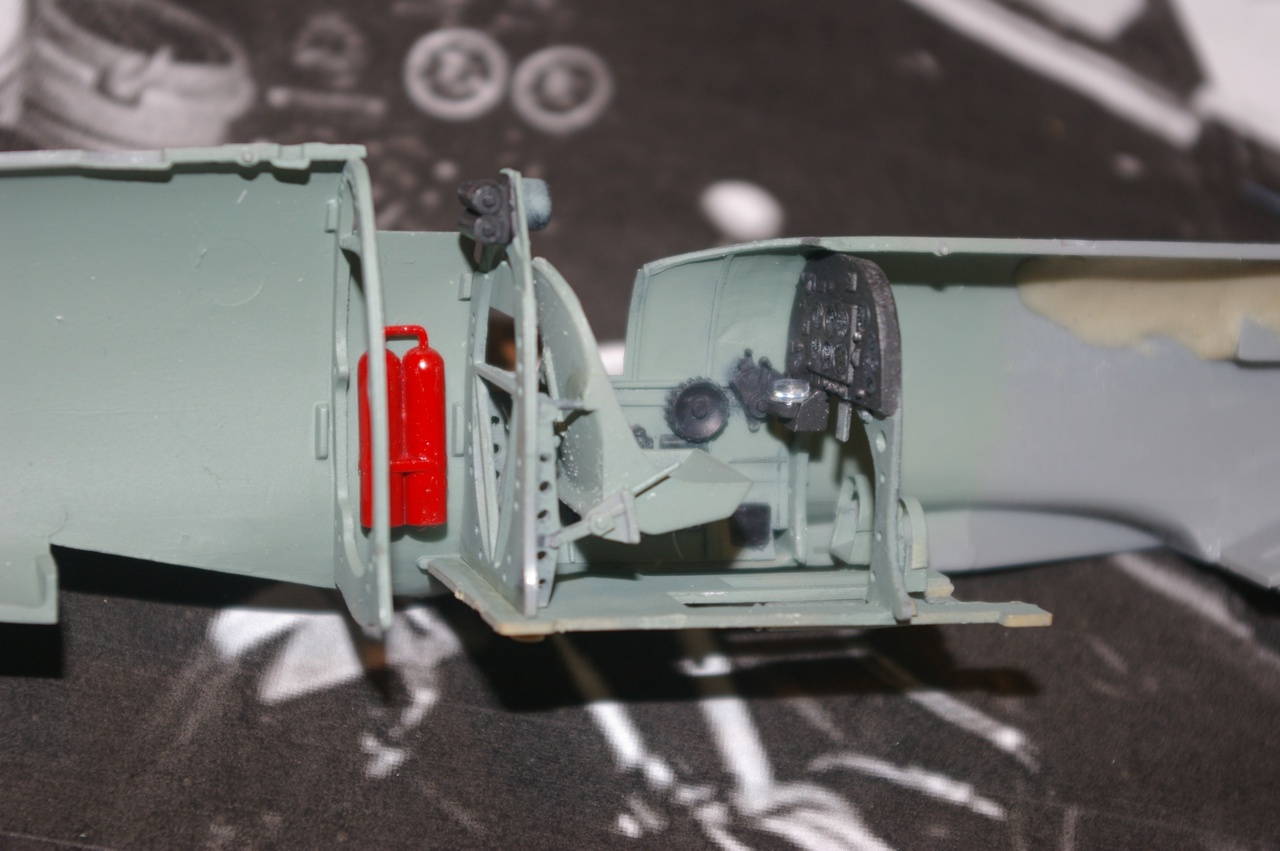
Well, here's some pictures of my K5054 project.  I've got the basic cockpit stuff done, but still have some wiring and plumbing to add, and a few more levers.  The relief on the instrument panel made it fairly easy to get a nice look.  I started with flat black on the panel and also preshaded in places on the sidewalls with flat black.  Next on the panel I drybrushed aluminum metalizer, then a drybrushing of flat black.  Next I picked out the details with flat white, and after going around with a little more flat black to subdue the white a little, I placed Future on all of the instrument faces.  You'll notice there is no control column, I messed up the paint on it and stripped it all off to start over.  The compass is moved to the left, and a porthole window from a Hobbycraft 1/72 C-45 was put on the top.  On the right sidewall, I moved the gear selector handle to the top forward position which was gear down on K5054 and some of the first Spitfires, and put a handle made from .030 brass rod with a superglue knob on the end, for the hydraulic pump attached under the gear selector housing.  The gear selector housing was reshaped some, it's close but not quite what it should be.  All of the lightening holes in the cockpit formers and seat brackets have been drilled out, and I preshaded with flat black inside all of them before putting on a minimum coat of the interior green.  The photos I have look to me like the seat in K5054 was aluminum, so I painted it interior green.  I have some Eduard prepainted PE seat belts to go on later.  The lower seat armor was not installed.  I probably should have removed the armor on the headrest, but I thought I might cause myself a lot of grief so I left it as it is fairly small.

I removed a lot of the locating lugs in the cockpit area, many were in very visible areas and lined things up and glued the bulkheads to the floor while they were all temporarily on the left sidewall.  The floorboard was modifioed by increasing the size of the open areas above the rudder linkage and the center front was removed completely just ahead of the pivot point for the rudder bellcrank.  A rudder bellcrank was made for the rudder pedal mechanism and the linkage was relocated to put the rudder pedals a bit closer to the seat, and the rudder pedals were changed to eliminate the upper foot rest.  The tops were cut off and thin plasticard was attached to simulate the foot straps.  The bellcrank was painted silver, and after an interior green coat the linkage and pedals were drybrushed with metalizer aluminum. 

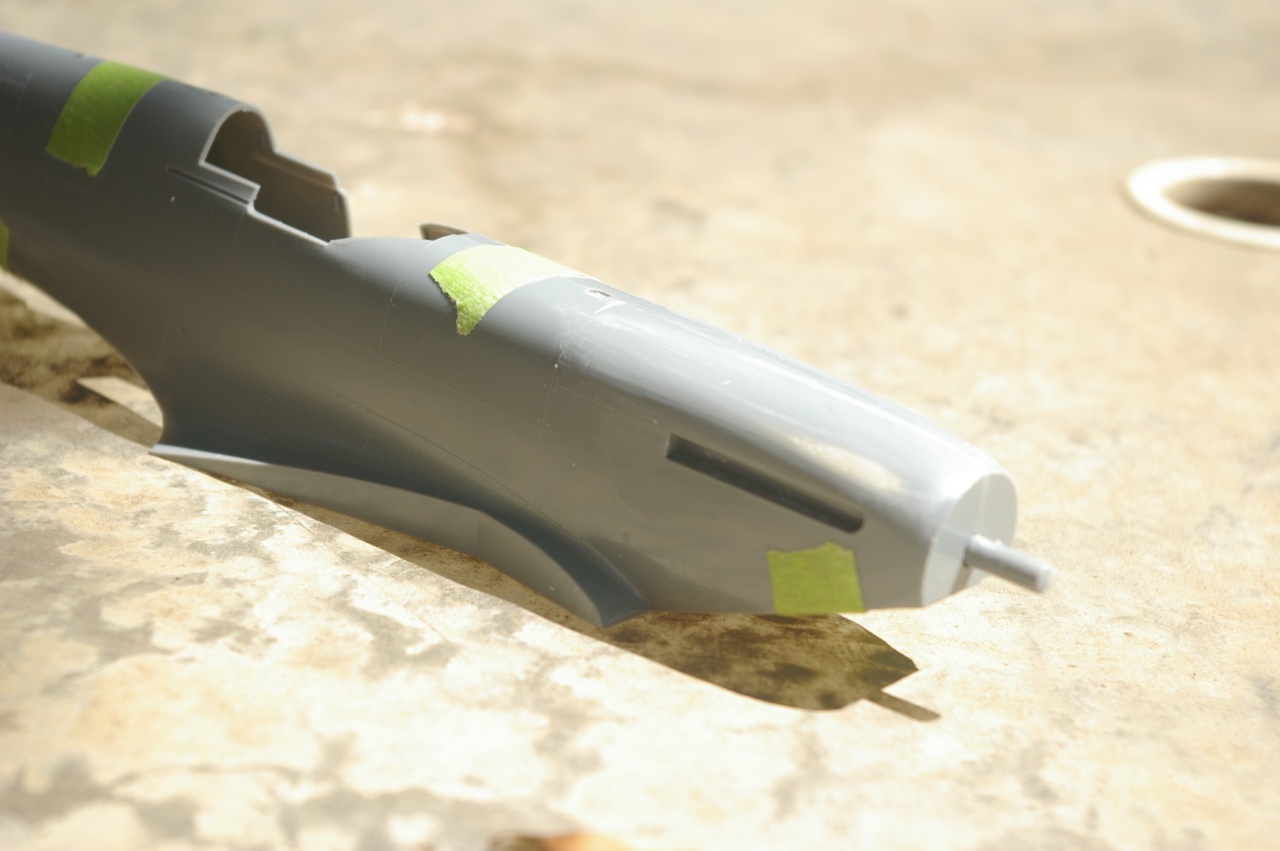
I've filled all the panel lines on the wings that I think would not be visible with the Rolls Royce paint scheme, but in the photos I've taken you can't really see what's filled and what isn't so I saved pictures of the wings for later.  The coolant radiator areas have been modified, as well as the oil cooler.  I may be wrong, but I don't think K5054 had quite the same shape on the front end of the oil cooler as the production airplanes.  Milliput was formed in on the inside of the upper cowling and the nose contours were rounded off so it looks like the photos and to fit the resin spinner.
 

John

To see build logs for my models:  http://goldeneramodel.com/mymodels/mymodels.html


  • Member since
    November 2006
  • From: Castro Valley.CA
Posted by TheLastPriest on Sunday, July 15, 2007 2:15 AM
nice, my photo etch set and RAF paint colors just came in from squadron today. I will be starting the build next week probably

It is only the intellect that keeps me sane; perhaps this makes me overvalue intellect against feeling

  • Member since
    September 2003
  • From: South Central Wisconsin
Posted by Daywalker on Sunday, July 15, 2007 12:33 AM
I would think so!  Glad to have you here! Sign - Welcome [#welcome]

Frank 


  • Member since
    November 2006
  • From: Castro Valley.CA
Posted by TheLastPriest on Saturday, July 14, 2007 9:27 PM
Hey guys, Im about to start on a tamiya 1/48 Spitfire mk vb. can I get in on the group build?

It is only the intellect that keeps me sane; perhaps this makes me overvalue intellect against feeling

  • Member since
    December 2002
  • From: Northern California
Posted by jeaton01 on Saturday, July 14, 2007 6:19 PM

I'm probably going to redo some of the plans I have for smaller electric.  One of these days.  I love flying a floatplane on a calm evening.  My Cub on floats is great fun, the Cub flies on floats like it was born to do it.  The LC does too, but it flies well only if you add some washout to the wing.  The full scale airplane would have benefitted from that as well.  Off to the spitfirewerk.  There WILL be photos today!


John

To see build logs for my models:  http://goldeneramodel.com/mymodels/mymodels.html


  • Member since
    September 2004
  • From: Vernon, BC, Canada
Posted by razordws on Saturday, July 14, 2007 5:17 PM

 Nice site John Thumbs Up [tup]  seeing that Aeronica on Floats has given me a head full of ideas.  One of the things that got me out of RC was having to pay field fees to use the clubs field.  There are lots of lakes around my new home that are suitable for a float plane (not even sure if there is a club field here).  Anyway, darn you for posting that!!!! Disapprove [V]Wink [;)]  Maybe in a couple more years I might look at getting back into it.  For now I'm looking into a small electric to fly in the park across the street with the kids.

Anyway, my spitfire is done Big Smile [:D] but I'll wait until my wife gets back later this week with the camera so I can take some proper pics. 


Dave

  • Member since
    September 2003
  • From: South Central Wisconsin
Posted by Daywalker on Saturday, July 14, 2007 1:49 PM
Can anyone help me to figure out the order of the colored identification lights on the bottom of a Mk.46/47 or Mk.22/24 Seafire/Spitfire?  The Airfix instructions indicate red, green, and orange with no mention of the order.  I can tell the middle one is green, but not sure if the red or the orange is closest to the nose.  Thanks!

Frank 


JOIN OUR COMMUNITY!

Our community is FREE to join. To participate you must either login or register for an account.

SEARCH FORUMS
FREE NEWSLETTER
By signing up you may also receive reader surveys and occasional special offers. We do not sell, rent or trade our email lists. View our Privacy Policy.