SEARCH FINESCALE.COM

Enter keywords or a search phrase below:

SPITFIRE GROUP BUILD 2007-2008

119055 views
2048 replies
1 rating 2 rating 3 rating 4 rating 5 rating
  • Member since
    December 2002
  • From: A secret workshop somewhere in England
Posted by TANGO 1 on Thursday, April 26, 2007 5:39 PM

 razordws wrote:
Since this is an open ended GB I might as well sign up.  I know I have a couple of old Heller kits (Mk. I and a Mk XVI I beleive) in the stash so I might use those as a warm up to something bigger later on.  I won't be able to start on them for quite a while though.


Good to have you on board Dave, glad you are here.Wink [;)]Thumbs Up [tup]

Regards, Darren. C.A.G. FAA/USNFAW GB
  • Member since
    September 2003
  • From: South Central Wisconsin
Posted by Daywalker on Thursday, April 26, 2007 6:11 PM
Nice one Darren!  Love those BoB Spits. Bow [bow]

Frank 


  • Member since
    February 2003
  • From: Melbourne, Australia
Posted by darson on Thursday, April 26, 2007 7:11 PM

The Airfix Spitfire F Mk 22/24 (and their Seafire FR 46/47) are, arguably, their best ever plastic kits IMHO and the Eduard kit that I plan to do is actually the Airfix kit plastic parts, an Aires resin cockpit, plus exhausts and F Mk 22 wheels. Eduard also throw in add one of their superb colour etch frets and canopy and wheel masks.  I simply couldn't resist it when I saw it at my LHS Big Smile [:D]

Darren that is a fantastic looking Spitfire Thumbs Up [tup]Thumbs Up [tup]Thumbs Up [tup].

Dave welcome to the build Sign - Welcome [#welcome]

Cheers

  • Member since
    February 2006
  • From: Smithers, BC, Canada
Posted by ruddratt on Thursday, April 26, 2007 7:20 PM

Yikes! That is just an awesome Spit, Darren! Man, you guys are really setting the bar way up high for this upcoming Spitfire build. I got a feeling there's going to be some incredible work on display here based on what I've already seen.

Darren, nice pickup on the Eduard Spit. I've yet to build an Airfix kit or any Eduard kit that was not a biplane, but it sounds like you got yourself a great deal there! I'm looking forward to following your progress on this one!

Mike

 "We have our own ammunition. It's filled with paint. When we fire it, it makes pretty pictures....scares the hell outta people."


  • Member since
    December 2002
  • From: Northern California
Posted by jeaton01 on Thursday, April 26, 2007 9:29 PM

Frank,

I don't plan on building the Seafang, so beyond making a mold from its canopy parts (my Spiteful is shy those parts, came that way from Squadron) I have no need for it, and would trade it for any reasonable 1/48 fighter kit.  The Silver Cloud kits are not easy builds, though, and before you go for it you might want to consider finding the Airfix Seafire 47 kit.  The Seafang kit is only appropriate if you just absolutely MUST have a Seafang!  I will say that the shape of the Spiteful and Seafang kits are much better than the reviews on Modelling Madness would make you think.  They are a little larger than 1/48 overall, about 3/16 too long in length. I think the reviewer may have missed that when he said the back of the fuselage was too high.  The fin and rudder do need rework on both kits.

John

To see build logs for my models:  http://goldeneramodel.com/mymodels/mymodels.html


  • Member since
    September 2003
  • From: South Central Wisconsin
Posted by Daywalker on Thursday, April 26, 2007 9:59 PM

Thanks for the info John.  I have a line on a couple of the Airfix kits, think I might see if I can get my hands on one of those.  Thanks again!


Frank 


  • Member since
    December 2002
  • From: Northern California
Posted by jeaton01 on Thursday, April 26, 2007 10:00 PM

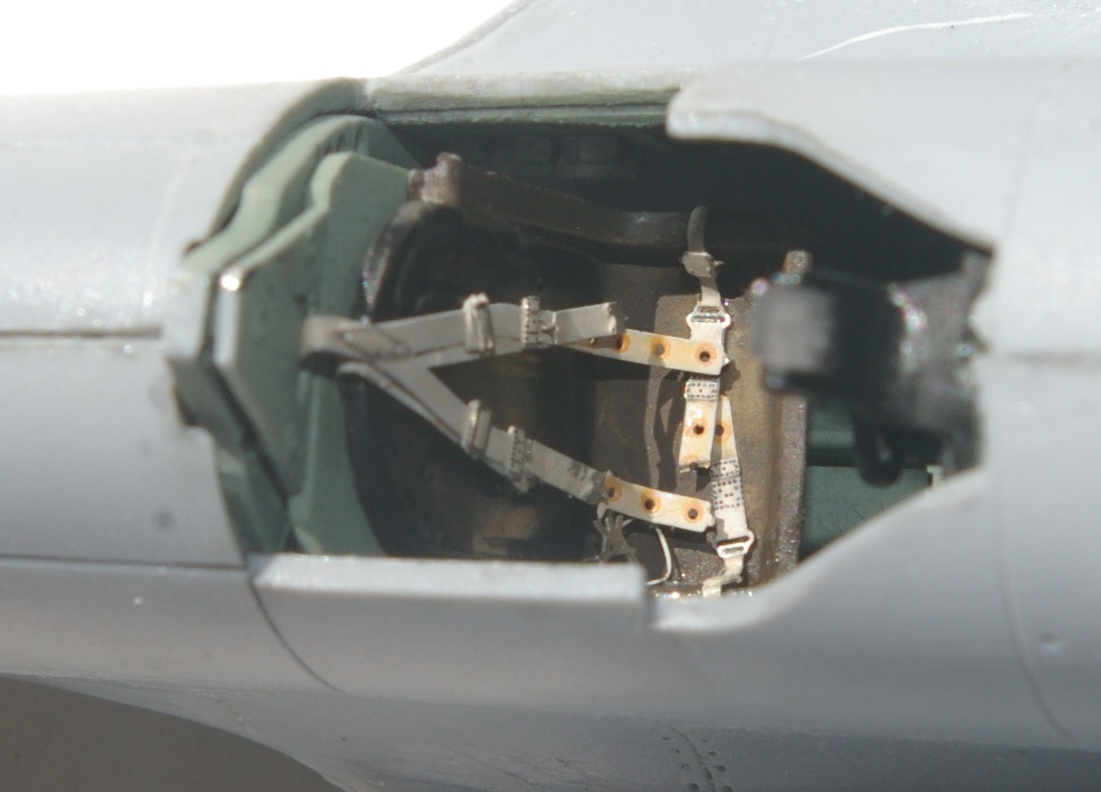
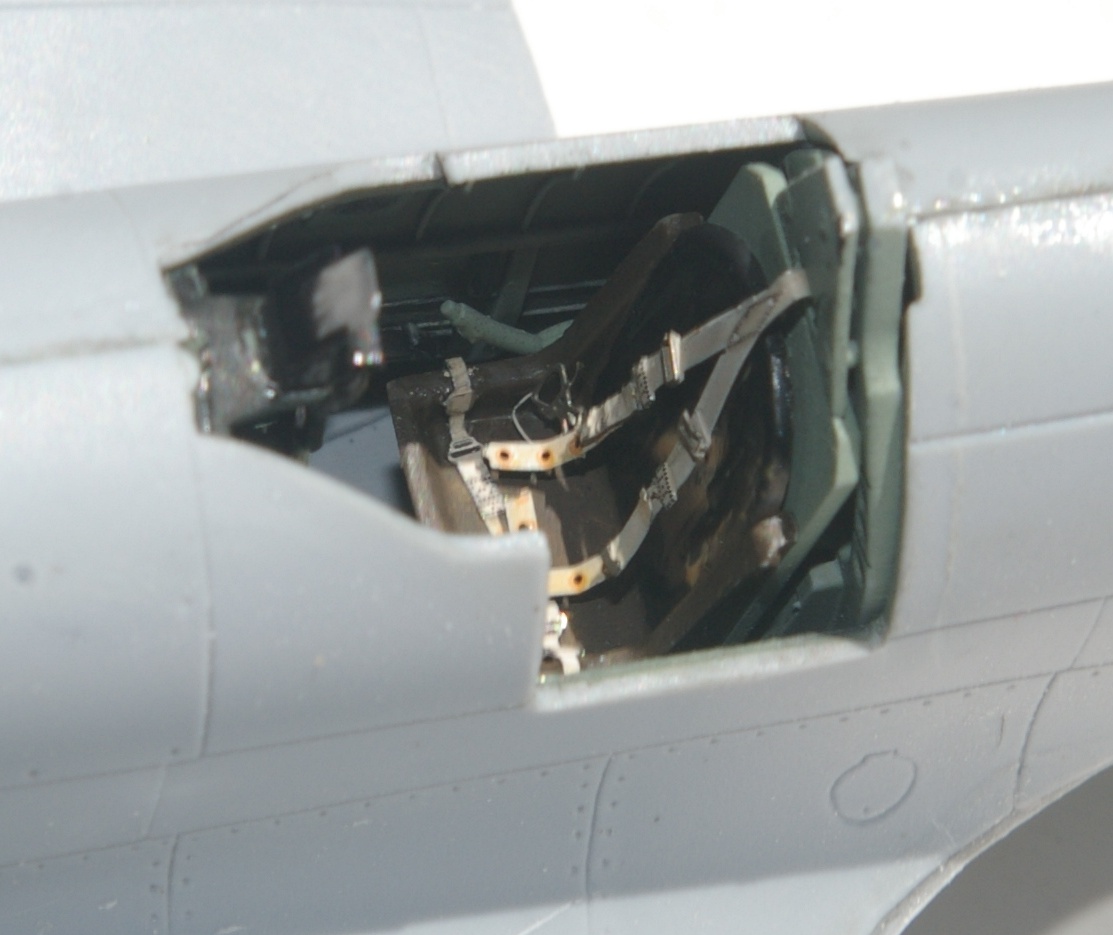
Another update on my practice build, the 1/48 ICM Mk XVI.

This is a very fiddly kit, but it is coming together OK.  Or maybe I am just in love with those Eduard color PE belts I put in today.  Whatever, I feel good.

The next two photos make me wish I had thought to thin down the sides and front of the seat.  Next time.  This is just practice.
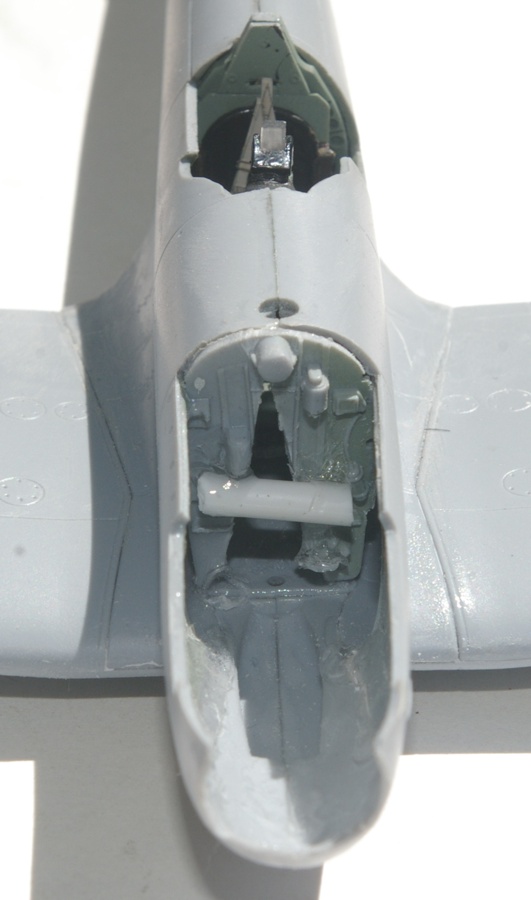
The next picture shows some "deviation from the written instructions". 

Test fitting and other people's opinions indicated a problem with the fit of the engine mount bulhead, and even though I thinned it down and narrowed its width, things were still not going in a way that was going to allow a tight fit to the wings at the upper roots.  The fuselage shells are so thin that I couldn't fit the wing without this bulkhead installed, so I went ahead and installed the bulkhead, and then the finished cockpit. Next I fitted the wing, which fit too tight, there was insufficient dihedral in the wing (the upper panels were already assembled to the lower, I think the best way to do it).  I took my Tamiya sprue cutters and cut out the center of the engine mount bulkhead, and then installed the wing, flowing thick super glue in on the upper wing roots.  The gap was minimal, but so was the dihedral at this point.  Next, I assembled the lower cowl halves, and when well cured I assembled that to the nose.  I then super-glued a piece of sprue accross the lower third of the EMB while I was holding a little more dihedral than I wanted to end up with.  Seems to have worked, and I have no bad gaps to deal with.  If the fuselage were not so "bendy" I probably couldn't have done it this way, but then maybe I wouldn't have had to.   As it is, I haven't glued anything in without studying the fuselage to see that it was all still going in a straight line.  The final result if I get it right will hopefully be an airplane with nice thin edges to things due to the kit's design.
 

John

To see build logs for my models:  http://goldeneramodel.com/mymodels/mymodels.html


  • Member since
    December 2002
  • From: Northern California
Posted by jeaton01 on Thursday, April 26, 2007 10:11 PM
 wing_nut wrote:

Now THAT"S what I call a Spitfire

Not retouched:

John

To see build logs for my models:  http://goldeneramodel.com/mymodels/mymodels.html


jwb
  • Member since
    February 2006
  • From: Parkton, NC
Posted by jwb on Friday, April 27, 2007 7:33 AM
 jeaton01 wrote:

The next picture shows some "deviation from the written instructions". 

Test fitting and other people's opinions indicated a problem with the fit of the engine mount bulhead, and even though I thinned it down and narrowed its width, things were still not going in a way that was going to allow a tight fit to the wings at the upper roots.  The fuselage shells are so thin that I couldn't fit the wing without this bulkhead installed, so I went ahead and installed the bulkhead, and then the finished cockpit. Next I fitted the wing, which fit too tight, there was insufficient dihedral in the wing (the upper panels were already assembled to the lower, I think the best way to do it).  I took my Tamiya sprue cutters and cut out the center of the engine mount bulkhead, and then installed the wing, flowing thick super glue in on the upper wing roots.  The gap was minimal, but so was the dihedral at this point.  Next, I assembled the lower cowl halves, and when well cured I assembled that to the nose.  I then super-glued a piece of sprue accross the lower third of the EMB while I was holding a little more dihedral than I wanted to end up with.  Seems to have worked, and I have no bad gaps to deal with.  If the fuselage were not so "bendy" I probably couldn't have done it this way, but then maybe I wouldn't have had to.   As it is, I haven't glued anything in without studying the fuselage to see that it was all still going in a straight line.  The final result if I get it right will hopefully be an airplane with nice thin edges to things due to the kit's design.


I just picked up the ICM Mk. VII, and I'd read about the engine fit. I'm going to print out your approach to dealing with it and stick it in the box so when I get to it I'll have a reference. Thanks for posting that! 

Jon Bius

AgapeModels.com- Modeling with a Higher purpose

"For I know the plans I have for you," declares the Lord, "plans to prosper you and not to harm you, plans to give you hope and a future." ~ Jeremiah 29:11

  • Member since
    May 2004
  • From: Dallas
Posted by KINGTHAD on Friday, April 27, 2007 9:57 AM

Frank, looked in the back and I dont have  the spit your looking for. I was hopeing there were two but no luck.


Thad

  • Member since
    December 2002
  • From: A secret workshop somewhere in England
Posted by TANGO 1 on Friday, April 27, 2007 1:41 PM

John,

thanks for the info on the ICM kit, I have built one of those and I hated building it, as it fought me all the way! Still, I have a pal trying to talk me into building his for him, so I might have a bash at it after my Spitfires are done!Mischief [:-,]

Regards, Darren. C.A.G. FAA/USNFAW GB
  • Member since
    December 2002
  • From: A secret workshop somewhere in England
Posted by TANGO 1 on Friday, April 27, 2007 1:45 PM

Hey, its the weekend!

Party [party]Party [party]Big Smile [:D]Captain [4:-)]Big Smile [:D]Captain [4:-)]Make a Toast [#toast]Make a Toast [#toast]Laugh [(-D]

CHEERS EVERYONE!


Regards, Darren. C.A.G. FAA/USNFAW GB
  • Member since
    December 2002
  • From: A secret workshop somewhere in England
Posted by TANGO 1 on Friday, April 27, 2007 1:56 PM

Speaking of that ICM kit......

Here is what I did with my Mk.VIII. Its Clive Caldwell's mount, he was Australia's highest scoring ace during WWII.

It was a pig of a kit and my fingers and thumbs approach did not help any,Blush [:I] still here it is.


Regards, Darren. C.A.G. FAA/USNFAW GB
  • Member since
    December 2002
  • From: Northern California
Posted by jeaton01 on Friday, April 27, 2007 2:47 PM
That's a nice looking diorama, Darren.  I'm taking the easy way out on mine and not installing the engine mounts, but I have assembled the engine and plan to fit it in some way, just to have a place to hang the prop and exhausts.  I suspect I may have to trim the forward valve covers some to get it to fit with the upper cowl. 

John

To see build logs for my models:  http://goldeneramodel.com/mymodels/mymodels.html


  • Member since
    August 2006
  • From: The Great State of Wyoming
Posted by wyoroy on Friday, April 27, 2007 3:28 PM

Looks Good!  I like the way you displayed the Spitfire, well done.

Roy

Roy (Capt. Wyoroy FAAGB/USNFAWGB)

John 3:16

  • Member since
    September 2003
  • From: South Central Wisconsin
Posted by Daywalker on Friday, April 27, 2007 3:33 PM

Thad,

Thanks for looking!  I'll find one one somewhere, someday... Mischief [:-,]

Frank 


  • Member since
    March 2003
  • From: Melbourne, Victoria
Posted by harvs73 on Friday, April 27, 2007 6:33 PM

Jon, I made two of the MK VII and had some problmes with them but they ended up ok, the biggest thing is just to test fit everything. I have done an article at the following link that may be of assistance to you:

http://www.aussiemodeller.com/pages/Gallery/Harvey_SpitMk7-2.html

If you look in the gallery section of the site I have also done another Mk VII and a Mk IX with the ICM kit. I tried three different ways to get the prop to fit of which none of them included the engine. I used the Ultracast prop on all three of them as the kit one is junk (sink holes, poor shape etc). To drill the hole for the Ultracast prop hubs the easiest way I found was to use the kit hub plate and mark the centre of the hub on the replacement prop and drill a hole big enough to fit some tube in. The exhausts were just put into place without any backing as the fit allows them to do so but a backing plate can be used for security.

Dave Harvey

jwb
  • Member since
    February 2006
  • From: Parkton, NC
Posted by jwb on Friday, April 27, 2007 7:39 PM
 harvs73 wrote:

Jon, I made two of the MK VII and had some problmes with them but they ended up ok, the biggest thing is just to test fit everything. I have done an article at the following link that may be of assistance to you:

http://www.aussiemodeller.com/pages/Gallery/Harvey_SpitMk7-2.html

If you look in the gallery section of the site I have also done another Mk VII and a Mk IX with the ICM kit. I tried three different ways to get the prop to fit of which none of them included the engine. I used the Ultracast prop on all three of them as the kit one is junk (sink holes, poor shape etc). To drill the hole for the Ultracast prop hubs the easiest way I found was to use the kit hub plate and mark the centre of the hub on the replacement prop and drill a hole big enough to fit some tube in. The exhausts were just put into place without any backing as the fit allows them to do so but a backing plate can be used for security.

Thanks Dave! That'll help to have as a reference when I get started on the VII. BTW- your VII looks great- you set the bar high! Smile [:)] 

Jon Bius

AgapeModels.com- Modeling with a Higher purpose

"For I know the plans I have for you," declares the Lord, "plans to prosper you and not to harm you, plans to give you hope and a future." ~ Jeremiah 29:11

jwb
  • Member since
    February 2006
  • From: Parkton, NC
Posted by jwb on Friday, April 27, 2007 7:40 PM

I posted this in the Aircraft forum, but figured since this is a Spitfire GB, I'd post here too.

This actually came packaged as Hasegawa's Spitfire Mk. IX, but the sprues contained the parts for the Mk. VIII and Mk. IX. As I already have a Mk. IX in the stash in this scale, I decide to make it a Mk. VIII.

The decals are from an Aeromaster set of Spitfires in US markings. I really like the look of these MTO Spitfires.

The kit is really nice. The cockpit is reasonably but simply detailed. The fit was very nice, and the surface detailing was excellent.

Overall I'm very happy with the end result. Only problem I had was the canopy.... I never could get it masked right, so I just gave up and hand painted it.


Jon Bius

AgapeModels.com- Modeling with a Higher purpose

"For I know the plans I have for you," declares the Lord, "plans to prosper you and not to harm you, plans to give you hope and a future." ~ Jeremiah 29:11

  • Member since
    December 2002
  • From: Northern California
Posted by jeaton01 on Friday, April 27, 2007 10:35 PM

Thanks for the link, Dave.  I have the engine in the Mk XVI, and expect I'll just go with the kit propeller, as I am just sort of practicing with this one and don't want to put a $10.00 prop on a $5.00 kit, which is close to what I paid for the bunch of ICM kits I have.  I'll put the extra touches into the Tamya and Hasegawa kits.  If it looks good enough I can always change the prop later.

To get the engine to fit I clipped off the hydraulic pumps that are below the reduction case, removed the valve covers, and also the water manifolds between the heads.  None of that was going to fit.  After that the engine dropped in and I just trapped it under the top cowl, with the exhaust stubs hanging in the opening between the cowls.  No wiggles, it's a tight fit, and the exhausts point down a little like they should.

John

To see build logs for my models:  http://goldeneramodel.com/mymodels/mymodels.html


  • Member since
    September 2004
  • From: Vernon, BC, Canada
Posted by razordws on Saturday, April 28, 2007 10:28 AM
John, Darren and everyone else who has been posting previous builds they look awesome Thumbs Up [tup] Keep them coming. 

Dave

  • Member since
    October 2006
  • From: Rochester, NY
Posted by silentmodeler on Saturday, April 28, 2007 5:47 PM
count me in!   ill be doing 1/32 scale spitfire mark Vb from has.  will be doing in 303 squadron royal air force in 1942.
"Do, do not, theres no try" ~Yoda
  • Member since
    March 2003
  • From: Melbourne, Victoria
Posted by harvs73 on Saturday, April 28, 2007 6:12 PM

 razordws wrote:
John, Darren and everyone else who has been posting previous builds they look awesome Thumbs Up [tup] Keep them coming. 

Well, if you insist! Smile [:)] I have added a link to more photos of each model as I could tie up the page with all the photos I have.

http://www.aussiemodeller.com/pages/Gallery/Harvs_spit_mk8.html

 http://www.aussiemodeller.com/pages/Gallery/Harvey_spitfire%20Mk14e%20no%202.html

http://www.aussiemodeller.com/pages/Gallery/Harvey_SpitMk9.html

http://www.aussiemodeller.com/pages/Gallery/Harvey_SpitMk7-1.html


Dave Harvey

  • Member since
    December 2002
  • From: Northern California
Posted by jeaton01 on Saturday, April 28, 2007 6:26 PM
That's a nice bunch of Spitfires there, mate!  I'm working on it but it's going to be some time before I have as many Spitfires in my completed area as you and Jon have.  (Sounds of glue drying and paint flying)

John

To see build logs for my models:  http://goldeneramodel.com/mymodels/mymodels.html


  • Member since
    December 2002
  • From: A secret workshop somewhere in England
Posted by TANGO 1 on Sunday, April 29, 2007 1:41 PM

Jon,

Very, very nice Mk.VIII ! That one is a little beauty!Bow [bow]Bow [bow]

Regards, Darren. C.A.G. FAA/USNFAW GB
  • Member since
    December 2002
  • From: A secret workshop somewhere in England
Posted by TANGO 1 on Sunday, April 29, 2007 1:46 PM

Dave,

Flippin Eck! You just make the most flawless builds mate.Thumbs Up [tup] Beautiful work. If I ever get to be half as good I'll be a happy man. Like the other lads said, keep 'em coming!Thumbs Up [tup]

Regards, Darren. C.A.G. FAA/USNFAW GB
  • Member since
    December 2002
  • From: A secret workshop somewhere in England
Posted by TANGO 1 on Sunday, April 29, 2007 1:50 PM

John,

I actually got some time to myself and found that magazine with the articles on K5054, its quite  involved (colour schemes included!) if you like, I can scan and send it to you. It no trouble, if you want it PM me your email addy. 

Regards, Darren. C.A.G. FAA/USNFAW GB
  • Member since
    February 2003
  • From: Melbourne, Australia
Posted by darson on Monday, April 30, 2007 2:10 AM

Darren your Caldwell Spitfire looks fantastic and I love the presentation as well Thumbs Up [tup]Thumbs Up [tup]

Jon that's a lovely looking desert Spit you've got there Thumbs Up [tup]Thumbs Up [tup].  I agree with you on the color scheme as well, the desert or MTO camo has always been on of my favourites.

Dave, wow Shock [:O] that's quite a collection you've got there Thumbs Up [tup]Thumbs Up [tup].  I especially like Cundy's green Mk.VIII with the Pegasus logo, nice job.

Cheers

  • Member since
    March 2003
  • From: Melbourne, Victoria
Posted by harvs73 on Monday, April 30, 2007 4:20 AM
 TANGO 1 wrote:

Dave,

Flippin Eck! You just make the most flawless builds mate.Thumbs Up [tup] Beautiful work. If I ever get to be half as good I'll be a happy man. Like the other lads said, keep 'em coming!Thumbs Up [tup]

Darren, I wish they were that good, alas the photos hide a lot of the stuff ups I did with them.

All, thanks for the compliments. The Foilage Green Mk VIII is in fact my favourite.

I have worked out exactly what I will do now for this GB. I have a Hasegawa Spit Mk IX and a Loon Mk IX fueslage with Kits At War SAAF Decals. Hopefully it should be as straight a build as the Mk VIII was.

Dave Harvey

  • Member since
    December 2002
  • From: A secret workshop somewhere in England
Posted by TANGO 1 on Monday, April 30, 2007 5:25 AM

 silentmodeler wrote:
count me in!   ill be doing 1/32 scale spitfire mark Vb from has.  will be doing in 303 squadron royal air force in 1942.

Hey welcome to the build!

Sign - Welcome [#welcome]Sign - Welcome [#welcome]Sign - Welcome [#welcome]

Glad to have you here!Thumbs Up [tup]


Regards, Darren. C.A.G. FAA/USNFAW GB
JOIN OUR COMMUNITY!

Our community is FREE to join. To participate you must either login or register for an account.

SEARCH FORUMS
FREE NEWSLETTER
By signing up you may also receive reader surveys and occasional special offers. We do not sell, rent or trade our email lists. View our Privacy Policy.