SEARCH FINESCALE.COM

Enter keywords or a search phrase below:

Knights of the Sky WWI GB The End

111747 views
1882 replies
1 rating 2 rating 3 rating 4 rating 5 rating
  • Member since
    September 2003
  • From: South Central Wisconsin
Posted by Daywalker on Tuesday, December 11, 2007 6:22 AM
 MrDrummy wrote:

Frank, where you at, buddy!? :)

I'm still here!  Taking a little break from the Fokker and working on an AM Dauntless at the moment.  Looking forward to seeing your pics! Thumbs Up [tup]

Frank 


  • Member since
    November 2007
  • From: Columbus, OH
Posted by chef_ben on Tuesday, December 11, 2007 7:59 AM

Frank,

Have you seen this sight?

http://www.madmaxmovies.com/cars/interceptor/history1.html

I have always wanted to build this car in real life.....had dreams about it

 Ben

On the workbench: 1/48 Spitfire Mark II (Revell) - rethinking this situation! 1/48 Eduard Pfalz D.IIIa - 2%
  • Member since
    September 2003
  • From: South Central Wisconsin
Posted by Daywalker on Tuesday, December 11, 2007 2:44 PM
 chef_ben wrote:

Frank,

Have you seen this sight?

http://www.madmaxmovies.com/cars/interceptor/history1.html

I have always wanted to build this car in real life.....had dreams about it

 Ben

Ben,

Yes, I have seen that site!  Very cool, isn't it?  I too have dreamed one of these as a real car.  Sure would stand out in a crowd! Thumbs Up [tup]

Frank 


  • Member since
    November 2005
  • From: that state up North
Posted by More Power Scotty on Tuesday, December 11, 2007 6:58 PM

Daywalker,

I am really getting close to starting this build now.  I actually pulled the kit out of one of my stacks of unbuilt kits and started looking over the parts and the instructions.  I also went through my reference books and found a nice cutaway drawing showing what was metal and what was wood on the real plane.  My idea is to leave the metal portions alone and to paint the wood, fabric, and engine as appropriate.  The other kits in this series that I have built I left in their bare metal state while painting the plastic parts aluminum (except for the engine).  I want this one to be different though, so I will paint it up a bit.  I have a couple of projects to clear off of my desk before I get going on this for real, but hopefully that will be within the next few weeks.  I did not want you to think that I had forgotten about this build. Smile,Wink, & Grin [swg]

Scott
  • Member since
    September 2003
  • From: South Central Wisconsin
Posted by Daywalker on Tuesday, December 11, 2007 9:33 PM

Scotty,

No worries!  I have not made much progress as of late, but a lot of the gang here has been working like gangbusters keeping the pages filled with awesome work!  Keep it up fellas!

Frank 


  • Member since
    December 2002
  • From: Northern California
Posted by jeaton01 on Thursday, December 13, 2007 8:38 PM

OK, minor progress on the German Front, SS DIIIa variety.  I think I'm about ready to put some paint on the fuselage and decals on the flying sufaces, here are some photos.  Building the machine guns came out well, I thought, more satisfying than the interior PE parts for some reason.  I like this stubby little thing, but I find the esthetics of it rather wierd.  The white metal engine came with the kit.  I thinned down the cowl as much as I dared, but I still had to remove some material from the back of the engine and the top of each cylinder to get it to turn.  It HAS to turn, all the rotaries I built as a kid did.  Or at least that's how I remember it.  Now I'm scheming to make it motorized.  Where am I gonna find a gearbox that small?Confused [%-)]

John

To see build logs for my models:  http://goldeneramodel.com/mymodels/mymodels.html


  • Member since
    October 2004
  • From: Colorado
Posted by StephenLawson on Friday, December 14, 2007 7:00 AM
 jeaton01 wrote:

OK, minor progress on the German Front, SS DIIIa variety.  I think I'm about ready to put some paint on the fuselage and decals on the flying sufaces, here are some photos.  Building the machine guns came out well, I thought, more satisfying than the interior PE parts for some reason.  I like this stubby little thing, but I find the esthetics of it rather wierd.  The white metal engine came with the kit.  I thinned down the cowl as much as I dared, but I still had to remove some material from the back of the engine and the top of each cylinder to get it to turn. . .

Just think of all that metal on those poor old plastic landing gear legs and wheel axle spreader bar. Especially the axle. Hint hint nudge nudge.


Stachel...unconfirmed by Armee means unconfirmed!!!!

  • Member since
    September 2003
  • From: South Central Wisconsin
Posted by Daywalker on Friday, December 14, 2007 7:30 AM
Nice work John!  As for a tine motor, try a pager motor.  They are TINY!  Seven mm in diameter, and seventeen mm long.

Frank 


  • Member since
    January 2006
  • From: K-Town, Germany
Posted by sirdrake on Friday, December 14, 2007 4:25 PM

... and some more progress with the french connection


It actually starts to look like an airplane! Cool [8D] Even a quick glance at the pictures will assure you that some serious filling and sanding is about to follow soon... Did I mention that I don't like filling and sanding? Not sure then why I started to do a kit that is known for being old and of rather mediocre fit.

But first the engine needs to be squeezed into the fuselage, and of course it doesn't really fit well. It seems I need to cut away a bit from the beams it is supposed to rest on in order to lower it a mm ore so.

sirdrake


  • Member since
    September 2003
  • From: South Central Wisconsin
Posted by Daywalker on Friday, December 14, 2007 5:11 PM
Looks like you're making great progress SD!  Keep up the good work. Thumbs Up [tup]

Frank 


  • Member since
    December 2002
  • From: Northern California
Posted by jeaton01 on Friday, December 14, 2007 6:39 PM
 StephenLawson wrote:
 jeaton01 wrote:

Just think of all that metal on those poor old plastic landing gear legs and wheel axle spreader bar. Especially the axle. Hint hint nudge nudge.

Why, yes, Stephen, I have seen those.  I even still have them, but I fear not, for I have slain those little handholds that go in various places on the fuselage.  I am somewhat in awe of myself that they all ended up more or less where and in the approximate alignment of what the instructions say!  As Jimmy Doolittle said, I shall never be so lucky again! 

John

To see build logs for my models:  http://goldeneramodel.com/mymodels/mymodels.html


  • Member since
    October 2004
  • From: Colorado
Posted by StephenLawson on Monday, December 17, 2007 10:37 PM

Lets see whats next on my desk.

A.  1 @ 1/48 Roden Fokker D.VII with Part of Poland brass etch. Tobe done as a cutaway.

B.  2 @ 1/48 Roden  SE 5a  1 Hisso & 1 Viper powered.  (Part of Poland fret maybe on one of these.)

C.  1 @ 1/32 Roden Fokker D.VI  (Part of Poland fret to be used.)

D.  1 @ 1/32 Roden SE 5a  Viper powered (Part of Poland fret to be used.)

What  do you all think?


Stachel...unconfirmed by Armee means unconfirmed!!!!

  • Member since
    February 2006
  • From: Smithers, BC, Canada
Posted by ruddratt on Monday, December 17, 2007 11:12 PM

 StephenLawson wrote:
What  do you all think?

Is that all? Tongue [:P] Smile,Wink, & Grin [swg]


j/k Stephen......if anyone can pull those builds off, it's you my friend! Thumbs Up [tup]

Mike

 "We have our own ammunition. It's filled with paint. When we fire it, it makes pretty pictures....scares the hell outta people."


  • Member since
    September 2003
  • From: South Central Wisconsin
Posted by Daywalker on Monday, December 17, 2007 11:14 PM
Hmmm...if I had to pick one, I would love to see one of the SE-5a's done!  I don't think I have seen very many of those. 

Frank 


  • Member since
    December 2002
  • From: Northern California
Posted by jeaton01 on Tuesday, December 18, 2007 12:51 AM
Yeah, do the 1/32 SE-5 first, that should be nice.

John

To see build logs for my models:  http://goldeneramodel.com/mymodels/mymodels.html


  • Member since
    February 2006
  • From: Smithers, BC, Canada
Posted by ruddratt on Tuesday, December 18, 2007 1:26 AM

You mean you want us to choose one for you? Ooooops. Dunce [D)]

In that case, the cut-away D.VII sounds neat! Big Smile [:D]

Mike

 "We have our own ammunition. It's filled with paint. When we fire it, it makes pretty pictures....scares the hell outta people."


  • Member since
    June 2007
  • From: Kansas City MO
Posted by Dougums on Tuesday, December 18, 2007 11:39 AM
Sign - Ditto [#ditto]
  • Member since
    October 2004
  • From: Colorado
Posted by StephenLawson on Wednesday, December 19, 2007 5:23 PM
Well thats two for the SE 5a and two for the Fokker D.VII.


Stachel...unconfirmed by Armee means unconfirmed!!!!

  • Member since
    February 2007
  • From: Lubbock, TX
Posted by MrDrummy on Thursday, December 20, 2007 10:31 AM
I'll break this tie--I'd like to see the SE 5A as well!
-Justin
On the Bench: 1:48 Dragon Dr. 1 1:48 Trumpeter MiG-15 Fagot B Photo Sharing and Video Hosting at Photobucket
  • Member since
    October 2004
  • From: Colorado
Posted by StephenLawson on Saturday, December 22, 2007 7:39 AM

Ok Frank, put me down for;

1 @ 1/48 Roden Fokker D.VII with Part of Poland brass etch. Tobe done as a cutaway.

2 @ 1/48 Roden  SE 5a  1 Hisso & 1 Viper powered.  (Part of Poland fret maybe on one of these.)

1 @ 1/32 Roden Fokker D.VI  (Part of Poland fret to be used.)

1 @ 1/32 Roden SE 5a  Viper powered (Part of Poland fret to be used.)

(That ought to keep me busy for a few months.)


Stachel...unconfirmed by Armee means unconfirmed!!!!

  • Member since
    September 2003
  • From: South Central Wisconsin
Posted by Daywalker on Saturday, December 22, 2007 2:48 PM
 StephenLawson wrote:

Ok Frank, put me down for;

1 @ 1/48 Roden Fokker D.VII with Part of Poland brass etch. Tobe done as a cutaway.

2 @ 1/48 Roden  SE 5a  1 Hisso & 1 Viper powered.  (Part of Poland fret maybe on one of these.)

1 @ 1/32 Roden Fokker D.VI  (Part of Poland fret to be used.)

1 @ 1/32 Roden SE 5a  Viper powered (Part of Poland fret to be used.)

(That ought to keep me busy for a few months.)

Shock [:O] OMG Stephen!  Looks like you're gonna be glued to the bench for quite some time with those! (Sorry about the pun, Ok maybe I'm not! Blush [:I])  I updated page 1, look forward to the WIP pics! 

Frank 


  • Member since
    February 2003
  • From: Saratoga Springs, NY
Posted by Jeeves on Saturday, December 22, 2007 11:41 PM

Finally can add some pics here-- this is from the Eduard Nieuport 11 Profipack kit-


First-- the inside of the left side of the pit-

The throttle quadrant wasn't too bad to put together for a disliker of PE...but my best work so far is the seat.  I wasn't sure how I was going to get it wrapped around the seat bottom- but luck was with me as the butt end of my knife was the perfect template:


That's it for now...I seem to have misplaced my instrument film that sandwiches behind the panel :(

Mike
  • Member since
    October 2004
  • From: Colorado
Posted by StephenLawson on Sunday, December 23, 2007 4:03 PM

Greetings all;

I have in hand four new sets of lozenge decals that will be available soon for sale.  Though I helped consult on these, I have no financial interest in them.  In 1/48 scale they are;

Fünffarbiger Flugzeugstoff  (5 colour) upper surface MD-48001
Fünffarbiger Flugzeugstoff  (5 colour) lower surface MD-48002


Vierfarbiger Flugzeugstoff  (4 colour) upper surface MD-48004
Vierfarbiger Flugzeugstoff  (4 colour) lower surface  MD-48005

In my opinion these are very good efforts. I would like to see one or two colours adjusted in the next run.  But over all these are nearer to the originals than anything available at this time.  There are plans to do lozenge rib tapes but the manufacturing process demands spot on register so these are not ready yet. When allowed to I will offer up the manufacturer's name and address. 

Merry Christmas and Happy New Year!

Stephen


Stachel...unconfirmed by Armee means unconfirmed!!!!

  • Member since
    February 2006
  • From: Smithers, BC, Canada
Posted by ruddratt on Sunday, December 23, 2007 6:25 PM

Jeeves, that's lookin' real sweet! I especially like the bracing between the fuselage framework...nice touch! Thumbs Up [tup]

Stephen, that sounds exciting. Please keep us posted! ....and a Merry Christmas & Happy New Year to you as well, my friend!

Mike

 "We have our own ammunition. It's filled with paint. When we fire it, it makes pretty pictures....scares the hell outta people."


  • Member since
    December 2002
  • From: Northern California
Posted by jeaton01 on Sunday, December 23, 2007 7:55 PM

Here's a progress report on my Siemens Schuckert.  I put shiny colors on it, to hide my goofs.  The decals need more work around the edges, I just got the lozenge stuff on today.  I'm learning some of these WW I types have a lot of details in a small bit of real estate.  The last time I did lozenges was in 1967 on the Revell 1/28 Dr. 1.  I should have kept practicing.  Big Smile [:D] I painted all of them on the Revell.

John

To see build logs for my models:  http://goldeneramodel.com/mymodels/mymodels.html


  • Member since
    September 2003
  • From: South Central Wisconsin
Posted by Daywalker on Sunday, December 23, 2007 9:44 PM

Jeeves and John,

Great looking work there, fellas!  Looks like you guys have been very busy. Thumbs Up [tup]

Frank 


  • Member since
    June 2007
  • From: Kansas City MO
Posted by Dougums on Sunday, December 23, 2007 10:19 PM
    Yes yes nice work.  Thumbs Up [tup] Looks like i'm going to be getting some bench work soon! (after the holidays) I can't wait to get the fuselage together and the paint on! Keep up the progress. I  should be posting some WIP pics soon.
  • Member since
    February 2007
  • From: Lubbock, TX
Posted by MrDrummy on Monday, December 24, 2007 7:27 PM

Merry Christmas, everyone! 

I've got some progress pics to post-- will get to it later tonight!! 

-Justin
On the Bench: 1:48 Dragon Dr. 1 1:48 Trumpeter MiG-15 Fagot B Photo Sharing and Video Hosting at Photobucket
  • Member since
    February 2007
  • From: Lubbock, TX
Posted by MrDrummy on Tuesday, December 25, 2007 1:26 AM

Alright--

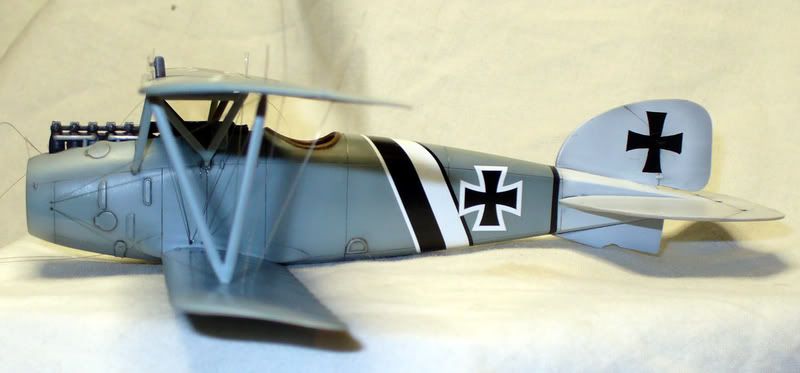
Here's where I am so far. I've got the rigging on the port side of the Albatros done.  It took me a little while to figure out how to make it all work, since the rigging was passing through the same holes that the struts were, and they all had to be attached at once, but I think I got it worked out.  (Sorry for the pictures- it's kind of hard to see the work.)
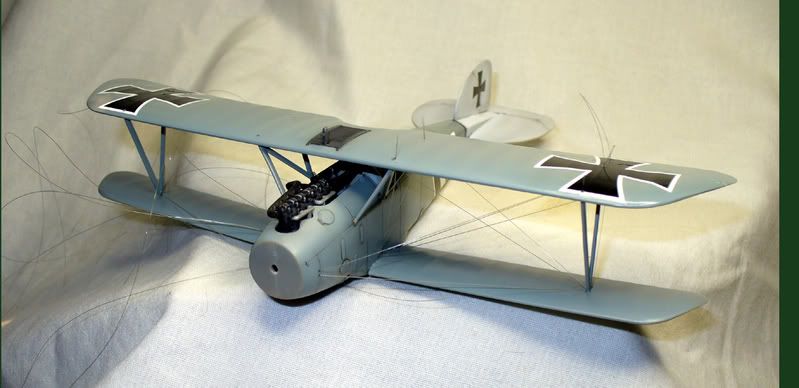
Here's a close-up of the shot above.  You can make out all the rigging a bit better...
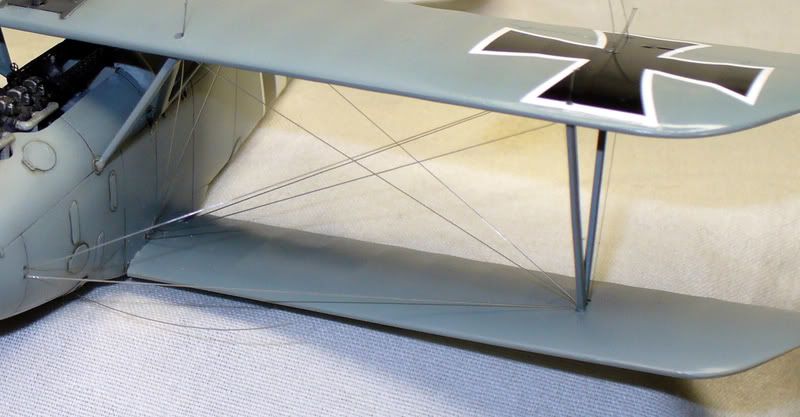


As you can see from the starboard side of the aircraft, my method was to simply attach the rigging in one spot,  and then pull the line through the strut holes before then attaching the strut and line to the top wing with one shot of CA.  It made for a bit of a web of rigging before hand, but once I got started, it all cleared up.  Whew.  Glad to have this under control, at least for the moment!

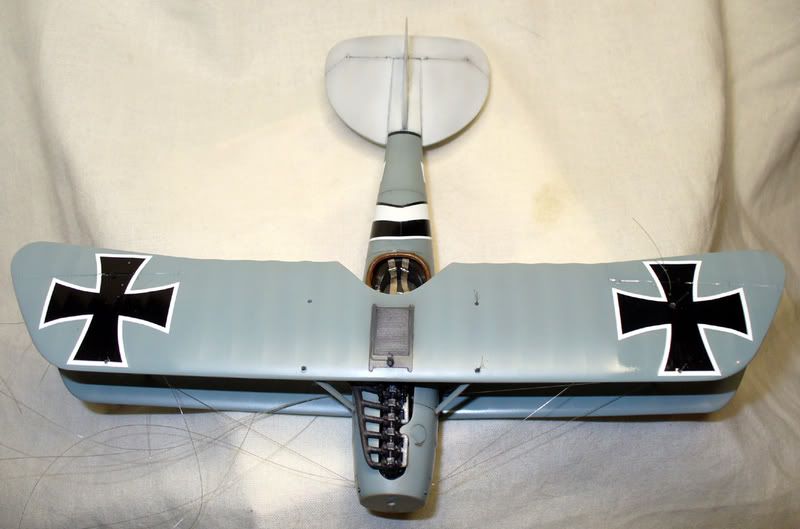
A shot of the top-what a beautiful bird the Albatros was...
 

-Justin
On the Bench: 1:48 Dragon Dr. 1 1:48 Trumpeter MiG-15 Fagot B Photo Sharing and Video Hosting at Photobucket
  • Member since
    October 2004
  • From: Colorado
Posted by StephenLawson on Tuesday, December 25, 2007 5:08 AM
Wow Gunga Drummy din. . . More power to you.  I always drill my rigging pilot holes through the wing adjacent to the struts.   Also I always save the wing crosses / decals as a last measure to keep them from getting boogered up. Then I add any aileron actions like on the Sopwith aircraft.  Very interesting.  Merry Christmas to you too!


Stachel...unconfirmed by Armee means unconfirmed!!!!

JOIN OUR COMMUNITY!

Our community is FREE to join. To participate you must either login or register for an account.

SEARCH FORUMS
FREE NEWSLETTER
By signing up you may also receive reader surveys and occasional special offers. We do not sell, rent or trade our email lists. View our Privacy Policy.