SEARCH FINESCALE.COM

Enter keywords or a search phrase below:

Winter Warriors GB 2008

82843 views
855 replies
1 rating 2 rating 3 rating 4 rating 5 rating
  • Member since
    November 2003
  • From: Nashville, TN area
Posted by bobbaily on Wednesday, January 30, 2008 6:52 PM

Ron-very impressive work on your T-34.  One question-why do you choose black primer over say, grey or red oxide?

Thanks

Bob


  • Member since
    November 2005
Posted by Anonymous on Thursday, January 31, 2008 3:25 PM
 SMJmodeler wrote:

tellis,

Getting the brush stroke effect is nearly impossible.  In fact the effort is futile IMHO.  I address how to acheive the "whitewash" effect in my Winter Camo' Tutorial...did you see it?  Study your photo again, notice how some areas have no whitewash at all, or it's worn off...that variety is what needs to be replicated.  Go take a look at the toot' it's actually very easy to do and doesn't require an "out of body" experience.

I don't know that it is impossible, but I do agree that it is very difficult to replicate hand-brushed whitewash. Sometimes the Germans had whitewash applied at the factory (if they were delivering tanks directly to winter environments) but most often the whitewash was field-applied. When it was done well, a fairly uniform effect was achieved. When it was done in haste or there were shortages of whitewash, it could look patchy or even unfinished...sometimes a pattern was intentionally broken or disruptive to better match the terrain.  Here are a couple of models that I have in whitewash. The 251 is supposed to look like it was brush-painted...the Mk III is supposed to replicate all methods, such as spraying, brushing, later touching-up, etc...


  • Member since
    June 2006
  • From: Michigan
Posted by ps1scw on Thursday, January 31, 2008 3:28 PM
Nice look on the 251.  The GrossD insignia in "blue" is for a specific battalion?  Each battalion a different color? 
  • Member since
    April 2007
  • From: Schroon Lake, NY
Posted by SMJmodeler on Thursday, January 31, 2008 6:52 PM

Manstein,

I'm going to focus on your tank for purposes of this discussion, which I think is a good example of a winter camo' schemeThumbs Up [tup]...I also think it looks similar to my technique.  What I was trying to emphasize to tellis was that trying to get the look of a "shrunken paintbrush or mop" would be somewhat futile, I think we agree on that point, that is the why I directed him to my tutorial, if only for future reference. 

This is the first I've seen of your winter technique so I'd like to comment on it now that you've posted it.  I particularly like the areas you airbrushed white, which appear to be a "diluted" or worn whitewash; but I think the front of the tank, specifically the spare tracks, vertical surface where the machine gun and driver's viewport are, and the driver's hatches, appear too white.  They seem too "freshly painted" in comparison to the rest of the tank IMO.  Again, in my camo' tutorial, I explain how I use several techniques to build up the whitewash effect, including the "brushed" look.  Here is my Stug III as a comparison of similar tanks, so we may continue this discussion...notice the similarities...???...and differences...???

  • Member since
    January 2005
  • From: in the tank factory in my basement
Posted by biffa on Thursday, January 31, 2008 9:42 PM

Bobbaily, for this one and others which require tire painting i tend to use black so i dont have to paint the tires again but normally i use red oxide seeing as this was a common primer if any shows through it can be justified heh but any primer would work to be honest.

SMJ, what you saw in the pic was straight van dyke brown oil paint the sheen on the edges is a by product of the washes buffing the paint edges (i work the washes around a lot) as far as technique in applying the paint its just applied with a scrap of sponge around edges and places i imagine would get scuffed i have a couple of articles showing this kicking around. when i prime the models i do it in several coats using a rattlecan from every possible angle then i look from every possible angle to see if anything was missed if it was i touch it up if i cant see anything then noone else can either so i dont worry about it kind of like not painting the interior because why bother worrying if it cant be seen :) setting the airbrush to fine and getting close will prevent much overspray onto the tires and weathering or a quick touchup takes care of the rest. 

well i have an update,

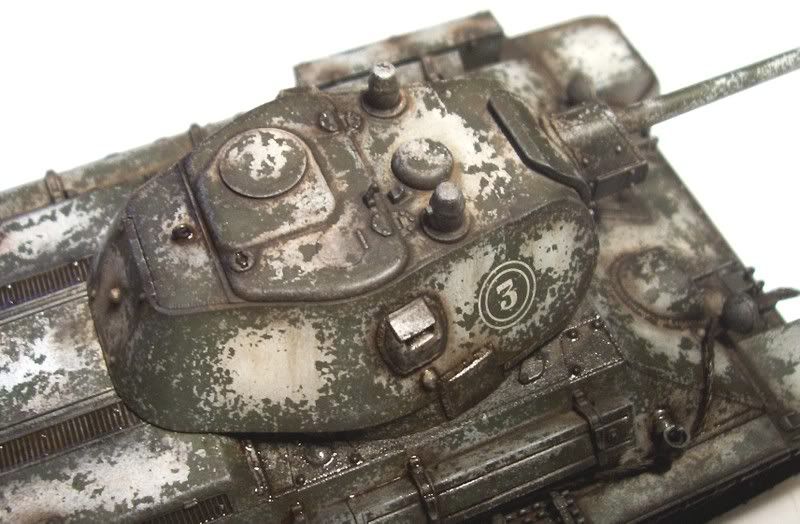
first a closeup of the turret for you SMJ note that most of this weathering will be lost but i did it just incase

and an overall view
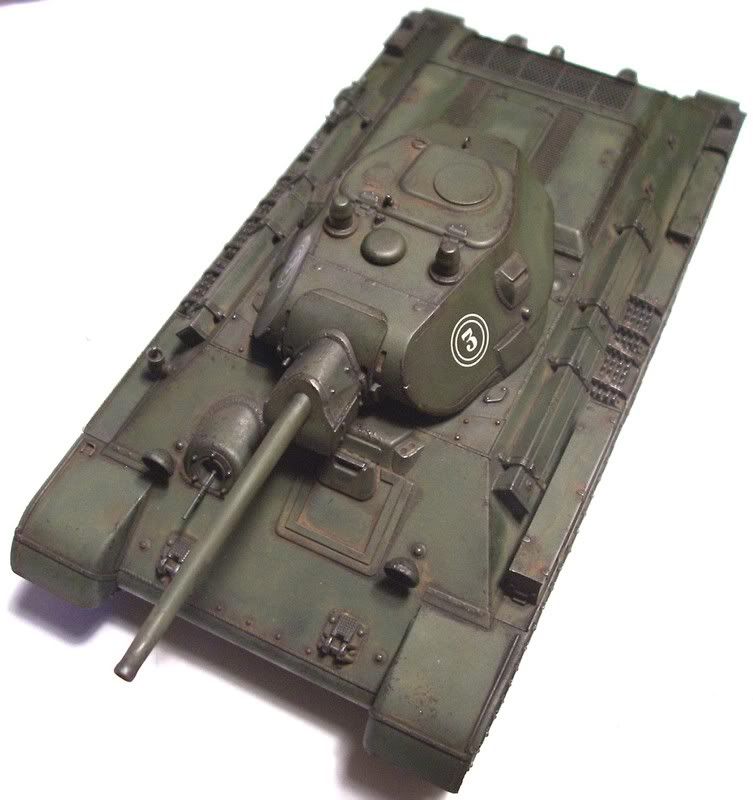
next i gave the model a coat of future then several coats of hairspray (i recommend at least four coats of arosol hairspray)
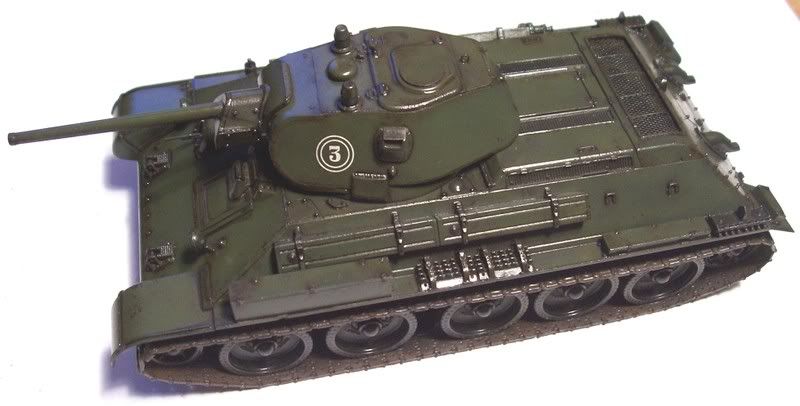
then the whitewash was airbrushed on (be sure to use acrylic paint if trying this)
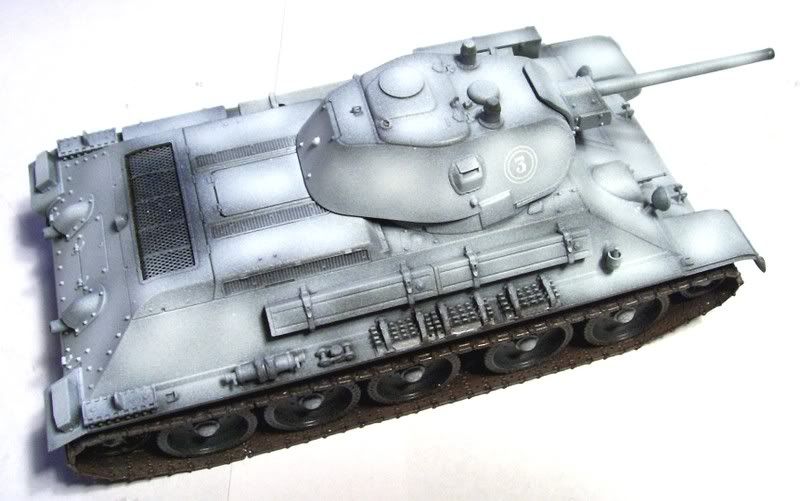
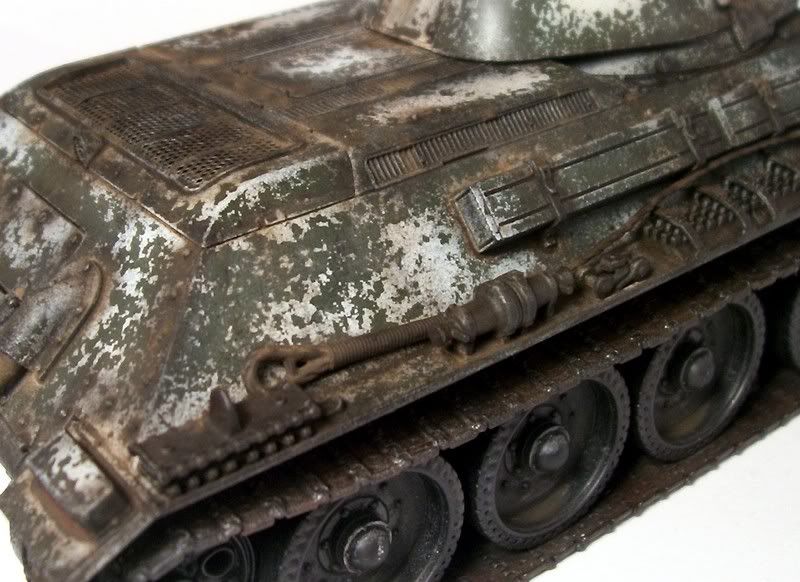
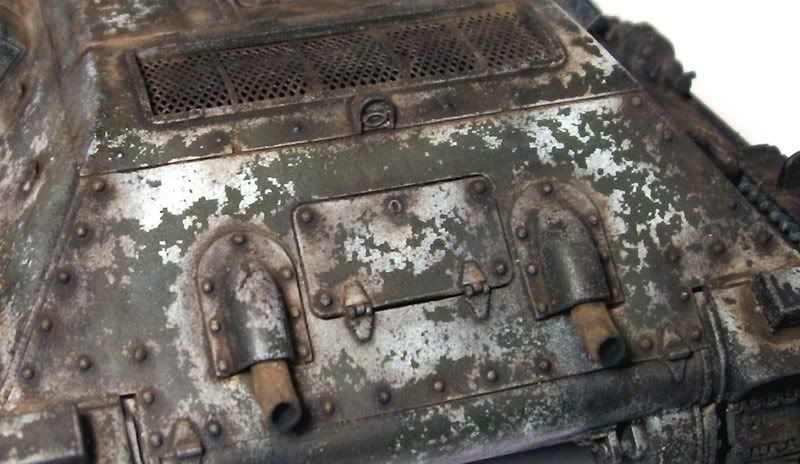
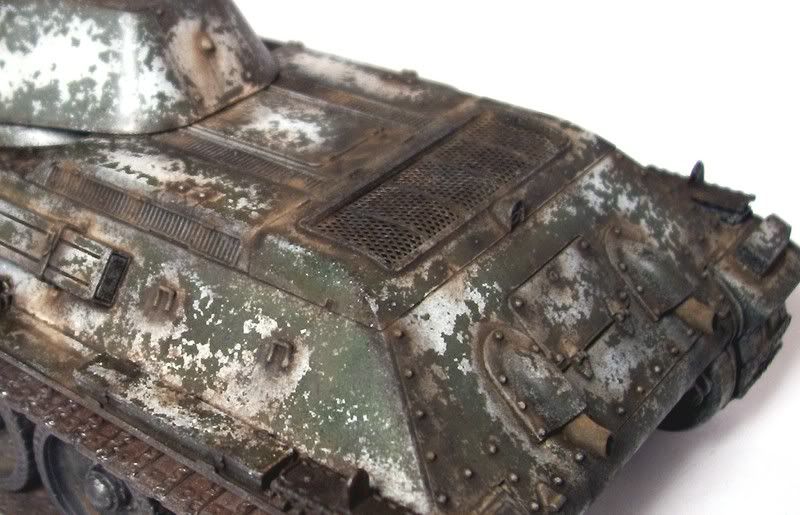
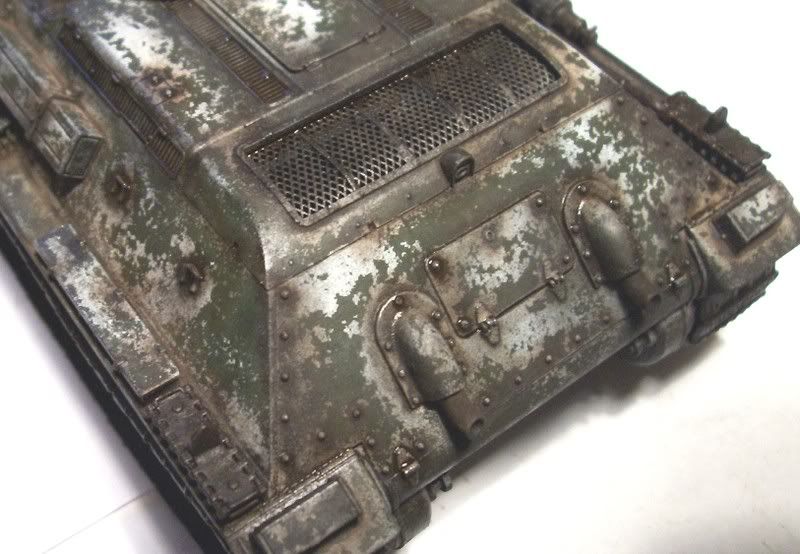
then i began wearing down the whitewash with a brush and water i intentionally went for a very worn look ultimatly for a springtime dirty tank but this method is very controllable so you can do as little or as much as you like

in progress

and all worn down

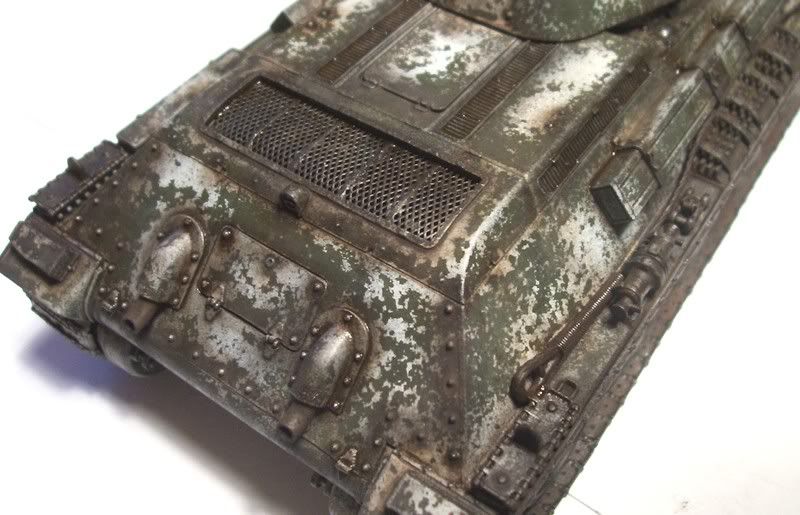
time to weather the whitewash i started with washes of black and van dyke brown
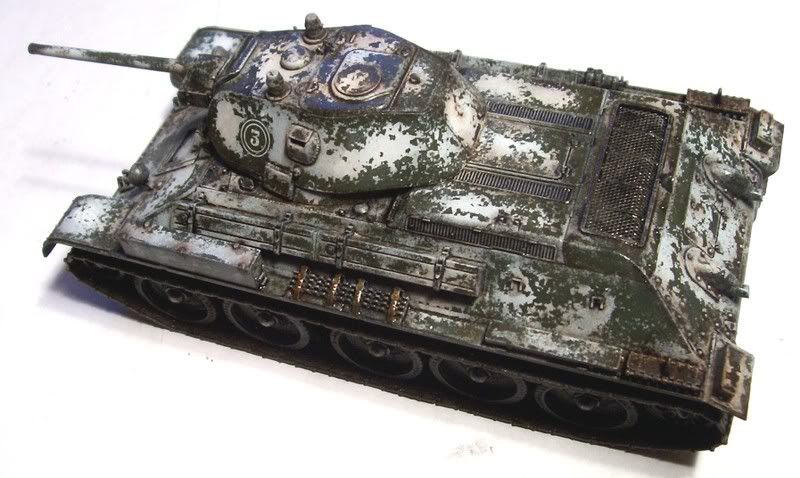
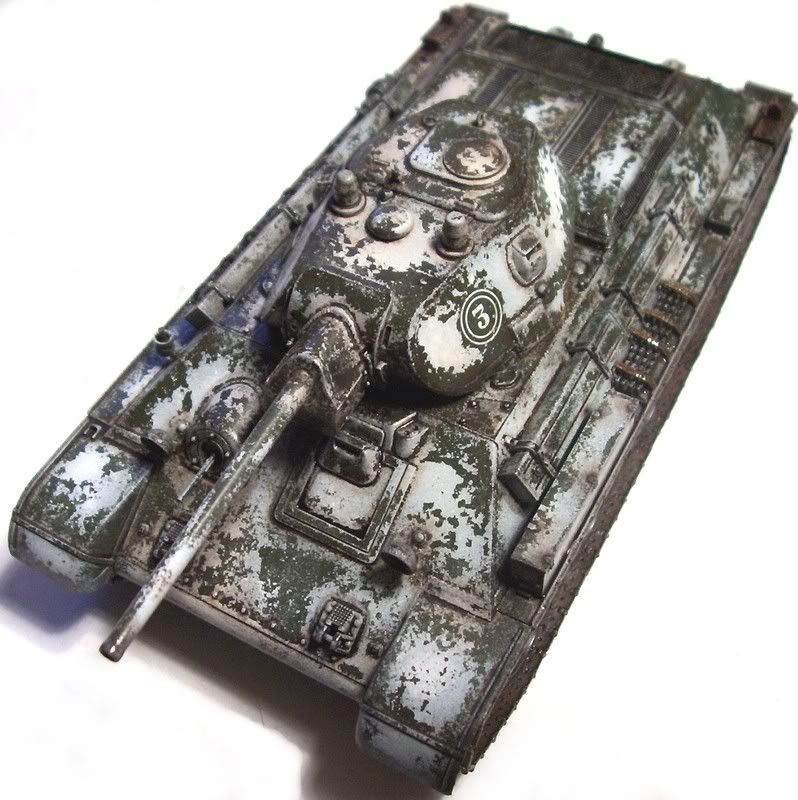
after a few more washes and i was happy with the look i worked on some of the details and began with the pigments

i followed the pigments with more washes to blend them and tone them down

next up will be dirtying up the lower hull and tracks.

Ron g.
  • Member since
    February 2004
  • From: Second City
Posted by arki30 on Thursday, January 31, 2008 11:02 PM

Holy....Bow [bow]

Ok, I quit part II.  I'm humbly going to put my little aircraft away and go find a nice quiet place to crochet. 

I've lurked in the Armor forum enough to see your weathering "in action" Biffa, but this is amazing even for you.  I take it the hairspray helps on the whitewash removal?


Building Now:

1/48 Academy Bf-109G6 - 100%

1/48 Tamiya F4U-1A - 5%

Upcoming:

1/48 Revell F-14D

  • Member since
    July 2006
  • From: San Francisco Bay Area
Posted by bufflehead on Thursday, January 31, 2008 11:37 PM
Very nice worn winter scheme on that T-34 Ron!!  That hairspray method works pretty well!!  You've done another bang up job so far dude!!Thumbs Up [tup]  I know its not 100% yet, but its looking great!

Ernest

Last Armor Build - 1/35 Dragon M-26A1, 1/35 Emhar Mk.IV Female


Last Aircraft Builds - Hobby Boss 1/72 F4F Wildcat & FW-190A8


  • Member since
    November 2005
Posted by Anonymous on Thursday, January 31, 2008 11:40 PM
 SMJmodeler wrote:

Manstein,

I'm going to focus on your tank for purposes of this discussion, which I think is a good example of a winter camo' schemeThumbs Up [tup]...I also think it looks similar to my technique.  What I was trying to emphasize to tellis was that trying to get the look of a "shrunken paintbrush or mop" would be somewhat futile, I think we agree on that point, that is the why I directed him to my tutorial, if only for future reference. 

This is the first I've seen of your winter technique so I'd like to comment on it now that you've posted it.  I particularly like the areas you airbrushed white, which appear to be a "diluted" or worn whitewash; but I think the front of the tank, specifically the spare tracks, vertical surface where the machine gun and driver's viewport are, and the driver's hatches, appear too white.  They seem too "freshly painted" in comparison to the rest of the tank IMO.  Again, in my camo' tutorial, I explain how I use several techniques to build up the whitewash effect, including the "brushed" look.  Here is my Stug III as a comparison of similar tanks, so we may continue this discussion...notice the similarities...???...and differences...???

"...but I think the front of the tank, specifically the spare tracks, vertical surface where the machine gun and driver's viewport are, and the driver's hatches, appear too white.  They seem too "freshly painted" in comparison to the rest of the tank IMO." 

Remember, I mentioned that on the tank I used several techniques to replicate different things. One of those things was "touch-ups"...meaning the crew would occasionaly apply fresh paint to worn areas which would appear "fresher" than the rest of the whitewash...

  • Member since
    November 2005
Posted by Anonymous on Thursday, January 31, 2008 11:42 PM
 arki30 wrote:

Holy....Bow [bow]

Ok, I quit part II.  I'm humbly going to put my little aircraft away and go find a nice quiet place to crochet. 

I've lurked in the Armor forum enough to see your weathering "in action" Biffa, but this is amazing even for you.  I take it the hairspray helps on the whitewash removal?


Sign - Ditto [#ditto] Ron, you've outdone yourself---AGAIN!!! Wow...no words come...

Does the hairsparay need to be alcohol based?...what is the exact reason for the coats of hairspray---to ease in lifting the white off?

  • Member since
    April 2007
  • From: Schroon Lake, NY
Posted by SMJmodeler on Thursday, January 31, 2008 11:52 PM

biffa:  A couple of clarifications please:

 biffa wrote:

straight van dyke brown oil paint the sheen on the edges is a by product of the washes buffing the paint edges (i work the washes around a lot)...

STRAIGHT VAN DYKE BROWN OIL, NOT DILUTED??? HOW CAN YOU WORK STRAIGHT OILS AROUND THAT MUCHConfused [%-)]  I MUST BE MISSING SOMETHING HERE...

...the paint its just applied with a scrap of sponge around edges and places i imagine would get scuffed i have a couple of articles showing this kicking around.

SCOTCH BRITE TYPE PAD?...WHAT ARTICLES?

closeup of the turret for you SMJ:

IS THIS WHERE THE OIL IS STRAIGHT?  YOU MENTIONED BUFFING...Confused [%-)]

Thanks for taking the time to help me, I generally get what you're doing but I want to be sure I understand.  I plan to try your technique on my "Jimmy" and/or my Panther G.

OK, now your progress shots...absolutely stunningShock [:O]Shock [:O]Shock [:O]...I think I've been studying these photos for a half an hour already.  VERY convincing!!! The tow cables and other goodies on the  fender look superb.  I like your whitewash technique too, again very realistic,...of course I'm watching close to see how others achieve their look.

If I can offer some constructive criticism, and believe me I had a heck of a time finding anything that might help you.  I think the amount of "positive(white)" to "negative(green)" spaces on each surface are too similar.  The green to white is almost 50/50.  I'd wear some areas a bit heavier or at least dirty the white a little more with a "spot" wash.  This is hard to explain...maybe this will help...it lacks "focal" points.  The applications of each technique are masterfully done, but as I view it I want to be drawn into the model...help the viewer "experience" the model by "creating" these "points of interest".  Does that make sense? If you're going for late winter, I'd "steak some of that white too.  Remember it's a water base "whitewash" so it will wash down those vertical surfaces.  

Again, thanks for helping me with my questions.  I really admire your workBow [bow]...it's fun to watch this build progressingThumbs Up [tup]!!!


  • Member since
    April 2007
  • From: Schroon Lake, NY
Posted by SMJmodeler on Friday, February 1, 2008 12:15 AM

Manstein,

I understand that you were trying to replicate several things, I guess I'm just not convinced yet.  Please don't get me wrong because I think I'm splitting hairs here and that is one damn fine looking build; but I think these types of discussions are what the forum is for and they help all of us improve. 

If the front of the tank, as mentioned before, needed a "touch-up", wouldn't some of the old whitewash still remain?  Maybe a super diluted white spray with the airbrush, then a wash or two, then the fresh paint streaks.  Not debating you here Manstein, just thinking it through and asking for your input....

  • Member since
    November 2003
  • From: Nashville, TN area
Posted by bobbaily on Friday, February 1, 2008 6:03 AM

Ron-thanks for the info.

As far as your T-34...WOW!  Very impressive.  I'll be reviewing your documentation when I get to the weathering portion of my T-34.  Again, very impressive.

Bob


  • Member since
    November 2006
  • From: Coastal Maine
Posted by dupes on Friday, February 1, 2008 8:38 AM
 arki30 wrote:

I take it the hairspray helps on the whitewash removal? 

Yes. What happens is (just like when you put it into your hair) the water on the brush loosens the hairspray layer, which flakes off, taking the whitewash with it. Leaving the future layer underneath. There was an article last month I think about doing a "hairspray hetzer" in...I want to say Tamiya Model Mag? Something like that. I'm sure Biffa can elaborate. Wink [;)]

Manstein - I seem to remember the article mentioning a water based hairspray, but I don't know if there is such a thing (not much hair)? 

Biffa - looking real good! How do you like this method so far? After reading that article, I was tempted to give it a shot as well...glad someone beat me to it. Laugh [(-D]

  • Member since
    November 2005
Posted by Anonymous on Friday, February 1, 2008 9:03 AM
 SMJmodeler wrote:

Manstein,

I understand that you were trying to replicate several things, I guess I'm just not convinced yet.  Please don't get me wrong because I think I'm splitting hairs here and that is what damn fine looking build; but I think these types of discussions are what the forum is for and they help all of us improve. 

If the front of the tank, as mentioned before, needed a "touch-up", wouldn't some of the old whitewash still remain?  Maybe a super diluted white spray with the airbrush, then a wash or two, then the fresh paint streaks.  Not debating you here Manstein, just thinking it through and asking for your input....

I am not offended at all with your observations as my builds certainly are nowhere close to being beyond critique...I did give the entire tank a spray of white to begin with of varying coverage (eg: top of the turret very light; sides of the turret heavier)...you may not be able to see it in the pics but the front of the glacis plate also has that very faded misting of white with the "brushed touch-ups" over it...I probably didn't do a good a job with "taking the entire tank to the next level" with heavy streaking, etc., but I actually was building it from an article by Mig Jiminez and tried to copy a Mk III he did in the very same scheme...he, too, replicated different methods of applying whitewash...that article is in Osprey's book on modeling the Mk III and is one of my all time favorite builds there is (doesn't hurt that I love Mk III's either)...thanks for the feedback...
  • Member since
    April 2007
  • From: Schroon Lake, NY
Posted by SMJmodeler on Friday, February 1, 2008 10:25 AM

Manstein,

EXACTLY how I like these threads to "play out"...Now I completely understand what you tried to achieve with this build.  You were gracious, we reached a "conclusion", and we are both the wiser because of itMake a Toast [#toast]

I also have a book with Mig Jiminez's work in it (T34), really great stuff, in fact, it inspired my "whitewash" technique.


  • Member since
    January 2005
  • From: in the tank factory in my basement
Posted by biffa on Friday, February 1, 2008 11:38 AM

SMJ, here is a couple of links to some russian building/weathering articles and SBS's i have done this may explain it better.

http://www.armorama.com/modules.php?op=modload&name=Sections&file=index&req=viewarticle&artid=1703

http://www.armorama.com/modules.php?op=modload&name=Sections&file=index&req=viewarticle&artid=1458

http://www.armorama.com/modules.php?op=modload&name=SquawkBox&file=index&req=viewtopic&topic_id=97632&page=1

As far as the whitewash goes i still have some weathering to do but as it stands i am satisfied with it the pics tend to illuminate the white more than it looks by eye bleaching out a lot of the discoloration.

The hairspray technique is as Dupes kindly explained although i heard about it on the web not the mag it is the same, the hairspray reacts with the water allowing the paint to be removed/lifted from the model in a very controlled manner.

Smile [:)] 

Ron g.
  • Member since
    July 2006
  • From: San Francisco Bay Area
Posted by bufflehead on Friday, February 1, 2008 11:50 AM

The Pz IV "Kharkov" is almost done, just waiting for a couple very small items to add, then its off to the paint booth.  I just need to determine if it should have a dark gray or dark yellow base coat.  I think it would look better with the gray, but I figure I need to be historically accurate and Field Marschall Von Manstein's notes point to the dark yellow bc.  I'll post pre painting photos tonight.

Ernest

Last Armor Build - 1/35 Dragon M-26A1, 1/35 Emhar Mk.IV Female


Last Aircraft Builds - Hobby Boss 1/72 F4F Wildcat & FW-190A8


  • Member since
    April 2007
  • From: Schroon Lake, NY
Posted by SMJmodeler on Friday, February 1, 2008 12:40 PM
biffa:  Thanks for the linksThumbs Up [tup], I'll go check 'em out soon.  I'll also wait to see the additional work on that whitewashWink [;)]!!!

  • Member since
    December 2002
  • From: Reno, NV
Posted by espins1 on Friday, February 1, 2008 12:57 PM

I was taking photos of my Tristar 1/35 PzKpfw. 38(t) Ausf. F for an in box review I'm writing (I do reviews of books and kits for another website....) and was so enamoured with this little kit that I began construction last night.  So far so good!  There have been no fit issues of any kind, which is pretty amazing considering that the lower hull is pieced together with separate parts for the front, back, sides and bottom.  At first it seemed it would be a bit tricky to get them together at the correct angles but it was surprisingly easy!  Big Smile [:D]

I'll have more progress to post tonight!  Big Smile [:D]

Scott Espin - IPMS Reno High Rollers  Geeked My Reviews 

  • Member since
    January 2005
  • From: in the tank factory in my basement
Posted by biffa on Friday, February 1, 2008 1:05 PM
Nice looking kit Scott i have the marder III h im thinking of doing for the TD group build i must concur they are fantastic pieces of work i cant wait to begin mine.
Ron g.
  • Member since
    July 2006
  • From: San Francisco Bay Area
Posted by bufflehead on Friday, February 1, 2008 7:22 PM

Just wait til you get to them indie links!! Mischief [:-,]

HEHE, just kidding Scotty!!  I've wanted this kit for some time, but decided instead to go with Dragon's (t)38 Ausf G since it was readily available at the IPMS Nats last year.  Is this your first Tristar kit?  I haven't built one yet, but I do have a Pz IV Ausf D in the stash.  I'm wondering if the plastic differs from Dragon's...harder, softer? 

Ernest

Last Armor Build - 1/35 Dragon M-26A1, 1/35 Emhar Mk.IV Female


Last Aircraft Builds - Hobby Boss 1/72 F4F Wildcat & FW-190A8


  • Member since
    December 2002
  • From: Reno, NV
Posted by espins1 on Friday, February 1, 2008 8:09 PM

I'm working on the suspension and wheels right now.  Very little cleanup to do except for a mold seem on the convex part of the leaf springs that needed a scrape or two with an X-acto knife and some light sanding.  Nothing out of the ordinary! 

If I'm really careful with the glue, the wheels will rotate and the suspension will articulate.  Tongue [:P]

This is my first Tristar kit and it will be my first attempt at plastic independant track links.  I've done two sets of Friulmodel tracks for other builds so I'm not afraid of the tedium.  It's the glueing and assembling that I'm worried about.  Oh well, gotta learn how to do this sometime, why not now!  Big Smile [:D]

Scott Espin - IPMS Reno High Rollers  Geeked My Reviews 

  • Member since
    November 2006
  • From: Coastal Maine
Posted by dupes on Saturday, February 2, 2008 8:49 AM
 bufflehead wrote:

I haven't built one yet, but I do have a Pz IV Ausf D in the stash.

Hey Bufflehead, that's also the lone Tristar kit I have rocking my closet...tell me when you're ready and I'll start the "TRISTAR PZ.IV D" Group Build. Laugh [(-D]

Scott - looks good! I would assume that a 5 part hull would be a bit tricky as well, but it looks to be square from your pics. Wink [;)] Ooooh...indy 38(t) links...ouch.

  • Member since
    July 2006
  • From: Rochester NY
Posted by mg42gunner on Saturday, February 2, 2008 9:02 AM
Wow, everyones builds are looking great! This group build is turning out really well. I do have one question for biffa though. Biffa, I saw how you sprayed white acrylic onto the tank, but how exactly did you do the green chips that show through? Did you paint on green paint? I know you mentioned water but I don't get how you made the chipping look so real? It looks fanstastic though I just don't understand how it came to be. (and I want to steal it so I can use it on my builds :)

Ive painted all three camo colors on my S tank, however I ran into a problem. I sprayed and masked the black and green, but ended up waiting 3 days until I sprayed the final coat of white. (stupid things called mid-terms that my school insists I take) So I ended up with some nasty looking overspray, because the masking tape lifted up. However Ive got touch up paint ready, and thats what ill be doing today. I know I haven't posted pics in a while, so Ill get off my lazy but and take pics today.
  • Member since
    November 2005
Posted by Anonymous on Saturday, February 2, 2008 12:03 PM

 ps1scw wrote:
Nice look on the 251.  The GrossD insignia in "blue" is for a specific battalion?  Each battalion a different color? 
Thanks. Actually the blue helmet signifies a vehicle from the Fuhrer Grenadier Brigade, a spin off unit from the Grossdeutchland Corps...this vehicle is representing a 251 that served with it during the battle of the Bulge...it was involved heavily in fighting in the Southern sector of the bulge.

Another brigade sized unit also served in the BOB that also descended from Grosseutchland: Fuhrer Begleit Brigade--it carried a yellow helmet.

  • Member since
    December 2002
  • From: Reno, NV
Posted by espins1 on Saturday, February 2, 2008 6:04 PM

I've been busy slogging away at the suspension components.  They're actually pretty sophisticated.  The parts are very small, so it's been a bit of a challenge getting them together.  Good thing I took it easy on the caffeine this morning.  Shock [:O]

Also, there is an error in the instructions in step 1-1.  Part E-6 is for the right side of the bogie, E-5 is for the left.  Pay close attention for those of you who have this kit in the stash.  The little shields on those two parts should be positioned so they act as a bumper if the suspension arm moves high enough to touch the leaf springs.

The bogie assemblies pivot on the springs, and the suspension arms articulate.  See!  If you watch real close you can see them dancing.  They're moving to the beat of the Led Zeppeling DVD I've got blasting in my fortress of solitude.  Headphones [{(-_-)}]

Hmm.... I think I've been inhaling too many glue fumes....  Laugh [(-D]

Scott Espin - IPMS Reno High Rollers  Geeked My Reviews 

  • Member since
    January 2005
  • From: in the tank factory in my basement
Posted by biffa on Sunday, February 3, 2008 5:23 PM

Hi mg42, the green was painted first then white over the top then i removed the white so the green could show through :)


well guys im calling this one done i muddied up the running gear and did a little more weathering to blend it all together and i am happy with the result and feel good about learning a new technique and will definatly be using it again, keep the builds coming guys i will be checking in to see them often.

Ron g.
  • Member since
    December 2002
  • From: Reno, NV
Posted by espins1 on Sunday, February 3, 2008 6:33 PM
Another outstanding job Ron.  I always enjoy following your builds and your techniques bring outstanding results!  Cool [8D] Thumbs Up [tup] Thumbs Up [tup]

Scott Espin - IPMS Reno High Rollers  Geeked My Reviews 

  • Member since
    February 2004
  • From: Second City
Posted by arki30 on Sunday, February 3, 2008 8:12 PM

Gorgeous!  Even the mud looks realistic!  Bow [bow]

In between work this weekend and the Superbowl, I've managed to shoot the RLM 76 underside along with some miscellaneous parts, i.e. wheels, props, etc.  Still slogging away at it.

Building Now:

1/48 Academy Bf-109G6 - 100%

1/48 Tamiya F4U-1A - 5%

Upcoming:

1/48 Revell F-14D

  • Member since
    November 2006
  • From: Coastal Maine
Posted by dupes on Monday, February 4, 2008 9:58 AM

Biffa - looks awesome! Thumbs Up [tup]Thumbs Up [tup] Glad the new technique worked out for you...did you need to do anything different to your weathering methods with the layer of hairspray in there? Some sort of sealer coat after you chipped away the white layer?

Also wondering about your mud - is it straight pigments, or do you mix something a little more "substantial" in there to get it nice and chunky like that?

Great build. Feel free to claim your badge at any time! Big Smile [:D]

JOIN OUR COMMUNITY!

Our community is FREE to join. To participate you must either login or register for an account.

SEARCH FORUMS
FREE NEWSLETTER
By signing up you may also receive reader surveys and occasional special offers. We do not sell, rent or trade our email lists. View our Privacy Policy.