SEARCH FINESCALE.COM

Enter keywords or a search phrase below:

The Official F4U Corsair Group Build 4/01/08 - rolling end date

179031 views
1732 replies
1 rating 2 rating 3 rating 4 rating 5 rating
  • Member since
    April 2005
Posted by Thunderbolt379 on Saturday, March 28, 2009 1:15 AM

Hi all,

The Hasegawa 1:72 -1D is moving along (and it needs to, there's only four days left!)

Photobucket" border="0" />

The cockpit is really tiny and of course highly inaccurate having a floor and all, but I'm not going to worry about that! I did main construction last night, having done the first joint dressing at the subassembly stage and today am at the secondary filling and sanding stage plus scratchbuilding the details to actually make it a -1D.

Photobucket" border="0" />

The main pylons are hand-shaped from .060" plasticard and superglued into place. The attachment plates for the rocket stubs are cut from .010" card. The stubs will be made from a strip of shaped .020" card, cut and superglued into place one at a time, as part of the last round of additions before painting, which will include the antennas.

My next job, after tidying up the wingroots, will be to get the engine into place. Maybe it's the age of the molds, I don't remember the problem from building this beast many years ago, but the pedastal over which the engine locates is way oversize. No way is the engine going to fit naturally, I've been filing back the pedestal bigtime. Nearly got it! I'll mask the inside arch of the cowling, glue the engine into the cowling, then seat the whole lot back onto the fuselage and fill the top joint. The canopy should be going on in that round of work too, then the next job is a full round of masking.

From my online research it appears the VMF-511 birds had midnight blue gear bay door interiors, and depsite appearances on the Superscale instructions may have retained the forward fuselage radio mast. (The Trumpeter/MRC 'Easybuild' -1D in VMF-511 markings sure has it, but is their research necessarily superior to Superscale's which indicated no forward mast but a supplementary mast in the belly?)

I'm aiming to have her finished with maybe a day to spare (famous last words...)

Comments, suggestions and research tips from the experts are more than welcome!

Cheers,

Mike

http://worldinminiature.blogspot.com/

  • Member since
    September 2007
  • From: galt, ca.
Posted by dirtball on Saturday, March 28, 2009 2:46 AM
  Ken, thanks. Thoughs help alot!! Mike, Great scratch building! I like............Harv
"I once shot an elephant in my pajamas. How he got in my pajamas, I`ll never know!"
  • Member since
    April 2005
Posted by Thunderbolt379 on Sunday, March 29, 2009 8:19 AM

Thanks Harv, I'm pushing it along every day, here's my next update:

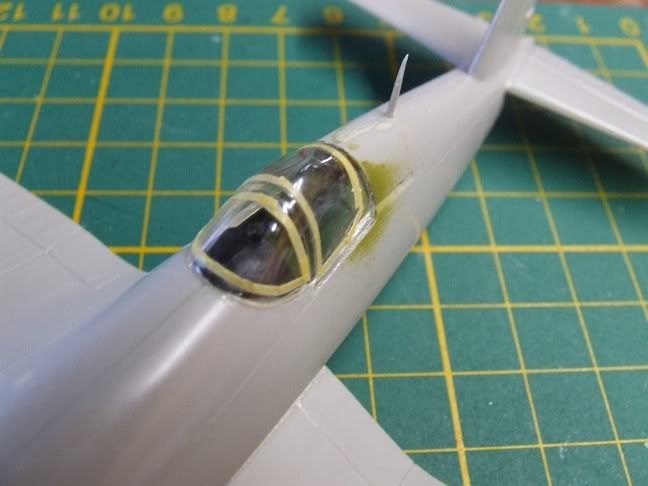
Not knowing I'd be building this one until very recently, I had no time to get a mask set, so the canopy is done the old fashioned way, though with Tamiya tape:

Photobucket" border="0" />

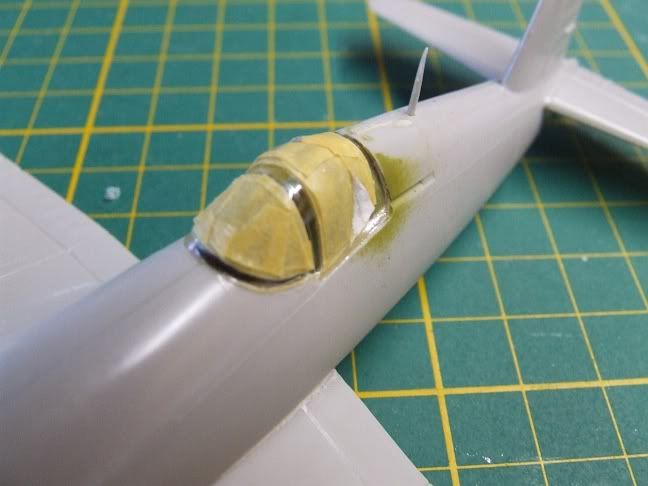
And the area filled in:

Photobucket" border="0" />

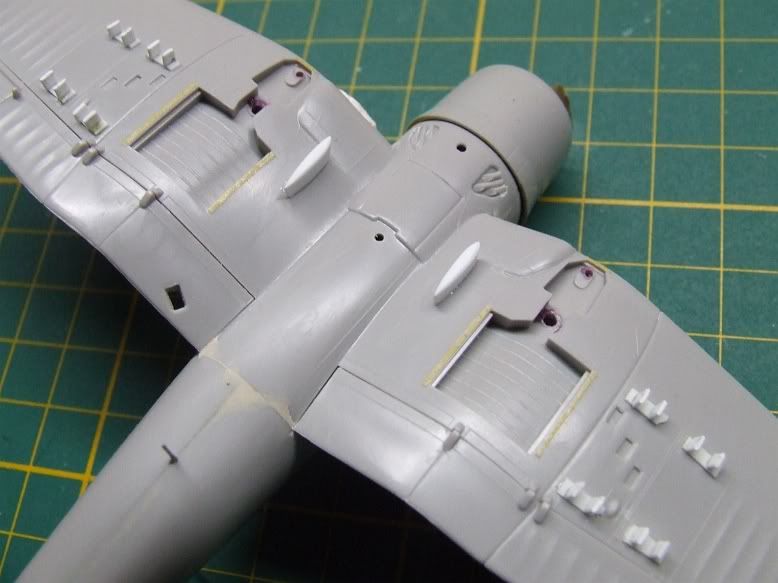
The straight supports of the windscreen will go on as decals, an old trick I used ages ago the first time I did this kit. Here's the -1D underwing racks completed:

Photobucket" border="0" />

The masking is almost all done, note the strips protecting the location points for the gear bay doors, and Maskol in the holes. I've decided to go with Superscale's research, thus the addition of the antenna in the belly, from .015" wire. The rocket stubs were made from 1.5mm pieces of shaped .020" stock, but all the same size and shape they're not! If I ever add a North Shortline Chopper II to my toolkit, my teensy bits of plastic will be more regular.

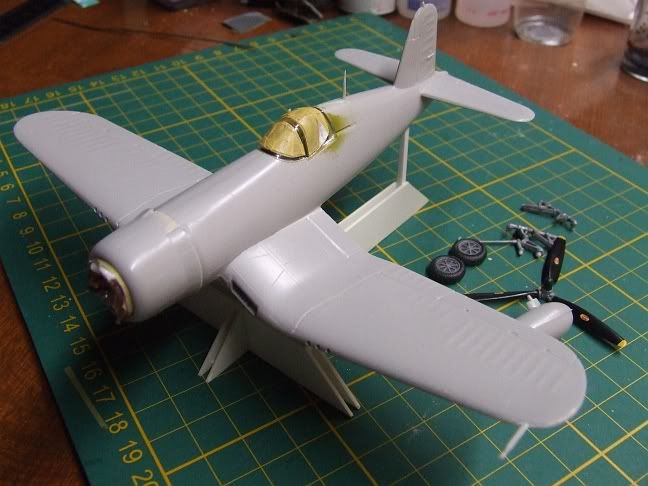
Here she is on the painting stand:

Photobucket" border="0" />

And for those with long memories, yes, that's the same stand that appeared in FSM several years ago, with an Italeri -5N on it! I need to remask the port wing radiator intake. Also, I'm planning on trying rigging for the first time (EZ-Line) and have drilled a receiver in the upper starboard fuselage side, and notched the fin tip mast where hopefully superglue will hold the stuff in place.

Tomorrow I should be painting: a splash of interior green over the canopy to create the inside colour, belly tank into flat white separately, then I'll prime her probably with an acrylic mid-gray to check all joints and mods. All being well, I'll lay Model Master FS 15042 Sea Blue Gloss over that.

Cheers,

Mike

http://worldinminiature.blogspot.com/

  • Member since
    March 2006
Posted by simpilot34 on Sunday, March 29, 2009 8:44 AM
Looking good Mike!!!! I think you'll come in under the wire after all!!!Thumbs Up [tup]
Cheers, Lt. Cmdr. Richie "To be prepared for war, is one of the most effectual means of preserving the peace."-George Washington
  • Member since
    April 2005
Posted by Thunderbolt379 on Sunday, March 29, 2009 9:00 AM

Thanks, sp34! I'll certainly give it my best shot. The only mod to go is to cut and extend the tail gear strut, I can do that while the paint is drying. Decals should take a couple of hours to apply, and last parts will be 8 gear bay doors and the prop. I'll dirty up the tank with graphite and pigments, use pigments for the exhaust and gun stains, dust in the landing gear bays and on the tires... The usual round of techniques, then throw in the rigging line. It has to be painted too, the supplier could only send rust-red and that's no good for antenna wire!

I'll keep dust under control, though, this was a carrier-based squadron, not an island-based unit.

Cheers,

Mike

http://worldinminiature.blogspot.com/

  • Member since
    October 2006
  • From: Lakewood, CO
Posted by kenjitak on Sunday, March 29, 2009 5:31 PM

Here's something a little different. This is my Special Hobbies 1/48, F2G in racing trim. It turned out to be a difficult build and not as satisfying a kit as the Tamiya 1/48 Corsair. The cockpit was rather sparsely detailed even with the included photetch, same with the wheel wells. The decals became crumbly when I applied them. At several points in this build I was going to pack it in but with the deadline looming I was determined to wrap her up. So here it is:


Ken

  • Member since
    September 2003
  • From: South Central Wisconsin
Posted by Daywalker on Sunday, March 29, 2009 5:40 PM

Ken,

I have been waiting and hoping for the finished photos of this build.  Looking at your photos, I cannot see any evidence of the troubles you mentioned.  It looks absolutely stunning!  I love the Super Corsair, and look forward to seeing her every year at the EAA AirVenture show.  As a matter of fact, I have my picture taken next to her every time! Blush [:I]  Good on you for finishing this one, I hope to build one soon too. Bow [bow]

You mention the decals being crumbly, any other advice you can pass along on this one? 

Mike- Looks like you are having fun with yours, glad to see it!  Nice looking work there. Approve [^]

I worked on the twins a little today, almost finished the masking and soon they'll be ready for some paint. Thumbs Up [tup]

Frank 


  • Member since
    December 2002
  • From: Northern California
Posted by jeaton01 on Sunday, March 29, 2009 8:21 PM
Nice work, Ken.  Looks great to me, all problems solved.

John

To see build logs for my models:  http://goldeneramodel.com/mymodels/mymodels.html


  • Member since
    April 2005
Posted by Thunderbolt379 on Sunday, March 29, 2009 9:35 PM

Nice work, Ken, she's a beauty! I've always been fascinated by this variant and in race colors she's extra-spectacular!

Progress on my lil guy:

Photobucket" border="0" />

Canopy interior color sprayed, and droptank sprayed. Note, by the stand, one of the rocket stubs has already fallen off and needs to be reattached. Also, the .015" wire used to make the belly antenna fell off and disappeared the instant the model was moved today, so it's been replaced with .020" plastic rod which seems to be bonded more securely (fingers crossed). And:

Photobucket" border="0" />

Overall primer coat of XF-24 mixed 2:1 with XF-2. She looks pretty good at this point. I'll look her over closely after it's had a chance to harden off, but all being well I'll be shooting the Sea Blue Gloss later.

Cheers,

Mike

http://worldinminiature.blogspot.com/

  • Member since
    October 2006
  • From: Lakewood, CO
Posted by kenjitak on Monday, March 30, 2009 1:43 AM

Thanks everyone, for the kind words! Describing the decals as "crumbly" was probably a bit of an overstatement. On each wing the white rays would break into parts so that it looked like a rodent had taken 2 or 3 bites out of the rays on each wing. So I spent a lot of time moving each broken piece back into place and touching up with paint. I think if were to do it again I'd stop after the first set of rays and put a coat of Microscale Liquid Decal Film on the sheet. I'd cut each ray seperately and place them individually.

I'm glad it's finished and I'm proud to join the ranks of this distinguished GB!


Ken

  • Member since
    April 2005
Posted by Thunderbolt379 on Monday, March 30, 2009 2:19 AM

Hi all,

I got the Sea Blue on and unfortunately it's turned out poorly, it's the most 'orange-peel' finish I think I've ever produced. I remember MM FS 15042 never being a particularly bright paint, I got a very satin result from it many years ago, and conditions were probably against getting gloss from it today. It was quite warm, the paint was fairly thick in the jar, and though I thought I had thinned to compensate for both, obviously that was just not the case. I have a crinkle-finish Corsair right now, and I have three options:

  1. Use a clear gloss over the top and see if it'll 'find its level' acceptably.
  2. Cut back the paint with 2000-grit wet'n'dry, lubricated with liquid soap. Or
  3. Ignore the problem.

The first is an easy experiment, I'll give Microscale Gloss a go, it seems friendly to apply with a brush and I could see what kind of result I get in an inconspicuous location, like under the tail. The second takes a really light hand, and on a model with surface protrusions the chances of a really patchy finish are high. The third raises the possibility that the Superscales won't like the surface...

I'm suddenly not sure if I'll make the deadline -- I should have been finishing it tomorrow, but...

I'll keep you posted, and any suggestions would be gratefully received!

Cheers,

Mike


http://worldinminiature.blogspot.com/

  • Member since
    March 2006
Posted by simpilot34 on Monday, March 30, 2009 6:34 AM

Ken she looks stunning mate!!!!!!!!!!!!!!!! Absolutely Beautiful!!!! WELL DONE!!!!Thumbs Up [tup]

Mike, keep at it buddy!!!!! Perserverance will win in the end!!!!! If it wasn't enamel I would simply say strip it and try again, but.....

Cheers, Lt. Cmdr. Richie "To be prepared for war, is one of the most effectual means of preserving the peace."-George Washington
  • Member since
    September 2003
  • From: South Central Wisconsin
Posted by Daywalker on Monday, March 30, 2009 6:48 AM

Mike,

Bummer about the paint!  Since time is at a premium, I would think the gloss overcoat is the best option.  Hope it all goes smoothly! Thumbs Up [tup]

Frank 


  • Member since
    April 2005
Posted by Thunderbolt379 on Monday, March 30, 2009 6:57 AM

Hi guys,

Thanks for the support. I think the topcoat is going to work -- it's not exactly a smooth finish but it's a bright one that I think the decals will take over. I'm simply brushing on coats and letting them dry, it's sure a bright gloss. if it was going over a smooth surface it would be amazing! Possible update pic later...

Cheers,

Mike

http://worldinminiature.blogspot.com/

  • Member since
    January 2007
Posted by thuds1 on Monday, March 30, 2009 11:05 AM

 Mike,

 I'm amazed, stunned or whatever about the rocket pods on the wings !!

 I've been toying with the idea of a 1D  with the same kit and I couldn't find the

 right dimensions or placement of the pods . So I'm just wondering ......

 Frank C 

  • Member since
    May 2008
  • From: Wherever the hunt takes me
Posted by Boba Fett on Monday, March 30, 2009 5:35 PM
Oh boy! This is really embarassing, but I thought that the deadline was 5/01/09 That was really dumb. Sorry, I won't be able to finish the Corsair by then.

  • Member since
    April 2005
Posted by Thunderbolt379 on Monday, March 30, 2009 6:24 PM

Hi Thuds --

The reference I used was Bert Kinzey's F4U Corsair in Detail and Scale, Part 1. There are 1:72 plans for all featured marks and I measured up from those. It's impossible to be really exact at this scale, I simply got as close as possible. The eye certainly can't pick the difference between 1.5mm and 1.75, especially with the midnight blue overcoat.

The conversion was actually pretty simple and I surprised myself, I've never done one like this before. I just wish the paint had been more cooperative as it kinda spoils the final result.

Cheers,

Mike

http://worldinminiature.blogspot.com/

  • Member since
    September 2003
  • From: South Central Wisconsin
Posted by Daywalker on Monday, March 30, 2009 6:37 PM
Mike and Graham- I was just looking at the main GB page, and I see Fred has changed the completion date to 6/1/09.  Looks like you fellas can take a breather, and finish them at a comfortable pace! Thumbs Up [tup]

Frank 


  • Member since
    September 2007
  • From: galt, ca.
Posted by dirtball on Monday, March 30, 2009 6:38 PM
  There are some FANTASTIC corsairs coming out of this wonderfull GB. Unfortunatly, I`ll not finnish in time. All my building is put on the back burner for about a week anyway. I`ve been moved to Graveyard shift. So for a short time, I`ll be sorting out my schedual for everything from eating to sleeping and of couse, building. So bear with me guys. I`ll continue to post most likely in the weee hours of the morning. I will finish it, but it`ll take some time. Thanks all. Your a Great bunch of friends & builders............Harv
"I once shot an elephant in my pajamas. How he got in my pajamas, I`ll never know!"
  • Member since
    September 2003
  • From: South Central Wisconsin
Posted by Daywalker on Monday, March 30, 2009 6:41 PM

No worries Harv, you have two more months! Big Smile [:D]

I finsihed up the masking on my twins, and they are ready for the paint shop.  Hope to get started on the paint this weekend. Thumbs Up [tup]


Frank 


  • Member since
    April 2005
Posted by Thunderbolt379 on Monday, March 30, 2009 6:59 PM

Thanks for the heads-up, Frank! Well, two more months -- there's a good chance I can still do the Salvadorean bird now, as well! It'll be a relief to be working in low-lustre paints doing the camo. I'm seriously miffed about the performance of the gloss and it's really frustrating to be a lifetime modeller yet not able to produce a reliable gloss paintjob when needed. I'm thinking of doing an experimental job on another half-finished beast, actually mixing a Midnight Blue in acrylics and seeing what I can manage in a different medium. I might put the Hasegawa bird aside until I see what the result is, and make a call on what to do before I use the Superscales.

Harv -- commisserations on being moved to nigthshift, I can really appreciate how that will reorganize your life.

Cheers,

Mike

http://worldinminiature.blogspot.com/

  • Member since
    May 2008
  • From: Wherever the hunt takes me
Posted by Boba Fett on Tuesday, March 31, 2009 10:54 AM

 Daywalker wrote:
Mike and Graham- I was just looking at the main GB page, and I see Fred has changed the completion date to 6/1/09.  Looks like you fellas can take a breather, and finish them at a comfortable pace! Thumbs Up [tup]


*sighs deeply* Ok! great! I guess I can do this now. I'll get pics up when I get a chance. The paint on this bird is going to be a flat black "primer" with insignia blue over that. I suppose that'll keep the finish dark. For the life of me, I couldn't find a gloss dark sea blue of even sea blue in MM acryl or Polly S. My mom doesn't like enamels, so my paint is somewhat limited.

  • Member since
    September 2007
  • From: galt, ca.
Posted by dirtball on Monday, April 6, 2009 10:00 PM

Small update. Trying to assem. these little pain in the *** pieces. This is about 9 parts. PE is part of the Verlindon wheelwell set for the Trump...so i`m fighting it all the way modifying all for the Revell stuff. Wheelwell is Lonestar. But this is it sofar............Harv

 100_0828.jpg picture by dirtball_photo

"I once shot an elephant in my pajamas. How he got in my pajamas, I`ll never know!"
  • Member since
    September 2003
  • From: South Central Wisconsin
Posted by Daywalker on Monday, April 6, 2009 10:08 PM

Looking good Harv! Thumbs Up [tup]  That's a lot of work to be certain.


Frank 


  • Member since
    March 2006
Posted by simpilot34 on Tuesday, April 7, 2009 7:30 AM
Harv, that looks great mate!!! Coming together slowly but surely!!!!Thumbs Up [tup]
Cheers, Lt. Cmdr. Richie "To be prepared for war, is one of the most effectual means of preserving the peace."-George Washington
  • Member since
    September 2003
  • From: South Central Wisconsin
Posted by Daywalker on Saturday, April 18, 2009 9:23 AM
I started painting my F4U-2 last week, hoping to have the rest of the airframe in it's base colors by Monday. Thumbs Up [tup]  Pics coming soon! Big Smile [:D]

Frank 


  • Member since
    March 2006
Posted by simpilot34 on Saturday, April 18, 2009 8:39 PM
Dinner [dinner]
Cheers, Lt. Cmdr. Richie "To be prepared for war, is one of the most effectual means of preserving the peace."-George Washington
  • Member since
    September 2003
  • From: South Central Wisconsin
Posted by Daywalker on Sunday, April 19, 2009 3:02 PM

I finished the base colors today, ending with the black sides.  During the course of the painting, I opted to weather each color a bit before going on to the next.  I used a very thin NATO black color to darken the panel lines, and add a little shadow in deep recesses.  Then, I used a lightened version of the base color to lighten up the centers of the panels, as well as some overall splotchiness.  Overall, I am happy with how it is looking so far.

Don't worry, I will also weather that awful colored radome in due time. Smile [:)]

Frank 


  • Member since
    September 2007
  • From: galt, ca.
Posted by dirtball on Sunday, April 19, 2009 10:38 PM
WOW, Frank! Way to go! I like the twins very much Cant wait to see them done.......Harv
"I once shot an elephant in my pajamas. How he got in my pajamas, I`ll never know!"
  • Member since
    April 2005
Posted by Thunderbolt379 on Sunday, April 19, 2009 10:50 PM

Very, very nice, Frank! I'm really looking forward to trying one of these multi-tone variations. My attempts to generate a high gloss have lately been less than inspiring but I think I could do a very nice job on a lower lustre scheme. The post-shading came out extremely well!

Mike

http://worldinminiature.blogspot.com/

JOIN OUR COMMUNITY!

Our community is FREE to join. To participate you must either login or register for an account.

SEARCH FORUMS
FREE NEWSLETTER
By signing up you may also receive reader surveys and occasional special offers. We do not sell, rent or trade our email lists. View our Privacy Policy.