SEARCH FINESCALE.COM

Enter keywords or a search phrase below:

BIG CATS GROUP BUILD 2008

55206 views
681 replies
1 rating 2 rating 3 rating 4 rating 5 rating
  • Member since
    December 2002
  • From: Bury St Edmunds, Suffolk, England
Posted by Bish on Thursday, June 5, 2008 5:59 PM
Hi guys, would love to make this my first GB. I have a Tamiya 1/35 Mid production Tiger I. I am going to build tank 131 of the 101. SS S Pz Abt in Normandy. Was going to start this at end of the year but this will give me an incentive to get it done sooner.

I am a Norfolk man and i glory in being so


On the bench: Airfix 1/72nd Harrier GR.3/Fujimi 1/72nd Ju 87D-3

  • Member since
    December 2002
  • From: Reno, NV
Posted by espins1 on Saturday, June 7, 2008 2:07 PM

SMJ - If you wouldn't mind, could you change my build to the Dragon Panther D w/zimmerit?  Thanks!

I'm going do mine as either:

  • Panther #232, 2nd Company, 15 Pz.Rgt., 11 Pz. Div.
  • Panther #424, 4th Company, 15 Pz.Rgt., 11 Pz. Div.

The markings are from the excellent Echelon Panther Decal sheet for the Panther D and A, ATX351009.


Scott Espin - IPMS Reno High Rollers  Geeked My Reviews 

  • Member since
    January 2008
  • From: Bournemouth UK
Posted by Bodge on Saturday, June 7, 2008 2:36 PM
Your panther looks greatThumbs Up [tup]
  • Member since
    May 2007
Posted by Specter on Saturday, June 7, 2008 9:26 PM

Hi SMJ, I would like to join with a 1/35 DML King Tiger please. Geist was telling me about it the other day and I couldn't resist.

edit* the kit is 6303 w/zimm

Seth
  • Member since
    April 2005
Posted by Thunderbolt379 on Sunday, June 8, 2008 2:40 AM

Hi guys,

The Academy Tiger I is moving along again, here she is:

Photobucket" border="0" />

I was a little quick off the mark with some details. I'll need to relocate the track hangers on the turret as I positioned them for a length of connected track, then put a magnifying glass to my reference photos and realised they were hung individually. (It's well to be seen that this is the first Tiger I've ever built!) Good job I didn't use superglue!

Also, while the majority of weld seams are very well represented, the weld running around the top of the turret 'horseshoe' is not feaured at all. This is a good opportunity to lay on some .020" half-round microrod and texture it with a hot knife, which will also obscure the somewhat visible parts juncture. So, gotta get some mirorod... It'll be my first time for this technique, which dictates an experiment off the model first. I'm also thinking of doing her with turret hatches open for visual variety, whether or not I do the included crew figures.

I'm still having trouble with the exhausts, I wish somebody made some replacement parts, cast as single units, to avoid fiddling with tiny bits of plastic that make you feel you're trying to manipulate individual sand grains while wearing boxing gloves...

The good news is, the Eduard grill set is back in stock at Squadron and the order is going out tonight, so I'm very confident of finishing this animal on time to collect my second GB badge.

Cheers,

TB379

http://worldinminiature.blogspot.com/

  • Member since
    November 2006
  • From: Coastal Maine
Posted by dupes on Sunday, June 8, 2008 12:58 PM
 espins1 wrote:

The markings are from the excellent Echelon Panther Decal sheet for the Panther D and A, ATX351009.


Scott - looks like you better be prepared to build several panthers when you invest in one of those Echelon sets! Shock [:O]

  • Member since
    April 2007
  • From: Schroon Lake, NY
Posted by SMJmodeler on Monday, June 9, 2008 10:21 AM

T379:  Good to see you making some progress...2nd badge, huh?...she's a beaut' for this GB!!!

Bish, espins1, Specter:  Got it!!!

  • Member since
    December 2002
  • From: Reno, NV
Posted by espins1 on Monday, June 9, 2008 11:03 AM
 dupes wrote:
 espins1 wrote:

The markings are from the excellent Echelon Panther Decal sheet for the Panther D and A, ATX351009.


Scott - looks like you better be prepared to build several panthers when you invest in one of those Echelon sets! Shock [:O]

Oh yeah!  I'm dying to get a Dragon 1/35 Panther Ausf. D Premium edition so I can do one of those gorgeous schemes with the black, red or white panther heads.  Cool [8D]


Scott Espin - IPMS Reno High Rollers  Geeked My Reviews 

  • Member since
    November 2006
  • From: Coastal Maine
Posted by dupes on Monday, June 9, 2008 11:13 AM

Yeah, those are hot! Cool [8D]

I have a pic saved of a Panther Roosterpelo did last year with those markings...very cool. Thumbs Up [tup]

  • Member since
    December 2002
  • From: Reno, NV
Posted by espins1 on Monday, June 9, 2008 11:15 AM
 Specter wrote:

Hi SMJ, I would like to join with a 1/35 DML King Tiger please. Geist was telling me about it the other day and I couldn't resist.

edit* the kit is 6303 w/zimm

That's a great kit with some pretty nice schemes included.  I reviewed it recently if you're interested.  Smile [:)]  Dragon 1/35 King Tiger w/zimmerit

I'll be watching your build with interest, and hope to build mine later this year.  Smile [:)]

Scott Espin - IPMS Reno High Rollers  Geeked My Reviews 

  • Member since
    December 2002
  • From: Reno, NV
Posted by espins1 on Monday, June 9, 2008 11:24 AM
 dupes wrote:

Yeah, those are hot! Cool [8D]

I have a pic saved of a Panther Roosterpelo did last year with those markings...very cool. Thumbs Up [tup]

I'd like to see that if you have it handy.  Cool [8D]

I made some progress on the Panther D w/zimmerit.  The suspension arms have been attached, as well as the final drive housings and other runner gear components.  So far it's been very easy with decent fit.  There was a little problem with the final drive housings.  One of the locating pins has to be removed because there is no corresponding locating hole for it.  That's probably due to canibalizing some sprues from previous kits.  

For those that plan on building this kit, be aware that the suspension arms 2nd from the front and 2nd from the rear are supposed to have that raised seam on them running down the middle.  Also note that those are beefier than the rest of the suspension arms.  Once I got them all attached I lined them up by resting just the ends of the arms on the edge of my workbench while simultaneously putting a stiff straight ruler on the top half so they would line up correctly as they set.  Because some of the arms are thicker than the others, you can't use the tried and true method of just setting the kit flat on the table as the thicker ones will wind up with the axle slightly above the rest of the arms.  Make sense?  Confused [%-)] Big Smile [:D]


Scott Espin - IPMS Reno High Rollers  Geeked My Reviews 

  • Member since
    November 2006
  • From: Coastal Maine
Posted by dupes on Monday, June 9, 2008 11:53 AM

I do have it handy...let me upload to p-bucket. (5 minutes later) 

*ROOSTERPELO'S WORK - NOT DUPES*

(don't want to infringe on any copyrights or anything Wink [;)])

Really liked how this turned out...so it went into my "library" of build pics. Big Smile [:D]

  • Member since
    December 2002
  • From: Reno, NV
Posted by espins1 on Monday, June 9, 2008 12:09 PM
 dupes wrote:

I do have it handy...let me upload to p-bucket. (5 minutes later) 

*ROOSTERPELO'S WORK - NOT DUPES*

(don't want to infringe on any copyrights or anything Wink [;)])

Really liked how this turned out...so it went into my "library" of build pics. Big Smile [:D]

That does look pretty good.  Is Roosterpelo still around?  I don't recall having seen him recently.

Scott Espin - IPMS Reno High Rollers  Geeked My Reviews 

  • Member since
    May 2007
Posted by Specter on Monday, June 9, 2008 12:15 PM
 espins1 wrote:
 Specter wrote:

Hi SMJ, I would like to join with a 1/35 DML King Tiger please. Geist was telling me about it the other day and I couldn't resist.

edit* the kit is 6303 w/zimm

That's a great kit with some pretty nice schemes included.  I reviewed it recently if you're interested.  Smile [:)]  Dragon 1/35 King Tiger w/zimmerit

I'll be watching your build with interest, and hope to build mine later this year.  Smile [:)]

Way ahead of you on your review, I read just about every review you do at armoramaWink [;)]. Everything in the box looks good to me, the only thing I might have trouble with is the spare track holders on the turret. I'll keep you updated on building for when you build yours. Also on your cool Panther chart, are there any pics of Grossdeutschland or 11 pz.div. from Kursk?

Seth
  • Member since
    November 2006
  • From: Coastal Maine
Posted by dupes on Monday, June 9, 2008 12:16 PM

Well, he's sort of around. He's popped in very randomly, he is finally working on another kit. He got married, and got a new job - been going to S.W.A.T. school lately (although, I think he must be done by now).

Hopefully he can free up some time and come back! Smile [:)]

  • Member since
    December 2002
  • From: Reno, NV
Posted by espins1 on Monday, June 9, 2008 3:55 PM

Specter - The only markings on that sheet are for Panther Ausf. D with zimmerit, which puts them several months after Kursk.  I believe most of the rest of the markings on that sheet are appropriate for Kursk with Pz.Abt.51 and Pz.Abt.52 well represented on the sheet. 

Dupes - Hopefully Roosterpelo can find some time to make it back to us for a GB or two.   

Scott Espin - IPMS Reno High Rollers  Geeked My Reviews 

  • Member since
    July 2007
  • From: Ohio
Posted by Geist on Monday, June 9, 2008 9:59 PM
I havn't made much progress on my KT since the pics I posted. I've been busy with preparing for my trip to Germany. I leave Wednesday night. I may find some time tomorrow to work on it though.

On the bench: Italeri Leopard 1A2 correction build with Perfect Scale turret and Eduard PE

  • Member since
    April 2005
Posted by Thunderbolt379 on Tuesday, June 10, 2008 4:27 AM

Hi guys,

The Eduard grills are on order, I got the stripstock today to make the weldseams around the Tiger turret, and picked up some extra acrylic thinner. I've even found a great price on Eureka tow cables to finish off the StuG III (Hunters) and do proper justice to the Merkava (for IDF). the Academy Tiger should pretty much fall together from here!

With one exception -- those miserable little rain shields over the exausts. Five microscopic uprights and a circular cap, to be arranged symmetrically. They're driving me &^%$@ CRAZY!Banged Head [banghead] I tried drilling out the broken tips of the first attempt and replacing them with wire. Quite apart from the near-impossibility of cutting precisely 5mm lengths of wire with pliers, within two seconds of taking hold of such a piece with tweezers it disappears, never to be seen again.

Does anybody know if Dragon engineered the rain covers as single-piece items on their Tiger Is? If they are supplied as single-piece units they could be fudged into place on the Academy kit, and I could probably buy them from Dragoncare.

Either that or I'll have to fudge it any way I can, which is probably pretty crudely, given that the armoured covers obscure the view of the rain covers from any but a forward perspective.

Advice would be very much appreciated!

Cheers,

TB379

http://worldinminiature.blogspot.com/

  • Member since
    April 2007
  • From: Schroon Lake, NY
Posted by SMJmodeler on Thursday, June 12, 2008 8:00 AM

Guys:  Here is my finished Panther G for this GB!!!  I have another thread going in armor if you'd like to see the "walkaround" pics':


  • Member since
    November 2006
  • From: Coastal Maine
Posted by dupes on Thursday, June 12, 2008 10:41 AM

Hey hey! It's done! Big Smile [:D]

Quite a departure from the original paint scheme with the uber-weathering, but I like it. Thumbs Up [tup]

  • Member since
    December 2002
  • From: Reno, NV
Posted by espins1 on Thursday, June 12, 2008 10:42 AM
Nice work SMJ!  That thing looks like a grizzled veteran, I like the look!  Cool [8D]

Scott Espin - IPMS Reno High Rollers  Geeked My Reviews 

  • Member since
    April 2005
  • From: Piscataway, NJ!
Posted by wing_nut on Friday, June 13, 2008 6:48 AM
Nice... on my way to the walk around...........................

Marc  

  • Member since
    April 2007
  • From: Schroon Lake, NY
Posted by SMJmodeler on Friday, June 13, 2008 8:07 AM

dupes: The pastels and tracks sure helped this one...you know I had some reservations/concerns...

espins1:  Thanks!...I hope to do it more justice with the dio'...that GB of yours was perfect timing!!!

wing_nut:  See my response in the walkaround...

  • Member since
    April 2005
Posted by Thunderbolt379 on Saturday, June 14, 2008 2:28 AM

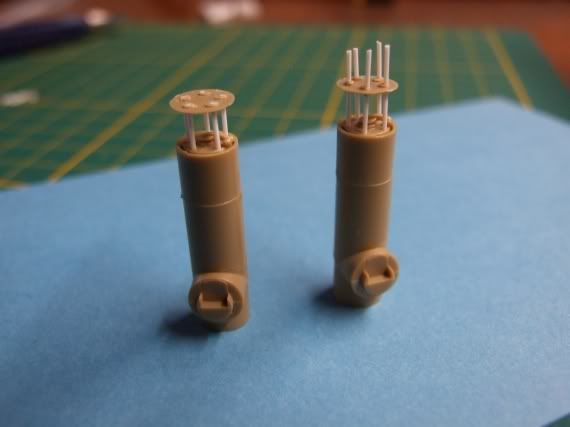
Okay, progress to report! Remember those nasty little rain covers on the exhausts that were holding things up? They're fixed. When kit parts fail, scratchbuilding techniques take over.

This is what I did:

Photobucket" border="0" />

One is finished, the other under way. I drilled through the caps with a .020"/0.5mm twistdrill in a micro pin-vise, and drilled out the receivers in the exhaust the same way. Then I cut 10mm lengths of .020" microrod (long enough to get hold of!) and passed them through. The bottom ends were dipped in superglue and snugged down into the lower holes, the cap, still loose, being used to cntrol them. When the glue was dry, I marked the rods with a pen at 5mm, and added supeglue to each,then eyeballed the alignment to settle the cap into place.

When this was dry, I used a sharp blade and trimmed away the excess rod, then filed the stubs down flush, and they were done. The caps aren't completely level and the rods aren't completely straight, but the kit parts were never going to be, and such relatively delicate structures probably got bent and knocked around on the real tanks too.

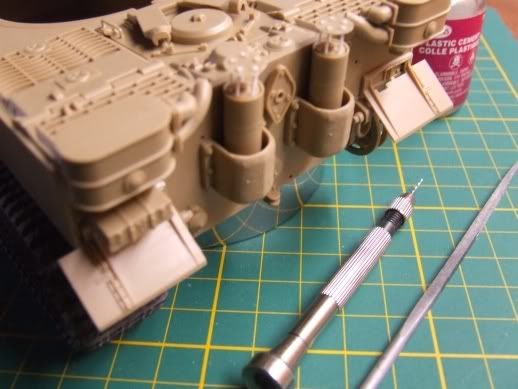
Here they are mounted, waiting for the external shields ('scuse the focus...):

Photobucket" border="0" />

Now I can get on with the build! Note the portside track test-fitted. I have the weld-seam experiment underway as well, that should be the next major job.

Cheers,

TB379

http://worldinminiature.blogspot.com/

  • Member since
    November 2007
  • From: Wisconsin Rapids, WI
Posted by moose421 on Saturday, June 14, 2008 8:53 AM

Nice save on the rain covers.  I to have found it sometimes is easier to install stuff like the rods over size and trimming to fit.  I to agree with your reasoning for misalignment.  Weak parts like that on the reall vehicle would get bent easily.  Keep up the great work.


  • Member since
    April 2005
Posted by Thunderbolt379 on Saturday, June 14, 2008 6:44 PM

Thanks, Moose!

Yes, making a small part larger and trimming the rest later is a technique I was introduced to a year or two back by a friend from England. I had to basically carve an aircraft fin from solid plastic for a scratchbuild project, a single-piece airfoil which would then be molded and cast in fast-cure resin as needed. The piece was maybe an inch and a quarter in size, and for the amount of elbow-grease required to shape it from 3.2mm sheetstock, holding it would have been impossible. So I shaped it from the end of a bar of the stock, the big end forming a 'handle' that could be controled by hand or fitted into my vice. When the part was shaped to my satisfaction, I simply cut it free of the handle, across its base, with my razor saw, exactly the same way as freeing a resin part from its pour stub.

Doing the rain covers was the same technique, in essence, at very much smaller scale. Use more material so you can control it, then trim it to size when it's fixed.

Cheers,

TB379

http://worldinminiature.blogspot.com/

  • Member since
    April 2005
Posted by Thunderbolt379 on Sunday, June 15, 2008 2:12 AM

Okay, turret weld seams are done.

Photobucket" border="0" />

Above, the seams, as nearly as they can be followed allowing for the vagaries of the moldings and parts-fit, especially at the very front, are outlined in .010" x .020" microstrip (couldn't get .020" half-round, which would have been more realistic). Below, the strip has been textured with the hot tip of an exacto blade. They have since been filed lightly to reduce both height and roughness.

Photobucket" border="0" />

The track hangers have now been installed correctly on both sides. The only remaining subassembly is the commander's hatch. I can add the skirts and forward U-hooks to the hull and she's almost ready for the paintshop. I need to mask all axles, the turret ring and the location points for all tools and track plates, and mating surfaces between wheel subassemblies and track connector-ends. I'm still waiting on the PE grills, also. When these details are complete, she's under the airbrush.

Cheers,

TB379

http://worldinminiature.blogspot.com/

  • Member since
    April 2007
  • From: Schroon Lake, NY
Posted by SMJmodeler on Sunday, June 15, 2008 10:50 AM
TB379: Those seams look awesomeThumbs Up [tup], I'll be looking forward to seeing that bad-boy with some paint!

  • Member since
    December 2002
  • From: Reno, NV
Posted by espins1 on Sunday, June 15, 2008 4:31 PM

TB379 - Nice save on the rain covers for the exhaust and nice weld seams!  Smile [:)]

I've made a little headway on the Panther Ausf. D w/zimmerit.  Been pretty busy the last few days and have been digging deep into the research for this kit.  As you can see in steps 5 and 6, some modifications need to be made to the exhausts and the jack. 

First up are the exhausts.  The grooves in the pipes needed to be filled and the excess plastic on the back needed to be removed.  The modifications are necessary to remove anything relating to the plastic brackets in order to use the the photo etch brackets provided in the kit and to get them to fit properly.  I carefully trimmed off the plastic on the backs, then filled the groove with squadron white putty.


Then came the jack modifications.  I carefully cut away the plastic brackets using a #11 blade, then carefully sanded everything smooth.  


The drive sprockets look great, as do the idlers.   There are two different sprocket caps included in the kit.  The more recessed cap appears on earlier variants of the Panther Ausf. D.  Be sure to check your references carefully to be sure you're using the correct cap for the vehicle you're modeling.  The vehicle I'm modeling features the later sprocket cap with the weld seam going around it.


Scott Espin - IPMS Reno High Rollers  Geeked My Reviews 

  • Member since
    June 2006
  • From: Michigan
Posted by ps1scw on Sunday, June 15, 2008 8:40 PM
 espins1 wrote:

TB379 - Nice save on the rain covers for the exhaust and nice weld seams!  Smile [:)]

I've made a little headway on the Panther Ausf. D w/zimmerit.  Been pretty busy the last few days and have been digging deep into the research for this kit.  As you can see in steps 5 and 6, some modifications need to be made to the exhausts and the jack. 

First up are the exhausts.  The grooves in the pipes needed to be filled and the excess plastic on the back needed to be removed.  The modifications are necessary to remove anything relating to the plastic brackets in order to use the the photo etch brackets provided in the kit and to get them to fit properly.  I carefully trimmed off the plastic on the backs, then filled the groove with squadron white putty.


Then came the jack modifications.  I carefully cut away the plastic brackets using a #11 blade, then carefully sanded everything smooth.  


The drive sprockets look great, as do the idlers.   There are two different sprocket caps included in the kit.  The more recessed cap appears on earlier variants of the Panther Ausf. D.  Be sure to check your references carefully to be sure you're using the correct cap for the vehicle you're modeling.  The vehicle I'm modeling features the later sprocket cap with the weld seam going around it.


I'm just finishing up their Premium A, looks like they decided to keep the color instructions, I got used to them, but I prefer the standard two color black/blue type. 

JOIN OUR COMMUNITY!

Our community is FREE to join. To participate you must either login or register for an account.

SEARCH FORUMS
FREE NEWSLETTER
By signing up you may also receive reader surveys and occasional special offers. We do not sell, rent or trade our email lists. View our Privacy Policy.