 arki30 wrote: arki30 wrote: |

Man, someone's gotta have some pics or something! Way too quiet. But it is the summer months here in the northern hemisphere... |
|
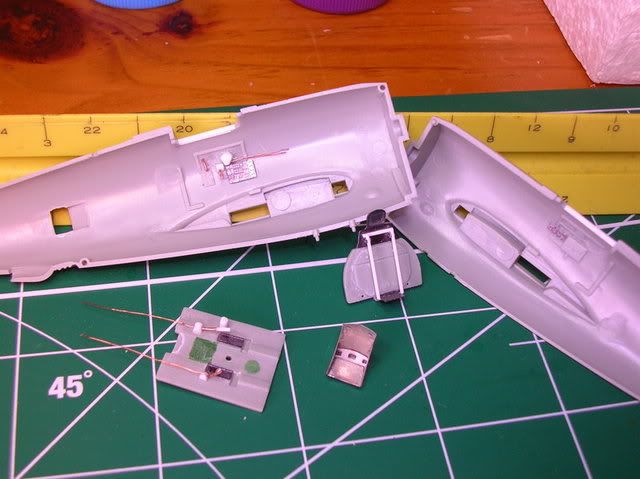
Here ya go, Arki! My progress so far:

The Academy kit's cockpit doesn't build up into a "tub" like the Tamiya kit - the sidewall detail is molded to the fuselage halves, and it's pretty thin. I'm dressing it up with a "kitbash" of two different PE sets: one for an Academy razorback, and the other a color set for the Tamiya bubbletop.
I sanded down the radio and electrical boxes and covered 'em with PE, then got to work adding some of the missing details. I had to sand the cockpit floor flat to get rid of some ejector pin marks. The kit's seat is supposed to fit into the floor, and I filled that area in, as well. I scratchbuilt the flap handle, landing gear handle, tailwheel lock, and hand-operated hydraulic pump out of styrene stock and a couple different gauges of copper wire. Glue blob knobs were added to the appropriate handles. I also added the mount for the fuel selector valve, and fabricated the small fluorescent lamps found around the cockpit. The lamps won't be mounted until later, to save me the joy of breaking them off, re-gluing them, breaking them off again, etc.
All of this detail was done using the ol' eyeball method, so it's a bit oversized - possibly by 30% or more in couple of cases. I just wanted to try some scratchbuilding without worrying about accuracy too much, and in any case, I don't think it will be very obvious when all is said and done.
I built a new seat frame using PE and .5 mm styrene rod, per Eduard's instructions. I also drilled two holes in the rear wall of the cockpit for hydraulic lines and such to pass through. I spent over an hour building up the PE seat, but in the end it looks acceptable. All that CA frost should disappear under some primer.
Eduard gives you a top and an end cap for the throttle quadrant, but it has no sides or bottom, as it is meant to be mounted on a core of plastic... and the Adademy kit has none to speak of. I traced the outline of the PE part onto a pattern, then trimmed some styrene strip to fit. Three cutouts sandwiched together made a decent throttle quadrant. Two holes were drilled out with a #78 bit, and thin copper wire added to make the control cables leading to the engine.
I also cut out the rear intercooler doors on the fuselage, because they were molded shut, even though the front doors are wide open. They'll get replaced with some strip stock cut to fit. The interior ducting is PE and will be visible as well.
I'm having a lot of fun so far, just thumbing through my reference books and scratchbuilding widgety little bits of stuff. Once the fuselage is closed up, the build should go quicker... oh wait, I bought an Aires engine for this thing. Never mind then...
Kev 
Kevin Johnson Ypsilanti, Michigan USA
On the bench: 1/72 Fujimi Ki-36 J-BAAR
