SEARCH FINESCALE.COM

Enter keywords or a search phrase below:

Prototype GB All Era's

45699 views
306 replies
1 rating 2 rating 3 rating 4 rating 5 rating
  • Member since
    January 2009
  • From: Algonquin, IL
Posted by model geek on Sunday, June 7, 2009 3:54 PM

mg,

That's definitely some precision work your doing. I find that even with instructions I'll sometimes take a couple of days just to think through the process of how I'm going to accomplish a task I've not performed before. So building from scratch as your are I can see why there may be some time between posts.

Keep at it, it's going to be a unique contribution to the forum and collection when finished.

I too have not posted in awhile but have been slowing working on the HE-100D. Here's an update.

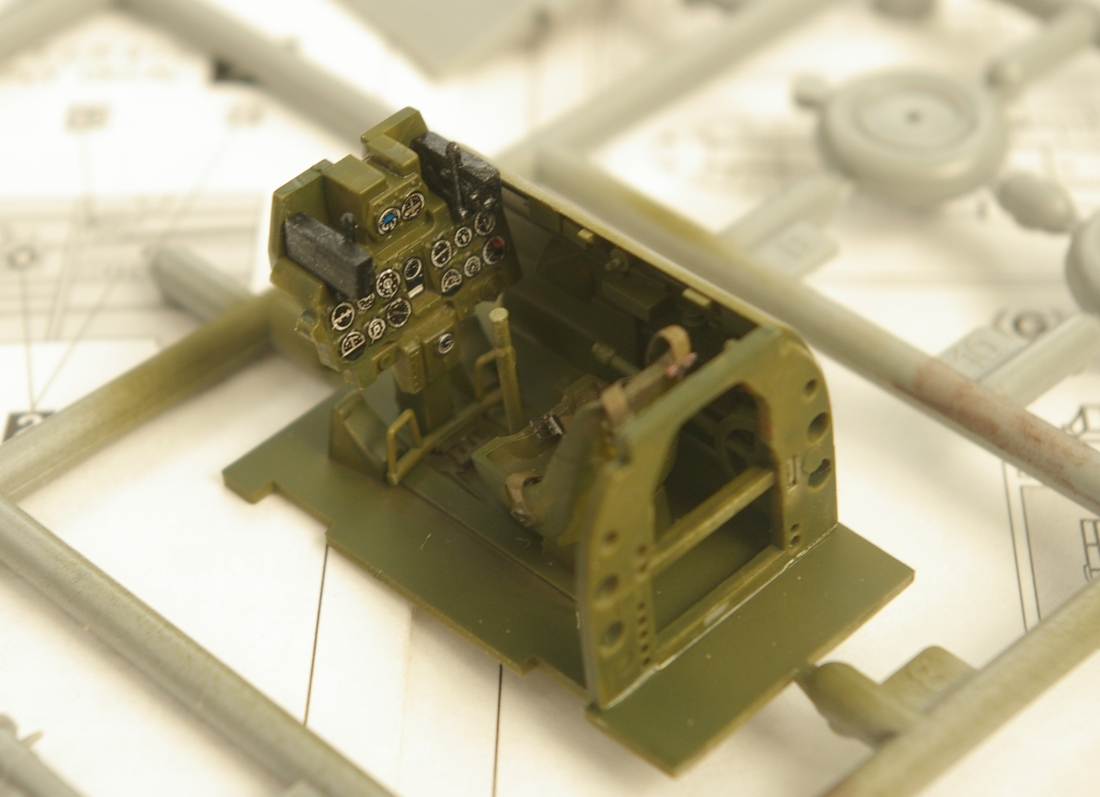
Cockpit finished with PE seat belts provided with the kit.

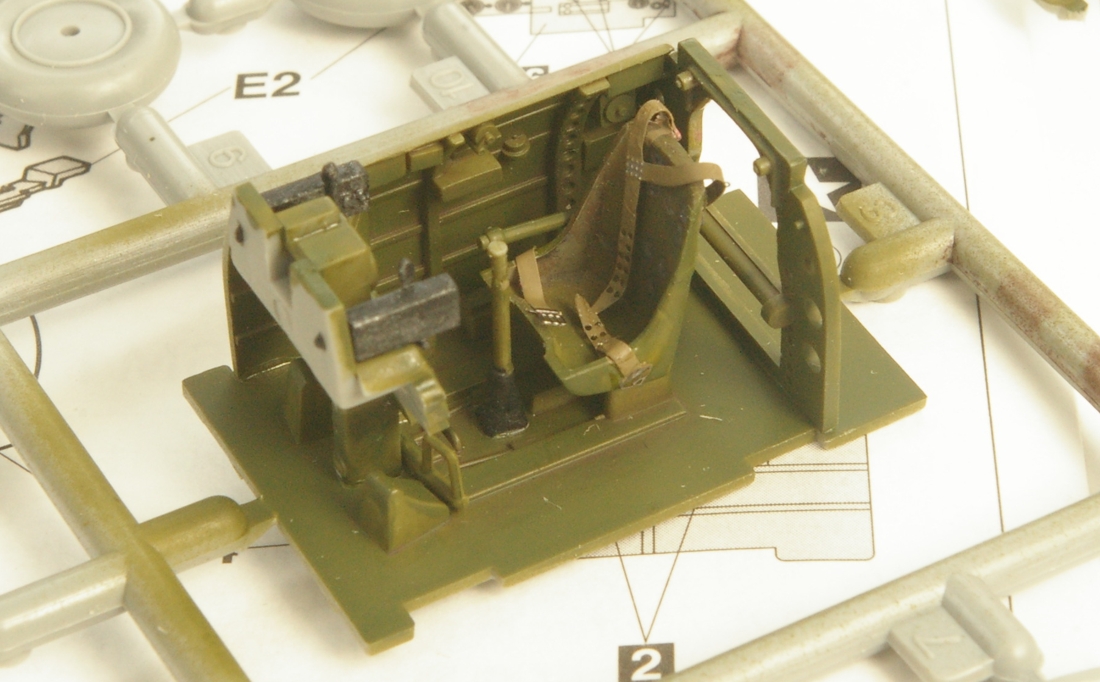
Cockpit side walls with a few PE details also provided with the kit and a wash to help enhance the few details.

Wings and fuselage assembled.

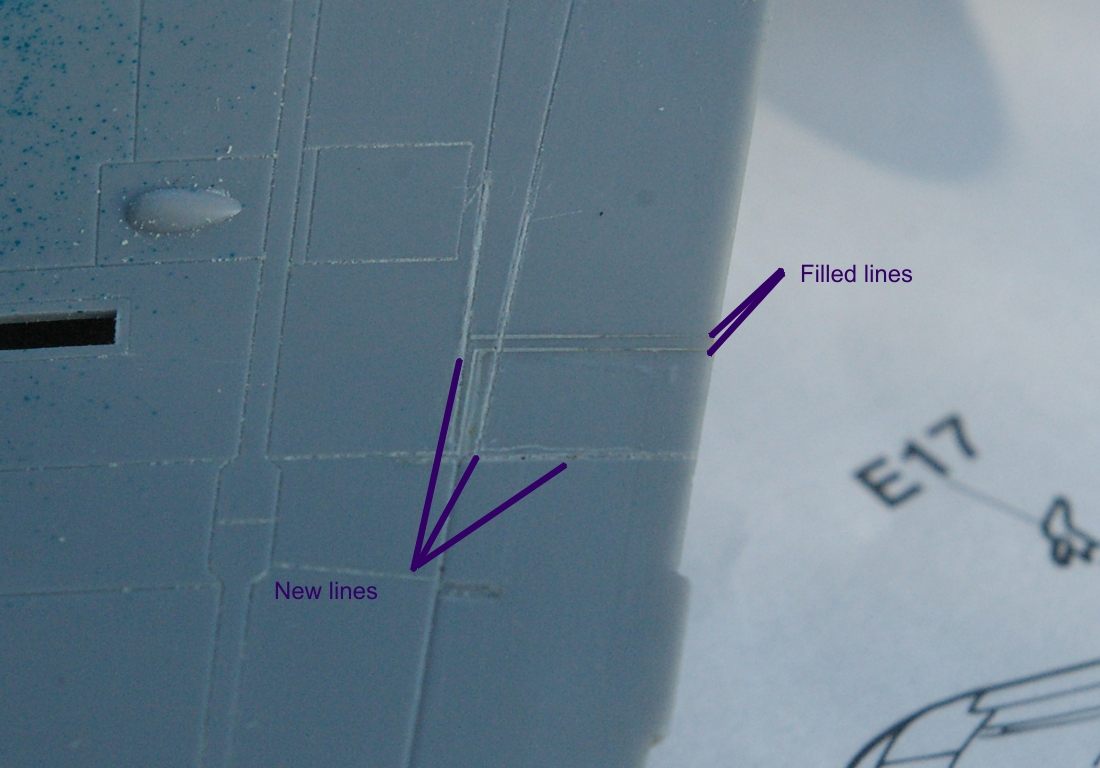
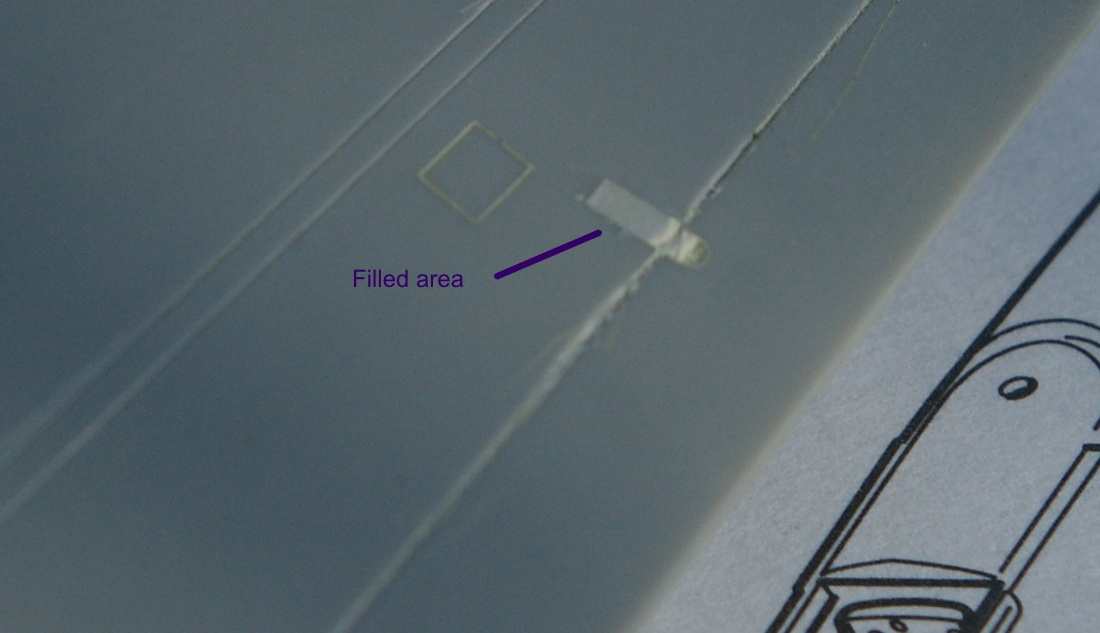
Most of the seam filling is complete. I need to rescribe some panel lines (ordered a 1/48 Verlinden scribing template which will hopefully be here tomorrow). A few more small parts to add and then on to paint.

Thanks for looking. Comments and suggestions welcome.


Tom  


  • Member since
    December 2007
  • From: Bridgeview, Illinois
Posted by mg.mikael on Tuesday, June 2, 2009 5:20 PM

Yeah I know it's been awhile since I got any updates up. Probably because I got lazy and kept putting the work off. Though I finally, yes finally did some work on my multiplane today.Big Smile [:D]

I glued on the supports that hold the rear axle to the frame, along with connecting the axle to the supports. It took a bit longer then expected, since I had to do constant measuring with a ruler to make sure the support brackets weren't too close, not too far, but just right. That so the height of the wheels(later put on) is at the key amount. Also had to use a level to ensure the axle wasn't sagging to far to one side(which could later give the build a lopsided view.)

As for what glue I used, I couldn't use the standard glue that bonds stryene. So I first applied a little Elmer's Nano Glue, (basically Gorilla Glue), to the ends of the support brackets where it would be touching the wood. Then I took some Krazy glue and applied a tad over the Nano Glue. The Nano glue has almost a 4 hour setting timeShock [:O], so I needed something to bond it quick to make sure it wouldn't move when setting. I then reapeated this process when connecting the axle itself to the supports.

I also started work on the front wheel. I already have an axle for it(using the clear green Lego rod I used for the supports on the rear axle.)  I also made the parts where the supports will touch on the axle. To make these parts, I simply took a piece of sprue and cut it. Then made another cut to get a small piece that sorta looks like a pancake. Taking that piece I drilled it out to fit the axle aka clear lego. Just be sure not to drill to quickly or you'll crack the fragile piece.

Thanks for looking!Smile [:)]


"A good plan executed now is better than a perfect plan next week." - George S. Patton

  Photobucket 

  • Member since
    December 2007
  • From: Bridgeview, Illinois
Posted by mg.mikael on Thursday, May 21, 2009 1:27 PM
Sorry about the lack of updates, I've sorta been put off by all the work I've got to do on the axle. Thus, because I got lazy it's been sittin' to the side of my bench for a week or so. Though I will try to get some work done on the multiplane later today(or tommorrow.)Wink [;)]

"A good plan executed now is better than a perfect plan next week." - George S. Patton

  Photobucket 

  • Member since
    December 2007
  • From: Bridgeview, Illinois
Posted by mg.mikael on Wednesday, May 13, 2009 11:41 PM
 model geek wrote:

MG, Sprialcity,

Sorry to get off topic the other night, it was just one of those days.

MG, sorry to hear about your dad. What industry was he in?

Sprialcity, I know where your coming from. I've been in the mfg industry for 20 years.

Anyway, like I said the other night hope to do some more work this weekend and post some WIP pics.


My dad used to be a computer technician for United Airlines. Now he's trying to get a government job aka technican at the Post Office, but those governement jobs are hard to get.

"A good plan executed now is better than a perfect plan next week." - George S. Patton

  Photobucket 

  • Member since
    January 2009
  • From: Algonquin, IL
Posted by model geek on Wednesday, May 13, 2009 7:57 PM

MG, Sprialcity,

Sorry to get off topic the other night, it was just one of those days.

MG, sorry to hear about your dad. What industry was he in?

Sprialcity, I know where your coming from. I've been in the mfg industry for 20 years.

Anyway, like I said the other night hope to do some more work this weekend and post some WIP pics.


Tom  


  • Member since
    April 2008
  • From: Fox Lake, Il., USA
Posted by spiralcity on Tuesday, May 12, 2009 12:00 AM
 model geek wrote:

MG,

It's been almost 2 weeks since I've touched the HE-100Sad [:(]. Like many other companies these days the same amount of work or more and less people to do it. Even doing work from homeSoapBox [soapbox]. I know, be happy I'm still gainfully employeed even if it's a lower salary, fewer benefits, blah, blah, blah.

OK, enough venting. At least I get a few minutes to log on and see what everyone's doing! Hopefully I can set aside some time this weekend to do some more work. I'm really anxious to do the major assembly and painting.

Till then, keep modeling!

Hey model geek,

We just went through a rolling lay-off at my shop ! I was working in the energy field, they held out at long as they could. Times are VERY hard.

Not much work available for machinist right now!!! Black Eye [B)]


  • Member since
    December 2007
  • From: Bridgeview, Illinois
Posted by mg.mikael on Monday, May 11, 2009 9:12 PM

spiralcity- Thanks for the comments!Smile [:)]

model geek- Well glad to hear you still have a job.(My father lost his job almost a year and a half ago, and the company screwed him over. He lost about a half a million dollars of stock he had in the company, and now he can't think of retirement, he's gotta find a job.Sad [:(]) Anyways, sorry for the downer of a story, lookin' forward to seeing some progress! 

"A good plan executed now is better than a perfect plan next week." - George S. Patton

  Photobucket 

  • Member since
    January 2009
  • From: Algonquin, IL
Posted by model geek on Monday, May 11, 2009 8:37 PM

MG,

It's been almost 2 weeks since I've touched the HE-100Sad [:(]. Like many other companies these days the same amount of work or more and less people to do it. Even doing work from homeSoapBox [soapbox]. I know, be happy I'm still gainfully employeed even if it's a lower salary, fewer benefits, blah, blah, blah.

OK, enough venting. At least I get a few minutes to log on and see what everyone's doing! Hopefully I can set aside some time this weekend to do some more work. I'm really anxious to do the major assembly and painting.

Till then, keep modeling!

Tom  


  • Member since
    April 2008
  • From: Fox Lake, Il., USA
Posted by spiralcity on Monday, May 11, 2009 5:03 PM

Hey Mg.

She's looking like she's starting to take shape. Nice work. I'll be looking for more progress pics.


  • Member since
    December 2007
  • From: Bridgeview, Illinois
Posted by mg.mikael on Monday, May 11, 2009 4:33 PM
 model geek wrote:

MG,

You've got some really good engineering and scratch building going on. Look forward to more updates.

Thanks for the comments, model geek!Smile [:)] Lookin' forward to seeing more progress on your Heinkel 100D.

"A good plan executed now is better than a perfect plan next week." - George S. Patton

  Photobucket 

  • Member since
    January 2009
  • From: Algonquin, IL
Posted by model geek on Sunday, May 10, 2009 9:27 PM

MG,

You've got some really good engineering and scratch building going on. Look forward to more updates.

Tom  


  • Member since
    December 2007
  • From: Bridgeview, Illinois
Posted by mg.mikael on Saturday, May 9, 2009 5:36 PM

I finally got around to cutting and trimming all the axle support braces(aka the clear green plastic). After a bit more sanding the clear green pieces will be glued down to the dark green stryene pieces(you see one of them on the build below), that way the axle support truss looks like it's attached to a small steel plate(will look like steel after painting) on the wood.

Here's a better pic of what I'm actually using to model the support metal plates on the wood, simply the part identification numbers cut off a sprue. Since their the perfect size, just a bit of sanding is needed and your done.Big Smile [:D]

"A good plan executed now is better than a perfect plan next week." - George S. Patton

  Photobucket 

  • Member since
    December 2007
  • From: Bridgeview, Illinois
Posted by mg.mikael on Saturday, May 2, 2009 6:13 PM

Here's the update I promised, however I have yet to finish the support truss, since it needs alot more work then I thought. Involves alot more measurements and planning then I thought.Dunce [D)]

Here's my pile of random parts that will be goin' to making the wheels, support truss, and axle. Porbably don't see how or what the parts are gonna be used for, so let me explain.Wink [;)] The gears(from a computer CPU) will go to makin' the three wheels. The stainless steel rod(also from a computer CPU) will go to makin' the rear axle. The white plastic rods(from an old lego set) will be used for the axle support truss holder. The clear green rod(also from an old lego set) will be used for the axle support truss itself since it's the same radius as the steel axle.

To make the part that connects the support truss coming from the wood frame to the axle I took the end of one of the white plastic rods. Snipped off the round ends, then enlarged the hole on one side, and drilled out the other side in order to slide the steel axle in. It's a perfect fit and probably no glue will be needed.

Then I made some measurements to how high I want the wood frame off the ground. After getting the height I wanted I put a glob of silly putty on each side of the frame where the axle will be. Then I pushed the axle into the putty to get the correct height. Then it was just a matter of taking the green clear rod and snipping it too a much smaller size. The work of cutting and sanding to fit the angles has now begun.

"A good plan executed now is better than a perfect plan next week." - George S. Patton

  Photobucket 

  • Member since
    December 2007
  • From: Bridgeview, Illinois
Posted by mg.mikael on Friday, May 1, 2009 7:19 PM

As for progress on my Horatio Phillips multiplane, I'll have another update tommorrow.Cool [8D]

Just started work on the axle support truss(in other words the thing that's gonna hold the axle to the frame). I'm gonna try finishing that up tonight. As for the wheel's, I went back to my first idea of using the gears. It may not be historically accuate, since the real vehicle used spoke wheels. Then again I could make spoke wheels, but to make them sturdy to hold a stainless steel axle and a wood frame would be next to impossible. Look for the pics, up tommorrow!

"A good plan executed now is better than a perfect plan next week." - George S. Patton

  Photobucket 

  • Member since
    December 2007
  • From: Bridgeview, Illinois
Posted by mg.mikael on Friday, May 1, 2009 6:06 PM
 jeaton01 wrote:

No real assembly line, just retired and selfish about my time.  Besides, if I don't build pretty fast how am I gonna build the other 2,500 or so models in the stash?

Thanks.

You could always send them my way.Big Smile [:D]

"A good plan executed now is better than a perfect plan next week." - George S. Patton

  Photobucket 

  • Member since
    December 2002
  • From: Northern California
Posted by jeaton01 on Friday, May 1, 2009 5:04 PM

No real assembly line, just retired and selfish about my time.  Besides, if I don't build pretty fast how am I gonna build the other 2,500 or so models in the stash?

Thanks.

John

To see build logs for my models:  http://goldeneramodel.com/mymodels/mymodels.html


  • Member since
    December 2007
  • From: Bridgeview, Illinois
Posted by mg.mikael on Friday, May 1, 2009 2:57 PM
Beautiful job, jeaton01!! Especially love the landing gears and the decals.Thumbs Up [tup] The decals look like they were painted on. I also got to give you another thumbs up for finishing this build amazingly quick yet still paying attention to detail.Thumbs Up [tup]Cool [8D] You runnin' an aircraft assembly line in your house or something?

"A good plan executed now is better than a perfect plan next week." - George S. Patton

  Photobucket 

  • Member since
    April 2008
  • From: Fox Lake, Il., USA
Posted by spiralcity on Friday, May 1, 2009 12:53 AM

I agree. Nice build. Make a Toast [#toast]


  • Member since
    December 2002
  • From: Northern California
Posted by jeaton01 on Friday, May 1, 2009 12:43 AM
Thank you, I'm glad you liked it.

John

To see build logs for my models:  http://goldeneramodel.com/mymodels/mymodels.html


  • Member since
    January 2009
  • From: Algonquin, IL
Posted by model geek on Thursday, April 30, 2009 9:52 PM

John,

Top notch work! I really like the cockpit detail. An excellent edition to the GB.

Thanks for all the photos and detailed captions.

Tom  


  • Member since
    December 2002
  • From: Northern California
Posted by jeaton01 on Wednesday, April 29, 2009 6:56 PM

This one is ready for the display case.  I see I forgot to paint the tail light.  Oh well.  Someday.  This is just a nice kit and I think a great effort to make an accurate kit with all the needed options and great fit. 

The model has a monochromatic look, but I want it to represent the airplane as it was on its initial test flight so I did not do any weathering.  Hopefully it looks as it did when Jiro Horikoshi described its color as a dimly shining Ash Green.  To get the dimly shining look I mixed a little Tamiya flat base in with the Future top coat.  There was no overcoat prior to decals, I just applied Future in decal locations.

I painted strips of decal for the canopy framing, and painted the perimeters only on the canopy parts.  Now what will be next.  One down and still thousands to go.

Decals were very nice in this kit, too.


John

To see build logs for my models:  http://goldeneramodel.com/mymodels/mymodels.html


  • Member since
    December 2007
  • From: Bridgeview, Illinois
Posted by mg.mikael on Tuesday, April 28, 2009 4:04 PM
Lookin' good, jeaton01, you sure are making good progress!! That cockpit looks just plain gorgeous, with all that detail.Thumbs Up [tup]Cool [8D]

"A good plan executed now is better than a perfect plan next week." - George S. Patton

  Photobucket 

  • Member since
    December 2002
  • From: Northern California
Posted by jeaton01 on Tuesday, April 28, 2009 1:41 PM

I have the fuselage painted, so here are some photos, one color, the other in 8-bit black and white.   The color shift is dramatic, I would not have thought it would come out this way.  Jiro Horikoshi called the color "dimly shining Ash Green" in his book, and it is easy to see why the conventional wisdom indicated early Zeros were grey since common photos were black and white.  The paint I used is Aeromaster Nakajima interior gray green.


John

To see build logs for my models:  http://goldeneramodel.com/mymodels/mymodels.html


  • Member since
    April 2008
  • From: Fox Lake, Il., USA
Posted by spiralcity on Tuesday, April 28, 2009 10:23 AM
 jeaton01 wrote:


This is the Hasegawa A6M1 1/48 kit.  Squadron had it on sale in their flyer in April, so I sent for one.  Had to, in order to fill out all the Zero line from the 12-shi airplane to the A6M8.  It is a very nice kit, I think, super fit and lots of detail.  Added some Eduard seat belts, why didn't they do something for them?  You can build any version of the 2 Zusei powered prototypes from the box, and there is also a complete Sakai engine included.  2 types of oil coolers, and two marking choices.  The vertical fin is very squat looking compared to an A6M2 or later type, and the horizontal stabilizer is set lower and I think at a more negative incidence.  There's no cutting, it is a completely new fuselage. There is also an extra set of horizontal stabilizers in the kit, not to be used.  I haven't done any real research yet to be sure that all the details are as Hasegawa says they should be, though I have references here to look at, The Eagles of Mitsubishi being my best should I be able to find it in my "library". 

I started the kit a week ago, and the following is where I am now.

The panel has decals for instruments, I thought they were too stark so I coated them with a good layer of Tamiya Smoke, and went all around each gauge with a flat clear coat.


Here is the engine.  I painted the cylinders and crankcase steel and gave it a dark grey wash, and detail painted the ignition ring.  The exhaust collector ring has about four coats, starting with burnt metal buffing metallizer and then dry brushing with rust, flat black, and probably something else.  I don't think it will be very visible once the cowl is on.


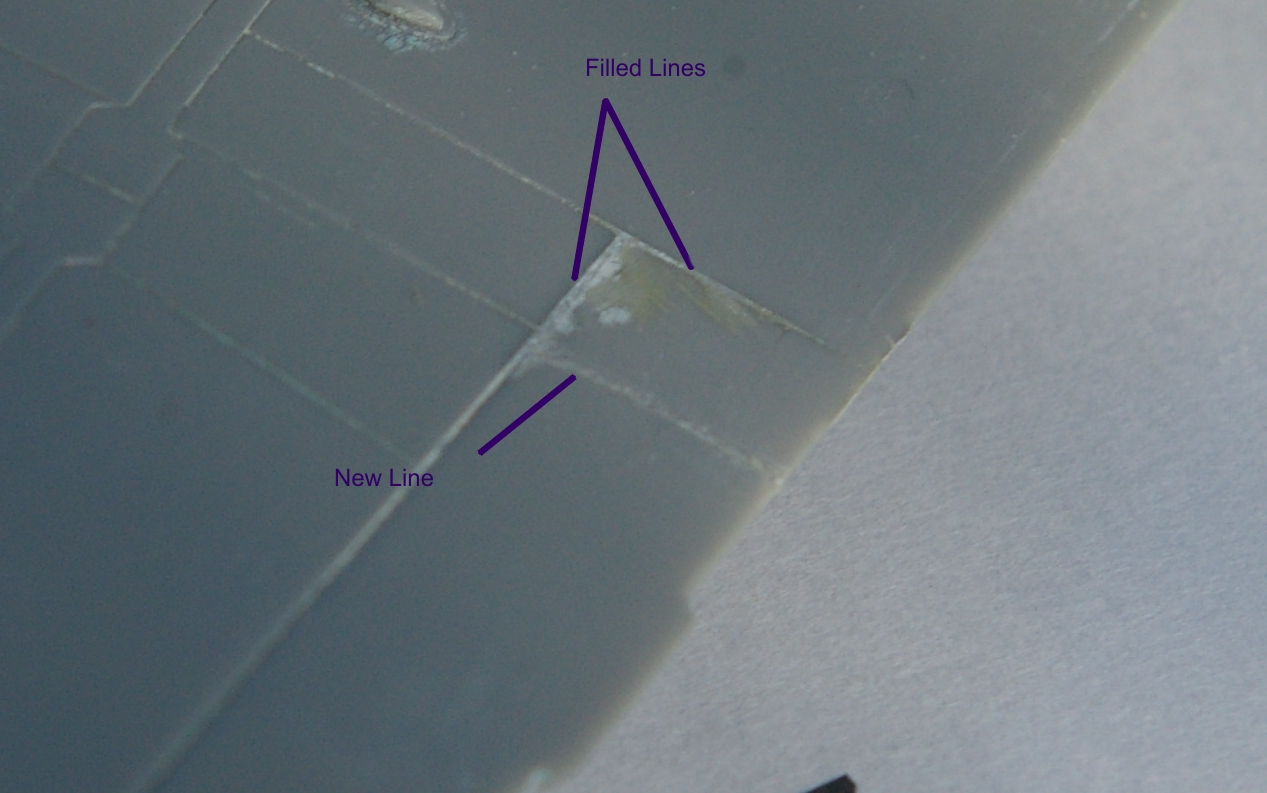
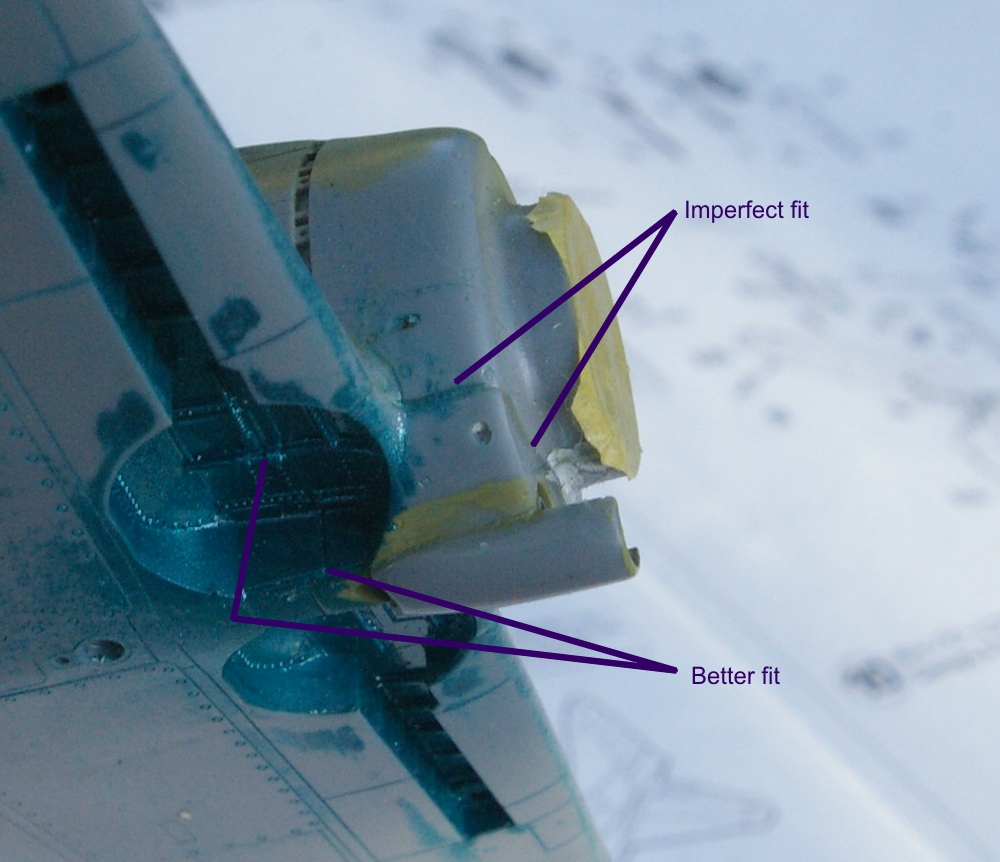
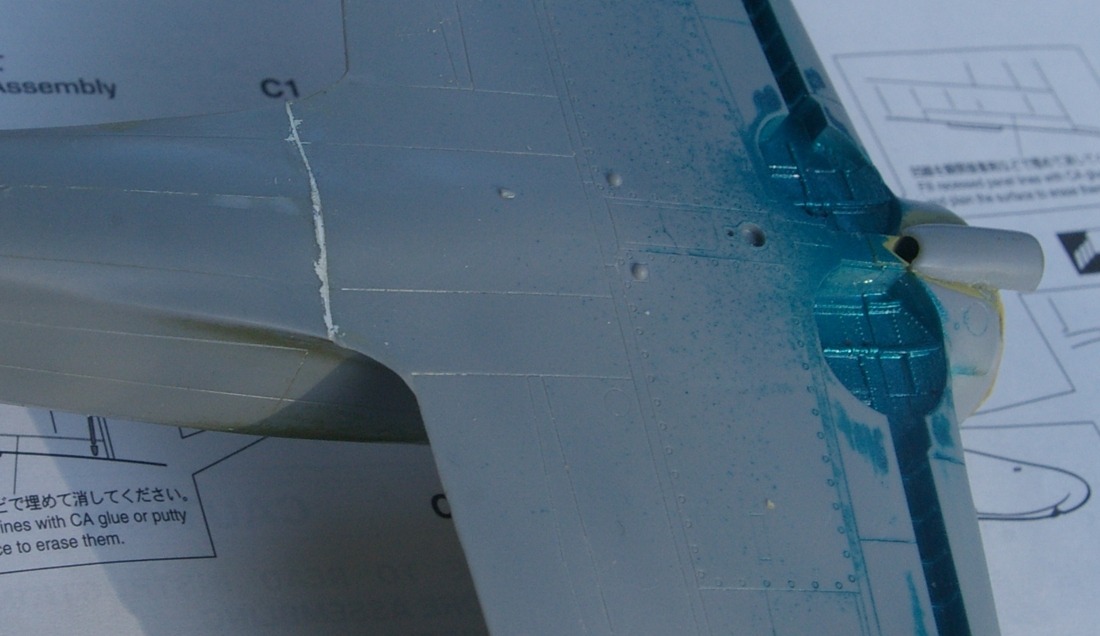
The big parts are together.  It does take some careful fitting of a few parts to avoid gaps in places, the added parts are necessary to allow building of both prototypes at different points in their lives.  With a little care things fit very well.  I filled the spots where the aileron counterweights attach, filled and rescribed the inboard ends of the ailerons and the outboard flaps as the ailerons were longer on the A6M1 and Hasegawa used the A6M2 wings which are otherwise the same in this kit.  Optional parts are for the oil cooler types, and they have to fit in the wheel wells, at the leading edge wing roots, and the front lower fuselage.  I used the eyeball method to get it right and avoid a misfit in the wheel wells.  It pays to fit the wing and the oil cooler parts at the same time to get the best fit, with a little filing needed at the wing trailing edge to fuselage joint. There is a lot of detail all around this area, especially in the wheel wells, which would not like any filling and sanding.  There aren't any pins or ledges that establish the right location, but it's not that hard.  I painted the wheel wells Aotake, and the oil cooler burnt metal, and sealed them with liquid mask.

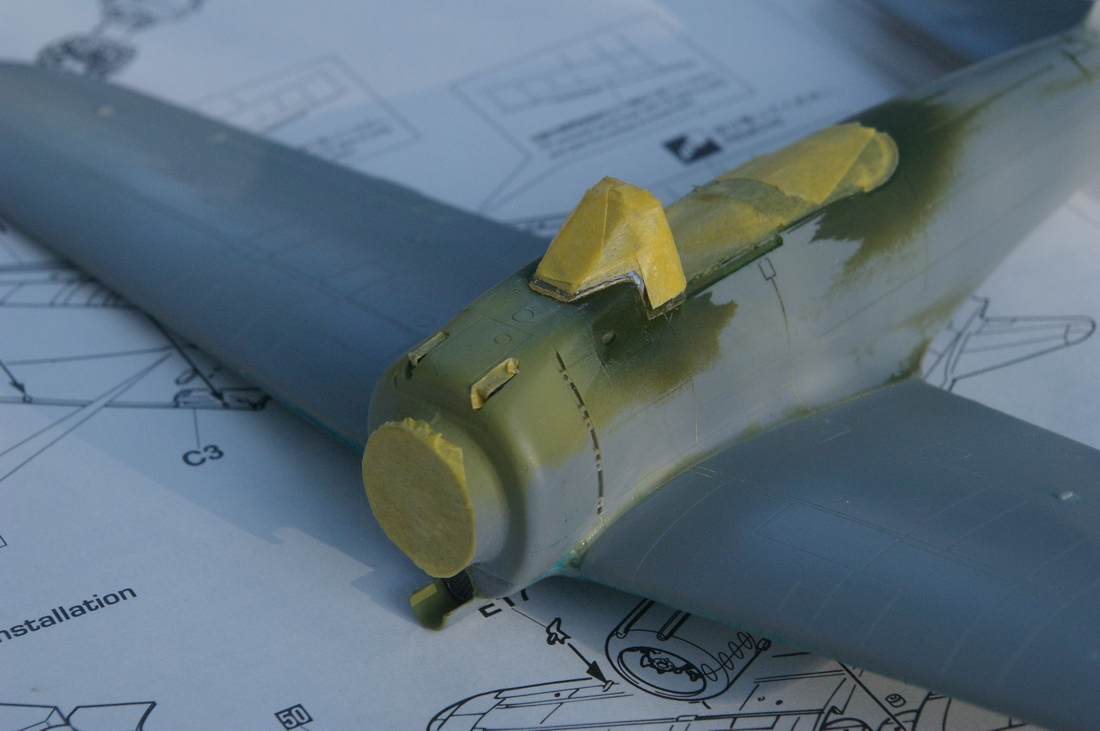
I am using colors recommended by J-Aircraft.com which concludes that the early Zero's were not Gray, but a color that is most closely matched by Aeromaster Nakajima Interior Gray Green, not gray as is most often seen.  It is said this color looks gray in black and white photos.  They are using color samples from the Zero that crashed at Pearl Harbor on Dec. 7, 1941, an A6M2.   I guess I will take some pictures and convert them to black and white and see what it looks like.  Looks a lot like a North African airplane right now, the top surfaces are painted.  I'm going to have to do more filling at the stabilizer/fuselage join, it is more evident than it should be right now. The last photo is this series has the Nakajima color on the nose, with the Mitsubishi interior green further back around the cockpit.  Sure hope these guys are not doing an April 1st joke on the color.  The cowl is painted flat black with a touch of dark blue added.


She's coming along nicley! Looks like it will be a very nice build.


  • Member since
    December 2002
  • From: Northern California
Posted by jeaton01 on Monday, April 27, 2009 11:40 PM


This is the Hasegawa A6M1 1/48 kit.  Squadron had it on sale in their flyer in April, so I sent for one.  Had to, in order to fill out all the Zero line from the 12-shi airplane to the A6M8.  It is a very nice kit, I think, super fit and lots of detail.  Added some Eduard seat belts, why didn't they do something for them?  You can build any version of the 2 Zusei powered prototypes from the box, and there is also a complete Sakai engine included.  2 types of oil coolers, and two marking choices.  The vertical fin is very squat looking compared to an A6M2 or later type, and the horizontal stabilizer is set lower and I think at a more negative incidence.  There's no cutting, it is a completely new fuselage. There is also an extra set of horizontal stabilizers in the kit, not to be used.  I haven't done any real research yet to be sure that all the details are as Hasegawa says they should be, though I have references here to look at, The Eagles of Mitsubishi being my best should I be able to find it in my "library". 

I started the kit a week ago, and the following is where I am now.

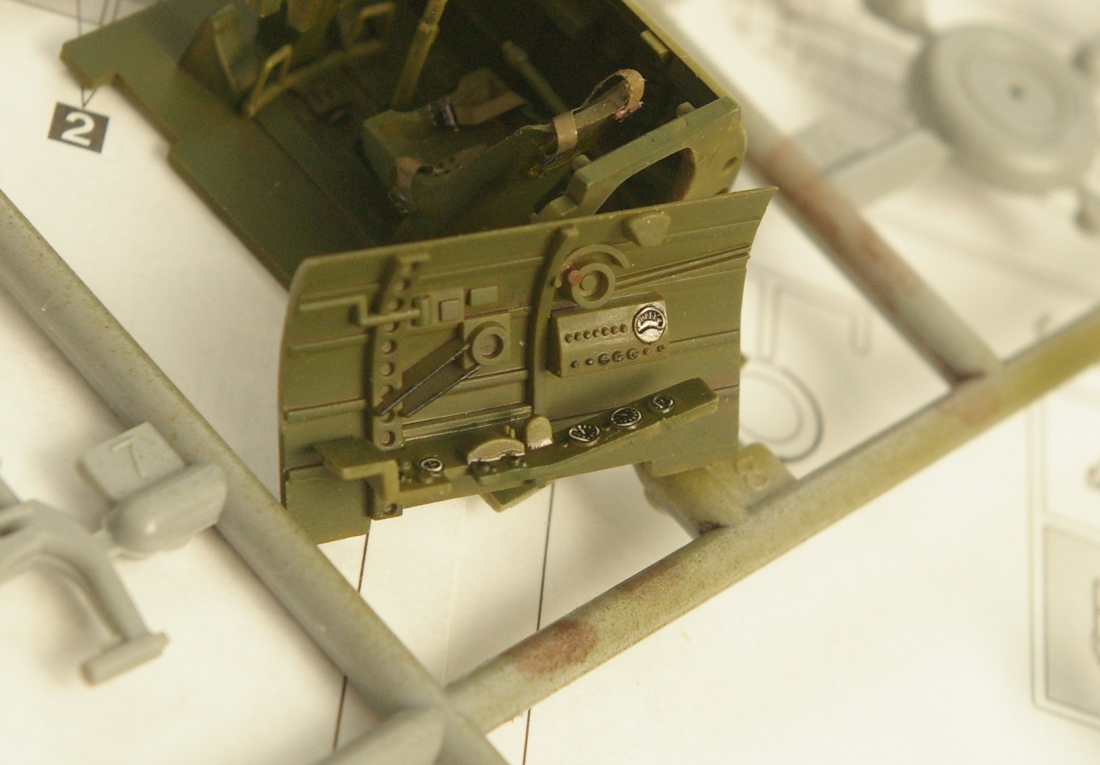
The panel has decals for instruments, I thought they were too stark so I coated them with a good layer of Tamiya Smoke, and went all around each gauge with a flat clear coat.


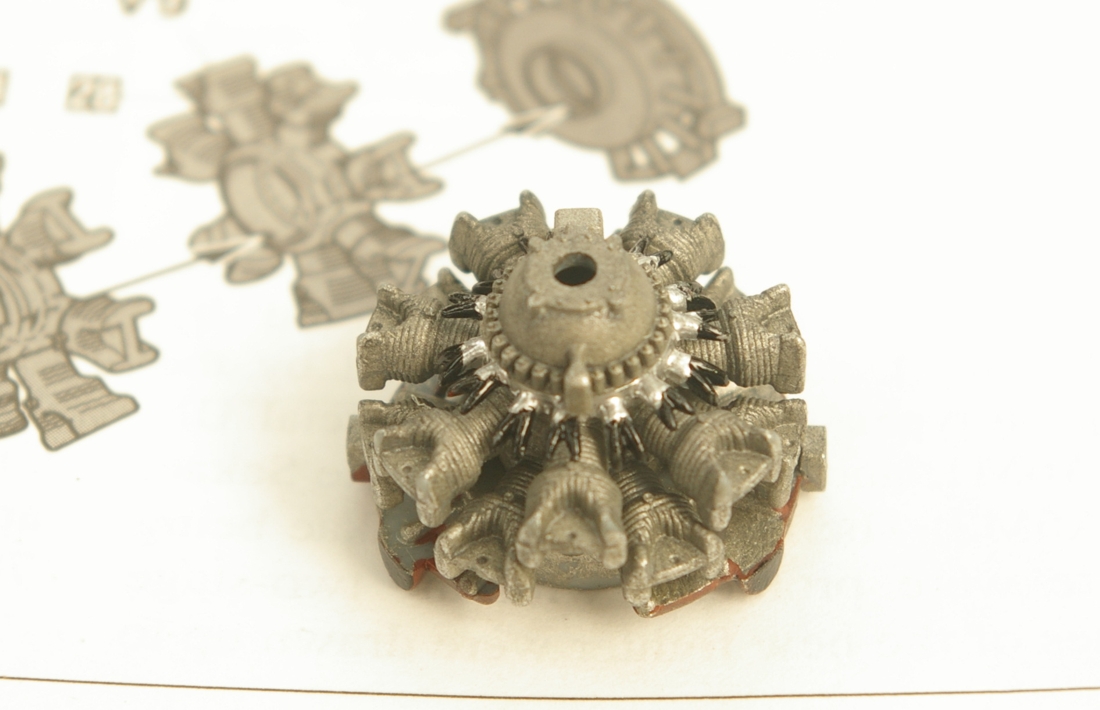
Here is the engine.  I painted the cylinders and crankcase steel and gave it a dark grey wash, and detail painted the ignition ring.  The exhaust collector ring has about four coats, starting with burnt metal buffing metallizer and then dry brushing with rust, flat black, and probably something else.  I don't think it will be very visible once the cowl is on.


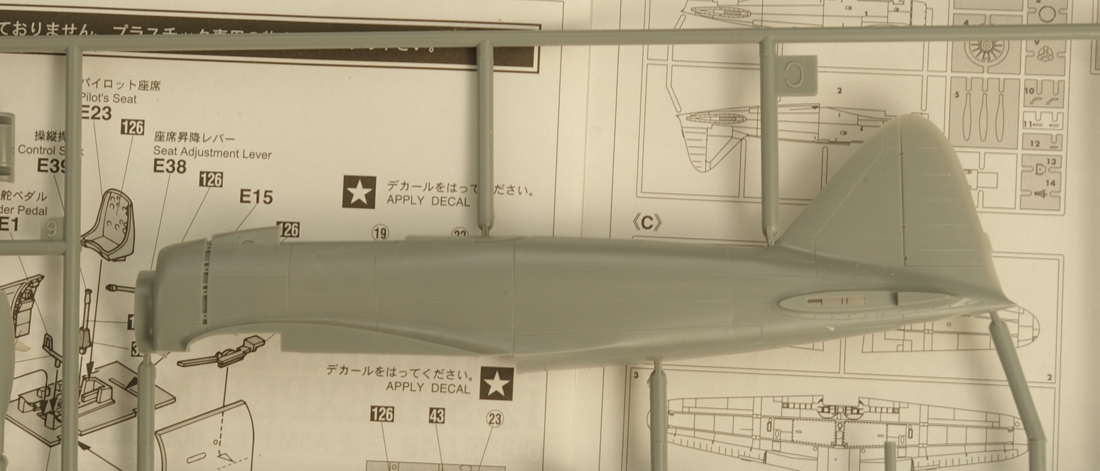
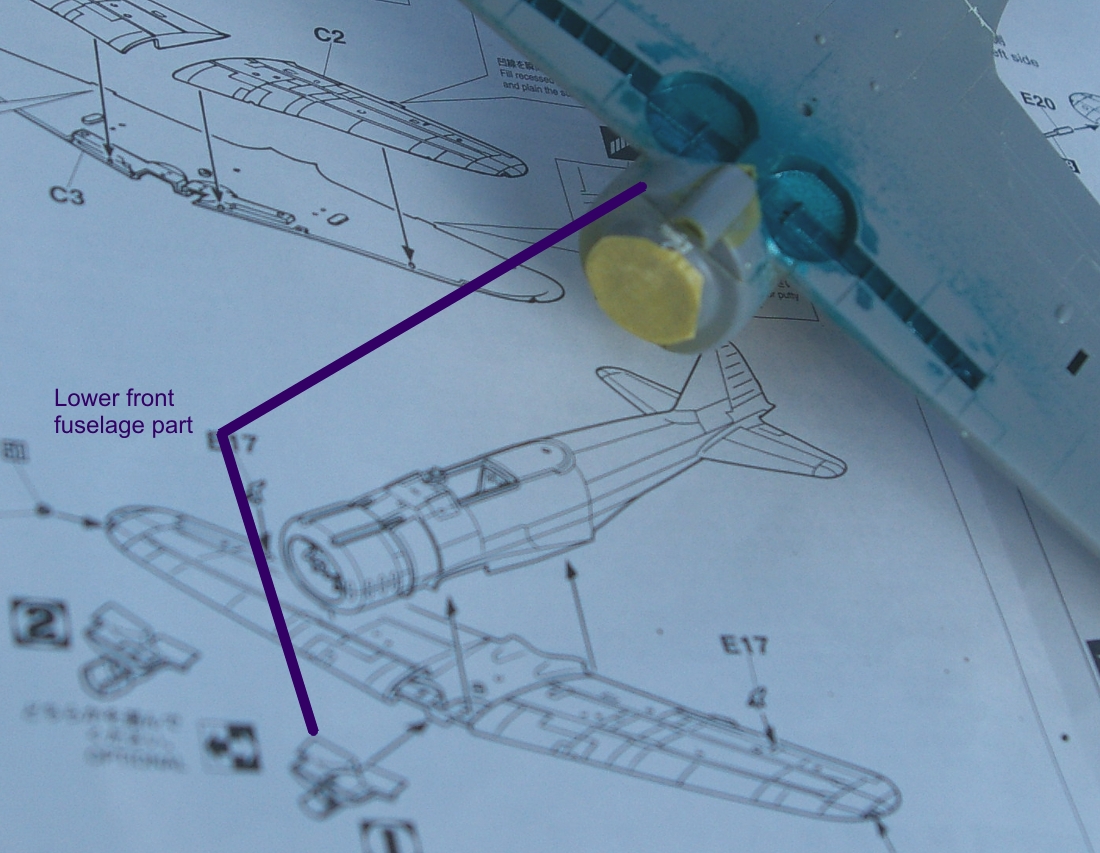
The big parts are together.  It does take some careful fitting of a few parts to avoid gaps in places, the added parts are necessary to allow building of both prototypes at different points in their lives.  With a little care things fit very well.  I filled the spots where the aileron counterweights attach, filled and rescribed the inboard ends of the ailerons and the outboard flaps as the ailerons were longer on the A6M1 and Hasegawa used the A6M2 wings which are otherwise the same in this kit.  Optional parts are for the oil cooler types, and they have to fit in the wheel wells, at the leading edge wing roots, and the front lower fuselage.  I used the eyeball method to get it right and avoid a misfit in the wheel wells.  It pays to fit the wing and the oil cooler parts at the same time to get the best fit, with a little filing needed at the wing trailing edge to fuselage joint. There is a lot of detail all around this area, especially in the wheel wells, which would not like any filling and sanding.  There aren't any pins or ledges that establish the right location, but it's not that hard.  I painted the wheel wells Aotake, and the oil cooler burnt metal, and sealed them with liquid mask.

I am using colors recommended by J-Aircraft.com which concludes that the early Zero's were not Gray, but a color that is most closely matched by Aeromaster Nakajima Interior Gray Green, not gray as is most often seen.  It is said this color looks gray in black and white photos.  They are using color samples from the Zero that crashed at Pearl Harbor on Dec. 7, 1941, an A6M2.   I guess I will take some pictures and convert them to black and white and see what it looks like.  Looks a lot like a North African airplane right now, the top surfaces are painted.  I'm going to have to do more filling at the stabilizer/fuselage join, it is more evident than it should be right now. The last photo is this series has the Nakajima color on the nose, with the Mitsubishi interior green further back around the cockpit.  Sure hope these guys are not doing an April 1st joke on the color.  The cowl is painted flat black with a touch of dark blue added.


John

To see build logs for my models:  http://goldeneramodel.com/mymodels/mymodels.html


  • Member since
    December 2002
  • From: Northern California
Posted by jeaton01 on Sunday, April 26, 2009 9:33 PM
Thanks. I'm glad to be here.

John

To see build logs for my models:  http://goldeneramodel.com/mymodels/mymodels.html


  • Member since
    April 2008
  • From: Fox Lake, Il., USA
Posted by spiralcity on Sunday, April 26, 2009 9:21 PM

 jeaton01 wrote:
I am wondering if I can enter this GB with the A6M1 Zero prototype I am building now.  I didn't start it until last week but I do have a bit done to it, fuselage and wings are assembled, filling in progress.  I have taken progress pictures so I can share them.  Hasegawa 1/48 kit.

Sure, feel free to jump in. I'll add you to the board.

PM headed your way.


  • Member since
    December 2002
  • From: Northern California
Posted by jeaton01 on Sunday, April 26, 2009 4:15 PM
I am wondering if I can enter this GB with the A6M1 Zero prototype I am building now.  I didn't start it until last week but I do have a bit done to it, fuselage and wings are assembled, filling in progress.  I have taken progress pictures so I can share them.  Hasegawa 1/48 kit.

John

To see build logs for my models:  http://goldeneramodel.com/mymodels/mymodels.html


  • Member since
    April 2008
  • From: Fox Lake, Il., USA
Posted by spiralcity on Saturday, April 25, 2009 2:15 PM
 mg.mikael wrote:

Here's the pics I said I'd get up.Smile [:)]

After sanding and timming down the support "planks" to fit in between the two main "planks", I was finally able to get out the glue.(Had to trim the edeges of some pieces to have a curve.) I used Elmer's Probond Interior Wood Glue, it's easy to wash and wipe off if you make a mistake before it dries.Thumbs Up [tup] I guess you could use Elmer's White Glue, but I wasn't gonna take the chance.

Here's a pic of the finished frame! It's suprisingly sturdy, and the glue holds perfectly.Big Smile [:D] After gluing, I sanded down the areas where a bit of excess glue dried and sanded down some areas in the wood that were not perfectly flat.

Now it's one to the axles and wheels in scratching. The wheels look like their gonna have to be scratched, since the parts I planned to use(the gears) were too small. The axles shouldn't be too much of a problem. Then I have to figure out the wheel supports the connect the axle to the frame. Might use stretched sprue if wood doesn't work well. Oh well, trial and error I guess.

Looks like she's coming along nicley. Smile [:)]


  • Member since
    December 2007
  • From: Bridgeview, Illinois
Posted by mg.mikael on Saturday, April 25, 2009 1:21 PM

Here's the pics I said I'd get up.Smile [:)]

After sanding and timming down the support "planks" to fit in between the two main "planks", I was finally able to get out the glue.(Had to trim the edeges of some pieces to have a curve.) I used Elmer's Probond Interior Wood Glue, it's easy to wash and wipe off if you make a mistake before it dries.Thumbs Up [tup] I guess you could use Elmer's White Glue, but I wasn't gonna take the chance.

Here's a pic of the finished frame! It's suprisingly sturdy, and the glue holds perfectly.Big Smile [:D] After gluing, I sanded down the areas where a bit of excess glue dried and sanded down some areas in the wood that were not perfectly flat.

Now it's one to the axles and wheels in scratching. The wheels look like their gonna have to be scratched, since the parts I planned to use(the gears) were too small. The axles shouldn't be too much of a problem. Then I have to figure out the wheel supports the connect the axle to the frame. Might use stretched sprue if wood doesn't work well. Oh well, trial and error I guess.

"A good plan executed now is better than a perfect plan next week." - George S. Patton

  Photobucket 

JOIN OUR COMMUNITY!

Our community is FREE to join. To participate you must either login or register for an account.

SEARCH FORUMS
FREE NEWSLETTER
By signing up you may also receive reader surveys and occasional special offers. We do not sell, rent or trade our email lists. View our Privacy Policy.