SEARCH FINESCALE.COM

Enter keywords or a search phrase below:

Prototype GB All Era's

45846 views
306 replies
1 rating 2 rating 3 rating 4 rating 5 rating
  • Member since
    April 2008
  • From: Fox Lake, Il., USA
Posted by spiralcity on Friday, April 24, 2009 5:24 PM
 mg.mikael wrote:

Another nice day here in the Chicagoland (80's and sunny), plus it's Friday!!!!!Cool [8D] Thus I feel invigorated to get the glue out and start gluing together the frame. Hopefully I'll get some pics up tommorrow.

Hmmm......maybe I'll even take the mountain bike out to a nearby trail.


YEAH!!! Great weather for a change in our area. Saturday should be good for the most part also.

GO SOX!!!

Looking forward to more progress pics. Smile [:)]


  • Member since
    December 2007
  • From: Bridgeview, Illinois
Posted by mg.mikael on Friday, April 24, 2009 4:32 PM

Another nice day here in the Chicagoland (80's and sunny), plus it's Friday!!!!!Cool [8D] Thus I feel invigorated to get the glue out and start gluing together the frame. Hopefully I'll get some pics up tommorrow.

Hmmm......maybe I'll even take the mountain bike out to a nearby trail.

"A good plan executed now is better than a perfect plan next week." - George S. Patton

  Photobucket 

  • Member since
    December 2007
  • From: Bridgeview, Illinois
Posted by mg.mikael on Wednesday, April 22, 2009 7:41 PM

Looks like your build is comin' along nicely (and quickly, that is when compared to my buildWink [;)]), model geek!!

You now it's a strange thing.......I enjoy the freedom to do what I want, when I want, when I'm scratching. Yet I sorta miss the crutch of instructions, since instructions always gives you an answer to part placement and etc. But overall I enjoy the freedom from any restraints other then the reference pics.Cool [8D]

"A good plan executed now is better than a perfect plan next week." - George S. Patton

  Photobucket 

  • Member since
    April 2008
  • From: Fox Lake, Il., USA
Posted by spiralcity on Wednesday, April 22, 2009 12:53 PM
 model geek wrote:

Mg.mikael,

Lookin good! Are you enjoying the scratch building and absence of instructions?

All,

Sorry for the absence, the PC was wounded in actionBlack Eye [B)] and recovering in a field hospital for 10 days. Now we're back at the front and ready for actionBig Smile [:D].

Broke the "honey do list" rule and started on the HE-100D. Following are some pics and narrative of progress to date.

Contents of kit. Nice little PE set included. Otherwise pretty basic kit.

Because the cockpit was so basic I decided to take a crack at adding some styrene bits and extra PE details from other kits.

The details are most likely not to scale but I was happy with the results for the first try at scratch building details.

Cockpit ready for paint.

Built this jig to assemble individual prop blades. Instructions courtsey of IPMS Stockholm web site.

And the results.

Next up a wash for the cockpit and the assembly of major compenents.

Thanks for looking.


Excellent Model geek, keep us posted as this progresses.


  • Member since
    January 2009
  • From: Algonquin, IL
Posted by model geek on Tuesday, April 21, 2009 10:19 PM

Mg.mikael,

Lookin good! Are you enjoying the scratch building and absence of instructions?

All,

Sorry for the absence, the PC was wounded in actionBlack Eye [B)] and recovering in a field hospital for 10 days. Now we're back at the front and ready for actionBig Smile [:D].

Broke the "honey do list" rule and started on the HE-100D. Following are some pics and narrative of progress to date.

Contents of kit. Nice little PE set included. Otherwise pretty basic kit.

Because the cockpit was so basic I decided to take a crack at adding some styrene bits and extra PE details from other kits.

The details are most likely not to scale but I was happy with the results for the first try at scratch building details.

Cockpit ready for paint.

Built this jig to assemble individual prop blades. Instructions courtsey of IPMS Stockholm web site.

And the results.

Next up a wash for the cockpit and the assembly of major compenents.

Thanks for looking.

Tom  


  • Member since
    December 2007
  • From: Bridgeview, Illinois
Posted by mg.mikael on Saturday, April 18, 2009 11:17 PM
 lewbud wrote:

Mg,

You've probably already thought of this (by now you maybe done), but if you put your main "planks" on top of the cross pieces, you can trace the inside curve.  Then you can trim with your saw (if possible) before sanding.

Good tip, and that's what I'll be doing before I start the sanding. Though I don't think I'll be using the saw anymore, since it would just raise the chances of splintering the wood. Maybe I'll use a scapel or something. 

"A good plan executed now is better than a perfect plan next week." - George S. Patton

  Photobucket 

  • Member since
    June 2008
Posted by lewbud on Saturday, April 18, 2009 8:34 PM

Mg,

You've probably already thought of this (by now you maybe done), but if you put your main "planks" on top of the cross pieces, you can trace the inside curve.  Then you can trim with your saw (if possible) before sanding.

Buddy- Those who say there are no stupid questions have never worked in customer service.

  • Member since
    December 2007
  • From: Bridgeview, Illinois
Posted by mg.mikael on Saturday, April 18, 2009 5:57 PM

Well, I was finally able to do a bit of work on my multiplane today. That probably had something to do with the fact it was 70 degrees outside and sunny.Cool [8D] Thus that meant it was very comfortable in the garage today, where I had to do the sawing.

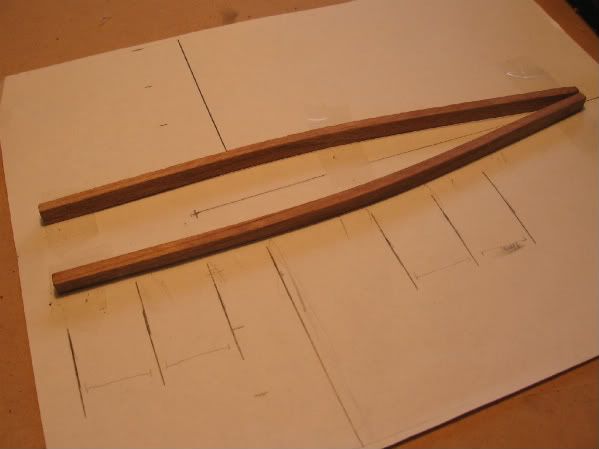
To get the final positioning of the two main "planks" I had to do some simple mathematics. Basically done by doing some measurements of the wing frame and eyeing it. Since there are no dimensions out there of the positioning of the two main "planks." But the overall result I believe was suprisingly not that bad. (Had to tape down the frame so I wouldn't lose the positioning I wanted.)
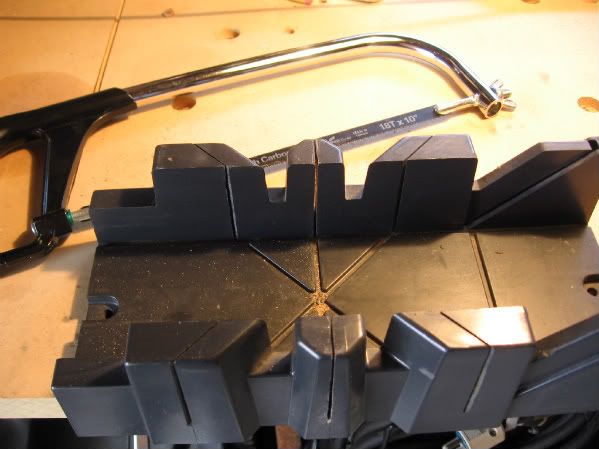
To cut the support truss for the main frame, you'll need a miter box and a saw(almost any saw should suffice.) For the support "planks" I used the same wood and same size, 0.20 X 0.30. (In order to save time I cut this piece at the same time I was cutting the wood that I would later use for the two main "planks".)
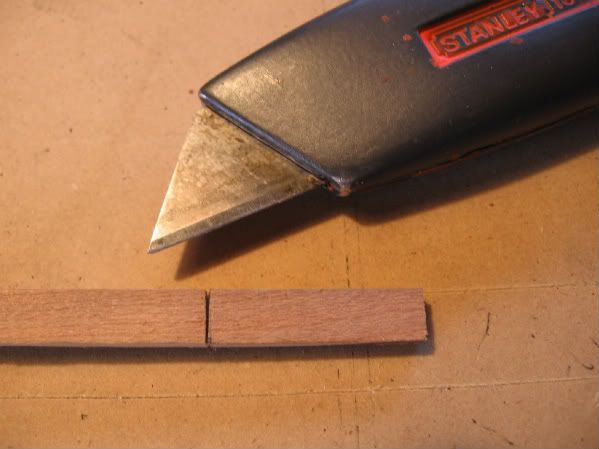
To make sure I didn't get too much splintering of the edges or cracking, I slightly notched all the sides of the wood I'd be cutting with a razor blade.
Here's all the support "planks" for the main frame cut to about the needed size. (Yeah, I know it looks more like a ship then a plane currently.Wink [;)]) I made sure my cuts were bigger then I needed, since I still need to sand down the edges to have a slight curve, in order to fit perfectly in between the two main "planks."
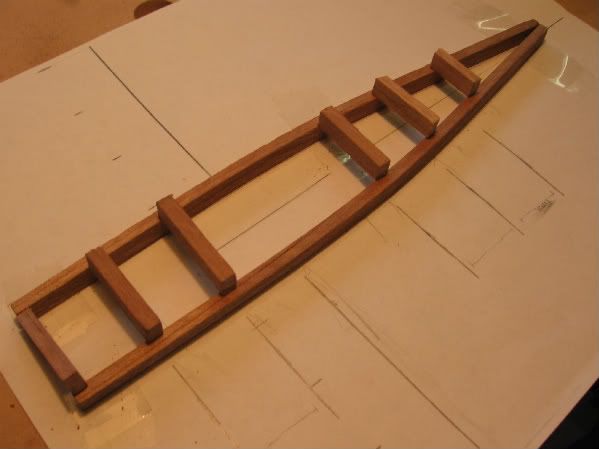
Now I have to get out the sanding paper/sponges and start the task of sanding. I have an electric sander(might try it on these small pieces, but only if I feel it's necessary to speed things up.)

"A good plan executed now is better than a perfect plan next week." - George S. Patton

  Photobucket 

  • Member since
    April 2008
  • From: Fox Lake, Il., USA
Posted by spiralcity on Friday, April 17, 2009 12:26 PM
 mg.mikael wrote:

My build has sorta been on the back burner this week. No pics today, since I didn't get done with much. The only thing I basically did was figure out how far apart the two main plank's will be. It's harder then it sounds, since I had to wing it. Thus it was done by "eyeing it" and a bunch of mathematics based off the other parts. What fun......Dunce [D)].

I did however find three gears, yes gears, that I plan to modify into wheels if all goes to plan. I also found an axle, (stainless steel, perfect size) for the rear wheels inside an old CPU from a computer. Boo yah!Cool [8D]


My projects are put to the side as of now also. I hope to see some more pics soon.Thumbs Up [tup]


  • Member since
    December 2007
  • From: Bridgeview, Illinois
Posted by mg.mikael on Thursday, April 16, 2009 6:43 PM

My build has sorta been on the back burner this week. No pics today, since I didn't get done with much. The only thing I basically did was figure out how far apart the two main plank's will be. It's harder then it sounds, since I had to wing it. Thus it was done by "eyeing it" and a bunch of mathematics based off the other parts. What fun......Dunce [D)].

I did however find three gears, yes gears, that I plan to modify into wheels if all goes to plan. I also found an axle, (stainless steel, perfect size) for the rear wheels inside an old CPU from a computer. Boo yah!Cool [8D]

"A good plan executed now is better than a perfect plan next week." - George S. Patton

  Photobucket 

  • Member since
    December 2007
  • From: Bridgeview, Illinois
Posted by mg.mikael on Thursday, April 9, 2009 9:06 PM

 model geek wrote:
This one will be interesting to follow. A whole different ballgame from the world of styrene! Look forward to updates on your progress. Looks like a good startThumbs Up [tup]

You got that right, styrene and wood are very different. Yet they suprisingly are quite similar, both can be glued, sanded, cut, and painted. But with wood, one mistake can mean the whole piece is good for kindling instead of modeling.Shock [:O] Oh by the way I also started a WIP of this multiplane in the aircraft section. So you can also follow the build in that section too.

"A good plan executed now is better than a perfect plan next week." - George S. Patton

  Photobucket 

  • Member since
    January 2009
  • From: Algonquin, IL
Posted by model geek on Thursday, April 9, 2009 8:41 PM
This one will be interesting to follow. A whole different ballgame from the world of styrene! Look forward to updates on your progress. Looks like a good startThumbs Up [tup]

Tom  


  • Member since
    December 2007
  • From: Bridgeview, Illinois
Posted by mg.mikael on Thursday, April 9, 2009 2:51 PM

The wood for the frame was soft and bendable today, so wasting no time I made the jig. Simply nails in a board. I'm pretty much wingin' it, since there's no info on how much these boards were curved in the 1893 aircraft. So the jig/curve was done by eye, getting the most appleaing cuve. Now I just gotta wait for the boards to dry, in the meantime I got a softskin armor on the bench.

"A good plan executed now is better than a perfect plan next week." - George S. Patton

  Photobucket 

  • Member since
    April 2008
  • From: Fox Lake, Il., USA
Posted by spiralcity on Wednesday, April 8, 2009 11:59 PM
 mg.mikael wrote:

Well, I had the wood for the main two planks of the frame cut about a week ago, finally got around to putting them in water. The two planks are 9.40 inches long, and 0.20 x 0.30 in width and height. After letting them soak for about 24 hours, I can start bending to the curvature I want. Though I think I may need to make a vice of some sort, so they keep that curve when drying. Hmmm.......I'll build it as needed.Wink [;)] Note: The wood just seems redder in the water, in actuality their much more pale in color.

Oh and I finally got around to starting the official WIP thread in the aircraft section.


Excellent ! this should be a lot of fun to watch.


  • Member since
    December 2007
  • From: Bridgeview, Illinois
Posted by mg.mikael on Wednesday, April 8, 2009 10:07 PM

Well, I had the wood for the main two planks of the frame cut about a week ago, finally got around to putting them in water. The two planks are 9.40 inches long, and 0.20 x 0.30 in width and height. After letting them soak for about 24 hours, I can start bending to the curvature I want. Though I think I may need to make a vice of some sort, so they keep that curve when drying. Hmmm.......I'll build it as needed.Wink [;)] Note: The wood just seems redder in the water, in actuality their much more pale in color.

Oh and I finally got around to starting the official WIP thread in the aircraft section.

"A good plan executed now is better than a perfect plan next week." - George S. Patton

  Photobucket 

  • Member since
    April 2008
  • From: Fox Lake, Il., USA
Posted by spiralcity on Tuesday, April 7, 2009 12:20 AM

 mg.mikael wrote:
Not wanting to sound like a nag, but can I get some "love" here too, and get on the first page roster, spiralcity?Wink [;)]

Sorry for the oversight. Whistling [:-^]

 I'll put you up there right now. Thumbs Up [tup]


  • Member since
    December 2007
  • From: Bridgeview, Illinois
Posted by mg.mikael on Monday, April 6, 2009 6:35 PM
Not wanting to sound like a nag, but can I get some "love" here too, and get on the first page roster, spiralcity?Wink [;)]

"A good plan executed now is better than a perfect plan next week." - George S. Patton

  Photobucket 

  • Member since
    April 2008
  • From: Fox Lake, Il., USA
Posted by spiralcity on Sunday, April 5, 2009 10:11 PM
 model geek wrote:

Spiralcity,

May I join the GB? I love building unusual subjects and there certainly are alot of great subjects in the thread so far.

If OK with you I'd like to submit the Heinkel HE-100D in 1/48 scale. It's a short run kit. It looks pretty good and inlcudes some PE for the cokcpit. Here's a picture.

Look forward to your reply!

model geek,

Feel free to jump in ! I'll drop you a pm and add you to the board.

By the way, thats a great subject you have there.


  • Member since
    January 2009
  • From: Algonquin, IL
Posted by model geek on Sunday, April 5, 2009 9:52 PM

Spiralcity,

May I join the GB? I love building unusual subjects and there certainly are alot of great subjects in the thread so far.

If OK with you I'd like to submit the Heinkel HE-100D in 1/48 scale. It's a short run kit. It looks pretty good and inlcudes some PE for the cokcpit. Here's a picture.

Look forward to your reply!

Tom  


  • Member since
    December 2007
  • From: Bridgeview, Illinois
Posted by mg.mikael on Monday, March 30, 2009 7:52 PM

JMart: I'll probably see you in this thread in the summer. Since I'll be building for a long, long while.Wink [;)]

Anyways, as for my update on where I'm at.......got the wood cut. I think it's some sort of cedar, not too sure, since I get alot of the wood from scraps from a nearby architectural wood molding place. How's that for being resourceful.Big Smile [:D] Anyways the wood is cut to a size of .20 X .30(I think, I gotta re-check to make sure). The cuts came out good, no chipping or bad splintering of the wood, I get some pics up soon. Smile [:)]

"A good plan executed now is better than a perfect plan next week." - George S. Patton

  Photobucket 

  • Member since
    April 2008
  • From: Fox Lake, Il., USA
Posted by spiralcity on Sunday, March 29, 2009 1:41 PM

 JMart wrote:
Been slowly catching up with my builds and GB forums :)   Will start this one in the summer

Great news Jmart,

Im looking forward to having you jump in... Make a Toast [#toast]


  • Member since
    March 2007
  • From: NJ
Posted by JMart on Sunday, March 29, 2009 9:36 AM
Been slowly catching up with my builds and GB forums :)   Will start this one in the summer


  • Member since
    April 2008
  • From: Fox Lake, Il., USA
Posted by spiralcity on Thursday, March 26, 2009 12:16 PM
 JMart wrote:

Spiralcity - Bummer about the cockpit issues....  You did a good job getting some character out of it. Weathering will bring some more details out. And I have about 6 Czech kits in my stash lol

mg.mikael - look forward to your build! Have never even heard of that beast... 

scott - nice build! Specially at that scale... I have couple RUFEs in partial completion state, IJN/IJA certainly had a lot of floatboat type craft.

Hi JMart,

I havent seen you around this GB in some time.

The only thing I will do with the cockpit now is shoot a ltiile flat in it and give it a light wash. Im finished with that thing. I just want to get it together now amd wrap it up.

Thanks for stopping in. Smile [:)]


  • Member since
    March 2007
  • From: NJ
Posted by JMart on Thursday, March 26, 2009 6:43 AM

Spiralcity - Bummer about the cockpit issues....  You did a good job getting some character out of it. Weathering will bring some more details out. And I have about 6 Czech kits in my stash lol

mg.mikael - look forward to your build! Have never even heard of that beast... 

scott - nice build! Specially at that scale... I have couple RUFEs in partial completion state, IJN/IJA certainly had a lot of floatboat type craft.


  • Member since
    April 2008
  • From: Fox Lake, Il., USA
Posted by spiralcity on Wednesday, March 25, 2009 1:29 AM
 mg.mikael wrote:

This past Saturday and Sunday I played around with the saw and wood. Basically just cut a test piece to figure if it will bend as needed. Then I ran into a problem with the dimensions I got off the web. ARGH!Angry [:(!] It said the two main boards of the frame were 18 inches wide! But are clearly not that wide in the pics, so now I'm gonna have to "wing" the board frame widths.

But I think I overcame that problem......so I should be able to get in the garage on the Friday and cut the boards. That way I have the time to soak the wood and bend it over the weekend to the preffered curvature. Geez, so much work, but suprisingly I'm not put off by it, and I'm one hell of a lazy procratinator.Wink [;)]


Cool, I hope to see some pics soon..

I've been busy with another project, so my Ryan has been sitting idle for a time. I'll be getting back to her shortly.

Good luck with your project.


  • Member since
    December 2007
  • From: Bridgeview, Illinois
Posted by mg.mikael on Tuesday, March 24, 2009 7:09 PM

This past Saturday and Sunday I played around with the saw and wood. Basically just cut a test piece to figure if it will bend as needed. Then I ran into a problem with the dimensions I got off the web. ARGH!Angry [:(!] It said the two main boards of the frame were 18 inches wide! But are clearly not that wide in the pics, so now I'm gonna have to "wing" the board frame widths.

But I think I overcame that problem......so I should be able to get in the garage on the Friday and cut the boards. That way I have the time to soak the wood and bend it over the weekend to the preffered curvature. Geez, so much work, but suprisingly I'm not put off by it, and I'm one hell of a lazy procratinator.Wink [;)]

"A good plan executed now is better than a perfect plan next week." - George S. Patton

  Photobucket 

  • Member since
    April 2008
  • From: Fox Lake, Il., USA
Posted by spiralcity on Thursday, March 19, 2009 11:58 PM
 mg.mikael wrote:

I finally did all the mathematics, and I figured out the scale my build will be in........1/32!Cool [8D]

Now with the calculations of some of the parts(some parts like the propeller and engine I'm gonna have to wing it), I can finally get in the garage and start cutting some boards to get started on the frame. I can't yet tell if I'll be using balsa for the two main support planks in the frame, probably not, because I'd have to layer the balsa six times to get the correct size.Shock [:O] So I probably be using some oak or pine or whatever else is laying around.

This should be very fun to watch. Keep us posted, I cant wait to see some progress pics..


  • Member since
    December 2007
  • From: Bridgeview, Illinois
Posted by mg.mikael on Thursday, March 19, 2009 10:09 PM

I finally did all the mathematics, and I figured out the scale my build will be in........1/32!Cool [8D]

Now with the calculations of some of the parts(some parts like the propeller and engine I'm gonna have to wing it), I can finally get in the garage and start cutting some boards to get started on the frame. I can't yet tell if I'll be using balsa for the two main support planks in the frame, probably not, because I'd have to layer the balsa six times to get the correct size.Shock [:O] So I probably be using some oak or pine or whatever else is laying around.

"A good plan executed now is better than a perfect plan next week." - George S. Patton

  Photobucket 

  • Member since
    November 2005
  • From: that state up North
Posted by More Power Scotty on Wednesday, March 18, 2009 11:25 AM

Spiralcity,

Thanks for the compliment, and yes, she is 1/72 scale.  Tamiya released a 1/48 version first, but I tend to prefer the smaller scale kits unless I am building WWI-era items.

Scott
  • Member since
    April 2008
  • From: Fox Lake, Il., USA
Posted by spiralcity on Sunday, March 15, 2009 11:20 PM

Well I spent most of my Sunday fitting the cockpit into my bird then sanding the seams. All the fun stuff!!!

Here's what I started with.


And i got this far ! Not much for most of my day but it's getting there.


JOIN OUR COMMUNITY!

Our community is FREE to join. To participate you must either login or register for an account.

SEARCH FORUMS
FREE NEWSLETTER
By signing up you may also receive reader surveys and occasional special offers. We do not sell, rent or trade our email lists. View our Privacy Policy.