SEARCH FINESCALE.COM

Enter keywords or a search phrase below:

#100 Tristar Pz 38(t) B COMPLETE PICS P.10 10-24-09

59016 views
221 replies
1 rating 2 rating 3 rating 4 rating 5 rating
  • Member since
    January 2012
Posted by I make stuff on Thursday, September 24, 2009 2:32 AM

This one is NICE, Bill.

You may reacll I supported, ahem, the OTHER candidate, but I have reconsidered my position.

AS for teh interior, I propose a tiem share arrangement so Manny and I can both have some time in there.

  • Member since
    February 2008
  • From: ladner BC Canada
Posted by stick man on Wednesday, September 23, 2009 6:36 PM

WOW! Bill this build is looking SUPER!

Smile [:)]

I'm 15 and I model I sk8board and I drum what could be better.
  • Member since
    July 2004
  • From: Texas
Posted by wbill76 on Wednesday, September 23, 2009 5:55 PM
Thanks Terry, glad to help out by doing all the legwork in advance! Laugh [(-D] Wink [;)]
  • Member since
    May 2005
  • From: Dublin Rep Of Ireland
Posted by terry35 on Wednesday, September 23, 2009 3:51 PM

Bill the progress is brilliant so far. Wow on the interior, watching this will take any guesswork out of it for me, when and if I ever get to it, ha!ha!.

Looks brilliant ,

Terry.


  • Member since
    July 2004
  • From: Texas
Posted by wbill76 on Wednesday, September 23, 2009 1:25 PM
Thanks Frank and Marc, appreciate the comments and support. Wink [;)]
  • Member since
    April 2005
  • From: Piscataway, NJ!
Posted by wing_nut on Wednesday, September 23, 2009 6:18 AM
Ah, Bill?  Are you aware you're really kickin' some butt with this build?  Just thought I would let you knowWink [;)]

Marc  

  • Member since
    September 2003
  • From: South Central Wisconsin
Posted by Daywalker on Tuesday, September 22, 2009 10:41 PM
Bill- This build is really coming together, excellent progress on the interior!  Really can't wait to see what's up your sleeve next. Approve [^]

Frank 


  • Member since
    July 2004
  • From: Texas
Posted by wbill76 on Tuesday, September 22, 2009 10:27 PM

Manny, awfully cramped on the inside but still better than sleeping out under the stars on the steppes! Thanks as always for looking in.

 panzerguy wrote:
Some serious work accomplished over the weekend there Bill! Looking real nice!

I have to admit when you said you were cutting out the turret sides I cringed a little bitShock [:O].

So what are the exterior paint plans for #100 will it be early say Polish or French campaigns or maybe one of the later anti-partisan vehicles with a camo scheme?

Thanks Steve! I readily admit that I had to think very long and very hard on what to do in regards to showing the interior. The standard kit provides a lot of detail in terms of the gun and breech as well as the commander's cupola and the Interior Set supplies the other missing elements in the form of the ammo cans for the turret rear and the traversing gear. None of that is visible through the top hatch so some cutting on the turret is inevitable if you want to show it off in any meaningful way.

As far as the exterior paint plans...I had originally planned to do a French Campaign vehicle in the 25th Pz Reg, 7th Pz Division (the Ausf Bs weren't available in time for the Polish campaign) with a two-tone scheme. That was before I discovered that the tracks provided in the kit (and the MKs as well for that matter) are the "lightened" style that were introduced with the Ausf D and used on all 38t's thereafter starting in Nov 1940, so that ruled out a French campaign vehicle from an accuracy standpoint. So far as I know no one makes the correct style of early-war tracks for the 38t. Add to that the fact that I'm going to cut away large portions of the turret and the prominent French campaign markings would be largely wasted anyhow. So this one will get a straight Panzer Gray scheme but will still be marked as belonging to the 25th Pz Reg, 7th PzDiv but in service on the Eastern Front in 1941 instead of France 1940.


  • Member since
    October 2007
  • From: N.H.
Posted by panzerguy on Tuesday, September 22, 2009 9:43 PM

 Mansteins revenge wrote:
I love that interior and want to move into it...

         Damn squattersLaugh [(-D]

"Happiness is a belt fed weapon"

  • Member since
    November 2005
Posted by Anonymous on Tuesday, September 22, 2009 9:41 PM
I love that interior and want to move into it...
  • Member since
    October 2007
  • From: N.H.
Posted by panzerguy on Tuesday, September 22, 2009 6:19 PM
 

  Some serious work accomplished over the weekend there Bill! Looking real nice!

  I have to admit when you said you were cutting out the turret sides I cringed a little bitShock [:O].

   So what are the exterior paint plans for #100 will it be early say Polish or French campaigns or maybe one of the later anti-partisan vehicles with a camo scheme?


"Happiness is a belt fed weapon"

  • Member since
    July 2004
  • From: Texas
Posted by wbill76 on Tuesday, September 22, 2009 6:09 PM

Thanks Andy, appreciate the comments!

 doc-hm3 wrote:
 Bill, all of your detail work looks great. Are you leaving the top to the fighting compartment loose so all of that detail can be viewed? She's coming along really well.

doc, thanks as well, as for the top it will be secured in order to support the turret properly and allow the hull sides to be joined up properly. I will be doing some surgical work to the roof and turret sides though to allow more of the interior to be viewed. Stay tuned! Wink [;)] 

  • Member since
    January 2008
  • From: Bournemouth UK
Posted by Bodge on Tuesday, September 22, 2009 5:26 PM
Freakin awsome im lovin this build , i take my hat of to youThumbs Up [tup]
  • Member since
    August 2007
  • From: The Plains of Kansas
Posted by doc-hm3 on Tuesday, September 22, 2009 4:43 PM
 Bill, all of your detail work looks great. Are you leaving the top to the fighting compartment loose so all of that detail can be viewed? She's coming along really well.

All gave some and some gave all.

  • Member since
    July 2004
  • From: Texas
Posted by wbill76 on Monday, September 21, 2009 3:46 PM

Thanks Boyd and ps1!

I played around with the lighting a bit and wanted to show off some more of the detail, especially the straps on the ammo cans. Those required some careful work under the magnifier and are tough to see in the previous shots. Keep in mind that there are 15 cans in all including the ones in the turret. I also neglected to mention that I had added the small foot step for the commander using a leftover part from an Eduard PE fret. Getting that in the right position was a challenge as it had to have sufficent clearance that the ammo cans could be removed but still be low enough on the hull for the commander to actually put his foot on.

Just as a trial run, I also dry fit the superstructure front plate, the hull roof with the turret bottom in place, and the rear engine deck to see how much would be visible without any modifications being done. Since the 38(t) doesn't have a turret basket or any other means to support the turret aside from resting inside the ring, I'm going to retain that portion of the roof but cut out everything else, leaving only the perimeter of the rivet lines plus the turret ring support. I think this will, when combined with cutting out the turret sides, provide quite a bit of visibility down into the interior while still allowing the vehicle to be displayed intact vs. having the turret separate for example.

  • Member since
    June 2006
  • From: Michigan
Posted by ps1scw on Monday, September 21, 2009 2:59 PM
I also find it pleasing.
  • Member since
    April 2003
  • From: 41 Degrees 52.4 minutes North; 72 Degrees 7.3 minutes West
Posted by bbrowniii on Monday, September 21, 2009 2:46 PM
BEEEE-YOU-TEEE-FULL!!!

'All that is necessary for the triumph of evil is for good men to do nothing' - Edmund Burke (1770 ??)


  • Member since
    July 2004
  • From: Texas
Posted by wbill76 on Monday, September 21, 2009 2:41 PM

 scratchmod wrote:
Damn Bill, that's one sharp looking interior and build, well worth the #100 slot. As far as that engine part goes, I would have gone nuts trying to clean it up.

What ref. books do you use when building your 38t's, I know I read it somewhere, hope you don't mind me asking. My interest in this tank is growing and may just build one in the very near future.

Keep up the great work Bill.

Thanks as always Rob and no problem at all supplying you with information...especially since I know what you'll do with it! Big Smile [:D] As for the engine part, I actually had to stop myself from doing any more work on it as it would've done more harm than good in the long run. Very fine detail in the ribbing but the limitations of how Tristar molded it were very evident.

In terms of references on the 38(t)s, by far the best one to get without going bankrupt is Panzer Tracts 13 by Jentz and Doyle. I'm also using the Nuts & Bolts #18 on the Marder III H since it's got beautiful multiple shots of the engine and Spielberger's Pz 35(t) and 38(t) and Variants (which is a bit misleading in the title since it's really all about the Czech vehicle manufacturing and not just the 35/38t tanks and chassis). The Spielberger is a hefty tome with a price-tag to match and is more a text reference than a photo reference and has some of the same drawings as in PT 13 but larger.  HTH!

  • Member since
    February 2009
  • From: mass,USA
Posted by scratchmod on Monday, September 21, 2009 12:09 PM
Damn Bill, that's one sharp looking interior and build, well worth the #100 slot. As far as that engine part goes, I would have gone nuts trying to clean it up.

What ref. books do you use when building your 38t's, I know I read it somewhere, hope you don't mind me asking. My interest in this tank is growing and may just build one in the very near future.

Keep up the great work Bill.

Rob
  • Member since
    July 2004
  • From: Texas
Posted by wbill76 on Monday, September 21, 2009 9:21 AM

Chris, sometimes it works out that way even though I try to avoid unnecessary work wherever possible. Appreciate the comments!

John, Marcus, thanks for the kind words as well. Wink [;)]

  • Member since
    July 2009
Posted by Marcus-Sirilicus on Monday, September 21, 2009 6:05 AM
Wow, Bill.  Just, Wow.
  • Member since
    August 2006
  • From: Cygnus X-1
Posted by ogrejohn on Monday, September 21, 2009 3:59 AM
Dang that's some mighty fine work!
  • Member since
    December 2003
  • From: Colorado
Posted by psstoff995 on Sunday, September 20, 2009 10:10 PM
WOW!! That's looking awesome- you're really going to town on this one Bill- I think the weathering in front of the seats was worth it, it looks great and adds to the lived in look, hey- we all know it's there too!! haha

-Chris

US Army Infantryman

  • Member since
    July 2004
  • From: Texas
Posted by wbill76 on Sunday, September 20, 2009 9:41 PM

Building on yesterday's foundational paint work, today was all about painting and installing the various details. I spent virtually the whole day painting and detailing items and it was only as I got to the end of the session that things finally started to get installed.

The first set of details to get installed were on the driver's side. I added the crash pad, the signal staff, main gun ammo can, and fire extinguisher after hand painting them prior to installation. The Interior Set neglected to provide a first aid kit that is supposed to be next to the FE, so I scrounged around in my spare PE fret bin until I found a box shape of suitable size/dimensions to use. I used the old artist trick of "trompe leoil" by painting in the "rack" that it's supposed to be sitting in on the base so it looks like it has a holder. I applied a wash of Raw Umber to weather the elfenbein and then dry brushed some of the enamel Panzer Interior Buff over that to blend it back in and give it a slightly grungy look. 

The radio operator's side got a similar treatment and the two ammunition holders were installed. Getting them into the right position required a careful check of my interior reference photos in PT-13 since the Tristar Interior Set instructions are vague at best as to their exact placement. Since they have to clear the MG ammo bins attached to the firewall and the radio operator's seat, the tolerances are very tight with no room for error. To insure I got them in the right position, I used the masking tape trick again to hold the hull side to the floor with the firewall dry fit in position and then carefully glued the racks in place with CA gel. The white stripe on some of the ammo cans is something that shows up in the PT 13 interior photos, my guess is that it distinguishes between HE and AP rounds but I can't be sure. I added the stripe using masking tape and careful application of Light Gray by brush.

Next up was the transmission/brake housing/drive shaft. Even though the brake housing won't be seen, I still painted it up just to be sure that there wouldn't be any bare plastic viewable. The transmission was given a wash of Raw Umber and then dry brushed just like the hull sides. The Interior Set provides two different radio sets but since this is a normal vehicle and not a command tank, I only used part H48 for the receiver that a standard tank would be equipped with. PT 13 indicates in the text that the receiver was mounted to the drive shaft so it was positioned that way deliberately. The Tristar Interior Set instructions don't provide any advice/help at all on where the radio is supposed to go since it's a generic set meant for any of Tristar's 38(t) vehicles including the command variants. I also wired it up with some 1mm diameter solder that will connect up to the antenna pot on the hull front plate once that's installed.

I also painted and installed the seat cushions for both crew positions. The driver's cushions had to be adjusted slightly to clear both the hull side and the transmission while the radio operator's went on just fine with no issues. The MG bins were added to the firewall and then the flooring for the area below the turret added to get it aligned properly. The transformer for the radio receiver was added, the rack for which I cut down since it was designed to hold transformers for both a transmitter and receiver. It too was wired up so that it could be connected to the receiver once it was installed. The double ammo bins for the driver's side were detailed and installed with the outer can receiving a white stripe as well. I also weathered the exposed floor areas with dry brushed Steel and Burnt Umber but I don't think very much of it will be visible in the end...but at least I know it's there!

The superstructure front plate also received some attention. It received the same wash and dry brush treatment as the rest of the interior and the driver's periscope was detailed with Flat Black and the green-red-blue signal lights added using regular Testors enamel Beret Green, Flat Red, and Sea Blue. The MG will get added later once the plate is installed to avoid the possibility of damaging it.

With all that taken care of, Franklin needed to start getting assembly...so the driver's side was added first to the floor using regular glue and finger pressure to get a good join.
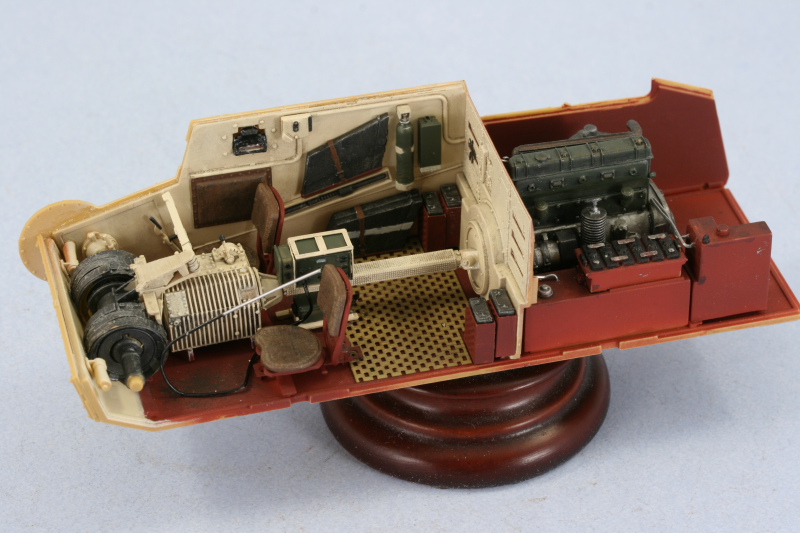
Same thing was repeated for the radio operator's side.

The final act for the day was to add the glacis plate and the rear hull plate to insure that the hull sides were lining up properly. The glacis plate required the use of some rubber bands to get it to sit down flush at the front due to the fact that it needed to align in three different directions to sit at the right angle. After about 15 minutes the bands came off and the hull was together.

Next up will be working on the turret details and then it will be time to do some cutting and fitting of the remaining external details.

  • Member since
    July 2004
  • From: Texas
Posted by wbill76 on Sunday, September 20, 2009 9:15 PM

Boyd, the weekend has come and gone so this one will sit until the next weekend before more work gets done it. That gives you 5 days to keep ahead of me! Thanks for the comments as always.  

 deafpanzer wrote:
WHOA!  I have been in California for only TEN DAYS for a conference and you are almost halfway DONE with your #100 by the time I returned.  So much stuff for the interior... it would be a shame to hide them!   Maybe it is a dumb question... instead of slicing an opening as suggested, just don't glue the top to the bottom part of chasis so you can lift it up for anybody to see the whole thing?  I will be following your build REAL CLOSELY from now on...

Andy, I thought of that but the problem that I run into is that the 38t really needs that roof in place due to the way Tristar designed the kit. Since the hull is slab sided, the roof is what ties it all together so it will sit square. If it's not glued down, the hull sides bow out slightly at the top. I've found what I think will satisfy both requirements...allowing more of the interior to be viewed and still providing enough structural integrity to hold everything together. We'll see how it goes!

 scratchmod wrote:
Bill the motor and comp. looks great. the added wiring tops it off and adds more life to it. I'll be looking for this kit next weekend at AMPS, but of course it'll be built as a wreck, something I've planned for over 8 years now. Thanks for the motivation and inspiration.

One thing I did notice on the motor, top view of the motor comp.. On the left side is a ribbed part, can't remember what it is right now, but it looks like you may have missed a mold line, could of course just be my bad eyes. Besides that it's one great looking motor.

I try popping in every couple of days to check things out and must say this build is going just as quick as your others. Not gripping mind you, I always enjoy your very thorough build blogs. OK I'm kinda jealous.

Thanks Rob for the comments as always! I can only imagine what a wreck of this vehicle with the interior provided would look like in your capable hands. You know you want to do it, so go for it! Laugh [(-D] The ribbed part on the left side does indeed have a slide mold seam remnant that unfortunately is a side effect of the way Tristar decided to mold this part...they used multiple small "fingers" on the sprue connector so it's virtually impossible to clean it up properly without leaving a trace behind...the camera never lies and picks it up even though with the naked eye I managed to hide it...almost! Wink [;)]

  • Member since
    February 2009
  • From: mass,USA
Posted by scratchmod on Sunday, September 20, 2009 8:51 PM

Bill the motor and comp. looks great. the added wiring tops it off and adds more life to it. I'll be looking for this kit next weekend at AMPS, but of course it'll be built as a wreck, something I've planned for over 8 years now. Thanks for the motivation and inspiration.

One thing I did notice on the motor, top view of the motor comp.. On the left side is a ribbed part, can't remember what it is right now, but it looks like you may have missed a mold line, could of course just be my bad eyes. Besides that it's one great looking motor.

I try popping in every couple of days to check things out and must say this build is going just as quick as your others. Not gripping mind you, I always enjoy your very thorough build blogs. OK I'm kinda jealous.


Rob

  • Member since
    April 2003
  • From: 41 Degrees 52.4 minutes North; 72 Degrees 7.3 minutes West
Posted by bbrowniii on Sunday, September 20, 2009 7:50 PM

Egads!!  I better get a move on - you are catchin' up to me!!!

Looks great, Bill.  I am in love with this kit and seeing your interior has made me even more determined to build a second one with all the extra stuff!

'All that is necessary for the triumph of evil is for good men to do nothing' - Edmund Burke (1770 ??)


  • Member since
    April 2009
  • From: Carmel, IN
Posted by deafpanzer on Sunday, September 20, 2009 7:00 PM
WHOA!  I have been in California for only TEN DAYS for a conference and you are almost halfway DONE with your #100 by the time I returned.  So much stuff for the interior... it would be a shame to hide them!   Maybe it is a dumb question... instead of slicing an opening as suggested, just don't glue the top to the bottom part of chasis so you can lift it up for anybody to see the whole thing?  I will be following your build REAL CLOSELY from now on...

Andy

  • Member since
    July 2004
  • From: Texas
Posted by wbill76 on Sunday, September 20, 2009 8:28 AM

Thanks Nate!

Mike, all I can say is that I've been extremely motivated on this project. I'm thoroughly enjoying it and that always helps! Big Smile [:D] Franklin is starting to get stitched together today so hopefully he'll be even happier to have some integrity at long last! Wink [;)]

  • Member since
    July 2006
  • From: New Jersey
Posted by redleg12 on Sunday, September 20, 2009 6:03 AM

A Shakspearian discussion leading up to primer....dammm.....was dinner discussion as good!!

Oh well...nice progress, Franklin is looking good!

Hummm.....I have to talk to the Princeton physics dept. to find out if the difference in time zone at you house causes 30 hour days.....all this work and dinner with the wife too....

Rounds Complete!!

"The Moral High Ground....A Great Place to Emplace Artillery."

JOIN OUR COMMUNITY!

Our community is FREE to join. To participate you must either login or register for an account.

SEARCH FORUMS
FREE NEWSLETTER
By signing up you may also receive reader surveys and occasional special offers. We do not sell, rent or trade our email lists. View our Privacy Policy.