SEARCH FINESCALE.COM

Enter keywords or a search phrase below:

M48 Patton FINISHED! Page 16

104539 views
278 replies
1 rating 2 rating 3 rating 4 rating 5 rating
  • Member since
    January 2007
Posted by the doog on Tuesday, November 16, 2010 8:13 PM

BigDaddyBluesman

I looked at those pix. The one pick of the machine gun without a can was probably a 30 cal. The other looked like they had an open can that was hidden because of the 2 dimensional picture.

I have a lot of pix of M48A3 in books and from online sources. I saw 4 types, the standard 50 cal in the cupola, the cupola with NO gun either on top or in it, a 30 cal on top and a 50 cal on top both with and without the 50 in the cupola.

In my time I never saw a 50 without an ammo box of some kind. The thing is the Army had access to a lot more gear then the Marines. So I don't think they used 20mm boxes, I would go with a standard 50 cal either on the weapon or on the turret. 50 cal belts would just fall straight down after the last link coming out of the feed tray, they're heavy.

BigDaddy, so then, I could get away with having the round bandoleer coming out and draping down to a open box on the turret there then? Your first-person experience is much valued for your opinion. I really like the look of the exposed round bandoleer--if I put the open can there and feed the band into it, would it pass muster?

  • Member since
    January 2007
Posted by the doog on Tuesday, November 16, 2010 8:14 PM

Pvt Mutt

If the Twinkies are in the creel where in the heck did you stash the sardines????

An Army moves on it stomach you know.Big Smile

Tony LeeSmile

Oh, um......I used the sardines for my feral cat traps....lol

  • Member since
    July 2003
  • From: On my kitchen counter top somewhere in North Carolina.
Posted by disastermaster on Tuesday, November 16, 2010 8:22 PM

All that kit needed was..............

http://www.oceansbridge.com/paintings/artists/special/big/creation_of_adam_detail.JPG

the touch of "doog"

http://i20.photobucket.com/albums/b232/gluetank/Decorated%20images/th_T1-4-copy.jpg

 https://i.imgur.com/LjRRaV1.png


  • Member since
    January 2007
Posted by the doog on Tuesday, November 16, 2010 8:27 PM

disastermaster

All that kit needed was..............

http://www.oceansbridge.com/paintings/artists/special/big/creation_of_adam_detail.JPG

the touch of "doog"

http://i20.photobucket.com/albums/b232/gluetank/Decorated%20images/th_T1-4-copy.jpg

HA HA! A BIG "laugh out loud"!

Thanks, Steve! You've got a way with comments! Big Smile

  • Member since
    October 2010
  • From: Staten Island
Posted by BigDaddyBluesman on Tuesday, November 16, 2010 8:44 PM

The way a machine gun works is that the linked rounds are pulled into the weapon's feed tray by a system that pulls them in and strips the round, the bolt then rams the round into the chamber and so on. One reason the M60 was replaced with the M240(MAG) was because of the feed system causing issues.

Having rounds hanging like that can cause the weapon to jam. It puts more stress on the mechanism which is working at about 700rpm. I think you get the picture here. A jam in combat means you die.....The old Browning 30 cal was a workhorse and the feed system was strong. Originally the 30 cal had non-disintegrating links.

So I doubt they would have those round just hanging from a 50 cal, although it did have the browing feed system which was stout. It's a hard weapon to fire even from a mount like that, it kicks like a mule despite what you see on TV/movies. In real life you only fire 5-7 round bursts, unless like Korea 100,000 Chinese troops are attacking your position. Anything more then that and the barrel will overheat and wear-out quicker decreasing accuracy.

You would need another person to hold the belt, so yes I guess you can hang them but at 1/35 scale it will NEVER look right. They hang funny due to the way the links are, same for 7.62mm. It's hard to explain unless you fired one or worked with one. My track had a 50 cal and a Dragon ATM mount. In Nam with M60s some guys used soda cans welded to the feed tray to help it. Those days they were not the soft aluminum we are used to. But the belts hung weird, they twisted slightly and stayed that way like in a suspension. I guess you could used some PE and just bend it a certain way. You have to study it. You can see it a little when you look at them loaded in the wings of WWII planes like a P-47 or P-51.

What you can do that might look cool is have the box on the M2 and drape some of the belt over the side in a double layer(like in the wings of the WII planes) like it's folded over itself. Maybe like it was fired and some of the belt pulled out of the box from the tank bouncing everywhere. And I mean if you ever traveled in the old armored vehicles you got bounced around.

In WWII the drivers developed something called jeep disease. It's what we know as lower back pain. I developed it due to my time in the army and driving a bus for the city. I am totally disabled due to the damage to my spine from driving heavy vehicles.

  • Member since
    January 2007
Posted by the doog on Tuesday, November 16, 2010 9:03 PM

BigDaddyBluesman

What you can do that might look cool is have the box on the M2 and drape some of the belt over the side in a double layer(like in the wings of the WII planes) like it's folded over itself. Maybe like it was fired and some of the belt pulled out of the box from the tank bouncing everywhere. And I mean if you ever traveled in the old armored vehicles you got bounced around.

In WWII the drivers developed something called jeep disease. It's what we know as lower back pain. I developed it due to my time in the army and driving a bus for the city. I am totally disabled due to the damage to my spine from driving heavy vehicles.

BigDaddy--wow, sorry to hear about your disability. Lower back pain can be a nightmare. I flirt with it when I race my dirtbike sometimes. A good chiropractor keeps me in line.

Thanks again for that thorough information--great stuff for the post! Ad I'll have to see what I can whip up. I don't know if I have enough PE rounds to do the fold-over. If I can't make it look good, I'll go back to the ammo can in the gun.It seems to be at least the most accurate rendering from the collective input here?

Thanks again for your in-depth info and time spent relaying it here. Much appreciated!  Beer

  • Member since
    October 2010
  • From: Staten Island
Posted by BigDaddyBluesman on Tuesday, November 16, 2010 9:20 PM

Glad I could help.

Actually reading this post has been inspirational. It has inspired me to really do it right. The work on the hull and turret was amazing. The treatment you did looks so good. I have been on those tanks, not driving but on them and that's the way the armor looks. Amazing!!!!

I need to really take that model to another level like you did. I have a few of them now and I am going to try and do a few versions.

I was in the 11th cav regiment so I want to do a whole ACAV, M551, M48A3 and some support vehicles thing from when we went into Cambodia in 1970.Tthe thing about the cav even in Nam was they were sticklers for keeping things uniform and clean. If you look at 11th ACR stuff even in a fire fight their tracks are cleaner and better kept. I know...I did it....LOL. The Cav was always like that even in war.

So their ar some older marine versions with the round light and some others and some army versions.....I just hope I can do the kind of work you do. Excellent and creative.

  • Member since
    January 2007
Posted by the doog on Tuesday, November 16, 2010 9:40 PM

BigDaddy, it really bring me a great deal of happiness to hear that I inspire you and others who might feel that as well. Smile

Likewise, I am inspired by some of the other great talent here, and especially people like you who care enough to weigh in, and to be not straightforward in your critique, but only generous in the knowledge that you are willing to impart. It always thrills me to hear from an actual tanker that I've :got it right": That's high praise, and much appreciated.

Remind me not to do anything by the 11th cav regiment--I"m not a "clean" kinda guy! Big Smile

  • Member since
    July 2004
  • From: Texas
Posted by wbill76 on Tuesday, November 16, 2010 10:35 PM

Nothing to add to the discussion except to say that I like the progress you've made as well as the figs Karl, looks like it's getting close to the finish line. Yes

  • Member since
    July 2006
  • From: New Jersey
Posted by redleg12 on Tuesday, November 16, 2010 11:02 PM

Outstanding....I love the stowage....

Put a little semi-gloss drip off the 5 gallon cans, the always either leak a bit or get spilled on when filling....try some thinned out Tamiya smoke....just a thought

Someday you should look at MV headlights or something close from Michaels the silver headlight and black light Whistling just look flat with all the other spectacular work.

Great stuff.....love it

Rounds Complete!!

"The Moral High Ground....A Great Place to Emplace Artillery."

  • Member since
    May 2009
  • From: Poland
Posted by Pawel on Wednesday, November 17, 2010 3:08 AM

Hey Karl! Your machine looks really nice! I double checked the machine gun mount and I'd say I have my biggest problem with this detail of your build (otherwise very good). Although I can't say for sure, I think the pintle would be attached to the main body of the cupola rather than to the "mantlet". Then there's also the mantlet cover on the cupola, so it can stay dry inside, and the MG mount can't interfere with that. I also heard the pintle has a tendency to crack due to the heavy MG recoil and was re-welded often. I doubt it was also repainted that often, so it's an oportunity to show some rust there.

As for the headlights, if you didn't drill them out to replace the lens with clear parts, I'd like to suggest other way to paint them - namely silver and white pattern, that looks a little better in my opinion. Try painting the lenses white, and then putting a few thin vertical silver lines on them like this: ( | | | ). Anyhow, my ideas for the headlights and MG mount can be seen in the foto below:

1:35 M48A3 Patton by Pawel Mroczkowski

Hope this helps, and keep up your great work. Have a nice day!

Paweł

All comments and critique welcomed. Thanks for your honest opinions!

www.vietnam.net.pl

  • Member since
    October 2010
  • From: Staten Island
Posted by BigDaddyBluesman on Wednesday, November 17, 2010 6:03 AM

Tanker....never......I was a scout. 19 Delta......we had tankers just because we needed some people to shoot a big gun and drive M1s, like we also needed some mortarmen to fire the 4 deuce. The Cav is mostly all Cav scouts. And once you become an NCO you go to school to be a tanker also but your MOS is always a 19 Delta, that's the backbone of the Cav.

By the way I hated the Army. It was not like you see in the movies. I could write a book. Some people love it and some people don't. Let me tell ya, I cleaned and buffed more floors then I ever fired any weapons and that's why I hated it. I picked up more cigarette butts on police call then I ever did anything relating to actually being a soldier. For every hour you drive your track you do 6 hours of maintenance or more.

Scouts out.

  • Member since
    January 2008
  • From: Bournemouth UK
Posted by Bodge on Wednesday, November 17, 2010 6:12 AM

Just had a look in on this one , well that looks pretty funky with all those goodies added to it bud, lovely work as allways. Love the little coke cans, touches like these do give a big impresion on the buildYesBeer

  • Member since
    October 2010
  • From: Staten Island
Posted by BigDaddyBluesman on Wednesday, November 17, 2010 7:22 AM

Yeah the coke cans are cool. When I saw them I had to laugh because of how many times I went to the PX before we went to the field and bought a case of coke. We had room inside so we kept them there. I was in Germany so they were cold even inside, outside they would have froze like I did....it was cold even during the summer at night there.

I have been studying the build and pictures of the Vietnam era M48A3 and so far this build is as good as I have seen on the internet., maybe the best.

I do remember the way the lights and vision blocks looked on my track and others and I can't for the life of me figure out how to do it.

Here's the deal........the human mind does not see things that are there. It cannot take in all that detail so it leaves out things. The lights always just looked dark and I never paid attention to them unless it was at night and I was following another track. You really never used the lights even in the dark you could see the tracks and learned how to follow them. Same for the periscopes, you couldn't see anything clear out of them and had to rely on your track commander or a ground guide.

So it's like wow how do I do all the little details on the armored vehicles I never paid attention to...LOL.

As far as I remember the glass always looked kind of blue to me and the lights were so small you could hardly see the lens, they had lens covers on them so that when they were on the light was a tiny dot. I will have to see if the Vietnam era stuff was the same. My track was a Vietnam era M113A1. I could swear one track looked like it was a rebuild and had some holes patched up.

I don't ever even remember turning on my lights that was a huge no no. They even changed the lights inside the track to green because of the ability of the Russian forces to see in the dark like we do with night vision and infrared(hence no red lights anymore inside green).

Like when you look at the track standing a few feet away. Your mind doesn't see that hatch detail, were is the handle and stuff like that. But when it comes down to 1/35 scale it's weird but you do a bit more. I am going to try and use PE and scatchbuild or file/sand down certain details to make them the correct thickness and height. I have noticed that indeed many of the models I see the details are too think and the real thing is much finer. By having this thickness it gives the model a cartoon like quality. Shadowing with a wash is great but sometimes I know I am going to have to use a tool of some kind to make that detail pop.

I did notice that in fact many of the details that were done were necessary without doubt. The Tamiya kit is pretty good but there are limitations. I think some things would have broke had they molded them the right dimensions.

  • Member since
    October 2010
  • From: Staten Island
Posted by BigDaddyBluesman on Wednesday, November 17, 2010 8:08 AM

I forgot about this web site..........I think this should answer all my questions about the little details of the M48.

http://data3.primeportal.net/the_battlefield_armor.htm

  • Member since
    January 2007
Posted by the doog on Wednesday, November 17, 2010 10:25 AM

Thanks guys!!!!

Bill, thanks for looking in-I was wondering where you'd been? Traveling? Thanks for the comp's!

Mike--you know, I did that "drill out the headlights and add epoxy" thing again, not remembering that the LAST time I'd done the same thing, I got the SAME criticism! lol! I kick myself for doing it. Of course, then I painted over the epoxy without masking them and then they lost any real transparency when I removed the paint with Testor's glue! Yup--I gotta come up with another method! Thanks for the tips on the gas cans--I'm going to be adding some of that when I get finished with the pigments and last weathering stages.

Pawel--thank you for your critiques! I had carefully researched the MG mount, however, as I knew there had to be some factors in play about where it might have been located, and this photo pretty much did it for me:

You can see that the MG pintle is right where I have it portrayed. You can see, too, that there's plenty of rust there! A nice looking M48 there as well that you've modeled--and I do like your headlights. Theylook better than mine! Embarrassed

BigDaddy--keep those stories and anecdotes coming! It really adds some sugar to this post! Good stuff, and all great to spice up the conversation! Thanks again for your generous compliment! Smile

Andy--thanks for looking in, and for the YesYes's!

I'm attending to some of the changes in the ammo belt now, and finishing up a bit of more details, guys--stay tuned! Won't be long now! Stick out tongue


  • Member since
    April 2003
  • From: 41 Degrees 52.4 minutes North; 72 Degrees 7.3 minutes West
Posted by bbrowniii on Wednesday, November 17, 2010 12:22 PM

doog,

I only had a chance to glance at your last photo and to read a couple of the follow on posts, so if my comment has been addressed already, I apologize for missing it.

Some people have commented on the .50-cal ammo.  The fact that there is no can there is a little unusual, but the biggest problem is the shape of the belt - it is too rigid.  If there is nothing supporting it, it should droop straight down.  The links on a belt of .50 ammo are metal rings that allow each round to rotate quite a bit, so the whole belt is very flexible.  Consider the picture that you posted to support the absence of the ammo can - look at how that ammo belt is draped around the contours of the gear it is on.

'All that is necessary for the triumph of evil is for good men to do nothing' - Edmund Burke (1770 ??)


  • Member since
    November 2005
Posted by Anonymous on Wednesday, November 17, 2010 1:07 PM

the doog

Manny--thanks, man--that's a high compliment from a master figure painter like you! Big Smile


You are very welcome; IMO some of the best figs you have ever painted, and also may be the best rendition of an African American I've ever seen in any scale... YesYes

  • Member since
    June 2005
  • From: Massachusetts
Posted by minimortar on Wednesday, November 17, 2010 7:33 PM

Great subject all around even with the few 'nitties' mentioned above!!!!!!

WOW!

Thanks,
Kevin Keefe

Mortars in Miniature
A Scale Model (Plus!) Collection of the Infantryman's Artillery

  • Member since
    March 2004
  • From: Spartanburg, SC
Posted by subfixer on Thursday, November 18, 2010 12:03 AM

In a previous post in this thread, you asked if anyone saw anything patently wrong with anything. Well, and this may be the most nitpickingest thing that I've ever nitpicked and I wouldn't blame you for ignoring it altogether, but your Coke cans, as far as I can tell, are wrong for the era. There, I've put it out there for all to see. I remember that as late as 1972, that the Cokes we got always tasted metallic because they had been shipped and stored so long that the steel (yes, steel) was partially disolved in the soda by the phosphoric acid in the drink itself. We didn't get those fancy-azz pull tabs, either, we had to carry a can opener (church key) for them, too. They didn't have that shape, either. They were basically cylindrical, without the present bulbous body  with the tapered top and bulged base that they have today. Pull tabs were around in those days, to be sure, but they didn't make it to Vietnam as far as I know. And if they did, I never saw them. The design on the cans in those days were the old harlequin design.

This is what the cans looked like:

Now, Karl, you can leave them on there like you've got 'em, or man up and make 'em right. Somebody besides me is gonna notice them, too.


See what hapens when you argue about mud color with me? Super Angry   (Even though you weren't wrong)Stick out tongue

I'm from the government and I'm here to help.

  • Member since
    June 2003
  • From: Rowland Heights, California
Posted by Duke Maddog on Thursday, November 18, 2010 12:19 PM

Doog, I've been following this one thoroughly, as the M-48 is my all-time favorite tank. I've got to get me another one to make for my Marine Corps. You've done an outstanding job and really inspired me to get another M-48 for my Marines. Way to go! Can't wait to see the finished pics!

  • Member since
    September 2006
  • From: Dripping Springs, TX, USA
Posted by RBaer on Thursday, November 18, 2010 4:38 PM

Lookin' sweet, doog!

Apprentice rivet counter.

  • Member since
    February 2009
  • From: mass,USA
Posted by scratchmod on Thursday, November 18, 2010 4:55 PM

Looks fantastic Karl. Love the weathering on it.


Rob

www.scratchmod.com

  • Member since
    January 2007
Posted by the doog on Thursday, November 18, 2010 7:50 PM

Guys, thanks--the beast is DONE!

But thanks, Boyd! I have rectified the situation with the ammo belt. Stay tuned for the results!

Manny, and Wayne, thanks for that generous praise! I am humbled...Embarrassed

Thanks, too, Kevin!

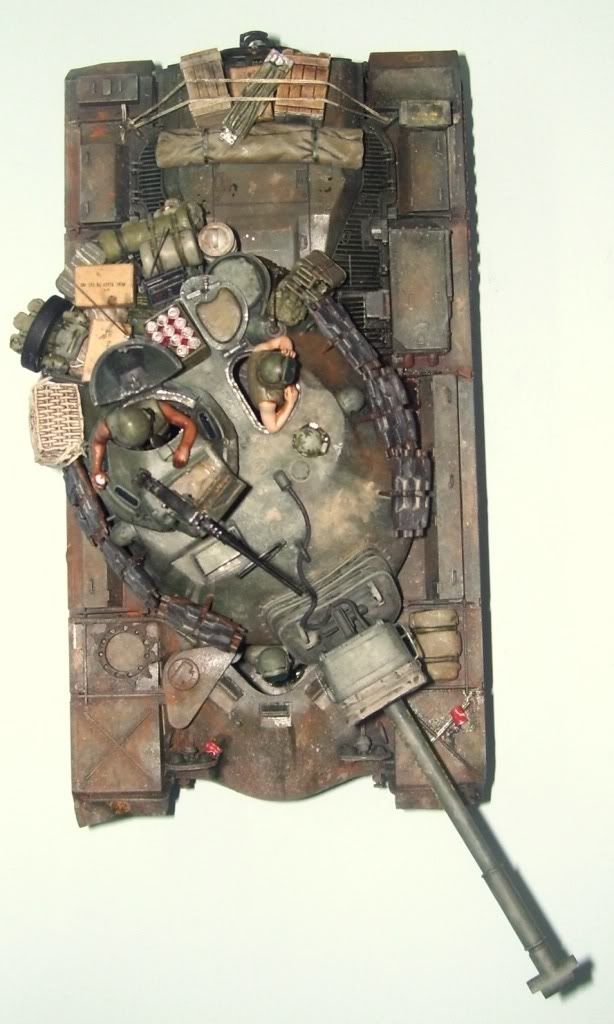
Lee--well, you make a strong point on the soda can, and that's honestly some great information for this thread, so thank you! I appreciate your first-person recollections, but I'm going to stick with the coke cans I have there. I'll tell you why--most people, I believe, would be unfamiliar with the type of coke can you have shown there. That's a 1967 design known as the "Small Diamond:". It was used from '67-70 as far as I can tell, and the steel one was an experimental one that was used in 1968.

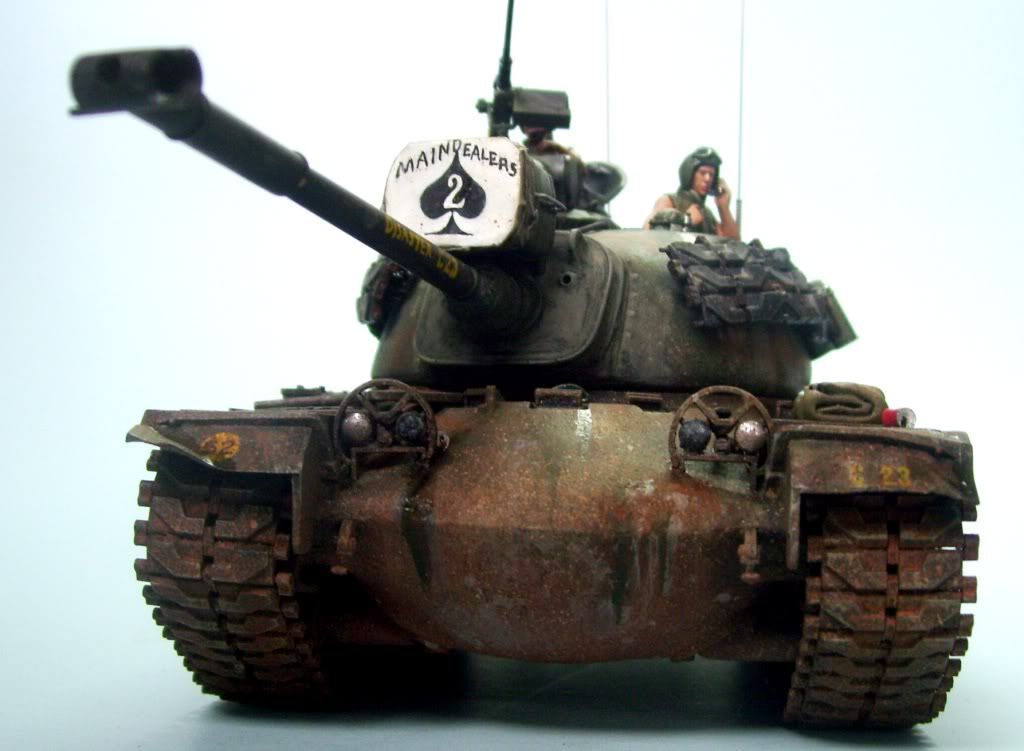
This tank is being portrayed as it was appeared in the Da Nang theater or February 1970. Coke changed its coke cans to the "Two Panel White Ribbon" in 1970, and I would assume that cases would have been shipped to Vietnam in large numbers? I don't think they had thousands of cases of surplus, un-drunk Small Diamond Coke sitting in warehouses at that point (although I may be wrong).I believe that it's plausible that these kind of cans would have been seen. And since they've been basically unchanged since then, I think that they're more recognizable as "Coke cans" to whoever might be viewing this model. Plus, those diamonds would be hell to paint!

Here's a great website-- Coke cans

Duke, glad you like the model! Thanks for the comment! And Rbaer and Rob too--thanks for looking in!

Well, enough talkin'--here's the pics:

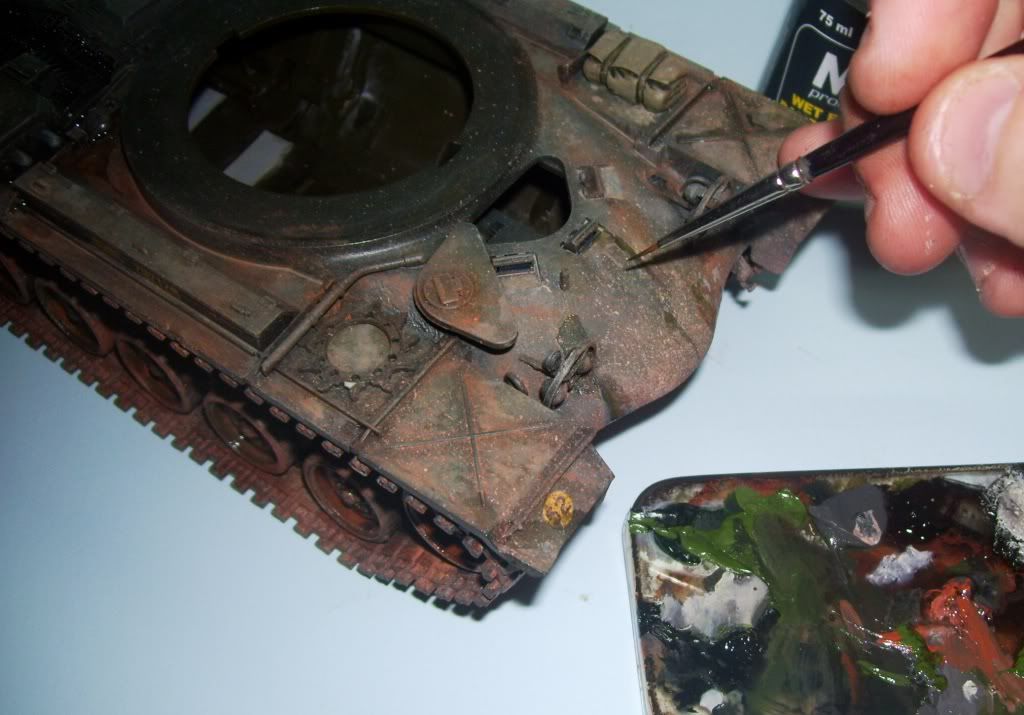
The model was "splattered" using a technique I learned from Adam Wilder. All you need is some paint and a long-bristled brush.

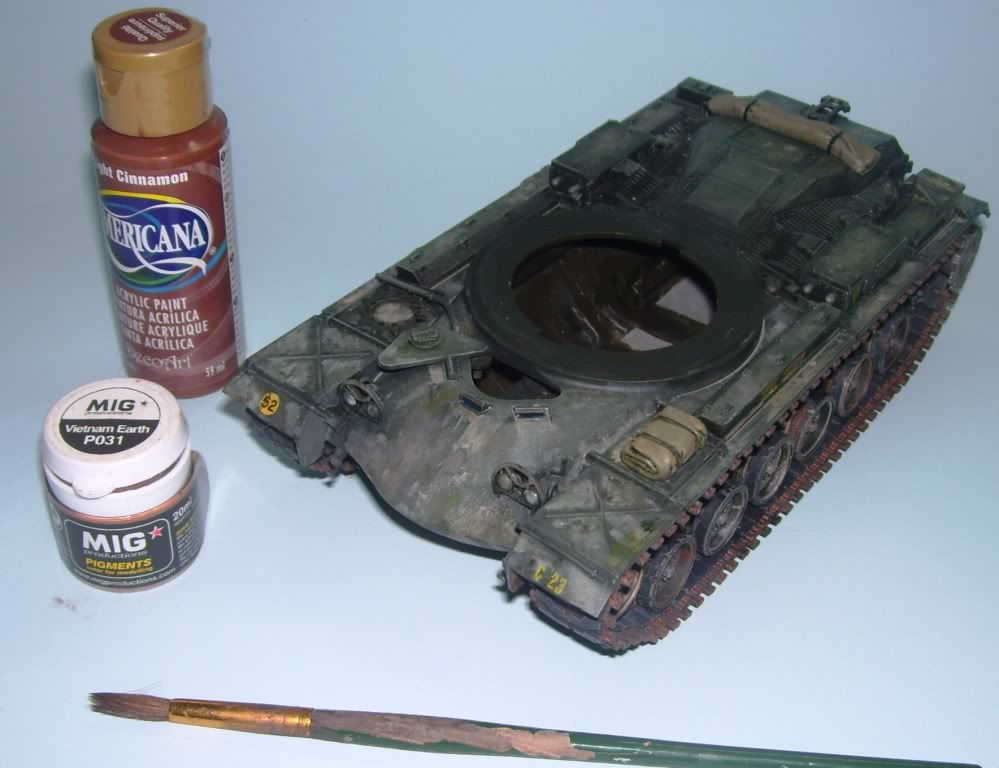
MAKE SURE YOU PRACTICE FIRST!!! You're going to want to blow the stream of air from your airbrush THROUGH the paint on the brush, blowing it onto the model in the back. Make sure you try this using different paints and different thickness of paint. If the paint is too thick, it won't splatter well; conversely, if it's too thin, you'll get a big ugly splotch.


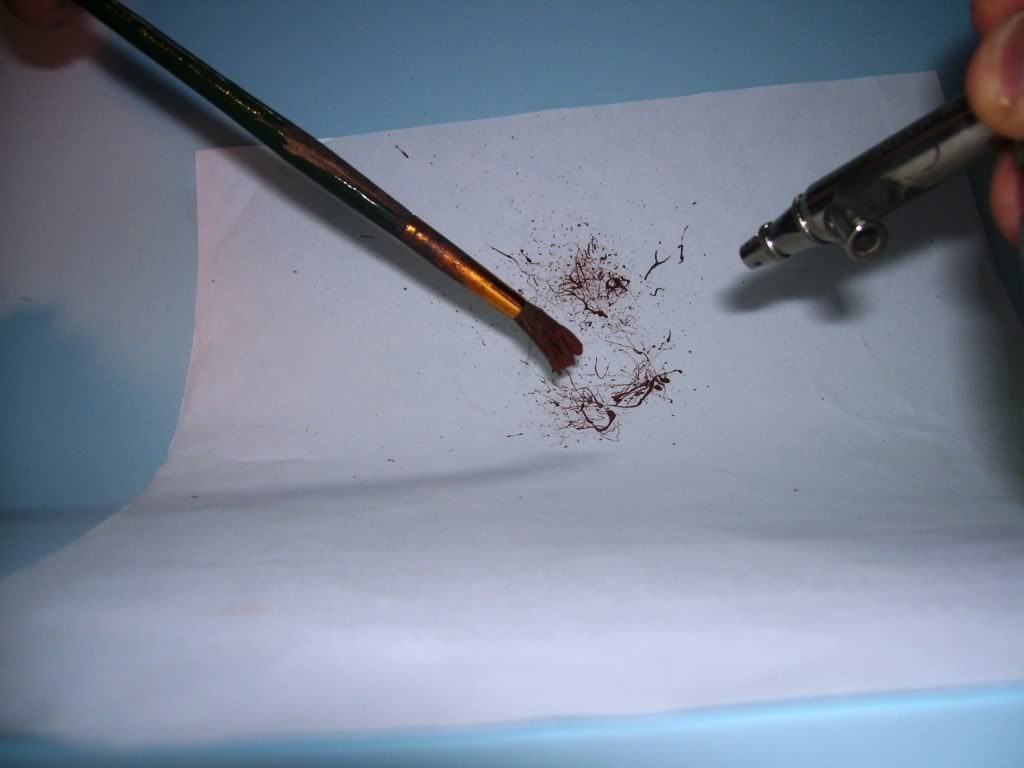
Then apply it to the tank.

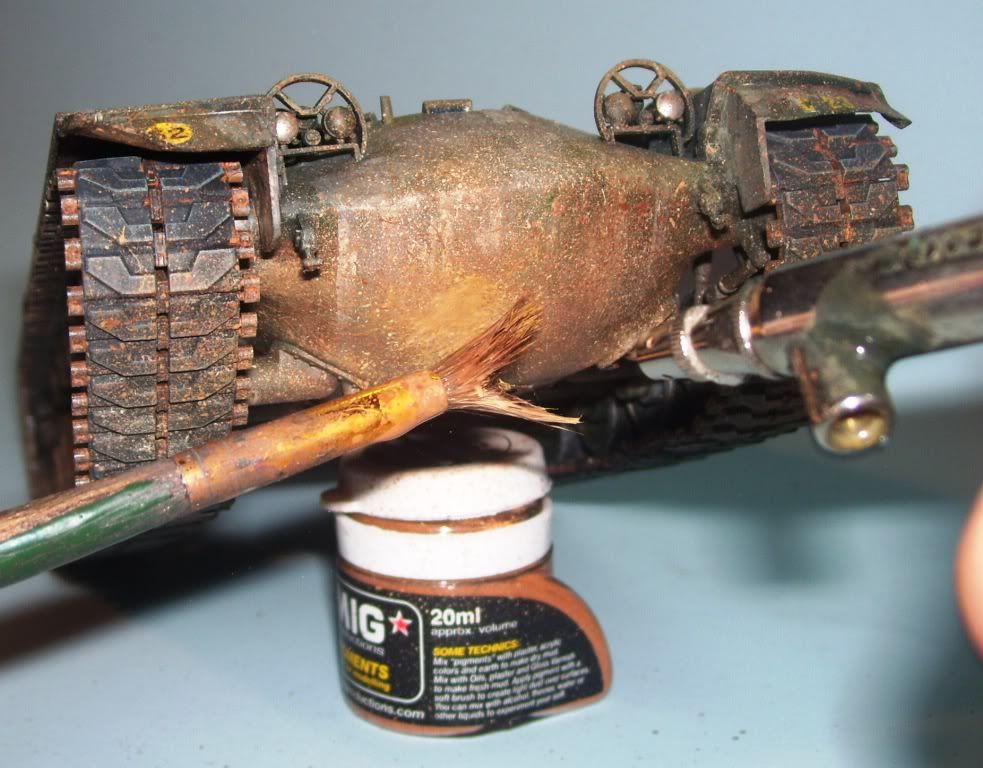
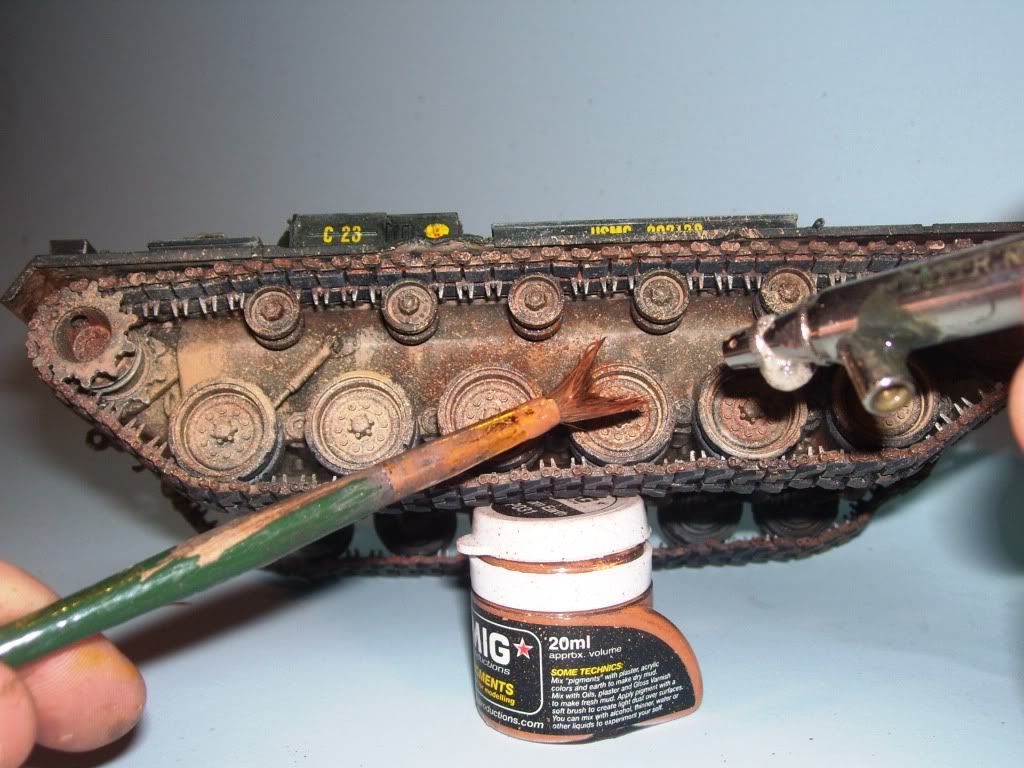
The neat thing is  that you get a slightly {pebbled" surface, just like real mud and dirt splatters.

After that, I did some streaks with base colors...

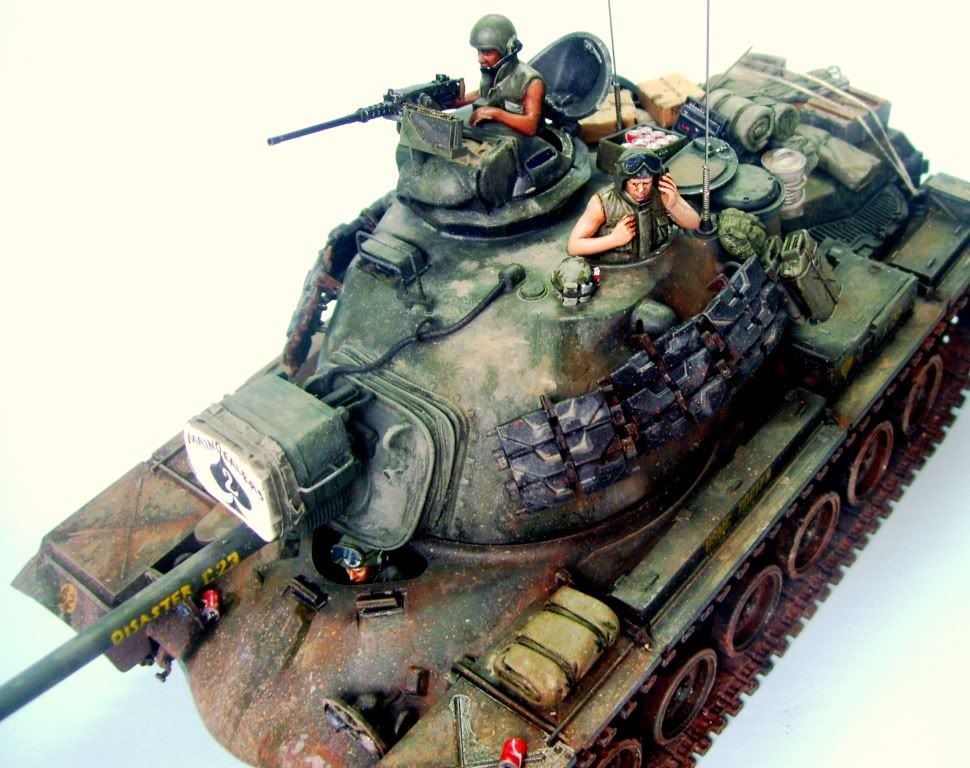
And here are the finished pics.


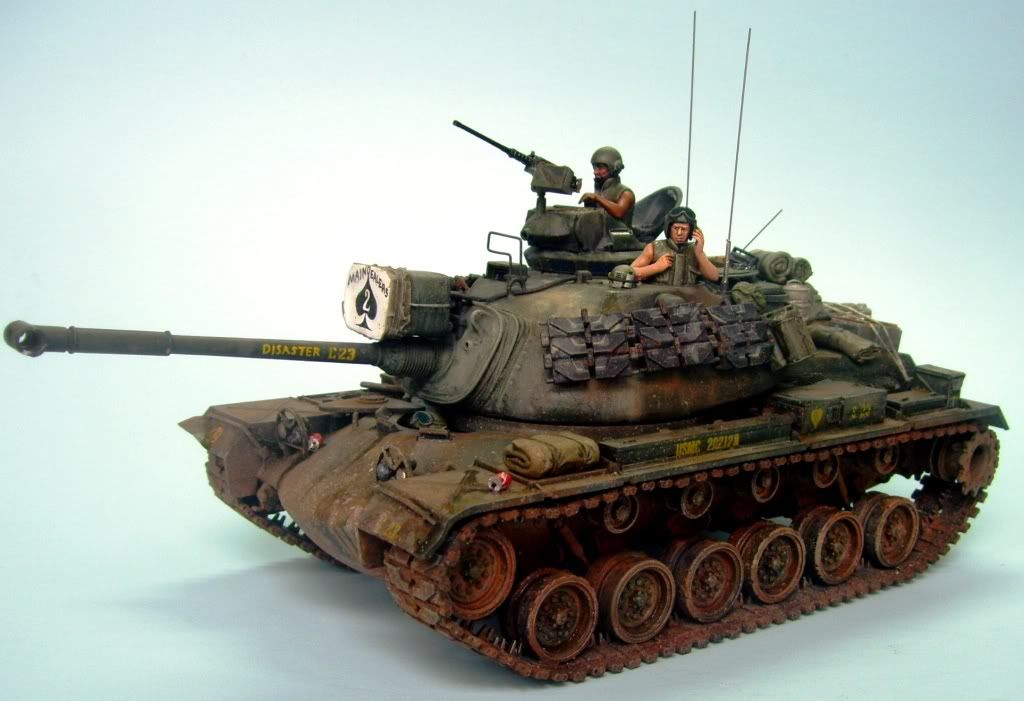
You can see that I did go back to the .50 cal ammo can with a folded length of PE rounds.

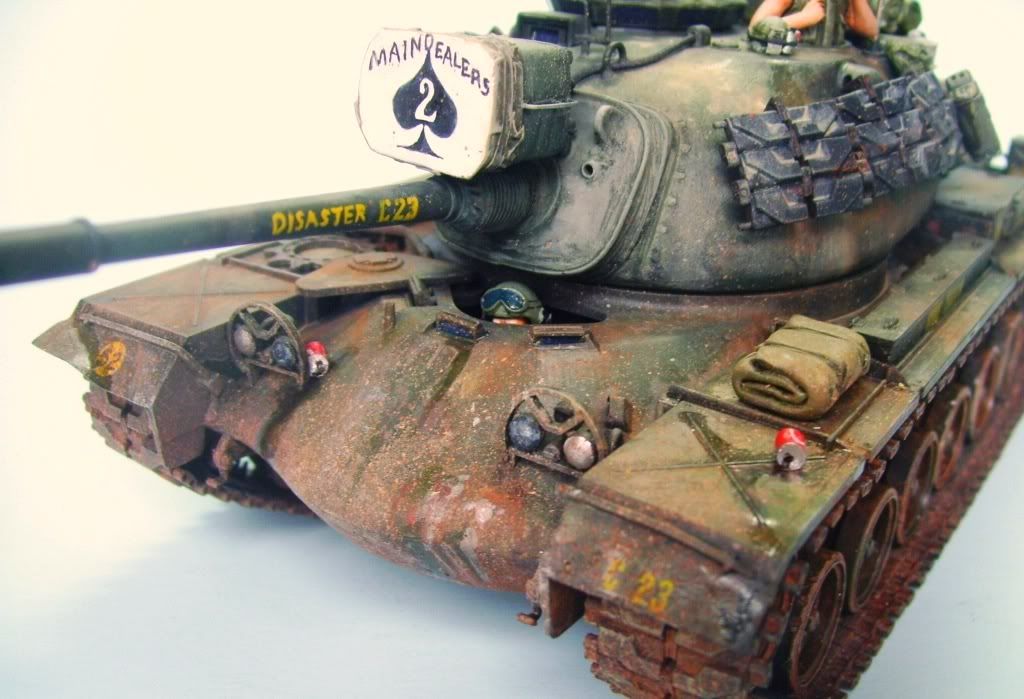
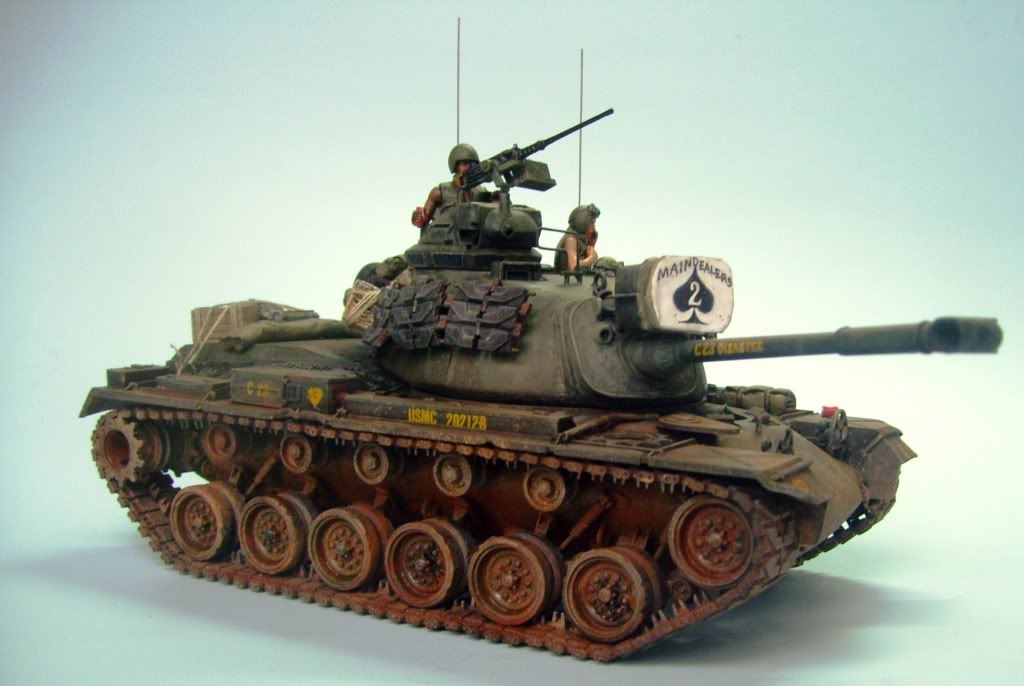
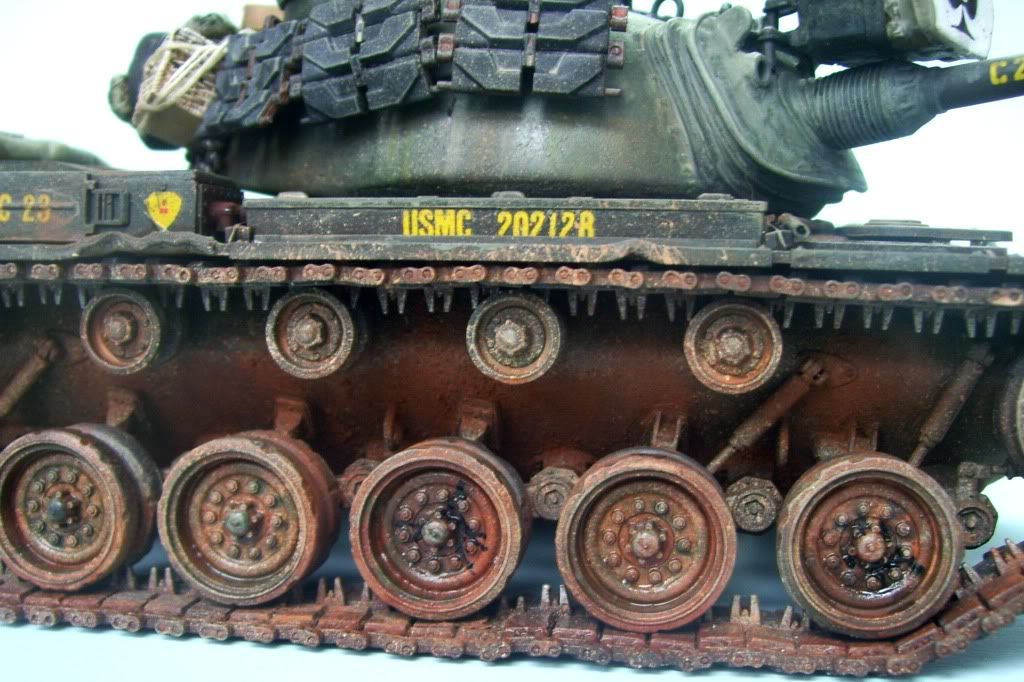
I went a little easier on the red pigments than I originally expected to do. I had applied them to the upper hull but washed them off, as they were just too overpowering. It's almost too much on the lower hull for me, but I think it needs it there.

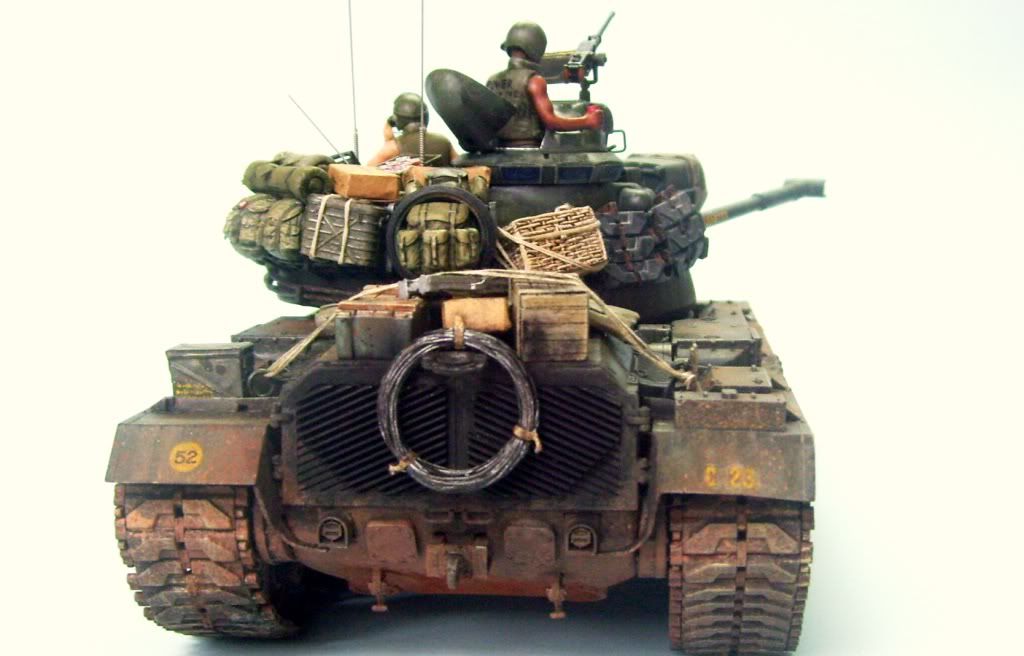
The rear--the TC's flak jacket says "Power to the Patton!" I added some rear deck goodies. Black pigments were used to show the M48's characteristically dirty butt. Two guitar strings made the antenna's.

I didn't go really heavy on the clumped dirt, as it was too chromatically overpowering. It just coats the hull in a thin layer. This is mostly paint splatters. I added some oil leaks to the wheel hubs.

So I do believe that maybe this one's a wrap? Unless of course, someone tells me something I did hopelessly terrible that makes me smash it underfoot..Whistling lol

All comments welcomed as always!  And thanks to all the vets who have lent their expertise on this thread and imparted such interesting and valuable information! YOU GUYS ROCKED!!! Yes[B


  • Member since
    February 2009
  • From: mass,USA
Posted by scratchmod on Thursday, November 18, 2010 7:58 PM

yeah baby that's what I'm talking about. YesYesYes

Freaking awesome dirt job Karl, you da man bro.

Weathering is perfect for Nam. I've always like your style of painting. Bow DownBow Down

Soooo, when we gonna see another rust bucket from the Doog ???


Rob

www.scratchmod.com

  • Member since
    August 2003
  • From: Connecticut, USA
Posted by Nachtflieger on Thursday, November 18, 2010 8:16 PM

Looks great Karl. I love the weathering.Big Smile

Nate


  • Member since
    April 2003
  • From: 41 Degrees 52.4 minutes North; 72 Degrees 7.3 minutes West
Posted by bbrowniii on Thursday, November 18, 2010 8:51 PM

Well done, Karl!  List me as a fan!!

'All that is necessary for the triumph of evil is for good men to do nothing' - Edmund Burke (1770 ??)


  • Member since
    December 2002
  • From: Valrico, FL
Posted by HeavyArty on Thursday, November 18, 2010 9:01 PM

Doog, She came out awesome.  It looks very realistic.  Great job on it.

Gino P. Quintiliani - Field Artillery - The KING of BATTLE!!!

Check out my Gallery: https://app.photobucket.com/u/HeavyArty

"People sleep peaceably in their beds at night only because rough men stand ready to do violence on their behalf." -- George Orwell

  • Member since
    November 2010
Posted by Beam17 on Thursday, November 18, 2010 9:23 PM

Hey Doog!

Great job! I love it!  I really like the weathering - especially those muddy tracks.

Nothing like cruising around in a tank, drinking some Coke and gettin' a little dirty!  Wink

Genes load the gun, but the environment pulls the trigger.

  • Member since
    August 2008
  • From: S.W. Missouri
Posted by Pvt Mutt on Thursday, November 18, 2010 9:26 PM

ABSOLUTELY GREAT KarlStarStarStarStarStar

WOW

Tony LeeSmile

Shoot Low Boys They're Ridin Ponys

JOIN OUR COMMUNITY!

Our community is FREE to join. To participate you must either login or register for an account.

SEARCH FORUMS
FREE NEWSLETTER
By signing up you may also receive reader surveys and occasional special offers. We do not sell, rent or trade our email lists. View our Privacy Policy.