SEARCH FINESCALE.COM

Enter keywords or a search phrase below:

M48 Patton FINISHED! Page 16

104696 views
278 replies
1 rating 2 rating 3 rating 4 rating 5 rating
  • Member since
    August 2003
  • From: Connecticut, USA
Posted by Nachtflieger on Thursday, October 14, 2010 2:38 PM

Really looking forward to seeing this one painted. Also, good for you in helping out a new modeler!Yes

Nate


  • Member since
    January 2007
Posted by the doog on Thursday, October 14, 2010 2:01 PM

redleg12

A generation thing!!! You are assuming I am an old gas passer (that's besides the point)....I thought of Aerosmith..and it is a classic.....but the Gene Autry song is like you "an Original Classic" Wink

Rounds Complete!!

Ha ha, Mike! I know that you meant well--hell, I prefer the "Original Classics" over the current spat of "remakes" too, any day!

Thanks again to all of you weighing in--sorry I haven't gotten around to answering, but I've been busy wrking to get an update--Steve, your "impatient smiley" cracked me up too! lol!

OK! 'NUFF TALK! Here we go---

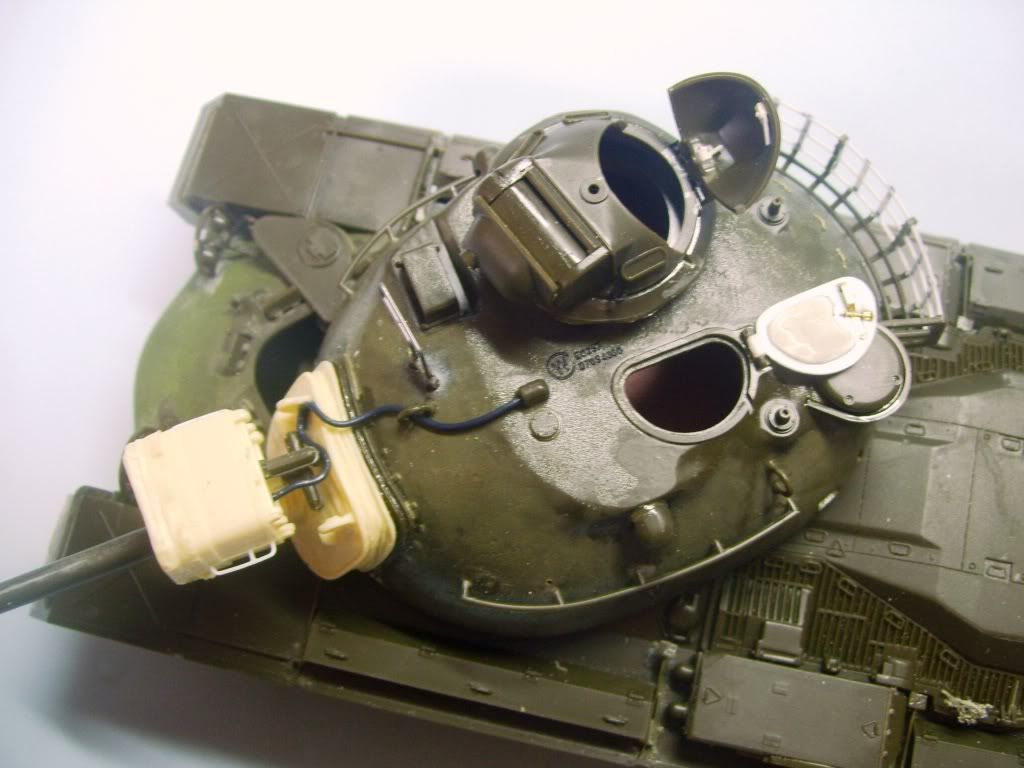
It' ready for a base coat., pretty much...

Here's some of the details. here is the location of the lifting hooks that you should add to the cupola. I used small guage wire to put these into drilled holes. Note also, that I added some latches to the interior of the TC's hatch.
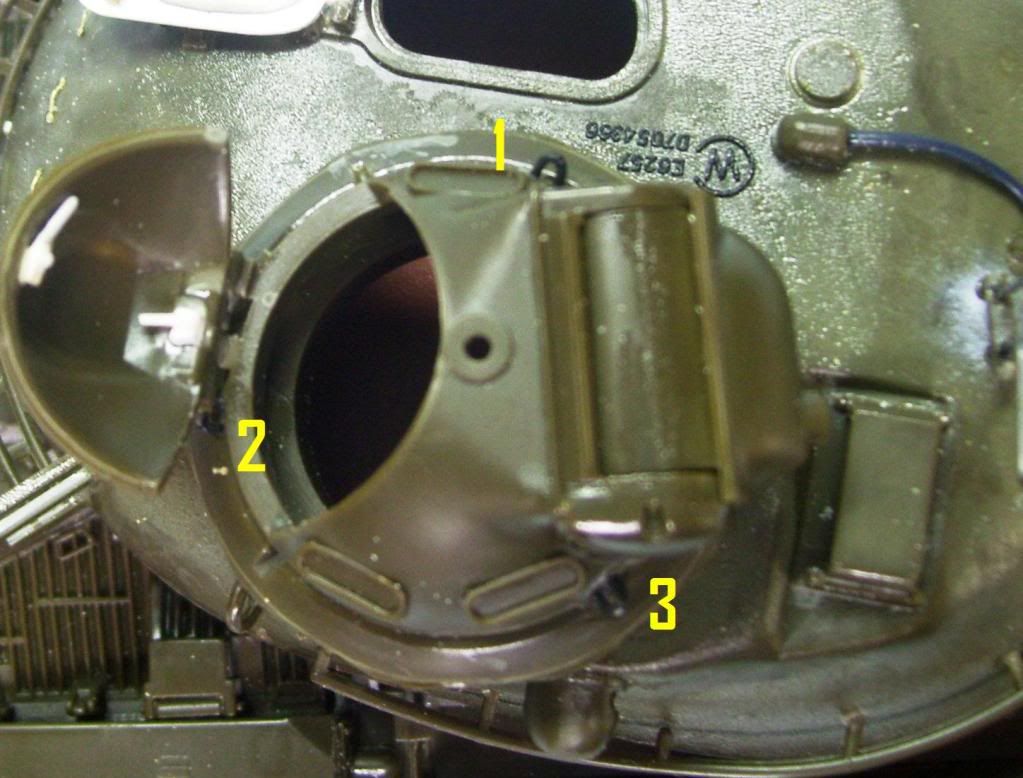
A word about that hatch--you'll see some photos of this hatch with two periscope cutouts in it, but Gino has assured me that both types existed--with, and without, Phew! I didn't know how I was going to pull that off! Also, the hatch can also be posed in "protective" position--it didn't always sit flat. There are numerous photographs to prove this, so no problem with interference from that antenna base...

The resin searchlight needed some grab rails--I didn't like the ones from the kit; they were kinda poorly-molded, so I made some new ones out of /030 rod.
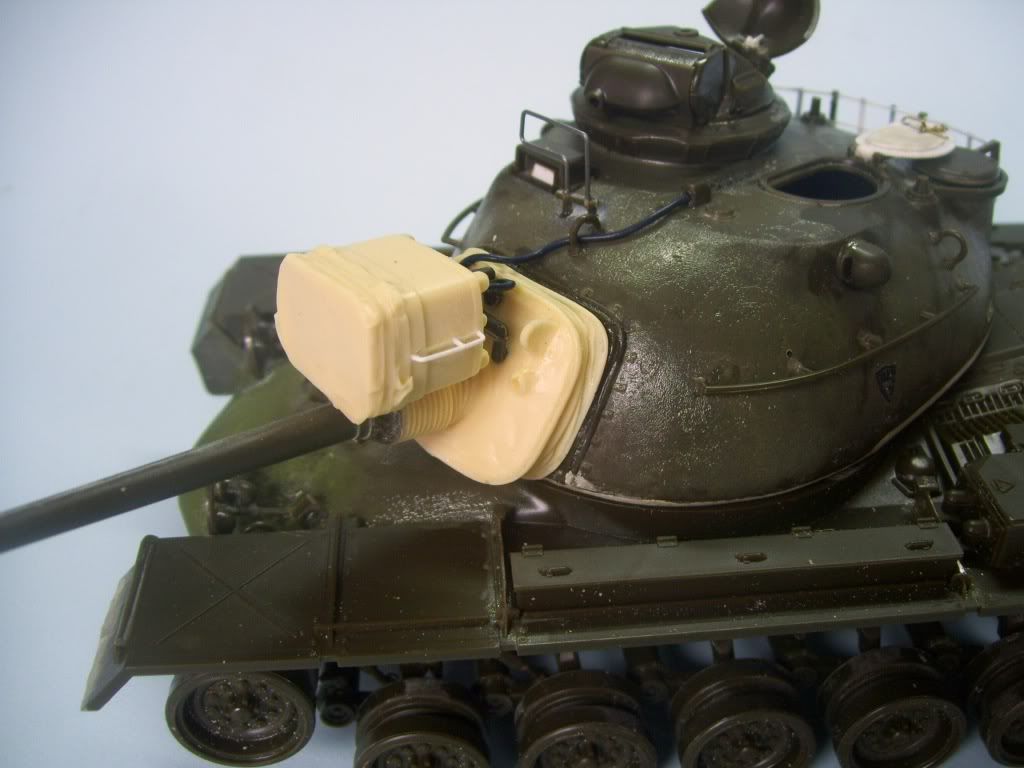
Ditto for that MG deflector-doodad on the top; I replaced that with music wire. Also, in this shot, I've added a bit of tissue to the top of the MG housing there, as a rain shroud seem to have been used in many cases.

And here's the wire to the light--this is actually "Detail Master heater hose" from my days spent working in the 1:24 garage....Whistling....gotta get back there soon, too--I've got a '69 Dodge Daytona calling me...Surprise

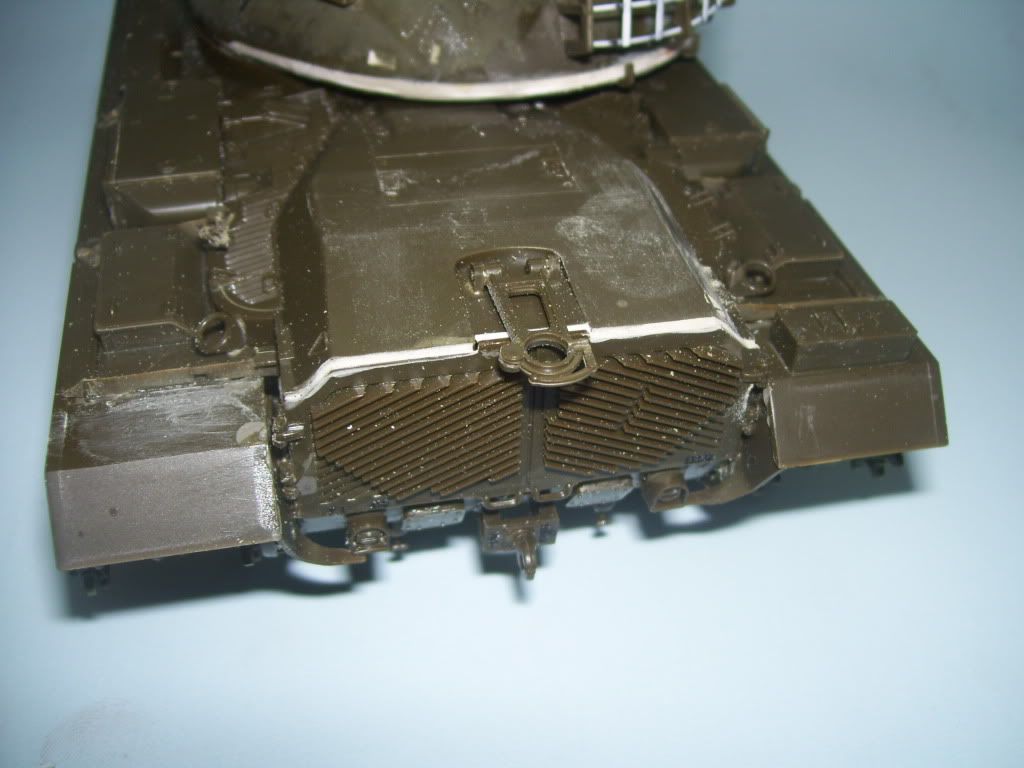
The rear of this tank was a bit of a mess--it's hard to get an accurate mating of the rear parts. I had some more filling and patching up to do. I actually wound up prying off the rear sprocket mounts and repositioning them, as I couldn't get the damned fenders to fit. As I had positioned them in the first place, the sprocket would have rode to high anyway--the track would have been hitting the bottoms of the fenders, so watch out for this when assembling yours. I honestly don't know how that happened--I followed the directions closely in this area? Thank god for Squadron White putty.
And the wheels got a good beating-up with a #11 blade, as the wheels seem to have taken a lot of abuse...

and, my "date" for tonight.....Sad

That's it so far....I'm going to paint it maybe tomorrow? I'm having one of my young guitar students (12 years old) sit in while I paint it. He's interested in modeling and recently got a new airbrush, and I want to give him a good start. It should be a fun day...

Give it to me, guys! See anything?


  • Member since
    October 2009
Posted by PANZERWAFFE on Wednesday, October 13, 2010 7:44 PM

Great job on everything  all looks outstanding to me.  I really like that casting effect on the turret and glacis.  I may try this on a future build.  Will be watching and learning.  Really enjoy how you explain things as you go.

Rob

Rob

  • Member since
    July 2003
  • From: On my kitchen counter top somewhere in central North Carolina.
Posted by disastermaster on Wednesday, October 13, 2010 12:24 PM

..........http://i38.photobucket.com/albums/e105/CommentCrazyGirl/Smileys%20Emotions/Waiting%20Suspicious/thwaiting.gif

 https://i.imgur.com/LjRRaV1.png


  • Member since
    April 2005
  • From: Piscataway, NJ!
Posted by wing_nut on Wednesday, October 13, 2010 6:51 AM

Manstein's revenge

About time you got back on this mofo...chop-chop...

A very demanding fan base.Wink

Marc  

  • Member since
    November 2005
Posted by Anonymous on Wednesday, October 13, 2010 6:20 AM

About time you got back on this mofo...chop-chop...

  • Member since
    July 2006
  • From: New Jersey
Posted by redleg12 on Wednesday, October 13, 2010 5:37 AM

A generation thing!!! You are assuming I am an old gas passer (that's besides the point)....I thought of Aerosmith..and it is a classic.....but the Gene Autry song is like you "an Original Classic" Wink

Rounds Complete!!

"The Moral High Ground....A Great Place to Emplace Artillery."

  • Member since
    January 2007
Posted by the doog on Tuesday, October 12, 2010 10:44 PM

Thanks, Marc! It's good to hear that I "haven't lost my edge"!

Mike--I had to laugh at your post there, because if I had posted "Back i the Saddle Again", I would have posted the Aerosmith version, lol! A generational thing, perhaps? lol  Big Smile And don't worry; I plan to be around for a while now. Hopefully! ?

Bill, thanks for looking in too, and for the thumbs-up!

Steve---that's it! Arte Johnson! For a moment there I had him confused with Sgt Schultz form Hogan's Heroes! lol! I remember Laugh In from when I was a wee little turd! Wink

  • Member since
    July 2003
  • From: On my kitchen counter top somewhere in central North Carolina.
Posted by disastermaster on Tuesday, October 12, 2010 9:55 PM

Doog, it was Arte Johnson.

http://www.signofthetimes.com/steve/ajohn.jpg

A regular on "Laugh-In" every Saturday night back in the sixties.

http://i20.photobucket.com/albums/b232/gluetank/Decorated%20images/th_T1-4-copy.jpg

 https://i.imgur.com/LjRRaV1.png


  • Member since
    July 2004
  • From: Texas
Posted by wbill76 on Tuesday, October 12, 2010 9:15 PM

Nice work on the sprocket fix Doog. The other details also definitely add some life to this one. Nice to see you back at the bench! Beer

  • Member since
    July 2006
  • From: New Jersey
Posted by redleg12 on Tuesday, October 12, 2010 6:56 PM

I saw you posting armor modeling work.....and all I can think of is

Outstanding scratch work....nice....I love the Archer Transfers....they make life soooooo easy. Moving along nicely.

Hope you can stay for a while!!

Rounds Complete!!

"The Moral High Ground....A Great Place to Emplace Artillery."

  • Member since
    April 2005
  • From: Piscataway, NJ!
Posted by wing_nut on Tuesday, October 12, 2010 5:11 PM

Hot diggity doog!  Your back!  Looking good too. Building rusty cars has not cuased you to lose your edge.

Marc  

  • Member since
    January 2007
Posted by the doog on Tuesday, October 12, 2010 4:43 PM

Thanks alot, guys! I genuinely appreciate the warm approval--it's nice to be back in gear here and making models again!

Pawel, thanks for that tip on the antenna base and for the nice comments!

Thanks, too Nate--I'll certainly need some patience while cleaning up those darned tracks!

Tony--your comment cracked me up! Thanks for the laugh, and the nice comment!

Gino--thanks again for the great tip on those casting numbers! Small details like that make your model stand out, IMO--and thanks again for that list of fixes. It's certainly been a great roadmap for proceeding with inspiration! I appreciate your help and your comments in this thread!

Steve, thanks for looking in too, and for a good chuckle! Ironic, that it's a German outfit on--what was his name--Marty something?

Rick, thanks for those photos! And don't feel bad--I get these tanks confused all the time too, lol! To a German fan like me, these big, fat, olive drab tanks almost look all alike some time! lol. Cool shots, though. Man, I gotta get down to Aberdeen one of these days and see what's left!

Again, thanks again guys. It's good to be back!


  • Member since
    December 2002
  • From: Valrico, FL
Posted by HeavyArty on Tuesday, October 12, 2010 2:49 PM

Wabashwheels

http://i745.photobucket.com/albums/xx92/wabashwheels/411WMainRemodel013.jpg

http://i745.photobucket.com/albums/xx92/wabashwheels/411WMainRemodel027.jpg

http://i745.photobucket.com/albums/xx92/wabashwheels/DSC_0018.jpg


Your top pic is an M48A2.  The M48A2 was the predecessor to the M48A3 that Karl is building.  There were quite a few changes between the different versions. 

Middle pic is an M60A1.  The M60A1 came after the M48 series and used many of the same automotive components on a new hull and turret. 

Bottom is an M47.  The M47 was the predecessor to the M48 series.  Many of the same style of components; road wheels, sprockets, same basic gun, etc. carried over to the M48.  The M48 components were beefier and bigger though.


Gino P. Quintiliani - Field Artillery - The KING of BATTLE!!!

Check out my Gallery: https://app.photobucket.com/u/HeavyArty

"People sleep peaceably in their beds at night only because rough men stand ready to do violence on their behalf." -- George Orwell

  • Member since
    November 2008
  • From: Crawfordsville, Indiana
Posted by Wabashwheels on Tuesday, October 12, 2010 2:26 PM

Karl; I haven't done much armor, but I love good work.  It's this kind of stuff that gets me closer to doing something without a propeller.  Well, I may not build it, but I still do love it.  I've got a couple of photos from The Patton Museum at Fort Knox, and The Ropkey Armor Museum at Crawfordsville, Indiana.  They show some pretty decent detail.

I'm not sure, but I think this in the M-48 family.

M-47, but the road wheels and suspension look so similiar, and the detail was so crisp.

Hope you can get a little good out of these.  Rick


  • Member since
    July 2003
  • From: On my kitchen counter top somewhere in central North Carolina.
Posted by disastermaster on Tuesday, October 12, 2010 2:24 PM


http://i133.photobucket.com/albums/q60/strad08/Very_Interesting.jpg 

http://i717.photobucket.com/albums/ww173/prestonjjrtr/Smileys/SmileyAboutTime.gif

http://i20.photobucket.com/albums/b232/gluetank/Decorated%20images/th_T1-4-copy.jpg


 https://i.imgur.com/LjRRaV1.png


  • Member since
    December 2002
  • From: Valrico, FL
Posted by HeavyArty on Tuesday, October 12, 2010 2:21 PM

It's looking great Karl.  The new sprockets look good.  Those casting number sets are a breeze and add lot of detail.  Keep up the good work, almost there.

Gino P. Quintiliani - Field Artillery - The KING of BATTLE!!!

Check out my Gallery: https://app.photobucket.com/u/HeavyArty

"People sleep peaceably in their beds at night only because rough men stand ready to do violence on their behalf." -- George Orwell

  • Member since
    August 2008
  • From: S.W. Missouri
Posted by Pvt Mutt on Tuesday, October 12, 2010 1:55 PM

My Goodness has the world come to an end and all the saints have risen from the dead.Angel

Good job you've done on the new parts Karl.Yes

Tony LeeSmile

Shoot Low Boys They're Ridin Ponys

  • Member since
    August 2003
  • From: Connecticut, USA
Posted by Nachtflieger on Tuesday, October 12, 2010 1:37 PM

Nice work on backdating the sprockets!Yes Also like the basket, and loader's hatch. Too bad about all those marks on the tracks: think of it as a meditation exercise  as you fill, and sand all those marks!Wink

Nate


  • Member since
    May 2009
  • From: Poland
Posted by Pawel on Tuesday, October 12, 2010 1:36 PM

Update ho!

Nice work on the sprockets, I wish I've done that on my model... Please check the location of the antenna base behind the commander's cuppola - on my Patton it interferes with the open commander's hatch, so something's wrong in this area. Other than that your machine looks great, good luck with the build and have a nice day

Paweł

All comments and critique welcomed. Thanks for your honest opinions!

www.vietnam.net.pl

  • Member since
    January 2007
Posted by the doog on Tuesday, October 12, 2010 1:25 PM

Hey guys--

I'm finally back to working on something here. I have some updates for the Patton.

I tool the advice to fix the sprockets to the more-common "early" solid-faced pattern seen in Viet Nam. Here's the photo-- #1 is the kit part; #2 shows a circle of styrene cut out using a circle template. #3 putty and then sand the top, #4 mark holes in pencil and then drill out the holes with a micro-drill bit, and fill with .040 styrene hexagonal rod. #5 Shows the sprockets after a quick test-coat of paint. Not too bad, I think?

Thanks to Gino, (Heavy Arty), I got some casting numbers transfers through the mail and have applied them on the top and side of the turret...

...and to the rear hull towing pintle and engine access doors. Not sure if these are 100% entirely "correct"< but they sure look the part.

I also corrected my boneheaded mistake of the wrong M60 hatch, and have made a new one. Thanks to "Vespa Boy" (Narayan) for the use of his manuals to get this detail on the correct, new hatch. This was done with styrene and spare PE scraps.

I also went through the trouble of re-doing the basket with .025 styrene rod. It is recommended to replace this, and suggests brass, but I just love the ease of working with styrene. Also, I've replaced the tie-downs with spare PE from my old Hetzer update set! NEVER THROW ANYTHING OUT, lol!

The tank is coming along...here, I've re-positioned the gun, bringing down the barrel a bit.

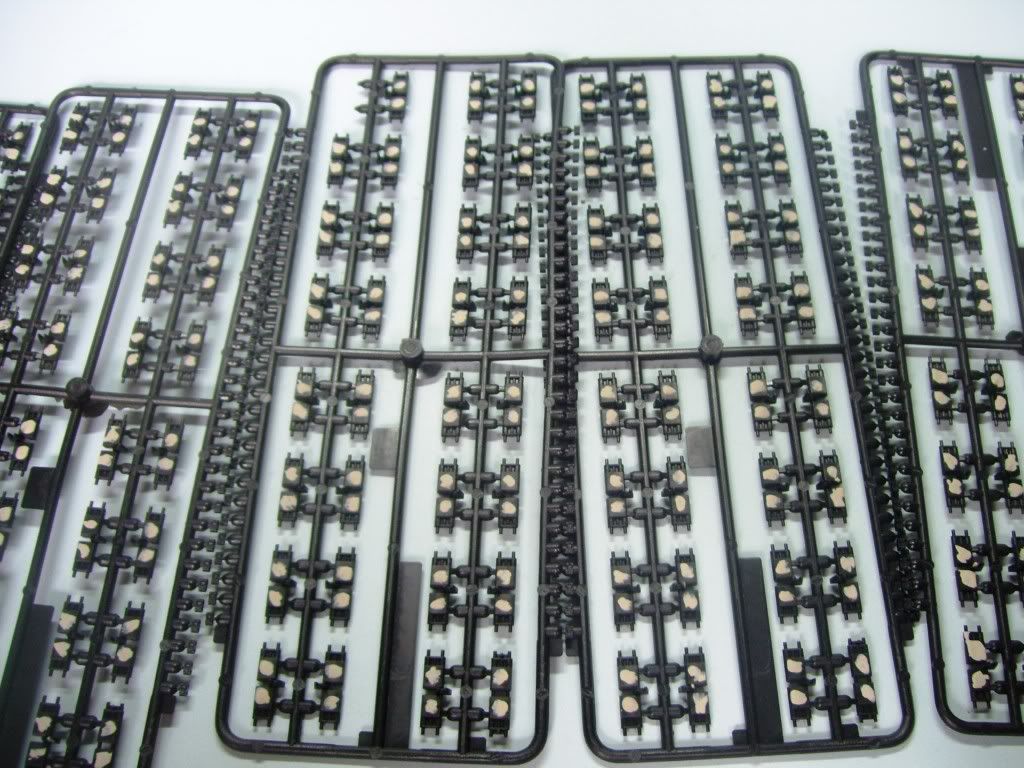
Here's a bummer--the AFV Club aftermarket tracks set has a freakin' BIG knockout mark in each of the track shoe sides! Every link will have to be laboriously cleaned-up! Set aside about three hours.....Bang Head

Call out anything that needs attention, guys! Don't hold back if you see something glaring?

That's it for now! Stay tuned! Big Smile

Tags: LOL
  • Member since
    January 2007
Posted by the doog on Friday, September 17, 2010 8:20 AM

disastermaster

http://smileys.smileycentral.com/cat/28/28_1_19.gifNorth Carolina!!!??!!


PS - This heat sucks soooooo bad http://smileys.smileycentral.com/cat/4/4_2_205.gif.

LOL--Steve, I couldn't agree more! Man, is it HOT down here! Blssscchhh! lol!

Narayan--thanks, man! Good to hear from you! I don't think I'll be able to find those manuals, but thanks for the heads up!

  • Member since
    April 2004
  • From: Boston MA
Posted by vespa boy on Thursday, September 16, 2010 5:40 PM

Karl, That build is coming along nicely. I built the Tamiya kit when it first came out in the early 80s and I borrowed a maintenance manual from a friend. If you can get hold of any of the manuals, they are FULL of very useful reference material, especially for detailling open hatches.

Congrats on your engagement. Its wonderful news.

http://public.fotki.com/nkhandekar

This ain't no Mudd Club, or C.B.G.B.,
I ain't got time for that now

  • Member since
    July 2003
  • From: On my kitchen counter top somewhere in central North Carolina.
Posted by disastermaster on Thursday, September 16, 2010 5:24 AM

Smiley SunglassesNorth Carolina!!!??!!

That's where I live.

SweatyWelcome to the land of the fickle weather.

Freezing90 + one day and 59 overnight .....

68 the next ..........and 88 the next and so onnnnnnn and on.

Thunder and spectacular lightning.......    Tornadotornadoes .....  a complete smorgasboard of events....... sometimes all in ONE day. 

Sweating 2Today's another 90+er..........enjoy.

Good luck!

http://i20.photobucket.com/albums/b232/gluetank/Decorated%20images/th_T1-4-copy.jpg

PS - This heat sucks soooooo bad Soapbox.

 https://i.imgur.com/LjRRaV1.png


  • Member since
    January 2007
Posted by the doog on Wednesday, September 15, 2010 8:31 PM

Andy--lol, a TV show? Geez, as if I don't get enough MTV time, lol!

RBaer

How's yours coming?

RBaer, I'm in North Carolina right now at Jenn's just coming home from Spain--won't actually be home til next Tuesday--the 21st I think ir is? And I won't be back at the bench for a few days--we have a wedding to go to, and stuff to do. I'll probably have some kind of update by the end of the month?

  • Member since
    September 2006
  • From: Dripping Springs, TX, USA
Posted by RBaer on Wednesday, September 15, 2010 4:27 PM

Karl, I'm looking for the mount info as well, seems like there was a build log on another forum a few eons back, but I can't find it. Until then, I'm pretty much stuck, since I modded the suspension arms to show the weight bias of a lifted blade......

....so until I get some more info, I'm in limbo.

How's yours coming?

Apprentice rivet counter.

  • Member since
    April 2009
  • From: Carmel, IN
Posted by deafpanzer on Sunday, September 12, 2010 11:16 AM

Doog, do you ever thought about starting up a TV show for MTV and call it 'Pimp Up My Tank"?  That would be awesome!  You can play us songs at the end of shows on top of the pimped up tank.  Heck I won't be able to enjoy your music but I won't mind hanging out with your friendly lady Rockers.

I will be following your work for sure... always a great toot for us rookies.  Thanks for doing this!

Andy

  • Member since
    January 2007
Posted by the doog on Sunday, September 12, 2010 8:32 AM

Thanks for replying, Richard, and tellis---tellis, I didn;'t see anypic show up in your post; maybe FSM removed it for copyright reason?

By the way, I have that book, but as I'm away from home right now, I wouldn't have access to it right now. It's good to know that if the book I have is the same, it will be in there. Thanks for pointing this out to me!

  • Member since
    September 2004
  • From: Burke, Virginia
Posted by tellis on Sunday, September 12, 2010 7:41 AM

Doog, I've found pix in the Squadron/Signal M48 in action that show the loaders hatch with the head pad in all variants thru the A5 model.  hope this helps.

T Ellis

T Ellis  Springfield, VA  http://i158.photobucket.com/albums/t104/cycledupes/WWIIArmorBadge.jpg

  • Member since
    April 2010
  • From: Malaysia
Posted by rtfoe on Thursday, September 9, 2010 1:19 AM

Hi Karl,

Great WIP on the M48, thought you only did castles?Big Smile Anyways I'll be following this thread with interest. 

Never knew about the shim for the turret and only heard about the high ride, that's why I was wondering why my Magach recently posted was short in the head and high heeled.

Referring to your WIP will make sure the next build will be more accurate. As for the hatch, let me check my references.

Cheers,

Richard 

" Our hobby is like a box kit full of plastic, You'll never know what you'll get till you complete one "

JOIN OUR COMMUNITY!

Our community is FREE to join. To participate you must either login or register for an account.

SEARCH FORUMS
FREE NEWSLETTER
By signing up you may also receive reader surveys and occasional special offers. We do not sell, rent or trade our email lists. View our Privacy Policy.