SEARCH FINESCALE.COM

Enter keywords or a search phrase below:

12.8 cm Waffentrager--FINISHED PICS

31069 views
134 replies
1 rating 2 rating 3 rating 4 rating 5 rating
  • Member since
    July 2006
  • From: San Francisco Bay Area
Posted by bufflehead on Wednesday, February 8, 2012 9:38 PM

Whoa!  I blink my eyes and the doog had almost got this one done!!  Amazing work Karl!!  I love the Frankenstein looking effect you've accomplished with paint job you did!  I'm very curious to see what you're going to do with the dark gray barrel.  Hmm

Ernest

Last Armor Build - 1/35 Dragon M-26A1, 1/35 Emhar Mk.IV Female


Last Aircraft Builds - Hobby Boss 1/72 F4F Wildcat & FW-190A8


  • Member since
    November 2005
Posted by Anonymous on Wednesday, February 8, 2012 8:31 PM

Looks great...doog, IMO I would think there would be NO markings on this mutha...not even a national cross...I love the camo on the shield but I feel that the camo on the muzzle brake is a bit overdone (typically even if an AFV was heavily camoed it rarely extended on the barrel, and if it did very rarely to the muzzle brake)---I woulda left it in dark yellow.  I still can't get over how well that brake turned out!

  • Member since
    August 2008
  • From: S.W. Missouri
Posted by Pvt Mutt on Wednesday, February 8, 2012 8:18 PM

Hey guys the eye dropper part of a Vallejo bottle just pulls out,I do it all the time.Yes

Tony lee

Shoot Low Boys They're Ridin Ponys

  • Member since
    May 2006
  • From: Queensbury,NY
Posted by panzer88 on Wednesday, February 8, 2012 8:14 PM

Looking great Doog!!!! That muzzle break looks sweeeeet, incedible save there.This beasty is shaping very nicely. And I know it is only going to get better.


  • Member since
    April 2009
  • From: Carmel, IN
Posted by deafpanzer on Wednesday, February 8, 2012 8:01 PM

WOW!  I have to say it is one of most weird looking armor I have seen... so pumped up on steroids?  I am really enjoying your WIP.  It is really good having you back! 


Andy

  • Member since
    January 2007
Posted by the doog on Wednesday, February 8, 2012 7:34 PM

Hey, thanks guys, for the comments!

SuppressionFire, this was a concept for a Waffentrager ("Weapon Carrier) that never actually made it to prototype stage. It was apparently only a design.

Ha ha, thanks Tony!

Mike, thanks for the info on the Vallejo primers! That's cool that they actually come in bottles! I have to see if I can find the bottled ones--I"d like to maybe think about using these paints, but only when they come out in bottles where I'm not feeling like I"m wasting paint. For the life of me, I can't believe that they haven't corrected the flaw of that "medicine dropper" bottle. Unfortunately, I've only ever seen the dropper-bottles on the stores' racks? Thanks for the comments and vote of confidence!

Jon, the way I'm reasoning it is that the wheels were produced for the 38t series--Hetzers, Marders, etc--so they would have been produced "in bulk", and probably painted. You can see a well-known shot of one of these related waffentragers where the wheels are plainly painted in DY. Of course, the hull is too, but I reason that the hull here is "so new" that it was just left in primer to get the gun mounted and out to the front as soon as possible?

Big Smile

  • Member since
    October 2008
  • From: New Jersey
Posted by oddmanrush on Wednesday, February 8, 2012 7:04 PM

Awesome work Karl, can't wait to see the weathering! I have a question about the road wheels. I don't know much about armor painting practices, especially late in the war. Why would the wheels have color but the hull left in primer red? 

Either way, I really like it. Visually interesting indeed!

Jon

My Blog: The Combat Workshop 

  • Member since
    July 2006
  • From: New Jersey
Posted by redleg12 on Wednesday, February 8, 2012 6:59 PM

Karl - LOOKING GOOD!!!

BTW....the Vallejo primers don't come in the little crappy bottles.....check out this link

http://www.acrylicosvallejo.com/gb/primers-gb.html

They are a 60 ml bottle....and yes the top screws off to pour excess back in from the AB. You could use the Hull Red primer and eliminate a coat of paint......just a thought and wanted to make sure you were looking at the right thing!! You know me, I like to try something new....At $5 for 60ml and great coverage, I adopted it.....trying to share the love!!

No it is time for the King of Finish to begin his work.....always fun to watch

Rounds Complete!!

"The Moral High Ground....A Great Place to Emplace Artillery."

  • Member since
    August 2008
  • From: S.W. Missouri
Posted by Pvt Mutt on Wednesday, February 8, 2012 6:40 PM

Karl there's more interest there than 40 people can handle. The other 60 will fall in line with the detailing and weathering for sure.YesCool

Cat Nip will do that to youWink

Tony lee

Shoot Low Boys They're Ridin Ponys

  • Member since
    September 2007
  • From: Truro Nova Scotia, Canada
Posted by SuppressionFire on Wednesday, February 8, 2012 6:39 PM

A stretched 38(t) on steroids?

Leave it to the desperate last days to design such a weapon!

The story line paint scheme is spot on. looking forward to how its weathered to nail down the concept.Hmm

I would fire the first round via long rope from behind a building, that chassis looks barely capable of moving the cannon let alone firing a shell!

Kind of dropped in, is this a 'paper Panzer' or a fielded design?

http://i6.photobucket.com/albums/y211/razordws/GB%20Badges/WMIIIGBsmall.jpg


  • Member since
    January 2007
Posted by the doog on Wednesday, February 8, 2012 6:09 PM

Hey, thanks, Steve, Manny, Boyd, and Bill! Once again, I appreciate you guys following along and offering suggestions!

Manny, I actually thought about that aspect of it, but actually decided against it because of the nature of the poses that I have in the crew figures that I'm going to pose with it--kinda laid back, hanging out. Also, as you'll see, the paint scheme I chose kinda tells its own narrative?

And now, without further ado...

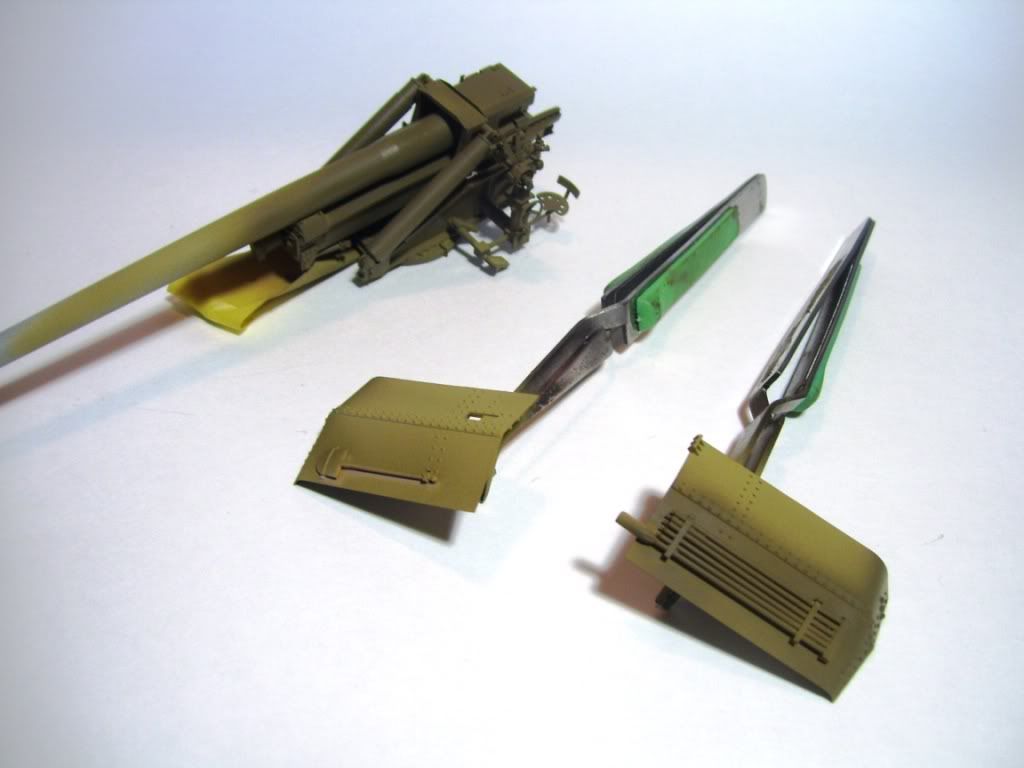
The paint and camo is finished. You can see that I used some masks to paint the travel lock and stowage box; I made these out of index cards and masking tape.

And now the finished paint. My concept for this vehicle is a new hull which has been left in Primer Red; the gun was taken from an existing carriage and mounted to this hull. A new barrel was fitted for the new weapon, and the old muzzle brake used. The stowage bin is from a damaged tank of some sort and was thus painted with a brush for visual interest and contrast; the travel lock also a "spare" part painted in DY. The wheels are simply DY--in most of the photos of Waffentragers and indeed a lot of late-war vehicles that I've seen, they seems to have plain DY wheels. All paint is Tamiya.

No, I still haven't got to the tracks...Sad I MAY paint the front spare tracks rack in rusty, bare metal, as if it was a field expedient? Might be cool?

Next up: decals (minimal, of course) and then start in weathering....Stick out tongue

All comments welcomed! Big Smile.


  • Member since
    July 2004
  • From: Texas
Posted by wbill76 on Wednesday, February 8, 2012 3:50 PM

Definitely a lot going on visually with this one Karl, look forward to the next round! Beer

  • Member since
    November 2005
Posted by Anonymous on Wednesday, February 8, 2012 2:47 PM

Wouldn't it be cool to partially paint on some camo green on a portion of one side, as if the crew had begun to paint over the primer and just ran outta time???

  • Member since
    April 2003
  • From: 41 Degrees 52.4 minutes North; 72 Degrees 7.3 minutes West
Posted by bbrowniii on Wednesday, February 8, 2012 2:34 PM

Yeah, that's hot...Toast

'All that is necessary for the triumph of evil is for good men to do nothing' - Edmund Burke (1770 ??)


  • Member since
    November 2005
Posted by Anonymous on Wednesday, February 8, 2012 10:35 AM

the doog


Here's the shading result.


http://i170.photobucket.com/albums/u244/heydoog/Waffentrager/100_2939.jpg

I'm digging this look...

  • Member since
    July 2003
  • From: On my kitchen counter top somewhere in central North Carolina.
Posted by disastermaster on Tuesday, February 7, 2012 10:36 PM

 A question.

http://board.marlincrawler.com/Smileys/marlin/pokinit.gif How much is a smidge, really?


A revelation.

http://www.freesmileys.org/smileys/smiley-fc/bottle.gifI hate those stoopid lil' bottles too.


A statement I overheard.

http://southrnfresh.com/images/smilies/naziskie.gif I vil not allow Manstein to marry my sister!

Nein, Nein, Nein, NEIN !!!


And an observation.

As always,the paint brings on the anticipation. I think you're spot on with this.


 https://i.imgur.com/LjRRaV1.png


  • Member since
    January 2007
Posted by the doog on Tuesday, February 7, 2012 10:11 PM

redleg12

Karl, I see you made it to Prime Time!!! Just as a note, in the future as an /acrylic lover, you may want to try the Vallejo primers. I tried the OD primer and I am hooked. Right from the bottle to AB, lays down and covers well and not too thick to cover details. Price is also good

Rounds.Complete!!

Thanks for the recommendation, Mike! I've picked up some Vallejo paints, but you know what I absolutely HATE about them? Those crappy little bottles! I just can't work with them. What do you do with the paint if you put too much out of the bottle? You've wasted it? Drives me crazy. Alas, with the limited availability of my favorite Tamiyas, I may have to start looking at them for future use!

----------------------------------------------------------------------------------------------------------------------------------------------------


OK--paint update! Stick out tongue

I started out with a dark red primer--this is Tamiya's Hull Red with a smidge of Red and some Black added. I painted the hull and wheels in this color. The travel lock is masked-it's going to be DY.
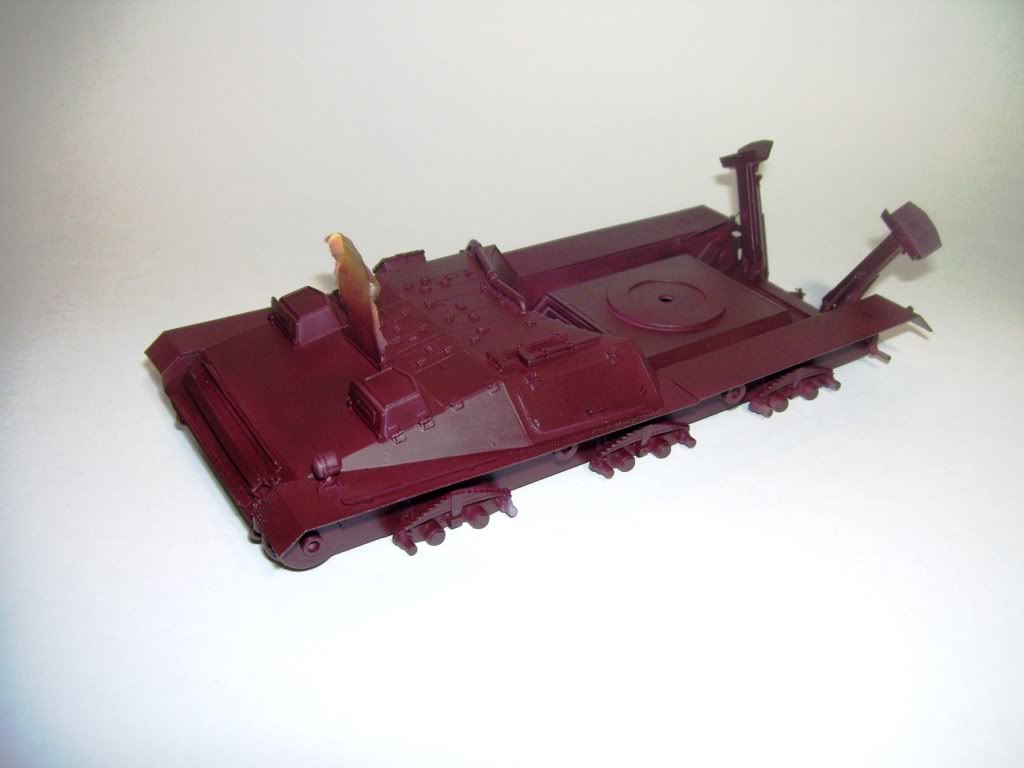
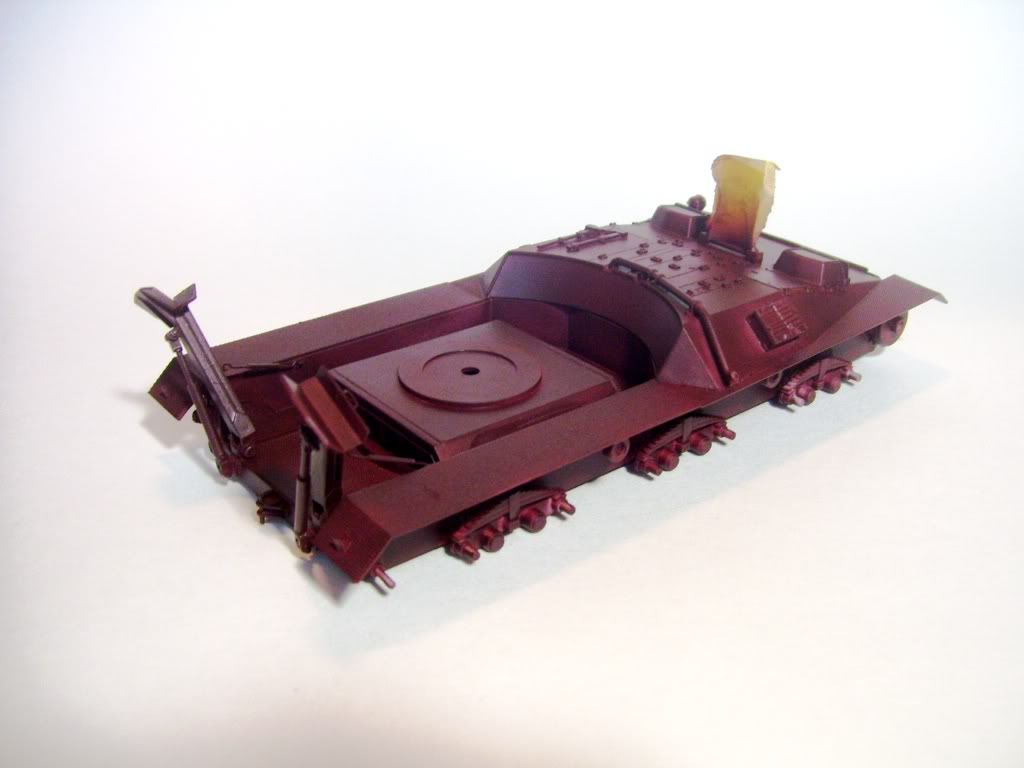
 

Next, I sprayed some straight Hull Red. It's hard to see, but it grades the finish a little lighter...
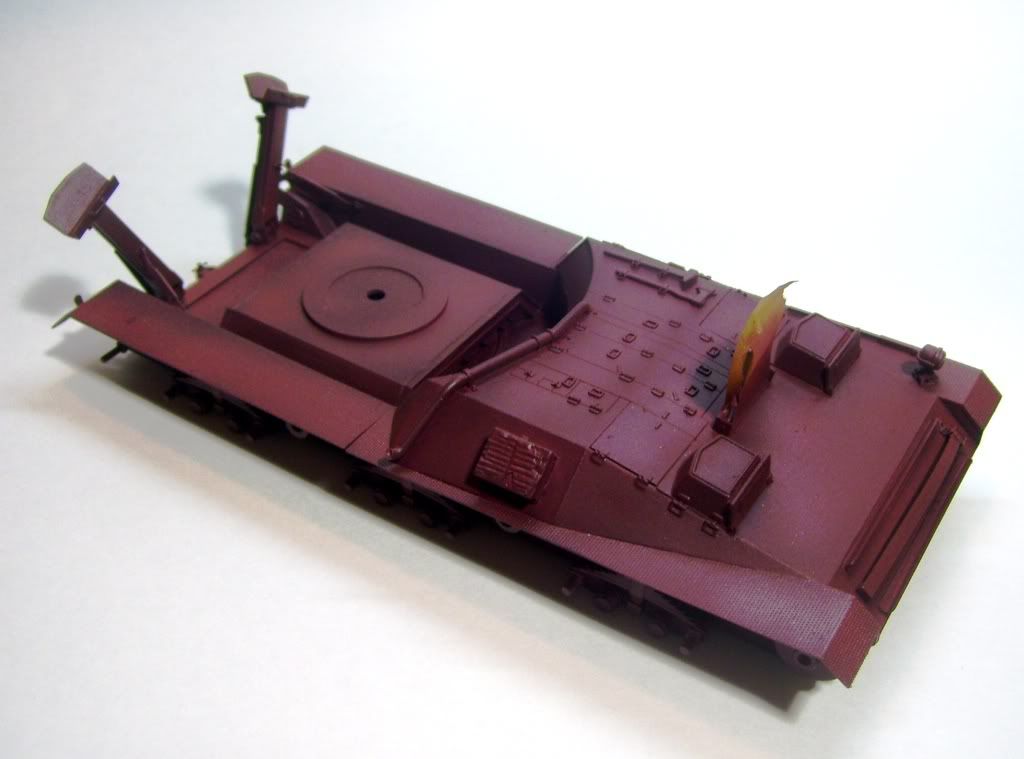
 

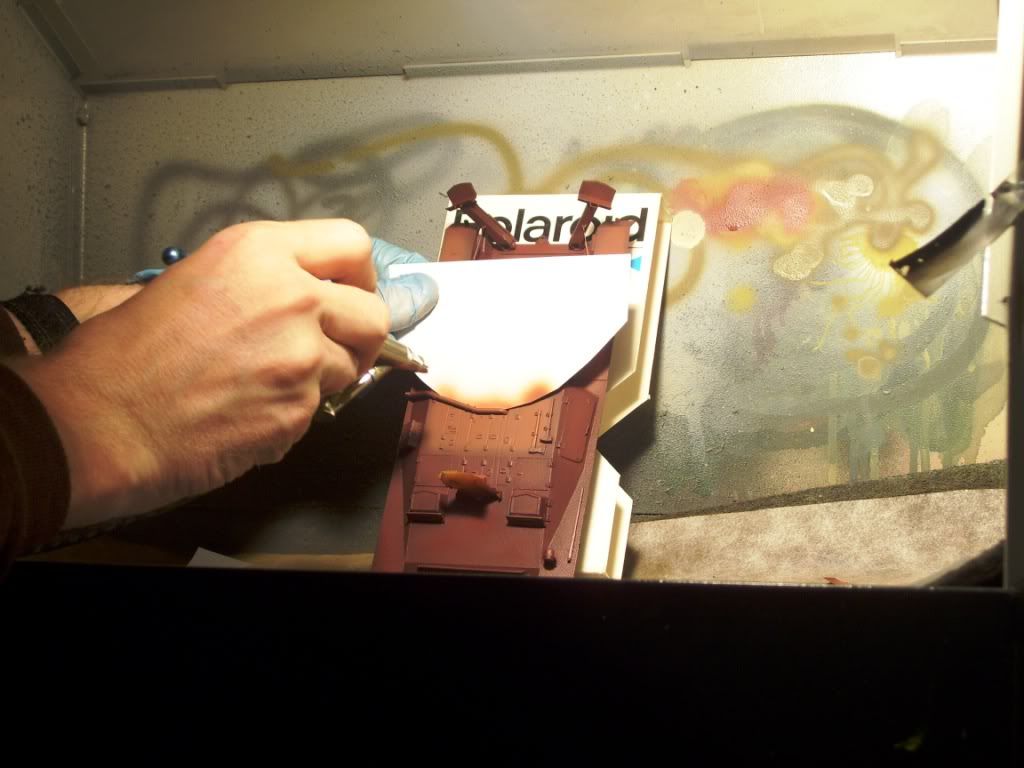
A rare action shot from the dooghouse! I'm using mask templates to block off sections that I don't want covered, and I'm now spraying a lighter Primer color that I have added some Buff to...
Here's the shading result.
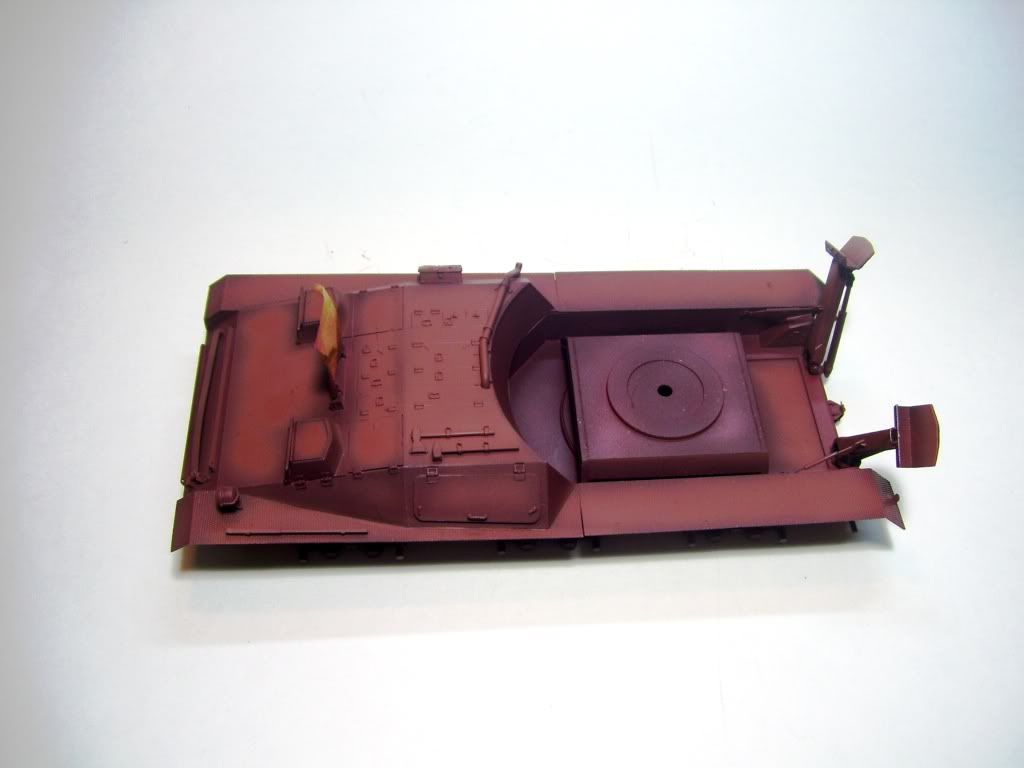
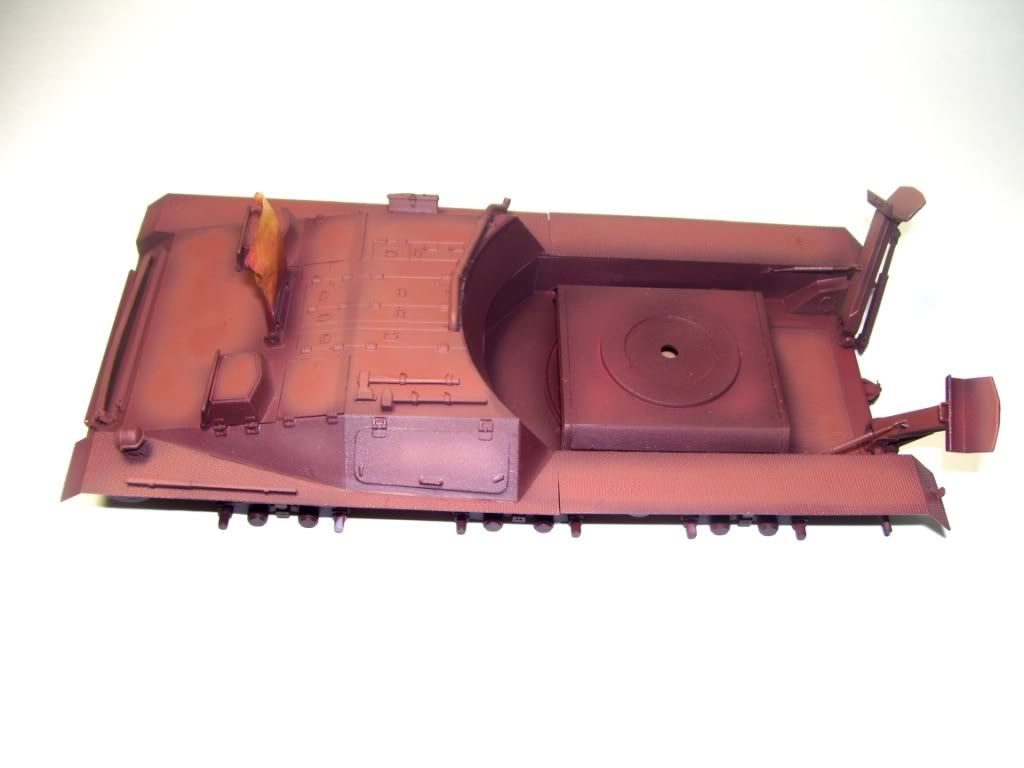
In the flash, it really looks glaring, but those of you who know my usual methods know that this is what I like to do, the better to tone it down and use the harsh gradient to my advantage when weathering and finishing. Note that the "tub" is a lot darker, because it would be more in the shadows.
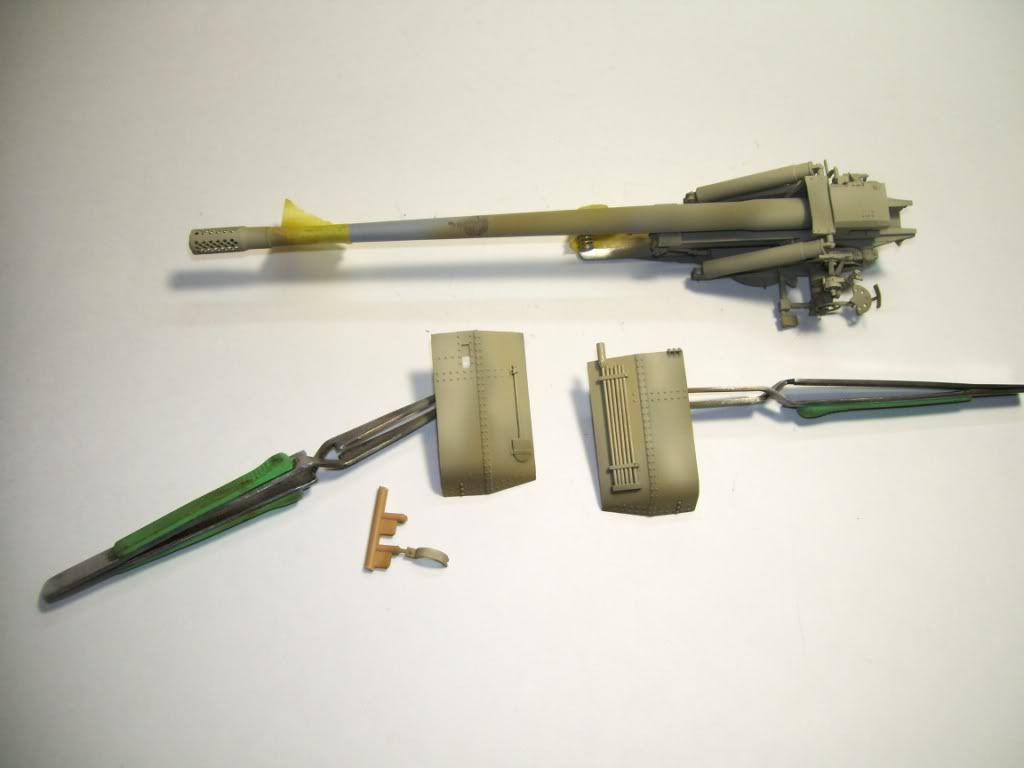
I was going to paint the gun white as if it were used in a previous vehicle, but thank to Manny, I re-checked my references and realized that that would be unrealistic, so I started the DY coat with a dark DY to which I had added some dark Grey. I had already painted a base coat of DY before I realized that I'd forgot to do a dark coat.....hey, it's late....Sleep


Next, I graded the lightness with a standard coat of DY.
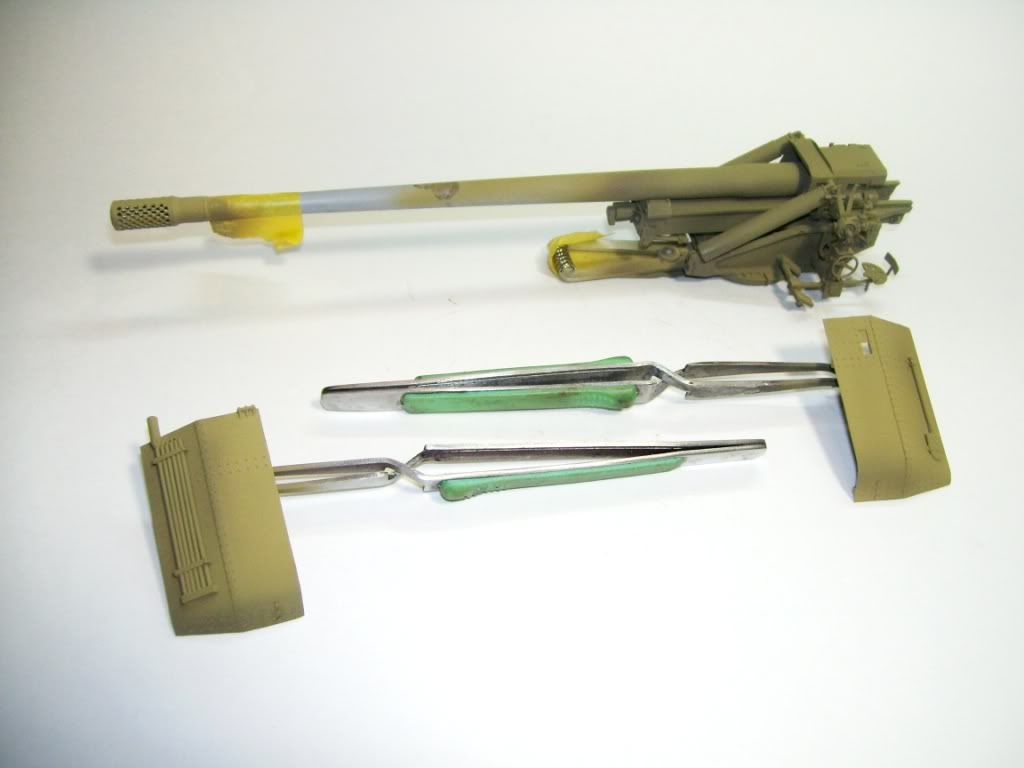
And then added some white and added a highlighting coat.
And a teaser---the gun has been painted the dark grey primer that was used on barrels--it looks nearly black here, but I will mitigate that with filters when the time comes.
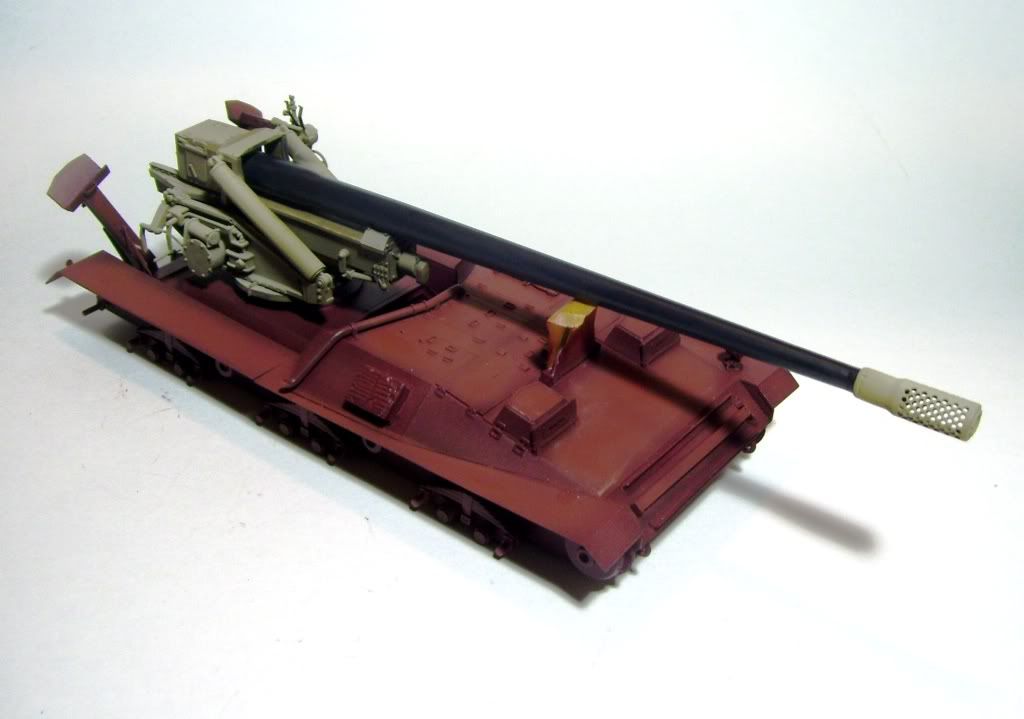
And that's the end of "phase one"--there's still more masking and careful painting tomorrow before I start the weathering....tune in tomorrow night for more!

Thanks for looking in, guys!

Karl the doog.....

  • Member since
    July 2006
  • From: New Jersey
Posted by redleg12 on Tuesday, February 7, 2012 8:42 PM

Karl, I see you made it to Prime Time!!! Just as a note, in the future as an /acrylic lover, you may want to try the Vallejo primers. I tried the OD primer and I am hooked. Right from the bottle to AB, lays down and covers well and not too thick to cover details. Price is also good

Rounds.Complete!!

"The Moral High Ground....A Great Place to Emplace Artillery."

  • Member since
    March 2003
  • From: Rain USA, Vancouver WA
Posted by tigerman on Tuesday, February 7, 2012 6:51 PM

Manstein's revenge

I love this model and want to marry it...

That travel lock sure looks flimsy for that mutha of a canon!!!

Is Polygamy allowed in the Fatherland? Der Fuhrer is making phone calls......

   http://i7.photobucket.com/albums/y269/wing_nut_5o/PANZERJAGERGB.jpg

 Eric 

  • Member since
    January 2007
Posted by the doog on Tuesday, February 7, 2012 5:50 PM

Thanks, Tony! Hey, don't go singing "Here comes da judge", or you're going to have me thinking about going back to the garage for a GTO fix! lol!

Thanks for the Yes!

Manny, ha ha; consider yourself "betrothed"! Kiss Hey, I DID research that idea I had about the white gun mount, et al, and you were right--the mounting for this gun in its "field gun" role was not the same as a JT. So I went back to the idea of a field gun mounted on a primer-red  testbed vehicle. Good call!

Bill, thanks for the advice! I looked at your blog and got that impression; that "Patience" counts! (I think you'd said as much in one post!) I"l get to those tracks one of these nights after I get some paint on it. I"m about halfway through the shading coats now...thanks for "following" my build here!

Big Smile

  • Member since
    July 2004
  • From: Texas
Posted by wbill76 on Tuesday, February 7, 2012 2:02 PM

Very nice work on the additional details Karl, really dressing this one up in style! Beer

The best advice I can give you on the tracks is to work on them in stages while watching TV or other similar activity...it helps break up the monotony! Depending on the track type I usually create an "assembly line" type of process that helps move things along and work with sections of 10 or so links at a time...that way you feel like you're making progress and it's not so much of a slog. Wink

  • Member since
    November 2005
Posted by Anonymous on Tuesday, February 7, 2012 6:35 AM

I love this model and want to marry it...

That travel lock sure looks flimsy for that mutha of a canon!!!

  • Member since
    August 2008
  • From: S.W. Missouri
Posted by Pvt Mutt on Monday, February 6, 2012 6:32 PM

My My Karl that rig is going to be BOSSToast

Katy Bar the Door here comes the judge,here comes the judge.Cool

Tony leeSmile

Shoot Low Boys They're Ridin Ponys

  • Member since
    January 2007
Posted by the doog on Monday, February 6, 2012 6:02 PM

Manny, you're correct--the Jagdtiger would have had this gun too. I think it's add some visual interest, and a bit of "story" to it. The muzzle brake, of course, will not have been used on it in the JT, but that will be cool as well; it can be painted either DY or red, as an add-on piece!

I'll do some research to be sure; that may change in time....

  • Member since
    January 2007
Posted by the doog on Monday, February 6, 2012 5:57 PM

OK, well the beast is ready for painting--this is the last construction update.

I've added some more small details--here's a look at the rear of the vehicle. I've added a central towing pintle, some handles to help raise the big spades, and some hooks to secure them, and some small details to the shields.

I also added some inside detail--a gas canister container her inside. I also put that cleaning head on one of the rods for added visual interest, and added some small detailed simulated-threaded ends to the rods.

Here's the clips on the tool holders too...

I haven't even started the tracks yet--ugh, I tool a look at wbill76's website to see what I was in for with these MK tracks, and it looks like it's going to be a task to get them all cleaned up and assembled. Got some work there....but for now, I've lightly primed the model with Tamiya Gray and will be putting a base coat of Red Primer on it soon.

That's all for now! Should have an update in a day or two when I get some proper paint down!

Stay tuned!! Big Smile

  • Member since
    November 2005
Posted by Anonymous on Monday, February 6, 2012 5:53 PM

the doog

 Manstein's revenge:

He's gone "Von Hammer" on us...very cool.  Maybe those spades that late in the war were manually put into place and then manually removed and stowed when on the move???  Anyways---your taking the basic model and adding your own what-ifs makes it more your creation and has the bonus of noone telling you its wrong!!!  Too cool for school, my friend...

...can't wait to see how you color her up...keep in mind that barrels were in a greyish primer...I could see this thing in part red-oxide primer, part dark yellow and maybe part in grey barrel primer...!!!  maybe some camo to boot...what a canvas to work with...

I hereby crown Karl the Paper-Panzer King.


Ha ha, Thanks, Manny! Big Smile

Man, I would think that those spades would have been HEAVVVV--VEE! I dunno if you could actually pick 'em up without breaking your back? But hey, who knows? Like you said, that's one of the joys of "Paper Panzers"---the possibilities! Stick out tongue

You're tuned right into my way of thinking with the painting! I was thinking of a primer red vehicle with a gray primed barrel, and "inside white" paint on the breech/gun mount, as if it would have extracted from an existing vehicle? I was also throwing around the idea of some hard-edged DY camo over the shields? Maybe some DY wheels...honestly, it's scary how close to my thinking you were on this! Great minds...lol? Whistling........Toast

Hey, I think it could be the "great minds" thing.  I'm with you on all but the white breech and mount---I mean what other vehicle carried this mutha?  The only thing I know would have been the Jagtiger, but I dunno if it had the exact gun or mount (but both are 12.8 cm)...???

  • Member since
    January 2007
Posted by the doog on Monday, February 6, 2012 5:48 PM

ColdSteel, hey thank you, that's a nice comment, and something I've never heard before. I like to think that anyone can make a model look unique, and some of the best "tricks" and ideas I've had have truly come from "accidents". I try to document them so that others can be inspired to never give up and to soldier on even after something that you might ordinarily think of as "disastrous" happens.

Thanks for the sincere compliment, and I'm happy to know you're tuned in!

  • Member since
    January 2007
Posted by the doog on Monday, February 6, 2012 5:45 PM

Manstein's revenge

He's gone "Von Hammer" on us...very cool.  Maybe those spades that late in the war were manually put into place and then manually removed and stowed when on the move???  Anyways---your taking the basic model and adding your own what-ifs makes it more your creation and has the bonus of noone telling you its wrong!!!  Too cool for school, my friend...

...can't wait to see how you color her up...keep in mind that barrels were in a greyish primer...I could see this thing in part red-oxide primer, part dark yellow and maybe part in grey barrel primer...!!!  maybe some camo to boot...what a canvas to work with...

I hereby crown Karl the Paper-Panzer King.

Ha ha, Thanks, Manny! Big Smile

Man, I would think that those spades would have been HEAVVVV--VEE! I dunno if you could actually pick 'em up without breaking your back? But hey, who knows? Like you said, that's one of the joys of "Paper Panzers"---the possibilities! Stick out tongue

You're tuned right into my way of thinking with the painting! I was thinking of a primer red vehicle with a gray primed barrel, and "inside white" paint on the breech/gun mount, as if it would have extracted from an existing vehicle? I was also throwing around the idea of some hard-edged DY camo over the shields? Maybe some DY wheels...honestly, it's scary how close to my thinking you were on this! Great minds...lol? Whistling........Toast

  • Member since
    December 2008
  • From: Currently Moscow, Russia
Posted by Coldsteel6d on Monday, February 6, 2012 1:08 PM

Love this write up. Gotta say my favorite part is the no BS honesty. I like to see how someone as accomplished as we all know you are has a run in or two and still puts it out there for all to see. I get the feeling a lot of the WIP write ups are touched up slide shows that just show off the successful steps on route to a finished project.

Its great to see the obstacles you run into and better yet how you conquered them. Lost to be learned here for sure. No doubt this one will be as great as your other masterpieces.


  • Member since
    November 2005
Posted by Anonymous on Monday, February 6, 2012 8:20 AM

He's gone "Von Hammer" on us...very cool.  Maybe those spades that late in the war were manually put into place and then manually removed and stowed when on the move???  Anyways---your taking the basic model and adding your own what-ifs makes it more your creation and has the bonus of noone telling you its wrong!!!  Too cool for school, my friend...

...can't wait to see how you color her up...keep in mind that barrels were in a greyish primer...I could see this thing in part red-oxide primer, part dark yellow and maybe part in grey barrel primer...!!!  maybe some camo to boot...what a canvas to work with...

I hereby crown Karl the Paper-Panzer King.

JOIN OUR COMMUNITY!

Our community is FREE to join. To participate you must either login or register for an account.

SEARCH FORUMS
FREE NEWSLETTER
By signing up you may also receive reader surveys and occasional special offers. We do not sell, rent or trade our email lists. View our Privacy Policy.