SEARCH FINESCALE.COM

Enter keywords or a search phrase below:

12.8 cm Waffentrager--FINISHED PICS

31068 views
134 replies
1 rating 2 rating 3 rating 4 rating 5 rating
  • Member since
    July 2004
  • From: Texas
Posted by wbill76 on Monday, February 13, 2012 4:27 PM

Looking good Karl! Definitely like the varied look that the additional pin washes and such achieved.

Sorry to hear the tracks defeated you in terms of making them workable...but you found the "Plan B" option that's always there with styrene workables. Big Smile

  • Member since
    July 2003
  • From: On my kitchen counter top somewhere in central North Carolina.
Posted by disastermaster on Monday, February 13, 2012 1:59 PM

deafpanzer

Third Reich is near its end and those white rags will come very handily for surrendering. 

1hi5Laugh1http://th1046.photobucket.com/albums/b461/timetraveller1992/Smiley/th_LMAO.gif

Aw man, that was good..........

 https://i.imgur.com/LjRRaV1.png


  • Member since
    March 2003
  • From: Western North Carolina
Posted by Tojo72 on Monday, February 13, 2012 9:42 AM

great work,and great tutorial,very easy to follow your processes,thanks Karl

  • Member since
    April 2009
  • From: Carmel, IN
Posted by deafpanzer on Monday, February 13, 2012 9:39 AM

I am really digging step-by-step thread... thank you for doing this.  I smell a great article in future FSM issue.  

Everything looks great! Yes  May be too much for some but for me I think its perfect... Third Reich is near its end and those white rags will come very handily for surrendering. 

Andy

  • Member since
    November 2005
Posted by Anonymous on Monday, February 13, 2012 7:20 AM

the doog

 I'm going to go with the PLAIN DY coat. I've often said that I choose "artistic" over "dead-on accurate" for .....uh, "artistic" (D'uh?!) reasons Embarrassed. ..

Aha!  That's where I was trying to get you in the first place....looks absolutely stunning!!!

  • Member since
    September 2007
  • From: Truro Nova Scotia, Canada
Posted by SuppressionFire on Monday, February 13, 2012 5:21 AM

disastermaster

http://i170.photobucket.com/albums/u244/heydoog/w10.jpg

I take the road wheels are loose as the third and second from last are outside the guide horns?

Looks good Doog, a bit heavy on the weathering and effects for my taste yet your 'artistic merit' in painting hits the Reich Mark at the finish.


http://i6.photobucket.com/albums/y211/razordws/GB%20Badges/WMIIIGBsmall.jpg


  • Member since
    July 2003
  • From: On my kitchen counter top somewhere in central North Carolina.
Posted by disastermaster on Monday, February 13, 2012 12:57 AM

http://i170.photobucket.com/albums/u244/heydoog/w10.jpg

HEh, HE,

http://www.emofaces.com/en/emoticons/c/cut-shaving-emoticon.gif  Looks like 'ya been shavin'.........

In a good way of course.

 https://i.imgur.com/LjRRaV1.png


  • Member since
    July 2006
  • From: New Jersey
Posted by redleg12 on Sunday, February 12, 2012 9:11 PM

Karl - I have almost given up on plastic indy tracks myself....love the metal but even still they are a PITA. Now I do like the tampon sag method....definitely different. 

I see you are pinned so I will let you go  Wink

Rounds Complete!!

"The Moral High Ground....A Great Place to Emplace Artillery."

  • Member since
    January 2007
Posted by the doog on Sunday, February 12, 2012 9:02 PM

OK, here's the next update...

I started adding in the next layer of weathering; pigments. I used "concrete" for the most part, laying the pigments down and then rubbing them in with a brush.

I then used MIG's "Thinner for Washes", dropping it over the whole area. I used "T.f.W" because I wanted to have the pigments be still movable, for modifications' sake.

The problem then, as I saw it, was that the pigments left the whole hull rather ..... dull? Too much dust and not enough distinction on the hatches, lines, etc. So I first took some straight Black oils, and added some judicious pin washes in the lines...then, I got my "three grades of Primer Red" here, and ....

..and I started defining the hatches and adding different shades of red to define the hatches...I"d add the paint with one brush...

...and then use another larger brush to blend it in and disperse the degree of color...

Note the subtle shaded differences here on the hull now. You can see the pin washes in the creases, and the different tones of red. I'll have to lighten up that one small hatch...

After I add a little more pigments, the look should be complete.

Now the second issue........Angry..........the tracks....Devil

I have to be honest--I don't care for the MK-style tracks. They're just too much work, and I can't see any appreciable advantage to having "workable" tracks. It's not like I"m going to play with the model?! I looked at wbill's tips on making the sections on the supplied jig, but I just though that it took so freakin' long, and I wasn't convinced that the tracks would be strong enough to go through what I knew I was going to put them through with finished.

So, the heck with it--I laid 'em down and glued em in the "normal way" that I do them--WITHOUT those darned track pins! (I'll add them later!)

I gave them a half-hour to set, and put them on the model, adding in "sag" with some tissue paper balls.

Eventually I added in the track pins with regular glue--what you see are those little "bullets" Whistling that are attached to the track pins. They just get cut off in a moment.....this seems to have strengthened the tracks pretty well. They're off the model right now and ready fr painting tomorrow...

That's it for now! We're almost in the home stretch! I still have to detail the gun ,and do some chipping and whatnot. And paint the figures...

Comments always welcomed, once again! Thanks for looking in, and following, guys! Big Smile

  • Member since
    January 2007
Posted by the doog on Sunday, February 12, 2012 8:41 PM

redleg12

Karl - You are back and better than ever with your toots. From the US side...the muzzle brake is a separate part which screws into the barrel.

It is nice to have you back.

Rounds Complete!!

Thanks, Mike! Good to be back! Thanks for the info on US Armor, too! You'd be the man to know about that here--especially US Artillery!

Big Smile

  • Member since
    January 2007
Posted by the doog on Sunday, February 12, 2012 8:39 PM

disastermaster

Yeah doog, in the mountains....... http://th717.photobucket.com/albums/ww173/prestonjjrtr/Winter/th_1lg090yodel.gif

........meanwhile, 35° here.

All we get here is http://i827.photobucket.com/albums/zz200/pepper2010_bucket/rainy_cloud.gif in Randolph county and crazy weather every other day.

UGH! BOOOOOO!!!

I shouldn't complain--I have to go up to NY next week, and I"m dreading going back to the slush and the mush and the snow and the cold!

I hope I can get this baby done by then! Big Smile

  • Member since
    July 2004
  • From: Texas
Posted by wbill76 on Sunday, February 12, 2012 7:56 PM

My pleasure Karl, glad to be of assistance. Beer

  • Member since
    July 2006
  • From: New Jersey
Posted by redleg12 on Sunday, February 12, 2012 6:47 PM

Karl - You are back and better than ever with your toots. From the US side...the muzzle brake is a separate part which screws into the barrel.

It is nice to have you back.

Rounds Complete!!

"The Moral High Ground....A Great Place to Emplace Artillery."

  • Member since
    July 2003
  • From: On my kitchen counter top somewhere in central North Carolina.
Posted by disastermaster on Sunday, February 12, 2012 3:54 PM

Yeah doog, in the mountains....... http://th717.photobucket.com/albums/ww173/prestonjjrtr/Winter/th_1lg090yodel.gif

........meanwhile, 35° here.

All we get here is http://i827.photobucket.com/albums/zz200/pepper2010_bucket/rainy_cloud.gif in Randolph county and crazy weather every other day.

 https://i.imgur.com/LjRRaV1.png


  • Member since
    January 2007
Posted by the doog on Sunday, February 12, 2012 12:38 PM

Thanks, guys---sorry it's taken a while to get back here--I've been a bit busy with these damned tracks! Angry

Ben--remember the advice I gave you--don't limit yourself to any one kind of paint; I use enamels as well for things like washes, details, metallic colors, etc--don't get stuck in a "one paint rut". I'm glad that you got some ideas for your Tiger wheels--I"m going to bop over to your thread after this and offer some advice....

Eric and Jon--I hope that you find something to help you improve your modeling as well here in this WIP. If I can offer any one-on-one advice, don't be afraid to PM me! Thanks for looking in!

Boyd-- You asked about the filters: "I am curious if you gave any time to dry between the layers or did you lay them on in pretty rapid succession?" --a great question, and one that deserves an answer.

When I do this kind of finish, I almost always mix the color either "on the brush" or "on the model". In other words, I just keep adding colors constantly, in rapid succession, not worrying too much about "bleed" or contamination of other colors. That aids in the blending of the colors. If one color tints or occludes another too much, I"ll just add in a little more of the original color until it looks right. At SOME point I"ll step back, let the whole thing dry and have a look at it the next day, and then add what I think needs more attention. I'm at this phase now--and you'll see in the next update what Ive done to bring out the divisions and delineations of individual hatches and panels. Smile

Bill -- Bill, I have to say that I thank you sincerely for your in-depth and encyclopedic-knowledge upon which I can always rely to give a clear and thorough answer to the most obscure and trivial questions regarding armor specifications and peculiarities! In this case, regarding the barrel/muzzle brake painting conundrum, I have to tend to agree with your point of view as far as the historical accuracy and the probability that the muzzle brake was indeed painted in dark grey lacquer to match the barrel. I've seen a picture or two which seems to back this up, and I think that it's probably the way that it should be portrayed.

However...Whistling

I've done a lot of thinking, and went back-n-forth on the question, and even the painting itself, and I think that for purely artistic reasons, I'm going to go with the PLAIN DY coat. I've often said that I choose "artistic" over "dead-on accurate" for .....uh, "artistic" (D'uh?!) reasons Embarrassed and perhaps in any other case I would not be moved in that direction with this piece but for the fact that I could theorize that the shortage of metal and possible chaotic conditions in the spring of '45 would have made it possible to have them re-use the muzzle brake because of supply shortage problems?

In any case, I did a "mock up" of the gun with the dark Grey painting, and it seemed to lack the visual interest of the DY coat. But in any case, the information you provided is great stuff to have in the thread for others' future reference, and was helpful in sorting through my mental processes (which, believe me, is hard enough as it is! Propeller) to make a decision! Thanks again for taking the time to add to this thread's body of knowledge, and to further enlighten me! Big Smile

Steve--thanks, too, buddy! Hey, you got any snow over there in the mountains? Indifferent

Update on the tracks and weathering coming later today!

  • Member since
    April 2003
  • From: 41 Degrees 52.4 minutes North; 72 Degrees 7.3 minutes West
Posted by bbrowniii on Saturday, February 11, 2012 9:09 AM

Hehe.... Bill said 'ergo'.... Geeked

'All that is necessary for the triumph of evil is for good men to do nothing' - Edmund Burke (1770 ??)


  • Member since
    July 2003
  • From: On my kitchen counter top somewhere in central North Carolina.
Posted by disastermaster on Friday, February 10, 2012 3:45 PM

Well, the new forum format precludes history and destroys the text I entered here 3 years ago.

 https://i.imgur.com/LjRRaV1.png


  • Member since
    July 2004
  • From: Texas
Posted by wbill76 on Friday, February 10, 2012 11:43 AM

Looking good Karl and a nice little toot to go with some of the techniques being applied!

I don't want to cloud the issue here of the muzzle brake so will do my best to keep this short. The brakes were indeed separate from the barrel (all brakes were screwed on and secured to the barrel) as a separate part. The barrels were treated with a special lacquer heat-resistant primer (the dark gray you have used) because of the temps subjected to when firing...the same holds true for the muzzle brakes, they too needed the same heat resistance and followed the same painting procedure. 

Here's where I apply logic to my thought process. As Manny points out, camo was rarely extended up to the muzzle brake on artillery pieces but was common on tanks and SPGs depending on the time period and inclination of the crew for field-applied patterns...so there's some latitude in that respect.

Barrels were replaced when either damaged or worn out and there's no guarantee that the brake wasn't also damaged or worn out...and a barrel without a brake meant that it wouldn't be serviceable due to excessive recoil. I would expect as a rule that replacement barrels would always include a replacement brake to go with them as a result. Would exceptions occur? Probably here and there as we all know that you can "never say never" when it comes to that type of possibility. However in this case we are dealing with a prototype under development being hurried into fight in the "last days" type of scenario. It would stand to reason that "if" they had replaced the barrel with a brand new one because the previous field one had been used/worn out, they would also replace the brake but hadn't yet gone through with full hull painting yet. Ergo my suggestion to have them look the same. Wink  

  • Member since
    April 2003
  • From: 41 Degrees 52.4 minutes North; 72 Degrees 7.3 minutes West
Posted by bbrowniii on Friday, February 10, 2012 9:27 AM

Karl

A question about your technique:

In the beginning of the toot, you descibe laying on your filters and you describe quite nicely how you do it. Then you state:

"This technique was then used with various color oils in dark browns, lighter browns, and all kinds of shades and variations/mixes in between, on the fenders and hull tops and sides. Streaks were added by pulling down the colors with a DRY brush after putting the colors on and massaging them into the base with a slightly WET brush."

I am curious if you gave any time to dry between the layers or did you lay them on in pretty rapid succession?

'All that is necessary for the triumph of evil is for good men to do nothing' - Edmund Burke (1770 ??)


  • Member since
    October 2008
  • From: New Jersey
Posted by oddmanrush on Friday, February 10, 2012 9:15 AM

Lookin' pretty sweet there Karl! I still haven't gotten the hang of that filtering process. Every time I try it, I wind up ruining the base coat. Sad You seem to have it down pat! 

Jon

My Blog: The Combat Workshop 

  • Member since
    March 2003
  • From: Rain USA, Vancouver WA
Posted by tigerman on Friday, February 10, 2012 9:10 AM

A subject that gets more interesting by the day. I like the painting toots, which make things more simplistic to slow people like myself. Embarrassed

   http://i7.photobucket.com/albums/y269/wing_nut_5o/PANZERJAGERGB.jpg

 Eric 

  • Member since
    September 2009
  • From: Rugby, England
Posted by Hinksy on Friday, February 10, 2012 8:21 AM

Hey Karl,

This beast is looking superb!

Great tutorial btw, I like the bit on the wheels as I'm always trying to add some life to them and as I'll be doing my Tiger I wheels soon this will help me a lot Yes

I see your buff weathering to give a dusty appearance. On some of my builds I like to put a drop of Tamiya Buff into my ab cup and heavily dilute with water then spray along edges and fenders etc. When the water dries it leaves a great dusty effect.

I know it's different with your Enamels but she's looking great - this build is going to be KILLER Cool 

Keep the photos coming - I'm loving this one!

Ben Toast

On the Bench - Dragon Pz. IV Ausf. G (L.A.H.) Yes

Your image is loading...


  • Member since
    January 2007
Posted by the doog on Thursday, February 9, 2012 9:25 PM

Manny--thanks for the suggestions. I've already painted the muzzle brake to match the gun tube; maybe I"ll go back to DY; I haven't made up my mind yet, but I think that the idea Bill proposed is sound. If you have any definite evidence, let's have it; it would help!

Anyhoo......I've got a painting/filtering update.

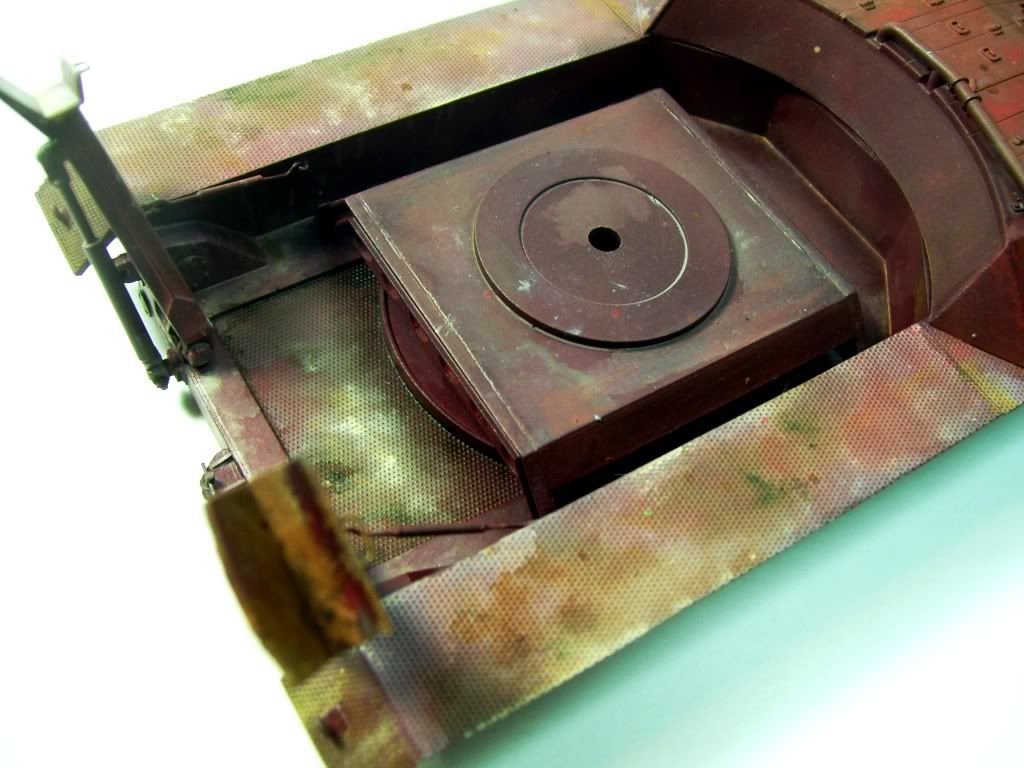
I started out by applying an overall filter of "Gray for Dark Yellow", just to fade the red a bit. Then I started in here with "Faded Dark Yellow" which is actually a funny orangey color, and also Primer Red, with some Buff, which is a nice, neutral tan. I added them in small diluted dots, adding them from the wet brush, NOT with a toothpick! NOTE--they are not "full strength"< but diluted with "Thinner for Washes" somewhat.
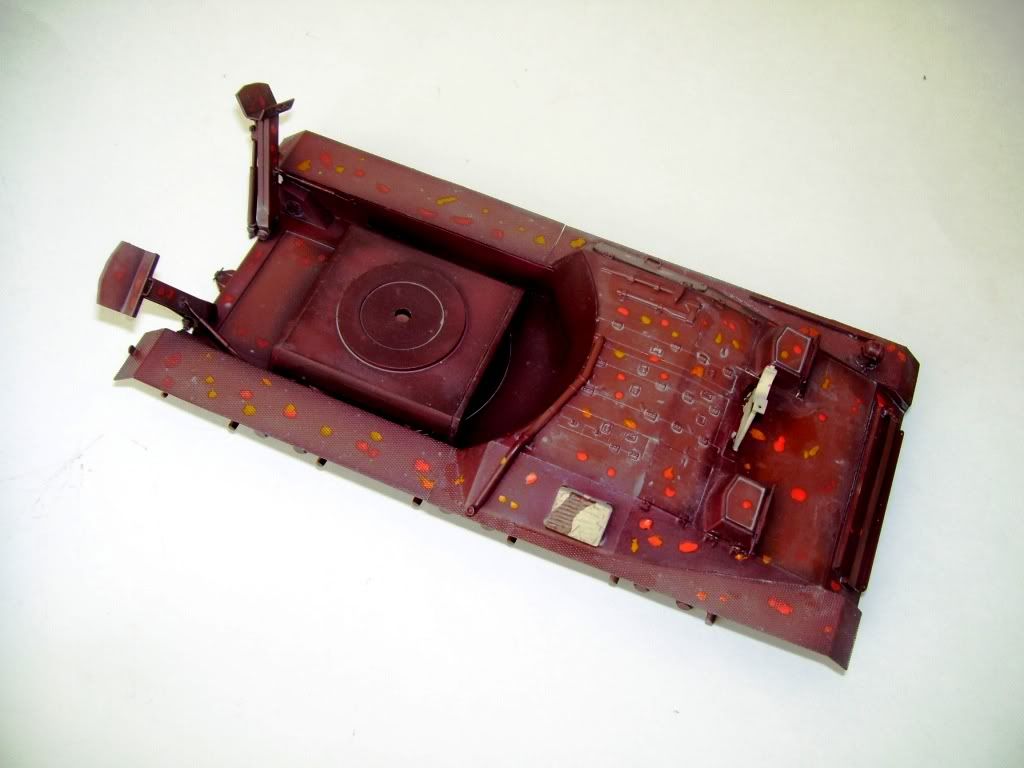
With a large, soft brush, I start to work them in to the paint...

Next, I take some Buff and add it to the model with a small brush.

Then with a DIFFERENT, flat brush, I pull the color out, blending it into the fender to simulate dust build-up.

This technique was then used with various color oils in dark browns, lighter browns, and all kinds of shades and variations/mixes in between, on the fenders and hull tops and sides. Streaks were added by pulling down the colors with a DRY brush after putting the colors on and massaging them into the base with a slightly WET brush.

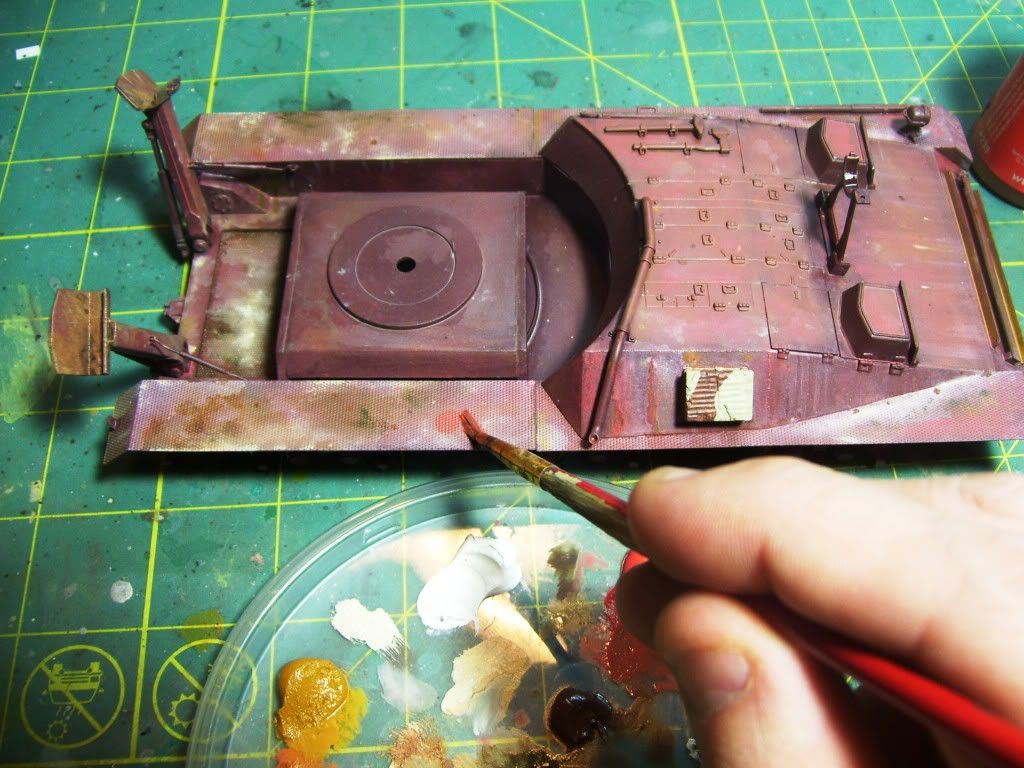
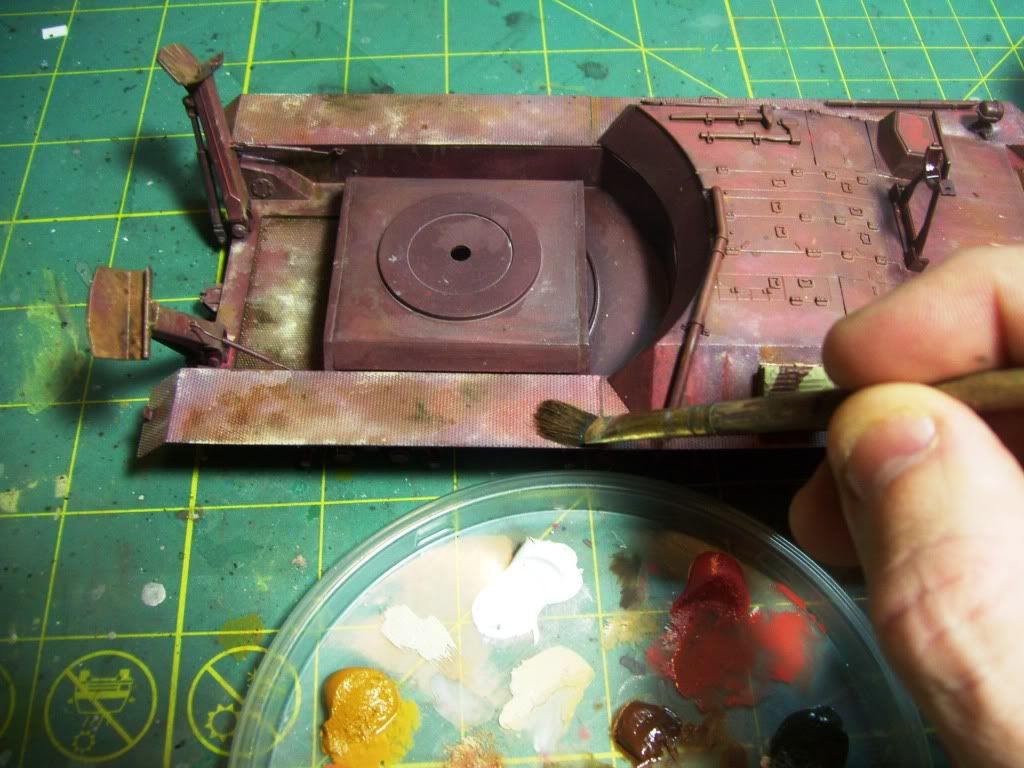
Here I'm going back to the primer red color in order to bring some of the reddishness back into the paint coat. You can see the results of the oils and filters on the rest of the model. The method that I use in the next series of photos is the same that I used for all the colors, so pay attention!

First, select the diluted, thinned color; in this case, primer red:
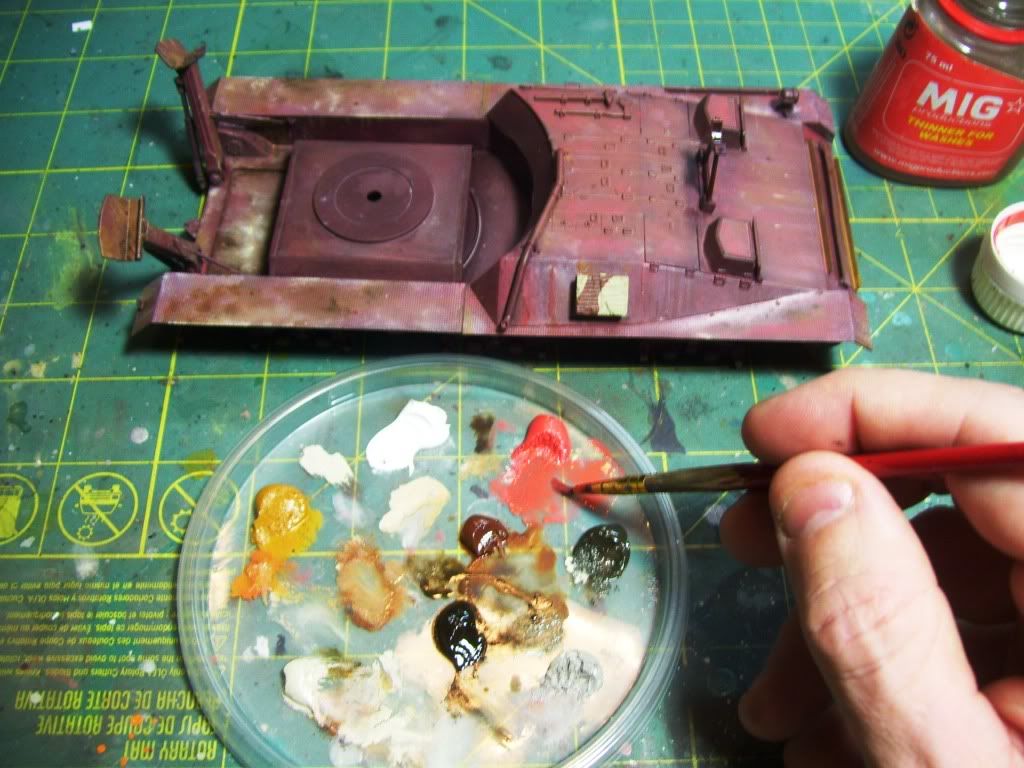
add it to the model:
Now I use a DIFFERENT, DRY brush to massage the color into the paint. Flat, dry brushes work well for blending.
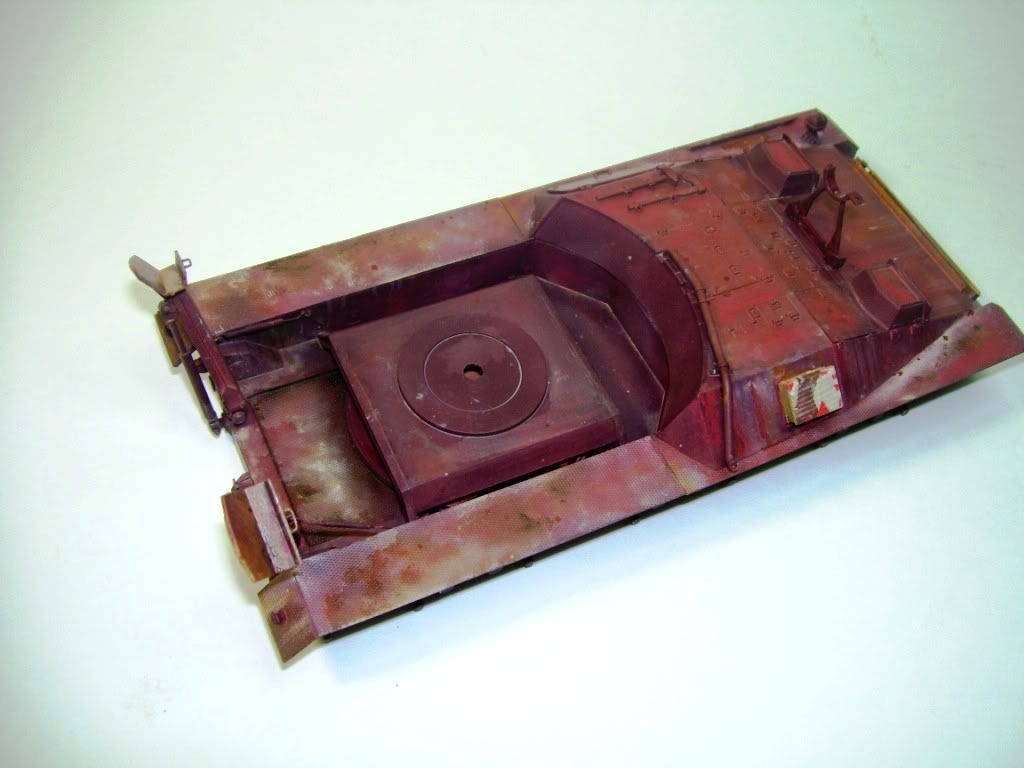
Here's the results SO FAR. More will be done once this dries well. The spare tracks rack was a field mod and will be rusty, as it was bare metal--still to be painted as such.
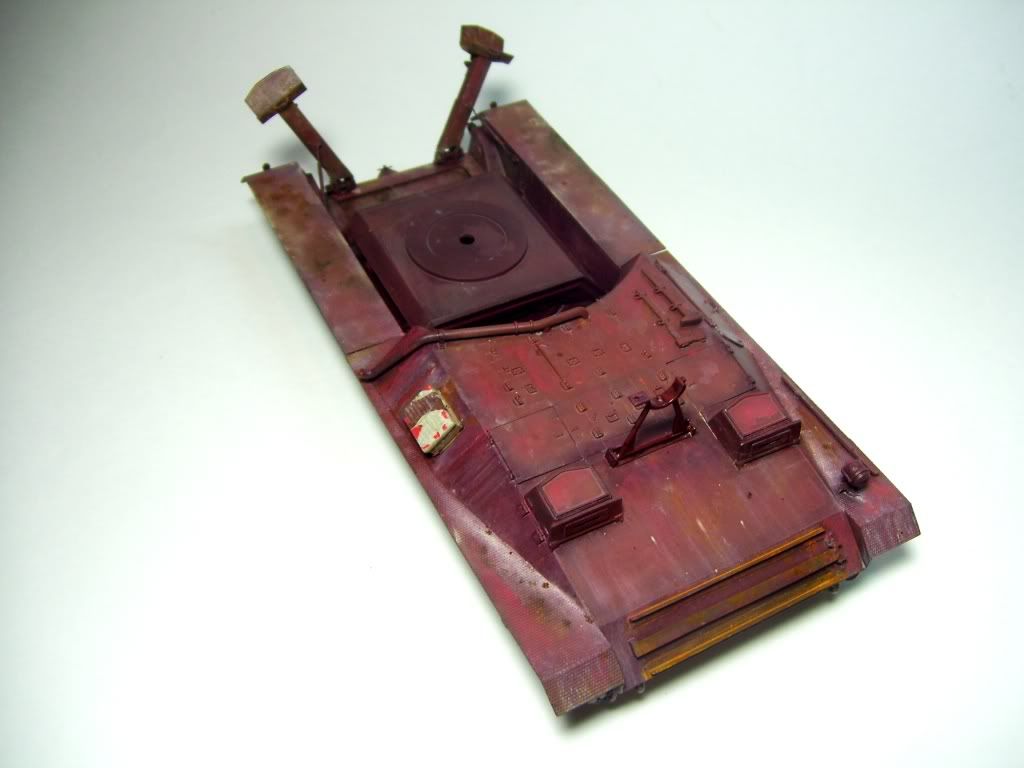
Note the subtle color gradients: the storage box is only starting to get worked on.
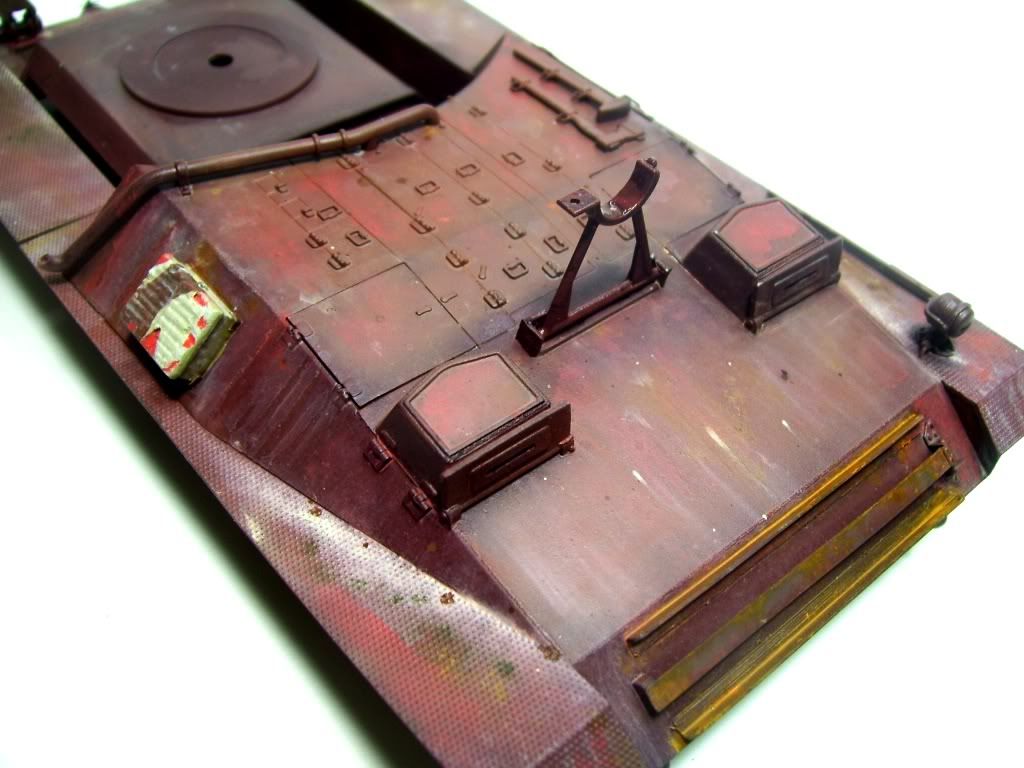
The first layer of weathering in the rear, Note the fenders, where the crew would stand, transferring a lot of dirt. Remember; I still have pigments to apply! Stick out tongue

With flash: the cleaner upper hull and clearer "red" color is evident here:
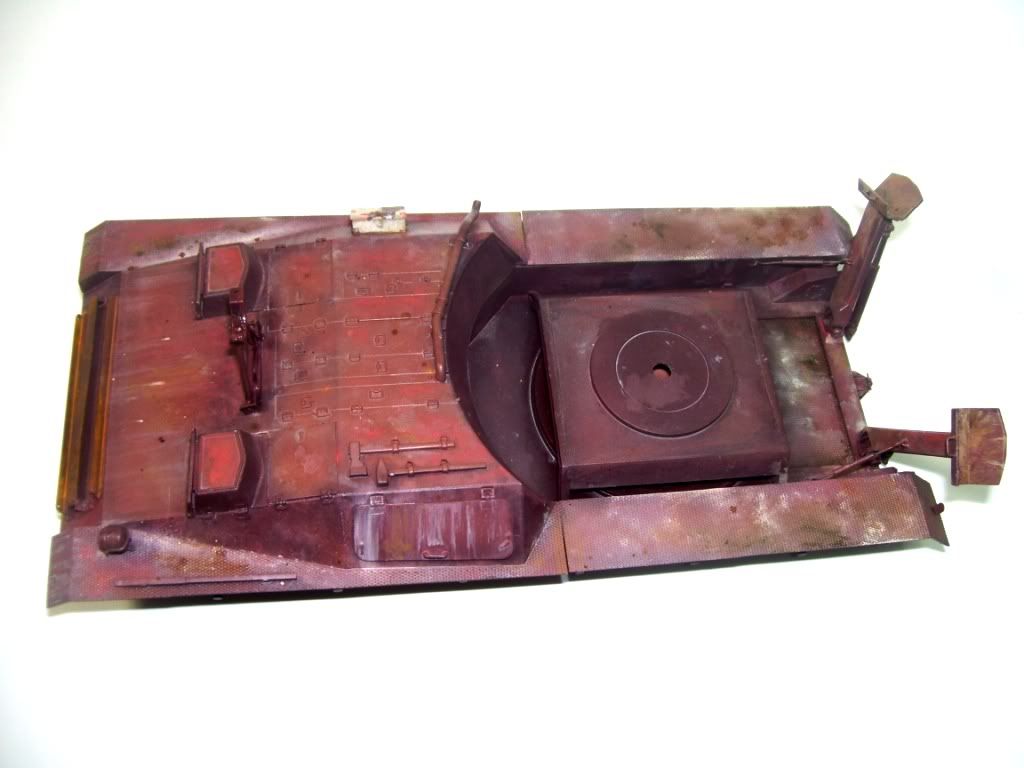
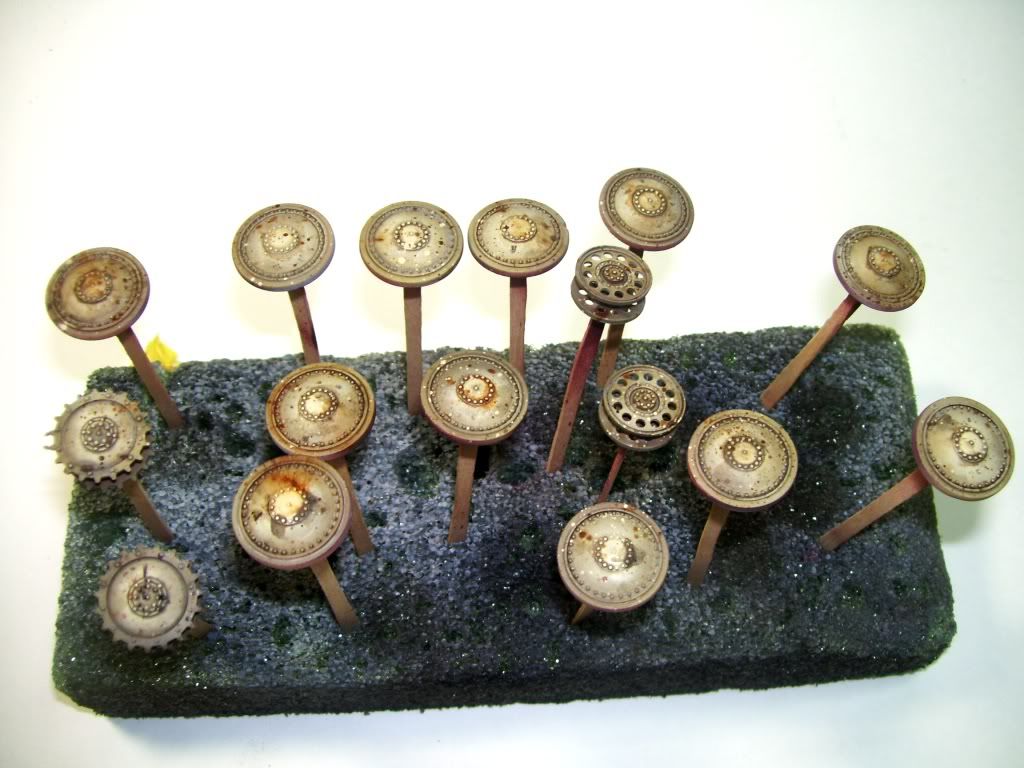
Now I'm going to show you a cool trick to use on wheels:

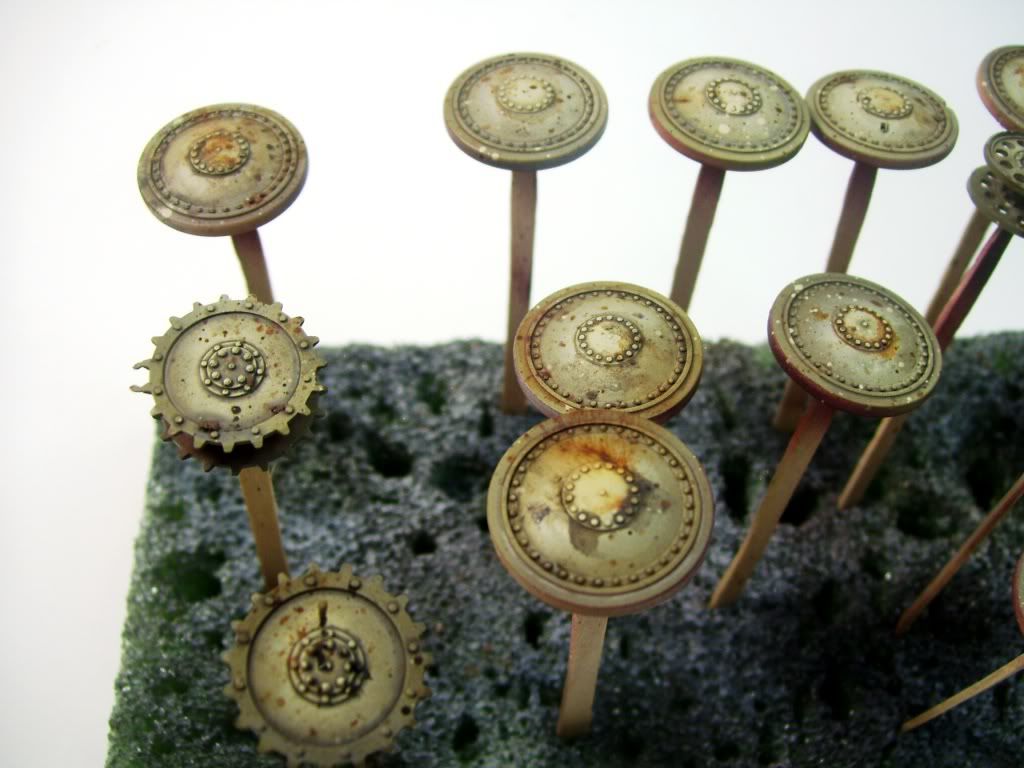
The wheels were weathered by simply adding filters of various colors--grey, Buff, etc, and a bit of raw umber. Then I wanted to add some random spots and discoloration. I did this by thinning some color. in this case "Shadow Brown"...I load up a brush with it. Practice this technique against some cardboard before you try it on the model...
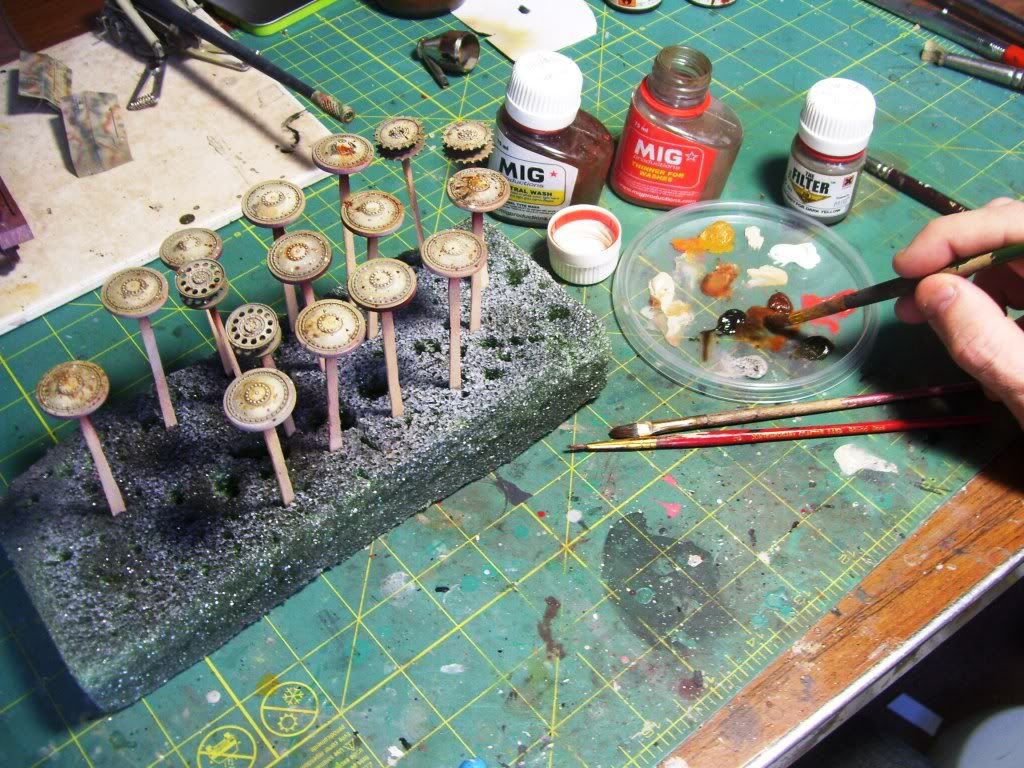
Next, get a large brush handle, or a similar implement to use, and smack the loaded brush against it like you're a drummer counting a song off--the oil color on the smaller brush will spatter onto the wheels (or model) leaving random spots.

You can then use another brush to mediate the color--draw it outward for streaks, or move the brush around the inside circumference of the wheel to "clean it up" a bit. You can see that I"m doing this with different colors as well, for variety. And I will still be adding some pigments after this, most likely....note that the rubber parts have not been painted yet.
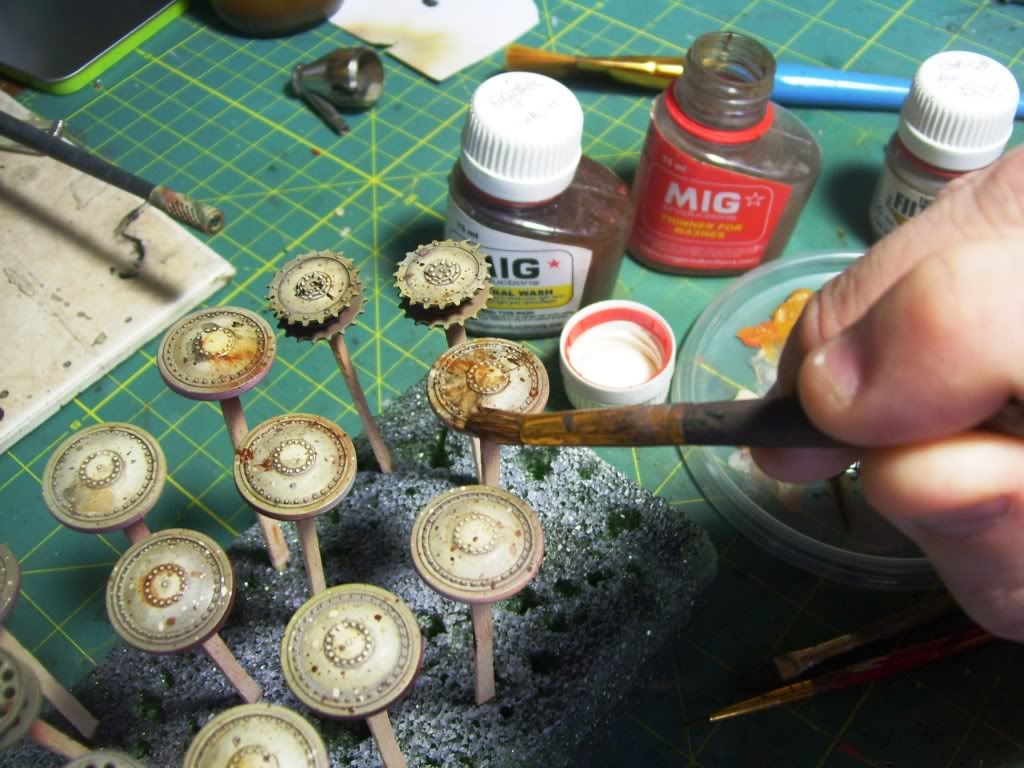
 

The wheels so far: I'll be adding to these with some grease runs and whatnot.
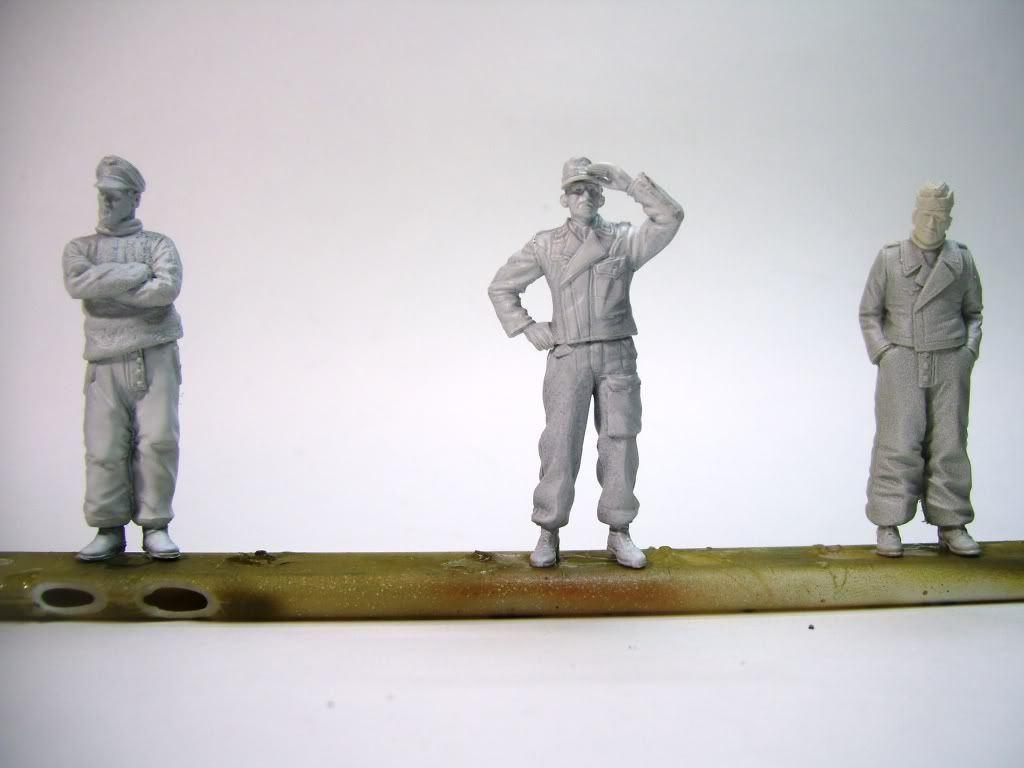
I do have figures too...the one in the middle will be put on my Tiger Coelian; the outside ones will crew this beast...
Well that's it for now! I hope you get some ideas out of this little toot! Comments, questions, and suggestions always welcomed! Smile


  • Member since
    November 2005
Posted by Anonymous on Thursday, February 9, 2012 6:41 PM

the doog

Manny -- You're right about the markings--I've taken your advice and nixed the idea. Wink I have researched the muzzle brake, and it probably was Black or at least the same color as the barrel--that will be easy enough to fix, though it pains me to blacken it. I liked the color variation. Embarrassed

Bill -- once again, thanks for straightening me out. If there's a guy here who knows his stuff inside and out, it's gotta be you--and I'll take your advice on the travel lock and--along with Manny's views--the muzzle brake. I got on a thread on Armorama where a guy said that gun barrels came separately from the muzzle brakes, but I don't know for sure, so I'll err on the side of caution if that's possible. Dark Grey it is! That'll be easy to correct.

doog, I think you'd be good with leaving it in dark yellow...my concern was the camo on top of the dark yellow...I'd go dark yellow sans camo on it---as you mentioned, the brake is separate from the barrel...my concern was that I've never seen camo extend up on the brake like that.  Bill?

  • Member since
    January 2007
Posted by the doog on Thursday, February 9, 2012 6:22 PM

Andy -- thanks, man! It's good to be back!

panzer88 -- Eric, is it? Thanks; I"m relieved that I saved that muzzle brake! I think it looks better than the plastic one could ever have looked!

Tony -- wow, I didn't know about the dropper tops pulling out of the Vallejo bottle! I thought it was sealed in there somehow--wow, that's great to know! Thanks!

Manny -- You're right about the markings--I've taken your advice and nixed the idea. Wink I have researched the muzzle brake, and it probably was Black or at least the same color as the barrel--that will be easy enough to fix, though it pains me to blacken it. I liked the color variation. Embarrassed

Ernest -- thanks for looking in, too! I"m trying to get this barrel thing straightened out here. But I"m glad you like the color scheme!

Marc -- thanks too, for taking the time to comment!

You too, Huxy!

Jon-- believe me, this is the place to learn things that you need to know about armor! I learn new things every day here--or should I say "every WIP!" Thanks for the comments!

Boyd -- thanks too for dropping in! It's great to be back and sharing the fun I have here. (It's easier to do without the O&E being such a temptation to cruise....Embarrassed lol)

Bill -- once again, thanks for straightening me out. If there's a guy here who knows his stuff inside and out, it's gotta be you--and I'll take your advice on the travel lock and--along with Manny's views--the muzzle brake. I got on a thread on Armorama where a guy said that gun barrels came separately from the muzzle brakes, but I don't know for sure, so I'll err on the side of caution if that's possible. Dark Grey it is! That'll be easy to correct. BTW, the travel lock color was just an idea thinking that it would have already been manufactured in the diameter for the large barrel? Maybe it was a stretch..Whistling

Thanks again, guys, for all the kind comments and the useful, informative suggestions!!! Big Smile Update coming real soon!

  • Member since
    July 2004
  • From: Texas
Posted by wbill76 on Thursday, February 9, 2012 1:35 PM

Karl,

I agree with Manny about the muzzle brake...those usually got replaced right along with the barrel as opposed to being re-used. I can't recall any photos off the top of my head where there was a replacement barrel with a painted muzzle brake...doesn't mean it didn't ever happen but for visual continuity I would suggest repainting the brake in the lacquer primer. I'm also curious as to why you decided to paint only the travel lock in DY (you might have said it in an earlier post but am too lazy to check Wink )? It's an integral part of the hull and wouldn't have been assembled/provided separately as a rule. I do like the wheels in DY as a visual contrast though. Also agree with Manny about the markings...leaving the hull in primer would equate to no markings IMHO. Looking forward to the next round! Yes


  • Member since
    April 2003
  • From: 41 Degrees 52.4 minutes North; 72 Degrees 7.3 minutes West
Posted by bbrowniii on Thursday, February 9, 2012 10:08 AM

Karl

As always, your work is both excellent and distinct. I like the way you illustrate your thought process for all to see.

I can't wait to see the weathering stages you will put into this.

'All that is necessary for the triumph of evil is for good men to do nothing' - Edmund Burke (1770 ??)


  • Member since
    October 2008
  • From: New Jersey
Posted by oddmanrush on Thursday, February 9, 2012 9:08 AM

Thanks for answering my question Karl. I wouldn't have thought that wheels were produced in bulk and painted separate from the tank. There is always good stuff to learn here. That's a pretty neat shot of the Waffentrager as well. Keep up the good work!

Jon

My Blog: The Combat Workshop 

  • Member since
    April 2008
  • From: Kristiansund, Norway
Posted by Huxy on Thursday, February 9, 2012 6:41 AM

That's an interesting scheme! Well done.

"Every War Starts And Ends With An Invasion".

  • Member since
    March 2003
  • From: El Dorado Hills, CA
Posted by IBuild148 on Wednesday, February 8, 2012 10:43 PM

Your moving this thing right along. Dig the paint scheme. The Germans were a creative bunch. I'll be watching the weathering.

IBuildOne48

Teach modeling to youth!

Scalefinishes.com

http://i712.photobucket.com/albums/ww122/randysmodels/NMF%20Group%20build%20II/Group%20Badge/NMFIIGBbadgesmall.jpg


JOIN OUR COMMUNITY!

Our community is FREE to join. To participate you must either login or register for an account.

SEARCH FORUMS
FREE NEWSLETTER
By signing up you may also receive reader surveys and occasional special offers. We do not sell, rent or trade our email lists. View our Privacy Policy.