SEARCH FINESCALE.COM

Enter keywords or a search phrase below:

12.8 cm Waffentrager--FINISHED PICS

30809 views
134 replies
1 rating 2 rating 3 rating 4 rating 5 rating
  • Member since
    January 2007
12.8 cm Waffentrager--FINISHED PICS
Posted by the doog on Monday, January 23, 2012 6:48 PM

YEEE-HAWWWW!   Stick out tongueStick out tongueStick out tongue

Back in the saddle again, boys, and eager to bump this one out! I've been thrilled at the release of the Waffetrager series lately--I've got four of 'em so far, I believe; the Alan one included, and the new one just released on the way as we speak. I've always thought these were kinda cool looking!

This one is the 12.8 cm Trumpeter version:

This is one sharp kit! The pieces almost snap together. One nice thing is this--look at how the delicate seat frames come pre-wrapped in protective foam? How COOL is that?

Here's some of the goodies that come too--check out the sheer numbers of shells that accompany this kit! And what's funny is that they're NOT the 12.8 cm shells!? I'm not sure what they're supposed to be--perhaps the shells for another version soon to be released? In any case, in case you get skeered at the mention on some merchants' sites and the Armorama review saying that the kit has "1080 parts", I guarantee you that they're counting these possibly-useless shells!

You also get some copper tubes for the recoil absorbers, and some photo etch, as well as an optional metal barrel! KEWL!

Just a heads up here--this little tool from MicroMark is the ultimate cutter for small, delicate pieces. It's a MicroMark # 82393 Fine Tip Cutter, and it's great for delicate pieces.

Not too much to show yet; I've got the hull somewhat started:

I used a Dremel tool to thin out behind two of the wheels and poked a #11 blade through them to simulate bullet damage.

I used that same Dremel to make the seats a little "saggy". Some putty here will help as well. I'll sand those out a bit when they harden.

That's it for now. I love the smell of Tenax 7 in the evenin'! Stay tuned for more! Big Smile


  • Member since
    July 2004
  • From: Texas
Posted by wbill76 on Monday, January 23, 2012 7:13 PM

Off to a good start Karl...but I'm confused by what you are referring to as the "sheer number of shells" that are provided. Are you referring to the dark brown sprues that are provided separate from the track links? If so, those aren' t shells...they are the track pins needed to create workable tracks for your Waffentrager, two per indy link in the bag at the top. The pins are on the end of handles (what look like shells) and are designed that way on purpose to make it easier to assemble the tracks. It's the same way that Model Kasten does theirs.

  • Member since
    August 2008
  • From: S.W. Missouri
Posted by Pvt Mutt on Monday, January 23, 2012 7:58 PM

Bill we send them to school and buy their books and what do they do???

Eat the covers off the books.          KIDSWink

Tony lee

Shoot Low Boys They're Ridin Ponys

  • Member since
    January 2007
Posted by the doog on Monday, January 23, 2012 8:57 PM

wbill76

Off to a good start Karl...but I'm confused by what you are referring to as the "sheer number of shells" that are provided. Are you referring to the dark brown sprues that are provided separate from the track links? If so, those aren' t shells...they are the track pins needed to create workable tracks for your Waffentrager, two per indy link in the bag at the top. The pins are on the end of handles (what look like shells) and are designed that way on purpose to make it easier to assemble the tracks. It's the same way that Model Kasten does theirs.

Ha ha ha ha!! Big laugh, Bill--boy do I feel stupid! Clown

Just goes to show how much experience I've had with Model Kasten tracks! I remember using them on that Patton, but I swear, I though they were like, 10mm shells or something!

OK....deep breath, reload. ha ha. Thanks for pointing that out! EmbarrassedYes

  • Member since
    January 2007
Posted by the doog on Monday, January 23, 2012 8:58 PM

Pvt Mutt

Bill we send them to school and buy their books and what do they do???

Eat the covers off the books.          KIDSWink

Tony lee

Embarrassed..........Big Smile

  • Member since
    March 2003
  • From: Rain USA, Vancouver WA
Posted by tigerman on Monday, January 23, 2012 9:01 PM

Gotta say i got a chuckle out of that Fubar Karl.

   http://i7.photobucket.com/albums/y269/wing_nut_5o/PANZERJAGERGB.jpg

 Eric 

  • Member since
    November 2005
Posted by Anonymous on Tuesday, January 24, 2012 3:40 PM

DOH!  Shells?---are you kidding me?  Tell me that you were just yankin' our chains, Karl...

Anyhow--this mutha is gonna be cool...I will be following this thread like a Russian sniper follows a Field Marshal's head in his crosshairs...

  • Member since
    January 2007
Posted by the doog on Tuesday, January 24, 2012 3:53 PM

Manstein's revenge

DOH!  Shells?---are you kidding me?  Tell me that you were just yankin' our chains, Karl...

Anyhow--this mutha is gonna be cool...I will be following this thread like a Russian sniper follows a Field Marshal's head in his crosshairs...

lol...spoken like a true MO-JO.....Wink

  • Member since
    July 2004
  • From: Texas
Posted by wbill76 on Tuesday, January 24, 2012 5:44 PM

No worries Karl...I can see how such a mistake could happen. Trumpeter has started to provide workable tracks as a regular feature in their latest releases so it's a fairly recent phenomenon. Wink

  • Member since
    July 2003
  • From: On my kitchen counter top somewhere in North Carolina.
Posted by disastermaster on Tuesday, January 24, 2012 6:06 PM

the doog


Ha ha ha ha!! Big laugh, Bill--boy do I feel stupid! Clown


Just goes to show how much experience I've had with Model Kasten tracks! I remember using them on that Patton, but I swear, I though they were like, 10mm shells or something!

OK....deep breath, reload. ha ha. Thanks for pointing that out! EmbarrassedYes

                        http://t2.gstatic.com/images?q=tbn:ANd9GcQd_UdDGauiqZBI-3ZNHsKGlQHjFTkUR9cLC_jaGpap_9YrHPB54w


                                   http://www.smileyvault.com/albums/forum/smileyvault-giggle.gif


Sherman-Jumbo-1945

"I was so much older then, I'm younger than that now"


  • Member since
    January 2007
Posted by the doog on Thursday, January 26, 2012 8:57 PM

Update time! A couple of warnings and call-outs here to be posted;

The first thing NOT to do is to confuse the parts called out in Part 8. These copper ducts are called out as "0.5" and "05.5".

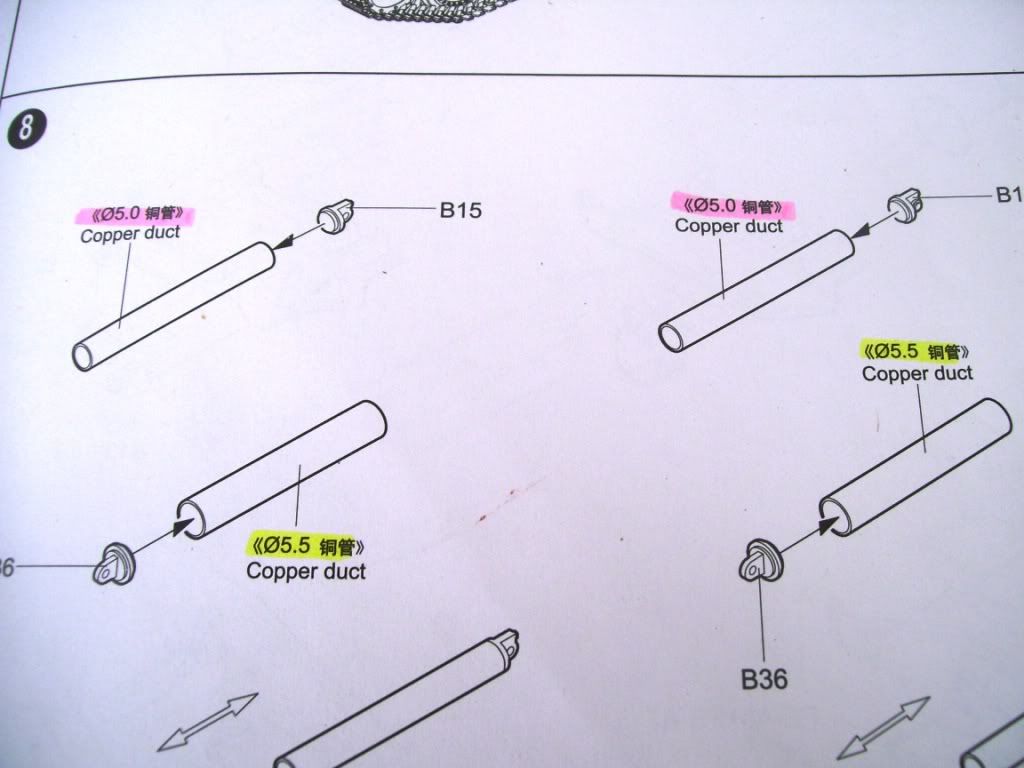
Now, I don't have any background in engineering, so I mistook that as meaning something about their length...

Well of course, THAT was stupid--it's all about their DIAMETER! So after ruining parts B14 and  B15 by getting 'em stuck fast in the wrong sized tubes, I had to wind up scratchbuilding two parts. Luckily there was enough of each left to copy them fairly exactly.

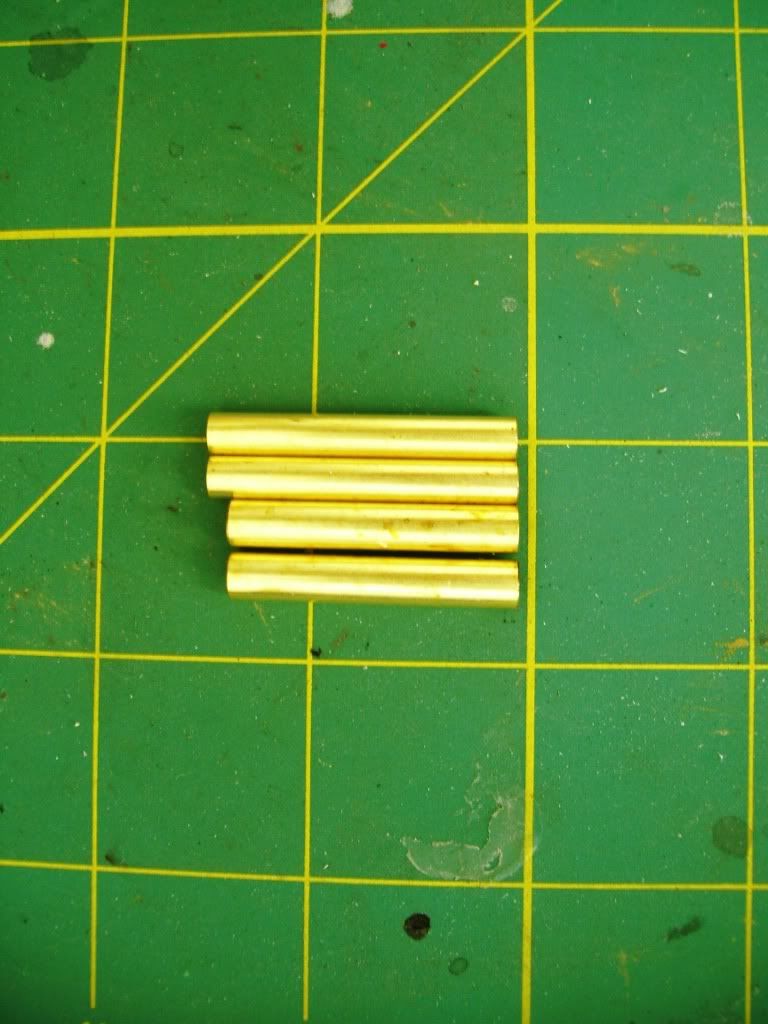
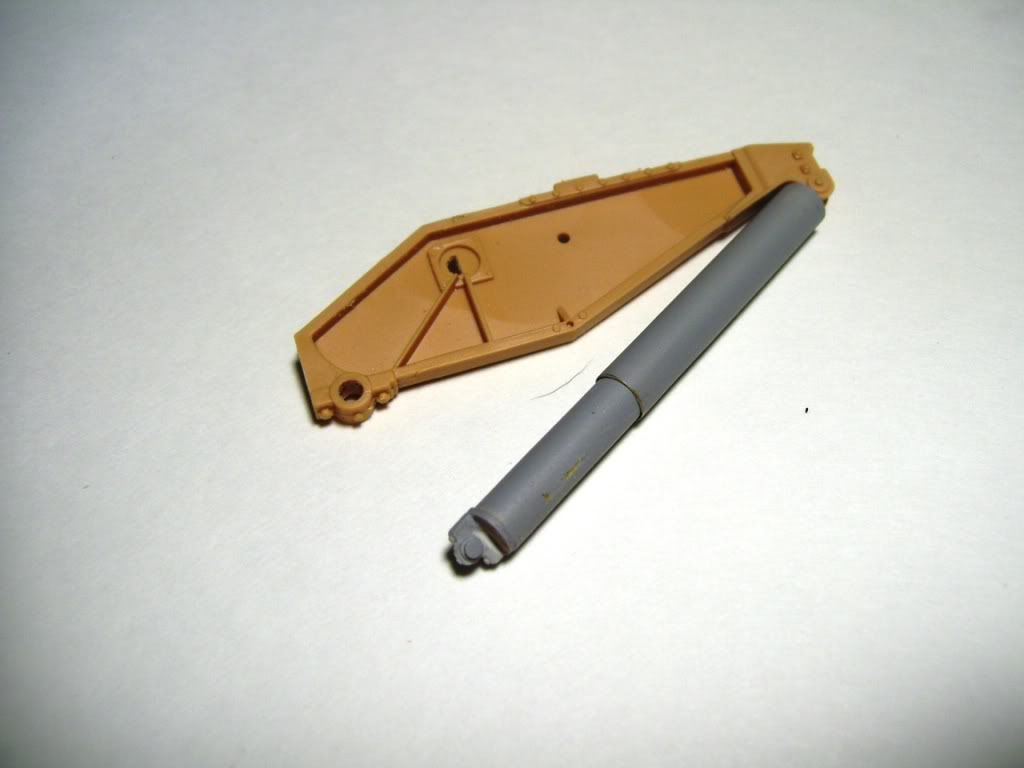
Here's the finished piece--the two copper tubes fit inside each other. I have already primed them with some Tamiya gray primer. The piece I had to scratchbuild is on the near end.

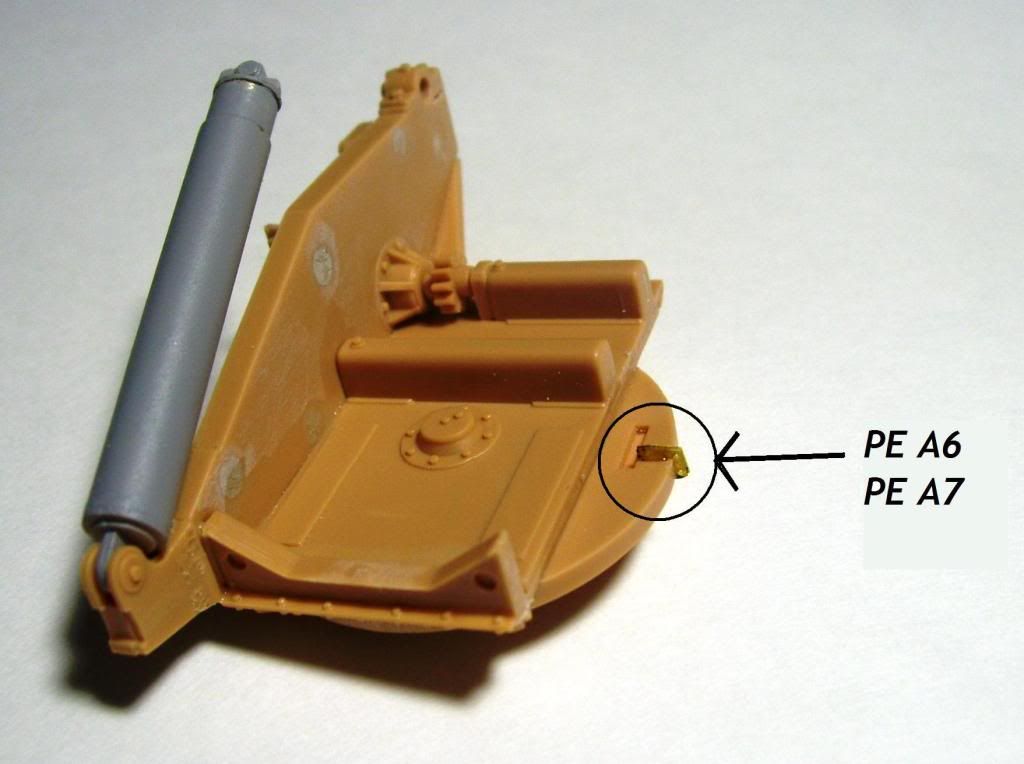
PE parts A6 and A7 are glued back-to-back in the slot in piece B28 in part 9. You can see some knockout marks to be filled in the gun truncheon side.

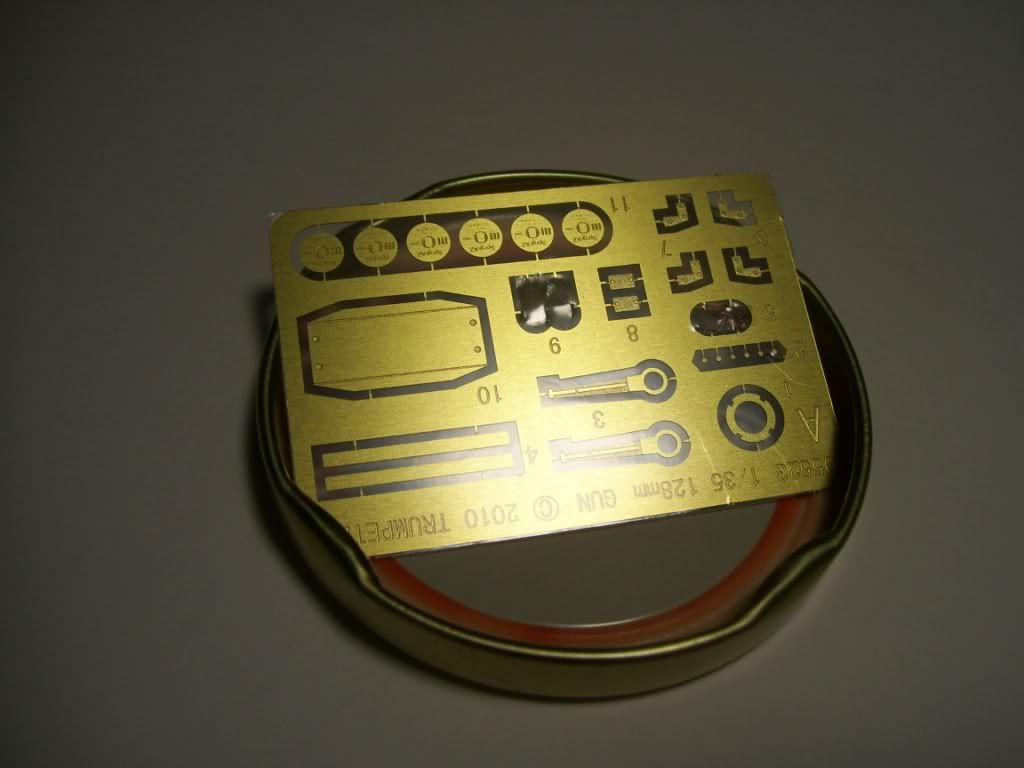
Speaking of the PE parts, check this out--this is cool. Trumpeter encloses the PE frames in an adhesive sleeve! So you can cut the piece out and not have it spring out into space. VERY cool idea!

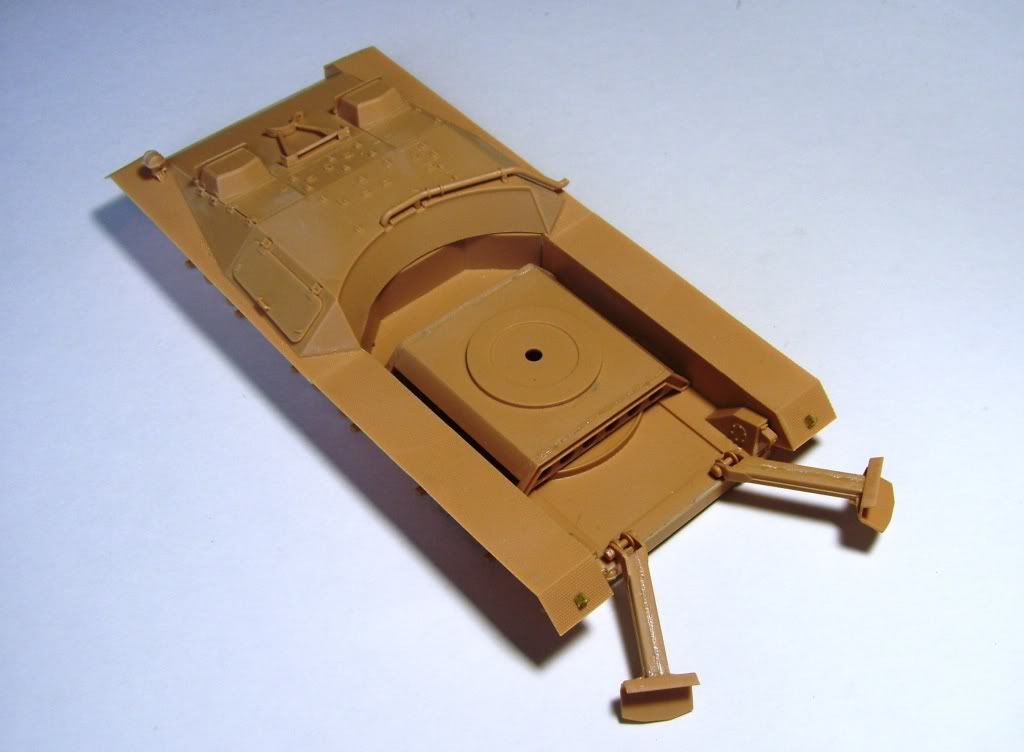
So here's the hull so far, finished. I decided to cover up the seats--darn, on second thought, I should've taken them out to use as spares before sealing up the hull! You just couldn't really see them and there wasn't much detail in the driver's compartment to be seen.


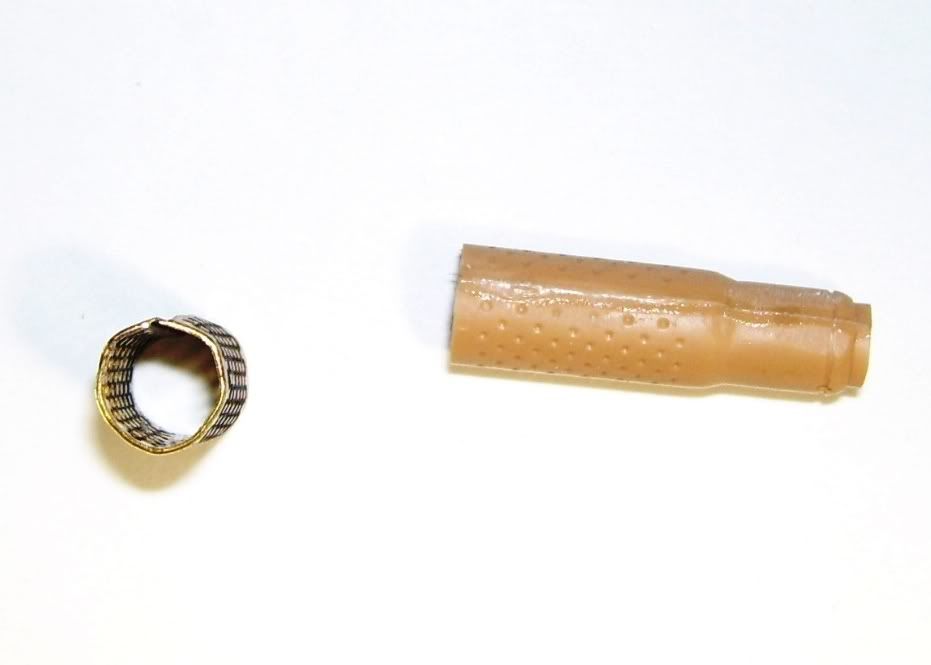
Well, here's my pathetic attempt to form the gun muzzle -- it's a really thick piece of PE, and I even tried annealing it in flame for a minute and then tried forming it around a wooden dowel, but the problem is that the numerous holes in the piece make that section of the piece much more flexible than the non-holed pieces that lays at 6:00 on the part. ( It looks just as uneven on the opposite side...Black Eye) So it was impossible (for me) to bend it evenly, though I gave it hell....I'll just have to use the plastic part and drill out each hole...

Anyone have any ideas on how I could have accomplished this in some presentable fashion?

That's it for now, boys! I'll be working on the gun through the weekend, and should have it ready for paint by...Sunday? Have a great Friday night, guys, and I"ll catch you soon!


  • Member since
    July 2003
  • From: On my kitchen counter top somewhere in North Carolina.
Posted by disastermaster on Thursday, January 26, 2012 10:00 PM

I ain't worried.

I know you'll work that muzzle out to look just great......http://t0.gstatic.com/images?q=tbn:ANd9GcRylZuOoyaOHU52-G_8W6Zw4Kp3-OFZQXWTBig0OTbODAgJmF3SktJizA

                        http://i20.photobucket.com/albums/b232/gluetank/Animated/th_1-Animated-Disastermaster.gif?t=1296616998

Sherman-Jumbo-1945

"I was so much older then, I'm younger than that now"


  • Member since
    November 2005
Posted by Anonymous on Friday, January 27, 2012 7:20 AM

Looking good...but that really bums me about the muzzle brake--especially since in my eye it is a major focal point.   Wonder if Aber offers a brass replacement option???

  • Member since
    January 2007
Posted by the doog on Friday, January 27, 2012 7:45 AM

Manstein's revenge

Looking good...but that really bums me about the muzzle brake--especially since in my eye it is a major focal point.   Wonder if Aber offers a brass replacement option???

Manny, no worries here--you just know that I"ll make that beautiful styrene piece look like it weighs 500lbs!

Have faith, M0J0-L0RD; the Master of Disaster believeth! Bow Down And that's enough for me!

  • Member since
    April 2008
  • From: Kristiansund, Norway
Posted by Huxy on Friday, January 27, 2012 2:21 PM

I guess this will look awesome..


As long as you make them tracks awesome. Which you do. Always.


Ø5.5, eh? That's not 05.5! Smile Burger


-Huxy

"Every War Starts And Ends With An Invasion".

  • Member since
    November 2005
Posted by Anonymous on Friday, January 27, 2012 2:33 PM

the doog

 Manstein's revenge:

Looking good...but that really bums me about the muzzle brake--especially since in my eye it is a major focal point.   Wonder if Aber offers a brass replacement option???


Manny, no worries here--you just know that I"ll make that beautiful styrene piece look like it weighs 500lbs!

Have faith, ***-L0RD; the Master of Disaster believeth! Bow Down And that's enough for me!

I have faith...I just don't want that muzzle to put a brake on things...


  • Member since
    July 2004
  • From: Texas
Posted by wbill76 on Friday, January 27, 2012 5:33 PM

Karl,

Check out www.jbmodels.eu I believe they offer the 12.8cm barrel complete with brass brake that will do this baby justice for a decent price. He ships fast and cheap even being based out of Austria and takes Paypal. Wink

Yep...the RB version: http://www.jbmodel.eu/product_info.php/cPath/22/products_id/2657 at 8 euros, that's a great deal IMHO.

  • Member since
    January 2007
Posted by the doog on Friday, January 27, 2012 5:59 PM

wbill76

Karl,

Check out www.jbmodels.eu I believe they offer the 12.8cm barrel complete with brass brake that will do this baby justice for a decent price. He ships fast and cheap even being based out of Austria and takes Paypal. Wink

Yep...the RB version: http://www.jbmodel.eu/product_info.php/cPath/22/products_id/2657 at 8 euros, that's a great deal IMHO.

Bill,

Thanks so much for the line on that barrel, but I have managed to "rise above"!  I"m proud to say that I've managed to improve upon my own deficient skills and learned something new!

See the following post!


  • Member since
    January 2007
Posted by the doog on Friday, January 27, 2012 6:15 PM

Hallelujah!

Well, I have actually managed to learn something new, and saved my PE muzzle brake!

So, in the last post, I had had a hell of a time bending that cylindrical muzzle brake, and had rather deformed it. I thought I would have been able to drill out the plastic substitute, but to my disappointment, the dimples which populated the surface in place of the actual hole were too shallow to allow my microdrill to track them accurately, and after drilling a few dozen of them I was less-than-satisfied with the results. Hmmm. NOW what to do? Both the PE and the plastic parts looked like crap, I"m here to testify!

Well, I put on my Big-boy pants and took another look at that PE piece. Hmmm, it wasn't TOO badly out-of-round?  The problem had been that the perforated surface in 80% of the piece had a lower tensile strength that the un-perforated ribs that sat opposite each other, and these "ribs" were hard to bend to the same degree as the perforations, leading to an out-of-round abomination. Well, I got back at it, and got the idea to use the plastic insert piece to help form to cylinder.

I used a flat pliers that I picked up at AC Moore's to help me. I finally got it round, and then had to face up to how to join the ends? Hmm...it didn't look like super-glue would hold it? So I trudged down to the hardware store and picked up some soldering tools, and took a crack at it. Holy styrene! I actually got it to take! I even managed to solder the end cap on! WAHOOOO!! I was thrilled!

I then used the pliers again to refine the shape and used a file to further correct and perfect the piece...

After some Tamiya Gray Primer, I think it looks killer!

That's it for tonight--I"l have more updates by Sunday! Big Smile


  • Member since
    November 2005
Posted by Anonymous on Friday, January 27, 2012 6:29 PM

WOW...what a save, bro!!!  The truth is in the primed piece...oustanding bit 'o fine-scale modeling here...

  • Member since
    August 2008
  • From: S.W. Missouri
Posted by Pvt Mutt on Friday, January 27, 2012 7:17 PM

Hey Bill the Doog found a book with the cover still on it.Wink

Good job Karl

Tony lee

Shoot Low Boys They're Ridin Ponys

  • Member since
    July 2003
  • From: On my kitchen counter top somewhere in North Carolina.
Posted by disastermaster on Friday, January 27, 2012 9:08 PM

disastermaster

I ain't worried.

I know you'll work that muzzle out to look just great......http://t0.gstatic.com/images?q=tbn:ANd9GcRylZuOoyaOHU52-G_8W6Zw4Kp3-OFZQXWTBig0OTbODAgJmF3SktJizA

                        http://i20.photobucket.com/albums/b232/gluetank/Animated/th_1-Animated-Disastermaster.gif?t=1296616998

http://i752.photobucket.com/albums/xx170/mqnina/emoticons/11.gifWas there ever any doubt?


Sherman-Jumbo-1945

"I was so much older then, I'm younger than that now"


  • Member since
    July 2004
  • From: Texas
Posted by wbill76 on Saturday, January 28, 2012 11:08 AM

Very nice on the save Karl. Soldering does wonders for things like this and using the styrene piece as a form makes sense. Glad you were able to work it out...the primed piece looks a beaut! Wink

  • Member since
    March 2003
  • From: Rain USA, Vancouver WA
Posted by tigerman on Saturday, January 28, 2012 2:05 PM

Nice save. Yes

   http://i7.photobucket.com/albums/y269/wing_nut_5o/PANZERJAGERGB.jpg

 Eric 

  • Member since
    April 2003
  • From: 41 Degrees 52.4 minutes North; 72 Degrees 7.3 minutes West
Posted by bbrowniii on Saturday, January 28, 2012 5:06 PM

NIce save, Karl.

I'll enjoy watching this one come together.

By the way, is it me or is something wrong with your second update - all the images are gone (or at least I can't see them. I get the "This image has been deleted or moved" message from Photobucket).

'All that is necessary for the triumph of evil is for good men to do nothing' - Edmund Burke (1770 ??)


  • Member since
    January 2007
Posted by the doog on Saturday, January 28, 2012 5:47 PM

Thanks, guys--I have to admit a feeling of being "well chuffed" at this lucky rescue! Thanks to all for the words of support! Big Smile

Boyd--thanks for that callout about my second post--I just remember that I DID move the photos in my Photobucket account. I loaded them into the wrong album. I'll have to go and repair that now. Sad Thanks again!


  • Member since
    September 2009
  • From: Rugby, England
Posted by Hinksy on Saturday, January 28, 2012 6:55 PM

the doog

Thanks, guys--I have to admit a feeling of being "well chuffed" at this lucky rescue! Thanks to all for the words of support! Big Smile 

You should be well-chuffed too Karl. I learnt soldering on electronic PCB's at college whilst getting my engineering qualifications and I still struggle with it sometimes - now it's primed that looks SUPERB Yes

I'll be really interested to see how this build turns out.

Nice save - keep it up!

Ben Yes

On the Bench - Dragon Pz. IV Ausf. G (L.A.H.) Yes

Your image is loading...


  • Member since
    March 2003
  • From: El Dorado Hills, CA
Posted by IBuild148 on Saturday, January 28, 2012 9:45 PM

Nice 

IBuildOne48

Teach modeling to youth!

Scalefinishes.com

http://i712.photobucket.com/albums/ww122/randysmodels/NMF%20Group%20build%20II/Group%20Badge/NMFIIGBbadgesmall.jpg


  • Member since
    May 2005
  • From: Dublin Rep Of Ireland
Posted by terry35 on Sunday, January 29, 2012 4:41 PM

Hi, Karl great to see you back home in armour. I love the subject, I bought two of the 105mm when it came out. I did not go for this one as I have the gun as a separate kit. 

Great save on the pepper pot muzzle brake, I only examined the gun parts in the kit box and did not realise that the plastic pepper pot was so badly done. 

Great work so far, I will be following this one closely. I know it's not a subject for everybody but it's so weird that I cannot turn away for an instant.

Just a heads up, I have heard that it might be worth your time adding some weight to the insides of the hull, the way that aircraft modellers add weight to the nose of tricycle landing gear aircraft, apparently the metal gun barrel can cause the vehicle to tip over.

Well good luck with the build and I look forward to seeing you progress.

Terry.

  • Member since
    July 2006
  • From: San Francisco Bay Area
Posted by bufflehead on Sunday, January 29, 2012 7:35 PM

Nice to see you back Karl!  Your builds always educate, amaze and inspire!  Great work and save on the perforated muzzle brake; with primer on it looks fantastic!  This is a very interesting vehicle and I know you'll hit a home run with it!

Ernest

Last Armor Build - 1/35 Dragon M-26A1, 1/35 Emhar Mk.IV Female


Last Aircraft Builds - Hobby Boss 1/72 F4F Wildcat & FW-190A8


JOIN OUR COMMUNITY!

Our community is FREE to join. To participate you must either login or register for an account.

SEARCH FORUMS
FREE NEWSLETTER
By signing up you may also receive reader surveys and occasional special offers. We do not sell, rent or trade our email lists. View our Privacy Policy.