SEARCH FINESCALE.COM

Enter keywords or a search phrase below:

Jagdpanzer IV A-O FINISHED! Page 8 Final pics!

23326 views
124 replies
1 rating 2 rating 3 rating 4 rating 5 rating
  • Member since
    December 2006
  • From: N. Georgia
Posted by Jester75 on Sunday, January 27, 2013 11:16 AM

Sweet, another doog WIP! I have a set of Cavalier zimm that I haven't used yet so I will be taking note of you application technique. Zimm looks like it went down very well!

Eric


  • Member since
    April 2006
  • From: ON, Canada
Posted by jgeratic on Sunday, January 27, 2013 11:57 AM

Looking good, doog.

The application of the resin zim got me thinking of how some other glue products would work. I've never tried them, but maybe a spray glue in a rattle can and once attached, a final bead of liquid super glue to the edges for a definite hold.  Another would be two coat rubber cement, though this would likely result with an added thickness.

regards,

Jack

  • Member since
    March 2003
  • From: Rain USA, Vancouver WA
Posted by tigerman on Sunday, January 27, 2013 12:40 PM

Great to seeing you back at the bench of late Karl. Always enjoy your WIP's. I have always had a soft-spot for the Jagdpanzers and this is no exception. If I'm somewhat correct, this was just a prototype, or did a few get into combat?

   http://i7.photobucket.com/albums/y269/wing_nut_5o/PANZERJAGERGB.jpg

 Eric 

  • Member since
    July 2003
  • From: On my kitchen counter top somewhere in central North Carolina.
Posted by disastermaster on Sunday, January 27, 2013 12:54 PM

Hey doog,

http://ts3.mm.bing.net/th?id=H.4845342464805214&pid=15.1 

     Looks like you're back with a vengeance.

 As you're probably aware you can simulate those muffler dents with various shaped mini-files that would enable more precise cuts and less "collateral" damage to repair.

 Here are the results that I got on my BT7 Here.

 I posted this here mainly for all the "newbies" that have signed on recently.

 https://i.imgur.com/LjRRaV1.png


  • Member since
    July 2004
  • From: Texas
Posted by wbill76 on Sunday, January 27, 2013 2:30 PM

Nice to see you back at full throttle at the bench Karl! Atak is my go-to source for zim these days, love their sets. Good progress with the zim application as well as all the other little detail treatments. Beer

  • Member since
    August 2012
  • From: Parker City, IN.
Posted by Rambo on Sunday, January 27, 2013 2:40 PM

Looking good doog I've never tried that Atak zim but I'm sure it's alot easier than making it with putty

Clint

  • Member since
    July 2006
  • From: San Francisco Bay Area
Posted by bufflehead on Sunday, January 27, 2013 3:57 PM

Sweet WIP build Karl!  I was really enjoying the 1/72 armor you've been doing lately, but this one looks like a real beauty!  I'm eager to see how you weather this Jagdpanzer, with all that zim.  Will the oil dot method still work on this?  I think Bill did it on one of his recent builds, going along the "grain" of the zim.  Anyway, I'm going to follow this WIP very intently!

Ernest

Last Armor Build - 1/35 Dragon M-26A1, 1/35 Emhar Mk.IV Female


Last Aircraft Builds - Hobby Boss 1/72 F4F Wildcat & FW-190A8


  • Member since
    March 2003
  • From: Western North Carolina
Posted by Tojo72 on Sunday, January 27, 2013 5:44 PM

Nice project Karl,should be a good one

  • Member since
    January 2007
Posted by the doog on Sunday, January 27, 2013 6:18 PM

Thanks, guys---Eric, just make sure you epoxy the FLAT side of the zimmerit panels--believe it or not I epoxied the wrong side of one while watching Supercross on TV today!  Luckily, some quick work in the sink with a toothbrush saved my piece! Surprise

Thanks, too, Jack--I tend to stick with epoxy and superglue. I don't  want to take any chance of it coming up post-paint and weathering. I think the rubber cement would definitely add too much depth to it.

Tigerman---I appreciate that! As far as I know, one of these was used by Panzer Lehr, I believe,and the other was a training vehicle. I've never seen actual combat photos of one where you couldn't say that it was just training photos. Hmm

Steve---hey thanks! Cool Smiley! And feel free to post the actual photo of that masterpiece you finished! I don't know if I saw that one before? WOW! It's magnificent, as is all of your fabulous disasters! Thanks for the tip on the file damage! Smile

Bill--thanks, man! I actually thought of you when I was posting this--I thought "Bill will like this" lol, because I know how much you use this ATAK stuff! Wink

Clint--hmm. You know, I'm not sure? Sometimes making zimm with some old razor saw blades can almost be easier depending on what you're working on? The nasty part of doing that is trying to do things like the rear panel of Pz IV's, or the bottom hull. This set was actually time-consuming to apply and cut out. On something like a Tiger or a Panther, the saw blade method is probably just as easy.

Ernest--thanks buddy. Good to know you're following along! I dunno if I'll do the dot thing on this? I may just try something new, or see how that "darklighting" thing I did on the 1/72 builds works out? I haven't really decided yet. But it's going to get "the Treatment" for sure! Super Angry

Back to the bench for me! Update tomorrow, guys! Thanks again, all! Beer

  • Member since
    September 2005
  • From: beacon falls , Ct.
Posted by treadwell on Sunday, January 27, 2013 9:01 PM

Hey Doog Smile

Nice man.... and I don't just mean the build Wink...Yes

tread Cool


  • Member since
    July 2003
  • From: On my kitchen counter top somewhere in central North Carolina.
Posted by disastermaster on Sunday, January 27, 2013 10:34 PM

doog,

I was thinking you saw it.....?

if not, click the pic below for the BT7 thread.

                             ☟

http://i20.photobucket.com/albums/b232/gluetank/BT7/BT-1.gif?t=1251826099 

 https://i.imgur.com/LjRRaV1.png


  • Member since
    January 2010
  • From: Nebraska, USA
Posted by CallSignOWL on Monday, January 28, 2013 10:04 AM

following ;)

------------------------

Now that I'm here, where am I??

  • Member since
    September 2006
  • From: Dripping Springs, TX, USA
Posted by RBaer on Monday, January 28, 2013 4:55 PM

Neat! I'll be watching.....

Apprentice rivet counter.

  • Member since
    March 2004
  • From: Kincheloe Michigan
Posted by Mikeym_us on Monday, January 28, 2013 10:26 PM

Karl the styrene rod weld bead does work well but have you thought about using Gunze Sangyo Mr. Dissolved Putty for the weld bead once applied you can stipple it with an exacto knife blade after about an hour. That way you don't need to carve styrene rod and accidentally slice your fingers.

On the workbench: Dragon 1/350 scale Ticonderoga class USS BunkerHill 1/720 scale Italeri USS Harry S. Truman 1/72 scale Encore Yak-6

The 71st Tactical Fighter Squadron the only Squadron to get an Air to Air kill and an Air to Ground kill in the same week with only a F-15   http://photobucket.com/albums/v332/Mikeym_us/

  • Member since
    January 2007
Posted by the doog on Tuesday, January 29, 2013 1:52 AM

Hey Tread! Thanks for stopping in, man! Good to see you here again! Big Smile

Steve--oh yes, now I remember that epic build! What a great model! Truly a "Master-piece"!  Bow Down

Mikey--I haven't tried that Gunze poduct, but thanks for the referral. I'll keep an eye out for in the next time I"m in an LHS! Geeked

RBaer and Owl----glad to have you along! Left HugRight Hug

I've got a quick update:

I've got maybe 80% done---I've got the gun on/in, and have started adding details. I also took the time to remind myself how much I hate using PE tool clamps and fittings! Bang Head Honestly---they drive me bonkers but I wanted to have some sweet detailing up front to catch your eye.

OOPS! Sorry! I accidentally deleted these pics from my Photobucket page! More pics in later posts!!!

I'm kicking around the idea of doing some more on the back deck, but it all depends on how long my patience lasts. I also built a spare track rack before noticing that one already came in the kit. Whistling Honestly, I have o stop watching Supercross while I"m building....lol

The kit does give you a metal barrel, but I'm not all that keen on metal barrels; I just used the plastic part. STill have some detailing to do on the rear deck and hull..

I also did some proper detailing on the commander's hatch here-it needed a corrected hinge, a circular plate around the periscope with bolts, and a wooden head pad. I've also just started detailing that other small binoculars hatch as well.

That's it for now. I should be able to get a lot more done tomorrow if the PE tool holders cooperate.

Thanks for looking in, guys and girl! Yes

  • Member since
    September 2006
  • From: Australia
Posted by Blitzwing on Tuesday, January 29, 2013 3:03 AM

It look's looking great already and would have caught my eye even without PE.

URL=http://picasion.com/]

  • Member since
    August 2012
  • From: Parker City, IN.
Posted by Rambo on Tuesday, January 29, 2013 3:30 PM

I really like the look of that zim especially over the MGs

Clint

  • Member since
    December 2006
  • From: N. Georgia
Posted by Jester75 on Tuesday, January 29, 2013 5:45 PM

Looking good doog! I feel ya on those tool clamps and such but the detail they add is so worth it!!

Eric


  • Member since
    January 2007
Posted by the doog on Tuesday, January 29, 2013 10:39 PM

Thanks, guys! I appreciate ya'll looking in!

Eric--yes, I must agree with you; they do add "something" to the build---I think it's the knowledge from other modelers that you actually would spend the time to craft these devilish little monsters, lol!

  • Member since
    August 2008
  • From: S.W. Missouri
Posted by Pvt Mutt on Tuesday, January 29, 2013 10:57 PM

Karl since you're a picker I would think you could do those clamps with one hand.Wink

Stop your belly aching and get on with it.Big Smile

Tony lee

Shoot Low Boys They're Ridin Ponys

  • Member since
    July 2004
  • From: Texas
Posted by wbill76 on Wednesday, January 30, 2013 8:55 PM

Some nice progress and detail work going on there Karl, dressing this one up nicely! Beer

  • Member since
    April 2008
  • From: N.H. USA
Posted by TZombie on Thursday, January 31, 2013 10:00 AM

Very nice work! Thanks for sharing. I have a quick question. Do you attach the pioneering tools to the hull before painting them and paint them in place?

  • Member since
    January 2007
Posted by the doog on Thursday, January 31, 2013 7:10 PM

Tony, you're right, man! I must quit my bellyachin' and model like a MAN! Super Angry (sorry, CallSignOwl! Embarrassed I'm working away on them right now!

Bill, thanks, bud! Good to see you stopping in to give me a Yes

TZombie.--thank you sir!--and regarding the painting of the tools; well, in this case, yes, I will--if only because the photo-etch parts are so delicate. It wouldn't be prudent to leave them off. Better too, to glue them directly onto the plastic than to a coat of paint, in my estimation. And those tool clamps need to be painted and weathered to match the hull base coat too, so, yes, I'll paint the in place. Smile

  • Member since
    July 2006
  • From: San Francisco Bay Area
Posted by bufflehead on Thursday, January 31, 2013 11:40 PM

Wow, you're just blazing through this one Karl!  Its looking might fine!  BTW, what did you use for the periscopes in the hull top?

Ernest

Last Armor Build - 1/35 Dragon M-26A1, 1/35 Emhar Mk.IV Female


Last Aircraft Builds - Hobby Boss 1/72 F4F Wildcat & FW-190A8


  • Member since
    January 2007
Posted by the doog on Friday, February 1, 2013 9:59 AM

Thanks, Ernest! The periscopes are kit parts---clear plastic. They look really nice, eh? This kit is actually quite nice---an optional metal barrel, some PE schurzen, clear periscopes. Almost ahead of its time for when it came out!

  • Member since
    January 2007
Posted by the doog on Saturday, February 2, 2013 9:07 PM

OOOOkay. Been working on this sucka all week, and finally I think I'm ready for paint. Here's where I've been, and what I got! Stick out tongue

Well, I committed myself to doing some PE tool holders on the rear, so I had to plug all the holes, natch--so I planted a stretched-sprue forest in the holes. A little candle and some old sprue, and you can have beautiful sprue shoots blooming in your model too! Clown You can also see some of the new details that I've added to the small hatch there--the star-shaped knob to open it, the three bolts, and then the handle to the gunner's hatch.

And after cutting out harvesting the sprue shoots, the garden is nicely bare. Notice that I haven't glued the roof on yet--I want to be able to paint the periscopes inside.and the interior dark at least.

Handling those @#&%#! tool clamps! Angry I've found that if I superglue the base of the clamp onto a piece of tile, I can use my two hand to maneuver the two other pieces onto the little pins that hold both the lever and the top of the clamp in place: I've got 5x reading glasses on here plus my Optivisor!

And here's the clamp! SUCCESS!!! I had to make 5 of these buggers!

I'm sure that most of you know my track method, so I won't bore you with it here:

I wanted to keep a relatively tight track, as the vehicle was only used sparingly. I set only a little bit of sag. The wood block is keeping a lazy idler wheel in place....

Here's some other details I should address. The #1 shows the cutouts for the schurzen hangers; I can't put them on yet because I wouldn't be able to get the tracks on or off for painting. #2 shows where I removed the supports that lie on the rear fenders--the real vehicle didn't have these, apparently?

More details were added: #1 shows the cleaning rods that I added, and racks that I made from spare PE. The right rack has a cloth strap and buckle made from lead foil and a buckle shaved off from a kit piece--I forget which. #2 These projections are on the rear of the original vehicle; not sure what they housed, but it's gone now, even as they remain. #3 shows the tail reflector that I made from spare PE and some 1/24 "side dot reflectors" PE from a Dodge Charger detail set. #4 the detail added to the wood block, which was taken from the excellent Tamiya On-Vehicle tools set. #5 shows the new supports which I had to fabricate in order to support the rear schurzen. These are more in line with the original vehicle's configuration. #6 I never realized this before, but the muffler bolts onto the rear rail which runs along the rear of the hull. So I corrected my own repair job there, adding some resin Verlinden bolts.

A little closer on the rear deck:

And here's where I am so far. I have a figure that I'll be putting in as well. I believe I"m ready for paint tomorrow!

If you see anything weird or left undone, call it out, guys! Comments and suggestions always welcomed! Smile

  • Member since
    December 2006
  • From: N. Georgia
Posted by Jester75 on Saturday, February 2, 2013 9:23 PM

Was looking forward to an update on this one doog. Sweet idea with the 'sprue forest'! The extra pe work on the clamps looks great and well worth the effort. I will be giving your magic track method a try on my 38t, always seems to look good on your builds. With all that magnification you had going on there, you should have been able to bend that pe on the molecular level Stick out tongue

Eric


  • Member since
    September 2005
  • From: Uppsala, Sweden
Posted by bultenibo on Sunday, February 3, 2013 5:34 AM

Hi doog!

My first reaction when looking at this thread:

"OMG, what IS that maniac doing? Is he adding tool clamps on a tank in 1/72-scale! That guy is not human!"

Then I saw that the Jagdpanzer was in 1/35, and my heart started beating again...

Seriously, impressive work, as usual. Glad you made it back to the forum (and to the 1/35-scale)!

/Bultenibo aka Tony

  • Member since
    January 2010
  • From: Nebraska, USA
Posted by CallSignOWL on Sunday, February 3, 2013 7:42 AM

nice!

------------------------

Now that I'm here, where am I??

  • Member since
    September 2009
  • From: Rugby, England
Posted by Hinksy on Sunday, February 3, 2013 9:52 AM

Great work Karl!

It just goes to show - a lot of modellers write these older Imperial Series DML Kits off as 'dogs' or other less than nice words but in the write hands they can be made to look bloody great Yes

Lovely Zim work my friend!

I laughed when I saw the photo of you attempting to assemble PE clamps as I just cannot do them. I have really bad eyes (Astigmatism) which basically means your eye's are Rugby ball (American Football) shaped instead of Soccer ball shaped - it's Genetic, Dad has it too. I wanted some Optivisors for my new found taste in using PE and tried some on at the last modelling club meet night.

I IMMEDIATELY had terrible triple vision and felt sick and had to take them off leaving me with a pounding head and aching eyes- I presume it's something to do with my prescription or my Astigmatism. I could never wear them so I'm glad I didn't ask for them for Christmas! Good job I had the chance to try them on first!

I've resigned myself to either 'bodging' them in place by sticking them on with CA then adding handles or by keeping the kit tools with moulded on clamps and simply sticking the PE latch release handle bit onto the moulded plastic.

Anyway, great work so far - I'm looking forward to see how this goes!

Ben Toast

On the Bench - Dragon Pz. IV Ausf. G (L.A.H.) Yes

Your image is loading...


  • Member since
    July 2003
  • From: On my kitchen counter top somewhere in central North Carolina.
Posted by disastermaster on Sunday, February 3, 2013 11:00 AM

This is really gonna be cool......

What got me a rockin' is this picture........ I wasn't expecting it.

http://th1046.photobucket.com/albums/b461/timetraveller1992/Smiley/th_LMAO.gif I REALLY cracked up !!!

http://i170.photobucket.com/albums/u244/heydoog/Jagdpanzer%20IV%20A-O/DSC02473_zps44c4311a.jpg

Looks like you're doing an autopsy on a ƥiʂʂ-ant.

OWWW!

http://i717.photobucket.com/albums/ww173/prestonjjrtr/Smileys/Avatars_Funny_Crawling_Bug.gif

Gimme back my leg!

 https://i.imgur.com/LjRRaV1.png


  • Member since
    July 2004
  • From: Texas
Posted by wbill76 on Sunday, February 3, 2013 1:13 PM

Nice work on those clamps and other doodads Karl! Look forward to seeing it with paint on. Wink

  • Member since
    May 2005
  • From: Dublin Rep Of Ireland
Posted by terry35 on Sunday, February 3, 2013 3:19 PM
Looking great Karl, I've been popping in and out since the start but have not been near a computer in ages. I have been searching for a particular photo for you, it's a photo of the mild steel prototype, but I don't want you starting another kit before you finish this baby. If I remember the photo correctly, then it is contempory and shows some great bare metal and beautiful Patinas that have built up over the years.

Terry

  • Member since
    January 2007
Posted by the doog on Sunday, February 3, 2013 3:33 PM

Eric, I hope those tracks work out for you! You're rocking that little Flacker! Oh, and the only problem with having all that magnification is that when I take them off, I can't see a thing for smaller than say, a basketball for like, five minutes! Black Eye.......Smile

Tony--thanks, bud! I appreciate you looking in, and the welcome back!  NOw......tool clamps in 1./72 scale? HORRORS! Surprise What a nightmare!

I wonder who'll be the first manufacturer to include those...? Indifferent ha ha

Bill, thanks for looking in from your busy schedule too!

STEVE--BIG lol! "...an autopsy on a pissantt!" HA HAHA!!! Good one! --and that's what it felt like! Big Smile

Thanks again, guys!!

  • Member since
    January 2007
Posted by the doog on Sunday, February 3, 2013 3:35 PM

Terry, I Just missed your post--thanks, buddy! If you find that pic I"d love to see it! Post it here if you find it!  ;)

  • Member since
    January 2007
Posted by the doog on Sunday, February 3, 2013 3:39 PM

Ben, wow, sorry to hear about he eye problems--that would be a bummer, but it doesn't look like ou let it slow you down much!

And that method you mentioned of just using the kit tools with some handles added to them is an excellent "cheat" to doing the tools. I've used that plenty of times myself!

Thanks for looking in, and good work on that Elefant! The paint looks great!

  • Member since
    August 2008
  • From: S.W. Missouri
Posted by Pvt Mutt on Sunday, February 3, 2013 6:06 PM

I was hoping to see at least a base coat but you're gaining anyway.

Tony lee

Shoot Low Boys They're Ridin Ponys

  • Member since
    July 2006
  • From: San Francisco Bay Area
Posted by bufflehead on Sunday, February 3, 2013 11:59 PM

the doog


Sorry Karl, this pic had me rolling!!  I so have to get me an Optivisor, just so I can look like this at my bench!! 

the doog

More details were added: #1 shows the cleaning rods that I added, and racks that I made from spare PE. The right rack has a cloth strap and buckle made from lead foil and a buckle shaved off from a kit piece--I forget which. #2 These projections are on the rear of the original vehicle; not sure what they housed, but it's gone now, even as they remain. #3 shows the tail reflector that I made from spare PE and some 1/24 "side dot reflectors" PE from a Dodge Charger detail set. #4 the detail added to the wood block, which was taken from the excellent Tamiya On-Vehicle tools set. #5 shows the new supports which I had to fabricate in order to support the rear schurzen. These are more in line with the original vehicle's configuration. #6 I never realized this before, but the muffler bolts onto the rear rail which runs along the rear of the hull. So I corrected my own repair job there, adding some resin Verlinden bolts.

I really like the numbers and descriptive text you've added to this Blog!  tI helps us out as we try to follow all the great super detailing you're doing!  Thanks!

Now for some dunkelgelb! 

Ernest

Last Armor Build - 1/35 Dragon M-26A1, 1/35 Emhar Mk.IV Female


Last Aircraft Builds - Hobby Boss 1/72 F4F Wildcat & FW-190A8


  • Member since
    May 2005
  • From: Dublin Rep Of Ireland
Posted by terry35 on Monday, February 4, 2013 7:45 AM
Hi, Karl love the progress, I have got that photo some where it was taken by Hilary Doyle, it was what perked my interest in this kit when it was released, there's no hatches or pistol ports and no zimmerit just bare rotten 40 year old steel with green moss and plants growing on it, I think it was your model T Ford wagon/truck that you done some time back that brought it to mind, I know your passion for recreating the way nature acts on man made objects left abandoned over time.

Terry.

  • Member since
    January 2007
Posted by the doog on Monday, February 4, 2013 8:06 AM

Pvt Mutt

I was hoping to see at least a base coat but you're gaining anyway.

Tony lee

Hopefully later today, Tony Lee! Working away here.... Big Smile

  • Member since
    January 2007
Posted by the doog on Monday, February 4, 2013 8:10 AM

Thanks Ernest---glad you like the format! It just seemed logical to point out the many little things that I've added or corrected. Thanks for letting me know that it's appreciated for the extra time it takes to do these little pics!

TERRY--- thank you once again! And I would love to see that photo if you find it! Smile

  • Member since
    September 2009
  • From: Rugby, England
Posted by Hinksy on Monday, February 4, 2013 6:34 PM

Cheers buddy,

It's not a major thing like I'm going to go nigh on blind Karl - it's really really common but it's not just simple short or long sightedness - it's  just generally my vision is rubbish, long or short!   

With my glasses or contacts in I can see 100% crystal clear but it causes havoc with optivisors for some reason! I can use Binoculars just fine though!

The Optician says if you have Astigmatism like me it tends to slow down a lot as you get older. It's no biggie but I'd love to be able to wake up in the morning with 20/20 vision! My Dad said his seemed to stop getting worse over the last ten years.

Loving the work on the build matey!

Ben Toast

On the Bench - Dragon Pz. IV Ausf. G (L.A.H.) Yes

Your image is loading...


  • Member since
    January 2007
Posted by the doog on Thursday, February 7, 2013 12:07 AM

OK, I finally have a painting update!

I've been really thinking about how to paint this--I wanted to try something along the lines of what I did on the 1/72 Sturmtiger I just finished, but I think that by the time I got through with it, that idea had somewhat tamed. Anyway, here's what I did, and where I am now.

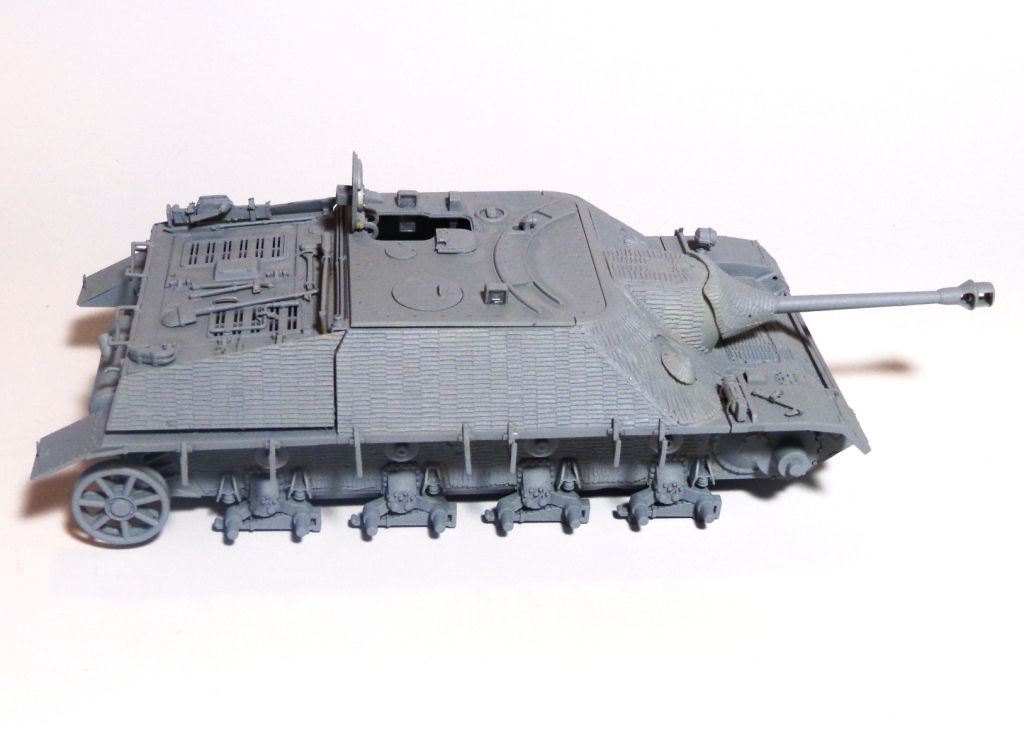
Since I had PE on it and resin zimm, I primed it with Duplicolor Gray. I've used this for my car modeling as well, and it seems to go down pretty nicely.
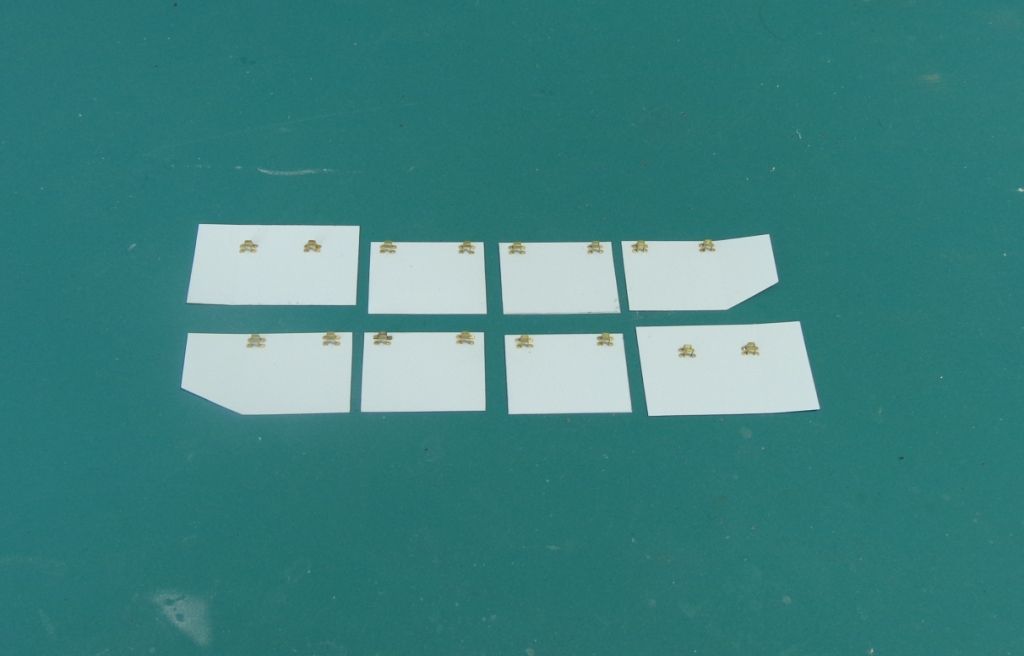
The kit gives you PE schurzen, but I didn't like the weight of them, so I made some new ones out of .010 styrene sheet.
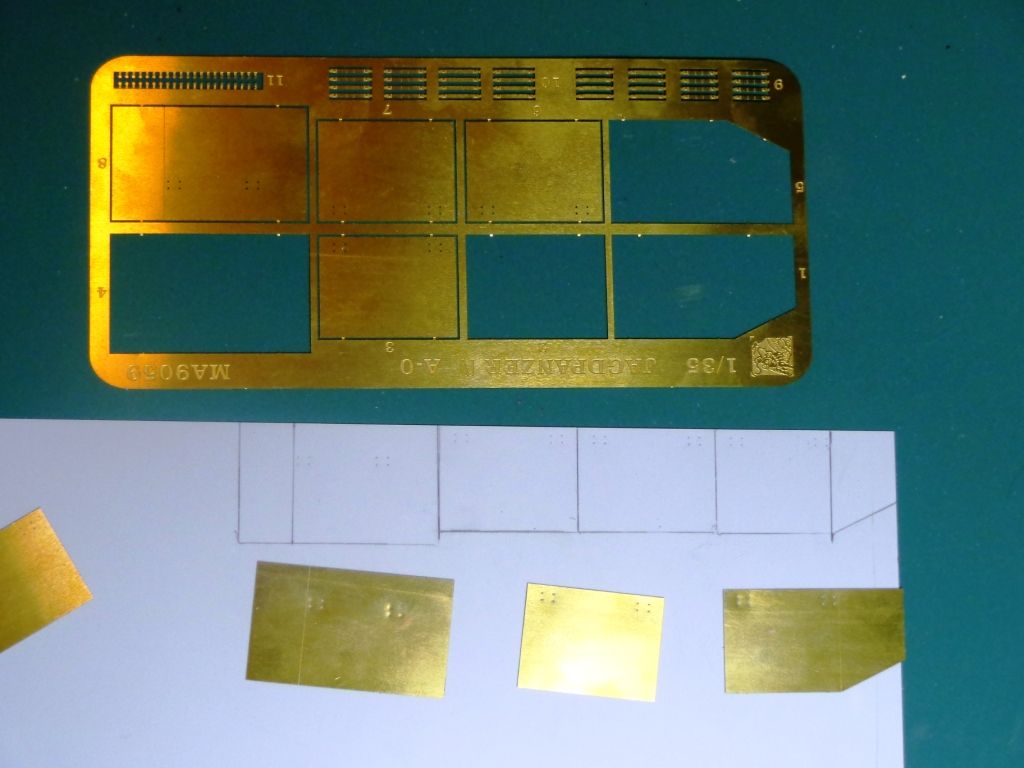
I used the PE hangers;
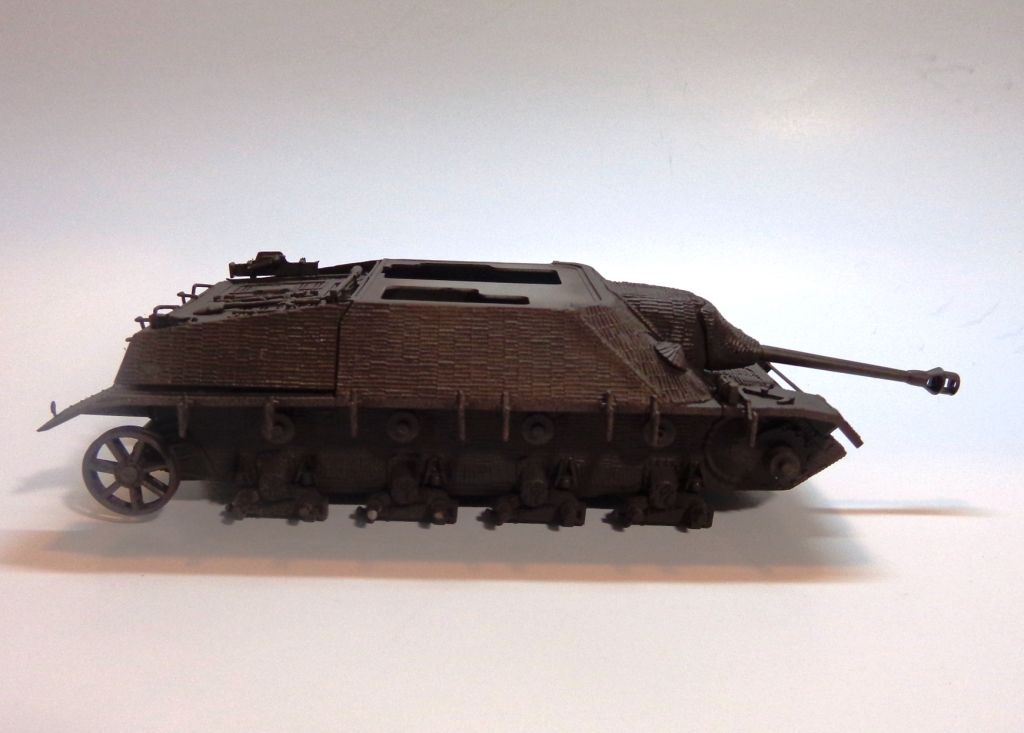
Now, I Start with a "Schokolade Brown" from Model Master as a base.
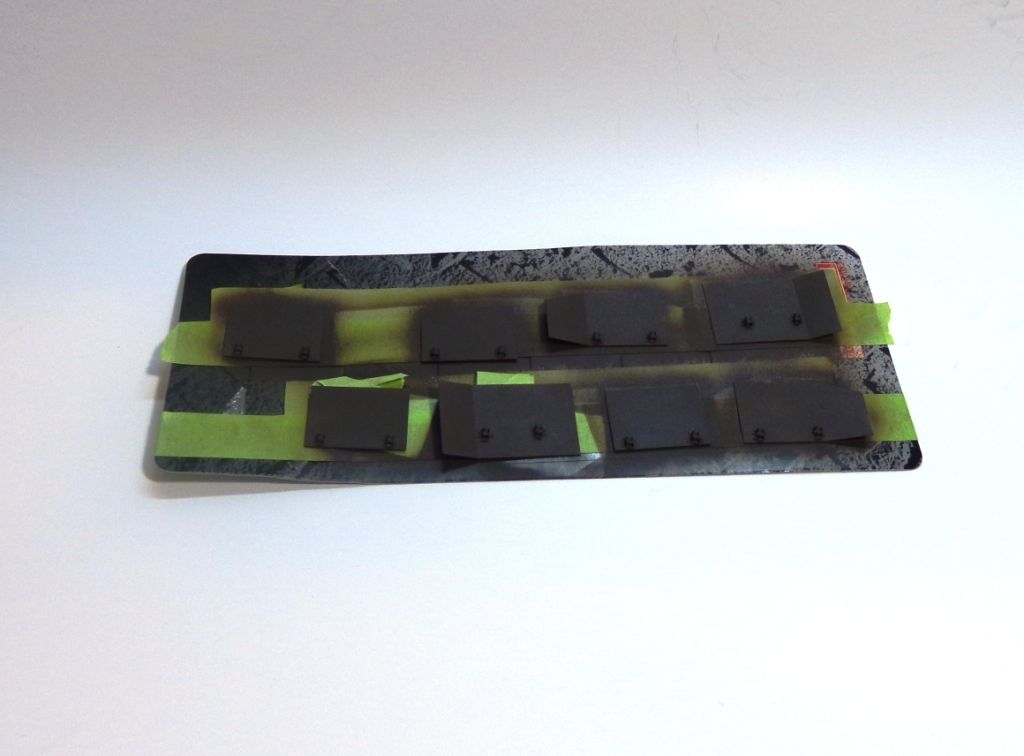
The new skirts get that treatment too.
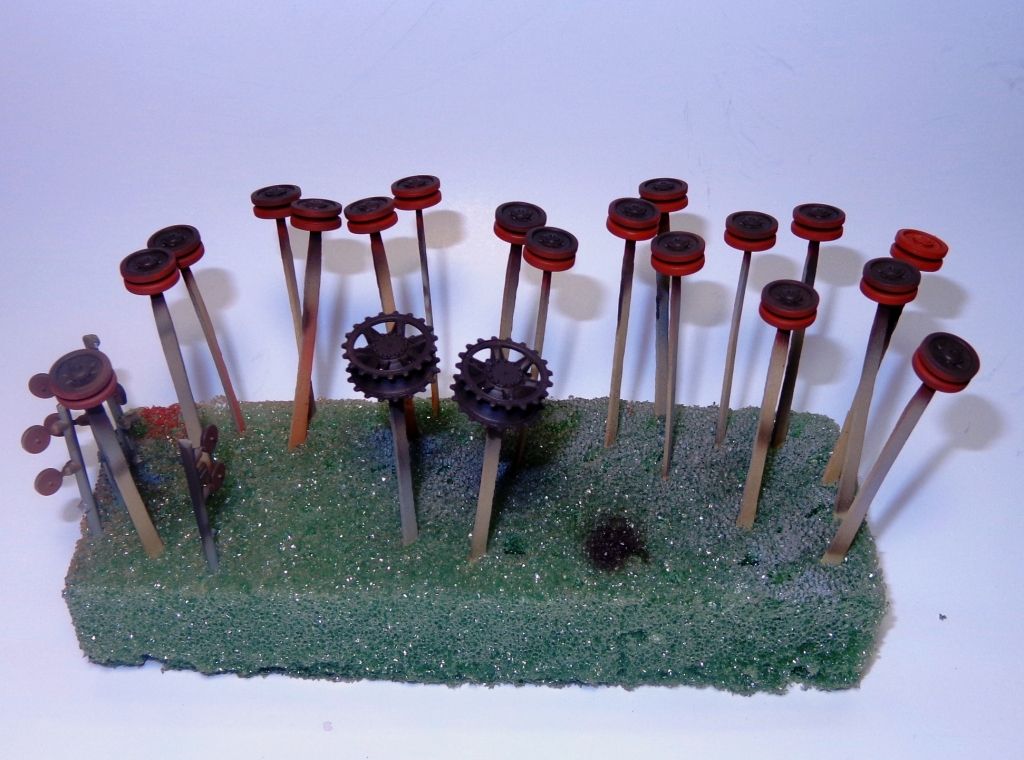
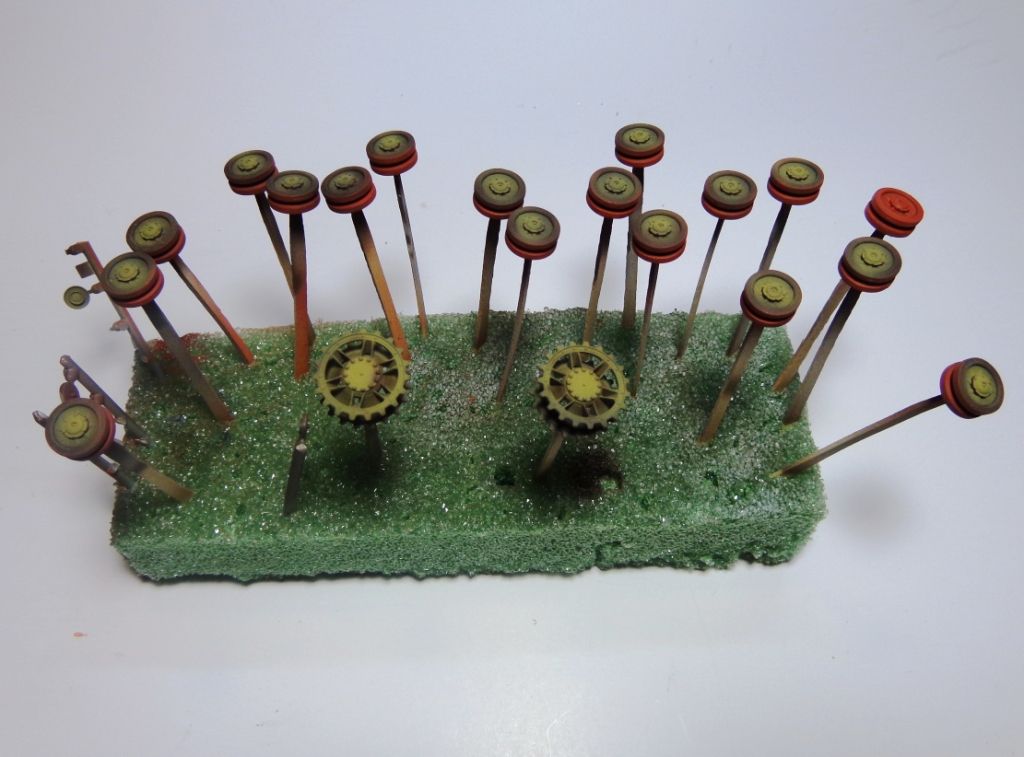
The wheels got the same treatment, but also got a shot of Primer Red on their inner race from Polly S--an old bottle I had found in my stash. This is called "Zinc Chromate Primer". I've seen wheels on real Pz IV's with primered inside wheel races, and like the way this looks, so...
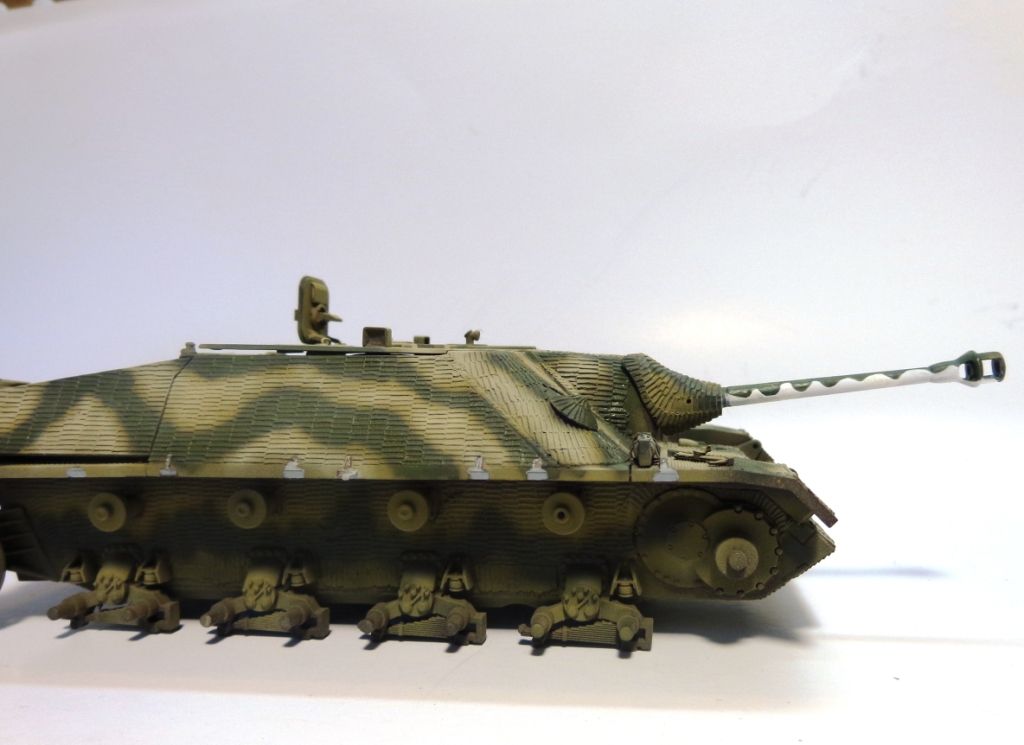
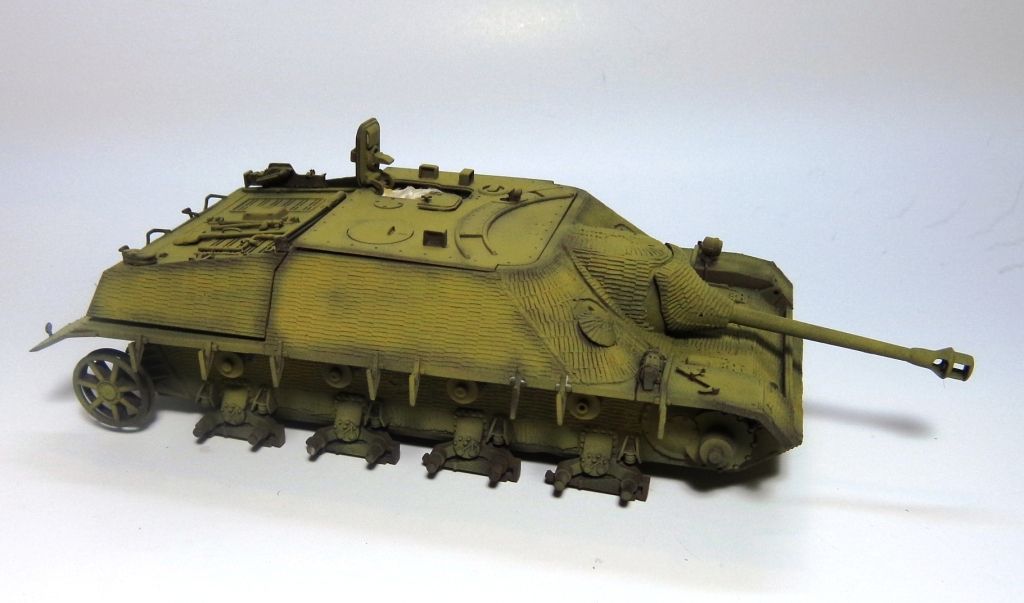
Now I gave a coat of straight DY from Tamiya...note I have not covered the model completely, but left "shadow edges" and brown in the hollows.
The wheels got that on their faces too, but not too opaquely...
And the INSIDE of the skirts got it ONLY toward the top, to simulate shadows as they hang.
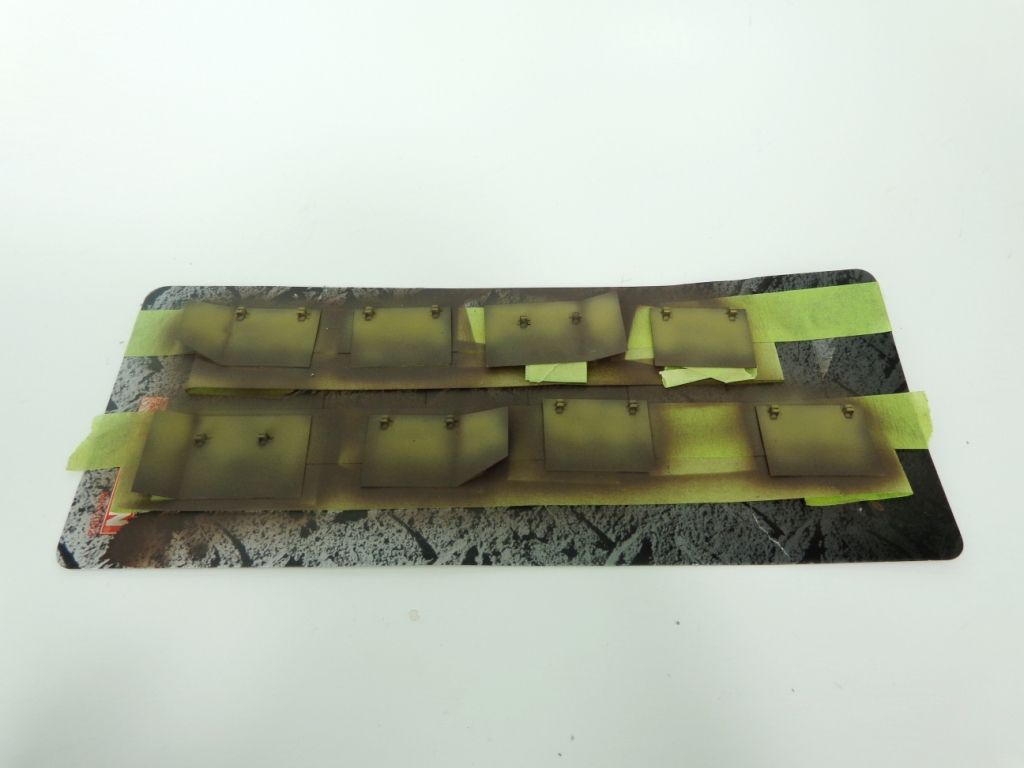
The faces, however, got a more complete coat.
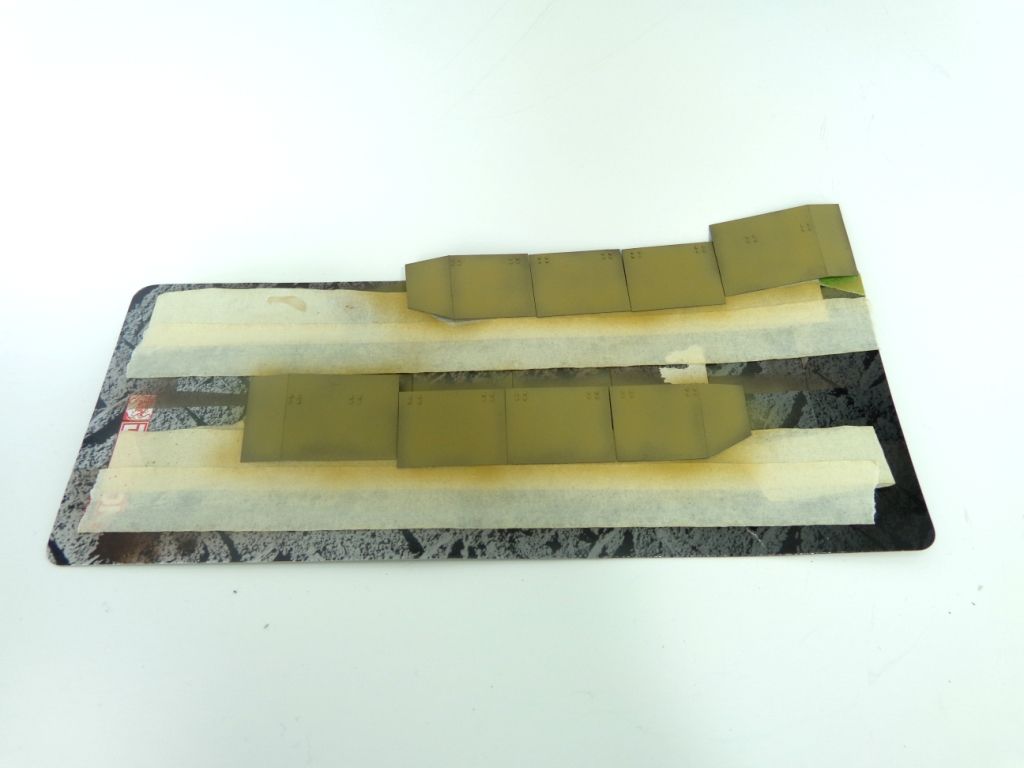
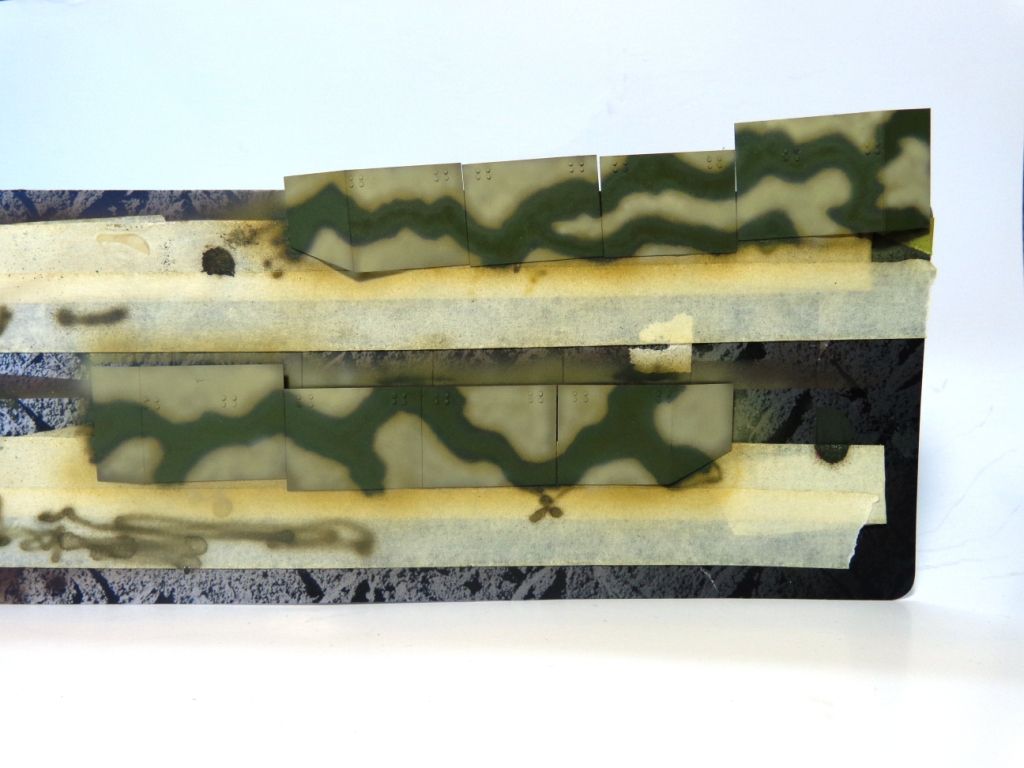
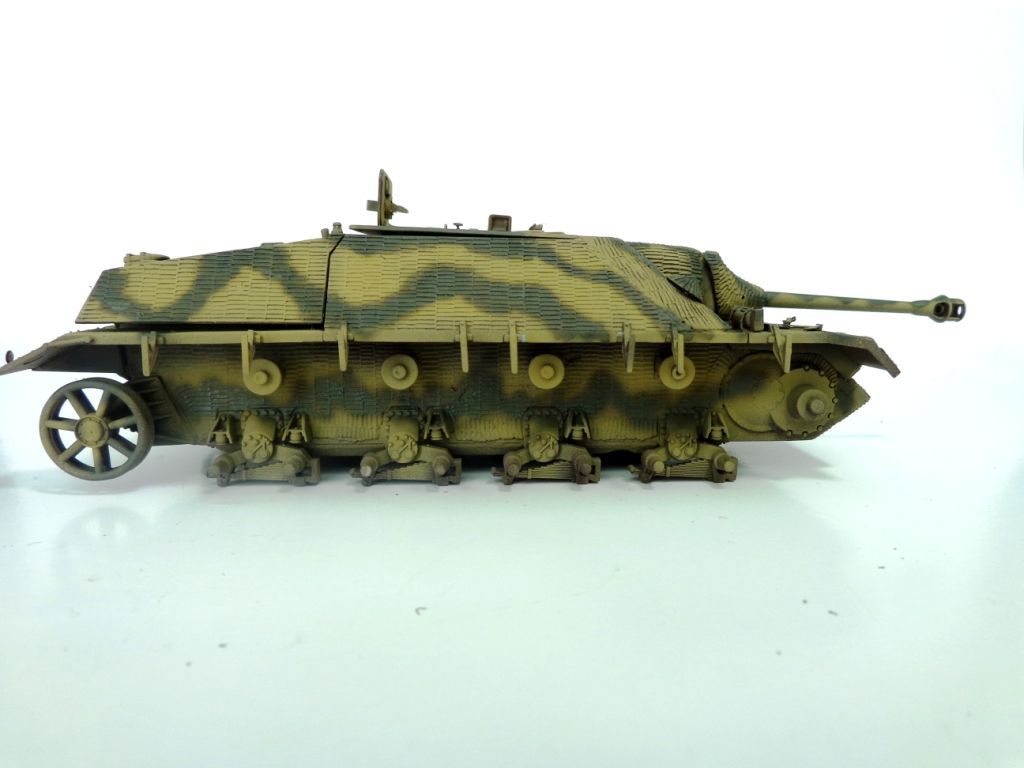
Next, I put on a green camo overspray. "WHAT??!!" you might say? "Where's the lightened DY coat?!" I thought about doing that here, but decided to wait until after the camo scheme was on it, to accent the pattern better. That way, I can leave darker yellow "edges" around the yellow parts when I highlight it.

The green is Tamiya Field Grey--their version of "Panzer green"-- with about 30% J.A. Green to darken it slightly.
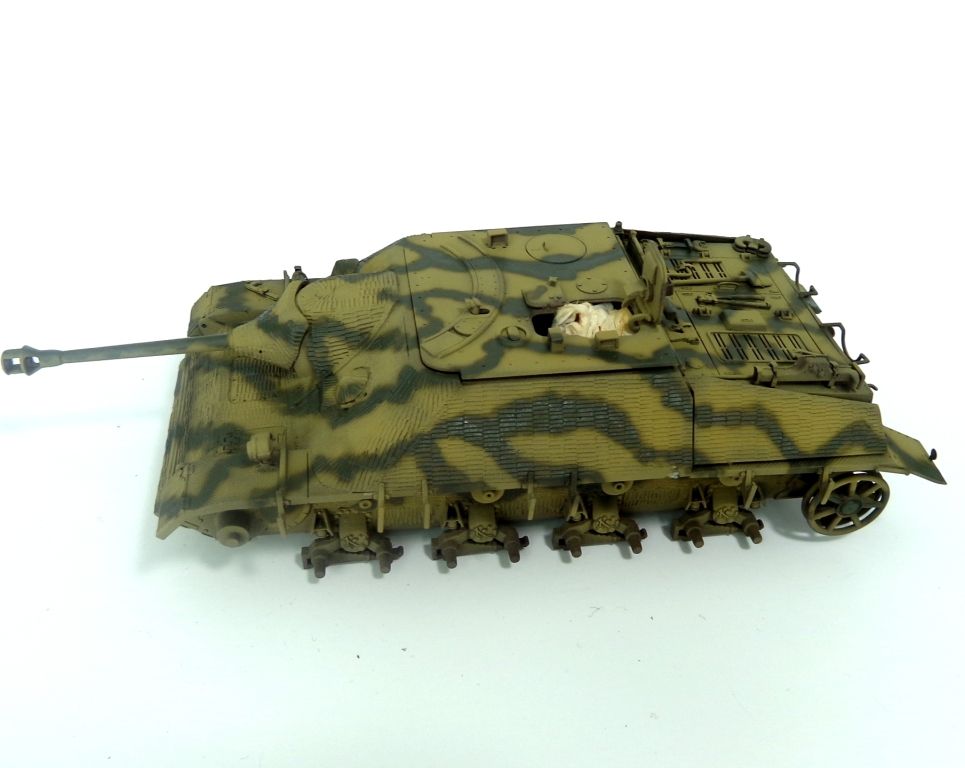
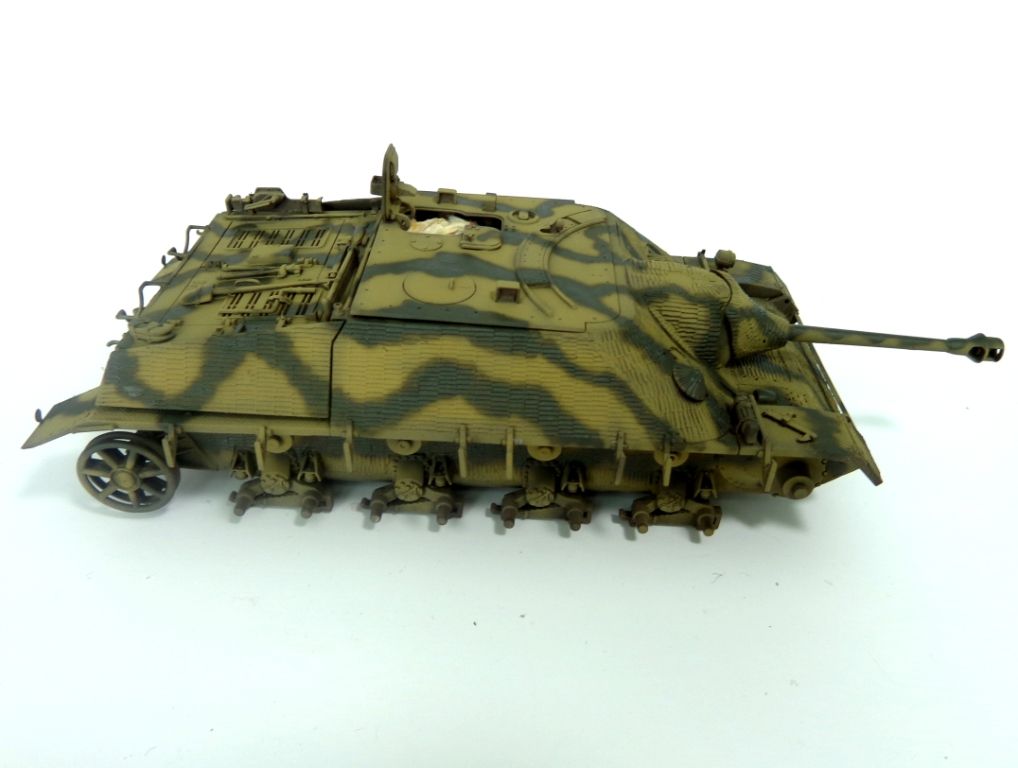
Now, the Panzer Green is given a dab of straight Yellow plus straight Green to make it "pop" a litttle more, and sprayed inside the panels, leaving the darker outline. I do NOT spray it in the bottom hull camo part, as it should be darker down there.
Skirts got the same treatment
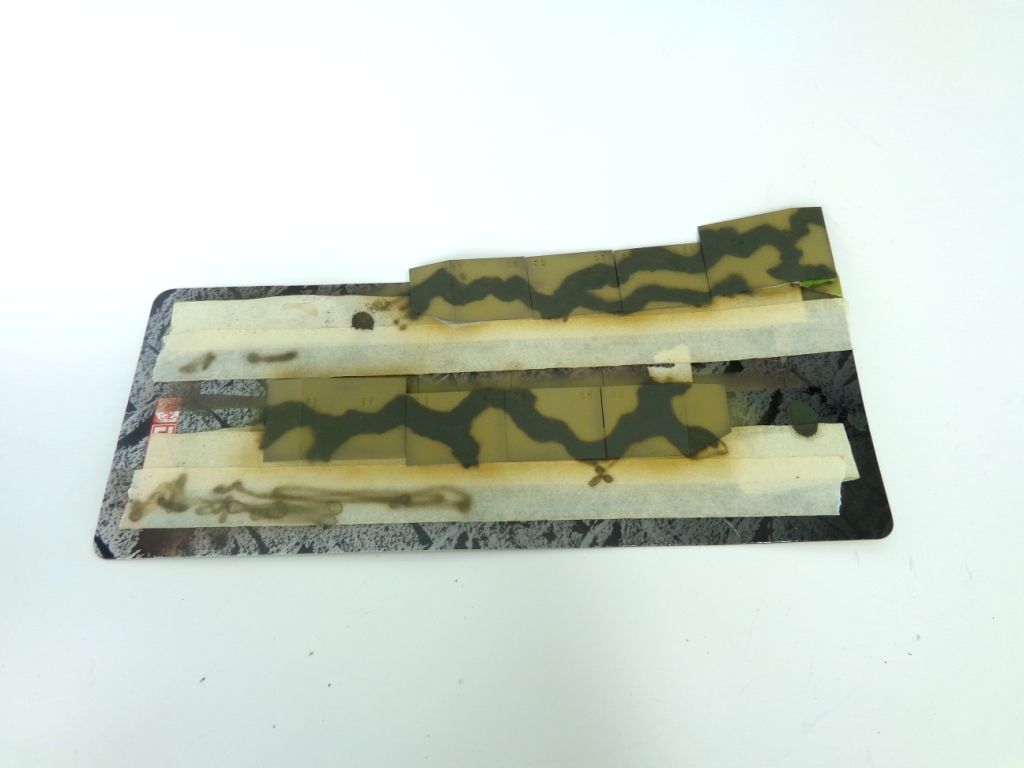
Now a touch of white is added, and the green is highlighted a little more. And NOW the lightened DY coat is also added to the insides of the Yellow patches. Note how much lighter it is now, yet still dynamically vibrant, not being a monotone finish.
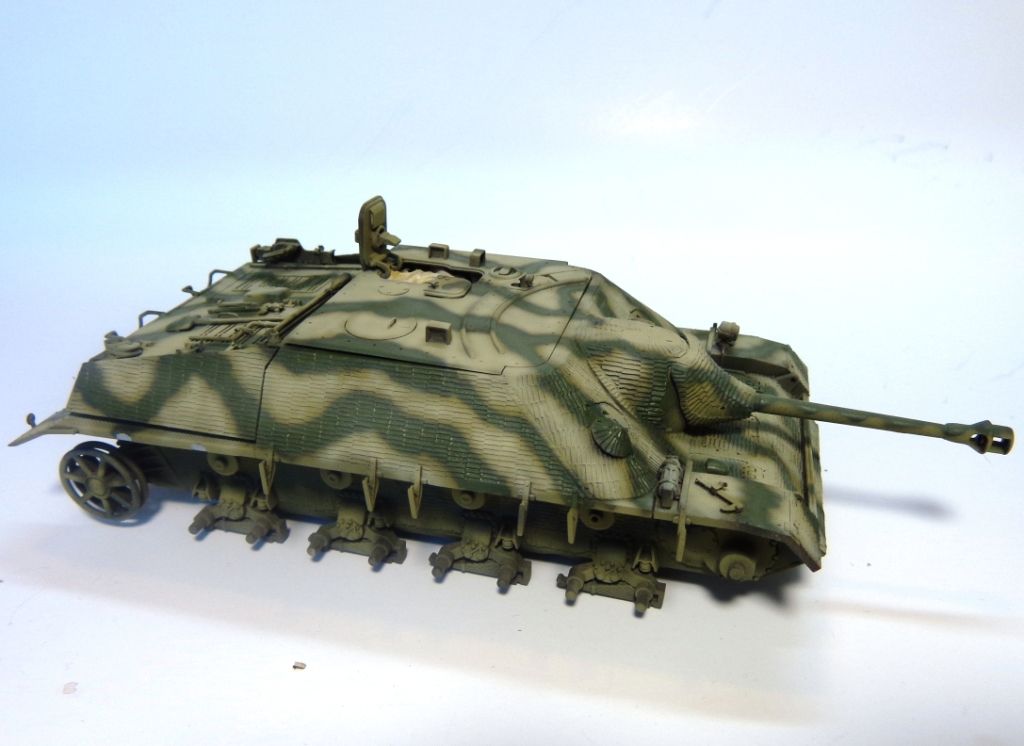
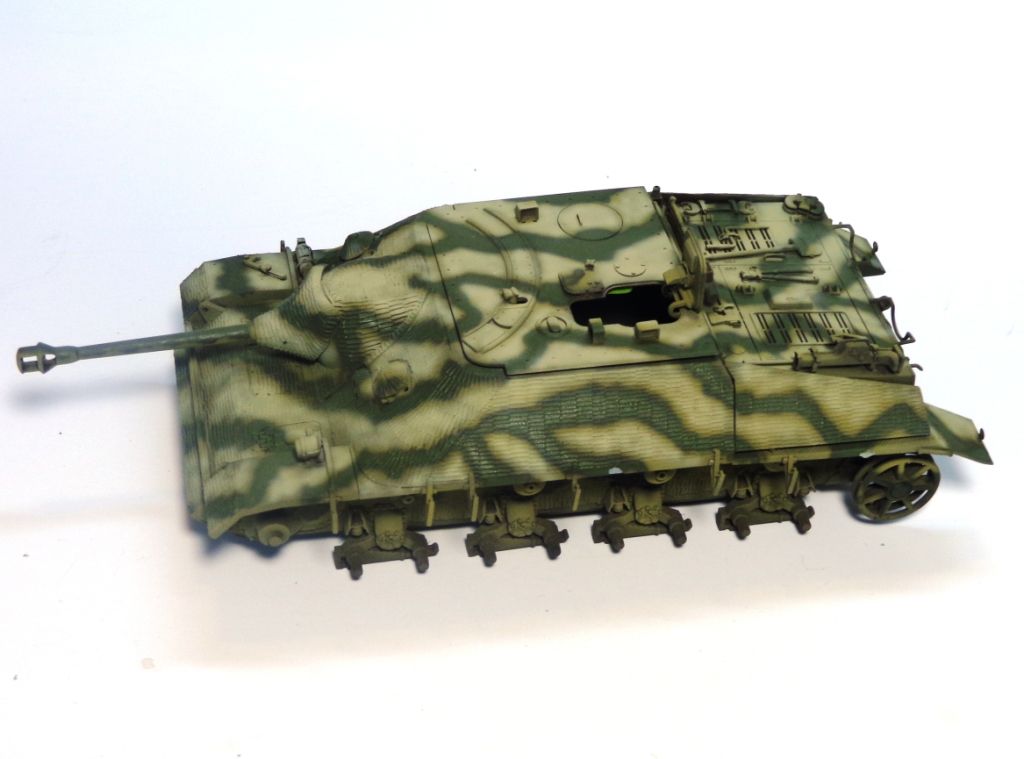
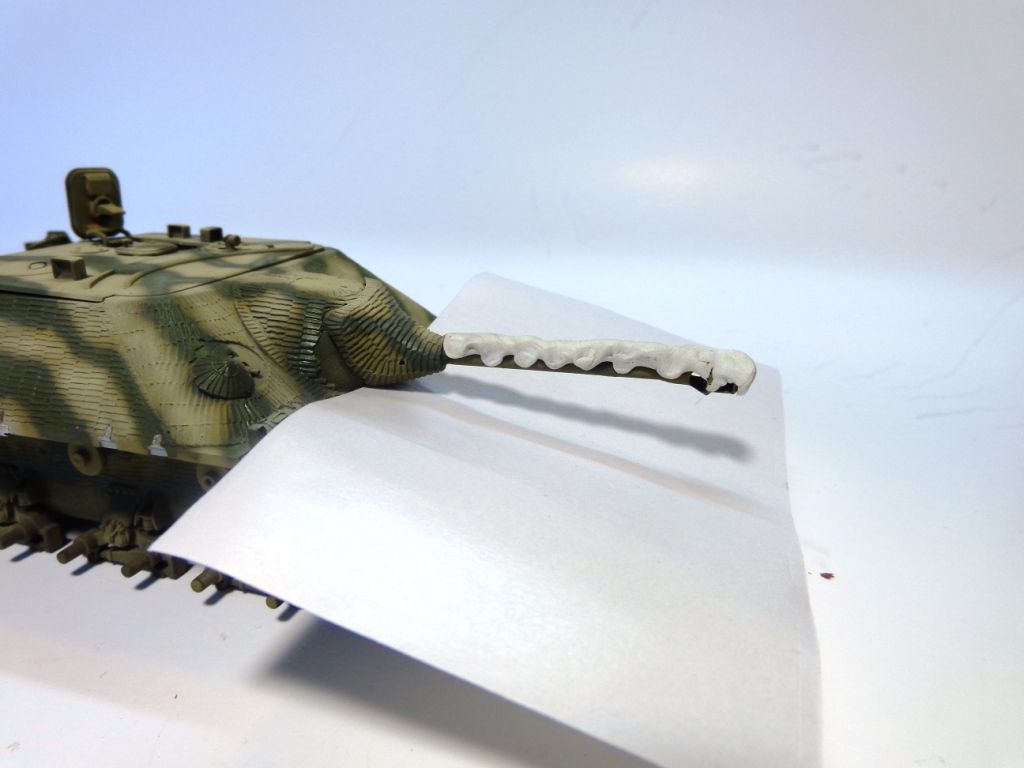
The barrel was masked, and a white counter-shadow sprayed.
And here's where I am now.
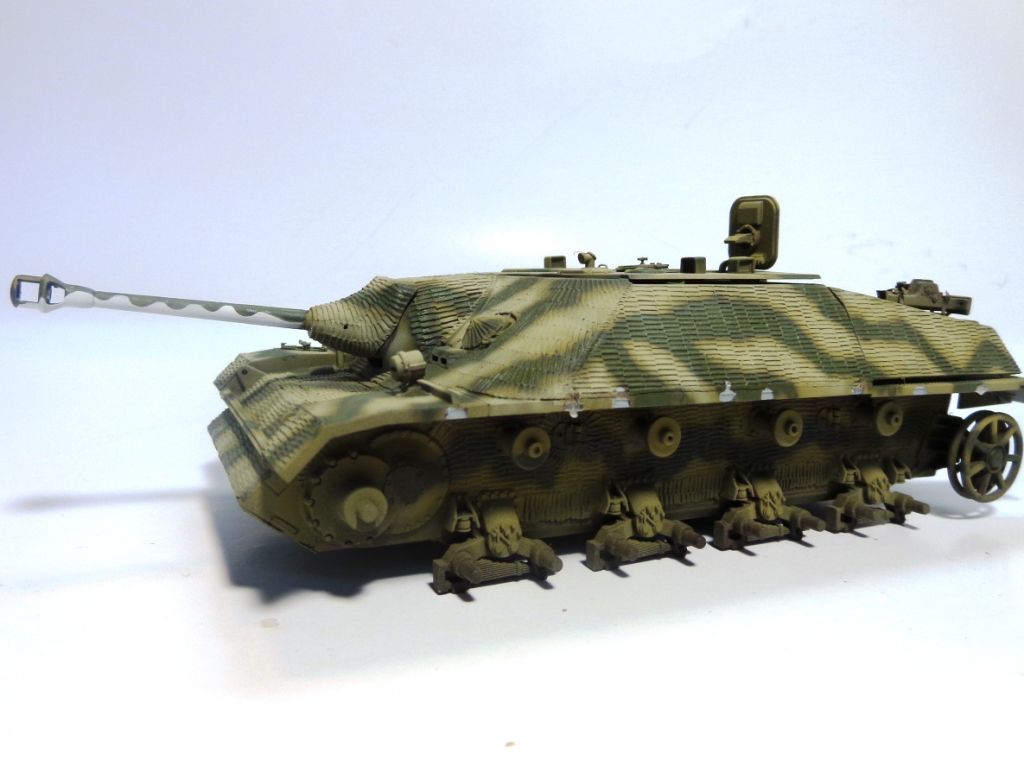
By the way, the bare patches you see are where I removed the schurzen hangers---I put them on with white glue only for the painting process. I'll touch them up when I attach the schurzen, after the tracks go on.

Well, that's it for now! Let me know if anyone has any suggestions or critiques! Thanks, guys!! (and girl!)

Smile

  • Member since
    January 2010
  • From: Nebraska, USA
Posted by CallSignOWL on Thursday, February 7, 2013 9:22 AM

whats the white on teh barrel for?

------------------------

Now that I'm here, where am I??

  • Member since
    December 2006
  • From: N. Georgia
Posted by Jester75 on Thursday, February 7, 2013 10:24 AM

Nice paint doog!!  That camo looks sweet!!

Eric


  • Member since
    January 2007
Posted by the doog on Thursday, February 7, 2013 10:42 AM

CallSignOwl,

The white on the barrel was/is a camouflage technique where areas that would normally be shrouded in shadow and, in the case of the barrel, provide an easily-recognizable "signature" to observers, is deliberately painted white in order to try to fool the enemy's eye. At least one of these "short barrel" Jagdpanzers had this kind of unusual scheme.

  • Member since
    January 2007
Posted by the doog on Thursday, February 7, 2013 10:42 AM

Thanks, Eric!

  • Member since
    February 2007
  • From: Brunswick, Ohio
Posted by Buckeye on Thursday, February 7, 2013 11:29 AM

Love that paint job! Toast

Mike

  • Member since
    August 2008
  • From: S.W. Missouri
Posted by Pvt Mutt on Thursday, February 7, 2013 6:55 PM

Karl just where did you come up with that paint scheme?????

Karl Von Gosh

Looks snazzy guys

Tony lee

Shoot Low Boys They're Ridin Ponys

  • Member since
    July 2004
  • From: Texas
Posted by wbill76 on Thursday, February 7, 2013 7:12 PM

Very nice work on the pattern and color shading Karl! Yes

  • Member since
    January 2007
Posted by the doog on Thursday, February 7, 2013 8:04 PM

Thanks, Tony, Mike, and Bill! I appreciate ya stopping in to take a looksee! Geeked

"Karl Von Gosh"---lol! Big Smile

  • Member since
    July 2003
  • From: On my kitchen counter top somewhere in central North Carolina.
Posted by disastermaster on Thursday, February 7, 2013 9:09 PM

  http://images.zaazu.com/img/make-up-female-girl-makeup-smiley-emoticon-000557-facebook.gif Man, when the makeup starts a goin' on, this baby really starts gettin' hot!      

          Just Loverly!

 https://i.imgur.com/LjRRaV1.png


  • Member since
    July 2006
  • From: San Francisco Bay Area
Posted by bufflehead on Friday, February 8, 2013 12:33 AM

Another doogerly finish!  That paint job is good enough that, if left as is without weathering, would still be better than many I see online or at model shows!!  Shoot...better than most of mine!!

Ernest

Last Armor Build - 1/35 Dragon M-26A1, 1/35 Emhar Mk.IV Female


Last Aircraft Builds - Hobby Boss 1/72 F4F Wildcat & FW-190A8


  • Member since
    July 2006
  • From: San Francisco Bay Area
Posted by bufflehead on Friday, February 8, 2013 12:49 AM

the doog

CallSignOwl,

The white on the barrel was/is a camouflage technique where areas that would normally be shrouded in shadow and, in the case of the barrel, provide an easily-recognizable "signature" to observers, is deliberately painted white in order to try to fool the enemy's eye. At least one of these "short barrel" Jagdpanzers had this kind of unusual scheme.

If I could add to this Karl.....

(and I apologize for hijacking your thread, but I just learned this myself not too long ago and I couldn't help sharing)

Owl, this might also be called a disruptive pattern, used to break up the outline of an object.  A good example of this are the Sherman Fireflys used by the British during WWII.  These were basically U.S. Shermans retrofitted with the Brit's 17 pound anti-tank gun - a long barreled 77mm gun that was much more destructive than the normal Sherman's short barreled 75mm gun.  To hide this from the Germans (especially German tank crews)  the long barrels were painted in the same pattern that Karl used here. 

To illustrate.  Take a look at his photo (for discussion purposes only) of a restored Firefly and note the barrel and its camo pattern.  Take into account that this is NOT how an enemy would normally see it!  If they got that close no amount of camouflage would hide any part of the tank!

Now lets see how an enemy would normally see this armored brute.....from a few hundred yards away or even further!


At a quick glance is it a "normal" Sherman or something else??  A Panzer tank crew might be fooled into thinking thats a short barrel and try to engage......oops! Black Eye

Pretty cool huh?

Ernest

Last Armor Build - 1/35 Dragon M-26A1, 1/35 Emhar Mk.IV Female


Last Aircraft Builds - Hobby Boss 1/72 F4F Wildcat & FW-190A8


  • Member since
    January 2010
  • From: Nebraska, USA
Posted by CallSignOWL on Friday, February 8, 2013 9:51 AM

that is pretty cool. Thanks for sharing bufflehead!

------------------------

Now that I'm here, where am I??

  • Member since
    March 2003
  • From: Western North Carolina
Posted by Tojo72 on Friday, February 8, 2013 10:54 AM

Zimm and camo pattern look really good Karl

  • Member since
    January 2007
Posted by the doog on Friday, February 8, 2013 1:17 PM

Thanks, Ernest, for that generous praise!

And a good posting on the "disruptive" camo! Really a nice compliment to the subject here and to the "back story" to the portrayal of it here. Yes

Thanks, too, Tojo! Smile

  • Member since
    January 2007
Posted by the doog on Monday, February 11, 2013 9:27 PM

Hey guys,

Sorry to be taking so long on this baby, but life just got REALLY busy lately---Jenn just got a job in Charlotte at a major hospital there, and we're moving on.....Saturday! Surprise.......(didja hear all that....stuff just hit the fan?!) Been going nuts packing, looking or an apartment--but I managed to eek out some progress on this!

I did some preliminary weathering on the lower hull--just some oil weathering with MIG's Pz Abt 502 "Buff" and "Basic Earth". This was dabbed on with a medium brush.

I painted the wheels by hand, one by one. The color is MM Dark Gull Gray. .

One thing I did differently, from seeing evidence of this in photos and in real life, is to add metallic gray to the inner wheels with a large artist's graphite pencil.

You can kinda see the effect here---oops, I got a little on the tire...

I added some oil paints to the sprockets to simulate dust build-up inside. I also added some MIG "OIl and Stains" effects to simulate a leaky seal.

Here's the semi-finished tracks (pigments still to be added once on the vehicle). I tried to think about all the contact points and wear places--the inside wheel tracks, outer track faces, and bottom of the guide horns are done in dark metallic gray; the tops of the guide horns and tracks are drybrushed in silver. The contact points for the sprocket teeth have been carefully picked out in silver. The outsides of the tracks have various shades of oils added to add a variety of dirt and rust effect. Shame that most of this detail will be hidden behind the schurzen, but eh---that's Armor modeling, isn't it? Tongue Tied

Adding the tracks to the vehicle--I place the sprocket into the curve where it's held by the track; the other end is then slipped over the idler, and the wheels are added last. Note how by having added ONLY the single, inside return rollers the track is able to be slipped right onto the single rollers. The 2nd outside rollers will be added after the tracks are secured.

The tracks have been superglued to the top rollers, and are being let to dry.

That's it so far----I should have one more update before I have to pack this bay up for moving. AT least now that the tracks are on, it should be easier to secure in a box without breaking the tracks apart, or losing wheels! Stay tuned---all comments always welcomed! Smile

  • Member since
    July 2006
  • From: San Francisco Bay Area
Posted by bufflehead on Monday, February 11, 2013 9:51 PM

Moving, packing, going nuts.....and still time to work on the Jagdpanzer!!  That's a true modeler!!   Even though you've got to be busier than a one armed paper hanger, you've managed yet again to achieve some incredible work!  Love the weathering so far on the lower hull and suspension, but one thing bothers me.......when did you sneak the markings in? Whistling

Ernest

Last Armor Build - 1/35 Dragon M-26A1, 1/35 Emhar Mk.IV Female


Last Aircraft Builds - Hobby Boss 1/72 F4F Wildcat & FW-190A8


  • Member since
    March 2004
  • From: Kincheloe Michigan
Posted by Mikeym_us on Monday, February 11, 2013 10:05 PM

Looking Cool KarlCool. I literally just got this very kit in this afternoon off of Ebay and it was worth every penny. Though I still can't figure out how they figure this is a Imperial series kit when it has all the bells and whistles of a Smart kit when most of the Imperial series kits are usually 20+ years old maybe it is a error.

On the workbench: Dragon 1/350 scale Ticonderoga class USS BunkerHill 1/720 scale Italeri USS Harry S. Truman 1/72 scale Encore Yak-6

The 71st Tactical Fighter Squadron the only Squadron to get an Air to Air kill and an Air to Ground kill in the same week with only a F-15   http://photobucket.com/albums/v332/Mikeym_us/

  • Member since
    April 2006
  • From: ON, Canada
Posted by jgeratic on Tuesday, February 12, 2013 5:15 AM

Karl, looking very interesting.  

I've never noticed before, but am curious -  the primer colour on the inner sides of the wheels, artistic choice or how it actually was done in the factory?

regards,

Jack

  • Member since
    December 2006
  • From: N. Georgia
Posted by Jester75 on Tuesday, February 12, 2013 5:38 AM

Looking great Karl! The tracks finished nicely with the different tones of "earth" in them. Best of luck with the move!

Eric


  • Member since
    January 2007
Posted by the doog on Tuesday, February 12, 2013 8:39 AM

Ernest--ha ha, yeah, I forgot about the decals--I put them on a some point after painting. I just placed them onto a light wash of Solvaset and then laid them over with a soft, wide brush wetted with water after about 10 seconds, and they snuggled right down over that zimmerit, nice and tight! No gloss coats or anything.

Yeah, moving is a drag! It's been crazy-busy around here, trying to find an apartment, pack, and still do any work on this model! Thanks for the look-in, and the nice compliments! Smile

  • Member since
    January 2007
Posted by the doog on Tuesday, February 12, 2013 8:52 AM

Mike,

Good score! I'm not aware of the designations and categories that they put these models into--"Imperial Series" and whatnot? I never paid attention to that.

But some interesting piece of trivia--a local dealer here told me that some of these lines of product--like Cyber Hobby, for instance--were created specifically to get around exclusive "deals" that model manufacturers had with certain major retail outlet stores/distributors here in he US. So like, if "Major Store A" had an exclusive right to sell one line, yet "Major Retailer B" wanted to be able to have some of that line or an "off-limits" group of Dragon's action, so they created "Cyber Hobby" line to enable them to get around those in-place business deals and restrictions! Crafty, eh?

MAYBE this is the reason that this kit has been "branded", per se, as "Imperial"? In any case, I guess it all works out for us modelers, the "little guys"!  Smile

  • Member since
    January 2007
Posted by the doog on Tuesday, February 12, 2013 8:57 AM

jgeratic

Karl, looking very interesting.  

I've never noticed before, but am curious -  the primer colour on the inner sides of the wheels, artistic choice or how it actually was done in the factory?

regards,

Jack

Thanks, Jack!

And it's a little bit of both--I've seen photos of Pz IV wheels where the insides have been definitely painted in primer red. It may be that these are more "late war" styles--I can't remember where it was, exactly--either from some museum photos, or it may even have been a recovered panzer site?--but in any case, it was visually interesting, and just a small bit of "personalization" to the build. There may well indeed be experts out here who can or would offer proof that I"m 100% wrong about this as well, but it doesn't matter--I'm an artist first, a modeler second, and a historian a distant third!

  • Member since
    January 2007
Posted by the doog on Tuesday, February 12, 2013 9:00 AM

Thanks, Eric! We found an apartment yesterday, and are moving out Saturday! Unfortunately, that'll also mean that this project gets delayed for a while---I have to travel to NY next Tuesday, and then return a week later, and then on March 2nd I fly out to Europe again for three weeks. Ugh! Here we go again!

Best I can figure is mid-April to finish this one, unfortunately!

  • Member since
    January 2010
  • From: Nebraska, USA
Posted by CallSignOWL on Tuesday, February 12, 2013 9:31 AM

nice progress!!

------------------------

Now that I'm here, where am I??

  • Member since
    March 2003
  • From: Rain USA, Vancouver WA
Posted by tigerman on Wednesday, February 13, 2013 1:10 AM

Missed a lot here, Excellent progress and nice toot.

   http://i7.photobucket.com/albums/y269/wing_nut_5o/PANZERJAGERGB.jpg

 Eric 

  • Member since
    April 2008
  • From: N.H. USA
Posted by TZombie on Wednesday, February 13, 2013 9:02 AM

Coming out very nice! Looking forward to your next update once you get going again.

  • Member since
    January 2007
Posted by the doog on Wednesday, February 13, 2013 9:30 AM

Thanks so much, CallSIgnOwl, Eric, and YZombie!

Unfortunately, I think I may have to wrap this one up for moving and resume it again once I get back from tour and am able to set up my work area again. Sad

Bummer!! 

If I can get another update before then, I'll try, but I think I'm wrapping this one up for the move!

Thanks everyone who has been following the build and commenting! YesSmile

  • Member since
    March 2004
  • From: Spartanburg, SC
Posted by subfixer on Wednesday, February 13, 2013 2:32 PM

I've been following the whole thing, but was waiting to chime in after you were finished. Since it looks like you won't be done for a while, I'd like to let you know that, once again, you are proving yourself a master.

YesYes

Have fun storming the castle!

Lee

I'm from the government and I'm here to help.

  • Member since
    August 2012
  • From: Parker City, IN.
Posted by Rambo on Wednesday, February 13, 2013 5:35 PM

that sucks that you have to pack everything up, but it sounds like you two are on to bigger and better

Clint

  • Member since
    January 2007
Posted by the doog on Wednesday, February 13, 2013 7:45 PM

Lee---thanks, man! That's very kind of you to say. Wink I appreciate it!

  • Member since
    January 2007
Posted by the doog on Wednesday, February 13, 2013 7:45 PM

Rambo--thank you! Yes, it is indeed great that a new college graduate found a great job only a few weeks after graduation. Things couldn't be better right now. Hoping THAT continues! Smile

I've already packed up quite a few of my finished models--I hope they survive the move undamaged!

  • Member since
    July 2003
  • From: On my kitchen counter top somewhere in central North Carolina.
Posted by disastermaster on Wednesday, February 13, 2013 11:32 PM

Bhttp://www.myemoticons.com/emoticons/images/msn/new-emoticons/watching.gif 4 http://fc01.deviantart.net/fs70/f/2010/270/6/9/brian_griffin_by_unkn0wnart1st-d2zmnpo.gif

 https://i.imgur.com/LjRRaV1.png


  • Member since
    May 2005
  • From: Dublin Rep Of Ireland
Posted by terry35 on Saturday, February 16, 2013 9:53 AM

Hi, Karl, you have certainly brought this one along, it's simply amazing, I love your approach to tackling the tracks, seems to make everything more manageable. The work up to present is amazing, I love the approach to the airbrushing, it has paid off really well and the toning down has produced an effect to you're 251 Drilling from some years back.

Terry.

  • Member since
    April 2005
  • From: Piscataway, NJ!
Posted by wing_nut on Saturday, February 16, 2013 11:00 AM

WOW man you are really pulling out the stops here.  Love the red primer between the road wheels.

Marc  

  • Member since
    July 2006
  • From: New Jersey
Posted by redleg12 on Sunday, February 17, 2013 12:15 PM

OK....next time you are in the northeast, stop by and beat me with a stick. Somehow I completely missed this on....I'm sorry old buddy, a mind is a terrible thing to waste!!

Very nice, love the paint pattern, work in and around the tracks is excellent. Another Karl masterpiece.

Hope all has gone well with the move and best of luck to Jenn in her new job.

Excuse me now as I will go off to become a monk and give penance for missing this for soooo long...be well

Rounds Complete!!

"The Moral High Ground....A Great Place to Emplace Artillery."

  • Member since
    July 2004
  • From: Texas
Posted by wbill76 on Sunday, February 17, 2013 5:21 PM

Moves are always a pain but am sure you're already well prepped for that in the logistics department Karl! Congrats to Jenn on the new job as well. Beer

  • Member since
    January 2007
Posted by the doog on Tuesday, February 19, 2013 7:29 PM

Thanks, everyone, for the kind words and well-wishes! I just got my internet hooked up this afternoon, so sorry for the tardy reply,

Jenn and I moved this week, on Saturday. Well, at least we moved FROM Chapel Hill--but in the WORST rain/sleet/snow storm that Charlotte has seen in 10 years. It was a nightmare, man! By the time we got loaded up---a 26 foot truck all the way to the back--it was sleeting out, and by the time we got to Charlotte 3 hours later, it was a full-on blizzard! Our movers weren't able to make it to help us unload, so we did as much as we could, to get a few things out to sleep on the floor for the night. We moved in the next morning up to the 3rd floor (with NO elevators!) after almost no sleep on a carpet, under mover's blankets from U-Haul! What a nightmare-move as far as these things go! We both felt like we were moving back to NY with all this darned snow and sleet!

Anyway---now it's another trip to NY tomorrow for business, and then back home here on Tuesday, and then off again on Saturday to Europe. So I won't be getting back to this one until late March. Thanks again, guys, and I"ll be still active here replying and whatnot. :)

  • Member since
    July 2004
  • From: Texas
Posted by wbill76 on Tuesday, February 19, 2013 8:04 PM

Travel safe Karl and don't let this build sit for too long or they'll start sending out search parties for you! Wink

  • Member since
    July 2006
  • From: New Jersey
Posted by redleg12 on Wednesday, February 20, 2013 5:47 AM

Rest up and be safe on your travels....we will catch you on the backside of the EU trip!!

Rounds Complete!!

"The Moral High Ground....A Great Place to Emplace Artillery."

  • Member since
    January 2007
Posted by the doog on Sunday, March 31, 2013 9:53 PM

Well I've finally been able to get back to work on this project here.

When I last sat down with it, I was just starting basic weathering. Now I've continued, and started by adding some tinting to the Dark Yellow. I used some 502 Abt. "Buff", adding some tonal variation to the patches remaining...

...and then using a second, dry brush to blend in the color...

I also used the Buff for some streaking, drawing it down from dots, down the sides of the model, and on the upper hull edges. Here's where I am so far;

Next, I added some chipping. I used a combination of acrylic MM Raw Umber, Black, Steel, and Rust, and used a small piece of sponge to add it...

Here's the sponge I used--this is just padding material from some resin AM parts--I just rip it from the square.

Adding it to the muffler. I tried not to do the "usual" full-rust-out, but to rather apply patches of rust around some dents.

Next, I used some of Adam Wilder's new pigment and products line to add some dirt and dust to the suspension and wheels. For those of you who may not know Adam, he's one of modeling's most talented and prolific modelers and author in some of the world's most respected armor magazines, He was with MIG Productions in the early days, and was an administrator on the MIG website for a long while. He now has his own product line coming out, with the first batch being some great pigments in bigger, and less-expensive bottles than what's currently available. Here's his bottle next to two other competitors.

And some of the "flavors" offered:

  Adam will be debuting them at AMPS this year in Atlanta, and I'll be using them in quite a few future builds. Here, I'm using a combination of Brown Russian Earth with Dry European Mud, mixed with a bit of pigment fixer into a slurry, and applied to the suspension using an old brush.

I then added some of the Dry Mud to add a lighter top layer.

A nice, dusty appearance for sure...

I thought the pigments covered up the camo a bit too much---still getting used to these new pigments---so I scrubbed some of them off the hull with a wetted brush.

This seems to have given me more of what I wanted--a darker layer of still-wet mud under a dried, and drying layer.

And that's where I am so far...more to come as  add some more detail painting and more pigment work.

Thanks for looking in, guys!  Whatcha think? Smile

  • Member since
    December 2006
  • From: N. Georgia
Posted by Jester75 on Sunday, March 31, 2013 10:21 PM

Love the weathering Karl, looks spot on!! This is where I need to get with it. Glad to see you made it back to the country and found the bench again!

Eric


  • Member since
    November 2004
  • From: Essex England
Posted by spacepacker on Monday, April 1, 2013 2:45 AM

Karl, I always enjoy following your builds and this one is no exception.

They are always so informative;  a Master Class in there own right.

I can say it now,  I'm  'gobsmacked'...cheers....Kenny

  • Member since
    July 2004
  • From: Texas
Posted by wbill76 on Monday, April 1, 2013 9:44 AM

Nice to see you getting back to the bench and making progress with this one Karl! Nice work on the paint fading and layering and pigments look good as well. Beer

  • Member since
    August 2012
Posted by Winetanker on Monday, April 1, 2013 9:49 AM

Looking Be-uuuuuuuu-tiful!

....working my way up the airbrush learning curve......

  • Member since
    August 2008
  • From: S.W. Missouri
Posted by Pvt Mutt on Monday, April 1, 2013 1:38 PM

Welcome home Karl

I may buy a few of the new product and give them a try if they are cheaper as you say but I feel the AM stuff is getting totally out of hand even if folks can afford it.

I've already started cutting back and refuse to fall for all the marketing hype that tells me I can't live without the product.

Again it's great to see you back my friend.

Tony lee

Shoot Low Boys They're Ridin Ponys

  • Member since
    December 2002
  • From: Bury St Edmunds, Suffolk, England
Posted by Bish on Monday, April 1, 2013 2:18 PM

Great looking build karl. Those new pigments look interesting.

I am a Norfolk man and i glory in being so


On the bench: Airfix 1/72nd Harrier GR.3/Fujimi 1/72nd Ju 87D-3

  • Member since
    September 2006
  • From: Dripping Springs, TX, USA
Posted by RBaer on Monday, April 1, 2013 2:45 PM

Same here, welcome back, and I like the look of the pigments a LOT.

Apprentice rivet counter.

  • Member since
    January 2007
Posted by the doog on Monday, April 1, 2013 5:50 PM

Hey guys, thanks for the welcome back, and for the comments! I"m glad to hear that you're digging it so far. I know you guys would tell me if I was going off-course!

Tony, I had to laugh at what you said--it's kinda true, isn't it, that there are so many options available now with all the AM finishing stuff. I guess I can't really argue; I mean, who can say "This brand is heads-and-tails so much better than THAT product"? You really have to try them out to see what works for you.

Adam told me that these pigments are actually "purer" than many on the market, in that they're not "cut" with some generic powders that are used in some other pigments as "filler". They certainly seem to be pretty good product from what I've so far experienced, and that hasn't been much, YET. I CAN say that there's definitely more in HIS bottles than you get in either of the competitors' bottles that I have. And with the price of finishing products these days, that makes me smile!

Thanks again for the nice comments and all, guys! I can't wait to meet some of you at AMPS!

  • Member since
    January 2007
Posted by the doog on Saturday, April 6, 2013 6:28 AM

Hey everyone!

I have a new update---some detail painting and the schurzen mounts have been added. It's ready to add the skirts, so here's documentation of the weathering behind them for the record. I added the spare track to the front, and the spare wheels. I also got the exhaust done, and did some more chipping around the hatches.

Here's the pics so far...

I used Adam Wilder's pigments to weather the exhaust and spare tracks...

Here you can see the chipping effects, in 3 layers.

I've added some bullet holes to the schurzen with an awl.

Next update should be the addition of the side skirts and maybe finished pics? Still working on the crewman, so the finish line is well within sight!

Have a great weekend, guys! Smile

  • Member since
    March 2003
  • From: Rain USA, Vancouver WA
Posted by tigerman on Saturday, April 6, 2013 10:38 AM

Looks sweet Karl. Nice touch on the schurzen.

   http://i7.photobucket.com/albums/y269/wing_nut_5o/PANZERJAGERGB.jpg

 Eric 

  • Member since
    December 2006
  • From: N. Georgia
Posted by Jester75 on Saturday, April 6, 2013 11:18 AM

Ditto on the schurzen, like the effect!! Having not used pigs yet, I am looking to invest in some before my next armor build. Are these available anywhere yet Karl?? Obviously your pretty pleased with them and they look great on this Jagdpanzer!

Eric


  • Member since
    December 2012
Posted by RX7850 on Saturday, April 6, 2013 2:59 PM

Top shelf build you got going on so far.Yes

  • Member since
    September 2009
  • From: Rugby, England
Posted by Hinksy on Saturday, April 6, 2013 5:15 PM

Looking very, VERY nice Karl,

Once my current WIP Pz.IV G is done I'll be taking to my stash and building Dragon's recently released StuG III G with the Zim and Schurzen.

I'm planning on a factory fresh build for that one so I'll probably go for a fully assembled Shurzen affair. Should I decide to beat it up a little I'll remember your punch used here to create some bullet impact effects.

Lovely looking buid Karl, it's nice to see an old 'Imperial' on the bench. I'll be looking into one of these - I know a smart kit with Zim has been released (I hate doing my own Zim although homemade Zim beats anything else imo).

All the best matey,

Ben Toast

On the Bench - Dragon Pz. IV Ausf. G (L.A.H.) Yes

Your image is loading...


  • Member since
    August 2012
  • From: Parker City, IN.
Posted by Rambo on Saturday, April 6, 2013 7:55 PM

looks great I really like the impact marks on the side skirts

Clint

  • Member since
    July 2004
  • From: Texas
Posted by wbill76 on Saturday, April 6, 2013 8:20 PM

Almost done with this one Karl, nice work on the underside weathering. Beer

  • Member since
    April 2005
  • From: Gothenburg
Posted by JohanT on Sunday, April 7, 2013 2:35 PM

Hi the doog,

Great looking build, love your attention to detail!

Hoping to be able to adopt some of your ideas in my future builds.

Thank you for sharing!

Very Best Regards

Johan

  • Member since
    August 2006
  • From: Amherst, MA
Posted by M1 A1 A2 Tanker on Sunday, April 7, 2013 2:46 PM

The doog strikes again! With a totally awesome looking build.

I really like the bullet hole effect.

Scott


“Computers are like Old Testament gods; lots of rules and no mercy.”  ~ Joseph Campbell


  • Member since
    May 2005
  • From: Dublin Rep Of Ireland
Posted by terry35 on Sunday, April 7, 2013 5:14 PM
Brilliant work so far Karl, great WIP.

  • Member since
    January 2007
Posted by the doog on Monday, April 8, 2013 7:02 AM

Thanks, Tigerman, and Eric----Eric, I'm not sure when or from whom Adam's pigment line will be available; I'll have to ask him. He gave me a bunch to try out, but hey should be available really soon. I'll certainly let ya know when they're here in the US.

RX7850, Ben, Clint, Bill, Rambo, Johan, Scott and Terry--thanks again, all, for the encouragement and kind comments!

Ben, that StuG kit is a killer offering! I can't wait to see it built up! And I didn't know they did a Smart Kit of this tank with zimm?! WOW--man, they're going to put some of these AM zimm manufacturers out of business! :)

  • Member since
    July 2006
  • From: San Francisco Bay Area
Posted by bufflehead on Wednesday, April 10, 2013 9:05 PM

Beautiful work Karl!  I love all your techniques, especially those dirty, dusty, crusty tracks and suspension!  Awesome!  Do you have some figures planned for this veteran tank hunter?

Ernest

Last Armor Build - 1/35 Dragon M-26A1, 1/35 Emhar Mk.IV Female


Last Aircraft Builds - Hobby Boss 1/72 F4F Wildcat & FW-190A8


  • Member since
    September 2006
  • From: Dripping Springs, TX, USA
Posted by RBaer on Saturday, April 13, 2013 1:22 PM

Wonderful work, yet again, from the doog!

Apprentice rivet counter.

  • Member since
    January 2007
Posted by the doog on Saturday, April 13, 2013 2:43 PM

Thanks, Ernest!

I've got a crewman, and am slowly painting him up. I've had a busy couple days, but am finished with the model---just waiting to get some pics and finish the figure. Should have an update an day now!

  • Member since
    January 2007
Posted by the doog on Saturday, April 13, 2013 2:45 PM

Rbaer, thanks man! I appreciate it!

SHould have finished pics soon!!!

  • Member since
    August 2008
  • From: S.W. Missouri
Posted by Pvt Mutt on Saturday, April 13, 2013 9:26 PM

Karl that exhaust is killer,just the way I like it.YesStarStarStarToast

Tony lee

Shoot Low Boys They're Ridin Ponys

  • Member since
    January 2007
Posted by the doog on Sunday, April 14, 2013 10:42 AM

Thanks, Tony! I appreciate that!

Doing exhausts are always fun--so much opportunity for variety and rustful expression.  Smile

  • Member since
    January 2007
Posted by the doog on Sunday, April 14, 2013 12:47 PM

OK, last update in weathering and then finished pics!

So, I wanted to work on the schurzen now; I started with a simple drawing-down of some ram umber oil dots on the skirts.

Next, I'm doing some scratching and chipping using a lighter shade of base color. For this, I chose an old bottle of Polly S "Aged Concrete".

Next, I'm going to do some "spattering" of some pigment "Mud". I used Adam Wilder's pigments, choosing "Russian Brown Earth", and "Track Dark Brown". I mixed it up with some mineral spirits on a stiff brush....

...and then used my finger to flick it against the parts.

Next, I used some regular craft store paints to put in some rust streaks.

You see all the work I've already done on the skirts; I've done a few layers--streaks, spatters, pigment dusting, etc. The bulletholes have been outlined in this light tan color to highlight them and to simulate the paint edges in the paint scuffing.

And then I put them on the model.

At this point, I'll call it finished!

FINISHED PICS!

I put some "Black Metal" pigment (AW) on the tip of my finger and rubbed it on both the muzzle brake and the front spare track section.

You might notice the oil stains on the one wheel....MIG "Grease and Oil Effect".

The muffler got "dusted" with paint splatters to simulate road spatter.

Hans got out his "reed green Denim Uniform" with the big pockets. I painted this with craft store paints--a combination of FOLK ART 426 Dark Grey and APPLE BARREL 20580 Pewter Gray with FOLK ART 467 Italian Sage for highlights. Hans got the pink-piped collar tabs and unadorned shoulder tabs, as well as the low-vis chest Eagle. I'm pretty sure this is just a standard DML figure?

Here's Hans in the new ride:

Well, that's it for this one, guys! It's ON TO AMPS!! I can't wait!!

Thanks for following along and for taking the time to comment!

Next up----the Hobby Boss VK4502 "Vorne"

 --- hey, there's a doog in the picture! HEY DOOG! Smile

  • Member since
    August 2012
  • From: Parker City, IN.
Posted by Rambo on Sunday, April 14, 2013 3:37 PM

Its been fun watching this one come together and it turned out great once again

Clint

  • Member since
    December 2012
Posted by RX7850 on Sunday, April 14, 2013 6:22 PM

Like I said before top notch YesYes. Those craft store paints are a real hidden treasure. I'd like to know if and how  others are using them in their builds.

  • Member since
    July 2006
  • From: San Francisco Bay Area
Posted by bufflehead on Sunday, April 14, 2013 10:51 PM

Karl, awesome, just awesome! YesYes  Fantastic weathering and superb instructions!   I've said this before and I'll say it again.....I've got to try the "splatter" technique!!  You do it so well, yet its so simple!  I'm so glad you've stuck around when so many have abandoned these forums,.  Your dedication to the hobby and your great WIP posts are a boon to so many of the forum members....Thanks Karl for the great work and keep them coming!   

Ernest

Last Armor Build - 1/35 Dragon M-26A1, 1/35 Emhar Mk.IV Female


Last Aircraft Builds - Hobby Boss 1/72 F4F Wildcat & FW-190A8


  • Member since
    August 2007
  • From: back country of SO-CAL, at the birth place of Naval Aviation
Posted by DUSTER on Monday, April 15, 2013 12:49 AM

bufflehead

Karl, awesome, just awesome! YesYes  Fantastic weathering and superb instructions!   I've said this before and I'll say it again.....I've got to try the "splatter" technique!!  You do it so well, yet its so simple!  I'm so glad you've stuck around when so many have abandoned these forums,.  Your dedication to the hobby and your great WIP posts are a boon to so many of the forum members....Thanks Karl for the great work and keep them coming!   

amen 

Karl, You have provided me with a wealth of detailing ideas.   

Steve

Building the perfect model---just not quite yet  Confused

  • Member since
    July 2003
  • From: On my kitchen counter top somewhere in central North Carolina.
Posted by disastermaster on Monday, April 15, 2013 12:57 AM

 Karl, I'm always aghast at the results you come up with. http://i1208.photobucket.com/albums/cc366/PlagueEleven/Smileys/aghast.gif

 This Jagd is exactly what I've come to expect when I see you post up a project and I have never been disappointed either, especially since this is the way I like to see them.

 Looking forward to your take on the VK 45.02 Vorne. I've had the dragon version on the kitchen counter for over a year (nearly finished) but just like the Battle of the Bulge I have burnt out all my gas. http://i411.photobucket.com/albums/pp195/shellatkin/GIFs/smiley-whacky103.gif

 https://i.imgur.com/LjRRaV1.png


  • Member since
    January 2007
Posted by the doog on Monday, April 15, 2013 9:33 AM

Thanks, Clint! and thanks for following along!

RX7850, thanks, man!! -- I think a lot of guys probably use these cheaper paints. They're plentiful, come in mind-boggling array of colors, but they aren't great at all for airbrushing, and whatever medium they use makes it hard to paint anything too small--the paint just doesn't come off the brush finely enough. But they're good for basic tasks.

Ernest, thank you for your kind words, too! And don't worry; I don't plan on going anywhere. These forums are my "home", and I like the neighbors. Wink

Steve, (Duster)  thanks as well---and I"m happy to have given you some inspiration for your own builds. That's what this forum is all about!

Steve (Disaster Master) Thanks kindly, man---your words are much appreciated. Hey, the feelings mutual--I wish I could send you some gas! Maybe this will inspire you to get back to the bench and turn out another piece of disastrous art! Stick out tongue

  • Member since
    July 2004
  • From: Texas
Posted by wbill76 on Monday, April 15, 2013 10:48 AM

Nice work all around here Karl! Hans looks right at home in his new ride. Looking forward to seeing you tackle that Vorne!

  • Member since
    March 2004
  • From: Spartanburg, SC
Posted by subfixer on Monday, April 15, 2013 11:16 AM

Very fine job.  YesYes

Lee

I'm from the government and I'm here to help.

  • Member since
    December 2006
  • From: N. Georgia
Posted by Jester75 on Monday, April 15, 2013 1:18 PM

I think you've hit a home run with this one Karl. Absolutely love the weathering. Can't wait to see what you do with the VK.

Eric


  • Member since
    September 2006
  • From: Dripping Springs, TX, USA
Posted by RBaer on Monday, April 15, 2013 3:13 PM

Hans is stylin'!

Apprentice rivet counter.

  • Member since
    March 2003
  • From: Western North Carolina
Posted by Tojo72 on Monday, April 15, 2013 4:34 PM

excellent finish,weathering looks just right

  • Member since
    May 2005
  • From: Dublin Rep Of Ireland
Posted by terry35 on Monday, April 15, 2013 4:57 PM

Great journey on this one Karl. It's been a pleasure to follow, thanks for such a detailed WIP.

Terry.

  • Member since
    January 2007
Posted by the doog on Monday, April 15, 2013 7:18 PM

Hey, thanks, Bill! I'll be getting to that VK Vorne after AMPS! If I survive......!  Indifferent......Big Smile

Lee, and Eric, thanks guys, muchly!

Russ, Tojo, and Terry, thanks too for looking in and leaving a comment!

I appreciate them all, guys! Thanks again! YesSmile

  • Member since
    January 2008
  • From: Bournemouth UK
Posted by Bodge on Tuesday, April 16, 2013 1:29 PM

Lovely build and a cracking paintjob and weathering Karl.Nice one.

  • Member since
    January 2007
Posted by the doog on Friday, April 19, 2013 9:35 AM

Thanks, Andy---nice to see you stop by in your busy schedule. I appreciate it!

JOIN OUR COMMUNITY!

Our community is FREE to join. To participate you must either login or register for an account.

SEARCH FORUMS
FREE NEWSLETTER
By signing up you may also receive reader surveys and occasional special offers. We do not sell, rent or trade our email lists. View our Privacy Policy.