SEARCH FINESCALE.COM

Enter keywords or a search phrase below:

Jagdpanzer IV A-O FINISHED! Page 8 Final pics!

23322 views
124 replies
1 rating 2 rating 3 rating 4 rating 5 rating
  • Member since
    September 2009
  • From: Rugby, England
Posted by Hinksy on Sunday, February 3, 2013 9:52 AM

Great work Karl!

It just goes to show - a lot of modellers write these older Imperial Series DML Kits off as 'dogs' or other less than nice words but in the write hands they can be made to look bloody great Yes

Lovely Zim work my friend!

I laughed when I saw the photo of you attempting to assemble PE clamps as I just cannot do them. I have really bad eyes (Astigmatism) which basically means your eye's are Rugby ball (American Football) shaped instead of Soccer ball shaped - it's Genetic, Dad has it too. I wanted some Optivisors for my new found taste in using PE and tried some on at the last modelling club meet night.

I IMMEDIATELY had terrible triple vision and felt sick and had to take them off leaving me with a pounding head and aching eyes- I presume it's something to do with my prescription or my Astigmatism. I could never wear them so I'm glad I didn't ask for them for Christmas! Good job I had the chance to try them on first!

I've resigned myself to either 'bodging' them in place by sticking them on with CA then adding handles or by keeping the kit tools with moulded on clamps and simply sticking the PE latch release handle bit onto the moulded plastic.

Anyway, great work so far - I'm looking forward to see how this goes!

Ben Toast

On the Bench - Dragon Pz. IV Ausf. G (L.A.H.) Yes

Your image is loading...


  • Member since
    July 2003
  • From: On my kitchen counter top somewhere in central North Carolina.
Posted by disastermaster on Sunday, February 3, 2013 11:00 AM

This is really gonna be cool......

What got me a rockin' is this picture........ I wasn't expecting it.

http://th1046.photobucket.com/albums/b461/timetraveller1992/Smiley/th_LMAO.gif I REALLY cracked up !!!

http://i170.photobucket.com/albums/u244/heydoog/Jagdpanzer%20IV%20A-O/DSC02473_zps44c4311a.jpg

Looks like you're doing an autopsy on a ƥiʂʂ-ant.

OWWW!

http://i717.photobucket.com/albums/ww173/prestonjjrtr/Smileys/Avatars_Funny_Crawling_Bug.gif

Gimme back my leg!

 https://i.imgur.com/LjRRaV1.png


  • Member since
    July 2004
  • From: Texas
Posted by wbill76 on Sunday, February 3, 2013 1:13 PM

Nice work on those clamps and other doodads Karl! Look forward to seeing it with paint on. Wink

  • Member since
    May 2005
  • From: Dublin Rep Of Ireland
Posted by terry35 on Sunday, February 3, 2013 3:19 PM
Looking great Karl, I've been popping in and out since the start but have not been near a computer in ages. I have been searching for a particular photo for you, it's a photo of the mild steel prototype, but I don't want you starting another kit before you finish this baby. If I remember the photo correctly, then it is contempory and shows some great bare metal and beautiful Patinas that have built up over the years.

Terry

  • Member since
    January 2007
Posted by the doog on Sunday, February 3, 2013 3:33 PM

Eric, I hope those tracks work out for you! You're rocking that little Flacker! Oh, and the only problem with having all that magnification is that when I take them off, I can't see a thing for smaller than say, a basketball for like, five minutes! Black Eye.......Smile

Tony--thanks, bud! I appreciate you looking in, and the welcome back!  NOw......tool clamps in 1./72 scale? HORRORS! Surprise What a nightmare!

I wonder who'll be the first manufacturer to include those...? Indifferent ha ha

Bill, thanks for looking in from your busy schedule too!

STEVE--BIG lol! "...an autopsy on a pissantt!" HA HAHA!!! Good one! --and that's what it felt like! Big Smile

Thanks again, guys!!

  • Member since
    January 2007
Posted by the doog on Sunday, February 3, 2013 3:35 PM

Terry, I Just missed your post--thanks, buddy! If you find that pic I"d love to see it! Post it here if you find it!  ;)

  • Member since
    January 2007
Posted by the doog on Sunday, February 3, 2013 3:39 PM

Ben, wow, sorry to hear about he eye problems--that would be a bummer, but it doesn't look like ou let it slow you down much!

And that method you mentioned of just using the kit tools with some handles added to them is an excellent "cheat" to doing the tools. I've used that plenty of times myself!

Thanks for looking in, and good work on that Elefant! The paint looks great!

  • Member since
    August 2008
  • From: S.W. Missouri
Posted by Pvt Mutt on Sunday, February 3, 2013 6:06 PM

I was hoping to see at least a base coat but you're gaining anyway.

Tony lee

Shoot Low Boys They're Ridin Ponys

  • Member since
    July 2006
  • From: San Francisco Bay Area
Posted by bufflehead on Sunday, February 3, 2013 11:59 PM

the doog


Sorry Karl, this pic had me rolling!!  I so have to get me an Optivisor, just so I can look like this at my bench!! 

the doog

More details were added: #1 shows the cleaning rods that I added, and racks that I made from spare PE. The right rack has a cloth strap and buckle made from lead foil and a buckle shaved off from a kit piece--I forget which. #2 These projections are on the rear of the original vehicle; not sure what they housed, but it's gone now, even as they remain. #3 shows the tail reflector that I made from spare PE and some 1/24 "side dot reflectors" PE from a Dodge Charger detail set. #4 the detail added to the wood block, which was taken from the excellent Tamiya On-Vehicle tools set. #5 shows the new supports which I had to fabricate in order to support the rear schurzen. These are more in line with the original vehicle's configuration. #6 I never realized this before, but the muffler bolts onto the rear rail which runs along the rear of the hull. So I corrected my own repair job there, adding some resin Verlinden bolts.

I really like the numbers and descriptive text you've added to this Blog!  tI helps us out as we try to follow all the great super detailing you're doing!  Thanks!

Now for some dunkelgelb! 

Ernest

Last Armor Build - 1/35 Dragon M-26A1, 1/35 Emhar Mk.IV Female


Last Aircraft Builds - Hobby Boss 1/72 F4F Wildcat & FW-190A8


  • Member since
    May 2005
  • From: Dublin Rep Of Ireland
Posted by terry35 on Monday, February 4, 2013 7:45 AM
Hi, Karl love the progress, I have got that photo some where it was taken by Hilary Doyle, it was what perked my interest in this kit when it was released, there's no hatches or pistol ports and no zimmerit just bare rotten 40 year old steel with green moss and plants growing on it, I think it was your model T Ford wagon/truck that you done some time back that brought it to mind, I know your passion for recreating the way nature acts on man made objects left abandoned over time.

Terry.

  • Member since
    January 2007
Posted by the doog on Monday, February 4, 2013 8:06 AM

Pvt Mutt

I was hoping to see at least a base coat but you're gaining anyway.

Tony lee

Hopefully later today, Tony Lee! Working away here.... Big Smile

  • Member since
    January 2007
Posted by the doog on Monday, February 4, 2013 8:10 AM

Thanks Ernest---glad you like the format! It just seemed logical to point out the many little things that I've added or corrected. Thanks for letting me know that it's appreciated for the extra time it takes to do these little pics!

TERRY--- thank you once again! And I would love to see that photo if you find it! Smile

  • Member since
    September 2009
  • From: Rugby, England
Posted by Hinksy on Monday, February 4, 2013 6:34 PM

Cheers buddy,

It's not a major thing like I'm going to go nigh on blind Karl - it's really really common but it's not just simple short or long sightedness - it's  just generally my vision is rubbish, long or short!   

With my glasses or contacts in I can see 100% crystal clear but it causes havoc with optivisors for some reason! I can use Binoculars just fine though!

The Optician says if you have Astigmatism like me it tends to slow down a lot as you get older. It's no biggie but I'd love to be able to wake up in the morning with 20/20 vision! My Dad said his seemed to stop getting worse over the last ten years.

Loving the work on the build matey!

Ben Toast

On the Bench - Dragon Pz. IV Ausf. G (L.A.H.) Yes

Your image is loading...


  • Member since
    January 2007
Posted by the doog on Thursday, February 7, 2013 12:07 AM

OK, I finally have a painting update!

I've been really thinking about how to paint this--I wanted to try something along the lines of what I did on the 1/72 Sturmtiger I just finished, but I think that by the time I got through with it, that idea had somewhat tamed. Anyway, here's what I did, and where I am now.

Since I had PE on it and resin zimm, I primed it with Duplicolor Gray. I've used this for my car modeling as well, and it seems to go down pretty nicely.
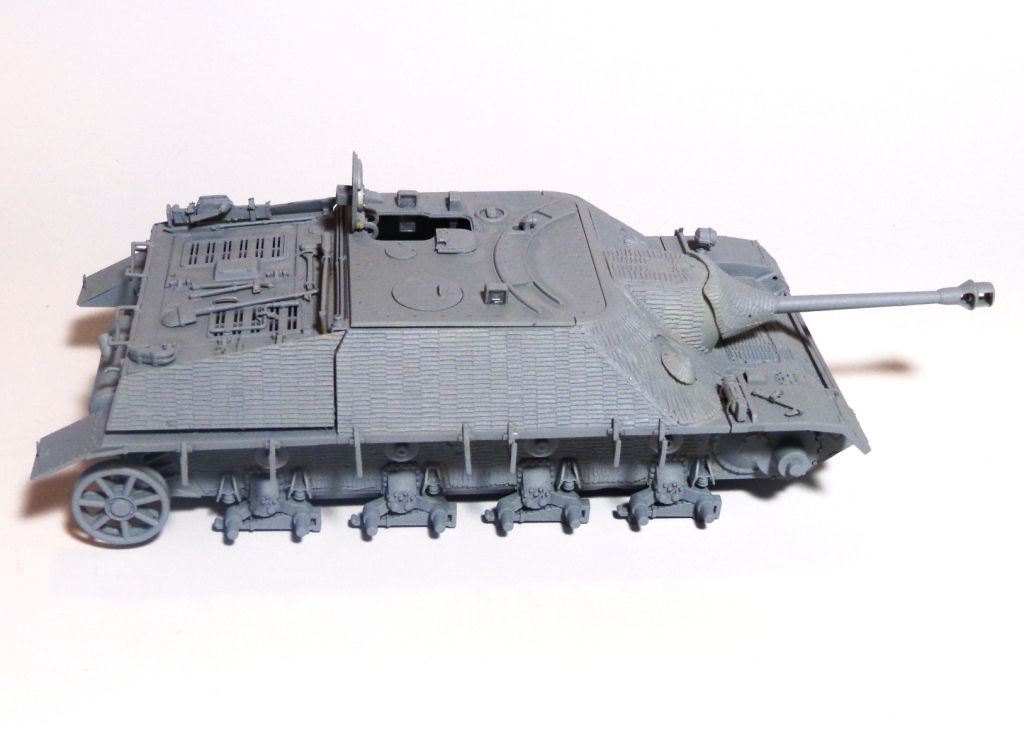
The kit gives you PE schurzen, but I didn't like the weight of them, so I made some new ones out of .010 styrene sheet.
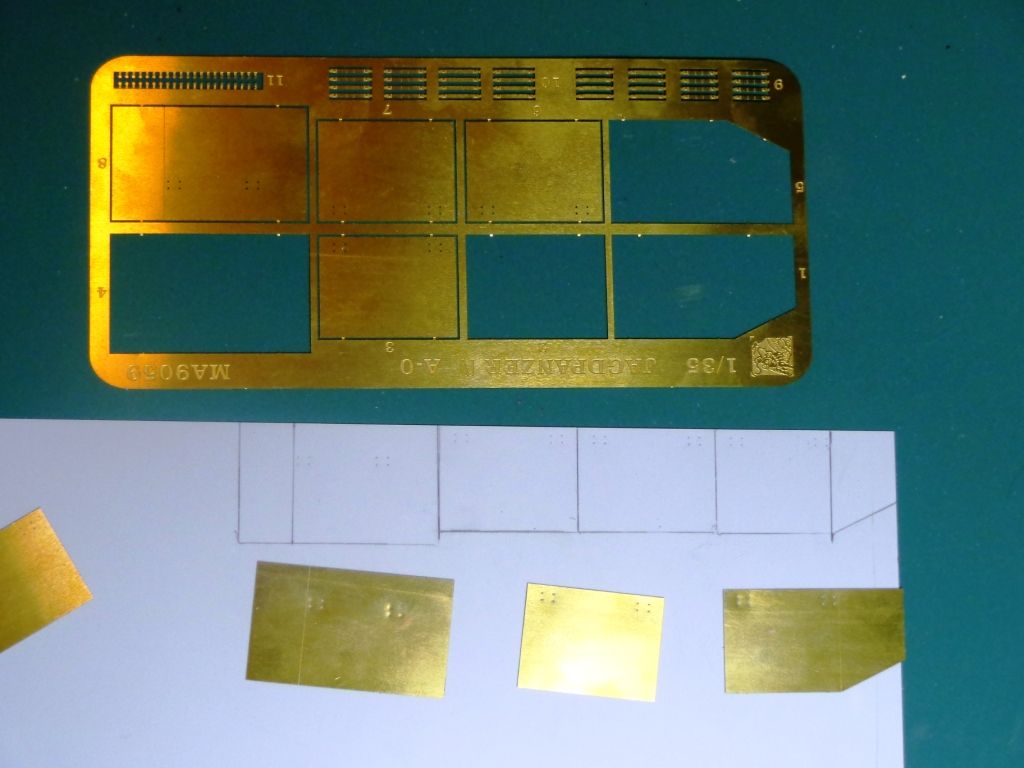
I used the PE hangers;
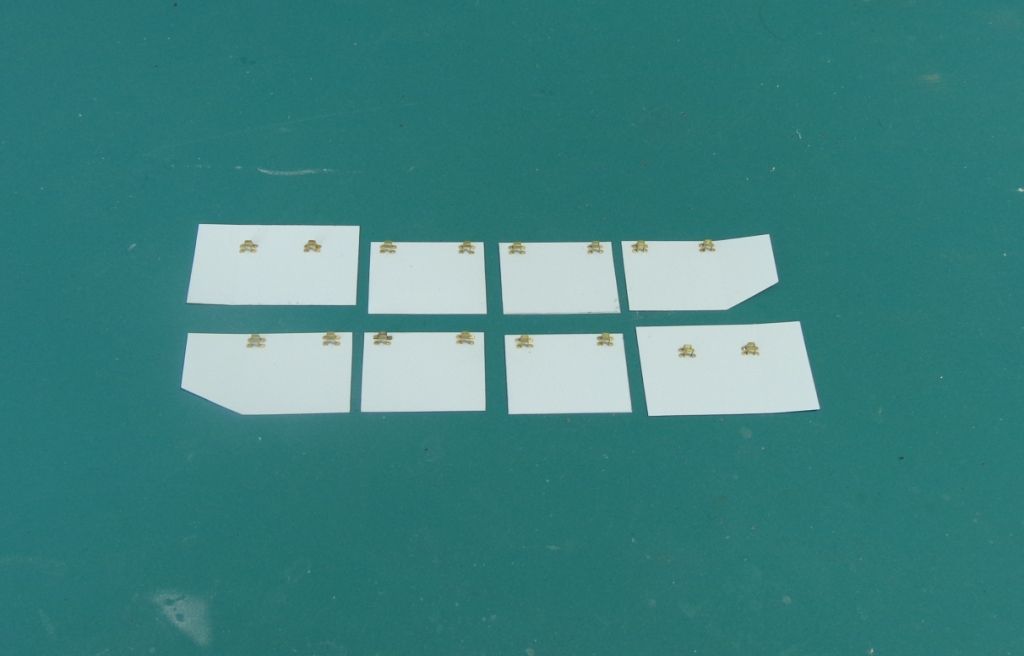
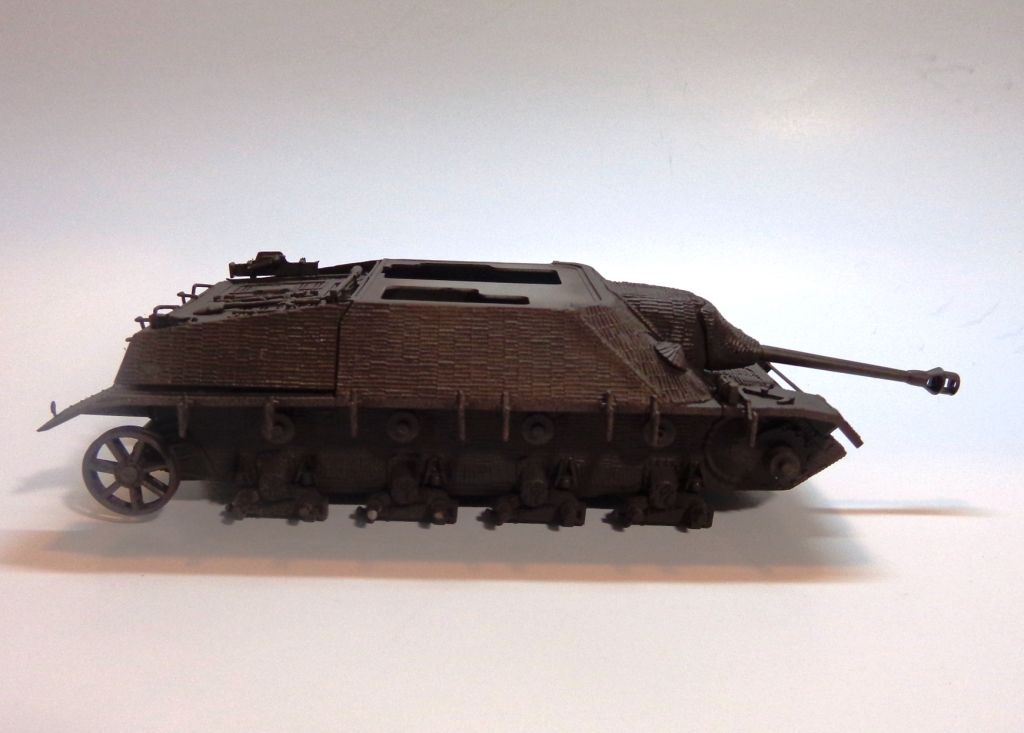
Now, I Start with a "Schokolade Brown" from Model Master as a base.
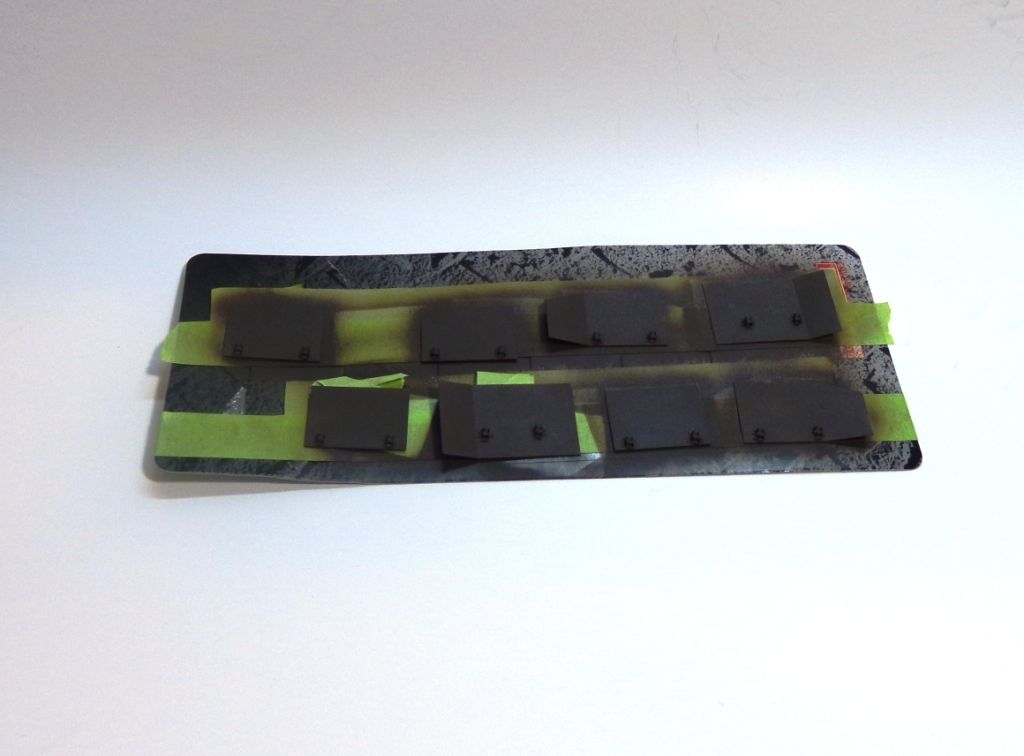
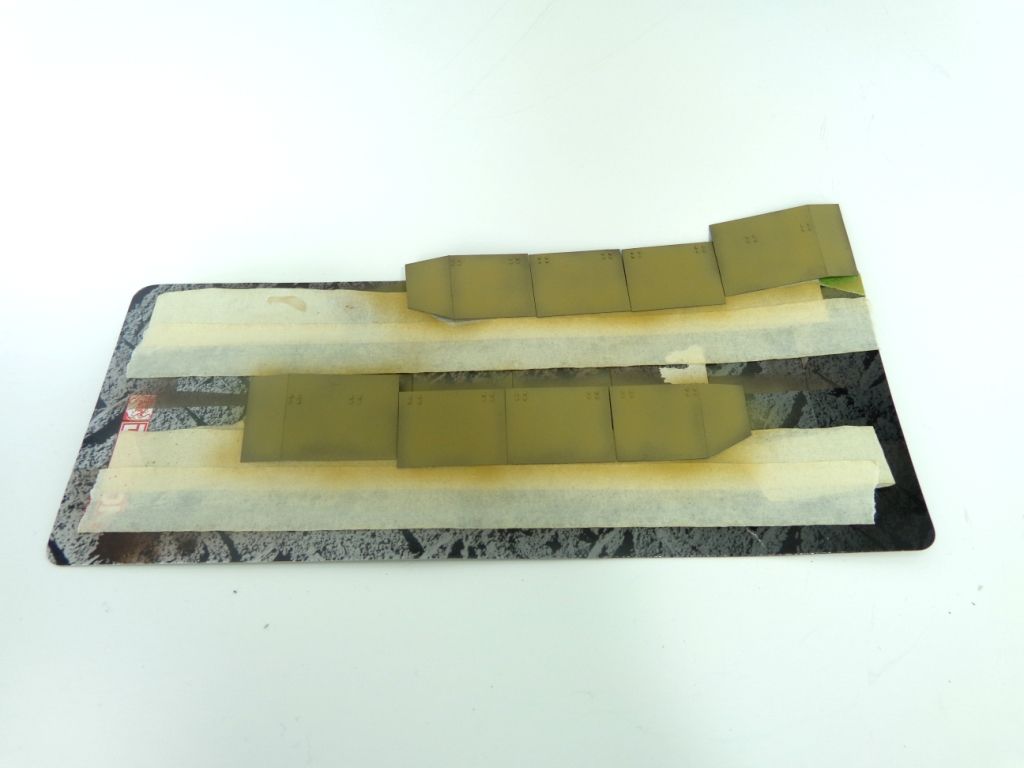
The new skirts get that treatment too.
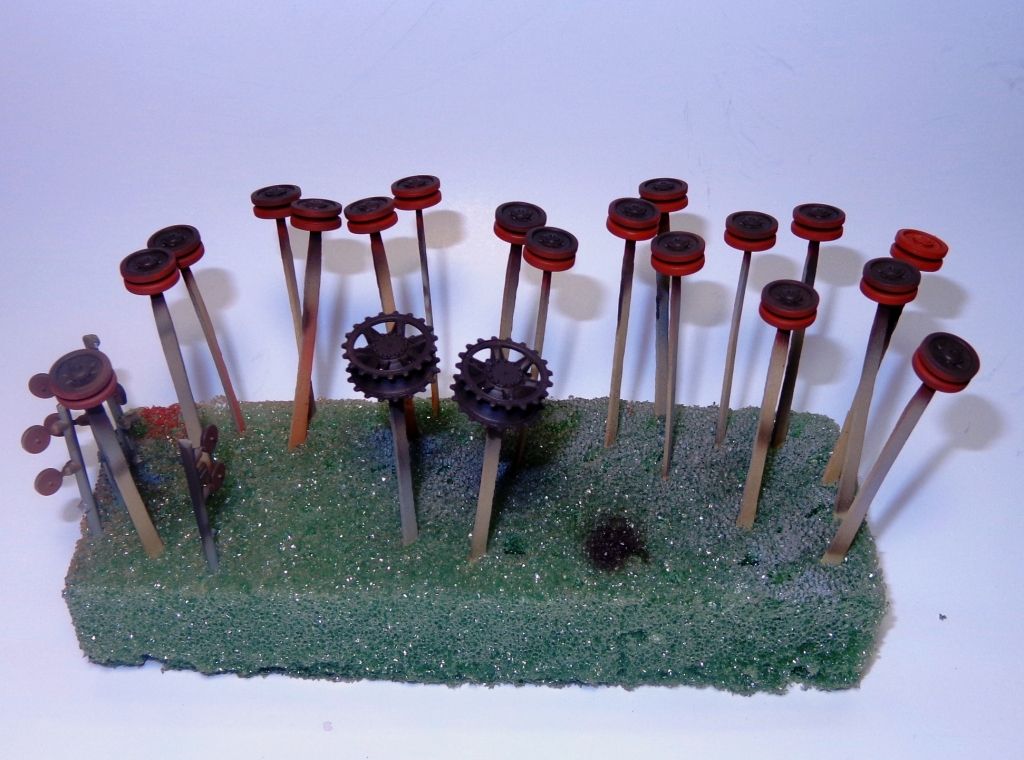
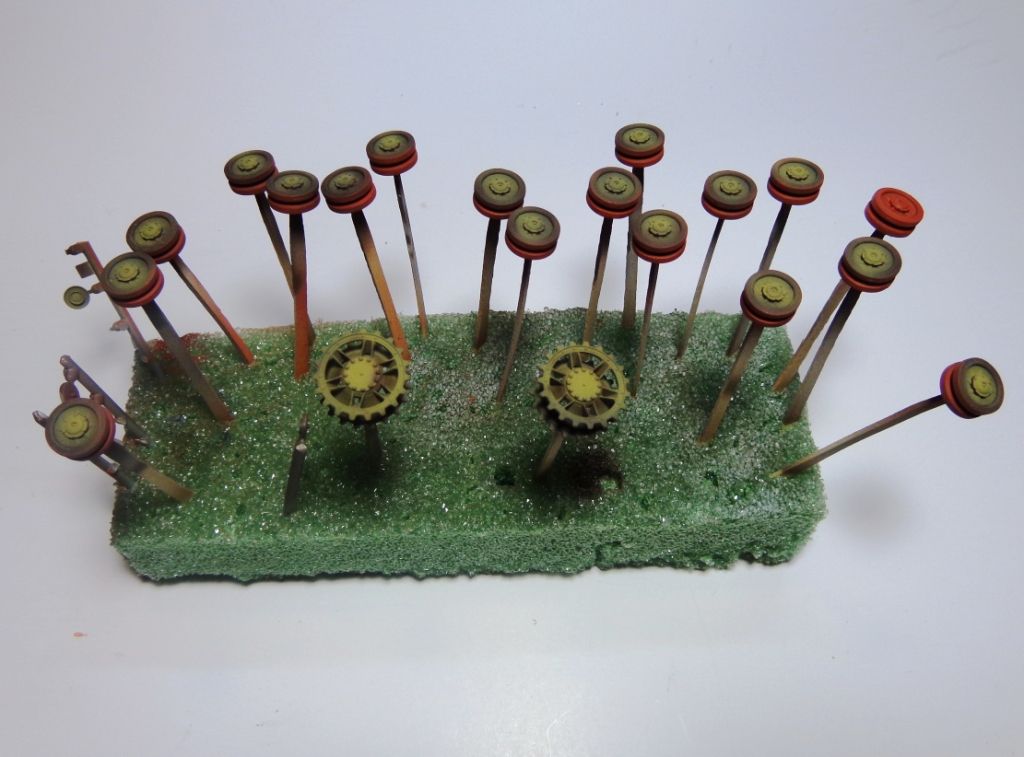
The wheels got the same treatment, but also got a shot of Primer Red on their inner race from Polly S--an old bottle I had found in my stash. This is called "Zinc Chromate Primer". I've seen wheels on real Pz IV's with primered inside wheel races, and like the way this looks, so...
Now I gave a coat of straight DY from Tamiya...note I have not covered the model completely, but left "shadow edges" and brown in the hollows.
The wheels got that on their faces too, but not too opaquely...
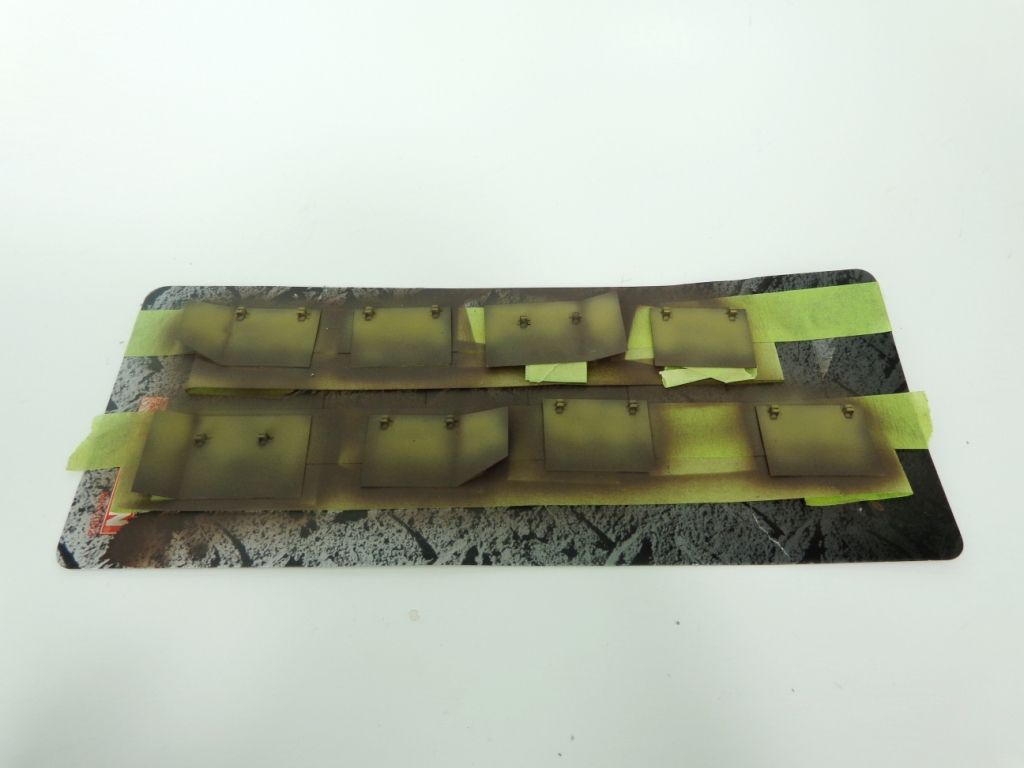
And the INSIDE of the skirts got it ONLY toward the top, to simulate shadows as they hang.
The faces, however, got a more complete coat.
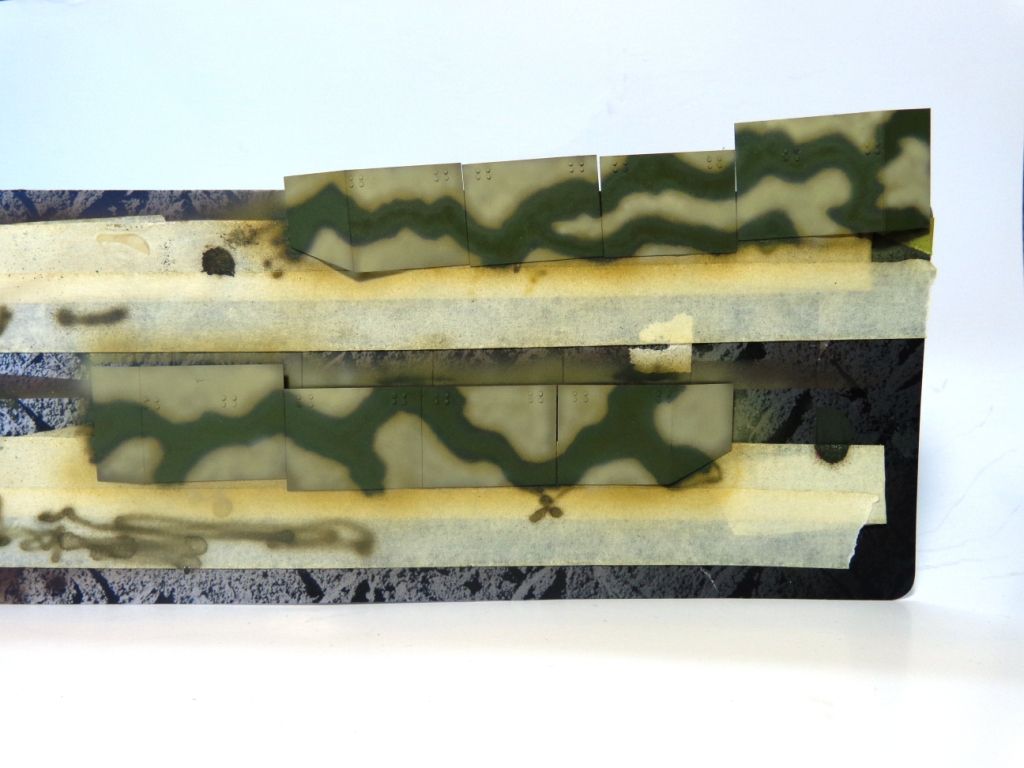
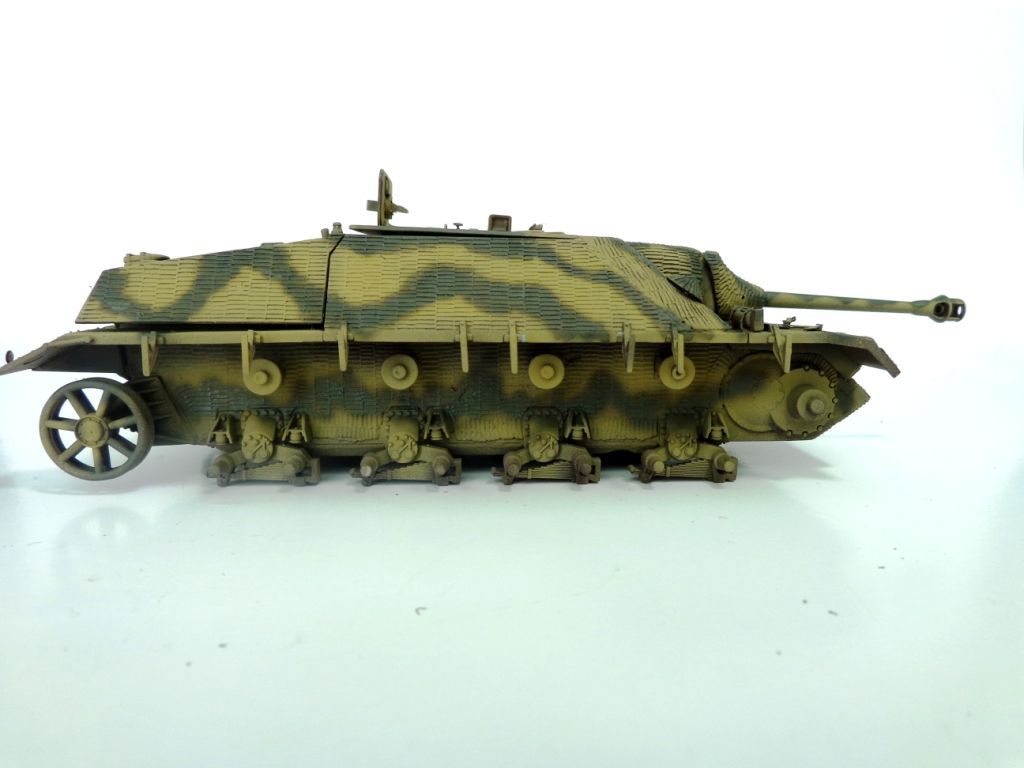
Next, I put on a green camo overspray. "WHAT??!!" you might say? "Where's the lightened DY coat?!" I thought about doing that here, but decided to wait until after the camo scheme was on it, to accent the pattern better. That way, I can leave darker yellow "edges" around the yellow parts when I highlight it.

The green is Tamiya Field Grey--their version of "Panzer green"-- with about 30% J.A. Green to darken it slightly.
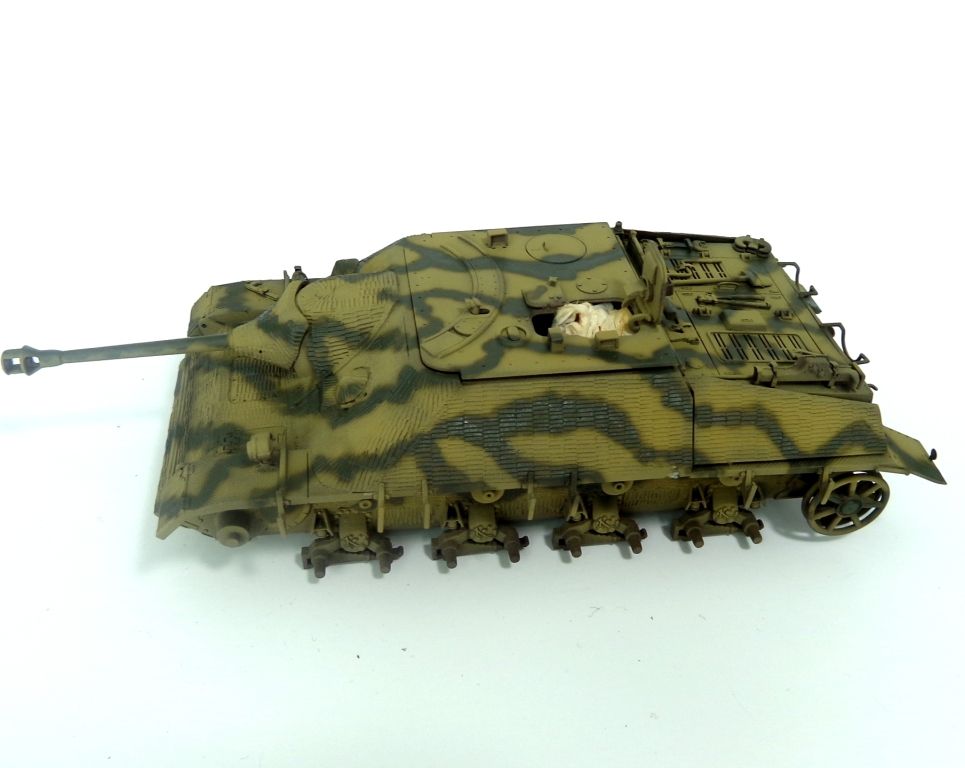
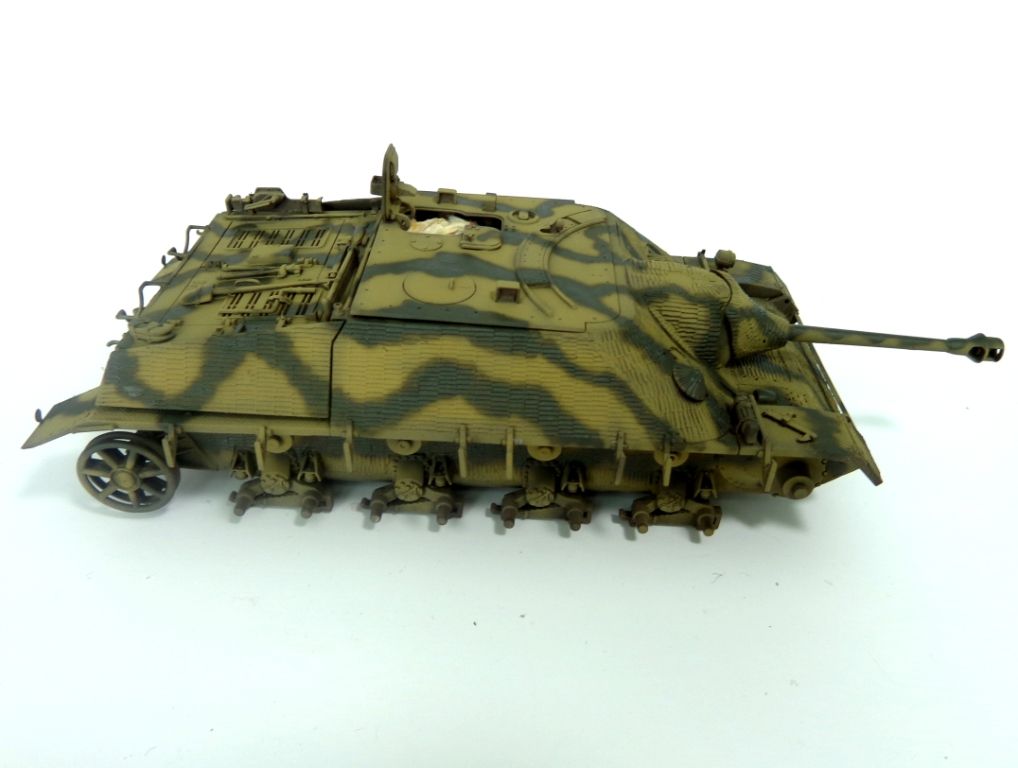
Now, the Panzer Green is given a dab of straight Yellow plus straight Green to make it "pop" a litttle more, and sprayed inside the panels, leaving the darker outline. I do NOT spray it in the bottom hull camo part, as it should be darker down there.
Skirts got the same treatment
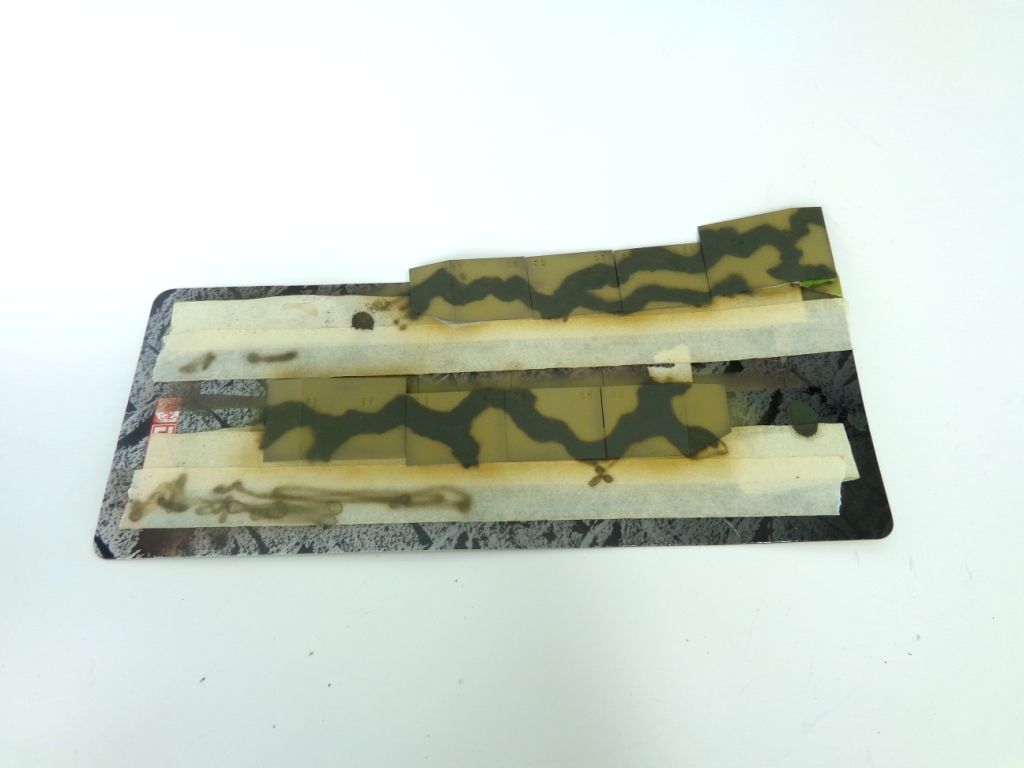
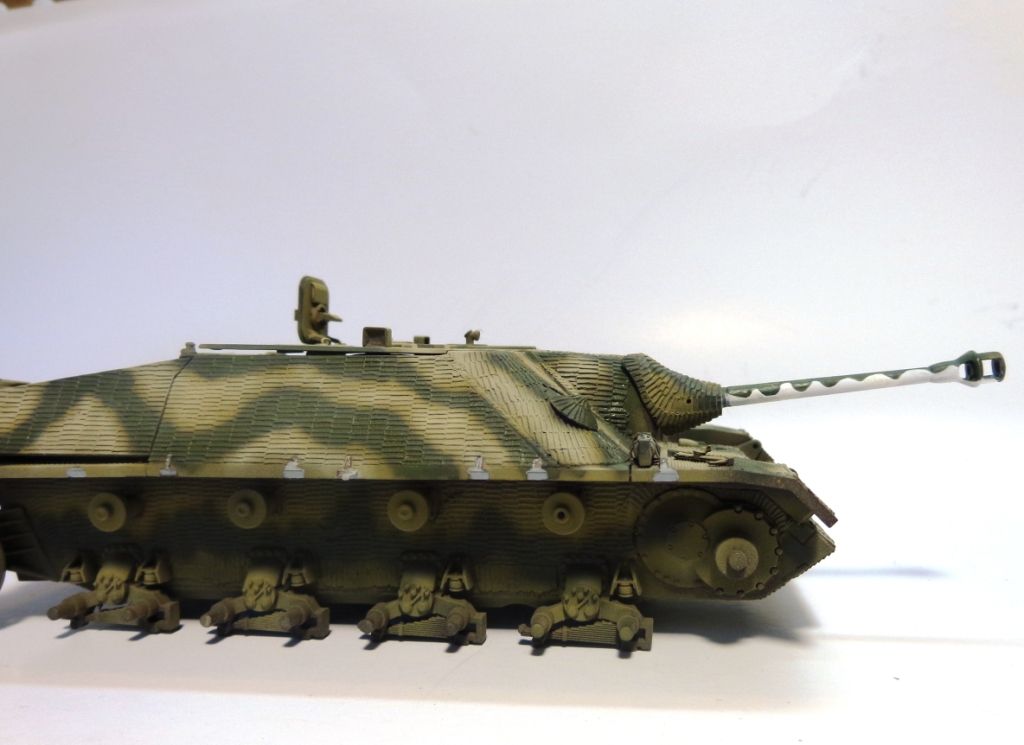
Now a touch of white is added, and the green is highlighted a little more. And NOW the lightened DY coat is also added to the insides of the Yellow patches. Note how much lighter it is now, yet still dynamically vibrant, not being a monotone finish.
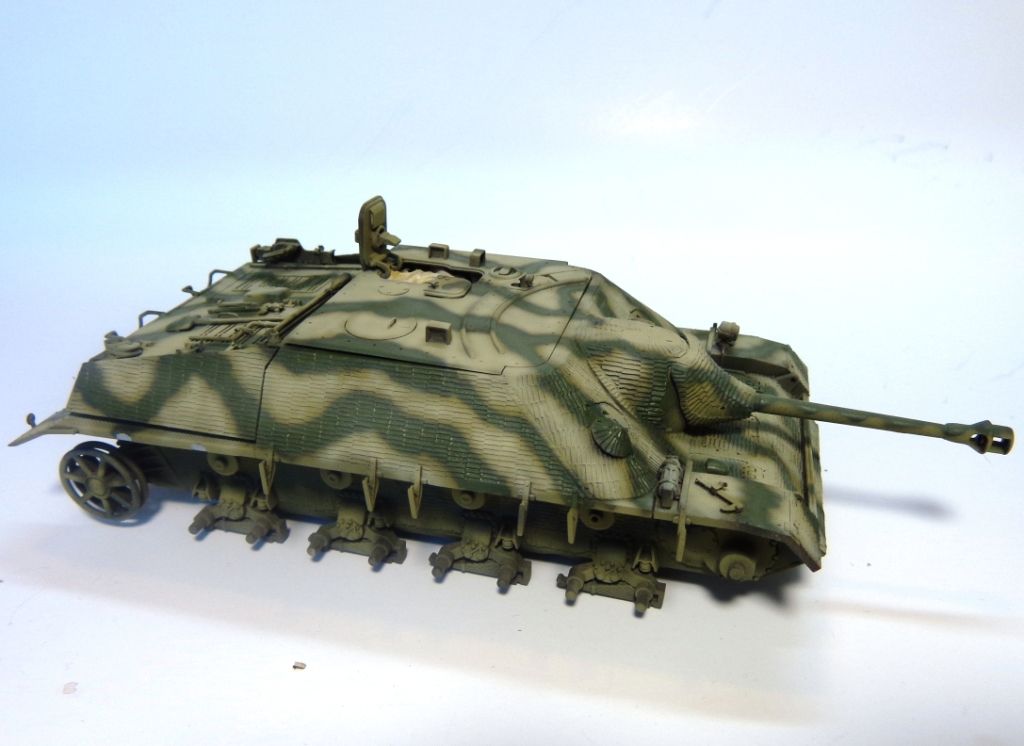
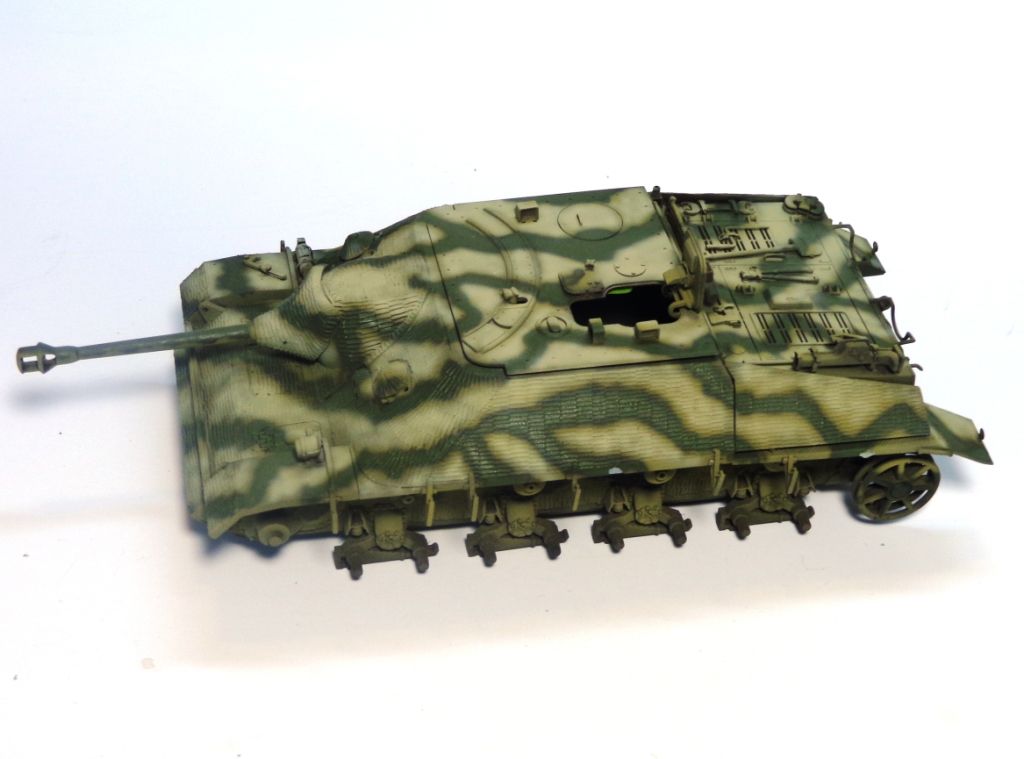
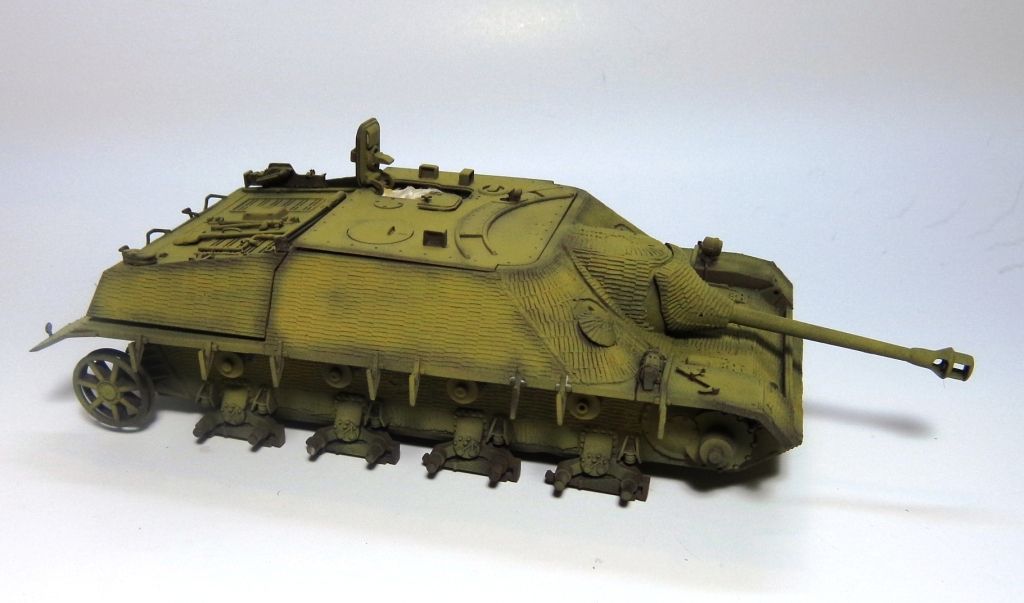
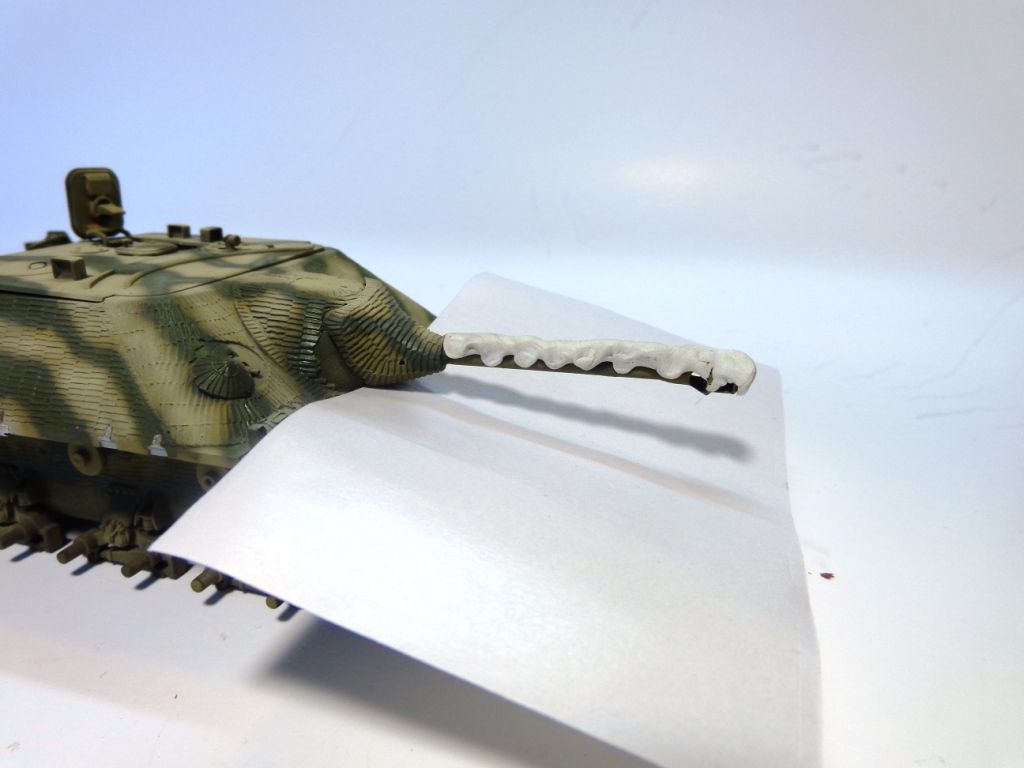
The barrel was masked, and a white counter-shadow sprayed.
And here's where I am now.
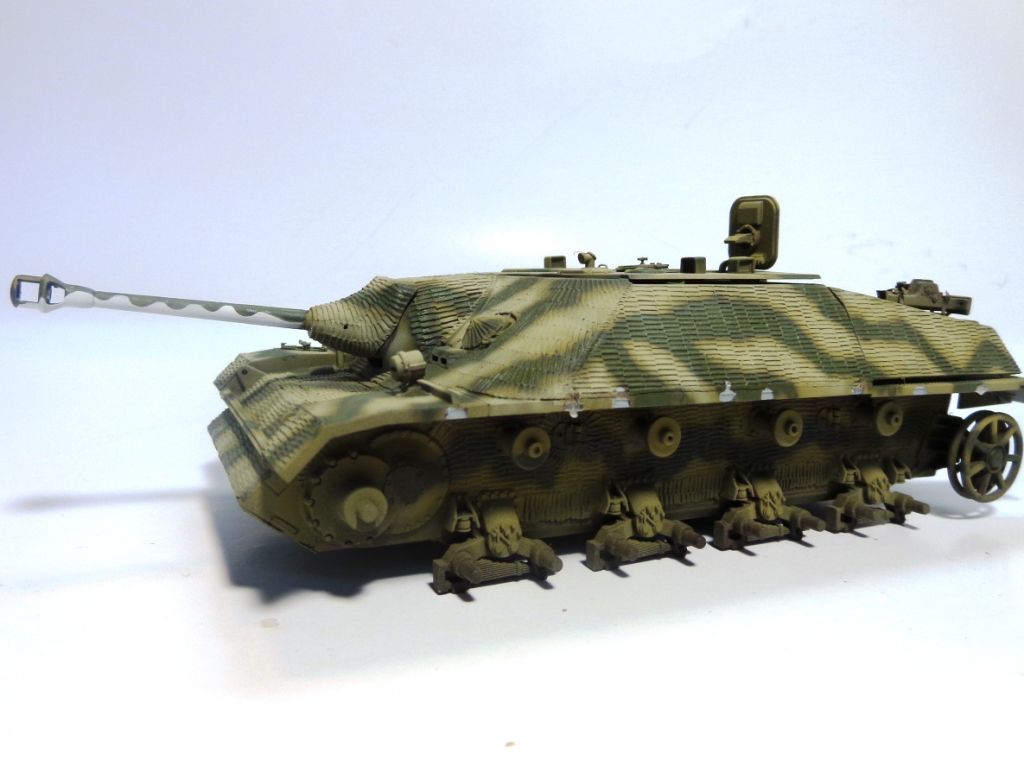
By the way, the bare patches you see are where I removed the schurzen hangers---I put them on with white glue only for the painting process. I'll touch them up when I attach the schurzen, after the tracks go on.

Well, that's it for now! Let me know if anyone has any suggestions or critiques! Thanks, guys!! (and girl!)

Smile

  • Member since
    January 2010
  • From: Nebraska, USA
Posted by CallSignOWL on Thursday, February 7, 2013 9:22 AM

whats the white on teh barrel for?

------------------------

Now that I'm here, where am I??

  • Member since
    December 2006
  • From: N. Georgia
Posted by Jester75 on Thursday, February 7, 2013 10:24 AM

Nice paint doog!!  That camo looks sweet!!

Eric


  • Member since
    January 2007
Posted by the doog on Thursday, February 7, 2013 10:42 AM

CallSignOwl,

The white on the barrel was/is a camouflage technique where areas that would normally be shrouded in shadow and, in the case of the barrel, provide an easily-recognizable "signature" to observers, is deliberately painted white in order to try to fool the enemy's eye. At least one of these "short barrel" Jagdpanzers had this kind of unusual scheme.

  • Member since
    January 2007
Posted by the doog on Thursday, February 7, 2013 10:42 AM

Thanks, Eric!

  • Member since
    February 2007
  • From: Brunswick, Ohio
Posted by Buckeye on Thursday, February 7, 2013 11:29 AM

Love that paint job! Toast

Mike

  • Member since
    August 2008
  • From: S.W. Missouri
Posted by Pvt Mutt on Thursday, February 7, 2013 6:55 PM

Karl just where did you come up with that paint scheme?????

Karl Von Gosh

Looks snazzy guys

Tony lee

Shoot Low Boys They're Ridin Ponys

  • Member since
    July 2004
  • From: Texas
Posted by wbill76 on Thursday, February 7, 2013 7:12 PM

Very nice work on the pattern and color shading Karl! Yes

  • Member since
    January 2007
Posted by the doog on Thursday, February 7, 2013 8:04 PM

Thanks, Tony, Mike, and Bill! I appreciate ya stopping in to take a looksee! Geeked

"Karl Von Gosh"---lol! Big Smile

  • Member since
    July 2003
  • From: On my kitchen counter top somewhere in central North Carolina.
Posted by disastermaster on Thursday, February 7, 2013 9:09 PM

  http://images.zaazu.com/img/make-up-female-girl-makeup-smiley-emoticon-000557-facebook.gif Man, when the makeup starts a goin' on, this baby really starts gettin' hot!      

          Just Loverly!

 https://i.imgur.com/LjRRaV1.png


  • Member since
    July 2006
  • From: San Francisco Bay Area
Posted by bufflehead on Friday, February 8, 2013 12:33 AM

Another doogerly finish!  That paint job is good enough that, if left as is without weathering, would still be better than many I see online or at model shows!!  Shoot...better than most of mine!!

Ernest

Last Armor Build - 1/35 Dragon M-26A1, 1/35 Emhar Mk.IV Female


Last Aircraft Builds - Hobby Boss 1/72 F4F Wildcat & FW-190A8


  • Member since
    July 2006
  • From: San Francisco Bay Area
Posted by bufflehead on Friday, February 8, 2013 12:49 AM

the doog

CallSignOwl,

The white on the barrel was/is a camouflage technique where areas that would normally be shrouded in shadow and, in the case of the barrel, provide an easily-recognizable "signature" to observers, is deliberately painted white in order to try to fool the enemy's eye. At least one of these "short barrel" Jagdpanzers had this kind of unusual scheme.

If I could add to this Karl.....

(and I apologize for hijacking your thread, but I just learned this myself not too long ago and I couldn't help sharing)

Owl, this might also be called a disruptive pattern, used to break up the outline of an object.  A good example of this are the Sherman Fireflys used by the British during WWII.  These were basically U.S. Shermans retrofitted with the Brit's 17 pound anti-tank gun - a long barreled 77mm gun that was much more destructive than the normal Sherman's short barreled 75mm gun.  To hide this from the Germans (especially German tank crews)  the long barrels were painted in the same pattern that Karl used here. 

To illustrate.  Take a look at his photo (for discussion purposes only) of a restored Firefly and note the barrel and its camo pattern.  Take into account that this is NOT how an enemy would normally see it!  If they got that close no amount of camouflage would hide any part of the tank!

Now lets see how an enemy would normally see this armored brute.....from a few hundred yards away or even further!


At a quick glance is it a "normal" Sherman or something else??  A Panzer tank crew might be fooled into thinking thats a short barrel and try to engage......oops! Black Eye

Pretty cool huh?

Ernest

Last Armor Build - 1/35 Dragon M-26A1, 1/35 Emhar Mk.IV Female


Last Aircraft Builds - Hobby Boss 1/72 F4F Wildcat & FW-190A8


  • Member since
    January 2010
  • From: Nebraska, USA
Posted by CallSignOWL on Friday, February 8, 2013 9:51 AM

that is pretty cool. Thanks for sharing bufflehead!

------------------------

Now that I'm here, where am I??

  • Member since
    March 2003
  • From: Western North Carolina
Posted by Tojo72 on Friday, February 8, 2013 10:54 AM

Zimm and camo pattern look really good Karl

  • Member since
    January 2007
Posted by the doog on Friday, February 8, 2013 1:17 PM

Thanks, Ernest, for that generous praise!

And a good posting on the "disruptive" camo! Really a nice compliment to the subject here and to the "back story" to the portrayal of it here. Yes

Thanks, too, Tojo! Smile

  • Member since
    January 2007
Posted by the doog on Monday, February 11, 2013 9:27 PM

Hey guys,

Sorry to be taking so long on this baby, but life just got REALLY busy lately---Jenn just got a job in Charlotte at a major hospital there, and we're moving on.....Saturday! Surprise.......(didja hear all that....stuff just hit the fan?!) Been going nuts packing, looking or an apartment--but I managed to eek out some progress on this!

I did some preliminary weathering on the lower hull--just some oil weathering with MIG's Pz Abt 502 "Buff" and "Basic Earth". This was dabbed on with a medium brush.

I painted the wheels by hand, one by one. The color is MM Dark Gull Gray. .

One thing I did differently, from seeing evidence of this in photos and in real life, is to add metallic gray to the inner wheels with a large artist's graphite pencil.

You can kinda see the effect here---oops, I got a little on the tire...

I added some oil paints to the sprockets to simulate dust build-up inside. I also added some MIG "OIl and Stains" effects to simulate a leaky seal.

Here's the semi-finished tracks (pigments still to be added once on the vehicle). I tried to think about all the contact points and wear places--the inside wheel tracks, outer track faces, and bottom of the guide horns are done in dark metallic gray; the tops of the guide horns and tracks are drybrushed in silver. The contact points for the sprocket teeth have been carefully picked out in silver. The outsides of the tracks have various shades of oils added to add a variety of dirt and rust effect. Shame that most of this detail will be hidden behind the schurzen, but eh---that's Armor modeling, isn't it? Tongue Tied

Adding the tracks to the vehicle--I place the sprocket into the curve where it's held by the track; the other end is then slipped over the idler, and the wheels are added last. Note how by having added ONLY the single, inside return rollers the track is able to be slipped right onto the single rollers. The 2nd outside rollers will be added after the tracks are secured.

The tracks have been superglued to the top rollers, and are being let to dry.

That's it so far----I should have one more update before I have to pack this bay up for moving. AT least now that the tracks are on, it should be easier to secure in a box without breaking the tracks apart, or losing wheels! Stay tuned---all comments always welcomed! Smile

  • Member since
    July 2006
  • From: San Francisco Bay Area
Posted by bufflehead on Monday, February 11, 2013 9:51 PM

Moving, packing, going nuts.....and still time to work on the Jagdpanzer!!  That's a true modeler!!   Even though you've got to be busier than a one armed paper hanger, you've managed yet again to achieve some incredible work!  Love the weathering so far on the lower hull and suspension, but one thing bothers me.......when did you sneak the markings in? Whistling

Ernest

Last Armor Build - 1/35 Dragon M-26A1, 1/35 Emhar Mk.IV Female


Last Aircraft Builds - Hobby Boss 1/72 F4F Wildcat & FW-190A8


JOIN OUR COMMUNITY!

Our community is FREE to join. To participate you must either login or register for an account.

SEARCH FORUMS
FREE NEWSLETTER
By signing up you may also receive reader surveys and occasional special offers. We do not sell, rent or trade our email lists. View our Privacy Policy.