SEARCH FINESCALE.COM

Enter keywords or a search phrase below:

Wirbelwind---FINISHED PICS! pg 7

20054 views
136 replies
1 rating 2 rating 3 rating 4 rating 5 rating
cml
  • Member since
    March 2007
  • From: Brisbane, Australia
Posted by cml on Monday, November 18, 2013 6:28 AM

I'm enjoying this build Doog.

Great work with the PE and balsa - truly an inspiration to us novice builders.

Chris.

Chris

  • Member since
    January 2007
Posted by the doog on Monday, November 18, 2013 6:47 AM

Thanks, Bill! I was going to use some of the new tracks after they arrived, but I figured that I already had the effort into these old dogs...now I"ve got to tackle the dreaded tool clamps! (collective groan!)

  • Member since
    January 2007
Posted by the doog on Monday, November 18, 2013 7:12 AM

Thanks, Eric, Steve, and Hugo! I appreciate the support!

Tony, thanks for stepping away from the assembly line and giving me a Yes ! !

Chris, glad you like it, an I"m always happy to show someone something new or helpful!

Thanks too, rocker286, and SprueOne! Sorry I missed you guys in the last post! Embarrassed

T26E4

good progress Doog.  My only thought is this: on the left rear fender, the forces that would bend it so dramatically--- wouldn't that just shear off the fender from its hinges?  I can understand a krinkle or slight bend but that huge an impact would seem to rip the fender off its hinges I'd think.  Just my 2 cents

Roy, an excellent call on that---I shall correct that; it's funny because that was actually a mistake! I was prying off a piece of PE zimm that had gone on slightly crooked, and accidentally crushed that fender against my chest when he PE let go suddenly, and figured I"d just leave it as it was, but you're right---it's probably too extreme to be plausible. Great catch on that, and thanks for the honest critique!!!

Wayne, I believe most, if not all, PZ IV's had those flaps on the rear fenders. I know that, at least the hulls that these flaktanks were built on had them. Just so you know, we're talking about those rectangular blocks on the rear fenders on the side of the rear deck. Wink

Those $25 sanding sticks make me SO MAD!!! I can get the package in the photo there for like, $7 or 8 dollars at the LHS! They're a "no name" company, and that's a reasonable price---but twenty five bucks? Ridiculous! Bang Head

  • Member since
    March 2003
  • From: Western North Carolina
Posted by Tojo72 on Monday, November 18, 2013 7:52 AM

man,those tracks are tedious !!!! ,but this is really coming together,looking good

  • Member since
    January 2007
Posted by the doog on Sunday, November 24, 2013 8:33 PM

Hey Tojo, thanks for looking in and taking time to comment again! Smile

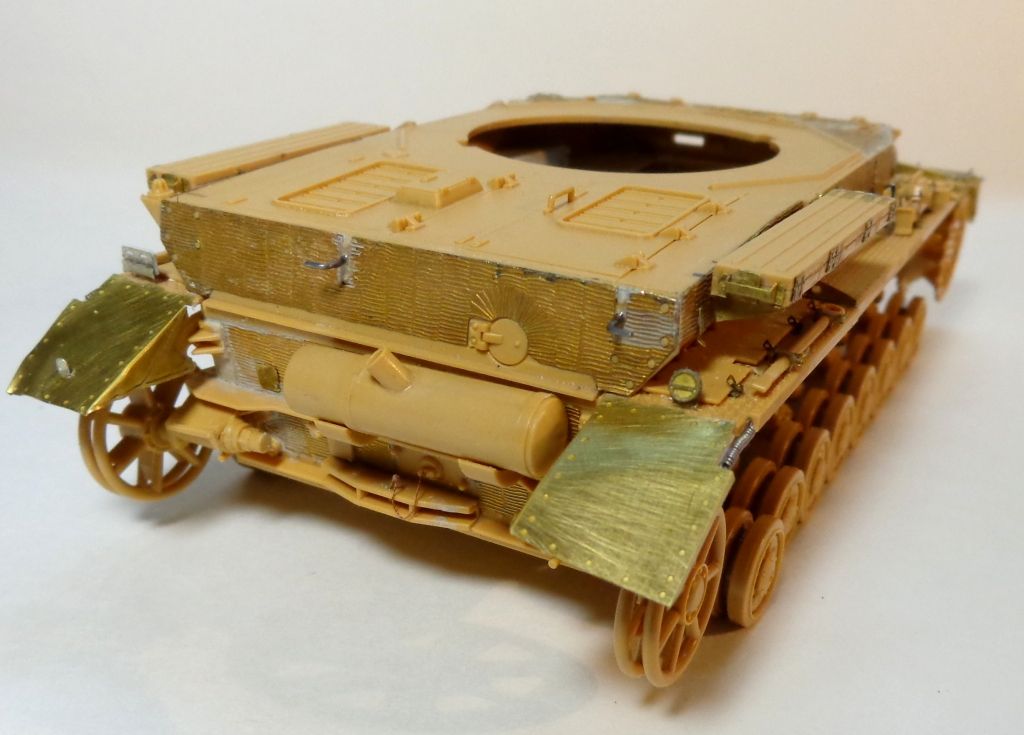
Well, after much PE wrangling and much stress over this build, I've finally got the hull basically finished as far as all the detailing and PE. Stick out tongue Man, what a PITA! I've realized that the PE set I have is actually for the OLD Wirbelwind kit--the original issue--and the PE is, in many instances, designed to fit the older tools which are different dimensions. The relatively NEWER kit which I have has that "New tools" sprue, which seem to be different, dimensionally.

The first pic I have to show is the new fender hinges I made; The Eduard set has a piece that is designed to fit over the zimmerit piece, but it rather gets lost in it. I used a piece of .009 guitar string--man, is that hard wire to shape!--and laid that over the correct spot. I made hinges out of metal foil, and cut bolts out of .040 sprue rod.
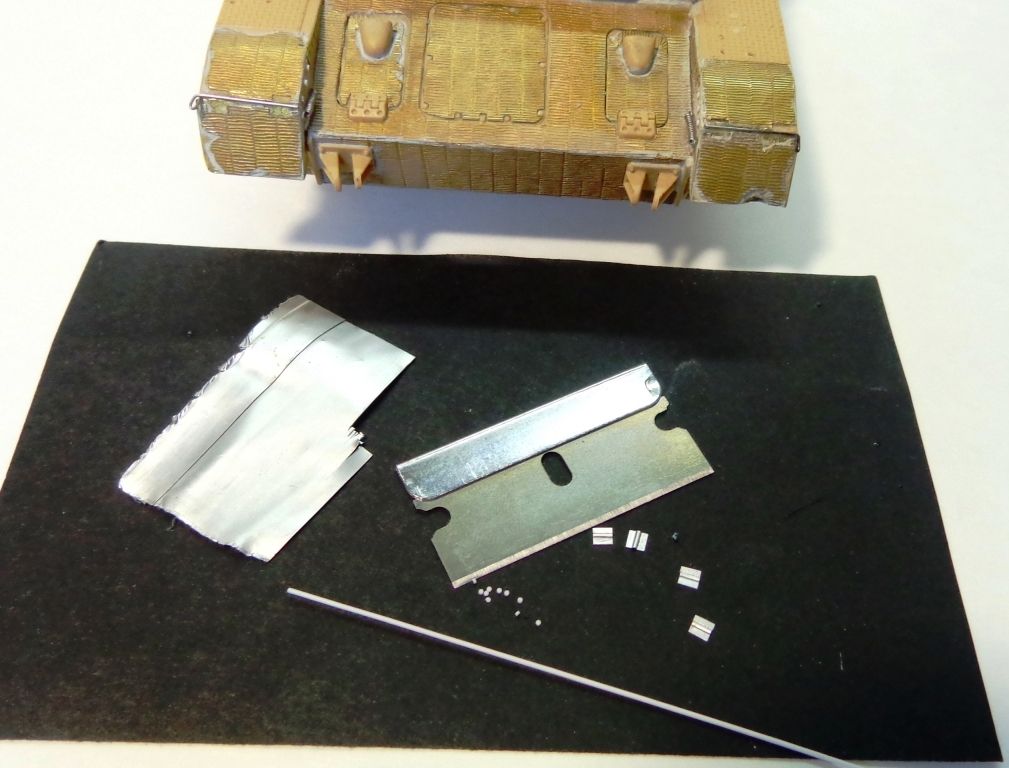
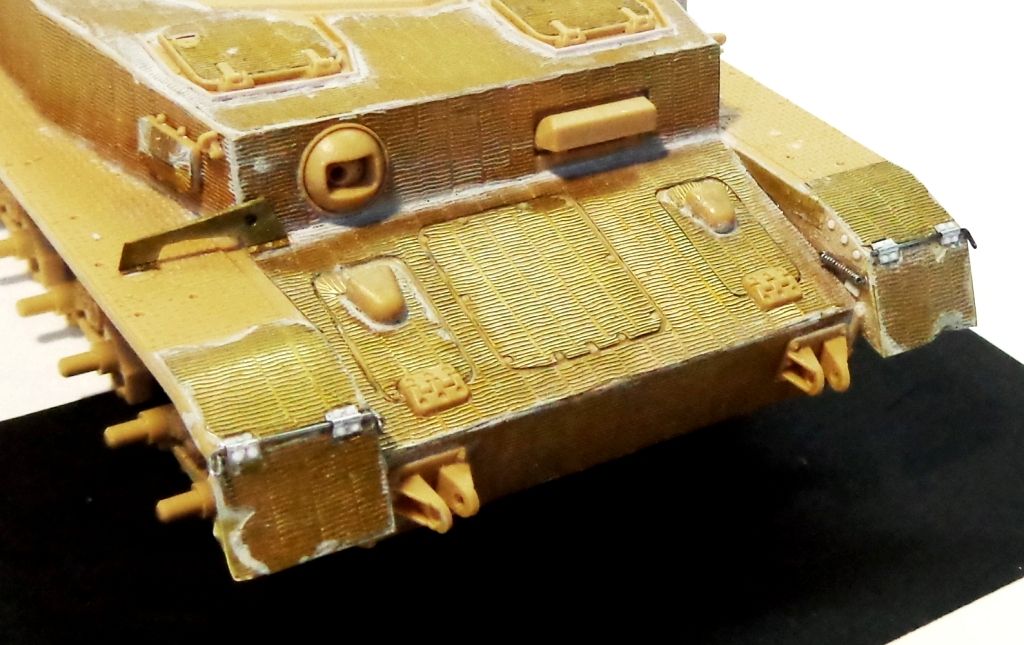
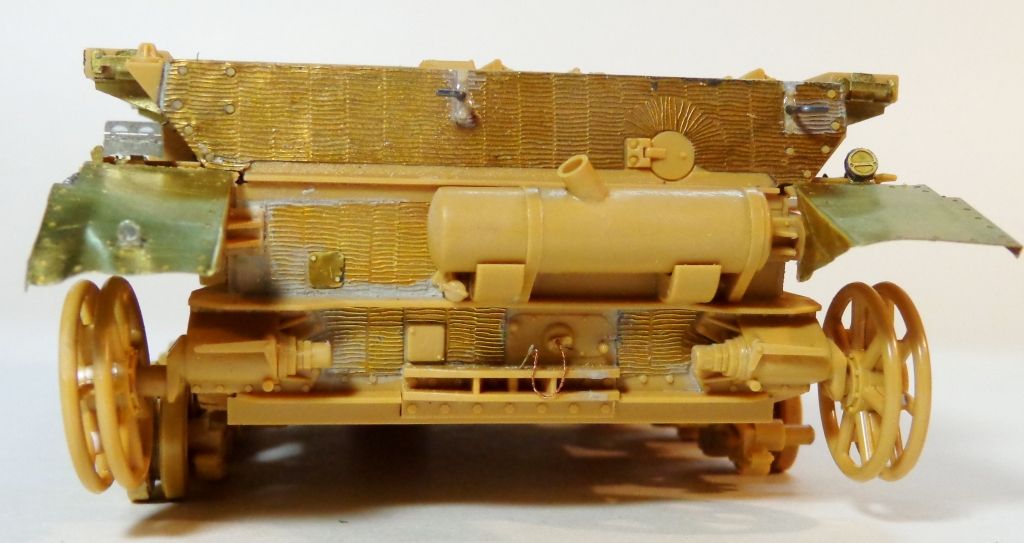
In the rear, I drilled out the cable stays and added some music wire to form new ones. I put a "chain" of twisted wires on the bottom circular crank cover. Since I lost the first rear light and reflector, I stole some from an extra Pz IV  Aber set I had laying around.Ignore that idler--its just falling off.
And now the fenders and tools. Ugh--I spent days wrestling with the arrangements and PE details, replacing or modifying some, ditching others, and just deciding not to use some pieces that were just unusable--such as the front spare track holder PE piece--it was just way too long to fit in the space between the shackles.
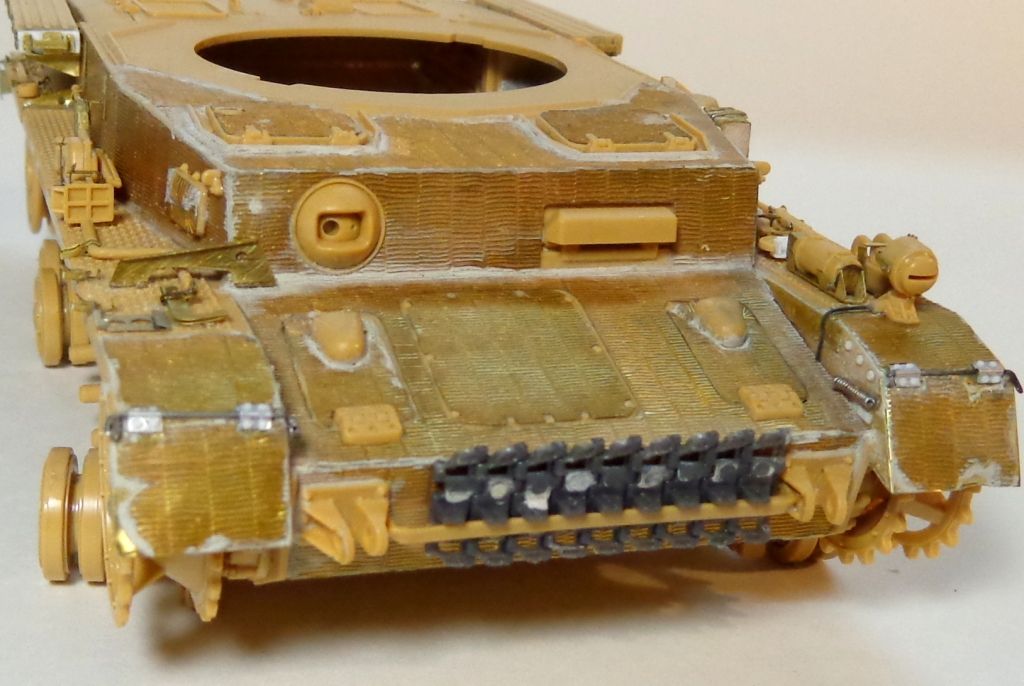
You can see that, despite my best efforts, the light is a little bit too far forward on the fender. I'm hoping that it gets lost in the finish and is not too much of a distraction. What precipitated this was a too-large fire extinguisher piece that I even shortened, but was still too long. Also, I had to rebuild the stays for the opposing track wrenches below the jack block.
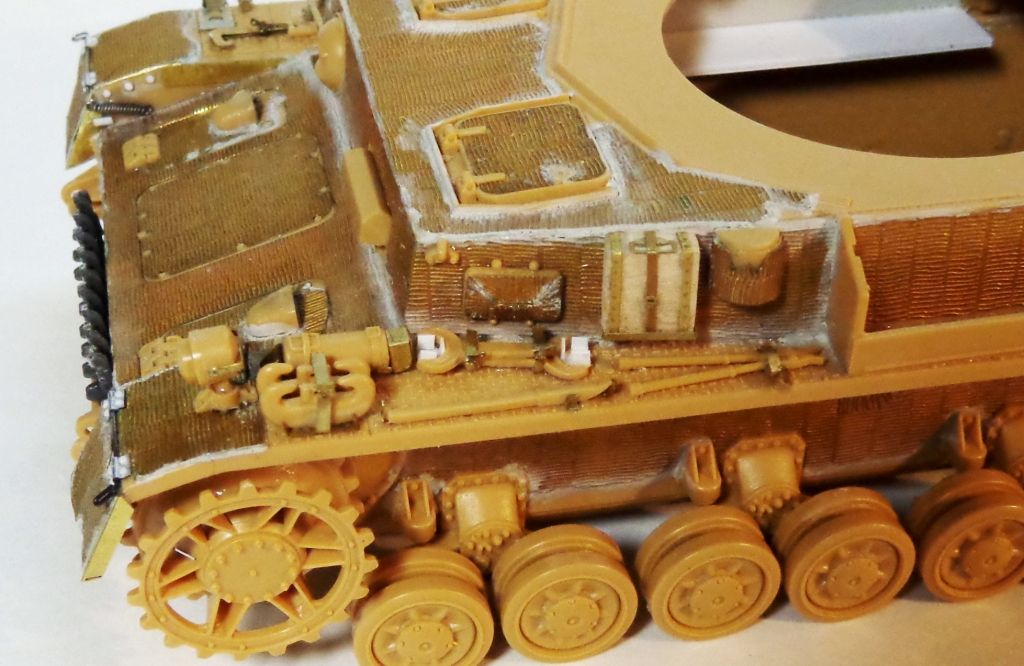
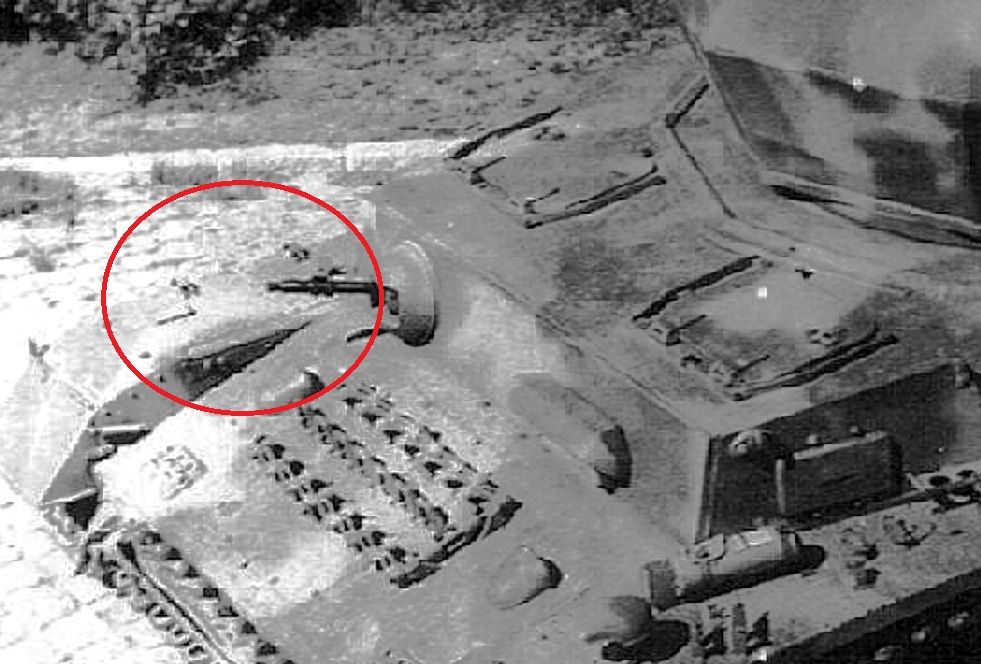
On the other fender, I couldn't fit the axe; I had to leave it off, as it wouldn't fit with the other parts. Even then, the arrangement of this fender is different than called for by the instructions, which are inaccurate. You can see in this photo that the axe is clearly on the fender in this position.
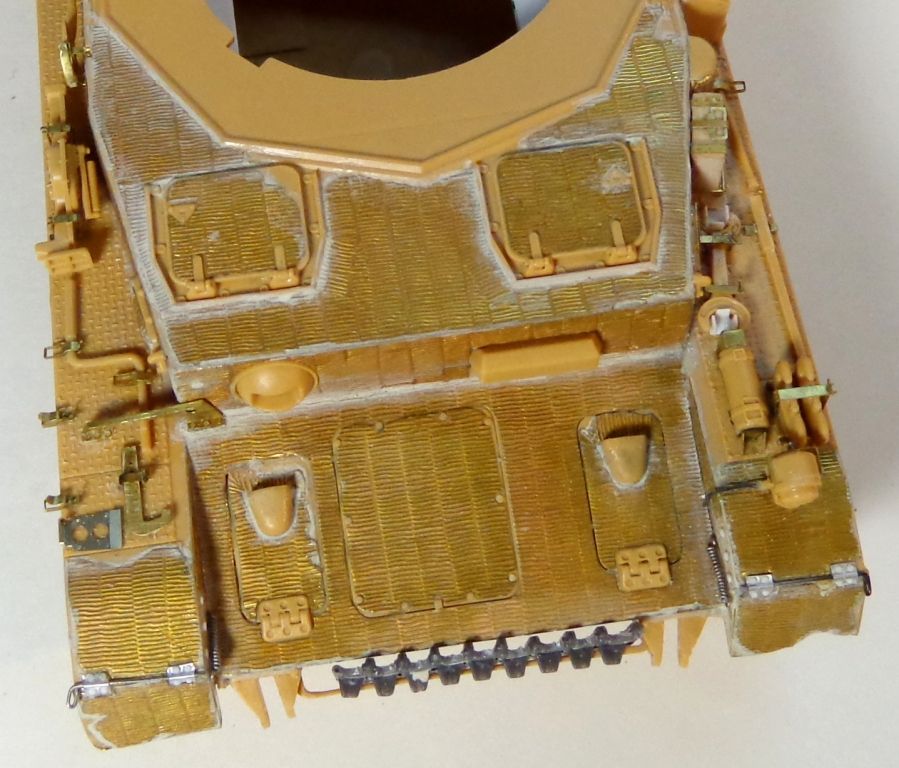
I won't be adding the second track over the glacis. Here's the overview; I added in the shovel as per reference photo placement.
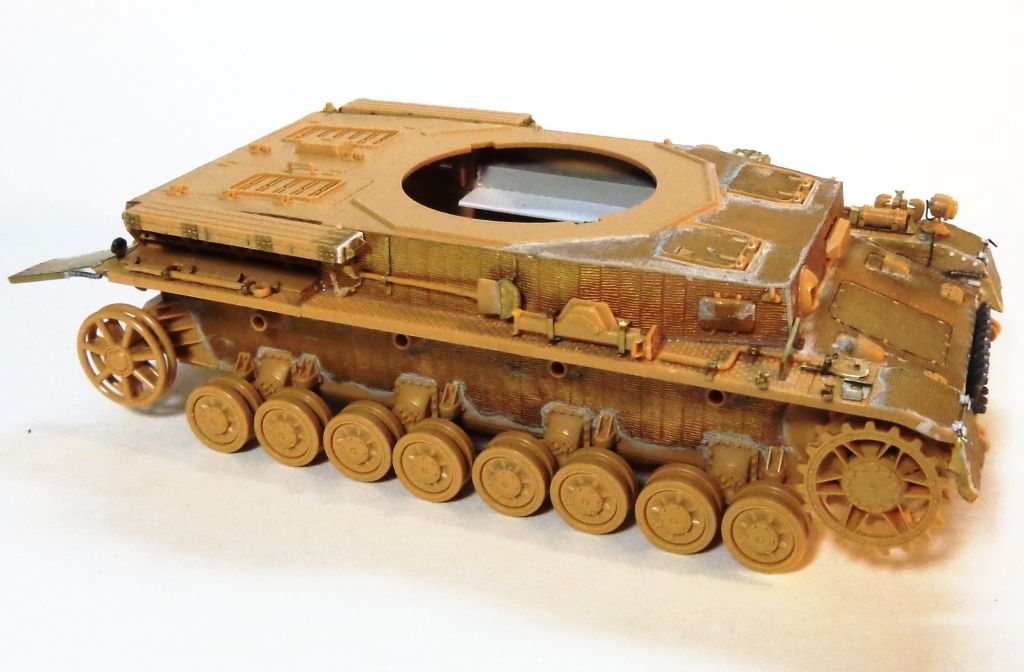
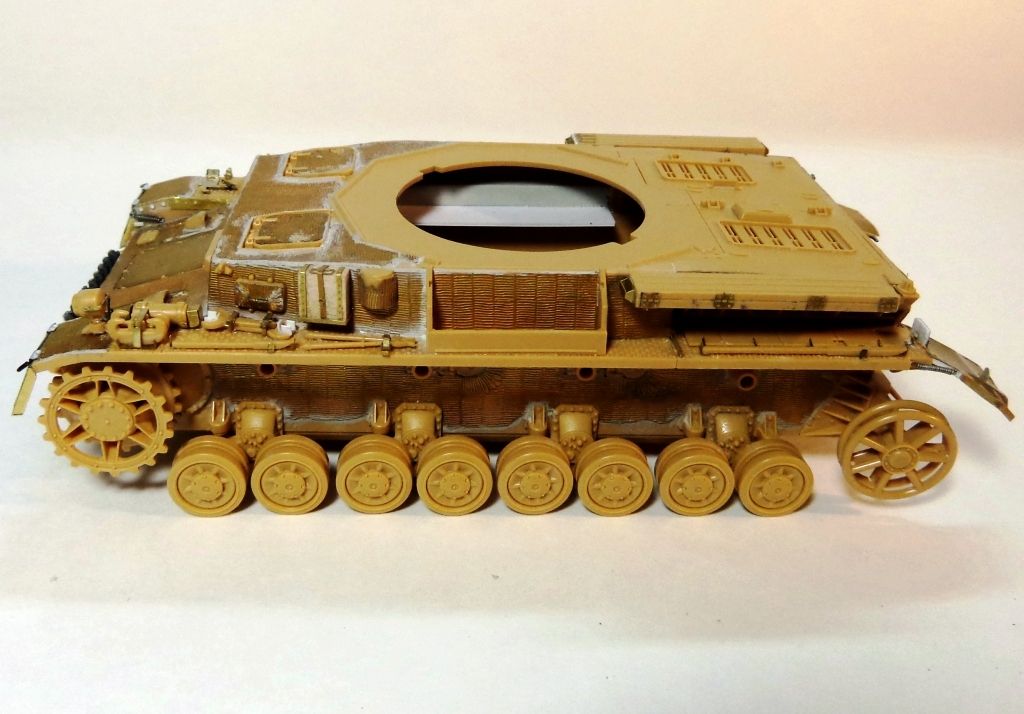
Oh god, but it's going to be good to move on from the hull! Onto the tracks and gun now. Kinda wish I had a detail set for the gun, but actually.....glad I"m done with the majority of the PE! NOT my favorite aspect of modeling!

I'm curious what the German armor modelers think about the tools placement? Does it pass inspection guys? Whistling

  • Member since
    July 2006
  • From: San Francisco Bay Area
Posted by bufflehead on Monday, November 25, 2013 12:55 AM

Man o Man Karl, that is some serious PE ZIM MADNESS you've got going there!  I feel your pain when it comes to those tools, I had some of the same struggles with the Pz IV D I'm currently working on.   Wish I knew more about Wirbelwinds, but everything looks great to me!  I love all the detailing touches you've added, like the fender hinges and the wrench holders....GREAT STUFF!  You're a man after my own heart! 

I am DYING to see some paint on this one!!

Ernest

Last Armor Build - 1/35 Dragon M-26A1, 1/35 Emhar Mk.IV Female


Last Aircraft Builds - Hobby Boss 1/72 F4F Wildcat & FW-190A8


  • Member since
    August 2008
  • From: S.W. Missouri
Posted by Pvt Mutt on Monday, November 25, 2013 7:57 AM

I see you took her by the body shop and had them beat out the dents Karl.

A few wrinkles wouldn't hurt.

Tony leeSmile

Shoot Low Boys They're Ridin Ponys

  • Member since
    January 2007
Posted by the doog on Monday, November 25, 2013 8:22 AM

Thanks, Ernest and Tony!

Good to hear from you guys!

Ernest, I feel your pain too about the PE you're into....it's a "necessary evil" I guess wen you get to a certain level of commitment to detail? Or can we call it a "disease"? It' IS contagious, it seems, lol! Tongue Tied

Tony--if this were a body it would have more than "wrinkles"; it would have broken bones! Big Smile

  • Member since
    March 2003
  • From: Rain USA, Vancouver WA
Posted by tigerman on Monday, November 25, 2013 9:42 AM

Solid work so far Karl. love all that metal.

   http://i7.photobucket.com/albums/y269/wing_nut_5o/PANZERJAGERGB.jpg

 Eric 

  • Member since
    December 2002
  • From: Bury St Edmunds, Suffolk, England
Posted by Bish on Monday, November 25, 2013 10:45 AM

Karl, great work on that, plenty of metal there.

In the regards to the axe, looking at the references I have, the holder for the head is the wrong way round. The blade should point out wards with the handle running under that bracket. The other item, no idea what that is, should then be on the outside edge of the fender.

I am a Norfolk man and i glory in being so


On the bench: Airfix 1/72nd Harrier GR.3/Fujimi 1/72nd Ju 87D-3

  • Member since
    November 2013
Posted by MRME on Monday, November 25, 2013 10:46 AM

Captaingentlemen, I realize that Im new to FSM, been on SA for a little while, but there is a wire that you can use. it is easier to use than guitar strings to bend jewelry makers use it to wrap stones, crystals and the  like. Any WALLYWORLD, or the such carry it in there arts n crafts depts. There a various brand names/gauges available. This is just a suggestion, don't want to step on any toesCaptain

anyone needing/wanting info about me contact me a richduddy@gmail.com. I only give info about myself on a need to know basis.

  • Member since
    December 2002
  • From: Bury St Edmunds, Suffolk, England
Posted by Bish on Monday, November 25, 2013 10:59 AM

Karl, I think I know what the problem is. That photo is from one of a series taken of one of the early Wibelwinds at Ostbau Sagan in summer 44. It shows one of the early vehicles on re built Ausg hulls. As you can see in that pic, there are no tools. On the other pics you can clearly see the axe bracket as you have it, but there's no holder for the other tool you have fitted. And that bracket is also absent.

The schematics show production Pz IV's as I mentioned, with the axe the other way and that other tool on the outside edge.

I am a Norfolk man and i glory in being so


On the bench: Airfix 1/72nd Harrier GR.3/Fujimi 1/72nd Ju 87D-3

  • Member since
    July 2004
  • From: Texas
Posted by wbill76 on Monday, November 25, 2013 11:06 AM

Bish is right, the tool placement will vary depending on whether the 'donor' Wirbelwind hull is a G or an H. With the tight spaces aside Karl, you've done a great job squeezing it all in. Yes

  • Member since
    December 2002
  • From: Bury St Edmunds, Suffolk, England
Posted by Bish on Monday, November 25, 2013 11:11 AM

Bill, do you know what that tool is. I was thinking it might be something designed just for the Flak versions, I know its also on the Ostwind.

I am a Norfolk man and i glory in being so


On the bench: Airfix 1/72nd Harrier GR.3/Fujimi 1/72nd Ju 87D-3

  • Member since
    December 2012
Posted by Ixion on Monday, November 25, 2013 12:12 PM

The "J"-shaped tool  is a track-tensioning tool, used for installing the tracks. It is actually two J-shapes, hinged at the bottom of the long end, which is opened up to form a V,

  • Member since
    December 2002
  • From: Bury St Edmunds, Suffolk, England
Posted by Bish on Monday, November 25, 2013 12:14 PM

thanks Ixion, in that case it would have ben on all version's, just as Bill says in different places.

I am a Norfolk man and i glory in being so


On the bench: Airfix 1/72nd Harrier GR.3/Fujimi 1/72nd Ju 87D-3

  • Member since
    January 2007
Posted by the doog on Monday, November 25, 2013 7:13 PM

Guys,

Thanks to everyone who weighed in thus far, and thanks a bunch for figuring out my error--to be honest, that factoid of hull differences crossed my mind, but in all seriousness, I couldn't find a way to put all of the tools there without putting them the way that I did. And after the light's position being so far forward due to the dimensional errors in the PE, I have pretty much resigned myself to the fact that this model will probably not catapult me into "Master" class at AMPS, lol. I think where I screwed up was when I put the shovel on the side---that made me shift the tools forward on the right side, and that made me run out of room.

Now the question is; do I have the patience to fix it?! Tongue Tied Every time you pry a piece off of that PE zimmerit, you have to carefully clean every vestige of superglue off of the PE, in between all the ridges, etc. UGH--I've done that at LEAST a half-dozen times already!

Even as I"m writing this question, I KNOW that I"m going to wind up doing that....Angry......Confused

I'l probably get to it tomorrow.. I've got the track drying on it now.,..Smile

Thanks again for setting me straight, guys!!!! YesYes

  • Member since
    March 2004
  • From: Spartanburg, SC
Posted by subfixer on Monday, November 25, 2013 7:35 PM

Sorry, doog...

I'm from the government and I'm here to help.

  • Member since
    January 2007
Posted by the doog on Monday, November 25, 2013 7:37 PM

ha ha, that's funny, Lee!

  • Member since
    August 2008
  • From: S.W. Missouri
Posted by Pvt Mutt on Monday, November 25, 2013 8:48 PM

Karl I was there and the shovel got knocked off going through some brush. I told the guys not to put it there

but why would they pay any attention to me? Registered Rednecks don't carry much weight you know.

Tony leeDunce

Shoot Low Boys They're Ridin Ponys

  • Member since
    April 2006
  • From: ON, Canada
Posted by jgeratic on Tuesday, November 26, 2013 3:09 AM

Bristling with awesomeness, all that PE sure does looks great.

I like what you did with the spare barrel boxes, simple but very effective.

If you are going to remove PE, I'm sure you are aware nail polish remover does the trick, (the acetone?)

regards,

Jack

  • Member since
    July 2003
  • From: On my kitchen counter top somewhere in central North Carolina.
Posted by disastermaster on Tuesday, November 26, 2013 5:26 PM

Well, we all know that doog is into heavy metal.

https://encrypted-tbn3.gstatic.com/images?q=tbn:ANd9GcSlu2TYHc3jU9PTMbFxEmkg4G32ie97fd-HynmxAwRUfqEysSY8lBHyvI8

This is just his armored version of it.

 https://i.imgur.com/LjRRaV1.png


  • Member since
    January 2006
  • From: California
Posted by SprueOne on Wednesday, November 27, 2013 11:14 AM

LOL, good one!

Anyone with a good car don't need to be justified - Hazel Motes


Iron Rails 2015 by Wayne Cassell Weekend Madness sprueone

  • Member since
    January 2007
Posted by the doog on Sunday, December 1, 2013 2:05 PM

disastermaster

Well, we all know that doog is into heavy metal.

https://encrypted-tbn3.gstatic.com/images?q=tbn:ANd9GcSlu2TYHc3jU9PTMbFxEmkg4G32ie97fd-HynmxAwRUfqEysSY8lBHyvI8

This is just his armored version of it.

Big SmileBeerBeerBeerBeerBeerBeerBeerBeerBeerBeerBeerBeerBeerBeer

  • Member since
    March 2003
  • From: El Dorado Hills, CA
Posted by IBuild148 on Sunday, December 1, 2013 11:21 PM

You are really testing your patience. Its even testing mine Bang Head just reading all the efforts in the details.

IBuildOne48

Teach modeling to youth!

Scalefinishes.com

http://i712.photobucket.com/albums/ww122/randysmodels/NMF%20Group%20build%20II/Group%20Badge/NMFIIGBbadgesmall.jpg


  • Member since
    January 2007
Posted by the doog on Monday, December 16, 2013 4:30 PM

Hi all,

Well, I'm back home from hunting up north, and after a successful hunt (got a nice 6 pointer) have gotten around to finishing this construction--she's ready for paint! YAY!

I have got the tracks on--I"m going to be doing a special "tracks tutorial" post here soon, so watch for it!

I detailed the interior of the gun trunions--there's no detail here on the old Tamiya kit, only knock-out marks. I found a photo in a book showing how to detail them and went to work. It's just styrene sheet with some razor-blade cut nuts.

The PE set had some small details to use on them.

And I also added some hand rails and foliage loops on the turret. I'm going to paint the guns and interior first, then glue it up and add weld seams to the joints.

I'm going to start painting tomorrow. Trying to think of something cool for the camo...this should be fun. Stay tuned! Comments or suggestions always welcomed!

  • Member since
    July 2003
  • From: On my kitchen counter top somewhere in central North Carolina.
Posted by disastermaster on Monday, December 16, 2013 7:04 PM

I'll be tuning in..... http://smileys.on-my-web.com/repository/Music/radio-006.gif

 https://i.imgur.com/LjRRaV1.png


  • Member since
    November 2004
  • From: Essex England
Posted by spacepacker on Monday, December 16, 2013 7:51 PM

'This was the model that brought me back into this game.

I picked it up from a Charity shop for £1.00 built OOB because I didn't know any better, even followed the box art for the painting; all very simple.

So, I'm very pleased you  did not publish this 'Blog' at the same time, it's for sure I would not have finished it and would not still be modelling.

Great build so far, looking forward to the finish...cheers....Kenny

  • Member since
    April 2013
Posted by SchattenSpartan on Tuesday, December 17, 2013 8:51 AM

She's looking superb, Karl! I can't wait to see pics of her with some paint on.

  • Member since
    July 2004
  • From: Texas
Posted by wbill76 on Tuesday, December 17, 2013 10:14 AM

Nice update Karl! Looking forward to seeing it with paint on. Beer

JOIN OUR COMMUNITY!

Our community is FREE to join. To participate you must either login or register for an account.

SEARCH FORUMS
FREE NEWSLETTER
By signing up you may also receive reader surveys and occasional special offers. We do not sell, rent or trade our email lists. View our Privacy Policy.