SEARCH FINESCALE.COM

Enter keywords or a search phrase below:

Bronco Pzkpfw I Ausf. F VK 18.01

20273 views
141 replies
1 rating 2 rating 3 rating 4 rating 5 rating
  • Member since
    December 2002
  • From: Bury St Edmunds, Suffolk, England
Posted by Bish on Sunday, May 4, 2014 5:04 PM

And all that interior is par of the kit, is that right. I know its small, but I thin that has to be the best kit supplied interior I have yet seen. I have the Dragon Pz I in the stash, and I am sure its not as complete as this.

And I am damn glad I didn't drive one of these. At 6'1'' my knees would have been round my ears.

Its looking really nice by the way, great detailing and great paint work, a nice grubby look just like a good AFV should look like.

I am a Norfolk man and i glory in being so


On the bench: Airfix 1/72nd Harrier GR.3/Fujimi 1/72nd Ju 87D-3

  • Member since
    July 2004
  • From: Texas
Posted by wbill76 on Sunday, May 4, 2014 4:43 PM
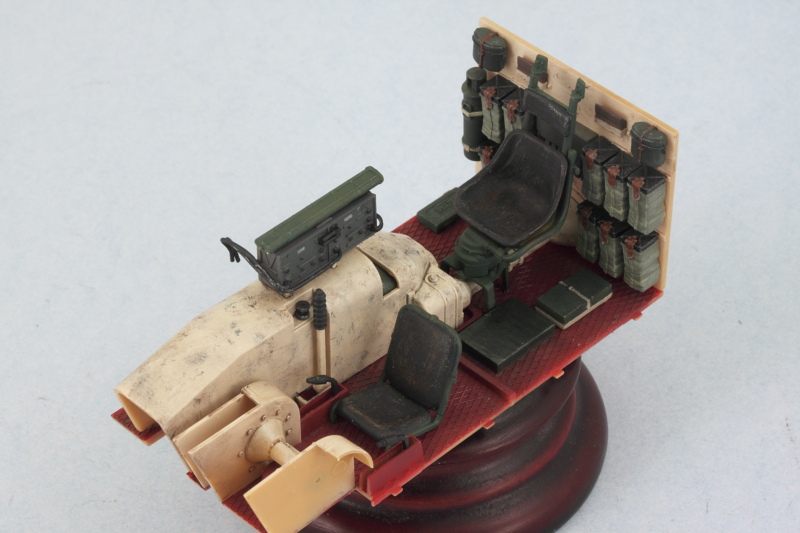
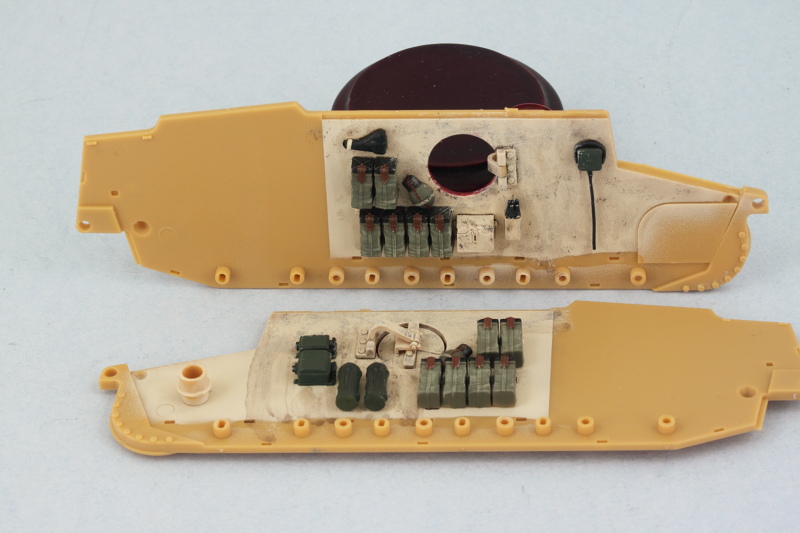
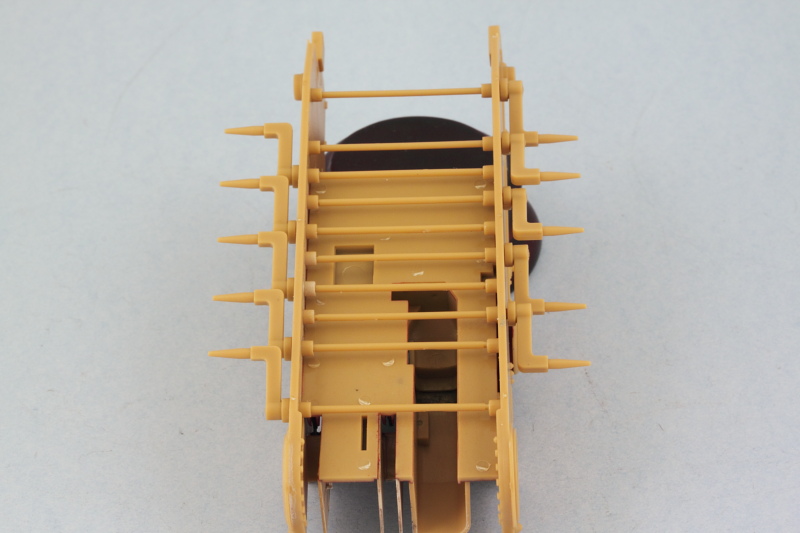
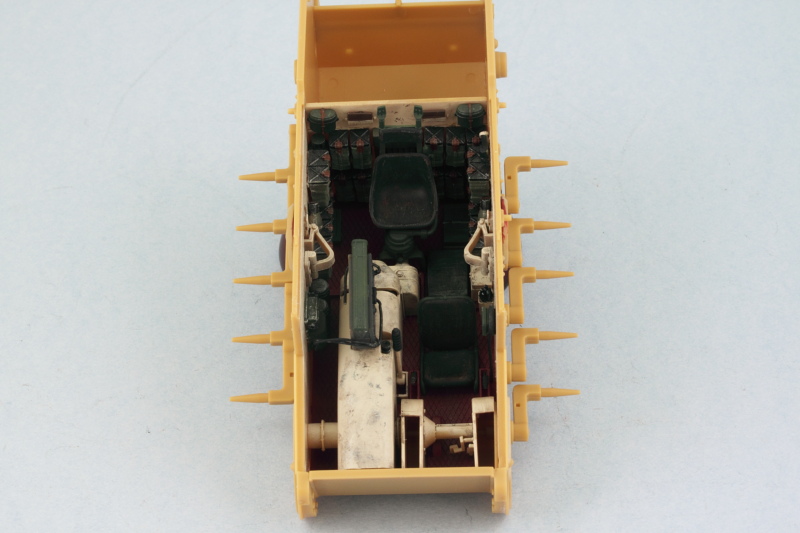
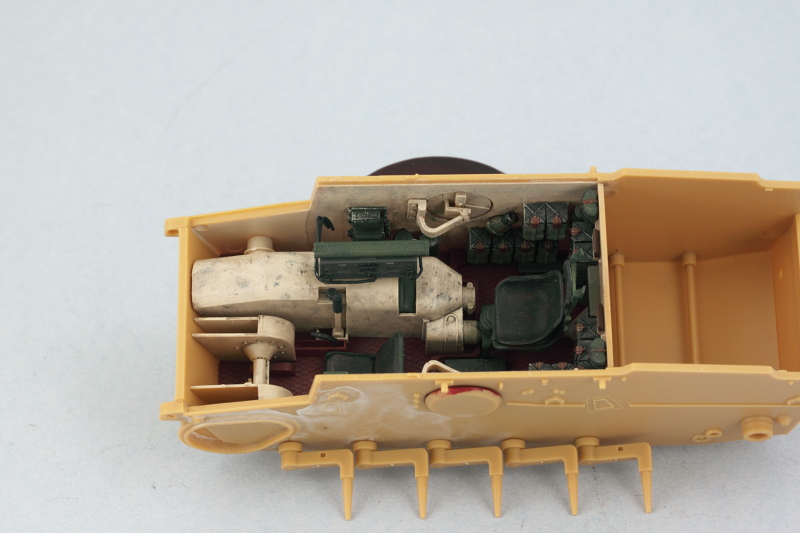
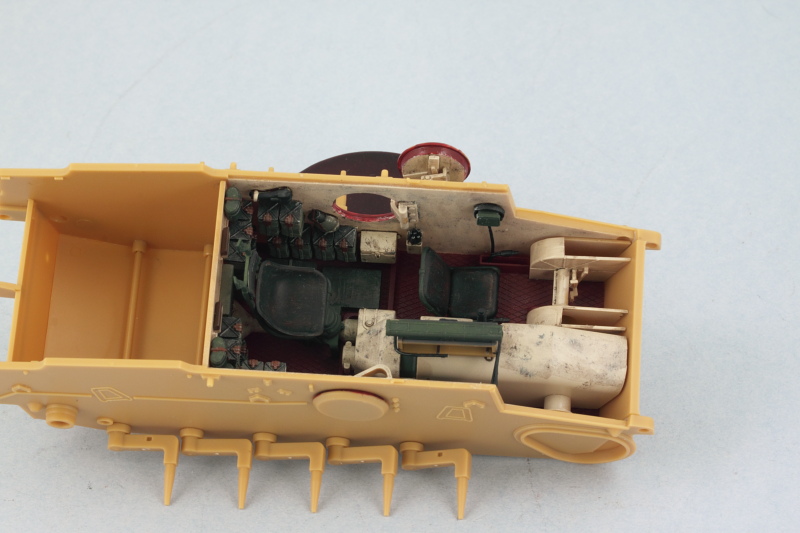
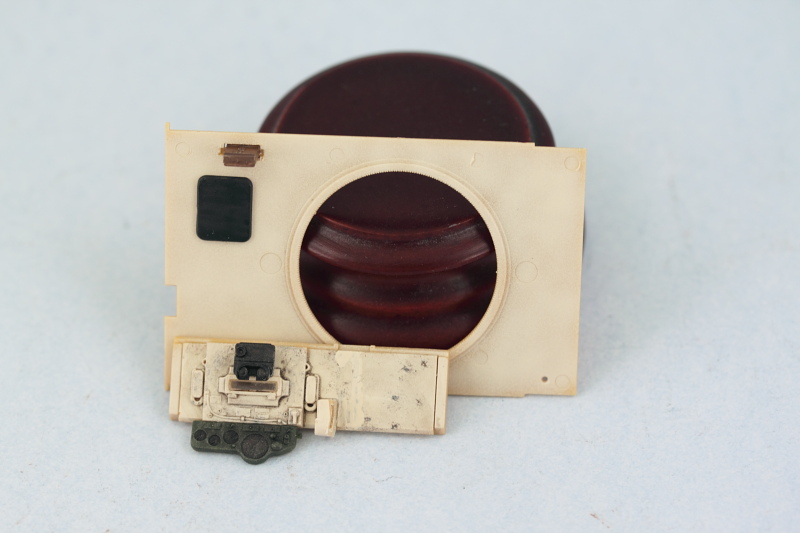
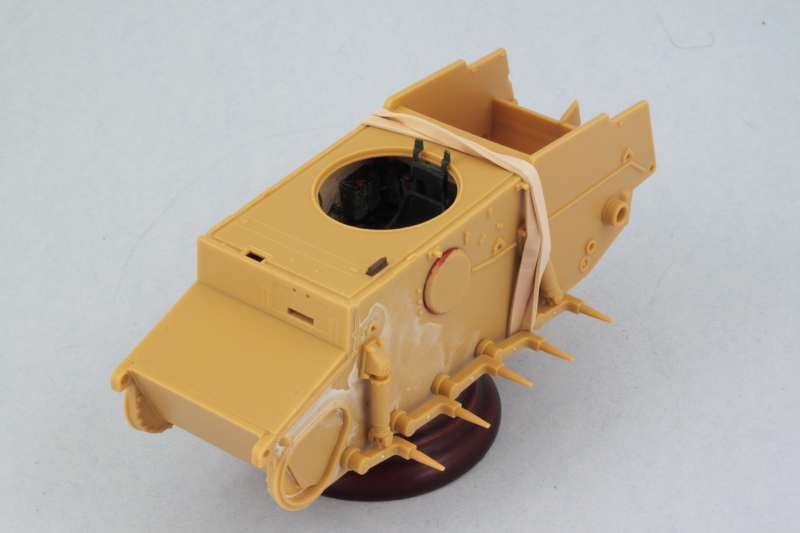
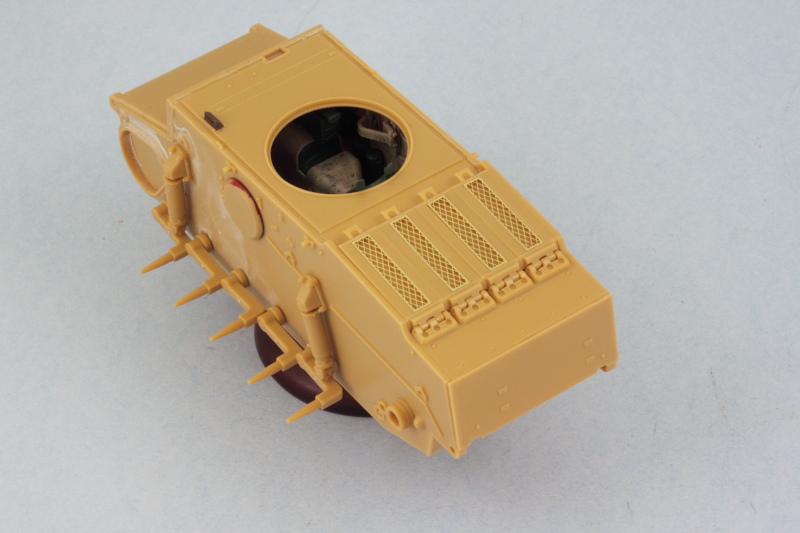
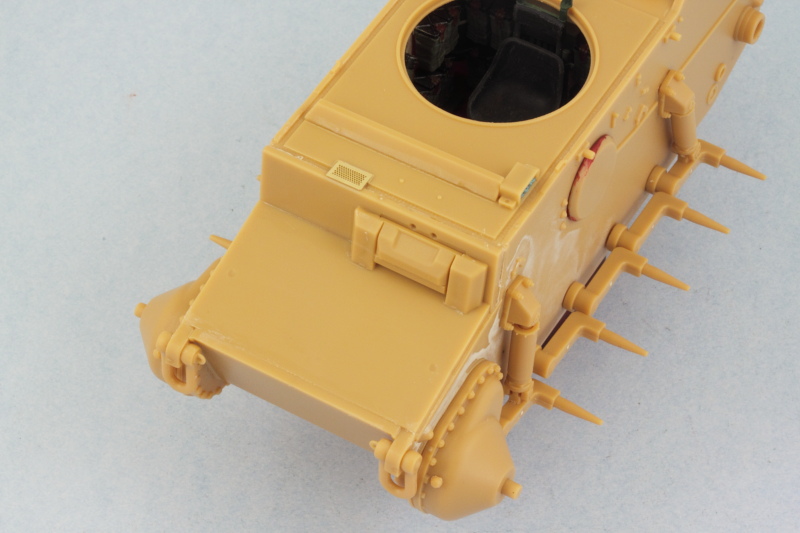
Work continued on the pocket Tiger by virtue of getting the interior weathering completed and the components ready for final assembly into the hull. I stippled some Burnt Umber to simulate scuffs/scrapes on the Panzer Interior Buff surfaces then applied a light wash of Raw Umber over that for general grime/dirt. Once that had dried, I dry-brushed more of the Panzer Interior Buff to blend things back in a bit and then joined the transmission housing and rear bulkhead with the floor and installed the commander's seat in position.  The hull sides got the same weathering treatment and I hand painted some of the primer red for the escape hatch opening rims as reference shots show a marked color contrast here which makes sense when you consider how the hatches closed.  Getting all the hull components together requires some careful thought due to the way the suspension installs. Each swing arm has its own torsion bar that has to fit into a socket on the opposing hull side, so I decided to install the fighting compartment floor and interior first so that it would help hold the hull sides together, then installed the torsion bars while I could still access them from the underside.  While the hull still had some flexibility to it, I added the hull bottom and rear plates, carefully slipping their tabs into position on one side and then gently flexing the other side until they slid into place.  Not exactly spacious accommodations by any stretch!  And just for grins, I tested out the side escape hatch and it works flawlessly.  One key element of the working suspension is to ensure that they sit at the right height. Working quickly before the glue set from the previous effort, I added the shock absorbers and used the already assembled road wheels to ensure everything was playing nice in this department. I let that set up overnight to be sure there wouldn't be problems down the road.  Returning back to the remaining interior bits, some test fits with the front compartment panel showed that the Bronco engineered tolerances were very tight. The added wiring on the radio that I put in interfered with the little side gauge on the driver's panel, so I had to sand it down a mm or two to adjust. The main instrument panel was also installed at this point and the compartment roof received the driver's head crash pad and side-facing periscope.  Then the moment of truth, the glacis, compartment front panel, and compartment roof were all installed. The rear part of the hull had a tendency to flex out a bit at the top so a rubber band was used to ensure that all set up nice and square.  Once that had set up, I added the engine compartment access panels and rear hull top plate. I found it easiest to install the hinge plate part first so that it met up squarely with the rear hull plate and then added the 4 access hatches afterward. These all have to line up just so with each other between the hull sides with no gaps and again Bronco has this down pat with the engineering. The PE screens were installed using liquid glue around their edges to soften the kit plastic and give them something to grip onto.  Rounding out this session, I returned to the hull front and added the tow shackles, final drive housings, and the armored visor for the driver's view port. The visor is shown here in the closed position but remains workable which will be handy for painting later on. I also added the little PE vent screen and the turret splash guard as well as the periscope guard for the driver's side periscope. The periscope itself received some blue-tack poster putty masking to protect its face later on in the painting stages.
  • Member since
    July 2004
  • From: Texas
Posted by wbill76 on Friday, May 2, 2014 10:50 AM

Thanks Steve! Beer Hope to get that interior all buttoned up this weekend, fingers crossed! Wink

  • Member since
    July 2003
  • From: On my kitchen counter top somewhere in central North Carolina.
Posted by disastermaster on Thursday, May 1, 2014 8:56 PM

http://i.somethingawful.com/inserts/news/images/03-2003/thumbsup.gif Looking gorgeous Bill!

 https://i.imgur.com/LjRRaV1.png


  • Member since
    July 2004
  • From: Texas
Posted by wbill76 on Thursday, May 1, 2014 8:10 PM
Thanks Jibber! Once the turret is on, the only way to view the interior is through the dime-sized hole in the hull side for the escape hatches. The commander's hatch in the turret won't show much of the fighting compartment because of the MGs and other gear that will be in the way there. The turret is designed to slide on/off though and a lot is viewable of the interior through the turret ring with it removed, so it's like a 'Russian Doll' in that respect I guess. Big Smile
  • Member since
    January 2013
Posted by jibber on Thursday, May 1, 2014 3:22 PM

Bill the bags are real nice and the weathering on the seat too, so how much of the interior will actually show. I've often thought about a low wattage diffused LED light somewhere in the cabin that would really show off the nice work with the hatches open.

  • Member since
    July 2004
  • From: Texas
Posted by wbill76 on Thursday, May 1, 2014 1:32 PM

Thanks IB! Wink

  • Member since
    March 2003
  • From: El Dorado Hills, CA
Posted by IBuild148 on Wednesday, April 30, 2014 11:33 PM

Now that I'm caught up. As always, stellar!

IBuildOne48

Teach modeling to youth!

Scalefinishes.com

http://i712.photobucket.com/albums/ww122/randysmodels/NMF%20Group%20build%20II/Group%20Badge/NMFIIGBbadgesmall.jpg


  • Member since
    July 2004
  • From: Texas
Posted by wbill76 on Tuesday, April 29, 2014 9:09 AM

Thanks Dave! Glad to have you along for the ride. Beer

  • Member since
    February 2010
  • From: Maine
Posted by Stage_Left on Monday, April 28, 2014 8:25 PM

Very nice work as usual Bill- I'm enjoying your progress! Yes

Dave

  • Member since
    July 2004
  • From: Texas
Posted by wbill76 on Monday, April 28, 2014 8:01 PM

Thanks Mike! Details take a lot of time but well worth it on this little guy. Yes

  • Member since
    July 2006
  • From: New Jersey
Posted by redleg12 on Monday, April 28, 2014 7:34 PM

I love all the little details. Nice work on the bags. Forming into an interesting interior.

Rounds Complete!!

"The Moral High Ground....A Great Place to Emplace Artillery."

  • Member since
    July 2004
  • From: Texas
Posted by wbill76 on Sunday, April 27, 2014 6:48 PM

Thanks Bish! Bronco certainly packs a lot into this little guy. Wink

  • Member since
    December 2002
  • From: Bury St Edmunds, Suffolk, England
Posted by Bish on Sunday, April 27, 2014 6:42 PM

Rambo

Its hard to believe that they give you so much for the interior.

I was thinking that, I had to go and check that this wasn't an open topped vehicle.

I am a Norfolk man and i glory in being so


On the bench: Airfix 1/72nd Harrier GR.3/Fujimi 1/72nd Ju 87D-3

  • Member since
    August 2012
  • From: Parker City, IN.
Posted by Rambo on Sunday, April 27, 2014 6:27 PM

Its hard to believe that they give you so much for the interior.

Clint

  • Member since
    December 2002
  • From: Bury St Edmunds, Suffolk, England
Posted by Bish on Sunday, April 27, 2014 5:07 PM

Some realy nice work there Bill. Those ammo sacks do look really nice.

I am a Norfolk man and i glory in being so


On the bench: Airfix 1/72nd Harrier GR.3/Fujimi 1/72nd Ju 87D-3

  • Member since
    July 2004
  • From: Texas
Posted by wbill76 on Sunday, April 27, 2014 4:55 PM
The devil's always in the details and that's where this session's attention focused on. Continuing on from last week, I went to work hand detailing all the various bits of gear that go into the fighting compartment interior. First up were the 24 ammo sacks, the MP40 ammo pouch, the canteens, mess tins, and the first aid box for the floor. Bronco provides some excellent molded-in 'cloth' detail to the ammo sacks so I dry-brushed some of my 50-50 Light Gray/Panzer Dunkelgelb custom mix that I keep around for three-tone camo to highlight and add some depth to them.  Now comes the tricky part, getting all the stuff to install just right in all the different spots! I started with the rear firewall as it's the most densely populated spot and also interacts with stuff on the floor and the hull sides. I found that working from the bottom up was the best way to go and did the right side first, checking alignment with things on the floor and the hull side as I added each row of items.  That of course meant that I also worked on the hull sides at the same time. First up was the driver's side. Ammo sacks and canteen were installed along with the hand-detailed flare gun, flare cartridges and box, and driver's intercom box and headphones. I added the wiring for the intercom using 0.5mm solder installed in the hole I'd drilled out previously with some CA gel.  Opposite site received ammo sacks and canteen, gas mask containers, and the radio power transformer units.  With the firewall squared away, I also added the wiring details to the radios with 0.5mm solder wire and installed it in position along with the spare MG13 barrels case.  Floor received some weathering attention with a light wash of Raw Sienna applied to simulate some dirt accumulation. Virtually all of this will disappear once the drive-train is installed along with the commander's seat but enough will show through to add some color variety. I also installed the small tool box and first-aid kit along with the driver's seat and track control levers.  Rounding out the day's activities, the commander's seat was detailed along with the driver's instrument panel and periscope view sights.  There's still more to do weathering-wise before the interior is ready to be assembled but it's definitely closer to 'the day' than it was before!
  • Member since
    July 2004
  • From: Texas
Posted by wbill76 on Thursday, April 24, 2014 10:16 PM

No worries Mike, glad you found it! You never know about the full cycle...but for now I'm back on familiar ground at least for a little bit. Wink

  • Member since
    July 2006
  • From: New Jersey
Posted by redleg12 on Thursday, April 24, 2014 8:16 PM

Holy Excrement.....I saw the posts on FB but i missed it here, that's what old age does to you, modelers dementia.  Up to your old tricks and looking good. Glad to see you back in armor...though I am still going to hold you to hitting the cycle Wink

Rounds Complete!!

"The Moral High Ground....A Great Place to Emplace Artillery."

  • Member since
    July 2004
  • From: Texas
Posted by wbill76 on Thursday, April 24, 2014 10:39 AM

Thanks Karl! Having fun with it so far. Beer

  • Member since
    January 2007
Posted by the doog on Wednesday, April 23, 2014 7:40 PM

Very cool choice, Bill! I just saw one of these in Kubinka! I did an RPM or Alan ? version of this--something like that; a nice little kit, but nowhere near as crisp as this offering. A neat little panzer! I'm sure you'll do it proud!

  • Member since
    July 2004
  • From: Texas
Posted by wbill76 on Wednesday, April 23, 2014 5:30 PM

Thanks Ernest! Now the fun begins in terms of pulling all that interior together. Wink

  • Member since
    July 2006
  • From: San Francisco Bay Area
Posted by bufflehead on Tuesday, April 22, 2014 11:50 PM

Nice detail painting Bill!  Yep, sometimes its worth it to bust out the AB for work like that!  Like your color choices!

Ernest

Last Armor Build - 1/35 Dragon M-26A1, 1/35 Emhar Mk.IV Female


Last Aircraft Builds - Hobby Boss 1/72 F4F Wildcat & FW-190A8


  • Member since
    July 2004
  • From: Texas
Posted by wbill76 on Sunday, April 20, 2014 5:12 PM
Ernest, your last comment slipped by me, apologies for that! I hear you about the quality of those tracks, very impressive. Beer Here's the latest: Spent the day working on the bulk interior painting to get things ready to move into the detail and assembly stage for that area. First up was an airbrush treatment of Model Master enamel Panzer Interior Buff to all the applicable hull areas and units. Because I hate to scrape paint, I used a combination of masking tape and poster blue-tack putty to mask off the hull floor and side joins to make life a little easier when the hull comes together down the road.  Ordinarily it's not worth the trouble to airbrush small detail parts but since the interior has so many, I decided this time around that the airbrush would be the better method vs. hand painting. The compartment floor was airbrushed with a custom mix of 'primer red' that I keep around but don't quite remember the exact mix ratio on...I do know it contains Insignia Red, Flat Black, and a touch of Light Gray...and a little bit goes a long way! Radio received some Gunship Gray, the seat mounts and other odd bits of gear were airbrushed with Khaki. The Gurtsacks and crew canteens are largely made of cloth or have cloth covers so I used a different shade for them, trying out some Faded Olive Drab as their base color, and have to say I was happy with the shade tone that produces.  This will all get the chance to cure before the next round of detail painting and the weathering process begins on the interior. Hope everyone had a Happy Easter!
  • Member since
    July 2006
  • From: San Francisco Bay Area
Posted by bufflehead on Tuesday, April 15, 2014 11:01 PM

Sweeeeet tracks Bill!   Better watch out MK....Bronco's got your number!

Ernest

Last Armor Build - 1/35 Dragon M-26A1, 1/35 Emhar Mk.IV Female


Last Aircraft Builds - Hobby Boss 1/72 F4F Wildcat & FW-190A8


  • Member since
    July 2004
  • From: Texas
Posted by wbill76 on Tuesday, April 15, 2014 1:09 PM

Thanks Steve! It definitely makes it easier to assemble the tracks for sure! Beer

  • Member since
    July 2003
  • From: On my kitchen counter top somewhere in central North Carolina.
Posted by disastermaster on Tuesday, April 15, 2014 12:33 AM

 Finally managed to drag myself online......   http://www.animateit.net/data/media/smiley712/desertsmile.gif                             http://img.photobucket.com/albums/v481/ladyelle/Most%20used%20emots/shame.gif

       (been busy with problems in life).

Now, that's the most sensible and efficient appearing jig I've yet to see.

 It's gonna look great Bill!

http://www.bpmodels.net/Model/PzIF/Tracks.JPG

 https://i.imgur.com/LjRRaV1.png


  • Member since
    July 2004
  • From: Texas
Posted by wbill76 on Monday, April 14, 2014 3:25 PM

Yes indeed J-M! I was very impressed by this as it saved me another $30 or so that I would normally spend on workables. Wink

  • Member since
    August 2006
  • From: Oromocto, Canada
Posted by Gun Tech on Sunday, April 13, 2014 7:16 PM

Those tracks are kit supplied?

NICE!!!    

Bronco is fast becoming one of my favorite manufacturer!    

Jean-Michel    "Arte et Marte"

  • Member since
    July 2004
  • From: Texas
Posted by wbill76 on Sunday, April 13, 2014 6:57 PM

Thanks Bish! The pins are two per link (one per side) and yes, the jig is kit-supplied, definitely makes things go together smoothly. Wink

JOIN OUR COMMUNITY!

Our community is FREE to join. To participate you must either login or register for an account.

SEARCH FORUMS
FREE NEWSLETTER
By signing up you may also receive reader surveys and occasional special offers. We do not sell, rent or trade our email lists. View our Privacy Policy.