SEARCH FINESCALE.COM

Enter keywords or a search phrase below:

Meng M2A3 Bradley w Busk III and Full Interior: State-to-Finish Build

30804 views
115 replies
1 rating 2 rating 3 rating 4 rating 5 rating
  • Member since
    December 2002
  • From: Fort Knox
Posted by Rob Gronovius on Friday, March 5, 2021 12:03 PM

This brings back so many memories of training on the original M3 Bradleys back in the day. A new vehicle, but a bit of a dog in its original configuration.

I remember the story of a reserve officer having his head get stuck between the turret and crew compartment when the turret was accidentally traversed as he attempted to go into it. He lived, but was scarred.

  • Member since
    March 2012
  • From: Louisville, KY
Posted by Builder 2010 on Thursday, March 4, 2021 6:03 PM

Thanks Gino, The aluminum insulation makes sense with the heating duct. No work today... errands and a hobby shop run. Work with re-commence tomorrow.

  • Member since
    December 2002
  • From: Valrico, FL
Posted by HeavyArty on Wednesday, March 3, 2021 6:30 PM

Builder 2010
...the ducting? that encircles the turret foundation. I think it's air conditioning ducting...

It is actually a heater duct.  The crew heater is behind the small wall on the sponson where the HALON fire bottles are.  This duct directs heat forward to the driver.

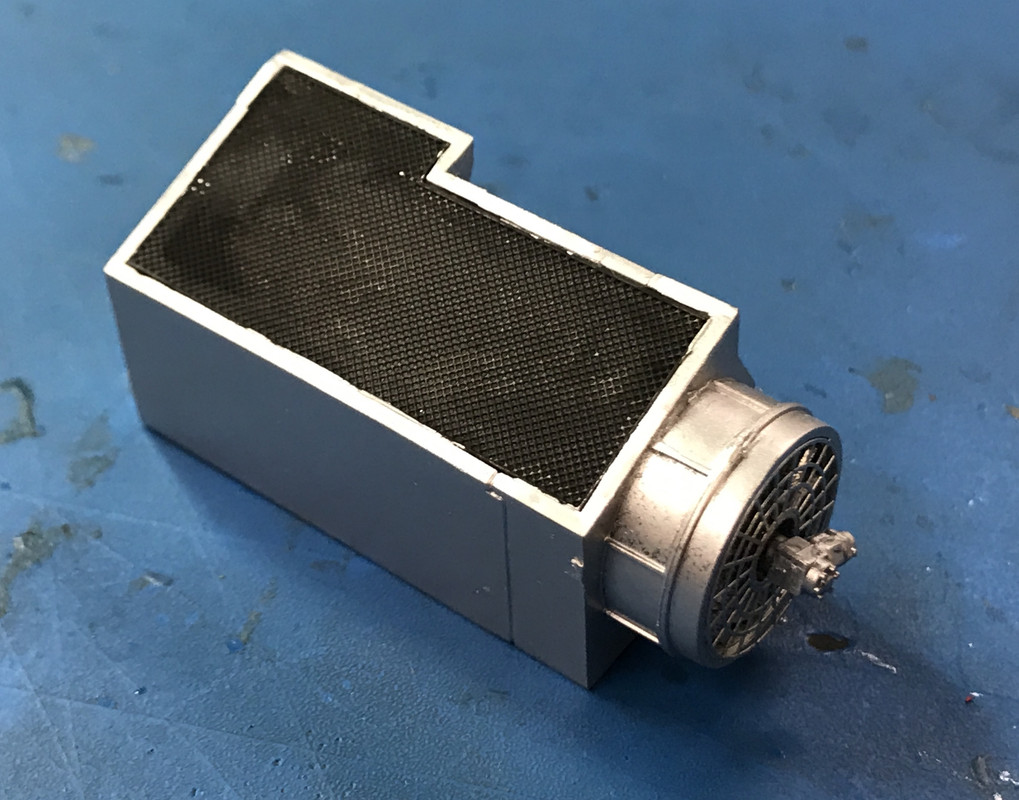
The A/C comes out of the black box you added to the underside of the roof.  It and the two external A/C compressors on the rear are only added in extreme environments like Iraq.  They are not standard equipment on Bradleys.

Good job on the working props for the engine access hatch.  It is all coming along great.

Gino P. Quintiliani - Field Artillery - The KING of BATTLE!!!

Check out my Gallery: https://app.photobucket.com/u/HeavyArty

"People sleep peaceably in their beds at night only because rough men stand ready to do violence on their behalf." -- George Orwell

  • Member since
    March 2012
  • From: Louisville, KY
Posted by Builder 2010 on Wednesday, March 3, 2021 6:13 PM

My goal in life is to inspire others. If I've done that for you, then my job is done.

First up today was putting Bare Metal Foil (Brushed Aluminum) on the ducting? that encircles the turret foundation. I think it's air conditioning ducting, but I'm not sure. It's clearly bright metallic in the real thing. It could also be a cable bundle with an insulating wrapper.

I close to not glue this in since it's held firmly with the turret bulkhead that goes on top. In addition to the duct, I installed the bulkhead that sits on the sponson behind the seats and made a soldeer wire pipe to replace the one that was not behaving well. The fire bottle sit on this as well and I used the Molotow Chrome Pen to do the metal straps that hold the bottles in place.

The front bulkhead joint was coming loose when the glue was drying so I used a gravity clamp to hold it until it was secure. I used the waiting time to get some lunch.

The last part to go on the hull bottom was the back bulkhead. I applied the liquid cement on the back of the seams, but it quickly wicked through to my fingers on the front side and made some glue mess. I let it dry thoroughly and sanded it a bit, but most of it will be hidden under the substantial air conditioning units that flank the rear hatch.

The instructions now call for work to start on the hull top, the cabin roof to be exact. I glued on the required armor panels and then painted the entire underside with sea foam. The plastic simulated hydraulic lift springs left something to be desired. For one, one piston shaft had been deformed and was fix'n to break off. The other was they were fixed, so you either had the engine hatch open or closed, but not operable. I want to make it work so I needed real piston shafts. This image shows the routine. 

At first I was going to make them entirely out of brass including a trunion. I drilled 0.022" with a micro-carbide drill and successfully got it to cross through the hole and drill the other side without breaking the bit. It wasn't exactly square. And I wanted to open it up for a 0.032". That didn't work. As soon as the 0.032" carbide bit got to the middle in bound up and broke. I solder a piece of 0.022" phos-bronze but still had the challenge of redrilling the cylinder bore to pass the piston rod. 

I went to plan B, removing the piston rod, drilling the plastic for a piece of Phos-bronze and fashioning a movable metal piston shaft and it worked. I made the shaped end with a filed blob of solder.

I glued on the various armor panels on the roof and then resprayed a coat of sea foam. I then added more stuff including the lights, fire extinguishers. These steps also include adding the digital readout screens and there's nice decals that show something on these screens.

I temporarily put the top on the bottom and took a picture through the open hatch to show what the screen looks like in the vehicle. I used Microscale MicroSol and MicroSet to get the screen decal to settle in nicely into the retangular recess in which is it supposed to fit.

And that was the end of today's session.

  • Member since
    June 2018
  • From: Ohio (USA)
Posted by DRUMS01 on Tuesday, March 2, 2021 6:47 PM

That is building up really nice and really brings back some memories. I did not have much time in one, but the little I had tells me this is nearly spot on. 

Kudo's to your attention to detail and abilities. And great recovery from the black hole part as well.

Watching you put this together may influence me in getting one too.

Keep up the great work!

Ben


"Everyones the normal until you get to know them" (Unknown)

LAST COMPLETED:

1/35 Churchill Mk IV AVRE with bridge - DONE

NEXT PROJECT:

1/35 CH-54A Tarhe Helicopter


  • Member since
    March 2012
  • From: Louisville, KY
Posted by Builder 2010 on Tuesday, March 2, 2021 5:23 PM

Thanks for your support!

The seats are molded as you see. All I did was brush paint Tamiya Khaki directly from the bottle. It has some slight refectance and the actual seats do to, so I didn't dullcoat it.

So black... sea foam... seems like both were used. I'm now sticking with black since I've already repainted once. Short session today so all I got done was to scratch-build that box that has NOT re-appeared from quantum dimension. Simple little thing. I also built the bulkhead that goes adjacent to the turret wall. I will install that tomorrow along with redoing a pipe that broke off from an undescribed piece of plumbing that goes into that bulkhead. I will use fine-gauge solder wire. 

After painting I put the turret wall into place for the pic, but it can't be glued in until the ducting goes in underneath and the bulkhead gets glued in.

  • Member since
    December 2002
  • From: Valrico, FL
Posted by HeavyArty on Tuesday, March 2, 2021 3:51 PM

It looks like he painted the kit parts as they come in the box.  As I said, Meng did a great job on their Bradleys.  They are super-detailed and look great when done well as he is doing.

Builder 2010
I changed the coloration in the driver's compartment and added the decals. I found that good interior picture and it shows the entire steering column and wheel are black

Meng isn't totally wrong on the color for the steering yoke and shaft parts.  It is also seen in seafoam green.  An older model in the first pic.   


Newer M2A3s have them too, note the newer black gear-shifter box in the second (slightly blurry) pic.

The Bradley has been around since the early '80s and has gone through a bunch of different upgrades.  There are many different variations seen across the current fleet.

Gino P. Quintiliani - Field Artillery - The KING of BATTLE!!!

Check out my Gallery: https://app.photobucket.com/u/HeavyArty

"People sleep peaceably in their beds at night only because rough men stand ready to do violence on their behalf." -- George Orwell

  • Member since
    December 2002
  • From: Fort Knox
Posted by Rob Gronovius on Tuesday, March 2, 2021 12:45 PM

The troop seat cushions look really well done; are they like that in the kit or did you do something extra to them?

Still a very well done build.

  • Member since
    December 2002
  • From: Valrico, FL
Posted by HeavyArty on Tuesday, March 2, 2021 8:24 AM

It is coming together nicely.  The Meng kit goes together really well.  I like them a lot.  I just may have to do another Bradley after watching your build.

Gino P. Quintiliani - Field Artillery - The KING of BATTLE!!!

Check out my Gallery: https://app.photobucket.com/u/HeavyArty

"People sleep peaceably in their beds at night only because rough men stand ready to do violence on their behalf." -- George Orwell

  • Member since
    March 2012
  • From: Louisville, KY
Posted by Builder 2010 on Monday, March 1, 2021 6:04 PM

Thanks for that. I suspected that there could be one in that space to the right of the turret since there was nothing going in there. And under the turret also makes sense since the turret floor is elevated so much.

I changed the coloration in the driver's compartment and added the decals. I found that good interior picture and it shows the entire steering column and wheel are black as is the entire gear shift box. Meng decals work very nicely, don't take too long to release from backing and have very tight margins as can be seen by how the large spec decal fit around the panel clamps. They were actually notched there so no decal softener was needed.

The other trans coolant line went on followed by the first of the steering clutch and shift linkage on the trans. The transcooler is a tubed heat exchanger that uses engine coolant to transfer heat from the trans fluid. I suspect it cools the trans first and then goes into the engine after leaving the radiator. Also glued the air handler in place.

I got the passenger seats in place after putting in some piece of plumbing that goes between the turret and sponson on the right side sponson wall.

Last thing I did was start assembling the outer turret walls. I was attempting to glue a pipe to a box that then goes onto the turret wall, and had pulled up my blue "parts catcher" but didn't use the clothes pin to connect it to my shirt, and the darn part popped up and slipped right through the gap between the catcher and my shirt and then disappeared. I spent 10 minutes trying to find it, but didn't. I even took a powerful LED work light, held it on the floor at a very low angle to highlight every piece of dust and detritus on the floor, but the part was not there. I'll make another tomorrow and then I'm sure it will come out of the dimensional rift and show up right under my nose.

  • Member since
    December 2002
  • From: Valrico, FL
Posted by HeavyArty on Monday, March 1, 2021 10:47 AM

The fuel cells  were not modeled by Meng (or any other company or AM outfit). There are two; one located behind the air cleaner on the right sponson and one under the turret. They are connected by a tube at the left front of the upper one.

Here is how another modeler (not me) at Armorama depicted them.  He intended to make a maintenance shop dio and leave the turret out and the upper engine panel removed to show off the interior parts. I don't know if he ever finished it as he didn't post any further shots of it.

The actual fuel cells are a sandy/tan colored plastic.

The external fuel filler cap is located under the hinged hatch with a handle to the right of the turret on top of the hull side, just behind the large intake vent screen.  Centered in the below pic.


Gino P. Quintiliani - Field Artillery - The KING of BATTLE!!!

Check out my Gallery: https://app.photobucket.com/u/HeavyArty

"People sleep peaceably in their beds at night only because rough men stand ready to do violence on their behalf." -- George Orwell

  • Member since
    March 2012
  • From: Louisville, KY
Posted by Builder 2010 on Monday, March 1, 2021 9:55 AM

Nice work! It's amazing what can be built on the Bradley chassis. I have a question. 

The Bradley has a 155 gallon fuel tank. On the model, "Where is it?" The big box with the fan is the filtration system I believe. There are no other big shapes on the sponsons that could be a tank. On the Sherman, the two fuel tanks were big and obvious flanking the engine on each sponson. But the Bradley model doesn't seen to have on. What am I missing?

Here's the Sherman's fuel tanks. Very obvious. So where does the Bradley keep its 155 gallons?

  • Member since
    December 2002
  • From: Valrico, FL
Posted by HeavyArty on Saturday, February 27, 2021 8:28 AM

Looking great.  The engine came out really nice.  It is a very good representation.  I used the Meng engine/tranny in an MLRS I built a few months ago.

More here: https://armorama.kitmaker.net/modules.php?op=modload&name=SquawkBox&file=index&req=viewtopic&topic_id=288015&page=1


Gino P. Quintiliani - Field Artillery - The KING of BATTLE!!!

Check out my Gallery: https://app.photobucket.com/u/HeavyArty

"People sleep peaceably in their beds at night only because rough men stand ready to do violence on their behalf." -- George Orwell

  • Member since
    March 2012
  • From: Louisville, KY
Posted by Builder 2010 on Friday, February 26, 2021 9:00 PM

Heavy Arty, the reference photos were GREAT! I didn't post last night so y'all in for a bunch tonight. BTW: I wasn't going to mess with the levers, but did. And furthermore, I wasn't going to mess with the gear shift, but when I broke of the kit's, I didn't have a choice and happy I did.

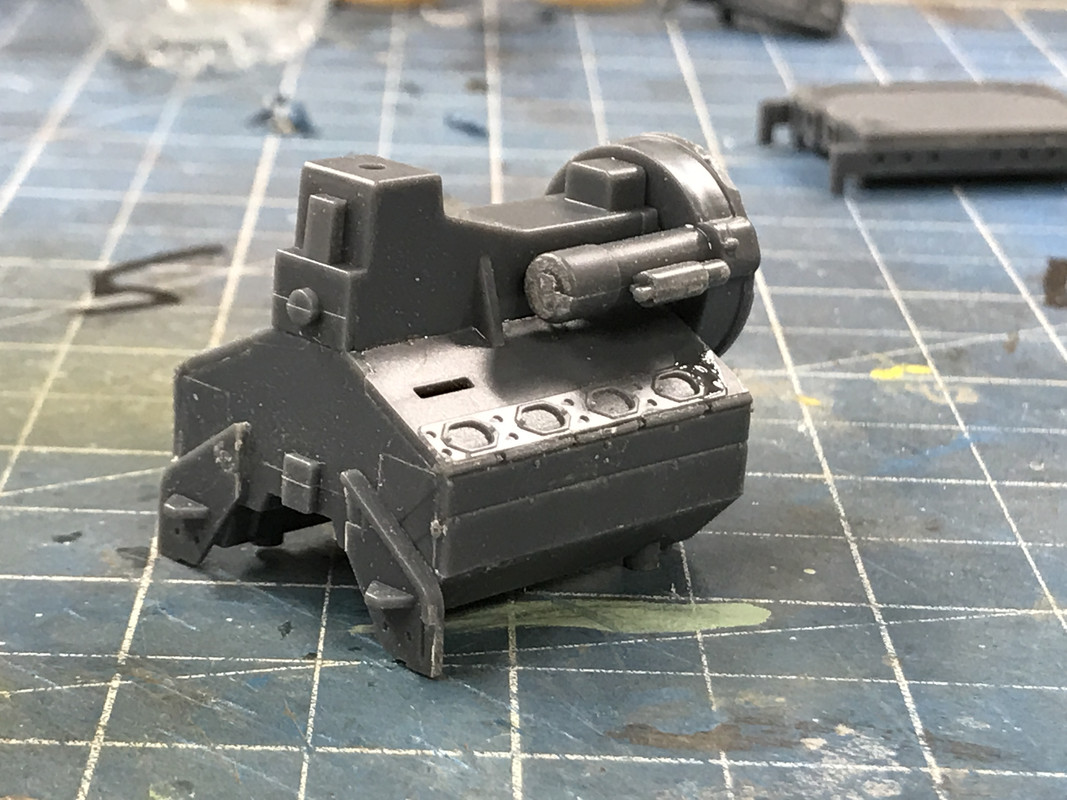
Yesterday was mostly Power Pack day. I built the engine, hydrodynamic trans and started working on the driver's compartment. After looking for about an hour to find good pictures of the Cummins VTA930 turbo diesel, I ended up doing what the kit suggested and airbrushed it all gun metal. When pulled for maintenance, the engine is all sorts of colors, but you can't see the darn thing so any time I spent on this detail is going to go unnoticed. 

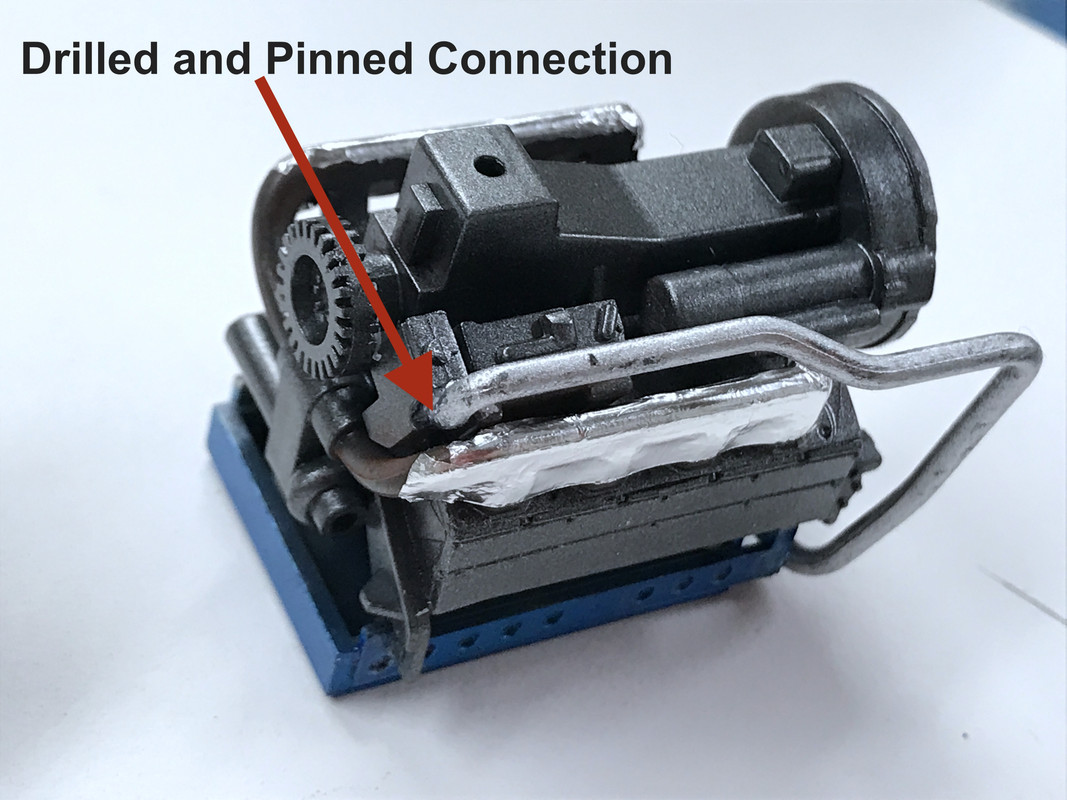
Here is the assembled engine. The Cummins engine is a modern design and therefore has streamlined shapes, very little visible piping and is clean.
Pictures I found, in addition to showing the typical heat-rust appearance of the exhaust headers, also show a heat shield on the outside. So of course, I had to add them.

The headers go into the bottom of the turbo manifold. The turbo seems a little smalll and insignificant compared to pictures of the engine, but I'm sure that Meng got it right.
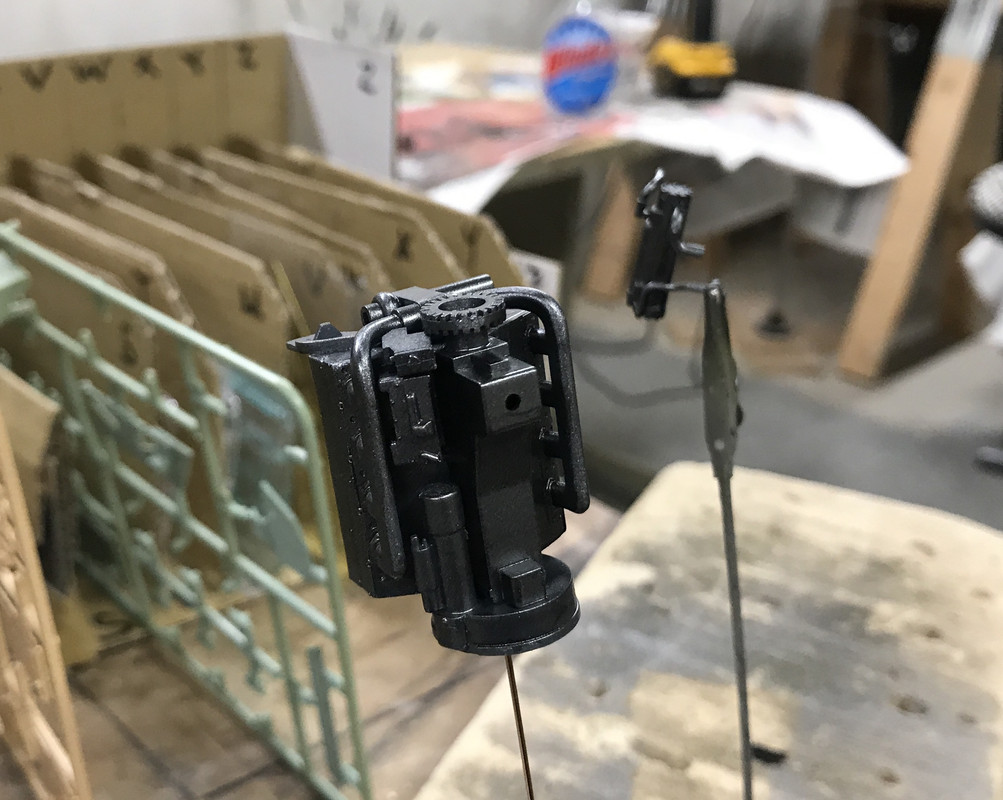
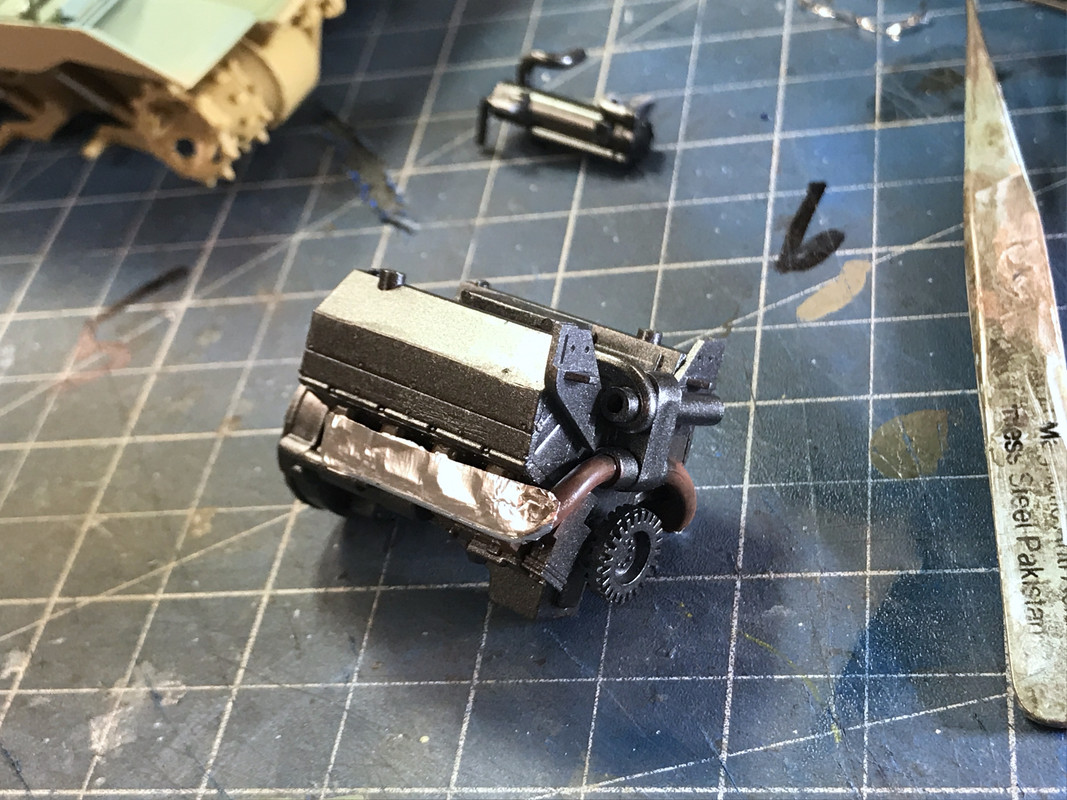
After the gun metal dried I overpainted the headers Dark Iron and then add rust pastels to give it that "used header" look. After that I add some Bare Metal Foil brushed aluminum for the heat shields. Too bad you won't see this either unless I build the model with the upper half removable like I did with the Sherman.
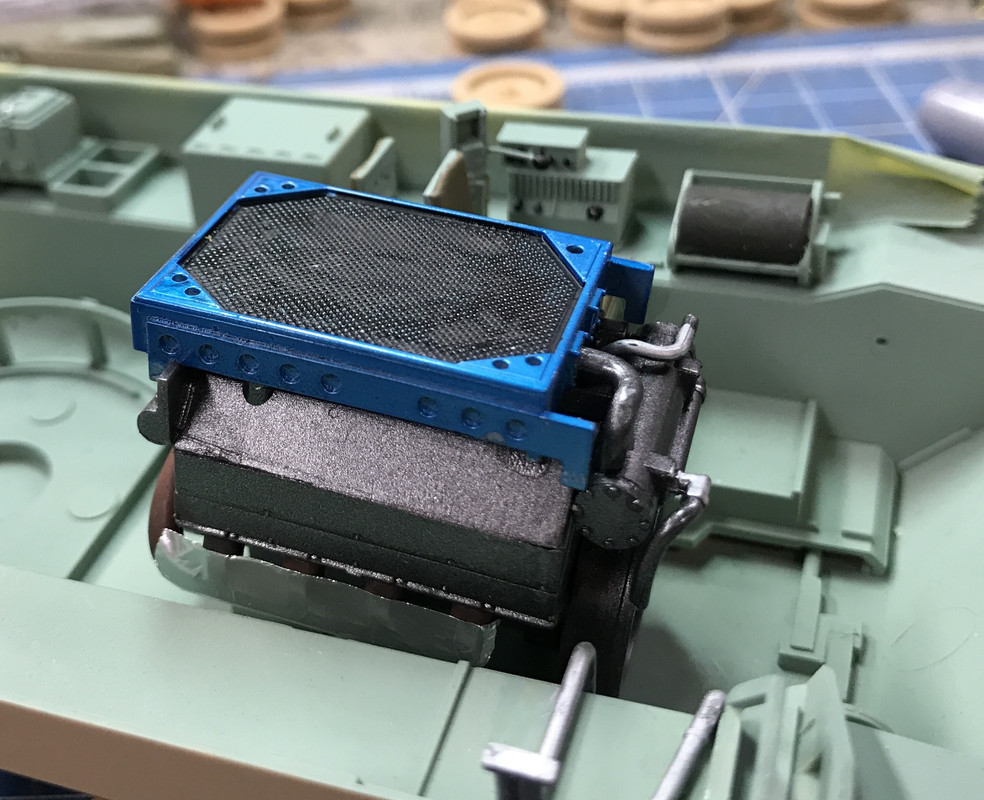
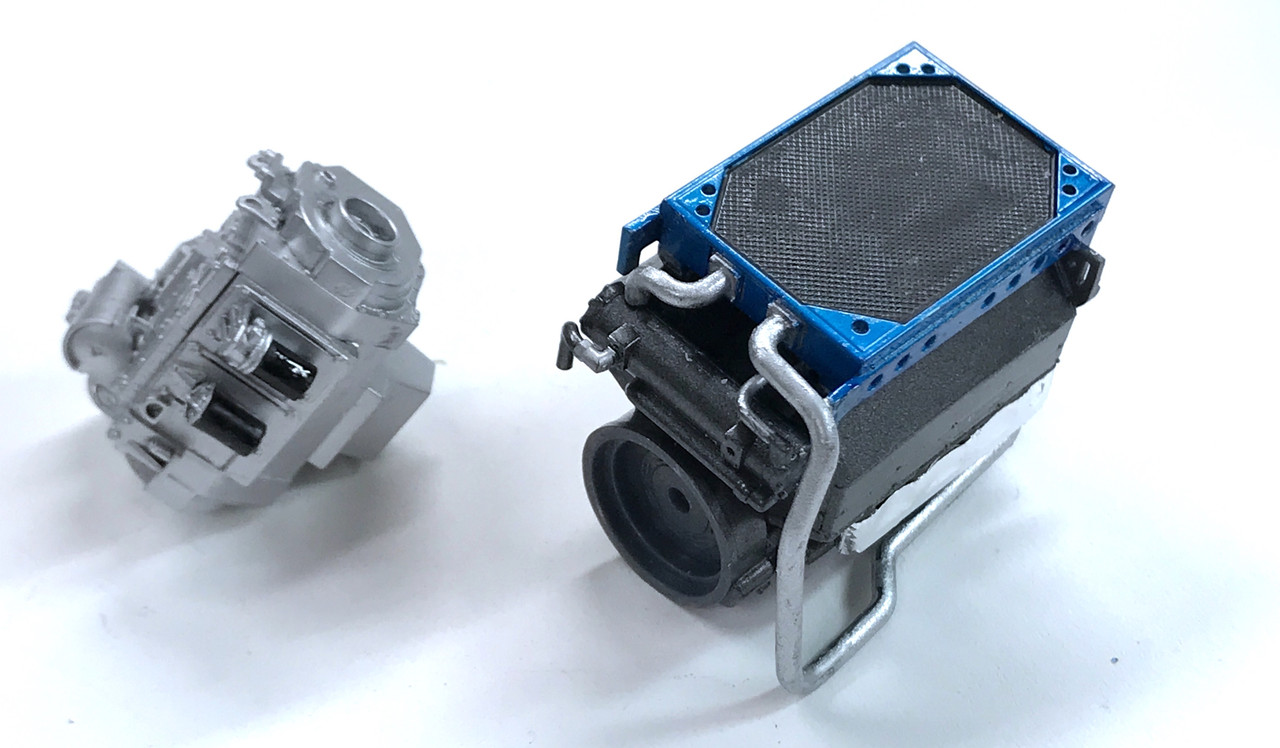
The radiator sits on to of the engine. The intructions call out "Blue" as the radiator frame color. Again, the reference photos were very ambiguous regarding this component, so I took some artistic license. I decided the frame would be blue anodized aluminum. In other words, silver overcoated with Tamiya transparent blue. You do see the end of the radiator from the open engine hatch. The radiator core is flat black and is up against the roof so you'll never see that either other than in my photos.

The silver was Tamiya rattle can silver and the blue was airbrushed.
There's another large coolant pipe that runs from a heat exchanger to the water pump inlet on the block's lower side. The pipe has some springiness and made gluing it difficult so I immediately decided to drill 0.032" and pin it with some phos-bronze and medium CA. It won't come loose.
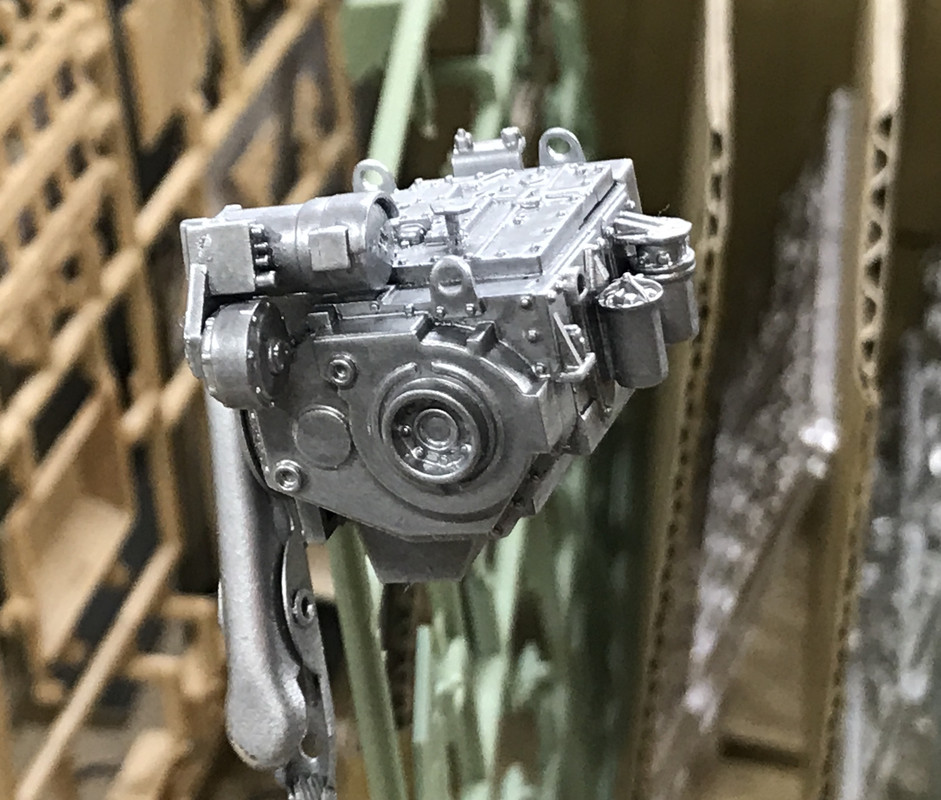
The GM-Allison Hydrodynamic Transmission was a simple glue-all-the-pieces together job which I again rattle canned with the Tamiya Silver. 
So the power pack is done and ready for install.
The tank has a huge air cleaner, bigger than the engine. The Bradley is extensively used in desert service and turbo-diesels don't like dirty air. In front of the what-looks-like hydraulic motor driven fan is the first piece of photo-etch on the model.
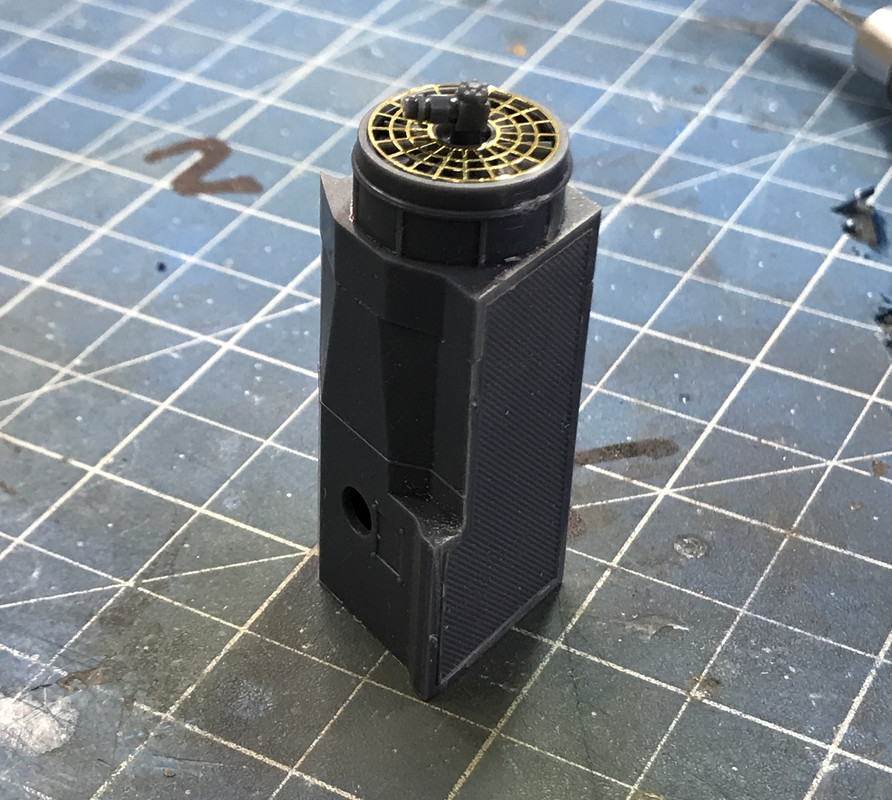
Again, I painted it like I did with the trans. The filter's intake was painted flat black and it too will be invisible to the naked eye.
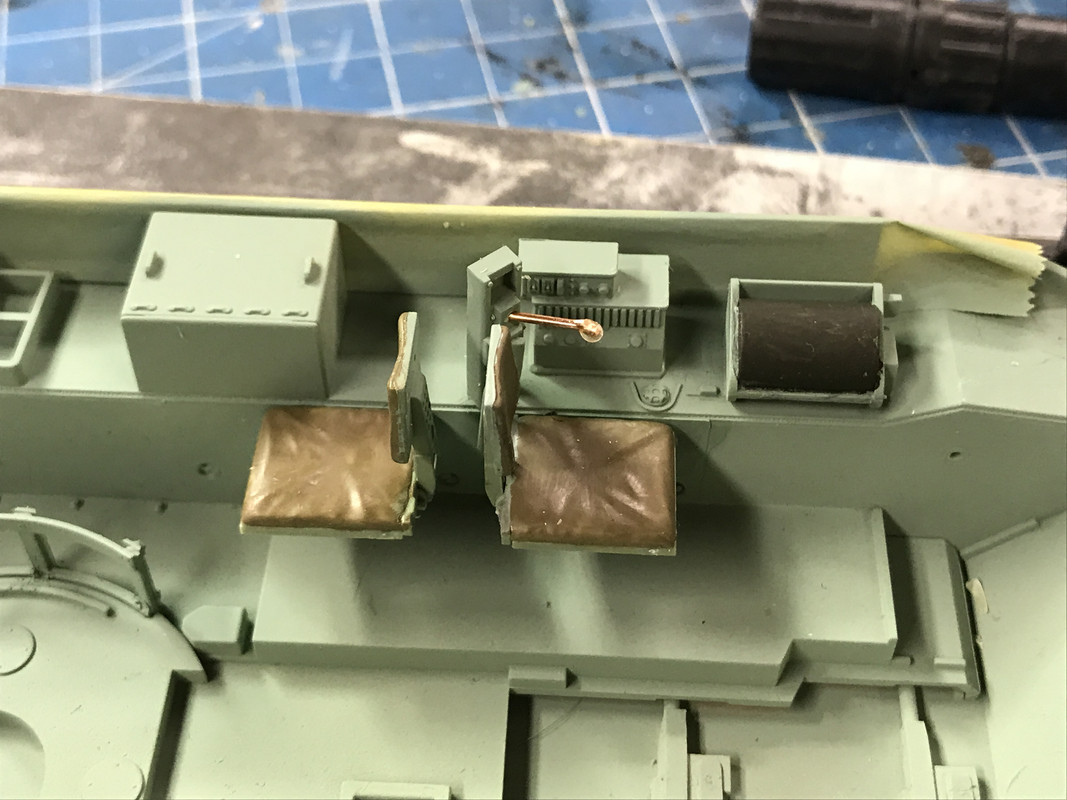
Today concentrated on the Driver's compartment and installation of the power pack. Since Heavy Arty pointed out that the model was missing the driver's seat adjusting lever I decided to add one. My first attempt got two things wrong: I put it in the wrong spot and made it out of too-heavy stock. So I filled that hole, drill another in correct location and redid the lever with thinner 0.022" stock.

Here was the wrong way,
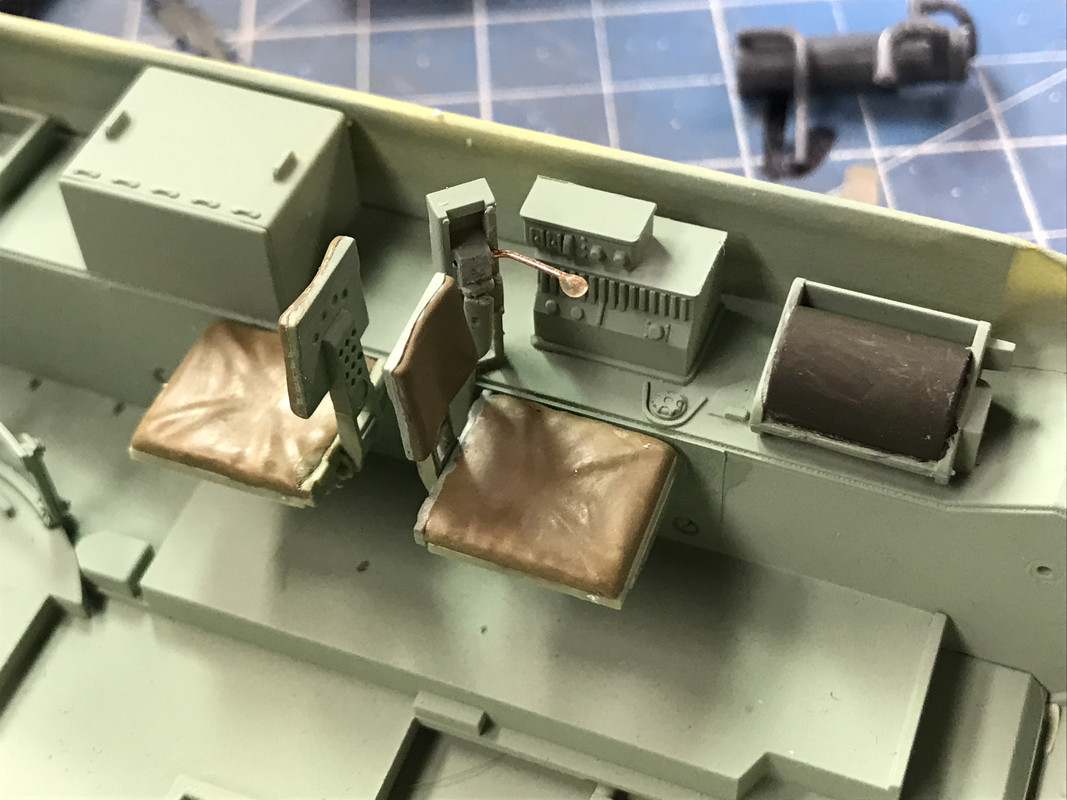
After spending a lot of time to find an image of the real tank that showed this lever, I built the corrected version. I used UV-Cure Bondic to form the handle ball.
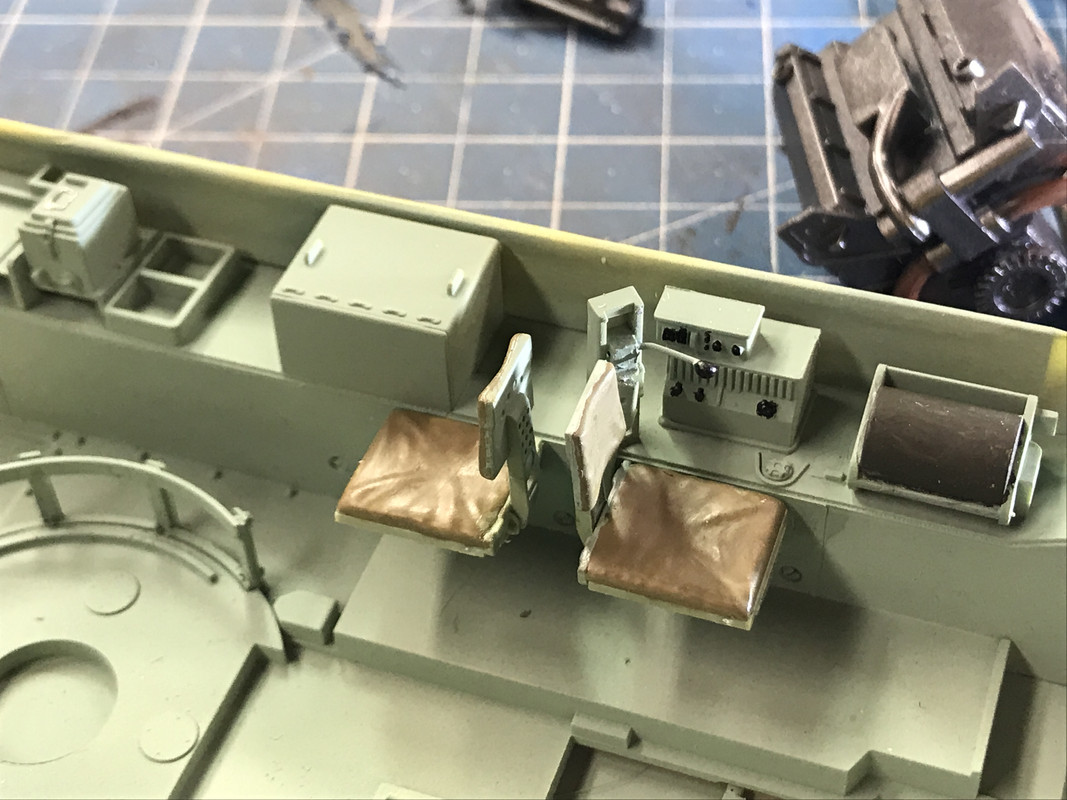
And here it is painted.
From the same set of Heavy Arty images that showed me the seat lever, I also saw what he did with the shift lever. The kit's impression of same is weak in appearance. It also turns out that it was weak in strength as well. I wasn't going to mess with this detail, until I broke off the kit's lever. So I built it back better. I removed the surface of the shifter plate and fabbed a piece of thin styrene and another phos-bronze lever. This time I used the thicker 0.032" stock which looked okay in this instance. 
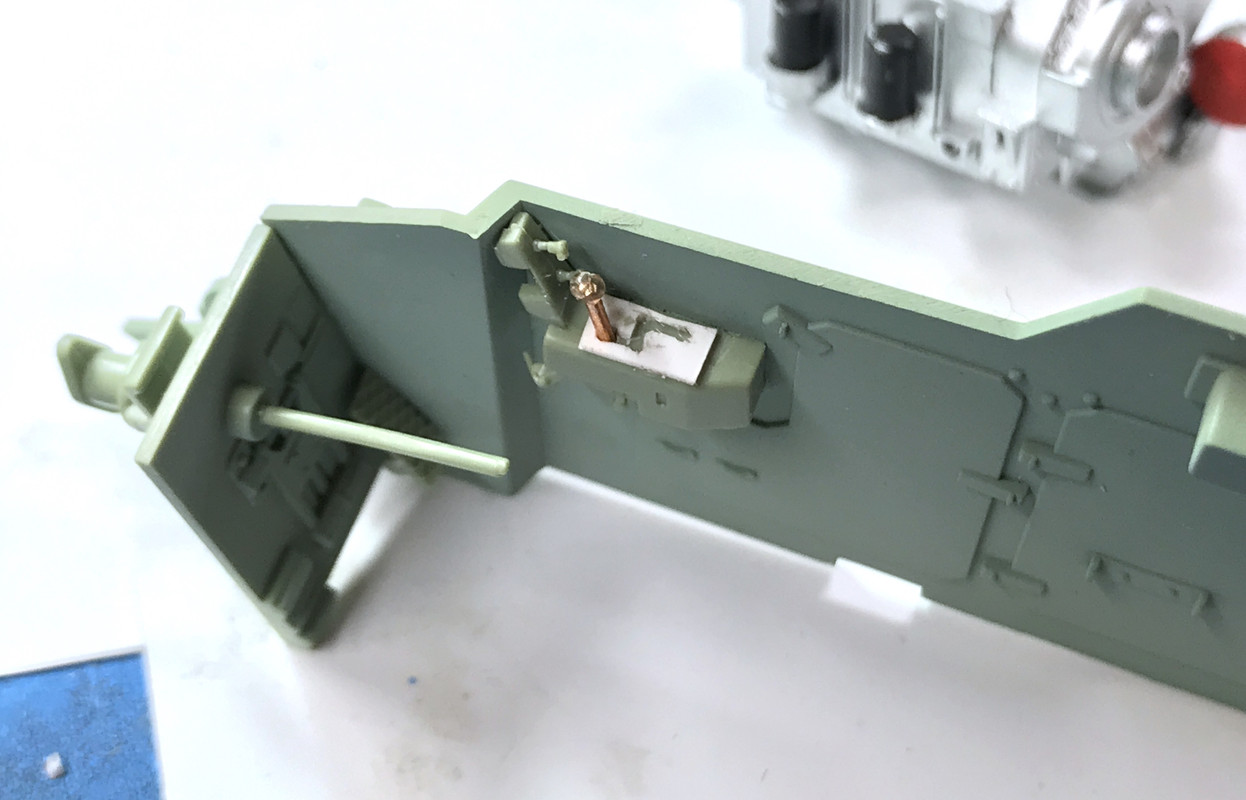
Here's the compartment with the lever painted. I also used some panel accent to dirty up the access panel seams. I painted all the doodads on the control panel, added the steering handles and did some more accenting on the controls on the left side of the panel. This was all after gluing the bulkhead into the vehicle.

And here's the actual driver's compartment and my lever isn't actually rights. The real lever is stamped out of sheet metal and the knob's not exactly round. The entire wheel is black as is the gear control box. There are decals that need to go on. I may or may not fix this discrepency. Talk me off the ledge... The kit called out many of these details as interior green.
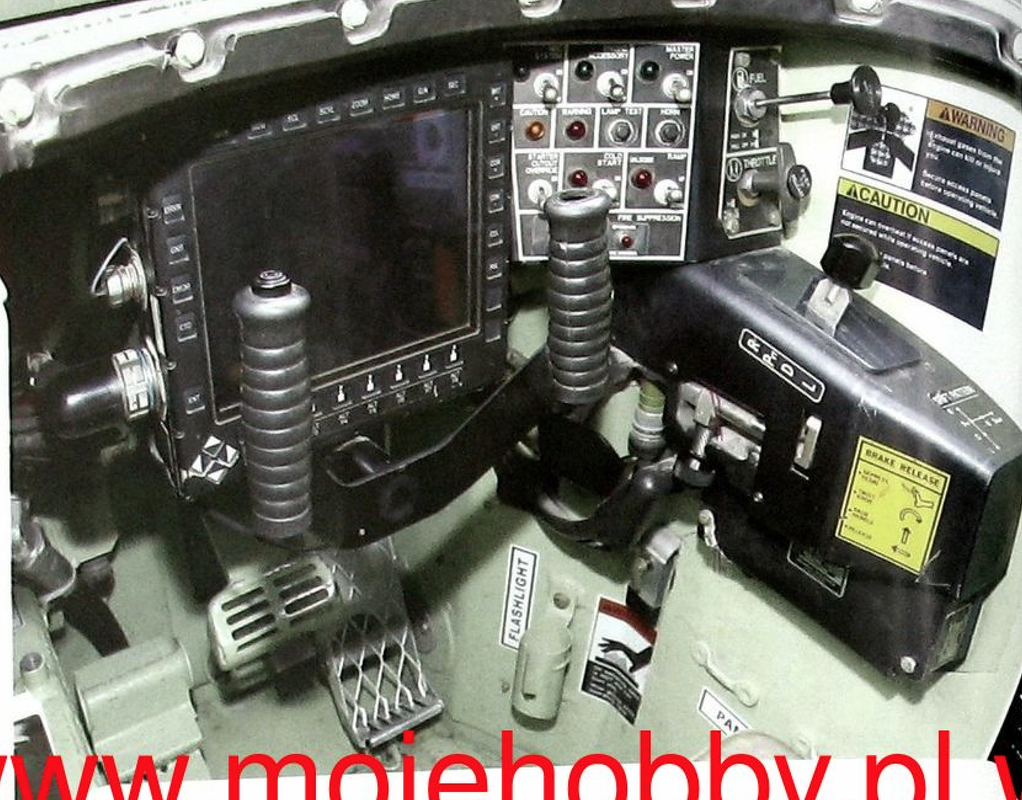
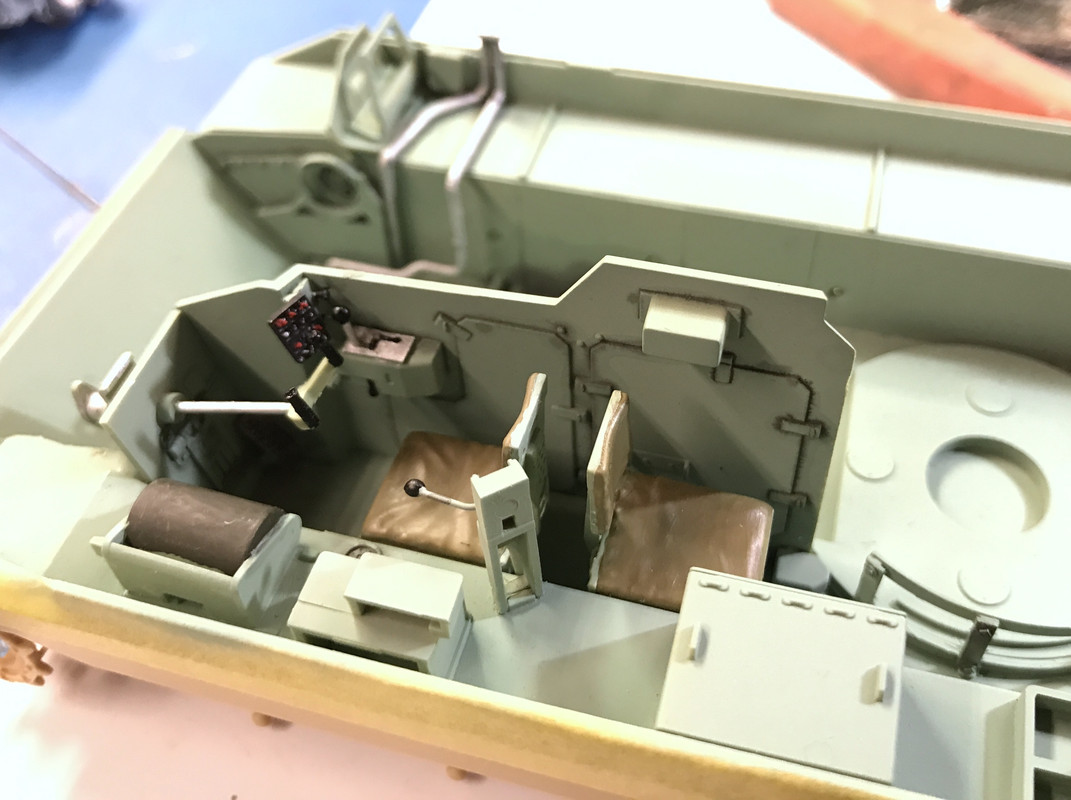
Reverse view,
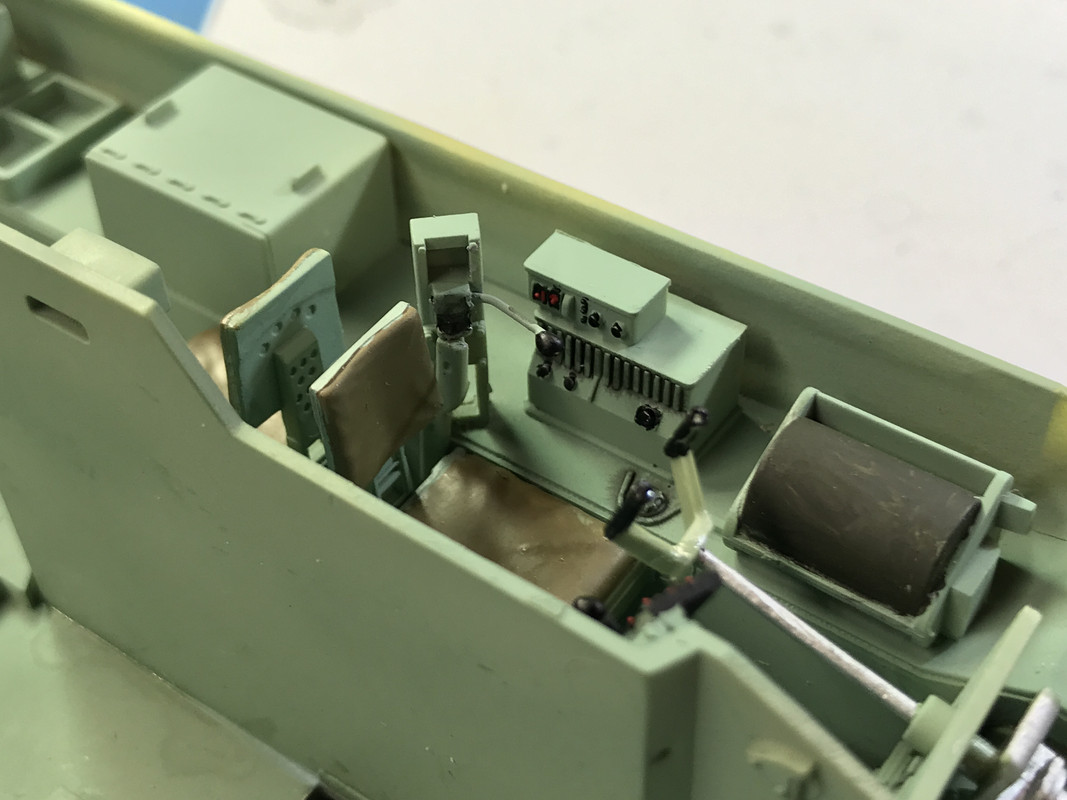
With this critical bulkhead in place it was time to glue in the engine and transmission. The engine glues into single point at the bottom of the oil pan. I'm surprised the kit didn't actually model the motor mounts that a real engine would require. The Rye Field Sherman had very detailed engine mounts.

The front of the engine engages a shaft that comes out of the transmission and this sets the engines fore and aft angle. You really need to glue both engine and trans in at the same time since they do interact. I put a weight on the engine to ensure that it was seated well in the square, fenced-in recess in the floor pan.
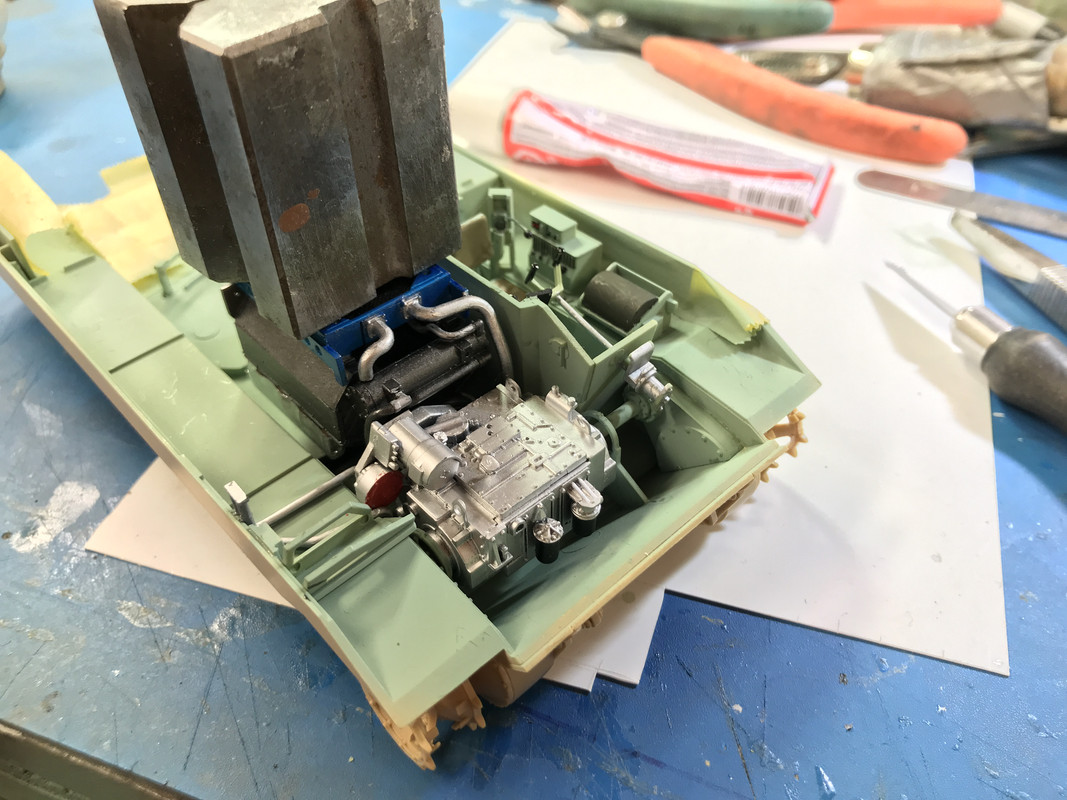
I left the job today with the engine and trans fully installed. The tank can now move under it's own power. It must be a hoot to drive one of these babies. They have lots of horsepower (600+), automatic transmission and a 'normal' acting steering wheel instead of pulling levers.
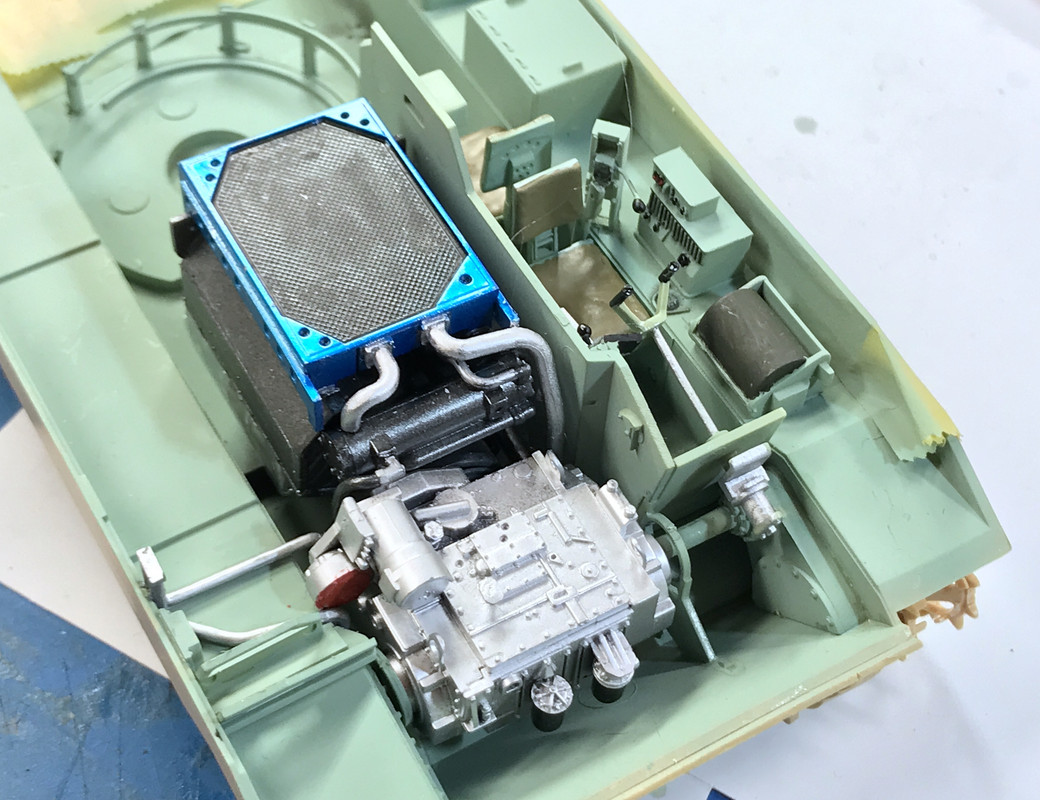
Oil filters are easy to change... There are some more links that get attached to the trans from the steering mechanism.

Have a great weekend!

  • Member since
    December 2002
  • From: Valrico, FL
Posted by HeavyArty on Wednesday, February 24, 2021 7:38 PM

Looking great so far.  One pointer that is an easy fix and adds a bit more detail.  Meng missed the lever to adjust the height of the driver's seat.  Tamiya got it right over 30 years ago on their M2.  You can see where I added it on my M2A2 backdate of the Meng kit below.

More here: https://armorama.kitmaker.net/modules.php?op=modload&name=SquawkBox&file=index&req=viewtopic&topic_id=241594

Gino P. Quintiliani - Field Artillery - The KING of BATTLE!!!

Check out my Gallery: https://app.photobucket.com/u/HeavyArty

"People sleep peaceably in their beds at night only because rough men stand ready to do violence on their behalf." -- George Orwell

  • Member since
    March 2012
  • From: Louisville, KY
Posted by Builder 2010 on Wednesday, February 24, 2021 6:11 PM

Thanks... I mixed enough so I probably won't run out before the interior is done.

Started today adding two little decals on the ramp actuator box and lever. I also painted the floor pad a neutral gray. That surface on the real vehicle is rubber, not steel. Weathering it will not be to make bare metal show through. It will simply be to make it more grimy. It's designed to be lifted to get to stuff below it.

In one of my references another modeler super-detailed the lower turret cage. There are some bolt details and the verticals were too understated. I spent some time adding some  detail to this using custom cut 0.015" strip styrene and some Tichy Train Group scale bolt details. I didn't do as nice a job as the fellow I was copying. It does, however, add some more interest.

Work progressed on the left side sponson details. There are various shapes that get glued in place. Since I had already painted the gluing surface, I scraped off the paint so the glue worked better. There are some operating things included that will need knobs and gadgets picked out with color. I need to find some images of some this stuff to know if there's anything particular I need to pay attention to.

The instructions called for assembling the seats at this time. The driver and backward facing passenger seat are assembled and installed, the others are built and set aside. The seats consist of lower frame, seat and back. The lower frames sit in positively located holes, but I found the seat was moving all over the place as I was trying to place the frame, so I curled some Tamiya tape and secured it to the bench. It still moved a little, but was much more controlled. I had airbrushed the sea foam on the frames while on the sprue.

I let the frames set up before attempting to glue on the backs. The backs also had positive engagement, and they too required some time to set up since it was a delicate joint. Here are the passenger seats assembled.

Seat cushions are called out as Khaki. I first pre-coated the seats with Dullcoat by brush to seal the Tamiya sea foam. Experience tells me that using another Tamiya color over the seat would dissolve the bottom coat and mix the colors. Sealing it stops that completely. I did the same thing on the rubber floor pan. The Khaki, for some reason is drying kind of glossy.

The driver and backward seats can get glued in now, but the rest wait until the interior is almost complete.

I'll probably dullcoat the seats and maybe weather them a bit.

The engine assembly is next and I got the block assembled before my work time was up. Wasn't very clean with the glue. The engine will be completely obscured when installed in the vehicle and it will be painted so most of my slop will not detract from the build.

This Cummins Diesel is a very clean design. Everything is buttoned up and there's very little plumbing to be seen on the exterior. And again, it will be buried. The radiator sits directly above it (that was also assembled today) and the air inlet boxes and filters flank it. The large transmission sits in front of the diesel and it's what you see when the "hood" is open.

  • Member since
    December 2002
  • From: Valrico, FL
Posted by HeavyArty on Tuesday, February 23, 2021 7:09 PM

The Seafoam Green looks good to me.

Gino P. Quintiliani - Field Artillery - The KING of BATTLE!!!

Check out my Gallery: https://app.photobucket.com/u/HeavyArty

"People sleep peaceably in their beds at night only because rough men stand ready to do violence on their behalf." -- George Orwell

  • Member since
    March 2012
  • From: Louisville, KY
Posted by Builder 2010 on Tuesday, February 23, 2021 5:57 PM

I am familiar with sea foam green. Although I wasn't in the service, I did spend a lot of time on FMC M113 APCs. During my college summers I worked for American Electronic Labs (AEL). I was a mechanical technician. AEL made sophisticated electronic countermeansures and jamming equipment. In 1964 they got an Army contract to install comprehensive EM and jamming equipment into 15 modified M113s. 15 brand new M113s came to AELs plant directly from FMC. Unfortunately, these were standard APCs equipped for battle. They even came packed with the 50 cal browning. Before work could proceed, the entire vehicle had to be gutted. Commander's cupola, all personnel equipment and seating, even the little welded-on-rings all over the walls for personnel equipment stowage had to be removed. To remove the rings we had to attack the vehicle with air chisels. 

Being a newbie I was tagged to go inside and remove these welded items. It was summer, it was hot and the chisel was incredibly noisy. The entire welded aluminum vehicle would ring like a bell. It was like banging on the bells of Notre Dame from the inside. I did it for a few minutes, went to my supervisor and told him it was intolerable and at least I needed ear muffs to reduce the noise. As it were, he was a terrific person and said it wasn't a job for a mech tech and they brought in some temp workers from Manpower who spent the rest of the summer stripping out those tanks. It was an awful job and I had a lot of sympathy for those guys.

But there was also a bright side. The tanks were not preserved. They needed to be driven every month. AEL built a test track in their back lot where the APCs would be run around AND I GOT TO DRIVE THEM TOO. It was extremely cool.

The finished products were spectacular. There were racks and racks of transmitters. The roofs were festooned with all kinds of antennas. They were shipped out two years later and were on time and on budget. I worked at AEL from the freshman/sophomore summer to the one following graduations in 1968. When I returned the last summer, all the tanks were back!

Apparently, they were so comprehensive and complex the ARMY couldn't train operators in the 10 week training cycle. AEL received another contract to disassemble them and put them back into stock condition, although that wasn't really possible. As it was, none of the apparatus went to waste. It was all re-purposed for smaller and more specialized jamming systems that would be in utility boxes on back of Jeeps and light trucks.

So I spent a lot of time with sea foam green. And as a result, I took Tamiya Sky and added a little bit of Tamiya Flat Blue. I felt that the Sky is a little too green. Here's what my version of sea foam looks like. The steps I did today were to start laying in the interior with the floor and some of the Inner side armor. I realized that I had to start laying down some interior green now or I would get jammed up later. The cooling pipes were painted with the a Sharpie Silver Marker. It gives you a lot of control.

Here's an interior shot of a real one for color comparison. To my eyes it's pretty close. This vehicle shows steering levers. This vehicle looks like an M113 since there's now turret. This is the vehicle I talked about in the first paragraphs. It has steering levers not a yoke like the Bradleys have. But sea foam is still sea foam. These were powered by Detroit Diesel engines.


I also used a Sharpie gold marker to highlight the "brass" armor fasteners. It's called out in the instructions to paint them brass. The brass marker is much more precise (to me) than a brush since the quantity of color is very consistent on the tip.

The rear gate accuator is contained in a little box and is movable, and also loseable. The box covering it is open at the front and the movable part can fall out. It did, but I found it. I now have a piece of tape covering the back so I don't lose it again until it gets connected to the door mechanism. Pardon the lousy focus. It was after putting in this detail, I decided to airbrush the sea foam green. Notice the ejection pin mark that I had to remove since it gets in the way of the armor panel that goes there. I removed all the other bumps too using a MicroMark chisel that I bought for just this purpose.

While I was waiting for the green to dry, I decided to make more sense of one of my paint drawers. I have quite a few bottles of custom-mixed or ready to spray bottles of paint that had the same threads as the Badger. I usually put a label on the side to i.d. them, but this week I opened up another drawer since my paint collection is growing. This drawer is lower than the others and I couldn't i.d. the color without picking each of them up. I labeled their lids so I can tell what they are from above. I'm in an organizing mood.

I reuse these bottles whenever I can. It takes some work to make them like new. I rinse them with IPA, then MEK and finally some time in the ultrasonic cleaner. One of these cleaned bottles is holding my sea foam mix. I'm going to use another for the exterior yellow that I'm going to mix.

  • Member since
    December 2002
  • From: Valrico, FL
Posted by HeavyArty on Tuesday, February 23, 2021 8:21 AM

Good job on fixing the slip-ups.  I usually don't leave the suspension workable, so would have just glued them up solid to the hull sides.

Builder 2010
Most of the interior is Sea Foam green. The model interior parts are molded in a lightish green, but it ain't seafoam. Research says that Tamiya Sky is a good match...

Tamiya Sky is good.  Another option (which I prefer) is by Krylon in a spray can called Pistachio.  It is an exact match for interior Seafoam Green.  It is what we used on actual vehicle interiors for touchups.

Gino P. Quintiliani - Field Artillery - The KING of BATTLE!!!

Check out my Gallery: https://app.photobucket.com/u/HeavyArty

"People sleep peaceably in their beds at night only because rough men stand ready to do violence on their behalf." -- George Orwell

  • Member since
    March 2012
  • From: Louisville, KY
Posted by Builder 2010 on Monday, February 22, 2021 10:09 PM

The left side suspension arms went on pretty sweetly. Can't say the same for the right. I always say, "It's not that you screw up, it's how you recover." This pertains to restaurants as well as model building. First thing that happened was I pushed off-axis to snap the shock piston rod onto the plastic lug and blew it off. So I had to recover by making a new lug out of 1/32" phos-bronze wire with a ball of solder on the end to simulate the flat end of the original plastic lug. I filed the ball flat so it wouldn't be obvious that it wasn't original.

I drilled a corresponding hole in the arm and CA'd the new lug in position. End result: problem #1 solved.

Then the second calamity happened. In trying to press the split pin on the piston head of the shock into the hole in hull, I broke off the piston head with the pin from the other half CA'd into the metal cylinder. This resulted in a very samll contact area for repair. First I tried to just glue it back on, but as I imagined, it didn't hold up at all. So it was back to drilling and pinning. This time I used 0.022" phos-bronze wire. I pre-located the drilled holes using a pointy end of a divider. Again, CA'd the pin and then glued the assembly into the hole in the hull since the split pin got a bit distressed also in the initial break. The arrow shows the now-fixed 2nd problem.

So given all that, all the suspension arms still work...whew!

The next steps had detailing the final drive in the front, adding lugs and clevises, and building and installing the return rollers. This step also had applying the drive sprocket, which I did, and installing all the road wheels, which I didn't. I'm going to paint all of them off the tank before installing. Since they just slip on with their poly-cap interiors, they can go on any time.

The clevises snap in and are movable, as are the drive sprockets.

Here are all the return rollers in place. The middle one gets painted with rubber tires.

Next up was to start with the interior. Most of the interior is Sea Foam green. The model interior parts are molded in a lightish green, but it ain't seafoam. Research says that Tamiya Sky is a good match and I'm going with it unless one of you faithful followers has a better suggestion. So I had to decide on what gets painted on the sprue and what should be painted as a subassembly or as the final assembly. The ceiling of the upper body needs to be interior color, but first I had to remove those pesky ejection pin things. I'm not sure what to call them, since they're not "marks". They're actually structures. The Rye Field Sherman has some instances of this also. I clipped them off and use my power micro sander to knock down the remainder. Most of the ejection pin marks were raised and could be removed by sanding instead of depressed which would require filling.

When I took the above I had already removed some of these structures.

And now I digress a bit...

I'm retired and all of my fun during Covid (like many of you I'm going to assume) is spent building cool things in the basement. I've been building kits since I was 8 so that's 67 years minus ages 16 to 19 when I discovered cars, guitars and girls. Since then, there's never been a time when model building didn't serve me well. In 1983, I was commuting from Philly to Houston every week from Sunday night to Friday Night and did this for 6 months while providing Management Training for ARCO Chemical's Texas manufacturing sites. I was staying in a not-so-hot room at the Holiday Inn on I-10 in Channelview, TX. It was kind of depressing, so what did I do. I brought a tin box on one of the early trips. The box contained some of my modeling supplies, and I bought and built two Tamiya 1/16 scale Formula 1 race cars. On Friday, before leaving I'd drop the box and the work in progress at the front desk and pick it up on Sunday night. Eventually, the staff would ask me to show my progress. This kept me sane and kept me out of trouble.

Again, in 1997, while working for Henkel, I was on a 7-week project at their Emory plant in Cincinnati. I had a nice apartment and would fly home on Friday and return on Monday. During the first week I found a great little train store and bought my first two craftsman kits for my yet-to-be-built model railroad. I then drove back to Cincy on the second week loaded with my modeling stuff including my airbrush and compressor. I had a suite including a nice dining table which became the modeling space. And again, it kept me sane and happy. Those buildings are on my current layout.

In Germany, when my wife returned to the USA for an extended visit with our daughter I started construction of the railroad that now sits in the basement of our Louisville house. Again, it kept me busy and out of trouble.

So I was thinking the other day about what is it about this hobby that so entices me and compels me to keep building things. I reckoned that it's the continous problem solving that model making requires. It's not just mindless busy work. You can't do it on auto pilot like one does when they're knitting. Even the simple steps require planning about things like "how to clip this particular part from the sprue to do the least damage?" What to paint it?" "How to paint it?" "When to paint it?" "Should I mask or free hand?" Should I wait until it's assembled to paint?" "Will I weather it and if so, how much?" "Am I building out of the box or am I changing something?" "Where will I get the reference material?" and on and on. And that's for a kit with decent instructions.

If you're doing a diorama, then you get into the next area; Scratch-building.

When you get into scratch-building, especially things which you've designed yourself, the level of problem solving and decision making goes up exponentially. You're working without a net. Now you have to build the entire thing in your head so you can preview areas that could cause trouble or prevent you from doing something much further down the line. My Hopper House project was like that. I had to figure out when to install the stair case and how to do that so I could get the rest of the building together around it. On my railroad, the last five out six projects were my own design. 

So in addition to the handwork and the satisfaction it brings, it the intellectual activity that really makes it fun and a life-long pursuit.

  • Member since
    March 2012
  • From: Louisville, KY
Posted by Builder 2010 on Monday, February 22, 2021 10:45 AM

I suspect that Meng found out that doubling the length of the arm to make it prototypical would have been a much-too-soft suspension. After all, the arm isn't high alloy steel like the original. On the Tamiya RC tanks they do use metal strips for the working torsion bar suspension. As it is, the Meng suspension is rather fragile.

  • Member since
    December 2002
  • From: Valrico, FL
Posted by HeavyArty on Sunday, February 21, 2021 7:23 PM

You're right, Meng's suspension is nice.  They go together well and look great when done.  Keep up the good work.

Builder 2010
I don't know if this is the prototypical connection point for the bars. I thought they connected to the wall on the opposite side. Does anyone know anything about the real machine's torsion bar setup?

You are correct.  On actual Bradleys the torsion bar goes all the way across the hull and bolts to the opposite side wall next to where the arm sticks out on that side.

Gino P. Quintiliani - Field Artillery - The KING of BATTLE!!!

Check out my Gallery: https://app.photobucket.com/u/HeavyArty

"People sleep peaceably in their beds at night only because rough men stand ready to do violence on their behalf." -- George Orwell

  • Member since
    March 2012
  • From: Louisville, KY
Posted by Builder 2010 on Sunday, February 21, 2021 3:50 PM

Those were great references! I copied many images for my reference file. I'm especially interested to see just how much weathering they undergo and it varies all over the map. I'm also interested in the actual color of the tracks. It's hard to pin down. If they are rusty, and they're in desert service, it's a very light tan/orange shade. 

Worked on a Saturday session. If any of you have followed any of my other builds, you'll know that my wife and I have an agreement. Since I'm retired and model building is my "full-time" occupation (what luck!), I must stop at 5:00 p.m. and no working on weekends unless I get a special "OK", which is what happened yesterday. We got our 2nd Covid shots yesterday, and her reaction was a low fever and conked out on the sofa, so working on stuff in my happy place was okay.

And work I did... although that's another area of contention. My wife insists that it's my hobby, and since she defines work as "something that someone else tells you to do and you get paid for it", what I'm doing can't be called "work." Okay... it's not work.

I got all the 12 sets of road wheels glued together with their captured polycaps. You can't get this step wrong since there are keys inside the hub that positively engage when you're gluing them together.

These all have to be painted before attaching.

The drive sprockets are 3-piece affairs: inner hub with teeth, outer hub and separate toothed ring. Again, there's a ky on the out hub to engage with the toothed ring so the inner and outer teeth are properly aligned. Two bad things happened: I inadvertantly cut off the alignment lug on the outer hub thinking it was a sprue nub, and both toothed rings fractured at the narrow point at the alignment lug notch. I thought it was how I was handling the parts when detaching them, but then realized that it was a molding flaw and I was NOT the cause.

This shows the outside of the sprocket where the now-repaired fracture occurred.

And here's a reverse view and you can see the alignment lug. You can see how thin the cross-section is at that point.

The torsion bar arms had a laminated piece that goes on. It's not functional... strictly cosmetic to give the arm some surface contours on the outside that couldn't be molded in one go.

There are four kinds of swing arms, 1, 2, 3, & 4 plus two kinds of shock absorber ends and shown in this instruction step.

To them all organized I marked the cutting mat with a fat Sharpie so I wouldn't get confused.

The shocks have the eye end that snaps over the lug sticking out of the swing arm. They seem like they're not going to fit, but when you put sufficient pressure straight on they reward you with a resounding "snap." The other end gets CA'd into the shock tube and has split lug that "supposed" to snap into a corresponding hole in the belly pan. It goes in, but doesn't snap since the pan's thickness is too great to permit the split to reopen on the other side. Therefore, they kept popping off and I had to glue them in. They don't have to really rotate very much to let the shock articulate.

By the time the session ended at 4:30 yesterday afternoon with the completion of all the suspension arms on the left side. They have square ends that key into a corresponding receptacle on the pan floor. I don't know if this is the prototypical connection point for the bars. I thought they connected to the wall on the opposite side. Does anyone know anything about the real machine's torsion bar setup? Seems like the shorter the bars the more severe their twisting action would have to be to do the job.

And here are all the completed arms.

This is my first Meng kit and so far I would say it's excellent. There is literally no flash. Ejection marks are minimal although there are some nasty ejection plug remains that needed to be removed on the front panel that went on at this time. I think it's going to be an enjoyable project.

  • Member since
    December 2002
  • From: Valrico, FL
Posted by HeavyArty on Saturday, February 20, 2021 12:57 PM

Rob Gronovius
I got the Orochi deluxe edition M3A3 (with the multimedia extras) in a trade.

Rob, the Orochi kit is pretty good.  It does have a few issues though.  You can check out my build review of it for some tips.  https://armorama.kitmaker.net/modules.php?op=modload&name=Reviews&file=index&req=showcontent&id=11172

Gino P. Quintiliani - Field Artillery - The KING of BATTLE!!!

Check out my Gallery: https://app.photobucket.com/u/HeavyArty

"People sleep peaceably in their beds at night only because rough men stand ready to do violence on their behalf." -- George Orwell

  • Member since
    December 2002
  • From: Fort Knox
Posted by Rob Gronovius on Saturday, February 20, 2021 10:35 AM

HeavyArty

Looks like you are off to a good start.  This is an excellent kit and will look great once done.  I have built a couple of them and had no issues.

I agree, it looks like a great, organized start.

I got the Orochi deluxe edition M3A3 (with the multimedia extras) in a trade. I just haven't had the motivation to build it. These newer modern kits are so involved; I sometimes long for the days when simpler kits were the norm.

  • Member since
    December 2002
  • From: Valrico, FL
Posted by HeavyArty on Saturday, February 20, 2021 10:20 AM

Looks like you are off to a good start.  This is an excellent kit and will look great once done.  I have built a couple of them and had no issues.

I was wondering why they chose to have the tire plus a little bit of rim as a separate part from the wheel hub ... As an aside, I wonder why the prototype used this design. Seems like it would pack with mud.

It is for weight reduction.  Pretty much all tank/AFV roadwheels are actually like this.  They have just been modeled solid on models until recently.

For more general Bradley info and some on building this one, check here:  https://forums.kitmaker.net/t/m2-m3-bradley-reference-archive/1597


Gino P. Quintiliani - Field Artillery - The KING of BATTLE!!!

Check out my Gallery: https://app.photobucket.com/u/HeavyArty

"People sleep peaceably in their beds at night only because rough men stand ready to do violence on their behalf." -- George Orwell

  • Member since
    March 2012
  • From: Louisville, KY
Meng M2A3 Bradley w Busk III and Full Interior: State-to-Finish Build
Posted by Builder 2010 on Friday, February 19, 2021 10:16 PM

After finishing another railroad project, it's time to build some plastic. With the fun I had building the massively complex Rye Field Model Sherman M4A3 76W HVSS, I decided to do it again with another complex tank with full interior, the Meng Bradley Busk III with interior. This model only has 874 parts (or something like that) instead of almost 2,000, mainly because the track are one part for each link instead of 7. The rest of the parts reduction is a reflection that Meng is not as manic as Rye Field. 

I started using my home-made sprue racks with my Tamiya Corsair project. I refined it with the Tyhphoon and Sherman. These are available commmercially from Hobby Zone, but with some scrap cardboard from boxes and a hot glue gun, you can make a very solid, practical and useful sprue rack that saves so much collective time in building high-parts-count kits that I'm surprised I didn't start using this years ago. I'm 75 and learning new crap all the time. My sprue rack for the previous kits went up to letter "R", but both the Sherman and this kit go beyond that. For the Sherman I re-labeled unused slots for the higher alphabet letters. This time I decided to simply build an extension to take me all the way to "Z".

Most of the cardboard came from on liquor box that I carried wine from the Party Store a week ago. 

This is the first part of the operation: build the overall enclosure and then add the partitions.

Notice that I use separate glued-on tabs rather than attempt to make the tabs part of the partition. It's simply easier and less time consuming to do it this way. I pre-lettered the slots since that too was easier to do before the partitions were in place.

Here's the entire extender rack. I used more cardboard tabs to lock the extension to the existing rack, and I used duct tape to fasten the rack to my jerry-rigged work table so it can't slip and fall off the table when I'm shoving a sprue back into the rack. That mod came from experience. That work table is my old college drawing board carriage bolted to an IKEA four-legged bar stool.

And here's the rack filled with lots of Bradley parts. The Meng kit actually had all those sprues in the box in letter order... very nice of them.

And then work actually commenced. You have to assemble the 12 sets of road wheels first. I started clipping them off the sprue, but didn't like that it may damage the tire surface of the outer part, so I used the micro-razor saw to saw them off and then sand a small nub that remains. It gives more control to do it this way when you can.

I was wondering why they chose to have the tire plus a little bit of rim as a separate part from the wheel hub. From this closeup you can see why. The outer rim overlaps the hub portion in such a way as to make molding in one piece impossible if they wish to maintain this interesting profile. As an aside, I wonder why the prototype used this design. Seems like it would pack with mud.

The inner wheel set is glued to the outer with an included polycap. Meng also includes a PE template for masking the tire and painting the hub. I think I'll use it to cut circular masks to paint the hubs first and then mask to paint the tires.

And here's the latest shot of my model railroad showing the new projects that have been added. The white and blue Victorian mansion in the middle ground is my rendition of Edward Hopper's "House by the Railroad" masterpiece. And in the foreground is a small park featuring another Sherman. This one is a Hobby Boss 1:48 Easy 8 that was given to me almost complete and only took a couple of days to make a nice permanent display in "Heritage Park." Lots of little bits were drawn by me and 3D printed.

Stay Tuned!

JOIN OUR COMMUNITY!

Our community is FREE to join. To participate you must either login or register for an account.

SEARCH FORUMS
FREE NEWSLETTER
By signing up you may also receive reader surveys and occasional special offers. We do not sell, rent or trade our email lists. View our Privacy Policy.