SEARCH FINESCALE.COM

Enter keywords or a search phrase below:

Sdkfz 250/1 Neu Premium WIP *Finished 01-13*

19839 views
104 replies
1 rating 2 rating 3 rating 4 rating 5 rating
  • Member since
    November 2005
Posted by Anonymous on Tuesday, January 1, 2008 7:22 PM
Oh, Bill---that is looking sweet!
  • Member since
    November 2005
Posted by Anonymous on Tuesday, January 1, 2008 7:22 PM
Oh, Bill---that is looking sweet!
  • Member since
    July 2004
  • From: Texas
Posted by wbill76 on Tuesday, January 1, 2008 1:18 PM

MrSquid, appreciate the commments!

Two small corrections to what I posted yesterday. The first is the instrument panel, the smaller gauges should have black faces, not white, so these were fixed.

The second deals with the position of the hand grenades on the right hull side. I had these in upside down (fortunately not glued in place, only held by the clips), so they've been reversed and glued in place with a dot of CA gel.

  • Member since
    March 2007
  • From: Atlanta, Ga.
Posted by MrSquid2U on Monday, December 31, 2007 11:41 PM

Um,

 I hate to say this but it's hard for me to look at your work for too long. I find it that offensive.


 I find it offensive that I am currently working on a 251 and felt it was coming along pretty well and then you share your interior pics and show me just how woeful my efforts are!Wink [;)]

 It's looking fantastic and your tutorial is helpful and inspirational!

Thanks for making the effort to share it with us.


  • Member since
    July 2004
  • From: Texas
Posted by wbill76 on Monday, December 31, 2007 10:56 PM

After a long break due to many different reasons, including the holidays and vacations, I was able to pick this one back up again today.

The first thing that needed to be done was to paint the interior, so I masked off the important mating surfaces with masking tape and applied a coat of straight Model Master Dunkelgelb enamel to all of the interior sub-assemblies. I deliberately didn't lighten it as I would for the exterior in order to provide a color differentiation interior vs. exterior.

With that out of the way, the different areas got their various detailing attention, starting with the driver's instrument panel and radio. The kit doesn't include any decals for the instrument faces but the detail is molded well enough that it's possible with creative dry-brushing to bring their details out. Since I couldn't use the kit-supplied clear styrene parts, I simulated the glass by painting it with Silver and then giving it an overcoat of Tamiya Clear Smoke.

Next up were the hull sides with their various crew kit items. The side panels were also given an overall wash of thinned down Burnt Umber to provide some wear and color contrast.

Then I worked on the floor sub-sections. All of the leather seats were first painted with Leather and then given a wash of thinned enamel Gunmetal.  The anti-skid floor plates received the same Gunmetal wash followed by a Burnt Umber wash and then dry-brushed with lightened Dunkelgelb. 

Last but not least, the rear plate and hatch received a Burnt Umber wash and dry-brushed with lightened Dunkelgelb to prepare it for inclusion in the interior.

With that out of the way, I secured the floor sub-sections in place and then attached both of the side panels, making sure to get a solid even join front-to-back using liquid glue, particularly around the instrument panel bulkhead area.

Then the nose plate and rear plate were installed as directed in Step 16, with careful dry-fit checks with the upper hull to insure the alignment was correct at both ends.

I also managed to get the left side fender and storage boxes mounted but will finish the right side tomorrow. The storage boxes have the options for both boxes to be either open or closed, a welcome change from the 251 series approach as it allows for a consistent look between the different boxes if you elect to close them both up IMHO. Extra care is needed when attaching part E12 to the front fender, E10, since this has to align perfectly with E6 for the whole thing to match up. I also left off the top half of the exhaust/muffler pot after a test fit showed it's possible to slide this in carefully later and will make it easier to paint/detail it off the kit.

Happy New Year everyone!

  • Member since
    July 2004
  • From: Texas
Posted by wbill76 on Monday, December 31, 2007 12:59 PM
 Luftwoller wrote:

8 Days in Hawaii!!!!! How dare you.. Dont you realise there are ppl here waiting for your next issue? Whats Hawaii got that this forum hasnt? Eh????Whistling [:-^]

...Guy

It was a hard choice, no doubt about it! Coming back from 75 degrees to 45 degrees was even tougher, but had a great time and managed to get to a lot of the great sites. Climbing Diamond Head and being inside the coastal artillery bunkers was a great experience as was touring the inside of the USS Bowfin at Pearl Harbor. So I did accomplish some model-related stuff at least as part of the trip! Wink [;)]

  • Member since
    February 2007
  • From: Bournemouth UK
Posted by Luftwoller on Sunday, December 30, 2007 3:24 PM

8 Days in Hawaii!!!!! How dare you.. Dont you realise there are ppl here waiting for your next issue? Whats Hawaii got that this forum hasnt? Eh????Whistling [:-^]

...Guy

..'Your an embarrassment to the human genus, makes me ashamed to call myself Homo'.
  • Member since
    July 2004
  • From: Texas
Posted by wbill76 on Saturday, December 29, 2007 11:14 PM

 ps1scw wrote:
Any updates for us?

Still working on this one, but had a brief interruption in the form of 8 days vacation in Hawaii that put the project aside for a bit, I'm sure you'll understand how difficult a choice that was for me! Big Smile [:D]

Never fear though, I have 5 days of vacation still to go before the holiday season is out so I promise an update in the coming days. Smile [:)]

  • Member since
    June 2006
  • From: Michigan
Posted by ps1scw on Saturday, December 29, 2007 2:55 PM
Any updates for us?
  • Member since
    July 2004
  • From: Texas
Posted by wbill76 on Monday, December 10, 2007 7:33 PM

Thanks Steve and yes, thank goodness for all those engine parts that are not visible on the 251s that always end up in the spares box! For those attempting this kit, that's an easy way to source a stand-in, for others there might be a mini-boom on E-bay! Smile [:)]

MR,

Hopefully so, that's one of the reasons I enjoy doing the blogs, to try and help others be aware and possibly avoid issues. Next up will be the big assembly test for all the interior pieces, the old 250 kits were notorious for having very small margins for error in this regard, something tha the one piece hull tub was aimed at helping.

  • Member since
    November 2005
Posted by Anonymous on Monday, December 10, 2007 9:54 AM
I'm lovin' it...you are overcoming issues w/ the kit as fast as they can throw 'em at ya! You will be saving some folks a lot of grief if they read this thread first!
  • Member since
    April 2004
  • From: The cornfields of Ohio
Posted by crockett on Sunday, December 9, 2007 4:14 PM

Nice work around Bill, incredible that the tranny wasn't included. Thank goodness for all those extra 251 parts.

Steve

  • Member since
    July 2004
  • From: Texas
Posted by wbill76 on Sunday, December 9, 2007 12:02 PM

Following on with the discovery yesterday that the kit doesn't have a transmission and after getting a great idea from a fellow modeler to use the often supplied tranny from a 251 kit, I dug around in the spares box and assembled one from the parts on Sprue C common to all DML 251 kits. They aren't quite the same as the 250 parts that were provided in the 250/10, but it's close enough to fit the bill. The nose pin on the 251 tranny fits perfectly into the housing under the dashboard but will not sit flat on the floor and will "float" a bit. This isn't a big issue necessarily but it does mean that you need a very good join at the nose to avoid it drooping.

The cover/cushion, C19, needs to be modified by having its pin removed, and then can be glued in place carefully over the new transmission. The cover only makes contact at the rear and along the left side, so careful gluing and positioning is key for it to sit properly.

Test fit into the compartment shows that this work-around will do...the cushion still sits just a touch lower than it should, but once the sides and top are in place, it won't be noticeable and is far better than if not used at all. I'll let this dry up good and solid before painting to be sure it doesn't shift around.

  • Member since
    July 2004
  • From: Texas
Posted by wbill76 on Sunday, December 9, 2007 12:01 PM

 SteveM wrote:

Bill, seems this one's a bit of a problem child. It's good for me to follow a level-headed guy work through these problems. Though I can detect the frustration, your tone is always one of a problem solver. Kudos to you.

I'm especially interested in seeing how the "modular" style assembly goes after painting. If it makes sense to me, it will change my approach and, hopefully, improve my building. But, I suppose, you always make this stuff look easySmile [:)]

Good luck today.

Steve

Thanks Steve, the way I look at it is this...if the kits always went together without any problems, then we'd just be assemblers instead of builders. Wink [;)] As far as the modular approach goes for the interior, I've used this before on 251 builds and it works well, just have to be careful to limit paint exposure on key mating surfaces and should be fine. I'll post progress on how I do that (masking tape mostly) as well so you can see how it works.

 the doog wrote:
I'm rather surprised to find the problems you've mentioned here--no more or less than any other kit, to be reasonable, but just a bit disappointing for a Premium kit. Somehow, you want to think that these would go together like lego's...snap, snap!  

Doog,

The most surprising thing on this, is that since it's a "Premium" kit, the practice of including parts/sprues from other kits should be a given as part of the upgrade package (the missing tranny is a head-scratcher) to benefit the upgrade but instead worked against it this time around...I think someone just forgot to measure the size of the visors before green-lighting the inclusion of the 251 clear sprues. After all, on the real vehicles, the visors are the same dimensions so it's not hard to see how that kind of oversight could happen.

 crockett wrote:

Hang in there Bill, I'm currently working on the CH Aufklarungspanzer 38T kit and I'm having some of the same "fun" you are. I hate to say it, but in a strange way I sort of enjoy figuring out the puzzling instructions and weird engineering pitfalls, but, I know most builders see them as a pain.

I know you'll make a silk purse out of any sow's ear......excellent work and documentation so far.

Steve


Thanks for the encouragement Steve, after having built the number of DML kits that I have, it's become almost a somewhat demented exercise to see how many instruction errors they can include to keep things interesting! Laugh [(-D] It does make the final build somewhat more of a triumph when they are overcome but people should know what they're in for when they tackle a kit and not have to live through so much pain on their own...one of the reasons why I keep the blogs is, if nothing else, to let others know that someone else had their same struggles with that kit. Wink [;)]


  • Member since
    April 2004
  • From: The cornfields of Ohio
Posted by crockett on Sunday, December 9, 2007 8:38 AM

Hang in there Bill, I'm currently working on the CH Aufklarungspanzer 38T kit and I'm having some of the same "fun" you are. I hate to say it, but in a strange way I sort of enjoy figuring out the puzzling instructions and weird engineering pitfalls, but, I know most builders see them as a pain.

I know you'll make a silk purse out of any sow's ear......excellent work and documentation so far.

Steve

  • Member since
    January 2007
Posted by the doog on Sunday, December 9, 2007 8:27 AM
 SteveM wrote:

Bill, seems this one's a bit of a problem child. It's good for me to follow a level-headed guy work through these problems. Though I can detect the frustration, your tone is always one of a problem solver.

Steve


Sign - Ditto [#ditto] Hmmm. Bill...I'm watching this one with interest, as this is the kit I won on the Armorama Contest. I'm rather surprised to find the problems you've mentioned here--no more or less than any other kit, to be reasonable, but just a bit disappointing for a Premium kit. Somehow, you want to think that these would go together like lego's...snap, snap!

Onward, through the fog patient captain! Pirate [oX)]

  • Member since
    June 2006
  • From: AusTx, Live Music Capitol of the World
Posted by SteveM on Sunday, December 9, 2007 8:05 AM

Bill, seems this one's a bit of a problem child. It's good for me to follow a level-headed guy work through these problems. Though I can detect the frustration, your tone is always one of a problem solver. Kudos to you.

I'm especially interested in seeing how the "modular" style assembly goes after painting. If it makes sense to me, it will change my approach and, hopefully, improve my building. But, I suppose, you always make this stuff look easySmile [:)]

Good luck today.

Steve


Steve M.

On the workbench: ginormous Kharkov dio


  • Member since
    July 2004
  • From: Texas
Posted by wbill76 on Saturday, December 8, 2007 9:39 PM

Thanks guys, appreciate the comments! Here's today's update.

Continuing on with the interior today, I skipped Step 11 as that calls for the installation of all the interior sections into the lower hull. Steps 12 and 13 deal with the new interior layout for the two different sides.

As a result of this being a "Premium" edition, the hull side panels have a mix-and-match set of molded in placement lines, some of which are appropriate for this kit and others left over from the older release. Why DML went through the trouble of adding new molded in locater guides but didn't remove the old ones is somewhat of a mystery, but that's the way it is on both sides of the hull. The newer locater marks overlap the old ones in many places as a result.

I started with the left hull side first, removing all the un-needed mold lines from the old kit as well as the new ones that were added for the large PE box that goes roughly in the middle according to the instructions. This box doesn't belong to a /1 variant, it belongs to the /5 spotting variant and since it won't be installed, the mold lines also went.

The right side required more surgery since it had molded on heavy mount points for the right side stowage bin not present on the Neu as well as a curved mount point that was a holdover from the older kit.

Once that was taken care of, I started in adding the details for the left side. The "premium" treatment here deals primarily with the addition of PE mount brackets and Gen 2 crew gear. Curiously, the MP38s provided in the added WA sprue are not identical...one has the folding stock molded in place and the other has the folding stock as a separate piece...and they both have different receiver/bolt mechanisms, one that is in the charged position and the other not...and although the instructions indicate you have a choice with the double arrows, only one of each is provided so your choice is really which one goes on which side!

The brackets for the MP38s are provided as PE and the instructions aren't very helpful in how to bend them to the necessary shape as they show them already installed, however after some study I was able to figure it out. The PE brackets are not the same size as the molded on locater positions, being somewhat shorter, so testing their respective positions just forward of the trigger and just forward of the magazine is essential to get their placement correct.

Fitting the brackets to the mess tins is a real pain...the Gen 2 tins have prominent features molded on them top and bottom and their little "ear" handles off each side make it an adventure to get the straps and brackets to line up properly. The little PE buckle portions that are on these were so fragile that they broke off with the slightest bit of pressure...a shame they weren't a bit more sturdy as they were a nice added detail. Last but not least, I added the stick grenade brackets one at a time starting at the rear and working my way forward. The instructions indicate only to fill 4 of the 6 brackets since the added GC sprue only has 4 "standard" grenades, although 4 additional are provided of a type I'm not familiar with. These are the normal grenades plus some sort of projection added to the "can" at the end of the stick, these however are too long to fit the brackets, so unless you have grenades from another kit to use, 4's the limit as provided. I carefully bent the clips so that the grenades could be added later after the panel has been painted.

Next up came the right side. This one has a bit more gear than the left side. I gave the PE signal flag racks, MA10 and MA18, a try but while their one-piece design was innovative, the tiny connection points for the little trays proved to be my undoing. Since these have to be shaped in a curve, I annealed it and as I was working on shaping the curves, the entire thing literally fell apart in my hand. The PE is too springy without annealing to shape the curve, so it's a Catch-22...and mine won't have this feature in the end. I'm not 100% sure it belonged to the /1 vs. the /5 to begin with, but wanted to give it a shot to see how they would assemble.

Just as with the left side, the various crew kit items were constructed and installed. I ran into a small problem with the three-in-a-row mess tin holders...due to the dimensions of the Gen 2 mess kits, it's not possible to fit 3 of them into the space designated and still be able to fit the gas mask and fire extinguisher as well as have the necessary room for the MP38 magazine that sticks down...so my novel solution was to install the third kit bracket empty. I also ran into a slight problem with the MP38 for this side, the one with the folding stock molded on...turns out the mount brackets aren't wide enough to fit around the folded mount in position, so some careful trimming with the hobby knife was necessary here as well.

The day's adventures didn't stop there...but a little calm before the next storm. I skipped over Step 14 since that installs the side panels to the hull as well as Step 15 which deals with the side fenders. Step 16 was largely skipped as well except for the construction of the rear hull panel and installation of the crew hatch door. The interior face of the panel and the door had slight raised sink marks that needed to be dealt with but these were very faint and just a small bit of sanding was all that was required. The door was installed in the closed position.

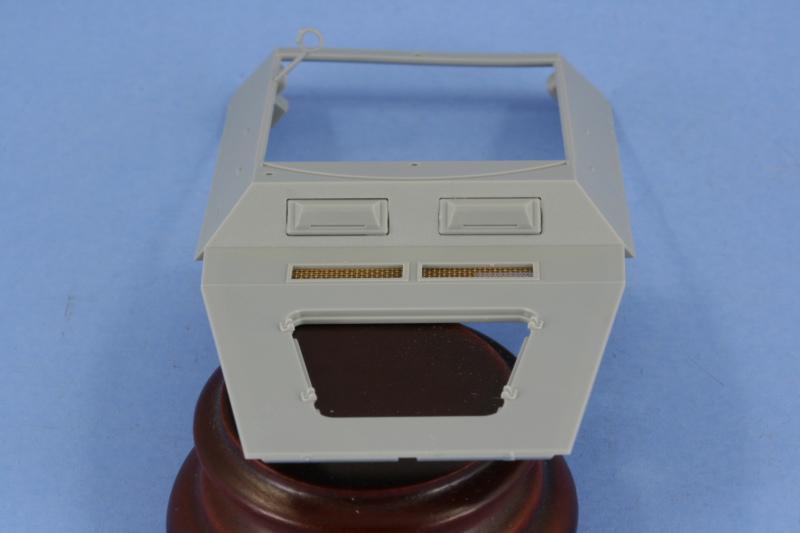
Staying with the interior prep work, next up was the upper hull. I installed the PE grills for the engine intake vents, a much improved area vs. the old vinyl mesh for sure. Other odds and ends details were also installed, except for the crew water bottles, as needed. When it came time to do the driver/radio operator visors is when the fun started. The "premium" package includes the now-familiar clear multi-part assembly for the visors, armored glass, and interior frames that allow for the visor to be posed open or closed on the 251 family of vehicles. As I went to test fit these before installation, I noticed a curious thing...the visors were too small vs. the openings in the hull plate. Since I have the older release kit in the stash, I pulled that at and compared the new clear visors to the old kit ones and sure enough, the older kit visors were larger.

Now the side-by-side difference may not seem like much, but it makes a huge difference when installing these as the frames that support them are the same dimensions...meaning that there's a noticeable gap around the perimeter if you use the supplied clear styrene parts. The "premium" kit still includes the parts on the sprue, E28/E29 and marked as not for use, that are the old kit armored glass/frames housings but the "premium" sprues DO NOT include the old visors. Fortunately, the old kit has 4 visors on the B sprues and only 2 are needed, so I snagged those for use on the "premium" kit. When the older parts are installed, they fill the cutout as they should. Just to highlight the difference, I placed the clear visor on the left over the kit backed frame to show just how much of a size difference there is. It would be possible to use sheet styrene and "fill" the cutouts to make up for this but it would produce a slightly off-center look to the visors unless you did it evenly on either side...a real pain given how small the total difference is. My only conclusion is that DML assumed that the visor dimensions would be the same on the 250 kit as on the 251s that these were originally designed for...and they aren't. You might be able to get by with installing both of the visors in the open position but I had a hard time installing the frames due to the size difference in the first place which is how I discovered the discrepancy so a gap would still likely be present to be dealt with. 

To round out the upper hull details, the instrument panel and radio were installed. These have nice molded on features that ought to make it easier to hand-paint their details. No instrument face decals are provided as in the 251 kits, so that's the only option for this area, but not a hardship really, just an observation.

To add insult to injury, as I was looking over the sub-assemblies to prep them for painting tomorrow, I was checking out the leather transmission cover that doubles as a rest/stand for the MG34/42 gunner's position and discovered that there's no transmission in the kit to go under the cover. Checking the older release, it too didn't have it but was an item that was included in the 250/10 kit #6139 on it's own little two-part sprue. Since they threw in sprues from other kits, why they left out this important detail is beyond me.


  • Member since
    January 2006
  • From: Macedon, NY
Posted by 315rooster on Saturday, December 8, 2007 6:21 PM

Wow.

The detail on this kit is scary good looking.  The wheels look fantastic.  I've built too many kits lately with very poor looking wheels.

Grant

Member of the Rochester HSMA (IPMS local club)

  • Member since
    June 2007
  • From: Elk Grove, CA
Posted by RandW on Saturday, December 8, 2007 3:45 PM

Thank you, Doog, once again. I'll check them out. And thanks 9toetanker(Joe) for the recommendation also.


Great to see you moving along again on this one, Bill. As usual looking top notch.

James "I'll have a Coke" Funny Man Rocco
  • Member since
    January 2007
Posted by the doog on Saturday, December 8, 2007 11:07 AM
 RandW wrote:
 

I know your ref. library is extensive, but any recommendations for a good all around book on German armor?

Two books I can recommend which are fairly complete in cataloguing every German armored vehicle you can think of are:

"Armored Fighting Vehicle of Germany" edited by Duncan Crow, ARCO Publishing, 1978ISBN 0-668-04641-4

"Encyclopedia of German Tanks of WWII" by Peter Chamberlain and Hilary Doyle (technical editor Thomas L. Jentz) 1999, ARMS AND ARMOR ISBN 1-85409-518-8

Looking forward to seeing this one develope, Bill! I've still got mine in the stash!  

  • Member since
    July 2004
  • From: Texas
Posted by wbill76 on Friday, December 7, 2007 10:17 PM

Made some progress on the interior, I decided that the best approach is going to be a "modular" one, meaning that I'm going to keep the interior broken down into sub-components as much as possible before painting.

Step 8 deals with the first module, the floor plate and seats for the driver and commander. The floor plate is one piece and the seats are two pieces, one for the seat itself and the other for the back rest. These installed easily enough, just a little care needed to get the tabs seated all the way into the bases with some liquid glue. This step also calls for the plate to be installed into the lower hull but I've held off doing that just yet.

Step 9 deals with the firewall for the driver's compartment. I installed all of the parts except the steering wheel, this will be painted separately and then installed. The details here are somewhat basic with the foot pedals just square representations and the gear shift lever is on the simplified side of things.

Step 10 deals with the rear compartment plate and various details. The locker for the MG ammo is a two piece assembly with the doors attached directly to the box in the closed position. The fuel filler cap is added to the rear and the long bench seat for the left side is also assembled and installed. Attached to the side of the ammo locker is the spare MG barrel holder and MG toolkit container, although looking at interior reference photos it looks as if the part has these reversed but it's not a huge thing considering. Last but not least, two holes need to be opened up in the right side of the floor to take the pedestal mount for the extra seat. Take care when doing this as the holes need to be big enough for the mount but not too big as the edge of the pedestal base isn't very wide to begin with. The seat itself is a two part assembly like the driver/commander seats and I used a bit of blue tack to dry-fit it in place to be sure it would clear the MG case behind it.

Next up will be the compartment sides, which ought to be a lot of fun as this is where much of the "premium" treatment gets applied.

  • Member since
    June 2007
  • From: Elk Grove, CA
Posted by RandW on Wednesday, November 28, 2007 7:29 PM
 Mansteins revenge wrote:
 RandW wrote:
 

Okay, so I'm a moron and don't know how to quote, non matching quote blocks? anyway the pics are up there!Laugh [(-D]

Not to divert from your WIP, Bill. Manny, those are some incredible pics. I know your ref. library is extensive, but any recommendations for a good all around book on German armor? And that pic of #7203 does not have enough chipping on it, but I can take care of thatBig Smile [:D]

hmmmmm...an overall book on ALL armor from ALL nations from ALL time periods doesn't exist, IMO (or that I know of)...narrow down nationality and a time frame and maybe I can point you in the right direction...

Oops, forgot time frame, got caught up with the blocked post! WWII German armor. I have Ian Baxter's 'Hitler's Panzers' which I enjoy, just wondering if there is something with all types of vehicles, not just the treaded ones? Just a brief rundown like Baxter's book. Thanks.

James "I'll have a Coke" Funny Man Rocco
  • Member since
    November 2005
Posted by Anonymous on Wednesday, November 28, 2007 2:45 PM
 RandW wrote:
 

Okay, so I'm a moron and don't know how to quote, non matching quote blocks? anyway the pics are up there!Laugh [(-D]

Not to divert from your WIP, Bill. Manny, those are some incredible pics. I know your ref. library is extensive, but any recommendations for a good all around book on German armor? And that pic of #7203 does not have enough chipping on it, but I can take care of thatBig Smile [:D]

hmmmmm...an overall book on ALL armor from ALL nations from ALL time periods doesn't exist, IMO (or that I know of)...narrow down nationality and a time frame and maybe I can point you in the right direction...
  • Member since
    August 2006
  • From: The Green "Mountains", Vermont
Posted by IanIsBored2000 on Tuesday, November 27, 2007 10:32 PM

Rumor has it that if you eliminate the apostrophe in Manstein's name, it lets you quote him.

That half rack's already looking great.  You've hardly started and the detail in it is incredible compared to the old Tamiya 250/9 I did a little while ago.

"Scanlon: work your knobby hands on the table in front of you, constructing a make-beleive bomb to blow up a make-beleive world."
  • Member since
    June 2007
  • From: Elk Grove, CA
Posted by RandW on Tuesday, November 27, 2007 9:01 PM
 

Okay, so I'm a moron and don't know how to quote, non matching quote blocks? anyway the pics are up there!Laugh [(-D]

Not to divert from your WIP, Bill. Manny, those are some incredible pics. I know your ref. library is extensive, but any recommendations for a good all around book on German armor? And that pic of #7203 does not have enough chipping on it, but I can take care of thatBig Smile [:D]

James "I'll have a Coke" Funny Man Rocco
  • Member since
    November 2005
Posted by Anonymous on Monday, November 26, 2007 10:43 PM

 wbill76 wrote:
Thanks MR, only slightly. That's the layout on the Alte as evidenced by the canvas flap covered bin on the left side.
Sorry, I'll keep my eyes open for something on the Neu interior...here is that cool dio from a Japanese modeller who used one of the painting/marking scheme from the DML instruction sheet:

  • Member since
    July 2004
  • From: Texas
Posted by wbill76 on Monday, November 26, 2007 9:15 PM
Thanks MR, only slightly. That's the layout on the Alte as evidenced by the canvas flap covered bin on the left side.
  • Member since
    November 2005
Posted by Anonymous on Monday, November 26, 2007 5:26 PM
Bill, does this help any?
  • Member since
    November 2005
Posted by Anonymous on Monday, November 26, 2007 5:00 PM
 wbill76 wrote:
Glad it helps, the 4 digit tac numbers on the 9th SS vehicles are something I've not seen before, usually 4 digit numbers are associated with AufKlarungs units ala the Luchs.
From what I gather they are also possibly Regimental and Battalion HQ numbers that were supposed to confuse the enemy...some sources quote these numbers as starting at 25...problem is that no records have yet surfaced with an index of what units used what numbers...???
JOIN OUR COMMUNITY!

Our community is FREE to join. To participate you must either login or register for an account.

SEARCH FORUMS
FREE NEWSLETTER
By signing up you may also receive reader surveys and occasional special offers. We do not sell, rent or trade our email lists. View our Privacy Policy.