SEARCH FINESCALE.COM

Enter keywords or a search phrase below:

Tamiya 1/35 Char B1 bis *WIP*

27556 views
137 replies
1 rating 2 rating 3 rating 4 rating 5 rating
  • Member since
    December 2002
  • From: Reno, NV
Posted by espins1 on Tuesday, September 15, 2009 10:43 AM
Thank you Schnobs!  Make a Toast [#toast]

Scott Espin - IPMS Reno High Rollers  Geeked My Reviews 

  • Member since
    January 2009
  • From: Everett, WA
Posted by Schnobs on Tuesday, September 15, 2009 12:57 AM

Congrats Scott!  Your win was well deserved!  Thumbs Up [tup]

I really like this AFV and your approach was excellent!

"There is a principle which is a bar against all information, which is proof against all arguments and which cannot fail to keep a man in everlasting ignorance. That principle is contempt prior to investigation." Herbert Spencer
  • Member since
    December 2002
  • From: Reno, NV
Posted by espins1 on Monday, September 14, 2009 9:56 AM
 Fast Heinz wrote:

Congrats on the first place. I remember this one and also recall that i commented that the finish was overdone for my personal taste or something like that. Shows how much i know.

Well done 

Ya, at the time I was a little discouraged but decided to listen to your critique and spent a good part of Friday night toning down some of the weathering by brushing just plain turpenoid over and over the entire tank, especially on the hull sides, gently washing some of the pigments off to make the underlying camo stand out more.  Your advice has paid off and got me my first "1st Place"!  Make a Toast [#toast]


Scott Espin - IPMS Reno High Rollers  Geeked My Reviews 

  • Member since
    December 2002
  • From: Reno, NV
Posted by espins1 on Monday, September 14, 2009 9:52 AM
Thanks guys, I really appreciate it.  It's been a tough year with my knee surgery and a bit of a cancer scare, so my modeling time had been pretty limited.  Things are going well now and I'm gettin' back into the groove!  Smile [:)]

Scott Espin - IPMS Reno High Rollers  Geeked My Reviews 

  • Member since
    August 2005
  • From: Sydney, Australia
Posted by Phil_H on Monday, September 14, 2009 7:25 AM

Hey Sxott,

Congratualtions on the First Place. Awesome job on the Char. Thumbs Up [tup]

  • Member since
    May 2006
  • From: Queensbury,NY
Posted by panzer88 on Monday, September 14, 2009 7:21 AM
Congrats!!!!


  • Member since
    January 2007
  • From: Australia
Posted by Fast Heinz on Monday, September 14, 2009 1:09 AM

Congrats on the first place. I remember this one and also recall that i commented that the finish was overdone for my personal taste or something like that. Shows how much i know.

Well done 


  • Member since
    March 2003
  • From: Rain USA, Vancouver WA
Posted by tigerman on Monday, September 14, 2009 12:42 AM
I was just thinking that you've been gone for some time. Kudos to your award. Glad to see you back. Smile [:)]

   http://i7.photobucket.com/albums/y269/wing_nut_5o/PANZERJAGERGB.jpg

 Eric 

  • Member since
    August 2007
  • From: The Plains of Kansas
Posted by doc-hm3 on Sunday, September 13, 2009 11:04 PM
 Scott, Congratulations on the win! Well deserved by your attention to the detail and finsh on your build.Thumbs Up [tup]

All gave some and some gave all.

  • Member since
    July 2006
  • From: New Jersey
Posted by redleg12 on Sunday, September 13, 2009 7:02 PM

Scott - HOLY EXCREMENT.....we have not seen you for a while.....hope all is well.

Congrats on the 1st place....hope to see many more here!!!

Rounds Complete!!

"The Moral High Ground....A Great Place to Emplace Artillery."

  • Member since
    December 2008
  • From: Northern Va
Posted by psstoff995's lbro on Sunday, September 13, 2009 5:55 PM

No idea how I missed this one! Confused [%-)]

Excelent build and congrats on 1st place! Thumbs Up [tup] Make a Toast [#toast]

-Will young modeler Test fit master
  • Member since
    December 2002
  • From: Reno, NV
Posted by espins1 on Sunday, September 13, 2009 12:43 PM
Thanks Bill!  I appreciate it!  Make a Toast [#toast]

Scott Espin - IPMS Reno High Rollers  Geeked My Reviews 

  • Member since
    December 2002
  • From: Reno, NV
Posted by espins1 on Sunday, September 13, 2009 12:39 PM
Thank you panzerguy!  Make a Toast [#toast]

Scott Espin - IPMS Reno High Rollers  Geeked My Reviews 

  • Member since
    July 2004
  • From: Texas
Posted by wbill76 on Sunday, September 13, 2009 12:39 PM
Congrats Scott on taking the 1st place, definitely well deserved! Thumbs Up [tup] Thumbs Up [tup]
  • Member since
    October 2007
  • From: N.H.
Posted by panzerguy on Sunday, September 13, 2009 12:35 PM


    Hey Scott I remember this one, a superb job and well deserving of its 1st award.                                            

              CongratsMake a Toast [#toast]!


"Happiness is a belt fed weapon"

  • Member since
    December 2002
  • From: Reno, NV
Posted by espins1 on Sunday, September 13, 2009 9:37 AM

Thanks again for the interest and feedback gentlement, I really appreciate it. 

I entered "Bourrasque" in the 2009 IPMS Reno High Rollers annual model contest.  There was some stiff competition this year and I was very pleasantly surprised when it took 1st place!  Make a Toast [#toast]

Scott Espin - IPMS Reno High Rollers  Geeked My Reviews 

  • Member since
    November 2007
  • From: Wisconsin Rapids, WI
Posted by moose421 on Friday, November 14, 2008 7:29 PM

I like the effect that you achived bish.  I love using the MIG pigments and found the nightvision DVD a great help in the use of them.

Once again great work on you Char.

  • Member since
    July 2007
Posted by Moon Puppy on Friday, November 14, 2008 7:15 PM

Hey Scott, I like it. I enjoyed your take on the the Migs stuff. I'm looking to drop a dime on the stuff for a build I'm doing, I've never used them either.

One thing I'd like to note, your reference photos and the open hatch. The Unit number on the side is quite visible, more visible that what you have on your model. Perhaps the buildup is overstated in the black and white photo? I'm not sayin' I'm just sayin'. I think you did a great job on it and really enjoyed reading this thread.

Remember, we are told Post Counts don't matter! (unless it's really high)

Modelers' Alliance

  • Member since
    October 2008
  • From: Portland, Oregon
Posted by RickLawler on Friday, November 14, 2008 5:58 PM

Ok, I'll get into some of this dirty talk.

Scott, I commend you on taking bold steps with the weathering, it takes nerve and vision to do what you are doing. 

I''m going to go out on a limb (boy, this is a first for me, aye?) and suggest that if you were to stop now you would be stopping before the miracles happen.  I see many very good models that seem to have only half of the idea expressed.  I believe that you are at that point...almost there!

I'm not suggesting slathering on another 20 layers of pigments, but I do believe that you are on the brink of some very exciting results if only you finish, or refine your thoughts.  I see your next step as re-defining the details that you have lost from the pigments.  At the moment the surfaces have lost their details and features.  I would suggest breaking out the artist oils and do some very selective pin washes around some of the bolt details and panel lines.  Use a dark(ish) earth color for this - I'm partial to Raw Umber. 

 Those darker streaks that you are contiplating could be achieved by these same washes.  Start at the top, slowly.  Let the paints/thinners do their thing and darken the base pigments - allow them to dry as this is the only way to really detemine the effect. (wet pigments will alway look dark and, well....wet!)  Repeat until you have what you are looking for.  The final weather with pigments and oils cannot be rushed...you really need to let things settle and dry to get a realistic assesment of where you are at and what needs to be done.

Fast Heinz has a point about loosing some of the base colors...some of that can be regained by brushing off certain areas allowing more glimpes to what is underneath.  I realize that you are working off the photo, but keep in mind that even a light dusting of earth taken on a black & white photo will obscure the colors...it's the nature of the photographs and it makes it very tough to interpret.

Great projects provoke great discussions....

Take care,

Rick 


  • Member since
    October 2004
  • From: League City, Texas
Posted by sfcmac on Friday, November 14, 2008 5:42 PM

Oh man that stinks. (not the tank but the stressful stuff) I think that once the change uncertainty and such pass things will probably get worse before they get better though. But I'll lie to ya if it makes you feel any better. Lots of us in that same boat right now I am afraid. Galveston Countys biggest employer the UTMB Hospital is cutting like 3500 jobs because of mismanagement and the hurricane damage. Businesses here are sucking wind trying to rebuild and repair during this slump. Really bad because Houston industry is usually pretty resilant. Oh well all we can do is what we can.

As far as your French tank 2 points of view clash. What looks right and what it actually looked like. You chose to be as genuine as you can make it. Nothing wrong with that as far as I can see. As long as it just isn't coffee stains on the photo.  Seriously I hate trying to interpret black and white photos as they can mislead ya. But it's all we got in a lot of cases! That is another greatness of this hobby! To see how each other see things.

Good luck with the work stuff! Goes for all of us!

  • Member since
    December 2002
  • From: Reno, NV
Posted by espins1 on Friday, November 14, 2008 5:20 PM

Thanks for all the input and suggestions gentlemen, much appreciated. Smile [:)]

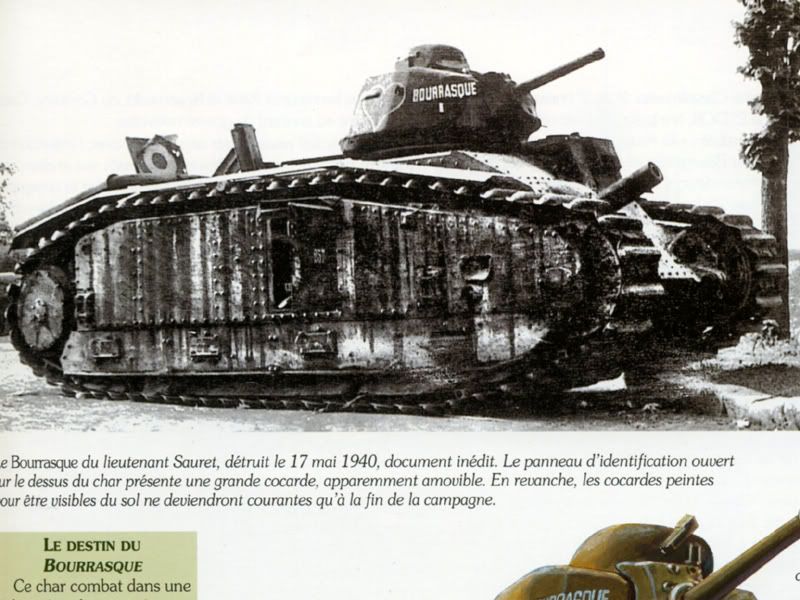
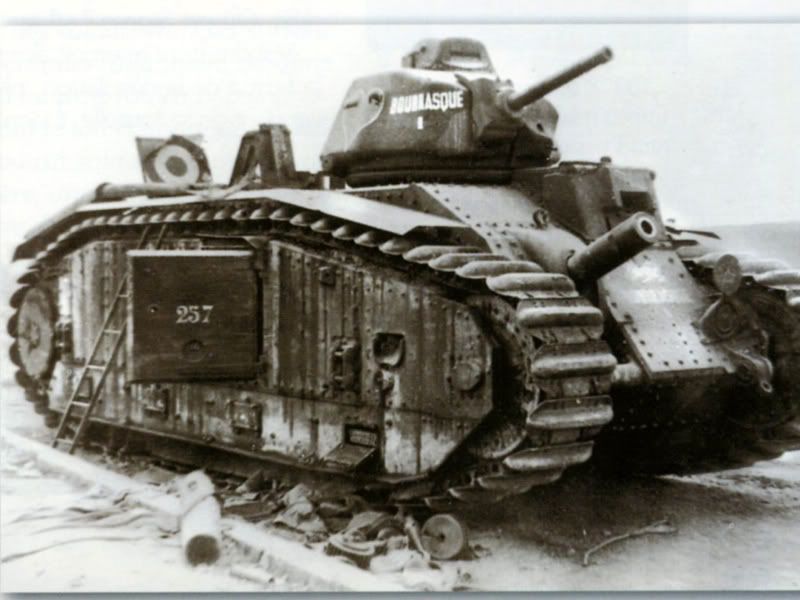
Again  Sigh [sigh]  I am trying to model Bourrasque as it appears in the two photos below taken shortly after it was abandoned by it's crew due to lack of fuel.  

Can anyone makeout the camo on the flanks?  I can't... it's completely covered with dirt and mud.  Look at period photos of the Char B1 bis in combat, almost without exception photos of the Char B1 bis in Combat show one thing in common.... dirt, oil and mud covered flanks in vertical streaks formed by it running down the sides. Shock [:O]  Look at how the tracks wrap around the entire outside of those big, slab sided flanks.  Mud, oil, water, goo, whatever, drips, plops and runs constantly down the sides from those filthy dinosaur tracks that go over the top of the flanks.  Shy [8)]  With the exception of the open hatches, I am trying to make mine look similar to the way Bourrasque appears in these photos...... not an "idealized" verson or an artistic "most pleasing to the eye" look of Bourrasque.  I am not trying to model it as it would have appeared on the parade ground.  I am trying to replicate what I see in the actual photos.  Notice, you can't make out any of the camo patterns or colors on the flanks, only on the upper hull and turret.  Whistling [:-^]

(I hope the above doesn't come across as testy in any way, it's been a rough 2 days at the office..... 300 people in the Reno facility alone were let go yesterday and today.  It's been very stressful and thankfully I am still here and I didn't have to let any of my staff go.  Angel [angel] )


Scott Espin - IPMS Reno High Rollers  Geeked My Reviews 

  • Member since
    January 2007
Posted by the doog on Friday, November 14, 2008 3:33 PM

Scott, I have to say that I agree about the aesthetics of the kit before the deluge of pastels. I think that you went a little overboard with the pastels.

Did you miss my post on page one? I really think that the problem with your pastel application was because you went for an overall coating of powders, rather than the "3-dimensional" application which I had suggested. I think that you could have kept much of the base paint visible and unobscured if you had used white glue drips coated in powders to simulate the "dripping" mud.

It still might be posssible to clean up some of that powder on the sides, and then add white glue "lines" down the side which you could then coat with powders while still tacky--that would give you 3-D drips of mud like it looks in the photos there.

It might be worth a shot? Can you scrub off some of that all-over powder coat on the sides?

  • Member since
    June 2005
  • From: San Tan Valley,AZ
Posted by smokinguns3 on Friday, November 14, 2008 3:26 PM
she looks great scott you did a bang up job on it.
Rob I think i can I think i can
  • Member since
    December 2002
  • From: Reno, NV
Posted by espins1 on Thursday, November 13, 2008 8:22 PM

Thanks everyone for the comments and the interest, I really appreciate it.  It's so much more fun when this hobby isn't a solo project.  Smile [:)]

I'm still debating what to do about the chains.  My original intention was to get more of the pigments etc on them, but due to the nature of the metal I'm not getting good coverage.  I'm considering some of the ideas mentioned earlier such as dipping them in coke or something. 

Do any of you have experience with "Blacken-It"?  I have some that I was going to use on some Friulmodel tracks on another build.  Would that work on these chains?

Scott Espin - IPMS Reno High Rollers  Geeked My Reviews 

  • Member since
    December 2002
  • From: Reno, NV
Posted by espins1 on Thursday, November 13, 2008 8:11 PM
 Fast Heinz wrote:

Yes, i have to concede that if the intention is to emulate the photo, then the degree of weathering is not overstated at all and you've done a fine job all round. My comment was around the "look" of the model. I thought (and still do) that it looked more visually pleasing at the earlier stage when the camo was visible through the dirt/dust buildup.

Its just a personal taste thing i guess.

Cheers

I agree with you 100%, it did look more asthetically pleasing before all the dirt.  Smile [:)]

I kinda wish I could have two of these built, one filthy and one just for the beauty of the tank.  The Char B1 bis has a beauty all it's own and each one of them was fairly unique in its own right.  This Tamiya kit is really nice and I would love to build another.  Tongue [:P] 

Scott Espin - IPMS Reno High Rollers  Geeked My Reviews 

  • Member since
    January 2007
  • From: Australia
Posted by Fast Heinz on Thursday, November 13, 2008 7:56 PM

Yes, i have to concede that if the intention is to emulate the photo, then the degree of weathering is not overstated at all and you've done a fine job all round. My comment was around the "look" of the model. I thought (and still do) that it looked more visually pleasing at the earlier stage when the camo was visible through the dirt/dust buildup.

Its just a personal taste thing i guess.

Cheers

  • Member since
    September 2007
  • From: Relocating
Posted by Mobious on Thursday, November 13, 2008 3:59 PM

 Hello espins1,Congratulations on taking a step outside the comfort zone and expanding on your skills, and sharing the results. IMO the weathering on the Char is not overstated and quite accurate in regards to the reference pics you've posted. The pics show the camo on the large slab sides of the Char to be obscurred and barely visible, while the camo on the upper structures are easily discernable, just as the model portrays. Nice job interpreting the photos and aritistically rendering the weathering to achieve realistic results. The only thing missing are the dark streaks. IMHO the chain is a bit bright and tends to distract from the overall picture, but that's just my opinion.

 Thanks again for posting,

 Best Regards,

 Mobious

"It's a problem of applied physics" Roy Brown

  • Member since
    April 2007
  • From: Schroon Lake, NY
Posted by SMJmodeler on Thursday, November 13, 2008 10:47 AM

Scott:  Venturing out of the "comfort zone" can be tough; but for me it keeps the hobby interesting and challenging.  The weathering may cover up some exhaustive time and effort, but it can be worth it too...you have progess pic's if ever needed.  You learn more each time you try another skill and you add it to your arsenalWink [;)]

She's a real beauty Scott, the massiveness REALLY comes through!  All the detail and weathering is superb!...and I LOVE those chains...I'll have to scroll back to see any info on how you did those. (I have a M26 in the stash)  I'd add those dark streaks, and don't be stingy with them, add a bunch...the contrast will be STRIKING...GO FOR IT!!!

  • Member since
    December 2002
  • From: Reno, NV
Posted by espins1 on Wednesday, November 12, 2008 1:09 PM

Thanks guys.  I must admit I was a bit nervous venturing outside of my comfort zone.  I usually build more idealized versions of my tanks, intact, with no damage and minimal weathering.  I almost stopped before the pigments and was ready to finish it up right then and there, but I really wanted to learn how to use pigments to take my modeling to the next level.

I've always been fascinated with the filthy look of the Char B1 bis in wartime photos.  I guess it boiled down to either the artistic (again, idealized view of the tank) or the realistic (what it looked like at the time of its final engagement).  Tough decision to make, but very enjoyable!  I may someday build another one with a more perfect appearance for aesthetic reasons to park next to my idealized Das Reich Tiger, Grossdeutschland Panther etc. 

I really wanted to try to replicate that weathered look somehow, both as a skill building exercise and just to see if I could do it.  Granted, I'm still a novice with pigments but man, talk about a fun learning exercise!  Tongue [:P]  The downside to wanting to replicate this look, as Fast Heinz mentioned, is that the camo is almost completely undiscernable on the flanks.  (Thanks for making that point Fast Heinz, I was wondering when someone would bring that topic up.  I had an internal debate about that very same thing my friend.) If you look at the photos I used for inspiration you'll see that the camo is even less discernable than it is on my build so the argument could be made that it needs even more!  Shock [:O]  I'm still debating on whether or not to add a few darker streaks of simulated mud as you can see in the photos.  The gears are turning.....  Burger [BG]


I have stayed away from using Future over my camo jobs for the last few builds after seeing some of Karl's (the Doog!) work and now prefer not to gloss coat my builds, even for decaling.  It's mostly a matter of personal preference.  I don't necessarily care for the over exaggerated look of pin washes over a gloss coat.  Without the gloss coat I like how the washes still emphasize detail but also leave a bit of grubbiness behind on the flat surfaces, which in my opinion is a bit more realistic if that is the look you're trying to achieve.

I'm home sick again with this stupid cold, so I'm taking a break from the workbench for a day or two.  Thanks again for the comments and interest gentlemen, I appreciate it!   :)

Scott Espin - IPMS Reno High Rollers  Geeked My Reviews 

  • Member since
    April 2005
  • From: Piscataway, NJ!
Posted by wing_nut on Wednesday, November 12, 2008 6:33 AM
The overall look is great Scott. Youmay have siad so but I missied it but did you do the pigment treatment over a flat or gloss surface? And once the turpenoid is dry, is the pigment fixed in place or does it need to be sealed?

Marc  

  • Member since
    April 2008
  • From: Commonwealth of Virginia
Posted by USArmyFAO on Wednesday, November 12, 2008 1:57 AM
Awsome work...  I can't wait to start mine (after of course I finish a Japanese D4Y1, Korean T-37, and some other partial builds languishing on my shelf)...  Your work is a true inspiration.  Keep it up!

Cheers, Matt

"If we increase the size of the penguin until it is the same height as the man and then compare the relative brain size, we now find that the penguin's brain is still smaller. But, and this is the point, it is larger than it *was*."

  • Member since
    January 2007
  • From: Australia
Posted by Fast Heinz on Tuesday, November 11, 2008 10:48 PM

Dare i say it, i think you've gone one step too far with the pigments. I thought the previous pics in your post of 9 November showed it off at its best. The weathering was good and the base camo was still visible. Personally i would have been happy at that point and stopped. The base paint in these latest shots is almost indistinguishable and i think its lost some of its character as a result.

Regardless of that though, the workmanship is excellent and i'm picking up a ton of useful tips for the one i'm building at the moment so thanks for that.

Cheers 


  • Member since
    September 2003
  • From: USA
Posted by mstazz62 on Tuesday, November 11, 2008 6:45 PM

OOOO, she's purdy! Love the scheme and the weathering is top notch - just enough.

I'm in the midst of building one now - a conversion to the German 10.5 cm howtzer - but after seeing yours I wanna do the original french version!

Thanks for the inspiration,

Mark

mstazz62
  • Member since
    July 2006
  • From: New Jersey
Posted by redleg12 on Tuesday, November 11, 2008 6:37 PM

Scott - Ahhhhhh.....chains look GOOD. I love pigments myself. Love the look. worth the wait to see.

Rounds Complete!!

"The Moral High Ground....A Great Place to Emplace Artillery."

  • Member since
    September 2007
  • From: Relocating
Posted by Mobious on Tuesday, November 11, 2008 5:35 PM

 Hello, espins1, with the results you've achieved with the "Warpigs", Think I'll be looking into a set. I like the fact that the names are a little more familiar to me than "City Double Rubble Dust" or "Early Fall, Central European, Windblown, Moments Before a Low Pressure Cell Moves Thru The Area, Dark Dust". The application tips are great, in particular, the way the pigments were applied to achieve the effect of accumulated dirt. Great work!Bow [bow]

 Mobious

"It's a problem of applied physics" Roy Brown

  • Member since
    October 2007
  • From: N.H.
Posted by panzerguy on Tuesday, November 11, 2008 2:55 PM


   Scott just got caught up on this. Man have you made some progress. Excellent jobBow [bow] Think I'll be printing out your weathering list if you dont mind. 

    A little tip on the chains, I've soaked them in coffee or cola soda and it take's the shine off .  


"Happiness is a belt fed weapon"

  • Member since
    December 2002
  • From: Reno, NV
Posted by espins1 on Tuesday, November 11, 2008 10:43 AM

Thanks for the comments and the interest guys.  Smile [:)]

This was my first time using pigments for weathering and I had a ball with them!  I did a little basic experimenting so I could get the hang of applying them dry, wet and dry onto a wet surface.  Once I got the feel for how they worked I really went to town developing streaks down those slab sided flanks.  I used a combination of techniques and three different shades of pigments from the Warpigs "earth" set - Natural Umber, Natural Sienna and either Light Sienna or Natural Yellow, can't remember which right now (I'm at the office Wink [;)])

  • Using a wide brush I lightly wetted one section at a time with turpenoid, tipped the tank about halfway on it's side supported by a big bottle cap and a plate edge, then dipped a dry, wide brush into some pigment then gently stroked the brush in downward strokes along the sides gently brushing the pigments in straight lines down the flanks.  I continued with that process all they way accross, then repeated for the other side.  This gave it the overall basic downward streaking I was looking for as a base, with heavier emphasis on the upper parts.
  • Using a smaller round brush with a fairly precise point at the end I dipped it into a mix of some darker pigments in a beer bottle cap with just a little turpenoid and more or less painted the darker streaks individually down the sides.
  • Used more dry pigments and dabbed them all over the tank in random batches using three different colors of pigments.  Using a dry short, stiff brush I dabbed it all over the tank to create a good general effect of dryed dirt and mud all over.
  • With dry pigments and a big brush, I flicked pigments down the sides starting at the trackes on top.  Pigment then slid down the sides and stopped along the tops of all the raised surfaces.  Using a small, round brush I wicked just a little turpenoid in the areas where the pigments had piled up so the "dirt" would stay and give the 3 dimensional effect of having loose dirt piling up. 
  • Using a mix of turpenoid and pigments I grubbied up the lower part of the tank, especially on the rubber boots at the bottom.
  • Wetted spots like the drive sprockets with a little turpenoid, dipped a big soft brush in the pigments then flicked the brush at the sprockets without actually touching them.  The pigments flecked off just right and look like mud spatters after they hit the wetted sprockets.
  • I also wicked turpenoid along all the seams and raised detail, again to simulate streaking of water, oil etc.  I also just flicked some clean turpenoid in various areas to simulate various stains etc.
  • I wetted up the chain pretty good and slathered it up with a dry brush dipped in the pigments.

For a first attempt using pigments I am pleased with the results and have a much better understanding of the different ways to apply them and the effect they create.  What do you guys think?


Scott Espin - IPMS Reno High Rollers  Geeked My Reviews 

  • Member since
    July 2006
  • From: New Jersey
Posted by redleg12 on Sunday, November 9, 2008 9:14 PM

Scott - Coming along nicely. Love the weathering. Turning it into a real mudder.

Just a quick thought. Does the chain in the back look to clean as compared with the rest of the weathering...just a thought.

Rounds Complete!!

"The Moral High Ground....A Great Place to Emplace Artillery."

  • Member since
    January 2007
Posted by the doog on Sunday, November 9, 2008 8:51 PM

Scott, it's looking really excellent!

To get that look of the mud, try this--get some real dirt (you can use pigments if you want, but it may get a bit pricey?) and turn the tank on its side. Then, "paint" long streaks of flat lacquer (Acrylic, preferably) down the sides, and drop the dirt (or pigments) onto the wet streaks, letting them absorb it and seal it in. This way you can build it up. You'll never do it by conventional methods. You have to get it on there "in bulk".

Let the stuff dry, and then blow/brush off the excess dirt/pigments. You should be able to build up long streals of thick mud in this way in a very short time.

  • Member since
    July 2004
  • From: Texas
Posted by wbill76 on Sunday, November 9, 2008 8:22 PM
Coming along nicely Scott, going to be a very dirty Char by the time you're all said and done! Thumbs Up [tup]
  • Member since
    September 2007
  • From: Relocating
Posted by Mobious on Sunday, November 9, 2008 6:37 PM

Espins1, The additional "dusting" really blended things together very well. Noticed the chain on the rear, Is that a brass chain? Noticed it on an earlier post and was wondering what you were planning. The subtle weathering on it looks great. Looking forward to more updates and application of the "Warpigs".

 Mobious

"It's a problem of applied physics" Roy Brown

  • Member since
    April 2005
  • From: Piscataway, NJ!
Posted by wing_nut on Sunday, November 9, 2008 5:52 PM
Scott my man that is just outstanding. Ive said before that Char seems to do well at MosquitoCon.  You should definately come East next year with that bad boy.

Marc  

  • Member since
    December 2002
  • From: Reno, NV
Posted by espins1 on Sunday, November 9, 2008 5:20 PM

I ordered some pigments from a new brand of pigments called "Warpigs".  There is an excellent review of them here if you're interested.  I'm going to use them to try to replicate the vertical mud and dirt streaks cascading down the huge flanks of the Char B1 bis. 

I just applied another dustcoat and am going in for the kill shortly with the pigments.  Here are some shots of the dustcoat prior to the final mud applications.

Scott Espin - IPMS Reno High Rollers  Geeked My Reviews 

  • Member since
    December 2002
  • From: Reno, NV
Posted by espins1 on Saturday, November 1, 2008 2:17 PM

Here's another great pic of Bourrasque as it appeared at the time of it's capture.  I'd love to be able to replicate the streaks of mud and goo coming down the sides like this.  I'm just going to have to keep building up the layers.

Scott Espin - IPMS Reno High Rollers  Geeked My Reviews 

  • Member since
    December 2006
  • From: N. Georgia
Posted by Jester75 on Saturday, November 1, 2008 1:46 PM
Awesome Scott!! This is one fantastic looking Char, I love it!

Eric


  • Member since
    September 2007
  • From: Relocating
Posted by Mobious on Saturday, November 1, 2008 1:41 PM

 Be looking forward to more "Mudslinging!" Interesting, looking at the earlier post and seeing where the weathering is going. Nice job, espins1

 Mobious

"It's a problem of applied physics" Roy Brown

  • Member since
    October 2008
  • From: Portland, Oregon
Posted by RickLawler on Saturday, November 1, 2008 1:17 PM

Then you are on the right track...you still have quite a ways to go! 

Rick

  • Member since
    December 2002
  • From: Reno, NV
Posted by espins1 on Saturday, November 1, 2008 1:06 PM

I may add a bit more mud actually, I was using images like this as my guide.  Smile [:)]


Scott Espin - IPMS Reno High Rollers  Geeked My Reviews 

  • Member since
    October 2008
  • From: Portland, Oregon
Posted by RickLawler on Saturday, November 1, 2008 12:23 PM

Pretty Cool!  You achieved some nice effects using your oils and washes. I might suggest feathering out some of the harder wash edges just a little - just my opinion.

Rick

  • Member since
    December 2002
  • From: Reno, NV
Posted by espins1 on Saturday, November 1, 2008 11:18 AM

Thanks guys.

Fast Heinz - you are correct.  I must have made my runs short by only having 57 links.  That's what I get for assembling the tracks under the influence of a good bottle of Cabernet  Blush [:I]

Mobius - The light dusting technique is pretty good for any build as it helps to blend everything together very nicely in addition to replicating the layers of dust that build up so quickly.

Thanks for the Birthday wishes for the Mrs. The kids took us out for dinner and we had a really nice time.  It was nice having them pick up the tab for a change.  Smile,Wink, & Grin [swg] Dinner [dinner] Make a Toast [#toast]

Here are a few shots after some "mud washes".  I wish I had some MIG pigments in the stash as I think they would be perfect for the effect I'm looking for.  Unfortunately I was building the Char for the Blitzkrieg GB over at Armorama and didn't think of using them until it was too late to order them in time.  Basically what I did for the mud streaks is put little blobs of Burnt Umber and Raw Sienna oils on the top of the slab sides just under the tracks.  Then using just straight turpenoid and a wide brush I dabbed the turpenoid loaded brush along the edge of blogs so the pigments would run down the sides.  I also put a blob of burnt umber in each of the mud shoots and ran turpenoid through the shoots from the top (since I had opened them up earlier in the build Smile [:)] )

Scott Espin - IPMS Reno High Rollers  Geeked My Reviews 

  • Member since
    October 2008
  • From: Portland, Oregon
Posted by RickLawler on Saturday, November 1, 2008 6:54 AM

Looks great, Scott!


 espins1 wrote:
  I still need to do some oil washes on the turret and next up will be an attempt to get the streaks of mud and goo going down the huge flanks  

 This is the fun part! 

 Rick

  • Member since
    July 2006
  • From: New Jersey
Posted by redleg12 on Saturday, November 1, 2008 6:02 AM

Scott - Sorry I have not spoken up on this thread.....(I'm a bad boy!!!)....but went back through and as usual another great build.

First HAPPY BIRTHDAY to your lovely wife. Before any of this stuff....the household 6 is most important. I hope she had a great time at dinner!

(And now we will return to our normal programming) Like the the idea of the "spary wash" for dust. Nice decals...(were the hearts for the wife????).

I'll keep my eye on things...hopefully not get side tracked so long again.

Rounds Complete!!

"The Moral High Ground....A Great Place to Emplace Artillery."

  • Member since
    September 2007
  • From: Relocating
Posted by Mobious on Friday, October 31, 2008 9:55 PM

 Hello,

 espins1, really like the way "Dust" lightens the overall subject, very subtle. Be giving that a try also.

 Thanks again,

 Mobious

"It's a problem of applied physics" Roy Brown

  • Member since
    January 2007
  • From: Australia
Posted by Fast Heinz on Friday, October 31, 2008 9:55 PM

Hey Espins

Once again, great thread and fantastic job on the build. I'm a bit confused about one point though. In a previous post you mentioned that you had to add some links in addition to those required by the instructions. I'm about to start one of these and my instructions tell me that 61 links per side are required. When i count the links in yours, i come up with 61 also. Perhaps Tamiya have corrected an error in the instruction sheet and i can go with it (??).

Cheers 


I went to put on the tracks and found that I'm 4 links short on each side!  Black Eye <img src=" border="0" width="15" height="15" />  That's what I get for trusting the directions...

  • Member since
    December 2002
  • From: Reno, NV
Posted by espins1 on Friday, October 31, 2008 7:59 PM

Thanks Mobius!  Smile [:)]

Usually for dust coats I'll put about 2ml of Tamiay Thinner X-20A in the paint cup and add about .1 to .2 ml of XF-60 Dark Yellow, or better yet XF-57 Buff depending on the tint I want for the dust. Basically 10 to 20% paint pigment to thinner.  I then just mist it back and forth and all over the tank.  For this beast I'm concentrating most of the dust along the flanks with heavier emphasis along the bottom half.

Scott Espin - IPMS Reno High Rollers  Geeked My Reviews 

  • Member since
    September 2007
  • From: Relocating
Posted by Mobious on Friday, October 31, 2008 7:34 PM

Hello,

 The decals look great. How are you applying the "dust"? The blue hearts really look good on these pics. Very nice work.

 You and the Mrs. enjoy the evening!Make a Toast [#toast]

 Best Regards,

 Mobious

"It's a problem of applied physics" Roy Brown

  • Member since
    December 2002
  • From: Reno, NV
Posted by espins1 on Friday, October 31, 2008 5:55 PM

The dust skirts will be so dusty even a psychic wouldn't be able to tell what the original color was.... heh heh heh  Wink [;)]

Cruising right along.  The tracks have been installed and I put down another dust coat making it heavier as you go down the sides of the tank.  I still need to do some oil washes on the turret and next up will be an attempt to get the streaks of mud and goo going down the huge flanks before we go early vote and take my wife out to dinner for her birthday. Dinner [dinner] Make a Toast [#toast]


Scott Espin - IPMS Reno High Rollers  Geeked My Reviews 

  • Member since
    July 2004
  • From: Texas
Posted by wbill76 on Friday, October 31, 2008 4:04 PM

Scott,

Thanks for the explanation and the effects of the wash are spot on, very nice. Are you going to paint the rubber dust skirts a different color for the road wheels or leave them as is with the hull color? Very nice effects all around, looking forward to seeing it with the tracks on. I had the same problem with the instruction count on the track links per side, not sure how Tamiya got that one wrong but they did! Laugh [(-D]

  • Member since
    October 2007
  • From: N.H.
Posted by panzerguy on Friday, October 31, 2008 3:49 PM


   A beautiful job you've have done there mon amie.  Looking foward to seeing the tracks and the weathering scott.

     I bet those german gunners must have loved that big blue heart lol.

"Happiness is a belt fed weapon"

  • Member since
    December 2002
  • From: Reno, NV
Posted by espins1 on Friday, October 31, 2008 3:04 PM
Here are some updated photos as my Char appeared yesterday evening.  Keep in mind no weathering had been done on the turret at this point as I was still in the process of repairing the damage from removing the lifting hook and getting the heart decals to hunker down.  The hull has received a couple of oil washes using turpenoid and burnt umber oils.

I went to put on the tracks, only to find the runs 4 links short!  That's what I get for following the instructions and not dry fitting......  I've quickly assemble the sections, painted them, dry brushed and applied a wash.  I'll be putting the track sections on shortly.  Then comes another dust coat and some dot/streak washes.


Scott Espin - IPMS Reno High Rollers  Geeked My Reviews 

  • Member since
    December 2002
  • From: Reno, NV
Posted by espins1 on Friday, October 31, 2008 2:02 PM
 Mobious wrote:

Hello,

 espins1, tell the betterhalf Happy B-Day [bday]. Glad the surgery went well.

 The blue heart decals look to be settled down very well.

 Mobious

And thanks Mobius, I appreciate it.  The updated photos will show them off a little better.  Smile [:)]

Scott Espin - IPMS Reno High Rollers  Geeked My Reviews 

  • Member since
    December 2002
  • From: Reno, NV
Posted by espins1 on Friday, October 31, 2008 2:01 PM
 wbill76 wrote:

Scott,

Glad the surgery went ok and happy birthday to your wife! Kudos as well for voting early, it's something everyone should do regardless of political affiliation or candidate preference to have their voice heard.

I noticed in your latest batch of photos after you say you applied a dust coat and some oil washes that many of the decals have silvered. Did this happen because of one or more of the steps between this set of photos and the last set?  

Thanks Bill.  What you're seeing is just an anomoly that occurs whenever I do a dust coat before the oil washes.  They're really not silvering, it's just the effect the paint has against the clear background of the decal borders.  As soon as I got the first oil wash down that visual effect went away.  I'll get some updated photos shortly.  I went to put on the tracks and found that I'm 4 links short on each side!  Black Eye [B)]  That's what I get for trusting the directions.......  So I'm quickly painting the two short sections so I can then grubby them up and get them to the same stage the rest of the tracks are at.

Scott Espin - IPMS Reno High Rollers  Geeked My Reviews 

  • Member since
    September 2007
  • From: Relocating
Posted by Mobious on Friday, October 31, 2008 1:55 PM

Hello,

 espins1, tell the betterhalf Happy B-Day [bday]. Glad the surgery went well.

 The blue heart decals look to be settled down very well.

 Mobious

"It's a problem of applied physics" Roy Brown

  • Member since
    July 2004
  • From: Texas
Posted by wbill76 on Friday, October 31, 2008 1:48 PM

Scott,

Glad the surgery went ok and happy birthday to your wife! Kudos as well for voting early, it's something everyone should do regardless of political affiliation or candidate preference to have their voice heard.

I noticed in your latest batch of photos after you say you applied a dust coat and some oil washes that many of the decals have silvered. Did this happen because of one or more of the steps between this set of photos and the last set?  

  • Member since
    December 2002
  • From: Reno, NV
Posted by espins1 on Friday, October 31, 2008 12:41 PM
Thanks guys.  I had minor surgery yesterday to remove a cyst which was the result of a spider bit about 18 years ago. Shock [:O]  The surgery went fine and the pain isn't too bad... yet... the Vicodin have been seeing to that.    Cool [8D] 

Here are a few photos after the dust coat from the other day.  I was way too busy yesterday to get these posted.  I'm actually much farther along than these photos show.  Several oil washes have been done and I'm just about to apply another dust coat (which will be the first on the turret).  I was finally able to get the blue heart decal to settle down over the hatch/visor on the turret.  The lifting hook has been reattached over the decal and painted blue as well.  I'll post the new pics in a little bit.  We're going to go early vote (McCain!) this morning and its my wife's birthday today! Happy B-Day [bday]


Scott Espin - IPMS Reno High Rollers  Geeked My Reviews 

  • Member since
    January 2007
  • From: Australia
Posted by Fast Heinz on Thursday, October 30, 2008 7:21 PM

Great Thread. I'm about to start one of these myself, having just finished a Centurion, so the build tips and references will be very helpful and much appreciated.

Love the one about the Mr Surfacer and Alcohol. There have been a few times i could have used that in the past and saved myself some frustration.

Cheers

  • Member since
    February 2008
  • From: ladner BC Canada
Posted by stick man on Thursday, October 30, 2008 6:55 PM
 espins1 wrote:
 the doog wrote:

Looking cool, Scott!

Hey! Shock [:O] Isn't that like, a Spitfire airplane decal on the back there?!? Smile,Wink, & Grin [swg]

I like to think of it as a "bulls eye" for the Stukas!   Whistling [:-^]

I wonder how meny German gunners had fun aming at that tagetWhistling [:-^]

Nice job so far the camo is realy cool.

Smile [:)]

I'm 15 and I model I sk8board and I drum what could be better.
  • Member since
    April 2005
  • From: Piscataway, NJ!
Posted by wing_nut on Thursday, October 30, 2008 6:53 PM
That camo is looking real nice. The markings sure are brightWink [;)]

Marc  

  • Member since
    September 2007
  • From: Relocating
Posted by Mobious on Thursday, October 30, 2008 6:47 PM
 espins1 wrote:
 the doog wrote:

Looking cool, Scott!

Hey! Shock [:O] Isn't that like, a Spitfire airplane decal on the back there?!? Smile,Wink, & Grin [swg]

I like to think of it as a "bulls eye" for the Stukas!   Whistling [:-^]

 LOLLaugh [(-D]Laugh [(-D]Laugh [(-D]

 BTW, Thanks for the tip with the Mr Surfacer/Alcohol espins1. I know I'll be using that one for sure.

"It's a problem of applied physics" Roy Brown

  • Member since
    July 2004
  • From: Texas
Posted by wbill76 on Thursday, October 30, 2008 1:54 PM
Almost done with this one Scott, looking good so far! The roundel on the rear deck ironically was to prevent "friendly fire" incidents...but turned out to be something different I think in the end. Laugh [(-D]
  • Member since
    December 2002
  • From: Reno, NV
Posted by espins1 on Thursday, October 30, 2008 12:59 PM
 the doog wrote:

Looking cool, Scott!

Hey! Shock [:O] Isn't that like, a Spitfire airplane decal on the back there?!? Smile,Wink, & Grin [swg]

I like to think of it as a "bulls eye" for the Stukas!   Whistling [:-^]

Scott Espin - IPMS Reno High Rollers  Geeked My Reviews 

  • Member since
    January 2007
Posted by the doog on Thursday, October 30, 2008 10:28 AM

Looking cool, Scott!

Hey! Shock [:O] Isn't that like, a Spitfire airplane decal on the back there?!? Smile,Wink, & Grin [swg]

  • Member since
    December 2002
  • From: Reno, NV
Posted by espins1 on Thursday, October 30, 2008 10:18 AM
I've done several oil washes and am working on building up the streaking on the flanks of the Char B1 bis. I've just about got the blue heart shaped decal that goes on the right side of the turret hunkered down over the hatch and visor. Repeated applications of micro-sol are slowly doing the trick. I'll post some update photos later today or tomorrow. It all depends on how I feel after my outpatient surgery (very minor) at 2pm this afternoon.

Anyway, it will be finished by tomorrow.

Scott Espin - IPMS Reno High Rollers  Geeked My Reviews 

  • Member since
    December 2002
  • From: Reno, NV
Posted by espins1 on Tuesday, October 28, 2008 11:26 AM

Thanks guys, I appreciate the compliments and the interest.  That was a very challenging paint scheme.  Shock [:O]

The decals are finished on the lower hull.  I ran into a problem with the turret though.  There are three big blue heart decals that need to go on the sides and back of the turret.  Unfortunately, there is a lifting hook on the left side that is right where one of the hearts is supposed to go.  I had to pry the hook off so I could get the decal on, and was planning on just reattaching the hook after and painting it blue.  I managed to damage the side of the turret in the process as the lifting hook was very securely attached to the turret.  I applied Mr. Surfacer last night (two applications), sanded it down this morning and repainted that side.  Hopefully the paint will be dried and stable enough to get the decals on as soon as I get home tonight.  I'm going to go ahead and start weathering the hull, which is fine because it's going to be a lot filthier than the turret. 


Scott Espin - IPMS Reno High Rollers  Geeked My Reviews 

  • Member since
    April 2007
  • From: Schroon Lake, NY
Posted by SMJmodeler on Tuesday, October 28, 2008 10:32 AM
Scott: I was wondering where this build went...TOP NOTCH camo' there sir!  I saw a couple really nice Char B1 bis at  Nationals and AMPS East...looks like you've got a beauty there yourself!

  • Member since
    January 2007
Posted by the doog on Tuesday, October 28, 2008 12:20 AM
Scott, your brush painting of this tank is impeccable! It's really stunning! And with Tamiya paints yet--WOW!
  • Member since
    October 2008
  • From: Portland, Oregon
Posted by RickLawler on Monday, October 27, 2008 9:17 PM

I've finally had the opportunity to read through your build...very nice, you've done some good building.

The painting steps are looking good as well.  I generally shy away from brushing Tamiya paints, but you seem to have tamed them just fine.  Very attractive camo scheme.

Rick

  • Member since
    September 2007
  • From: Relocating
Posted by Mobious on Monday, October 27, 2008 9:06 PM

 Hello,

 Fine looking camo. Looking back over your WIP and noticed the number of roadwheels the Char-B had. Wow, that's a lot of wheels. A really well executed build, the paint looks great. Be looking forward to weathering. Best of luck with the research project sounds very intriguing. Have read a couple books on the "Blitzkrieg Era" but nothing really detailed enough to list individual tanks or commanders.

 Keep up the excellent work, hope you're feeling better.

 Mobious

"It's a problem of applied physics" Roy Brown

  • Member since
    January 2005
  • From: Las Vegas
Posted by dood_dood on Monday, October 27, 2008 8:19 PM

You wield a steady brush, my friend!  That looks excellent. 

Have you tried silly putty for hard edge?  My Char B was my first attempt.  Used it many times since for hard edge.

  • Member since
    December 2002
  • From: Reno, NV
Posted by espins1 on Monday, October 27, 2008 10:47 AM

Thanks guys.  I appreciate the comments and the interest.  The tracks were an absolute dream to assemble.  They've been painted, and metallic gray has been drybrushed on the upper surfaces.

The camouflage has been painted  Shock [:O]   Much of it was done by hand so the pattern would have a hard edge to it.  I used Tamiya Acrylics (as always) and thinned it a bit more than 50% so it would flow well and be brush mark free.  I then painted the outlines for the green striping so I could fill them in using the airbrush, although the turret was done entirely by hand.  I got the idea of hand painting the outlines from an excellent article that Mike Rinaldi did documenting his builds of 4 different Char B1 bis in MMiR.  I had to go back over some of the tan areas, again with highly thinned paint to fix a bit of the green over spray here and there.  Up next, decals!


Scott Espin - IPMS Reno High Rollers  Geeked My Reviews 

  • Member since
    November 2007
  • From: Wisconsin Rapids, WI
Posted by moose421 on Saturday, October 25, 2008 8:01 AM

Looking real killer.  Your Char is an odd duck, and I must resist the urge.  To buy one that is.  Between your wip and wbill76's would make such adventure alot easier.  Keep up the great work.

Off to the basement, my tiger is crying for some more washes.


  • Member since
    March 2007
  • From: NJ
Posted by JMart on Friday, October 24, 2008 7:47 PM
great build and great blos as usual scott, great job and thanks for all the tips!


  • Member since
    July 2004
  • From: Texas
Posted by wbill76 on Friday, October 24, 2008 11:53 AM
Making great progress here Scott, the Tamiya click-together tracks are a dream to assemble aren't they? It's too bad that type of arrangement can't be used more often with tracks, it would sure cure a lot of headaches for builders if they could. Looking forward to seeing this one with the paint scheme on! Thumbs Up [tup]
  • Member since
    September 2007
  • From: Relocating
Posted by Mobious on Friday, October 24, 2008 11:48 AM

 Hello,

 Great lOOking build, espins1. Tracks look great. Looking forward to comparison pics.

 Best Regards,

 Mobious

"It's a problem of applied physics" Roy Brown

  • Member since
    December 2002
  • From: Reno, NV
Posted by espins1 on Friday, October 24, 2008 11:00 AM
 espins1 wrote:
 the doog wrote:

Hey Scott--that's looking great!

How big is this sucker? Can you take a shot next time next to a Sherman or a Tiger for comparison?

Thanks Karl and you bet!  I'll post a pic with my Tiger I S33 "Das Reich" tonight.

Whoops, forgot to take the photo last night, had a brutal headache when I got home which was cured by some red wine and an early bed time.  Zzz [zzz]

Scott Espin - IPMS Reno High Rollers  Geeked My Reviews 

  • Member since
    December 2002
  • From: Reno, NV
Posted by espins1 on Friday, October 24, 2008 10:58 AM
 adb2323 wrote:

Hi Scott, nice work on the bis so far. (I have the German version waiting to be built...)  I have a question regarding the Tamiya surface primer.  Are you using the bottled primer and airbrushing it? If so, how much do you thin it and what thinner do you use? 

Thanks,

Al B.

Thanks Al.  The Tamiya primer I'm using comes in a "rattle can", so I just quickly spray it in even strokes.  

Scott Espin - IPMS Reno High Rollers  Geeked My Reviews 

  • Member since
    August 2007
Posted by adb2323 on Friday, October 24, 2008 10:39 AM

Hi Scott, nice work on the bis so far. (I have the German version waiting to be built...)  I have a question regarding the Tamiya surface primer.  Are you using the bottled primer and airbrushing it? If so, how much do you thin it and what thinner do you use? 

Thanks,

Al B.

  • Member since
    December 2002
  • From: Reno, NV
Posted by espins1 on Wednesday, October 22, 2008 10:28 AM
 the doog wrote:

Hey Scott--that's looking great!

How big is this sucker? Can you take a shot next time next to a Sherman or a Tiger for comparison?

Thanks Karl and you bet!  I'll post a pic with my Tiger I S33 "Das Reich" tonight.

Scott Espin - IPMS Reno High Rollers  Geeked My Reviews 

  • Member since
    January 2007
Posted by the doog on Wednesday, October 22, 2008 10:17 AM

Hey Scott--that's looking great!

How big is this sucker? Can you take a shot next time next to a Sherman or a Tiger for comparison?

  • Member since
    December 2002
  • From: Reno, NV
Posted by espins1 on Wednesday, October 22, 2008 10:12 AM

Tanks Marc.  I hope you're recovering quickly!

The painting has begun!  I use Tamiya Acrylics exclusively.  The tracks have been sprayed with a 1 to 1 ratio of XF-56 Metallic Gray/XF-64 Red Brown.  That mixture was then thinned with X-20A Tamiya thinner in approximately a 50/50 ratio.  The base coat has also been sprayed.  I used a 2 to 1 ratio of XF-59 and XF-60 Desert Yellow XF-60 Dark Yellow, again thinned to about a 50/50 mix with Tamiya X-20A thinner.   


Scott Espin - IPMS Reno High Rollers  Geeked My Reviews 

  • Member since
    April 2005
  • From: Piscataway, NJ!
Posted by wing_nut on Tuesday, October 21, 2008 10:52 AM
Looking good Scott.  Snap together tracks? very handy.  I've done that wipe off thing with Tamiya putty and acetone, nefer with Mr. Surfacer.  That's is handy stuff.  I just used Mr. S. 500 to make some weld beads on the 251 i am working on.

Marc  

  • Member since
    December 2002
  • From: Reno, NV
Posted by espins1 on Tuesday, October 21, 2008 10:02 AM
Thanks guys.  I can't take credit for the technique though, I picked it up from the excellent Master Class Model Building Video "Building the Bf 109G-6" by Floyd S. Werner Jr.  

The tracks are assembled and I must say, these have got to be the easiest individual track links, they simply snap together.  The joins are very strong which allows you to handle the tracks as much as you want without coming apart.  I used a medium sanding stick to scuff the highest part of the track links to simulate the scuffing that appears from the tank driving over hard surfaces which can clearly be seen in most good photos of the Char B1 bis.  


Scott Espin - IPMS Reno High Rollers  Geeked My Reviews 

  • Member since
    November 2005
Posted by Anonymous on Monday, October 20, 2008 7:45 PM
Great looking build and nice tip on the Surfacer...
  • Member since
    March 2003
  • From: Rain USA, Vancouver WA
Posted by tigerman on Monday, October 20, 2008 5:43 PM
This is too funny. I came across a bottle of Mr. Surfacer the other day and wondered why I bought it. I believe after looking at your demonstration, it must have been for the same purpose. Thanks and btw, the Char is looking great so far.

   http://i7.photobucket.com/albums/y269/wing_nut_5o/PANZERJAGERGB.jpg

 Eric 

  • Member since
    December 2006
  • From: N. Georgia
Posted by Jester75 on Monday, October 20, 2008 5:40 PM
Looking pretty sweet!!Thumbs Up [tup]

Eric


  • Member since
    November 2006
  • From: Massachusetts
Posted by jadgpanther302 on Monday, October 20, 2008 5:35 PM
looks nice!
  • Member since
    December 2002
  • From: Reno, NV
Posted by espins1 on Monday, October 20, 2008 4:34 PM

I replicated the pigtail lifting hook for Bourrasque using a wire type item from my wife's misc. craft supply box that already had loops of about the right size in them.  It worked perfectly.  I just pulled the end of the loop out a bit, carefully filed the tip to a point and then gently bent it back in (but not all the way).  I drilled a hole into the plastic to mount it above the 75mm gun on the top of the mantlet assembly and voila, the pigtail lifting hook is good to go!  Looking at my reference photos, it was apparent to me that the lifting hooks were crafted individually, and mounted in all sorts of ways so that each tank was unique.  Bourrasque's was installed parallel with the front of the tank, with the pigtail point on the front.  Other Char's had them flipped the opposite way, or even perpendicular to the front, so check your reference photos if you're building one of these.


I am rapidly running out of time as I'm building this tank for the Blitzkrieg Group Build over at www.armorama.com which ends at the end of this month, so I think I'm going to skip rest of the corrections I had planned (the 6 bolts on the 75mm gun mantlet and the mud scrapers).  

The seam corrections are complete as well.  I used Mr. Surfacer 1000, Q-tips and 91% Isopropyl Alcohol to fill in the seam errors with this kit.  This is a great technique for filling in seams, especially if there is delicate detail in the area or there are hard to reach places.  This way you won't damage anything, unlike the fill and sand technique.  Just apply the Mr. Surfacer with a toothpick or small brush.  After it has dried simply dip the end of a Q-tip in the 91% Isopropyl Alcohol (squeeze a bit off so you don't flood the model) then just gently rub the area where the seam is.  It may take a few moments for the alcohol to begin dissolving the Mr. Surfacer, longer if it has thoroughly dried and cured.  You may need to apply more Mr. Surfacer and repeat the process a couple of times until the seams are filled to your satisfaction.  I did one more application after these photos and carefully cleaned up any Mr. Surfacer residue using Q-tips and the alcohol.


I sprayed on a coat of Tamiya gray primer yesterday evening so now it's ready for the base coat.


Scott Espin - IPMS Reno High Rollers  Geeked My Reviews 

  • Member since
    April 2007
  • From: Schroon Lake, NY
Posted by SMJmodeler on Tuesday, July 8, 2008 8:35 AM

Scott:  "It's only a flesh wound"...

...Still a nasty looking beast, nice build though, really cleanThumbs Up [tup]!!!

  • Member since
    March 2007
  • From: NJ
Posted by JMart on Monday, July 7, 2008 6:08 PM
excellent build as usual... great thread! Your pictures are also top notch, look forward to the paint! Thanks for sharing your build log, and everyone that has added reams of good info to this one... a bookmark for sure! cheers


  • Member since
    June 2005
  • From: San Tan Valley,AZ
Posted by smokinguns3 on Monday, July 7, 2008 4:16 PM
Nice work there Scott.
Rob I think i can I think i can
  • Member since
    December 2002
  • From: Reno, NV
Posted by espins1 on Monday, July 7, 2008 4:07 PM
 wbill76 wrote:

Making good progress Scott, have you settled on a vehicle yet? Since you've opted for the spaced fenders, it'll have to be an earlier numbered vehicle but still leaves some good choices out there. Check out this listing on the Char-Francais site if you haven't already: http://www.chars-francais.net/new/index.php?option=com_content&task=view&id=524&Itemid=66

My all-time favorite is "Fantasque".

Thanks guys.

Bill, I'll have to agree with you on that one.  The paint scheme for Fantasque is killer!  I'm going to have to build another Char B1 bis which I'd like to do in that scheme, although that would be a tough one to paint.  That web site is a wealth of information.  In fact, I've compiled a document with the data from each individual link for each of the tanks all into a single document, which I've been translating into English for my own purposes.  It is time consuming, but will make a great reference!  

I was on a roll with the build and went for the configuratoin found on Bourrasque and will probably stick with that scheme, although I may change my mind at the last minute to another one that matches that configuration. 

Scott Espin - IPMS Reno High Rollers  Geeked My Reviews 

  • Member since
    July 2004
  • From: Texas
Posted by wbill76 on Monday, July 7, 2008 2:45 PM

Making good progress Scott, have you settled on a vehicle yet? Since you've opted for the spaced fenders, it'll have to be an earlier numbered vehicle but still leaves some good choices out there. Check out this listing on the Char-Francais site if you haven't already: http://www.chars-francais.net/new/index.php?option=com_content&task=view&id=524&Itemid=66

My all-time favorite is "Fantasque".

  • Member since
    May 2007
Posted by Specter on Monday, July 7, 2008 12:48 PM
Looking goodThumbs Up [tup]
Seth
  • Member since
    November 2005
Posted by Anonymous on Monday, July 7, 2008 12:44 PM
Very clean build...should paint up nicely...
  • Member since
    December 2002
  • From: Reno, NV
Posted by espins1 on Monday, July 7, 2008 11:24 AM

I made a lot of progress on the Char B1 bis this weekend.  I took in progress photos but now that most of the assembly is complete it seems a bit redundant to post the earlier photos.  There are a few more detail parts to attach, such as the rear turret hatch, jacks, lifting hooks etc.  I also need to fix the seam between the turret and the turret ring.  The tow chain will be attached later after painting, but before weathering.  Burger [BG]


Scott Espin - IPMS Reno High Rollers  Geeked My Reviews 

  • Member since
    December 2002
  • From: Reno, NV
Posted by espins1 on Saturday, July 5, 2008 12:24 PM
 bufflehead wrote:

Hey Scott!  I missed your original post early this week, I had no idea you were building this!!  Great WIP on a vehicle thats starting to get the attention it deserves!  I'm really glad Tamiya released this kit and I'm itching to get one myself.  I'm going to keeping a close eye on this WIP post!  BTW, your photos are getting better and better!!  Did you change your photo setup?

Oh, and sorry about your smoky skies.....darn California widlfires!!  I also had some respiratory problems a couple of weeks ago and it was kind of strange to wake up to orange skies!

Thanks Ernest.  Yes, I changed my lighting and am using a different background, which seems to be helping.  I always loved the black background, but it really messes up the light metering on the camera.  The light baby blue seems to work much better.  Having a big and small tripod makes a big difference as well.  

I'm still taking my anti-biotics and nasonex and am slowly feeling better.  The skies are still a little bit smokey here, but not as bad as they were last week or the other day.  

I can say one thing, there is nothing like the fit and engineering of a Tamiya kit!  The fit is pretty good!  

Scott Espin - IPMS Reno High Rollers  Geeked My Reviews 

  • Member since
    July 2006
  • From: San Francisco Bay Area
Posted by bufflehead on Saturday, July 5, 2008 12:21 PM

Hey Scott!  I missed your original post early this week, I had no idea you were building this!!  Great WIP on a vehicle thats starting to get the attention it deserves!  I'm really glad Tamiya released this kit and I'm itching to get one myself.  I'm going to keeping a close eye on this WIP post!  BTW, your photos are getting better and better!!  Did you change your photo setup?

Oh, and sorry about your smoky skies.....darn California widlfires!!  I also had some respiratory problems a couple of weeks ago and it was kind of strange to wake up to orange skies!

Ernest

Last Armor Build - 1/35 Dragon M-26A1, 1/35 Emhar Mk.IV Female


Last Aircraft Builds - Hobby Boss 1/72 F4F Wildcat & FW-190A8


  • Member since
    December 2002
  • From: Reno, NV
Posted by espins1 on Saturday, July 5, 2008 12:21 PM
 wbill76 wrote:

Scott,

If you want some variety, check out Echelon's set for the Char B1 bis, they've got quite a few vehicles to choose from and different schemes as well.

Those are some nice decals, but you know me.  I have to know about the tank, where it served and the exploits of its crew.  Its slow going doing the researc, but I've stumbled upon a great way to make all the great resources in French usable by saving the web page, pasting it into MS Word, then copying the French text into a free translator, such as Yahoo's Babelfish.  Then I paste the text back in overwriting the French.  Each word is translated literaly, but I an almost always figure out what they were trying to say, which has really opened up the resources available to me for this build.  It's a bit painstaking, but when printed out it's almost like having an English version of the text with pictures! I've been doing something similar with selected pages from the "Chars B au Combat" book.  

These are exciting times to be alive my friends!  I am a lot further along with the build now, and will post some more pictures when I finish some more of the exterior.  Tongue [:P]

Scott Espin - IPMS Reno High Rollers  Geeked My Reviews 

  • Member since
    April 2008
  • From: Canadian Prairies
Posted by caSSius on Friday, July 4, 2008 8:21 PM
 espins1 wrote:

having a hard time finding resources in English. 

Looking good so far Scott. If you're still looking for reference material, I have a copy of "Trackstory 03 - Les Chars B: B1-B1bis-B1ter", a 64 page bilingual (french/english) chronology of the tank from concept to operational units. It has colour plates, scale line drawings, explanation of all markings, etc.. If you're interested, let me know and we'll figure out a way for you to get a look at it.

Brad

"Only those who will risk going too far can possibly find out how far one can go."

- T.S. Eliot


  • Member since
    July 2004
  • From: Texas
Posted by wbill76 on Friday, July 4, 2008 6:38 PM

Scott,

If you want some variety, check out Echelon's set for the Char B1 bis, they've got quite a few vehicles to choose from and different schemes as well.

  • Member since
    March 2007
  • From: NJ
Posted by JMart on Friday, July 4, 2008 6:26 PM

Great work so far, and i always enjoy the extra historical info you bring to the table.

I love that tank, I learned to respect it on my wargamer years when they used to slaughter my Pzs.. lol.. if the French had a different doctrine, history would have unravelled in a vastly different way! Looking forward to the rest!


  • Member since
    May 2006
  • From: Queensbury,NY
Posted by panzer88 on Thursday, July 3, 2008 9:55 PM
Looking good. I'll be following this build with great interest. I've been on the fence on this one since it came out, now I 'll get my answer without having to spend any money. Unless that is I decide to pick this one up. Thanks.


  • Member since
    December 2002
  • From: Reno, NV
Posted by espins1 on Thursday, July 3, 2008 12:45 PM
 SMJmodeler wrote:

Scott:  Let's just say the French woman are more enjoyable to look at than their tanks.  That is one nasty looking beast, but I'm sure your talents will do it justice!  Are you planning to replicate the box cover paint scheme?  Nice work so farThumbs Up [tup]

Here's one....We are the knights that say, NEE!

"I blow my nose at you silly Arthur King!  Now go before I taunt you a second time!"

I'll have to agree with you about the French women.  ooh la la!  Kisses [:X]

As it stands right now I'm planning on doing mine as "Bourrasque" which I believe means "Squall" or "Gust of Wind" which is the scheme on the box cover.  I am trying to do more research on the individual tanks and commanders but am having a hard time finding resources in English.  You know me, I like to build my models to represent a moment in time and to honor the men and machines.  If I can find some good reading about some of the Char B1 bis and their crews that kicked a little butt then I'd be interested in modeling one of those instead.  Heck, so far I haven't been able to find anything about the combat record of Bourrasque.  Although, if I keep chipping away at the book "Chars B au Combat" by scanning and translating sections I might be able to find the answers I need.  I don't know about you guys, but I LOVE the research part of model building.  Cool [8D]

Scott Espin - IPMS Reno High Rollers  Geeked My Reviews 

  • Member since
    April 2007
  • From: Schroon Lake, NY
Posted by SMJmodeler on Thursday, July 3, 2008 12:07 PM

Scott:  Let's just say the French woman are more enjoyable to look at than their tanks.  That is one nasty looking beast, but I'm sure your talents will do it justice!  Are you planning to replicate the box cover paint scheme?  Nice work so farThumbs Up [tup]

Here's one....We are the knights that say, NEE!

  • Member since
    December 2002
  • From: Reno, NV
Posted by espins1 on Thursday, July 3, 2008 10:33 AM

 tigerman wrote:
This is kind of one of those cool ugly vehicles, much like the KV-II. I look forward to what you will do with this beast.

I agree, it has a beauty all its own.  The Char B1 bis is growing on me, and so is the Somua S-35!  I'm going to have to add one of those to the stash too.  Cool [8D]

Scott Espin - IPMS Reno High Rollers  Geeked My Reviews 

  • Member since
    December 2002
  • From: Reno, NV
Posted by espins1 on Thursday, July 3, 2008 10:22 AM
 panzerguy wrote:


  Scott looking foward to seeing more of this.I've seen one of these at just about every show I've been to but this is the first wip.

  Interesting thing about the Char, at the outbreak of WWII it was considerd on of the best tank's at that time,fire power and armor, and could have been a real problem for the Germans if the French had used them in the way that some of their General's had wanted.

The Char B1 bis definately had some strengths, that's for sure.  The Germans had a heck of a time trying to knock them out.  The 37mm Anti-tank guns and 20mm and 37mm Tank guns couldn't give it anything more than a scratch.  Eventually, the Germans figured out that the engine intake grill on the left hand side was a weak spot and exploited that to at least give them a fighting chance against them.  

The Germans shouldn't have been in that position however.  Guderian had been pushing for a 50mm gun for the Pz.Kpfw. III for quite some time which would have greatly increased the punching power.  Later, when Hitler finally gave the order to upgun AT and Tank guns to 50mm, someone diverted production and the 50mm AT gun was produced first.  That greatly put the Germans at a disadvantage when they encountered the T-34!  Black Eye [B)]

Scott Espin - IPMS Reno High Rollers  Geeked My Reviews 

  • Member since
    December 2002
  • From: Reno, NV
Posted by espins1 on Thursday, July 3, 2008 10:08 AM
 T26E4 wrote:

Here's a quick list of tweaks:

  1. fill the vertical seam on the driver's armor, parts B29 and the upper hull
  2. fill the seam of the 75mm mantlet D4 and where it meets D10 (it's supposed to be a single casting)
  3. add the "pigtail" hook atop D10
  4. add a seam to the upper turret parts C23 and C22
  5. add 3 lifting horns to the commander's cupola
  6. consider adding a row of rivets atop the sponsons at the outer edge
  7. open the mud chute

I think I listed all my tweaks on my build log.  Contact me offsite if you want my full nitpick list!  LOL

Thanks for the list of tweaks Roy, I appreciate it. I already dealt with the mud shoot issue, I'm still puzzled why Tamiya makes no mention of cutting that out, yet it's framed on the underside just like the spots where you have to drill holes.  I plan on spending a lot of time on the Char B1 bis this weekend and have been scouring all my references. 

I picked up an excellent book "Chars B au Combat" which is a wealther of information, but it's all in French.  I would pay big bucks for an English translation of the book.  I experimented last night with scanning a page of the book, converting it to text using Microsoft's document imagining software, sent it to MS Word, then copy and pasted the text into Babel Fish online to translate.  It worked out ok, but sometimes it takes a while to completely understand a sentence because the text is translated literally word for word.

I really want to research this tank, the units, the men etc. just as deeply as I research all my German armor projects but am having a hard time finding good resources in English.

Scott Espin - IPMS Reno High Rollers  Geeked My Reviews 

  • Member since
    May 2007
Posted by Specter on Thursday, July 3, 2008 8:08 AM
Good job so far and get well soonSmile [:)]
Seth
  • Member since
    July 2003
  • From: On my kitchen counter top somewhere in central North Carolina.
Posted by disastermaster on Wednesday, July 2, 2008 9:15 PM

 Hope ya get better soon. It's really aggravating when you tilt your head down to work and your nose starts a running.

The image “http://th76.photobucket.com/albums/j37/InfolinkNetzwerk/smileys/th_krank1.gif” cannot be displayed, because it contains errors.

 https://i.imgur.com/LjRRaV1.png


  • Member since
    December 2002
  • From: Reno, NV
Posted by espins1 on Wednesday, July 2, 2008 11:09 AM

Nasonex and anti-biotics.... I think I'm going to live now.  Laugh [(-D]

I decided to go ahead and cut out the opening for the mud shoots on the upper housing for the suspension components.  I simply used a 1mm bit in my pin vise and used it to create a perforated rectangle slightly smaller than the opening.  It was very easy to cut the piece of plastic out with an X-acto knife.  I then carefully used flat and rounded files, in addition to sanding sticks to clear the opening right up to edge of its correct shape.  I'm glad I did that as it really adds a lot to the look of the mud shoots, in fact you can see right through them now... way cool.  Cool [8D] I find it odd that Tamiya makes no mention of cutting out the openings, even though the opening is framed on the underside and clearly should be cut out.  Question [?]

I have a lot more progress done, but didn't have time to photograph.  I'll post another update this evening.

Scott Espin - IPMS Reno High Rollers  Geeked My Reviews 

  • Member since
    April 2005
  • From: Piscataway, NJ!
Posted by wing_nut on Wednesday, July 2, 2008 7:04 AM

Make sure you stay healthy so you can get this finished.  Oh and for the other reasons too like family, friends blah blah blahWink [;)]

Here in NJ we have that same grungy vaporous stuff that irritates eyes and lungs whenever you go outside.... we call it air.Dead [xx(]


Marc  

  • Member since
    March 2007
  • From: NJ
Posted by JMart on Tuesday, July 1, 2008 5:30 PM
excellent build log as usual Scott, looking good so far, again appreaciate all the pics and explanations! A must bookmark for anyone interested in the Bis


  • Member since
    December 2002
  • From: Reno, NV
Posted by espins1 on Tuesday, July 1, 2008 4:08 PM
 agentg wrote:

Good to see something other than a Pzkpfw something or other. Smile [:)] I'm liking it already.

BTW how's the fire situation up yonder thataway?

Friends in wine country had some anxious moments as did a casino shift manager friend of mine in Temecula.

Thanks for the comments and the intereste gentlemen, I appreciate it!

It had been really smokey in the Reno area from the California fires for about a week and a half.  As you can imagine, it caused many people to have sinus and respiratory problems.  We pretty much stayed indoors as much as we could, with the exception of going out in the yard to handwater the garden and flowers.  It gave me a nasty sinus infection, in fact, I'm heading off to the Dr. office right now to deal with that. 

If I'm up to it, I'll work some more on the Char this afternoon and post update pics this evening.

Scott Espin - IPMS Reno High Rollers  Geeked My Reviews 

  • Member since
    November 2005
Posted by T26E4 on Tuesday, July 1, 2008 1:36 AM

Here's a quick list of tweaks:

  1. fill the vertical seam on the driver's armor, parts B29 and the upper hull
  2. fill the seam of the 75mm mantlet D4 and where it meets D10 (it's supposed to be a single casting)
  3. add the "pigtail" hook atop D10
  4. add a seam to the upper turret parts C23 and C22
  5. add 3 lifting horns to the commander's cupola
  6. consider adding a row of rivets atop the sponsons at the outer edge
  7. open the mud chute
I think I listed all my tweaks on my build log.  Contact me offsite if you want my full nitpick list!  LOL

Roy Chow 

Join AMPS!

http://www.amps-armor.org


  • Member since
    April 2008
  • From: Commonwealth of Virginia
Posted by USArmyFAO on Tuesday, July 1, 2008 1:04 AM
I build 1/48th Armor and aircraft, but boy is this tank on my short list (probably right at the top) should I take the plunge and [gulp] start building 1/35th armor - unless Mr. Tamiya kicks one out in quarter scale.  I love this tank and its history.  Looking forward eagerly to your build!  Happy Modelling!

Cheers, Matt

"If we increase the size of the penguin until it is the same height as the man and then compare the relative brain size, we now find that the penguin's brain is still smaller. But, and this is the point, it is larger than it *was*."

  • Member since
    March 2003
  • From: Rain USA, Vancouver WA
Posted by tigerman on Tuesday, July 1, 2008 12:34 AM
This is kind of one of those cool ugly vehicles, much like the KV-II. I look forward to what you will do with this beast.

   http://i7.photobucket.com/albums/y269/wing_nut_5o/PANZERJAGERGB.jpg

 Eric 

  • Member since
    June 2008
Posted by scrambler8 on Monday, June 30, 2008 9:28 PM
Nicely done! I'm glad you posted this thread. I've been thinking about buying and building the B1 kit. You've increased my level of motivation. Thanks.
  • Member since
    November 2005
Posted by T26E4 on Monday, June 30, 2008 7:56 PM
Scott: I built one two years ago and have started another because I got one in a good trade.  If you want to look at another build blog have a look here.  Have fun!  I surely did.

Roy Chow 

Join AMPS!

http://www.amps-armor.org


  • Member since
    December 2007
  • From: Bridgeview, Illinois
Posted by mg.mikael on Monday, June 30, 2008 6:33 PM
So far your Char looks fantastic! Can't wait to you start painting.Thumbs Up [tup]Smile [:)]

"A good plan executed now is better than a perfect plan next week." - George S. Patton

  Photobucket 

  • Member since
    October 2007
  • From: N.H.
Posted by panzerguy on Monday, June 30, 2008 5:16 PM


  Scott looking foward to seeing more of this.I've seen one of these at just about every show I've been to but this is the first wip.

  Interesting thing about the Char, at the outbreak of WWII it was considerd on of the best tank's at that time,fire power and armor, and could have been a real problem for the Germans if the French had used them in the way that some of their General's had wanted.

"Happiness is a belt fed weapon"

  • Member since
    July 2004
  • From: Texas
Posted by wbill76 on Monday, June 30, 2008 4:46 PM

Scott,

Since Tamiya uses the polycaps, the idlers and sprockets remain fully rotatable once assembled. I made sure to paint them completely so as not to have any "bare plastic" showing through.

  • Member since
    December 2002
  • From: Reno, NV
Posted by espins1 on Monday, June 30, 2008 4:34 PM

Thanks guys. It's been fun researching this tank and learning all kinds of new things, especially about French armor and their "flawed" military doctrine in the use of their tanks.  The Char B1 bis had good potential, as did the Somua S35, but they were poorly deployed and the logistics/support structures in place for them was inadequate. 

Bill - I had already checked out your log for some pointers before I began.  I really liked the ways yours turned out.  I meant to ask you, did you have any problems painting the idlers with the idlers and hull completely assembled? 

Marc - I may have to make a trip back east!  Wink [;)]

Scott Espin - IPMS Reno High Rollers  Geeked My Reviews 

  • Member since
    October 2004
  • From: League City, Texas
Posted by sfcmac on Monday, June 30, 2008 3:39 PM
 Thanks for posting your build. I have alwats been curious about this kit.
  • Member since
    April 2005
  • From: Piscataway, NJ!
Posted by wing_nut on Monday, June 30, 2008 3:33 PM
Nice start Scott. I don't know anything about the Char either but it is an interesting looking vehicle.  At MosquitoCon since I am in a bunch of aircraft categories, I end up judging the armor. (I guess I'll be judging aircraft next yearWhistling [:-^]) and there is always a Char involved in the final decision.  Dunno why that is, but maybe you should bring it to NJ next yearWink [;)]

Marc  

  • Member since
    July 2004
  • From: Texas
Posted by wbill76 on Monday, June 30, 2008 3:24 PM
Off to a great start Scott, I built this one at the start of last year and kept a Build Log of it that you might find helpful. There's some little things that can be done to the kit to make it more accurate without too much difficulty, the real challenge will be deciding which style of fenders you go with based on the vehicle you decide to model. It's a great kit to build, the click-together tracks in particular are very very nice. Looking forward to seeing what you do with this one!
  • Member since
    November 2005
Posted by Anonymous on Monday, June 30, 2008 3:17 PM
Looking good....
JOIN OUR COMMUNITY!

Our community is FREE to join. To participate you must either login or register for an account.

SEARCH FORUMS
FREE NEWSLETTER
By signing up you may also receive reader surveys and occasional special offers. We do not sell, rent or trade our email lists. View our Privacy Policy.