SEARCH FINESCALE.COM

Enter keywords or a search phrase below:

Trumpeter 1/350 HMS Dreadnought 1907

37090 views
113 replies
1 rating 2 rating 3 rating 4 rating 5 rating
  • Member since
    September 2013
  • From: San Antonio, Texas
Posted by Marcus McBean on Monday, September 1, 2014 7:41 PM

Bill,

Outstanding work.  Using brass rod was a smart choice.

I stop worked on the SMS Konig and went back to the dreadnought.  Decided to work on her until finish.  To much effort to stop and start each model.

Marcus.

  • Member since
    July 2004
  • From: Texas
Posted by wbill76 on Monday, September 1, 2014 7:54 PM

Thanks Marcus! The styrene arms in the kit just weren't going to cut it with any kind of rigging tension applied to them. Just looking at them the wrong way caused them to warp and that was still on the sprues! Wink Looking forward to seeing your Dreadnought move forward at full steam, I hear you about switching back and forth on projects, that's something I've never been able to do well myself...I'm a one-build-at-a-time kind of guy when it comes to model building. Beer

  • Member since
    July 2004
  • From: Texas
Posted by wbill76 on Thursday, September 4, 2014 7:07 PM

More progress to report, this time in relation to the smaller aft mast and platform. After looking at all the parts involved, I decided to build up the platform and tripod first and allow that to set up nice and solid before adding the fire direction/control station and all the little PE that form up the mast brace and rigging points. A little bit of putty and sanding work was necessary where the two angled legs of the tripod join up together but otherwise everything assembled as designed. The Eduard set provided the railing for the searchlight platform. Then I attached the fire direction station box to the top of the tripod and let that set up. Unlike the main mast, this one goes a lot smoother this way in terms of getting all the PE parts to align properly vs. trying to puzzle piece them together separately. Once the station was firm, I used CA gel to add the mast after filing it's contact surface flat for better gluing. Last but not least, the PE stuff was added to build up the mast brace and rigging 'starfish' points. Just like with the main mast, some Aves epoxy putty was used to strengthen the connection between the mast and the clamp PE parts and will get the chance to setup hard overnight before it gets painted along with the main mast.

  • Member since
    September 2013
  • From: San Antonio, Texas
Posted by Marcus McBean on Thursday, September 4, 2014 8:28 PM

Bill,

Again great work you are doing,  really like how you describe each step, it is really helping along with my model.  

Marcus

  • Member since
    July 2004
  • From: Texas
Posted by wbill76 on Friday, September 5, 2014 9:28 AM

My pleasure Marcus, thanks for the comments as always! Beer

  • Member since
    July 2004
  • From: Texas
Posted by wbill76 on Friday, September 5, 2014 4:25 PM

More progress on the masts front to follow-up from yesterday. First order of business was adding in the tall posts, parts D7, that Trumpeter has you add in Step 43. These need to go in before the rigging though so I added them now especially as they interact with two of the 'starfish' points. Roof for the platform was also added so it could be painted as a single unit for easier handling.

The main mast got some final details as well in the form of the Eduard set. These rigging lines would be pretty tough to add using just the EZ Line given their curved shape and interaction with the other signal flag lines to be added. Since these are PE, I added them now so that the CA would have a metal-to-metal attachment point. Roof of the fire direction platform was also assembled

Out came the airbrush again and, with the help of some locking tweezers, both sets of masts were painted.

While hard to spot in the following pic, I used some MM non-buffing Metalizer Gunmetal to detail the curved rigging lines. Then the main mast was installed permanently atop the tripod and the roof added. I had to lightly sand the back edge of the roof so it would sit at the proper height/angle in relation to the mast as a minor adjustment.

The rear mast element received its pair of search lights and was also permanently installed. I used regular glue for the base of the platform elements and some gap-filling CA for the tripod legs that install into the deck.

All of that will get the chance to set up nice and solid overnight before I start adding the rigging. Due to the tight spaces involved, some decisions will have to be made on just which lines to add or leave out as I don't think there's quite enough room, particularly with the rear mast, to add all the lines that the Kagero 3D book and blueprints show as being used but I'll do my best under the circumstances.

  • Member since
    July 2004
  • From: Texas
Posted by wbill76 on Saturday, September 6, 2014 5:41 PM

Spent a great deal of time working on the rigging today and was really impressed with the EZ Line, it truly lives up to its name in this particular application! After some careful study of the Kagero 3D close-ups and the rigging diagrams in the scale blueprints, I started in on the fore mast first. All of the interior rigging and bracing lines were done first and I generally worked my way from bottom to top one side at a time so I could get things as close to symmetrical as possible.

Then the real fun began in terms of running the signal flag lines. I decided to run them as single lines only instead of doubling them up as the space is pretty crowded even with the single only. The connection points I had installed earlier proved very handy still as it made life a lot easier for attaching the bases of the lines and avoiding any tangling in the process. For these I started with the lowest cross arm first and worked from the innermost out to the ends, one side at a time, until I had the 6 lines done. Rinse and repeat for the 2nd cross arm.

For the rear mast, the space tolerances are smaller but I followed basically the same pattern as on the main mast. I was able to get all the lines in place around the 'starfish' with a little patience and care. The rigging is now about 95% complete. While I won't be trying to recreate the cage-style aerials, I will run single representative aerial lines between the two masts and to the jack staff once it's installed but I'm deliberately holding off on doing that until I get the rest of the hull details done to avoid any snagging/complications in that process.

Rounding out the day's activity, I added the railing and optical range finder to the spotting platform and then installed it in place on the boat deck. The Trumpeter railing set included a piece that was just perfect as-is for my needs but these railings are more flimsy than the Eduard railings and will deform at the slightest opportunity, so shaping it into the correct oval shape was an exercise in patience for sure. Last but not least the remaining four coal derricks were painted and installed. For some reason, Trumpeter left out of the kit the horizontal derrick arms that should be at the front...I think they planned to include them since they had notches in the legs of the tripod where they should connect to...but no parts provided on any of the sprues in the kit. I had filled those notches earlier after trying to figure out why they were there...and now that little mystery is solved I think.

Next up will be the repetitive joy of installing 50+ PE coal scuttle covers on the deck and starting to add in more of the remaining details there now that the rigging is largely out of the way.

  • Member since
    August 2007
  • From: back country of SO-CAL, at the birth place of Naval Aviation
Posted by DUSTER on Saturday, September 6, 2014 8:02 PM

The rigging is very much an outstanding feature.  This quality build is giving me the idea (far off for now ) that ships can be cool to build too.

As to the coal scuttles why don't you just use the three big holes shown the last picture? --

-Never Mind 

Steve

Building the perfect model---just not quite yet  Confused

  • Member since
    July 2004
  • From: Texas
Posted by wbill76 on Saturday, September 6, 2014 8:06 PM

Thanks Steve! Ships can be a lot of fun, definitely a nice change of pace from the usual for sure! I'm sure the Admiralty would have certain ideas about the crew using the turrets as coal bins. Big Smile

  • Member since
    July 2004
  • From: Texas
Posted by wbill76 on Sunday, September 7, 2014 2:01 PM

Today's update focuses on one of those less-glamorous aspects...dealing with lots of tiny parts in a repetitive process, but one that does add some nice detail to the deck when complete. Due to the Dreadnought's compartmentalized design for vertical access to areas of the ship vs. the usual horizontal water-tight door type of access, there are a ton of coaling scuttle points scattered all over the ship. 56 in total on the main deck plus another 4 on the super deck. Fortunately, the Wood Hunter set includes a nice PE fret with 60 of these designed specifically to fit the openings provided in the wood deck. A while back in one of my previous airbrushing sessions I took advantage of having the AB loaded up and applied some of the hull gray so it could sit and cure for a nice long while before I got around to installing them.

Working one at a time, I used Gator Grip glue applied with a toothpick point into the openings and a 2nd toothpick (important not to mix them up!) moistened with spit to pick up and place the cover in position. Careful pressure with the point of a toothpick pressed it into place. Rinse and repeat 56 times and you have all the ports in place after a couple of hours, 28 on either side of the deck.  

Still more work to come in the detail department as I work on all the little odds and ends.

  • Member since
    July 2004
  • From: Texas
Posted by wbill76 on Tuesday, September 9, 2014 8:02 PM

Last couple of rounds have focused on the ship's compliment of various boats. This is a little trickier than it might be otherwise because you have to kind of puzzle piece things together between what's in the instructions and what you actually install and where...but more on that in a moment.

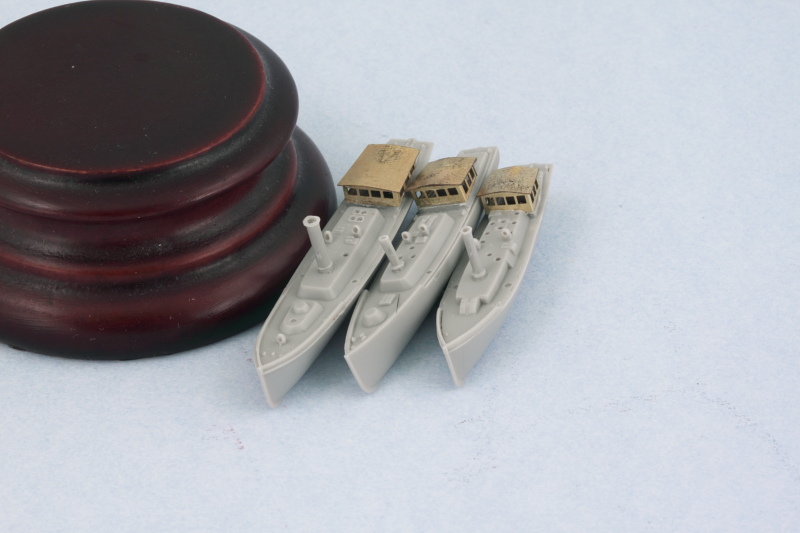
First order of business was improving some of the details on the three different steam-powered barge and pinnace craft. Trumpeter provides them as two part assemblies with the cabins molded solid (but hollow on the inside) as part of the upper deck portion. The Eduard set really improves the detail here by providing actual wheel-house/cabins with open windows, but that means surgically removing/cutting-down the molded on item so it can take its place.
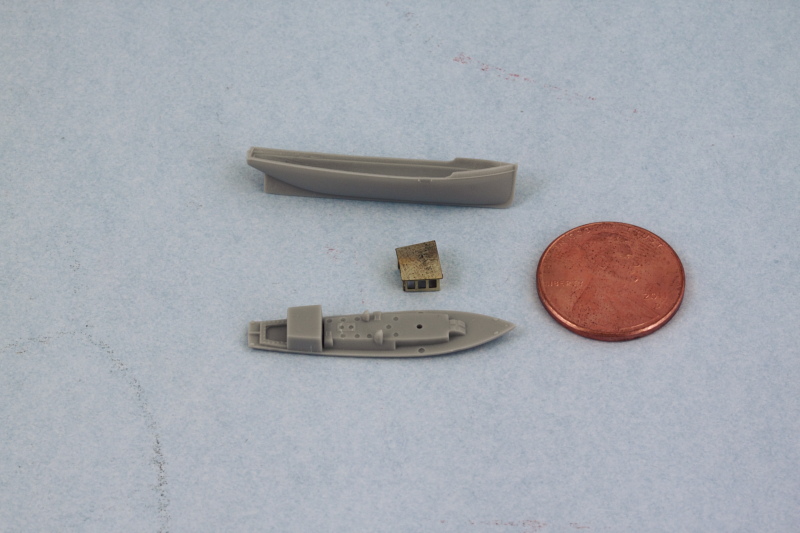
After careful surgery and some sanding, you can get a pretty good result between the two. I also improved the detail level by drilling out the air funnels and the smokestacks on each of the three boats along with the main cabin port holes.
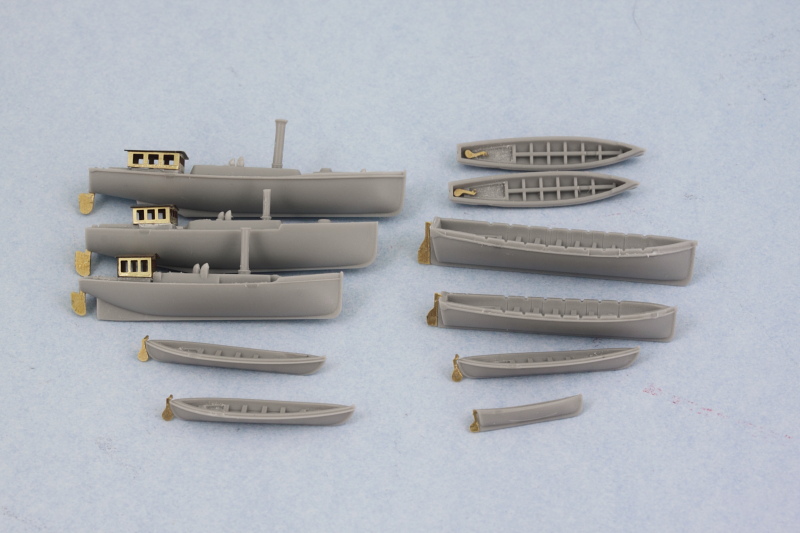
Now where life gets interesting is figuring out which of the kit-supplied oar-powered boats to use and where they will ultimately go. After studying the Kagero 3D reference photos, I figured out the following:

1) D43 are the 30 ft. gigs, and you need 2 of them, one on either side of the first funnel on the boat deck...but for them to fit, you need to not install the rudders and instead place them inside the boat itself as a stored item.

2)  J1 isn't actually used anywhere even though the instructions have you assemble it...it's close in size to D43 but slightly longer...so it doesn't fit anywhere regardless.

3) D35 is the 16 ft. dinghy, you only need one of these and not the two that the instructions would have you build. The one you need will stack inside the port side suspended whaleboat.

4) J3 are the 32 ft. cutter life boats...you need 3 of these (one in the middle of the boat deck and 2 for the davits at the front of the boat deck). Unfortunately, the kit only provides one for the middle...so I've asked my good friend Steve Reid at Celtic Werks to cast some resin copies from the kit part to fill this gap, as a result they are 'MIA' from the group photo below until the casting is done.  

5) D3 are the 27 ft. whaleboats, the instructions want you to build 5 but only 4 are needed (one in the middle of the boat deck, the other two hang from supports at the rear of the boat deck, one nests in the three-stack of boats on the port side). Ignore the weird directions that would have you stack a whaleboat and dinghy on top of the port side steam pinnace, that's a Trumpeter invention as far as I can tell.

While the instruction steps never show them actually installed, the 2 whaleboats and the dinghy that suspend from the rear portion of the boat deck do show up on the finishing guide as does the pair of 30 ft. gigs, so if you're paying attention you can catch that at least. All of the boats received their PE rudders in anticipation of some airbrush attention to lay down a base/primer coat of hull gray before they get further hand detailed.
Tomorrow will see the boats get further detailing so they can be ready for installation.

  • Member since
    July 2004
  • From: Texas
Posted by wbill76 on Wednesday, September 10, 2014 7:27 PM

More progress in the boat department, we have paint! I airbrushed the hull gray color so that it could do double duty as both a primer for the detail areas and PE parts and provide the main external color for the boats. The detail work was all done with the aid of an Optivisor and a 10/0 pointed brush. Flat White for the trim, a mix of 50-50 Dunkelgelb/Light Gray for the wood areas, and Italian Dark Brown for the steam boat wheel houses. To add a little variety, I applied some non-buffing Metalizer Brass to the smokestacks to round things out. Not a lot in terms of number of pics but a full day's effort to get the detail painting done.

Next up will be placing some of the boats and continuing to work on the remaining main deck details.

  • Member since
    June 2014
Posted by Charles_Purvis on Thursday, September 11, 2014 10:56 AM

Love the detail work here.  I'm sure I'm not alone when I say there's something that's very appealing about working on a ship's boats right in the middle of the longer project.  It's nicely distracting, and it's fun to be able to "finish" something so quickly.

I'm really enjoying watching this project . . . great work!

Charles

  • Member since
    July 2004
  • From: Texas
Posted by wbill76 on Thursday, September 11, 2014 12:24 PM

Thanks Charles! You're right about the boats being like a 'mini project' all by themselves, especially given how prominent they are in the superstructure. It's been fun working on them for sure. Yes

  • Member since
    July 2004
  • From: Texas
Posted by wbill76 on Friday, September 12, 2014 4:42 PM

Latest progress has lots to report on multiple fronts. First up were all the bow super-deck details. I used the Trumpeter-supplied copper anchor chain and painted it with Model Master non-buffing Metalizer Gunmetal applied by hand. For the two non-fitted 12 pdr mount plates, I cannibalized a couple of the spare guns on the sprue and clipped off their bases, gluing them in place with CA gel then sanding them smooth and painting them in place. Anchors were installed along with the stove pipes, small cranes, and the turret break water. Then the A turret was carefully placed as all the other small details now prevent it from being able to rotate, so it had to be dropped in place vertically at an angle so the rear of the turret would clear the connecting stand to the superstructure. Last but not least I added the jack staff and angled PE brace for it.

With that out of the way and time to install the boats, I added the last remaining piece of rigging by running aerial lines from the bow to each of the masts as well as connecting lines down into the boat deck roof of the wireless room.

Speaking of the boats, I started on the port side first since it has the most boats. The three-stack was assembled and installed in place followed by the suspended whaler and dinghy combo. For that combo, some EZ line was used to represent the suspended rail/rope combo that holds it up.

Rounding things out on this side, the steam pinnace was installed. The 30-ft gigs were added as well to both sides of the forward funnel and then the life boat davits added. Other small details like the wing turret break waters and the small mid-ship cranes were also installed.

Next up will be the starboard side boats before moving aft to continue with the remaining details there.

  • Member since
    February 2007
  • From: Brunswick, Ohio
Posted by Buckeye on Friday, September 12, 2014 7:14 PM

Looking mighty fine!

Mike

  • Member since
    July 2004
  • From: Texas
Posted by wbill76 on Friday, September 12, 2014 7:22 PM

Thanks Mike, appreciate the comments! Beer

  • Member since
    July 2004
  • From: Texas
Posted by wbill76 on Saturday, September 13, 2014 7:23 PM

Work continued on the remaining details. As promised, first up were the starboard boats getting installed in place on the boat deck.

With that done, attention turned to the remaining details on the stern. One of those is the compass stand and I have to admit that the difference here between what Trumpeter provides and what should be there (which the Eduard set does cover) is miles apart. The Trumpeter part is on the right while the Eduard multi-part PE replacement is on the left. I'm sure it's no surprise which one I went with!

The Eduard set also provides caps for all the bollards, so those were installed and painted to match the posts. Small hoist cranes and stovepipes were added where needed and the X and Y turrets installed in place.

Last but not least, the stern received the previously mentioned compass stand, 2 of the 3 12 pdrs, and the flag pole with its PE brace and small extended access stand. The kit-supplied access stand was just a simple piece of straight PE, so I used the Eduard piece instead to replace it. The third and final 12 pdr gun was left off so I could install the railings without having to fight with it since the barrel extends out over the rail and will be added later.

Not a whole lot left to do. Essentially just the railings to add along with the retention arms for the torpedo nets that stick out under the railings, will add those after the railings of course.

  • Member since
    September 2013
  • From: San Antonio, Texas
Posted by Marcus McBean on Saturday, September 13, 2014 8:06 PM

Bill,

Looking mighty fine.  I am still working on the boat deck, but almost done.  Question, are you going to add the torpedo nets?  

Marcus.

  • Member since
    July 2004
  • From: Texas
Posted by wbill76 on Sunday, September 14, 2014 11:05 AM

Thanks Marcus! Due to the incredibly small space available for the nets and the fact that I haven't been able to identify a practical material to replicate them, I'll be leaving off the nets on my build. Trumpeter didn't add any extra room along the hull side for their shelf and once the railings are added, there's going to be virtually no room left for something like the nets to sit on. In hindsight if I were going to add the nets, the shelf/space issue would've had to be addressed way back at the beginning when the hull was first assembled I think.

  • Member since
    September 2013
  • From: San Antonio, Texas
Posted by Marcus McBean on Sunday, September 14, 2014 2:53 PM

Bill,

If I can find a set black shoe laces narrow enough I made give it a try.  The Kagero book shows the railings running along the bollards and not at the edge of the deck, which just made provide enough space to  fit the laces.

Marcus

  • Member since
    July 2004
  • From: Texas
Posted by wbill76 on Sunday, September 14, 2014 4:40 PM

That might work Marcus...maybe a set of infant laces? I suppose the trick would be getting something of the right consistent diameter that could still be shaped to conform to the hull curve and fit in the space available.

  • Member since
    September 2013
  • From: San Antonio, Texas
Posted by Marcus McBean on Sunday, September 14, 2014 4:46 PM

Bill,

Never thought of infant laces.  I hope they come in a round shape will have to check into it.

Marcus

  • Member since
    July 2004
  • From: Texas
Posted by wbill76 on Sunday, September 14, 2014 5:05 PM

Fingers crossed for you Marcus!

Between needing to do some yard work and Sunday football, not a lot of bench-time was available but still managed to get in a little more progress. One of the remaining details involved the stand's plaque and the 4 screw propellers. The props are handed, so I was careful in keeping them separate and marked their little toothpick painting handles accordingly. Some Model Master Non-Buffing Metalizer Brass sprayed through the airbrush did the trick.

Some Model Master Non-Buffing Metalizer Steel was applied by hand to the prop shafts and then the props themselves installed in place. Better to do it now vs. after the railings are in as it's one of those hard to handle spaces unless your a contortionist.

The plaque was added to the stand as well. I used a metal ruler to work out the spacing for it so it would sit evenly as Trumpeter doesn't provide any guide for that and the plaque is smaller than the molded in recess that's on the stand proper. The plaque will get some further attention to age/weather it a bit and give it a more 'brassy' feel as well.

If all goes to plan, tomorrow should see the railings added.

  • Member since
    July 2004
  • From: Texas
Posted by wbill76 on Monday, September 15, 2014 6:00 PM

Today's efforts were all about the railings. Started with the super-deck first. The Eduard railings fit beautifully with one small exception, the short section of railing that attaches to the back portion doesn't take into account the two raised hatches that sit in that area. So that meant some trimming and adjustments to that section to get it represented properly. The fore sections of railing for the main deck were also added at this stage. Leaving off the wing turrets also paid off in terms of providing some room to maneuver so I'm glad I resisted the temptation to install them earlier.

It was at this stage that I decided to give the Trumpeter PE torpedo net retainer arms a try as I wasn't too sure how that was going to play out. There's no room for error, 21 are called for per side and that's exactly how many are provided. They are tiny, with only a very small mount point, so I knew they were going to be a challenge. After losing three in a row to the carpet monster, I decided to leave the rest of them on the fret and surrendered to the inevitable.

Despite that minor capitulation, the rest of the day's efforts proceeded without incident and involved the rest of the railings for the aft areas. Eduard provides these as two long sections of railing per side and it's best to install the stern rails first and work your way forward vs. the other way around. The Eduard railings also don't take into account if you're using their detail set to replace things, so I had to trim a section off the starboard side rail so it would meet up properly with the flag pole access stand.

Now all that is left is waiting for the lifeboat cutters to arrive so I can finish that off and then add the last few remaining details like the gang ways to round things out.

  • Member since
    July 2004
  • From: Texas
Posted by wbill76 on Monday, September 15, 2014 7:57 PM
I just got back from checking my mail and the extra 32 ft. lifeboat cutters that I needed had arrived. Steve at Celtic Werks did an awesome job. The original kit part is on the left and the resin casts are on the right.   Given the nature of the omission by Trumpeter and the general interest in this kit with both the 1907 and 1915 versions out there with the same issue, Steve let me know that he made additional molds in the event that anyone else needing additional cutters was interested in them to populate the davits. Just drop him a note at info@celticwerks.net and he'll be happy to work something out for you.
  • Member since
    July 2004
  • From: Texas
Posted by wbill76 on Tuesday, September 16, 2014 5:12 PM

Today's efforts focused on getting the remaining boats finished and installed. First up, each of the cutters needed rudders, so I scratch-built some using sheet styrene and one of the left over rudders on the PE fret as a sketch stencil.

Then it was time to paint them. Same drill as with the other boats, hull gray color by airbrush, then hand detailing for their interiors and trim. The middle deck cutter got the 4th whaleboat added for its 'short stack' configuration.

Then the real fun began in installing the two for the davits. Originally I was going to try to replicate the canvas holding straps that help hold the boat in place but trying to accomplish that proved problematic due to the fragility of the davit parts. I ended up using lengths of EZ line to suspend them from the davit pulleys along with some strategic CA glue applied to the sterns to keep them from swaying in the breeze.

With all the boats in place, the wing turrets were permanently installed as well to round things out for the day.

Just a couple of small details left to do before I seal it up with some Future and add some weathering to the main hull.

  • Member since
    December 2010
  • From: Salem, Oregon
Posted by 1943Mike on Tuesday, September 16, 2014 6:30 PM
Bill, As usual, your work is just excellent. I have what may be a rather naïve question of you: How are you going to paint the future on her - via airbrush or hand painting? If airbrushing, how will you mask everything above the hull? Perhaps your skill, steady hands and pre-planning will allow you to airbrush the future on the hull where it is needed without masking? Just curious. Mike

Mike

"Le temps est un grand maître, mais malheureusement, il tue tous ses élèves."

Hector Berlioz

  • Member since
    July 2004
  • From: Texas
Posted by wbill76 on Tuesday, September 16, 2014 7:42 PM

Thanks Mike! The Future will be applied by airbrush. There's no need to mask anything above the hull with this type of application. The Future will be applied using a mist coat approach and not a heavy wet pass. I did some tests early on with the wood deck to see how it would respond to this type of treatment (and the usual dull coat that's applied over the weathering to finalize it) and had no problems with it. Hope that answers your question? Wink

  • Member since
    December 2010
  • From: Salem, Oregon
Posted by 1943Mike on Tuesday, September 16, 2014 9:31 PM

Thanks Bill, it does.

Mike

Mike

"Le temps est un grand maître, mais malheureusement, il tue tous ses élèves."

Hector Berlioz

JOIN OUR COMMUNITY!

Our community is FREE to join. To participate you must either login or register for an account.

SEARCH FORUMS
FREE NEWSLETTER
By signing up you may also receive reader surveys and occasional special offers. We do not sell, rent or trade our email lists. View our Privacy Policy.