SEARCH FINESCALE.COM

Enter keywords or a search phrase below:

Revell 1:83 Mayflower

51341 views
601 replies
1 rating 2 rating 3 rating 4 rating 5 rating
  • Member since
    July 2014
  • From: Franklin Wi
Posted by Bakster on Thursday, February 25, 2016 11:00 AM

Agreed.

"Unfortunately, though, asking the hobby industry to standardize on anything seems to be asking for the hopeless."

I like this quote so much, I might add it to my signature!

  • Member since
    May 2013
  • From: Indiana, USA
Posted by Greg on Thursday, February 25, 2016 10:55 AM

Shame on me for not following this project, Steve.

I am really impressed with your attention to detail and research and.....

Bow Down

Now that I've finally found this thread, hopefully I can follow along.

I see you have some really great expert help and advice going on. How can it get any better?

  • Member since
    May 2003
  • From: Greenville, NC
Posted by jtilley on Thursday, February 25, 2016 10:29 AM

Good point. I favor the "links per inch" designation. The idea of identifying chain as "HO scale," or "1/350 scale" makes no sense - for the simple reason that real chain comes in so many sizes. (The links of a destroyer's anchor chain are way smaller than those of a battleship.) Unfortunately, though, asking the hobby industry to standardize on anything seems to be asking for the hopeless.

Youth, talent, hard work, and enthusiasm are no match for old age and treachery.

  • Member since
    July 2014
  • From: Franklin Wi
Posted by Bakster on Thursday, February 25, 2016 10:07 AM

John, thanks for the feedback. I will review all of this and I will surely find something.

"The world will beat a path to the door of the individual who figures out a way to make genuine, three-dimensional chain on small scales."

So true.  In the meantime, how about a standardization of how the product is sold. I see it sold by the number of links, by scale, or strictly by dimensions. Heck, I have even seen some being sold that offers none of those. It would be nice to have a standard that modelers can use that takes some of the guesswork out of it. Pick one, and we will adapt. I guess that would be too easy. Ah well. Why should it be easy. (Cough!)

  • Member since
    July 2014
  • From: Franklin Wi
Posted by Bakster on Thursday, February 25, 2016 9:37 AM

GM, I am glad you think so!

  • Member since
    May 2003
  • From: Greenville, NC
Posted by jtilley on Wednesday, February 24, 2016 5:06 PM

My suggestion: order a foot of each of Bluejacket's four smallest chain sizes. That'll cost you $16.00 (plus shipping). You're almost sure to get the size you need.

I'm curious about where this little chain comes from. I strongly suspect all, or most, of the hobby dealers get it from one or two manufacturers.

Like GM, I haven't had any luck buying jewelry-type chain for model work. 

The world will beat a path to the door of the individual who figures out a way to make genuine, three-dimensional chain on small scales. (BJ makes nice individual links in cast Britannia, but they're way too big for any model I'm likely to build.

Youth, talent, hard work, and enthusiasm are no match for old age and treachery.

  • Member since
    September 2012
Posted by GMorrison on Wednesday, February 24, 2016 9:25 AM

Thats a really great tip- cut the part centered and square around the hole rather than try to land the hole centered. I like it. thanks.

 Modeling is an excuse to buy books.


  • Member since
    July 2014
  • From: Franklin Wi
Posted by Bakster on Wednesday, February 24, 2016 7:21 AM

Hey Mike, thanks for that. I will look into it. I appreciate that you posted this.

Steve

  • Member since
    December 2010
  • From: Salem, Oregon
Posted by 1943Mike on Tuesday, February 23, 2016 10:59 PM

Steve,

I don't know how accurate (considering what we don't know about these chains per JTilley) you want to be but here's another link. I can't vouch for it, just did a quick Google.

Mike

http://www.builders-in-scale.com/bis/parts-chain.html

Mike

"Le temps est un grand maître, mais malheureusement, il tue tous ses élèves."

Hector Berlioz

  • Member since
    July 2014
  • From: Franklin Wi
Posted by Bakster on Tuesday, February 23, 2016 9:30 PM

PS: The upper and lower part of each link should in reality be all 1 piece, I think.  There are limits to my madness. Once painted, they will look as one.

  • Member since
    July 2014
  • From: Franklin Wi
Posted by Bakster on Tuesday, February 23, 2016 9:21 PM

Steve--thanks for the support and the ebay links. The chain options that you posted are being reviewed.

Speaking of chains...  I looked back at my records and the first chain that I purchased was 15 links per inch. I misspoke earlier saying that it was about 20. The 27 link version that JT mentioned might fit the bill. As a side note. I pulled out the jewelry chain that I purchased from Michaels and that one is pretty darn close to what I need. I am able to get 4 links underneath the channel and they look more to scale. I would be good with that. As GM said though, they have the twist. If all else fails, it is an option.  Anyway, this will resolve itself over time.

Today I worked on the mizzen plate backing links. I made these smaller than the others, as well the holes are smaller. I learned something with these. It is easier to pilot hole the plastic strip, then cut it to backing link size, and install. Then, the pre-drilled hole on the link acts as a guide for the drill as I drill through the hull. If I was ever to do this again, I would do it this way, and not with them installed on the ship. I feel I was able to get tighter patterns.

Two images below.  


  • Member since
    July 2010
  • From: Tempe AZ
Posted by docidle on Monday, February 22, 2016 9:10 PM

Steve,

Great work so far. I really like the picture where the windows show a bit. They look awesome.

Not sure if it is too late but I have purchased from this guy on evilBay for both pedestals and anchor chain. Here is the link If you want to take a look.

This is his 1/700 chain and he also has 1/350 chain. It is already black and I think it just might be what the Doc ordered.

Steve

http://www.ebay.com/itm/Model-Ship-Anchor-Chain-1-700-Scale-/171692359220?hash=item27f9a97e34:g:za8AAOSwWTRWwKUM

http://www.ebay.com/itm/Model-Ship-Anchor-Chain-1-350-Scale-/171687927630?hash=item27f965df4e:g:0fQAAOSwqYBWoOxP


  • Member since
    July 2014
  • From: Franklin Wi
Posted by Bakster on Sunday, February 21, 2016 11:56 PM

Too funny. So my chain is a ponderous one. 

  • Member since
    September 2012
Posted by GMorrison on Sunday, February 21, 2016 11:48 PM

 Modeling is an excuse to buy books.


  • Member since
    July 2014
  • From: Franklin Wi
Posted by Bakster on Sunday, February 21, 2016 11:43 PM

JT, The first one that I purchased was something like 20 links per inch. The links were way too big. I then looked at others and the next two that I purchased did not indicate the links per inch, but the dimensions seemed about right. Well, I know now that these are not quite right either. They are much closer than the first one that I bought but I am still not there. I will look a little further into your recommendations.

Sorry GM, I am not ready to give up on my chain fixation. Maybe with more therapy I will get there. Sigh. Thanks though. I DO appreciate your thoughts on the subject. 


  • Member since
    September 2012
Posted by GMorrison on Sunday, February 21, 2016 10:09 PM

I meant the machine somewhere in China that makes the chain that somehow is so useful that the local jewelry store buys it.

I have had a very long and very fruitless relationship with the idea of finding chain for models in jewelry stores. So much so that when I build the increasingly rare for me plastic warship, I leave cast on parts... on. Years back I built the rather incomparably cool Trumpeter USS San Francisco. I looked all over and bought the best chain I could find. The comments were all really positive, except for " the chain is way out of scale".

My last attempt at suggesting sanity here, GAKKK!!!. (sorry that comes up now and then). Attempt to make something that you'd expect to recognize as chain, from 83 feet away. A straight line with regular lumps on it will look about right.


 Modeling is an excuse to buy books.


  • Member since
    May 2003
  • From: Greenville, NC
Posted by jtilley on Sunday, February 21, 2016 9:57 PM

To my knowledge there is no firm evidence about the shapes of chain links in 1620. They may have been round or elongated.

The finest chain I've seen on the market is 42 links per inch. That's plenty small enough for this job. My guess is that 28- or 30-link chain, stretched slightly, would look about right - and when you're talking about a seventeenth-century ship, "looking about right" is about the best you can hope for.

Youth, talent, hard work, and enthusiasm are no match for old age and treachery.

  • Member since
    July 2014
  • From: Franklin Wi
Posted by Bakster on Sunday, February 21, 2016 9:16 PM

Laughing...  What can I say.  My psychosis is a problem at times.

But wasn't Capn referring to making a jig?  Whats this about a machine. Psychosis and all, I do draw the line at getting a machine.  


  • Member since
    September 2012
Posted by GMorrison on Sunday, February 21, 2016 8:39 PM

Anytime, anyplace as long as there's rum, eh Capn?

Chain is a challenge. Try finding scale barred chain. Hrrmmmph!

Most jewelry chain has a quarter twist too.

Methinks a chain making machine costs a lot of money and needs to make miles of the stuff to pay for itself.

Commander Baxter comes along and wants about 11 inches of the stuff?

"Back in ten minutes".

 Modeling is an excuse to buy books.


  • Member since
    July 2014
  • From: Franklin Wi
Posted by Bakster on Sunday, February 21, 2016 8:29 PM

GM.. thanks brother...  I got something bad all right. I just don't know what it is yet. I hear they have meds for most anything though. 

Thanks JT.

Capn...thanks for that idea. That may be the way to go to make them myself. Funny that you mention jewelry chain because I have one that fits better. But then it doesn't look much like a ships chain.

Oh the dilemmas.

Thanks guys.  You have given me more to think about.

  • Member since
    November 2005
  • From: Formerly Bryan, now Arlington, Texas
Posted by CapnMac82 on Sunday, February 21, 2016 7:51 PM
To get the links in the "chain" strops, you probably will have to bend your own links. Contemporary information tells us the links were long skinny rectangles. What you'll need is to take a measurement of the length of all the links. Let's say it's 0.20" One fifth of that is 0.040. So, you could take some 0.020 (as a for instance) and cut that 0.040 wide. Around that form you could then bend annealed steel wire, or brass rod that had been annealed. Or, given that 1 / 0.020 = 50, you could search for some 50 link per inch jewelry chain.
  • Member since
    September 2012
Posted by GMorrison on Sunday, February 21, 2016 7:49 PM

Steve, sometimes a little of "kinda" beats a lotta "is".

You might try putting three or four gentle twists into a doubled up piece of copper wire and painting it black.

 Modeling is an excuse to buy books.


  • Member since
    May 2003
  • From: Greenville, NC
Posted by jtilley on Sunday, February 21, 2016 6:37 PM

That chain does look a little coarse. I think you need to use a smaller size and stretch it a bit. Brass and copper chain can stretch a surprising amount before the links open up.

Youth, talent, hard work, and enthusiasm are no match for old age and treachery.

  • Member since
    September 2012
Posted by GMorrison on Sunday, February 21, 2016 6:17 PM

Really nice work. I think your alignments are very good. I do not think a Dremel would help- same bit, higher speed, faster screw-up. A pilot hole with a smaller bit is always a good idea, but you did so well I would not worry about it.

The only other idea might have been to stick in a straight pin with it's rounded head, but yours look great.

You've got it BAD, brother!

 Modeling is an excuse to buy books.


  • Member since
    July 2014
  • From: Franklin Wi
Posted by Bakster on Sunday, February 21, 2016 3:38 PM


Well, the saga of the chain plate assembly continues. I have decided that the backing links looked a little bare and incomplete. So, I made the decision to add bolt heads.

Though I had decided to do this, at this scale, I was not sure how I could pull it off. The thought of trying to chop little bolt heads, making them uniform and square, positioning them for gluing, it all seemed like a pretty daunting task. Maybe with The Chopper it might have worked, but this was reaching the limits of my fumbling hands. Then, I had a epiphany. Why not drill holes clear through the hull, insert round stock, position them, and glue from behind. In theory, it should work. 

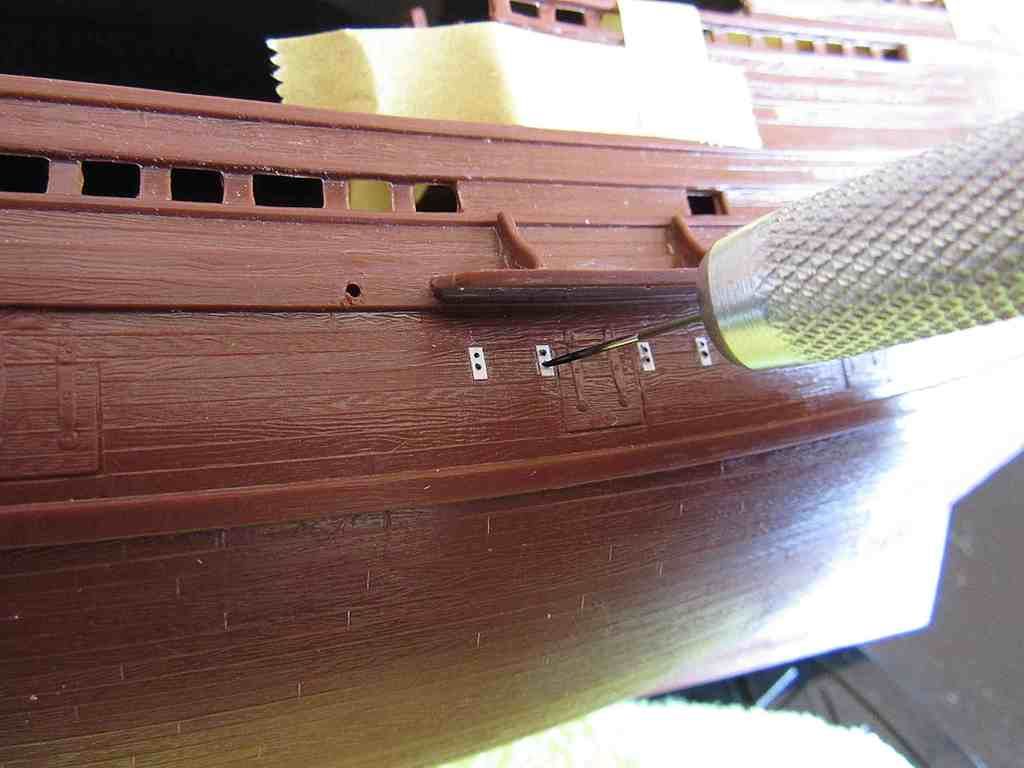
Below: My one concern with this plan was if I can drill the holes somewhat straight and within the limits of the backing links. I know that drill bits tend to walk until they grab into the material being drilled. This was a concern. In fact, my first attempt did just that. I figured my best bet is to make starter holes. Since I can't use a drill to do this, or I could but what is the point, I decided to heat up a pin using a candle and then melt starter holes. The idea here was to make them deep enough for the drill bit to have something to grab into. This did work, and it helped.  In the end though, I still have some off-center holes. Maybe if I used a dremel instead of drilling them by hand I might have held a tighter pattern.  Not sure, but since I can barely see these things without some decent magnification, its good enough. This image shows the starter hole process.
 

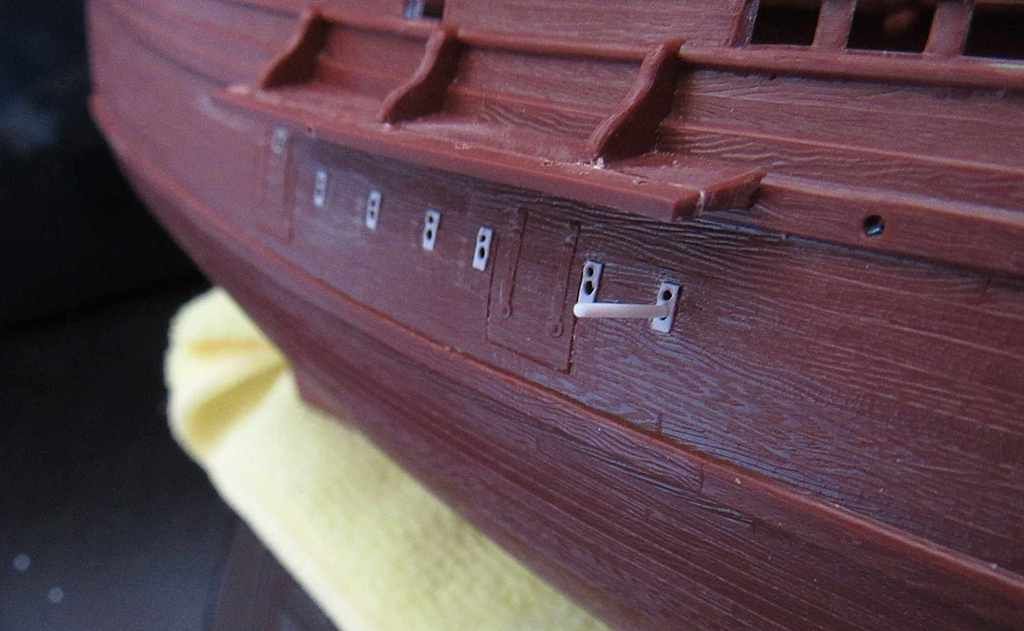
Below: This shows the round stock process. All that I did was to keep pushing it into the hole until just a bit of it is sticking out. This worked out really well, and I was able to breeze through the process with all of them.
 

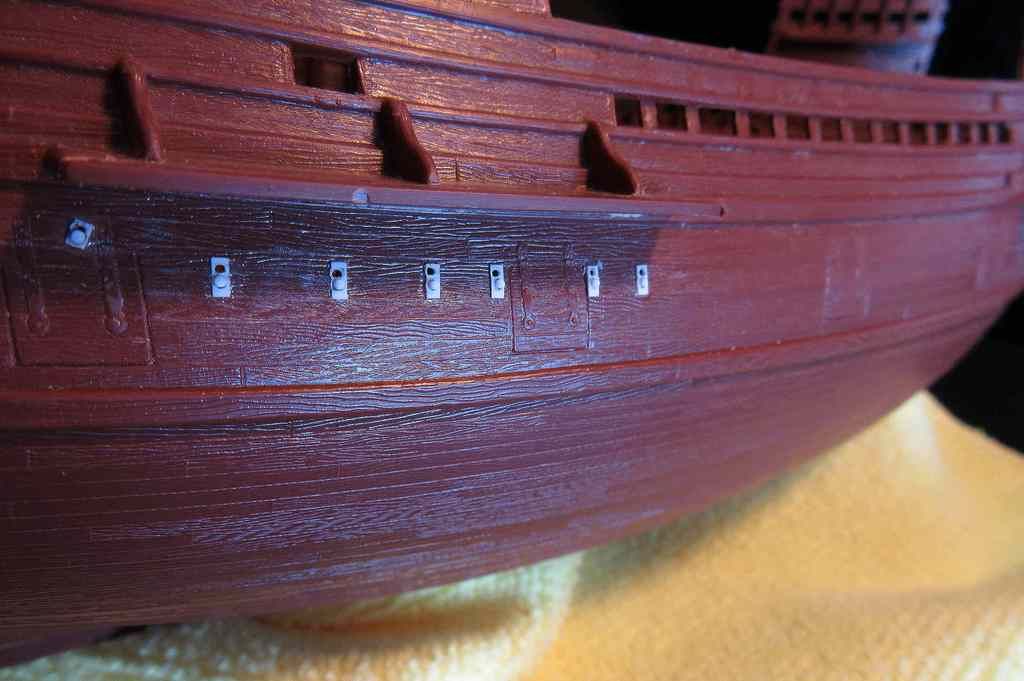
Below: Here is how they look.


Below: A reference of scale.
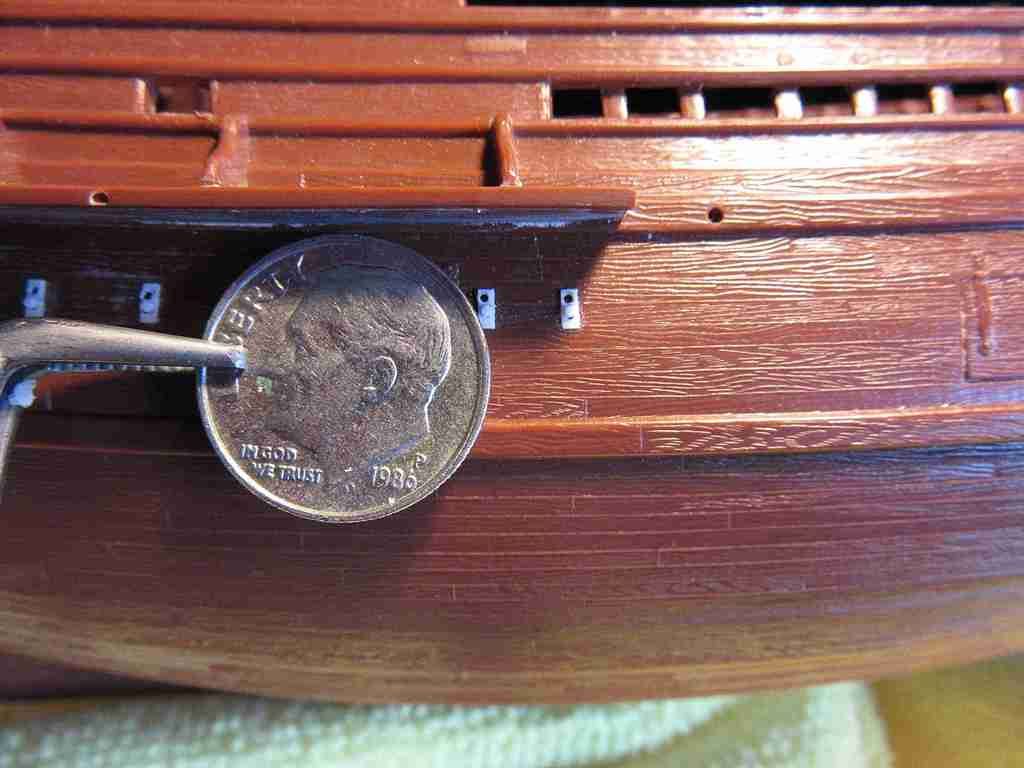


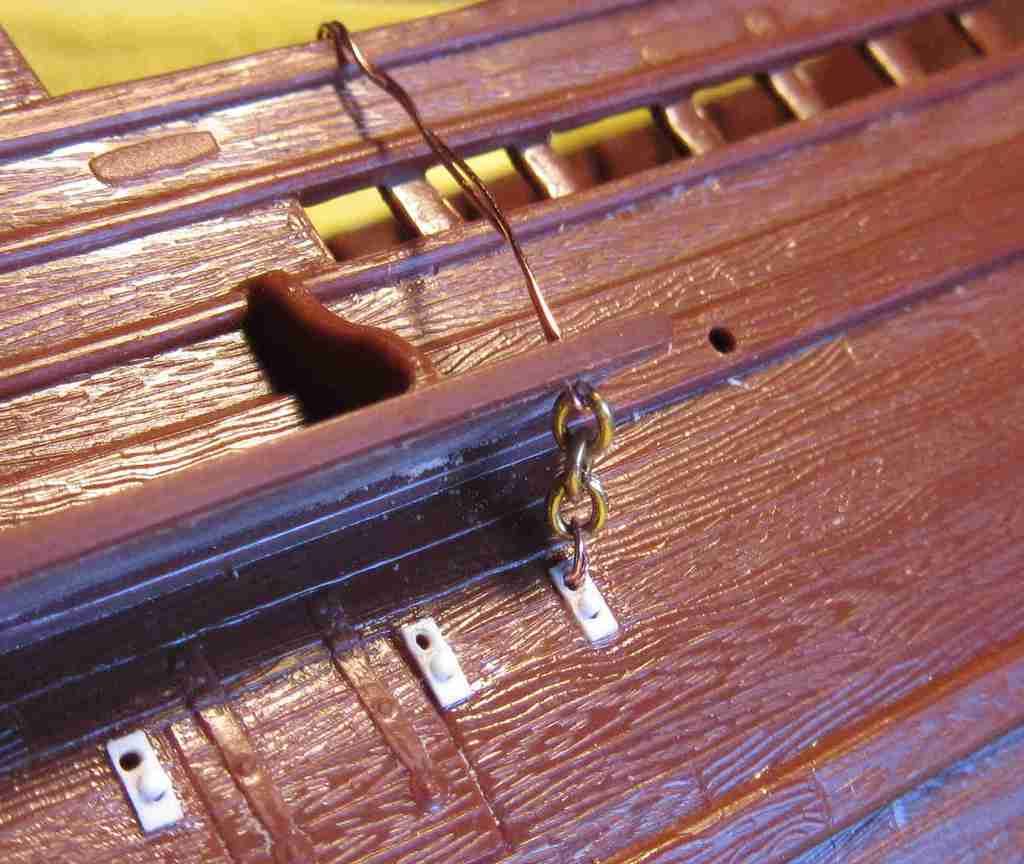
Below: A test run of adding a chain. A few things to note.

1. In the final run the deadeye strop will run down through the channel. When the time comes, it will be a real bear to install the chains. It was difficult for me to add this chain with not installing the deadeye via a strop. It will be much more difficult doing so. It will be a real test securing the lower strop to the chain underneath the channel. Its tight in there. I will have to come up with a process that will help.

2. I am not sure that I have the correct chains for this scale yet. I could only fit three links. On the replica they seem to have 5 links. I am still befuddled on if I can get one that will work. I have tried several and this is the closest I have come. 


  • Member since
    July 2014
  • From: Franklin Wi
Posted by Bakster on Sunday, February 7, 2016 8:38 AM

Steve, thanks for the compliment but you are selling yourself way too short. You are doing EXCELLENT work on your build. I hope that I can mimic the detailed paint-work like with what you are able to do. This tea light thing that I am doing is in my opinion, just a fun thing to do. It will not add much to the build because it will be barely seen and probably seldom used. Really, the only reason I am doing it is because I like to tinker and to try new things. My opinion...I don't think it is a standard to shoot for. I am just having some fun with it.

Thank you, sir!

  • Member since
    July 2013
Posted by steve5 on Saturday, February 6, 2016 6:40 PM

gee I'm enjoying this build steve ; learning so much ,what your doing is above my pay grade . but will file it and attempt to try it in the future    ....   steve5


  • Member since
    July 2014
  • From: Franklin Wi
Posted by Bakster on Saturday, February 6, 2016 5:14 PM

Some of you may recall that I will be adding a tea light assembly into the cabin of the ship. I need to get some of this sorted out before I reach the paint stage. Primarily, how I will run wires from the cabin and out of the ship to a power source. My goal was to come up with a way that will sort of hide things. Here is what I came up with.


Below:  I will run the wires through the cabin floor and out through the transom/rudder assembly.

Below: I cut grooves and openings into the rudder. It looks like all heck but it won't be seen when the two sections are joined together.

Below: How the wires lay.

Below: Glued toegther.

Below: Back of the transom.

Below: How it will look when the rudder is attached.


  • Member since
    July 2014
  • From: Franklin Wi
Posted by Bakster on Sunday, January 31, 2016 2:31 PM

Steve, that is a great idea.

  • Member since
    May 2003
  • From: Greenville, NC
Posted by jtilley on Friday, January 29, 2016 1:55 PM

Steve,

Of course I'd be honored. If you'll send it to me, I'll pay for sending it back. (Actually, if I just wrap it up and put it in the department Out box, the university will pay for the shipping.)

The address:

John A. Tilley

Dept. of History

East Carolina University

Greenville, NC 27858

Youth, talent, hard work, and enthusiasm are no match for old age and treachery.

JOIN OUR COMMUNITY!

Our community is FREE to join. To participate you must either login or register for an account.

SEARCH FORUMS
FREE NEWSLETTER
By signing up you may also receive reader surveys and occasional special offers. We do not sell, rent or trade our email lists. View our Privacy Policy.