SEARCH FINESCALE.COM

Enter keywords or a search phrase below:

Another 1/96 USS Constitution - third time's a charm (I hope)

21615 views
175 replies
1 rating 2 rating 3 rating 4 rating 5 rating
  • Member since
    March 2018
  • From: Chicago suburbs
Posted by Luvspinball on Tuesday, December 20, 2022 9:42 AM

Boat looks great.

As for the dolphin striker, I also rebuilt the whole thing out of wood since the angle on the Revell is wrong.  It is also missing a few tie points as well.  I used hardwood strips for the stikers, as I was very worried about snapping them.  I also beefed them up a bit by adding an additional tapered piece on the back side above the holes for rigging, as well as a small stretcher bar between the strikers about 1/4 of the way down as it is shown in the AOTS book.  When finished and painted, it looks so much better then the plastic one.  BTW mine also had a deep molding depression in the upper portion, which would have stood out, even if I filled it.  Wood is very forgiving.  I probably won't build another plastic sailing ship again.  Maybe just use the hull and fabricate everything else out of wood.

Bob

Bob Frysztak

Luvspinball

Current builds:  Revell 1/96 USS Constitution with extensive scratch building

  • Member since
    March 2019
  • From: San Diego, CA
Posted by Jose Gonzales on Monday, December 19, 2022 5:49 PM

Here is the finished boat:

 20221218_214115 by Jose Gonzales, on Flickr

I had glued the bowsprit cap/double dolphinback striker assembly to the end of the bowsprit, when, guess what? I hit one of the strikers and broke it. It has happened to every model of Constitution I've built, multiple times each. Luckily I had ordered an extra one for my previous builds, but I thought to myself, wouldn't a wooden assembly be less likely to break? Besides, that wishbone-shaped pair of strikers always looked wierd to me.

 20221218_214029 by Jose Gonzales, on Flickr


I cut and filed off the remnants of the broken striker and fashioned a pair from basswood dowels out of the BlueJacket kit, then drilled holes and CA'ed them onto the plastic CAP. Based on how easy it was to drill through the wood I'm worried that basswood will be too soft, so I may look in the LHS for more robust wood dowels.


  • Member since
    September 2012
Posted by GMorrison on Friday, November 11, 2022 2:16 PM

Welcome back, Jose.


I'm very sorry to hear about your parents. That's one of those life milestones.


Bill

 Modeling is an excuse to buy books.


  • Member since
    March 2019
  • From: San Diego, CA
Posted by Jose Gonzales on Friday, November 11, 2022 12:26 PM

Hello all,

Shortly after my last post, I lost both my parents in a span of 6 days. They had both lived long lives, and I am grateful for all they gave me. After a 2 year hiatus, I have resumed  my build. I'm starting small with the ship's boats, using Marquardt as the main source.

 20221011_001556 by Jose Gonzales, on Flickr

  • Member since
    September 2012
Posted by GMorrison on Sunday, May 24, 2020 11:41 AM

Jose, that's hard to answer without more info.

What paint are you using?

What thinner?

What ratio?

What's the weather?


Bill

 Modeling is an excuse to buy books.


  • Member since
    March 2019
  • From: San Diego, CA
Posted by Jose Gonzales on Sunday, May 24, 2020 10:47 AM

 this is a pic of the barque Star of India in drydock for a hull cleaning. I suppose a technically accurate diorama of a ship would at least hint at the type of marine growth seen here.

  • Member since
    March 2019
  • From: San Diego, CA
Posted by Jose Gonzales on Wednesday, May 20, 2020 1:00 PM

This is probably a question for the painting discussion, but I am not an expert on airbrushing. I just started using my new airbrush which I received from my son for Christmas. It's a neo by Iwata, and it's the nicest airbrush I've ever worked with.

I finished priming and painting the ships tops and boats. In both, I found that after a full day of drying, the painted items still seemed tacky to the touch. I was wondering if I overdiluted or underdiluted the paints with paint thinner. Do I just need to let them dry longer?

Thanks,

Jose

  • Member since
    March 2019
  • From: San Diego, CA
Posted by Jose Gonzales on Monday, May 18, 2020 11:08 PM

Hello all,

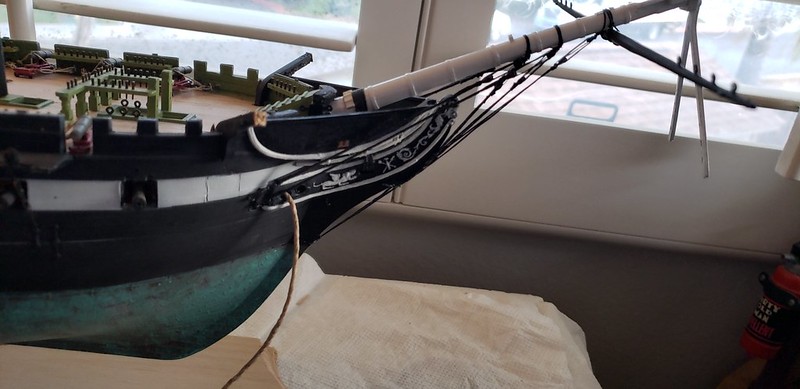
Time for a quick update. I finished rigging the bobstays (the three lines running from the stem to the underside of the bowsprit) and the bowsprit shrouds (pair of lines running from the bowsprit to either side of the bow near the rear of the trailboards).
 wx_camera_1589682087754 by Jose Gonzales, on Flickr

I served the shrouds along their entire length using the contraption I made. Next on the agenda-the fore-tack boomkins (or bumkins, or even bumpkins, depending on who you ask). Revell provids some very strange slightly s-shaped beams that are rectangular in cross-section. I read somewhere that boomkins did not become rectangular until the 1830's or 1840's, and that the Constitution's boomkins were round spars during the War of 1812, so I determined to fashion my own. I took a small-diameter dowel from the BlueJacket kit, cut two pieces to the same length as the revell pieces, chucked them into my power drill, and used 600 grit sandpaper and needle files to grind down one side of the dowels to a slight taper. I used 0.010x0.040 styrene strip and wrapped it around near the tapered end of the dowels to simulate an iron ring, secured with CA, and drilled 3 holes through the ring to accept 3 eyebolts.

 20200517_164110 by Jose Gonzales, on Flickr

 20200517_164246 by Jose Gonzales, on Flickr

I've painted them black and will mount and rig them shortly.

I've also primed the ships boats, along with the three fighting tops. I'm debating whether or not to mount the swivel guns that come with the BlueJacket kit.

 wx_camera_1589685971812 by Jose Gonzales, on Flickr


Finally, the red tide here in San Diego is waning now, but I got a chance to take a couple of pictures with my less than ideal cellphone camera:

 _DSD7468_edited-1 by Jose Gonzales, on Flickr

 _DSD7465_edited-1 by Jose Gonzales, on Flickr

  • Member since
    March 2019
  • From: San Diego, CA
Posted by Jose Gonzales on Tuesday, April 21, 2020 3:19 AM

Here's a link to the USS Constitution Museum webpage describing recent restoration work on the bobstays: https://ussconstitutionmuseum.org/2017/04/20/springtime-for-uss-constitution/

Cheers!

  • Member since
    March 2019
  • From: San Diego, CA
Posted by Jose Gonzales on Tuesday, April 21, 2020 3:05 AM

I created a serving machine from scrap pieces of wood and a set of gears ordered from an online toy store

 20200418_212832 by Jose Gonzales, on Flickr

 20200419_175156 by Jose Gonzales, on Flickr

I patterned it after the pictures on the Syren website of their serving machine, though mine is quite a bit simpler. The wood joints were reinforced by drilling through the wood joints with a pin vise drill and inserting brass rod.

I have installed 2 of 3 of the bowsprit bobstays.

 20200421_000428 by Jose Gonzales, on Flickr

 20200421_000633 by Jose Gonzales, on Flickr

Interesting differences in the depiction of the bobstays between Revell, BlueJacket, and my other resources. Revell would have you install 6 separate bobstays, 3 per side (3 pairs of separate lines with separate bullseye assemblies for each) while BlueJacket would have you install only 3 bullseyes attached to 3 single lines. The current ship and the previously cited Erik Olafson book say that the bobstays are actually 3 big loops of rope, rope lengths whose ends have been spliced together to form a loop. Th rope passes through holes in the stem/knee at the head of the ship, and have a deadeye siezed at the other end of the loop. The bowsprit has deadeye lashed to it , and the bobstay's deadeye is lashed to the bowsprit deadeye by a lanyard running between them. It is this version that I have chosen to model. I drilled 3 holes through the stem/knee, passed a length of line through each hole, then spliced the ends to form a closed loop. I siezed the deadeyes to the ends of the bobstays and lashed them to deadeyes on the bowsprit with a lanyard. The deadeyes were 3/32' dia from BlueJacket Shipcrafters, and came with the BlueJacket Constitution kit that I'm bashing with the Revell kit. Next up - the bowsprit shrouds. 

  • Member since
    October 2019
  • From: Cape Cod, Mass
Posted by Rick Sr on Thursday, April 9, 2020 8:22 AM

You'll be ok as long as you don't start licking people or barking all night. Smile

  • Member since
    March 2019
  • From: San Diego, CA
Posted by Jose Gonzales on Thursday, April 9, 2020 1:21 AM

Hi all!

Some small updates:

 20200408_073005 by Jose Gonzales, on Flickr

I've mounted the bowsprit, installed the gammoning (my first real rigging on the model), and stropped the spritsail yard. I defaulted to the revell yard instead of trying to make one from the wood dowels that came with the BlueJacket kit. After painting the yard Modelmalster Aircraft Interior Black, I figured it looked plenty good enough. I have, however, carved a jib boom from the dowels becase the revell plastic version looks a little ragged due to the molds being so old. Pics to come.

 20200408_073019 by Jose Gonzales, on Flickr

I've installed ringbolts on the spar deck to retract the slides carrying the carronades. I will not mount the training tackles for all guns, but perhaps I may install one and crew the gun - perhaps firing the morning salute. I've also carved and mounted a couple of larger cleates for the main braces. I am now facing a dilemma - whether or not to install bumpkins on either side of the stern for the main braces. From my previous builds, I know the braces have a tendency to rub against the boats mounted in the stern davits; bumpkins might spread the braces out far enough so that they won't run into the boats. If I recall correctly, Evan (Force9) tried outfitting bumpkins (aka boomkins) - I'll review his build for ideas. The Hull model does not have them, and I believe the Corne paintings of Constitution vs Guerriere don't show theim, but the Ware plans of the USS United States (Constitution's sister ship and one of the original 6 US frigates) do show them:

 45-Ware-15-DeckPlans by Jose Gonzales, on Flickr

 Note - the Ware plans are available from the USS Constitutution Museum website under modeler's references. Revell clearly consulted these plans, especially in regard to the spar deck boat posiions over the main hatch.


  • Member since
    October 2019
  • From: Cape Cod, Mass
Posted by Rick Sr on Tuesday, April 7, 2020 3:41 PM

Strawberry shortcake?_

  • Member since
    September 2012
Posted by GMorrison on Tuesday, April 7, 2020 3:33 PM

I've become my dog. I spend all day sleeping, yearning for car rides, or wandering around the house looking for something to eat...

 Modeling is an excuse to buy books.


  • Member since
    October 2019
  • From: Cape Cod, Mass
Posted by Rick Sr on Tuesday, April 7, 2020 3:33 PM

I can't have mine at the bench. He's nosy and keeps sticking his head in the way. When you tell him to get out of the way, he licks you!

I talk to the ghosts of models gone by.

  • Member since
    October 2019
  • From: Cape Cod, Mass
Posted by Rick Sr on Tuesday, April 7, 2020 3:29 PM

Big Smile  


  • Member since
    May 2006
  • From: Chapin, South Carolina
Posted by Shipwreck on Tuesday, April 7, 2020 9:07 AM

Luvspinball

I 'm talking to the dogs a lot more.


If you are like most people. you will learn a lot if you listen to them!

On the Bench:

Revell 1/96 USS Constitution - rigging

Revell 1/48 B-1B Lancer Prep and research

Trumpeter 1/350 USS Hornet CV-8 Prep and research


  • Member since
    March 2018
  • From: Chicago suburbs
Posted by Luvspinball on Tuesday, April 7, 2020 7:54 AM

I 'm talking to the dogs a lot more.  Not sure why, since they are asleep half the time. 

Bob Frysztak

Luvspinball

Current builds:  Revell 1/96 USS Constitution with extensive scratch building

  • Member since
    October 2019
  • From: Cape Cod, Mass
Posted by Rick Sr on Tuesday, April 7, 2020 6:34 AM

Guns are fastened in to the gun deck. Thanks for that picture, putting in the messenger cables now and that picture has been a great help. BM posted a picture of HMS Victory. Those pictures are a great help. After the messenger cable is finished, it will be time to tie in the guns.

Have you guys had a propensity to talk to yourselves during these builds?

  • Member since
    September 2012
Posted by GMorrison on Saturday, March 14, 2020 6:41 PM

That is a wonderful drawing. It suggests how the messenger was rigged when the anchors were raised, with the eyes and lashing.


 Modeling is an excuse to buy books.


  • Member since
    March 2019
  • From: San Diego, CA
Posted by Jose Gonzales on Saturday, March 14, 2020 6:21 PM

 918xfJIVWcL by Jose Gonzales, on Flickr

This is one of the drawings on which I based my gun deck design and my rigging of the capstan, anchor cables and messenger cables. It describes the HMS Victory's system, but I believe the Constitution's system cannot have been much different. Note the heavy vertical beams just next to the rearmost pumps, designed to keep the messenger cable away from the pumps. I placed similar structures next to my pumps:

 _DSD2146 by Jose Gonzales, on Flickr

  • Member since
    October 2019
  • From: Cape Cod, Mass
Posted by Rick Sr on Saturday, March 7, 2020 7:25 PM

Thanks Jose. The plans I have show the cables dropping through the gun deck through spurling holes just forward of the main hatch. But they also show chain cable instead of hemp for the anchor cables. I think these plans are for the refit done sometime in the late 1830s.

I've started painting the hull on my third Constitution and will be using a lot of what I have seen here on that build.

Your build and Bob's are excellent and very good tutorials, as is Bill"s with his HMS Victory. I hope my third will be just as well.


  • Member since
    March 2019
  • From: San Diego, CA
Posted by Jose Gonzales on Saturday, March 7, 2020 1:33 PM

 _DSD7448 by Jose Gonzales, on Flickr

I finished the head. I added a couple of seats of comfort to each side. Revell's placement of the single seat on each side is illogical, as several rigging lines pass directly over the seat, and there would be no room to sit on it without having to duck them. I had to take into account where the bumpkins or boomkins would pass through the head rails.

  • Member since
    March 2019
  • From: San Diego, CA
Posted by Jose Gonzales on Saturday, March 7, 2020 1:19 PM

Yes I agree with your decision.  If any bulwark cutting were to be done, it probably would have been best done before even assembling the hull. 

Im going to take a good look at how the deadeyes actually line up with the carronade ports. I may end up completely  rebuilding the channels, modifying the deadeye locations.

  • Member since
    October 2019
  • From: Cape Cod, Mass
Posted by Rick Sr on Thursday, March 5, 2020 10:14 AM

Not going to do any fixing as it seems not practible. Would it be easier for you to adjust chains a little to improve carronade interference? The chains molded into the hull aren't very prominent.

  • Member since
    October 2019
  • From: Cape Cod, Mass
Posted by Rick Sr on Tuesday, March 3, 2020 6:44 AM

I am working on my gun deck and think I can cut my spar deck bulwarks level with the gun deck and rebuild them, using the spar bulwarks I would have off my parts kit. Maybe.

Any suggestions on where to place them regarding carronade ports? 

  • Member since
    March 2019
  • From: San Diego, CA
Posted by Jose Gonzales on Tuesday, March 3, 2020 12:42 AM

Hi again,

With regard to the Hull model at the Peabody Essex Museum, here are my 2 cents worth. 

The model was built by a sailor/group of sailors on the ship, who, while intimately familiar with the details of the ship, did not have a draftsman's or nautical engineer's eye for scale or proportion, hence the oversized guns on the spar deck, the distorted proportions in the shape of the hull and perhaps, the spacing of the gun ports, in particular the forward ports.

In his review, Mr Eriksen points out how early portions of the build were more carefully executed than later portions; for example, the gun deck was fully planked, but the spar deck was completed using larger pieces of wood. 

All of this points to the larger truth, that while the model is a historical treasure with a wealth of useful information, including the rigging detail and color scheme, it should not be considered an accurate scale representation.

Cheers,

Jose

  • Member since
    March 2019
  • From: San Diego, CA
Posted by Jose Gonzales on Tuesday, March 3, 2020 12:03 AM

 forecastle guns by Jose Gonzales, on Flickr

Here is a picture of the front third of the Constitution as she appears today. The carronade ports are not directly between the gun deck ports, but are logically spaced to allow the deadeyes and shrouds to run between both gun deck and spar deck ports.


Unfortunately the Revell spar deck ports are very poorly spaced, as are the deadeyes.

 _DSC8071 by Jose Gonzales, on Flickr

Four deadeyes/lanyards between the second and third gun deck ports, and the placement of the spar deck ports for the carronades are nowhere near where they should be to optimally fit between the deadeyes/lanyards. I'm too far along to fix either the deadeyes or the carronade ports.

  • Member since
    March 2018
  • From: Chicago suburbs
Posted by Luvspinball on Monday, March 2, 2020 11:23 PM

GMorrison

Looking at the draft drawing vs. model; the quarter deck and forecastle deck carronade locations seem way off on the model.

I suppose the easier thing a modeler could do to revise stuff would be to rebuild the bulwarks.

Bill


Bill,

While that may be something someone just starting on the model could accomplish, mine is way to far into the build to go that route.  I have multiple sources for my build (7 by my count), and the only thing consistent is the inconsistency of the plans.   At some point, you just have to make your best guess based on the evidence at hand and just be happy with your decision down the road.  Based on all the comments I have received over the last 1 1/2 years, I am and will continue to be proud of my build.  And to be brutally honest, only those of us who have taken the time to do this research will actually know the difference.  Most folks will just look at her and marvel at the finished product, without any mind to the numerous agonies we have endured along the way.  Kind of like raising kids: you do your best and hope that you can be proud of the final product.  Either way, I know I have learned a LOT about ships from others on this forum and from my two clubs.

Bob


Bob Frysztak

Luvspinball

Current builds:  Revell 1/96 USS Constitution with extensive scratch building

JOIN OUR COMMUNITY!

Our community is FREE to join. To participate you must either login or register for an account.

SEARCH FORUMS
FREE NEWSLETTER
By signing up you may also receive reader surveys and occasional special offers. We do not sell, rent or trade our email lists. View our Privacy Policy.