SEARCH FINESCALE.COM

Enter keywords or a search phrase below:

Revell 1/72nd S-100 Schnellboot Completed Page 4

8454 views
132 replies
1 rating 2 rating 3 rating 4 rating 5 rating
  • Member since
    December 2002
  • From: Bury St Edmunds, Suffolk, England
Revell 1/72nd S-100 Schnellboot Completed Page 4
Posted by Bish on Monday, February 24, 2020 2:49 AM

Not often i get to but a build thread in here. This is my first 72nd scale ship build and the most detailed ship to date. As i am not to familiar with building ships, i am taking my time with this and i am intending follow the instruction sequence rather than jump around as i might do with armour or aircraft.
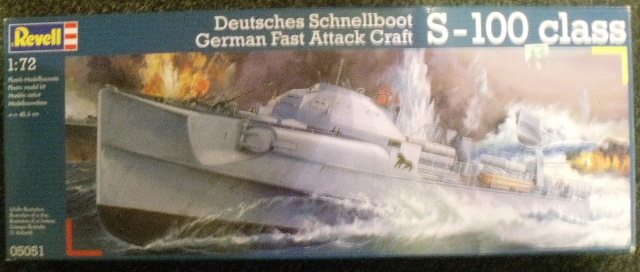
I don't usually get referance boks for subjects i only have one kit of, but i have made an exception with my larger ship kits.

The kit itself cost me nothing, being a gift from Bobby (Eagle90) a few years back. But i made up for that with the AM. The Griffon premium set contains 14 PE frets, resin parts, metal barrels and torpedo's and a few other things. I got 2 Peddinghaus decal set as the boat i want to do, S-205, is not covered by one of them. Also an Artwox wood deck and some sea mines from CMK.

I started out with the mounts for the railings on the main deck piece. I didn't have much spare time Thurs night so didn't want to get into anything to intricate.

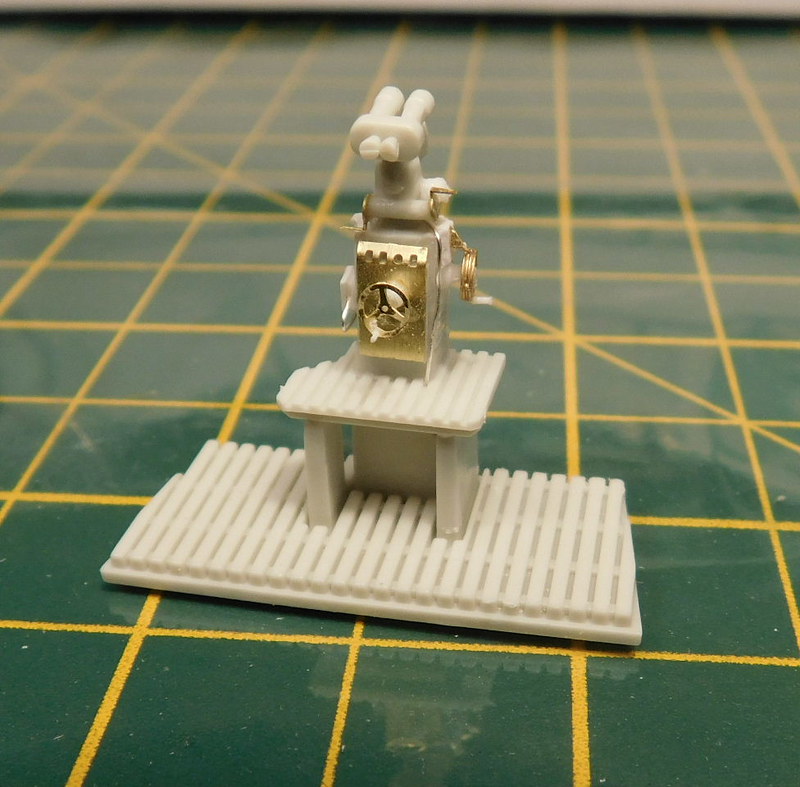
Then over the weekend i made a start on the bridge. Main piece i needed to work on was the RZA 5 torpedo sight. The kit piece lack detail and is totally wrong, and the PE only added a couple of bits. This is what it should look like, from the Squadron book.

And this is the kit part, this being the upper portion. Notice how it narrows at the top.
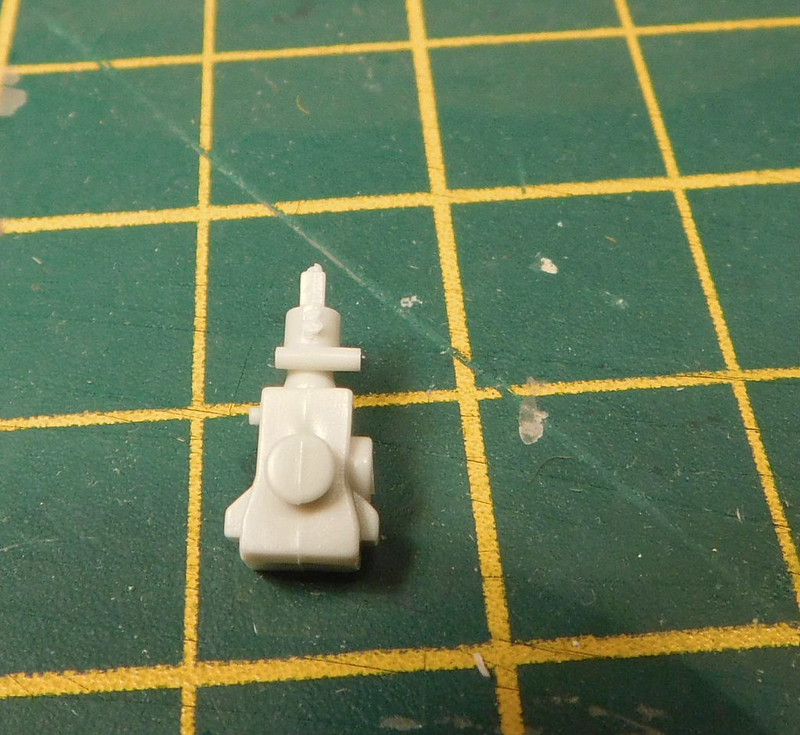
And the lower portion is part of the front of the bridge. On the real thing, it would extend lower down below the bridge floor.

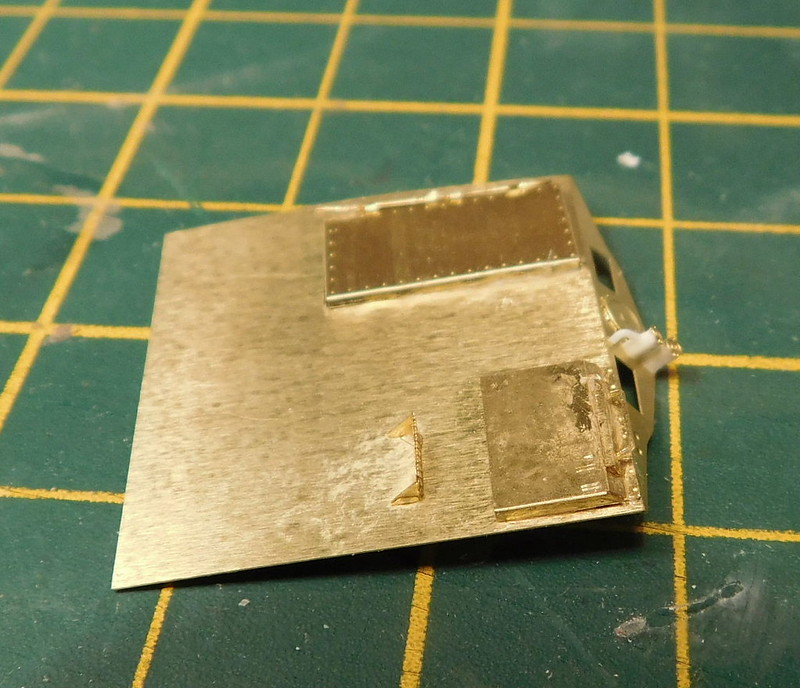
That whole piece is replaced by PE. So i cut out the bit i needed and attached it to the upper portion. I also filled out the side with some styrene sheet and added a bit of PE.

I then finished it off with some PE and scratched some detail with styrene and PE scrap. The hand wheel on the rear is from the PE set, the one of the right is made from 2 spare wheels from one of my Luftwaffe ladder sets. I put 2 together to give it some thickness. I finished off with some wireing. This was one of those things when you have to know when enough is enough. I could have spent a whole day adding tiny details and it still would not have matched the real thing. I think this looks enough without going OTT. It was then fitted to the bridge floor.

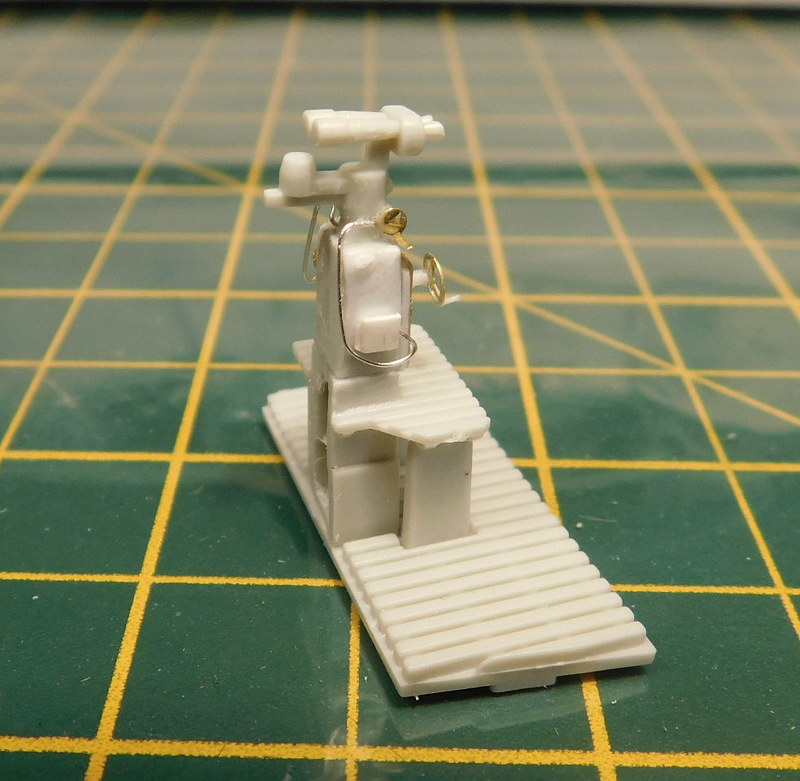
I then got the front and sides of the bridge fitted out.

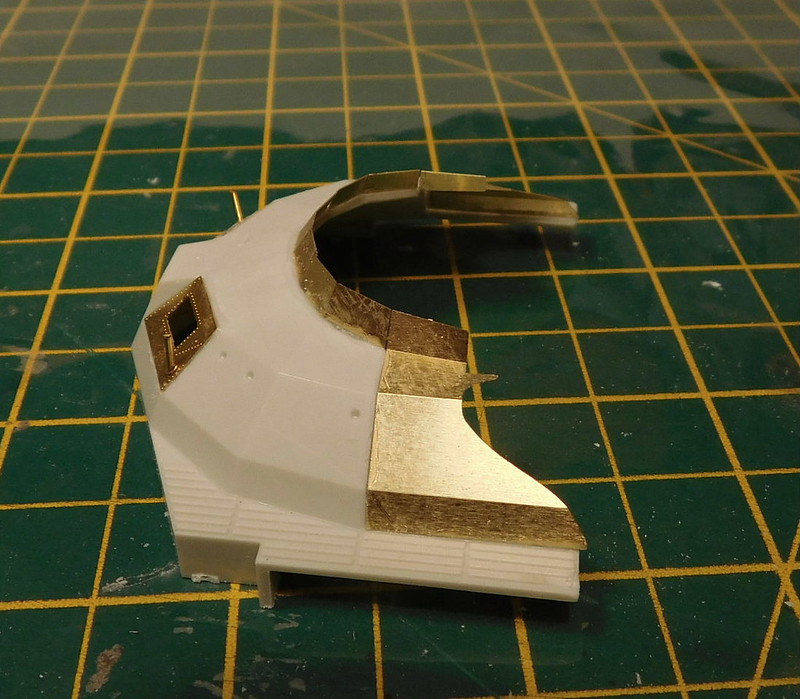
And then the armoured front to the bridge/wheel house.

So the bridge is now ready to be primed and painted on the inside. I'll do that and then put it all tofgether. There is some slight cleanup and a few parts to be added to the outside, but they can be done later.

Enjoying this so far, still a long way to go.


I am a Norfolk man and i glory in being so


On the bench: Airfix 1/72nd Harrier GR.3/Fujimi 1/72nd Ju 87D-3

  • Member since
    July 2010
  • From: Tempe AZ
Posted by docidle on Monday, February 24, 2020 10:58 PM

Bish,

Welcome to the wet side of things. I’m pulling up my desk chair for this one! I have the Flak kit that I’ve been adding PE and 3D goodies to. I have the same PE set and reference materials so I’ll be following closely.

Steve


  • Member since
    November 2008
  • From: Central Florida
Posted by plasticjunkie on Monday, February 24, 2020 11:21 PM

Hi Bish. I have this  one and the old Airfix high bridge boat. Will be watching your build.Yes 

 GIFMaker.org_jy_Ayj_O


Too many models to build, not enough time in a lifetime!!

  • Member since
    December 2002
  • From: Bury St Edmunds, Suffolk, England
Posted by Bish on Tuesday, February 25, 2020 3:35 AM

Thanks guys.

I am a Norfolk man and i glory in being so


On the bench: Airfix 1/72nd Harrier GR.3/Fujimi 1/72nd Ju 87D-3

  • Member since
    July 2012
  • From: Douglas AZ
Posted by littletimmy on Wednesday, February 26, 2020 7:52 PM

I built one of these a few year's ago. But I did it without any after market stuff.

It build's up nice straight out of the box. but you will have a real "show winner" when you finish !  I seem to recall that the kit supplyed propellers are wrong.

( Mine currently lives in a box.... broken into several piece's. ......)


 Dont worry about the thumbprint, paint it Rust , and call it "Battle Damage"

  • Member since
    December 2002
  • From: Bury St Edmunds, Suffolk, England
Posted by Bish on Thursday, February 27, 2020 2:56 AM

Thanks timmey. Ye, i have read that about the props, but i can't find out what the issue is. Going to have to find some pics and try and see if it can be fixed.

I am a Norfolk man and i glory in being so


On the bench: Airfix 1/72nd Harrier GR.3/Fujimi 1/72nd Ju 87D-3

  • Member since
    December 2015
  • From: providence ,r.i.
Posted by templar1099 on Thursday, February 27, 2020 5:49 AM

Off the beaten path here Bish,looking foward to it.

"le plaisir delicieux et toujours nouveau d'une occupation inutile"

  • Member since
    November 2008
  • From: Central Florida
Posted by plasticjunkie on Thursday, February 27, 2020 6:35 AM

Bish

Thanks timmey. Ye, i have read that about the props, but i can't find out what the issue is. Going to have to find some pics and try and see if it can be fixed.


I've read a couple of reviews and all they say is that the props are wrong but doesn't explain what or how to correct. I have looked for pictures too but nothing, even in my In Action book. Please let us know what you find out. 

 GIFMaker.org_jy_Ayj_O


Too many models to build, not enough time in a lifetime!!

  • Member since
    December 2002
  • From: Bury St Edmunds, Suffolk, England
Posted by Bish on Thursday, February 27, 2020 6:37 AM

Thanks templar. Ye it is a bit, but gets worse later in the year when i am starting a 72nd U-Boat.

I am a Norfolk man and i glory in being so


On the bench: Airfix 1/72nd Harrier GR.3/Fujimi 1/72nd Ju 87D-3

  • Member since
    July 2010
  • From: Tempe AZ
Posted by docidle on Thursday, February 27, 2020 8:52 PM

Bish,

How is the Griffon PE? I have this set for my kit and was wondering what you thought? Also, are you going to replace the barrels on the weapons?

If you’re talking about the Revell 1/72 U-Boat, I think you’ll like it. It was the first “modern” ship I did when I got back into modeling in 2010. It was actually a great kit with few problems that were more than likely user error! I also used the Eduard PE set.

Steve


  • Member since
    December 2002
  • From: Bury St Edmunds, Suffolk, England
Posted by Bish on Friday, February 28, 2020 1:58 AM

Steve, the PE set seems ok so far, nothing to complicated, its certainly easier to use than the Voyager sets. I am just in the process of doing the centre section of the deck and the instructions are slightly muisleading, i'll expand on that in an update at the weekend. I think it will be useful for those who have the set. And as it seems several people do have this set, i will try and give as much detail as i can. And ye, i will be useing the barrels that come in the Griffon set.

Ye, its the Revell Type VIIc, i am really looking forward to that. I have the Eduard set and a few other things to go with it. Hopfeullu starting that in August or Sept.

I am a Norfolk man and i glory in being so


On the bench: Airfix 1/72nd Harrier GR.3/Fujimi 1/72nd Ju 87D-3

  • Member since
    December 2015
  • From: providence ,r.i.
Posted by templar1099 on Friday, February 28, 2020 5:57 AM

Bish
Ye, its the Revell Type VIIc, i am really looking forward to that


Funny, I just pulled the Revell type ix off the shelf having finished the BMP-1. Perused the instructions but decided to start the Olympia. Maybe have an August U boat build?

"le plaisir delicieux et toujours nouveau d'une occupation inutile"

  • Member since
    December 2002
  • From: Bury St Edmunds, Suffolk, England
Posted by Bish on Friday, February 28, 2020 1:05 PM

plasticjunkie


Bish

Thanks timmey. Ye, i have read that about the props, but i can't find out what the issue is. Going to have to find some pics and try and see if it can be fixed.


I've read a couple of reviews and all they say is that the props are wrong but doesn't explain what or how to correct. I have looked for pictures too but nothing, even in my In Action book. Please let us know what you find out. 


Will do. I know i have seen a pic some where. The kagero book is not to helpful on that area.

I am a Norfolk man and i glory in being so


On the bench: Airfix 1/72nd Harrier GR.3/Fujimi 1/72nd Ju 87D-3

  • Member since
    December 2002
  • From: Bury St Edmunds, Suffolk, England
Posted by Bish on Friday, February 28, 2020 1:06 PM

templar1099


Bish
Ye, its the Revell Type VIIc, i am really looking forward to that


Funny, I just pulled the Revell type ix off the shelf having finished the BMP-1. Perused the instructions but decided to start the Olympia. Maybe have an August U boat build?


Modelcrazy will be starting the German ships GB in August. I am keeping the Type VII for that.

I am a Norfolk man and i glory in being so


On the bench: Airfix 1/72nd Harrier GR.3/Fujimi 1/72nd Ju 87D-3

  • Member since
    July 2010
  • From: Tempe AZ
Posted by docidle on Sunday, March 1, 2020 10:42 PM

Bish


plasticjunkie


Bish

Thanks timmey. Ye, i have read that about the props, but i can't find out what the issue is. Going to have to find some pics and try and see if it can be fixed.


I've read a couple of reviews and all they say is that the props are wrong but doesn't explain what or how to correct. I have looked for pictures too but nothing, even in my In Action book. Please let us know what you find out. 


Will do. I know i have seen a pic some where. The kagero book is not to helpful on that area.


Bish,

I forgot to post this link to Shapeways that have the correct props. This is one of the upgrades I plan on making on mine. Hope this helps.

Steve

https://www.shapeways.com/product/FGYP79TKM/1-72-german-schnellboot-propellers-kit?optionId=62908397&li=marketplace


  • Member since
    December 2002
  • From: Bury St Edmunds, Suffolk, England
Posted by Bish on Monday, March 2, 2020 4:08 AM

Thanks Steve, i will look intio that. I am at work at the moment, but looking at them i think the curve in the blades is completly different. Only issue i can see is that i an sure on the kit one of the props attaches to the rudder. Will have to check that.

Thanks.

I am a Norfolk man and i glory in being so


On the bench: Airfix 1/72nd Harrier GR.3/Fujimi 1/72nd Ju 87D-3

  • Member since
    November 2008
  • From: Central Florida
Posted by plasticjunkie on Monday, March 2, 2020 7:44 PM

I looked at the kit props and compared them to the Shapeways ones. They look the same to me except for the blade pitch being reversed. Is this the issue? I can’t justify spending about what the kit cost me initially for 3 props.

 GIFMaker.org_jy_Ayj_O


Too many models to build, not enough time in a lifetime!!

  • Member since
    April 2015
Posted by Mopar Madness on Monday, March 2, 2020 9:40 PM

Well I can't believe I missed this one! I've got this one in the stash and look forward to seeing what you make of it. Beer

Chad

God, Family, Models...

At the plate: 1/48 Airfix Bf109 & 1/35 Tamiya Famo

On deck: Who knows!

  • Member since
    July 2010
  • From: Tempe AZ
Posted by docidle on Monday, March 2, 2020 10:20 PM


plasticjunkie

I looked at the kit props and compared them to the Shapeways ones. They look the same to me except for the blade pitch being reversed. Is this the issue? I can’t justify spending about what the kit cost me initially for 3 props.


I agree with you PJ. Here are links that show the correct props. Looking at these, the Shapeways props are correct. Notice the different pitch on the port prop. The second link has a write up of the correct style of props. The metal props are no longer avaible but I will be picking up the Shapeways ones, heck I’ve already spent way more on the kit with the PE and the 3D extras I have now! Hope this will help.

Steve

http://www.modelwarships.com/reviews/misc/cw/s-100-props/props.html


http://www.modelwarships.com/reviews/misc/cw/s-100-props/s100-02.jpg


  • Member since
    December 2002
  • From: Bury St Edmunds, Suffolk, England
Posted by Bish on Tuesday, March 3, 2020 2:24 AM

plasticjunkie

I looked at the kit props and compared them to the Shapeways ones. They look the same to me except for the blade pitch being reversed. Is this the issue? I can’t justify spending about what the kit cost me initially for 3 props.


Ye, from what i could tell looking at them last night, i think this is the main issue. Also the centre prop which connects directly to the rudder. I am sure thats not right either.

Like Steve, i have already spent a bicket load on AM on this kit, so i might as well get those and after looking through it, they also have the 37mm gun shield i need for my boat that the kit and PE set don't supply. Thats going to save some scratch building.

I am a Norfolk man and i glory in being so


On the bench: Airfix 1/72nd Harrier GR.3/Fujimi 1/72nd Ju 87D-3

  • Member since
    December 2002
  • From: Bury St Edmunds, Suffolk, England
Posted by Bish on Tuesday, March 3, 2020 2:29 AM

Mopar Madness

Well I can't believe I missed this one! I've got this one in the stash and look forward to seeing what you make of it. Beer


Well, glad to have you on board.

I skipped an update this weekend as there was not that much done. But for those who have this PE set, there are a few issues i have picked up, mainly with the instructions. I will highlight those at the next update and hopefully save people a bit of head scratching.

I am a Norfolk man and i glory in being so


On the bench: Airfix 1/72nd Harrier GR.3/Fujimi 1/72nd Ju 87D-3

  • Member since
    November 2008
  • From: Central Florida
Posted by plasticjunkie on Tuesday, March 3, 2020 6:59 AM

Thanks Steve for the links. I will try to reverse the pitch on the kit blades using Tenax to melt the corrected plastic blades in place. If that fails then I may go with replacement props. I have the 05051 Revell kit with the single 40mm and have the Griffon N72001 PE set for it. 

I also have the old Airfix high bridge E Boat in the stash and have been waiting for someone to come out with a pe set for it. It's a lovely kit but it will benefit a lot more with some PE upgrades.

 GIFMaker.org_jy_Ayj_O


Too many models to build, not enough time in a lifetime!!

  • Member since
    December 2002
  • From: Bury St Edmunds, Suffolk, England
Posted by Bish on Tuesday, March 3, 2020 9:13 AM

Well, i took the plunge and ordered the props and gun shield. never used 3D printed stuff before, so keen to see what iots like. Won't be here until the end of the month, but thats no problem.

I am a Norfolk man and i glory in being so


On the bench: Airfix 1/72nd Harrier GR.3/Fujimi 1/72nd Ju 87D-3

  • Member since
    November 2008
  • From: Central Florida
Posted by plasticjunkie on Tuesday, March 3, 2020 9:17 AM

Bish the detail is excellent. I bought a 3d printed 1/144 3" deck gun and the level of detail is incredible. Use water based acrylic paint on that plastic as per the instructions. It mentioned something about solvents possibly damaging the plastic.

This is my 1/144 Gato's 3d printed 3" deck gun. The picture doesn't do it justice. One can see each traversing wheel, gears, levers, bolts etc. Even the barrel is drilled out.


 GIFMaker.org_jy_Ayj_O


Too many models to build, not enough time in a lifetime!!

  • Member since
    December 2002
  • From: Bury St Edmunds, Suffolk, England
Posted by Bish on Tuesday, March 3, 2020 9:24 AM

Thanks PJ, thats good to know. I use Alclad primer and enamel paint. Not sure if there is an acrylic version of S-Boot white so maybe seal with Tamiya first. Is there any excess to be removed that could be used to test it on?

I am a Norfolk man and i glory in being so


On the bench: Airfix 1/72nd Harrier GR.3/Fujimi 1/72nd Ju 87D-3

  • Member since
    March 2018
  • From: Chicago suburbs
Posted by Luvspinball on Tuesday, March 3, 2020 9:46 AM

Bish

 Is there any excess to be removed that could be used to test it on?


Depends on the particular process used.  Some do, some don't.  Be sure to follow any directions they send with on washing/cleaning the parts prior to painting.  Purchased quite a few things over the years, and always been quite pleased with the level of detail.

Bob


Bob Frysztak

Luvspinball

Current builds:  Revell 1/96 USS Constitution with extensive scratch building

  • Member since
    December 2002
  • From: Bury St Edmunds, Suffolk, England
Posted by Bish on Tuesday, March 3, 2020 9:59 AM

Thanks Bob. I will be sure to read anything they send me. And i know where to come if i have any questions.

I am a Norfolk man and i glory in being so


On the bench: Airfix 1/72nd Harrier GR.3/Fujimi 1/72nd Ju 87D-3

  • Member since
    November 2008
  • From: Central Florida
Posted by plasticjunkie on Tuesday, March 3, 2020 10:16 AM

Bish

Thanks PJ, thats good to know. I use Alclad primer and enamel paint. Not sure if there is an acrylic version of S-Boot white so maybe seal with Tamiya first. Is there any excess to be removed that could be used to test it on?


No, don't use those. Use like MM acryl or Vallejo paint. Remember that tamiya is an acrylic lacquer and not a true acrylic. It may look ok at first but you may get a reaction days or weeks later. My buddy used MM enamel on it and it looked fine for about a month then he noticed what looked to be like grit on the surface. You will more than likely get the same reaction from a solvent type acrylic lacquer. He carefully brushed it off and used Vallejo paint and had no reaction from that. I used Vallejo black  on my 3" deck gun and it's been fine.

 GIFMaker.org_jy_Ayj_O


Too many models to build, not enough time in a lifetime!!

  • Member since
    July 2010
  • From: Tempe AZ
Posted by docidle on Wednesday, March 4, 2020 10:51 PM

Bish

Thanks PJ, thats good to know. I use Alclad primer and enamel paint. Not sure if there is an acrylic version of S-Boot white so maybe seal with Tamiya first. Is there any excess to be removed that could be used to test it on?


Bish,

I have been using ColourCoat paint a great deal lately so I understand the trepidation on using them on 3D parts... especially with the price! I’m going to try and use an acrylic clear flat coat after the primer (Tamiya) on some of the spare sprue and see what happens. Since I’m not really going to start this kit yet.... that said, I had started it a couple of years ago before my hands started going wonky on me. 

The acrylic ”equivalent“ to Scnellboot Wheis (sorry my iPad doesn’t have the correct German B sort of thing for the S), is Vallejo Model Color 70.993 White Grey.

Something else I did when I started this kit was to drill out the different underwater holes for induction and ejection. I then added Evergreen tubing on the interior to give them depth and painted them and the interior Black. Here are a couple of picks to show what I mean. Just some of my AMS (Advanced Modeler Disease) showing through!

Another area of discussion from another thread was the question of the German Anti Fouling paint colors. From what I could find in regards to S-Boots, the earlier boats such s PJ’s Airfix High Bridge E Boot S-1 through S-7 as well as the early S-38 series vs. the later S-38 to S-100 series discussed in another thread, was that the earlier boats used Schiffsbodenfarbe III Grau (Anti Fouling Grey) and the later boats sported Scheffbodenfarbe Rot III (Anti Fouling Red) which is actually on the Brownish side of Red.

Anyway, I hope this helps a bit,

Steve


  • Member since
    December 2002
  • From: Bury St Edmunds, Suffolk, England
Posted by Bish on Thursday, March 5, 2020 4:17 AM

Thanks Steve. I have the colourcoats paint including the white and red. I had noticed that about the hull colour as well, and from what i can tell there is no black water line.

Damn, i wasn't sure what to do with those underwater parts so i left them and now i have the deck on. I wounder if i can insert them from the outside. What size tube did you use?

I really should have thought of that.

I am a Norfolk man and i glory in being so


On the bench: Airfix 1/72nd Harrier GR.3/Fujimi 1/72nd Ju 87D-3

JOIN OUR COMMUNITY!

Our community is FREE to join. To participate you must either login or register for an account.

SEARCH FORUMS
FREE NEWSLETTER
By signing up you may also receive reader surveys and occasional special offers. We do not sell, rent or trade our email lists. View our Privacy Policy.