SEARCH FINESCALE.COM

Enter keywords or a search phrase below:

1/48 Monogram B-17G Flying Fortress

233413 views
590 replies
1 rating 2 rating 3 rating 4 rating 5 rating
  • Member since
    December 2008
  • From: Goffstown, NH
Posted by New Hampshire on Monday, March 16, 2009 6:26 PM

I can NOT wait to see this baby all done up!!!!!!  Bring on those WIP pics!!!!!!

Brian

  • Member since
    June 2005
  • From: Novi, Mi
Posted by Lancair IV on Tuesday, March 17, 2009 7:53 PM

Finished the Rudder today and started the Rear Crew Door. Man is this Eduards Photo Etched stuff nice.


Rudder in Neutral Position

Rudder Deflected Left

Rudder Deflected Right

Rudder Structure

Rear Crew Access Door molded into the kit

Eduards Rear Crew Access Door Outside

Eduards Rear Crew Access Door Inside


Thanks for looking

Happy St. Patrics Day


Rob Byrnes

Novi, Mi

  • Member since
    January 2007
Posted by Gigatron on Wednesday, March 18, 2009 9:48 AM

Looking good, so far!

And when you get bored of adding the interior PE, just keep telling yourself 2 things; 1) you only have to put in half, as half is mounted on clear side and therefore, not needed and 2) you don't know true boredom until you've gotten to the PE for the flaps. Laugh [(-D]

-Fred


  • Member since
    May 2004
  • From: Land of Lakes
Posted by cbaltrin on Wednesday, March 18, 2009 3:21 PM
Wow, Nothing gets me going quite like a B-17 tail wheel! Big Smile [:D]

On the Bench: Too Much

  • Member since
    June 2005
  • From: Novi, Mi
Posted by Lancair IV on Wednesday, March 18, 2009 4:52 PM

Little more work today. Rear crew door, and tail gunner emergency exit are cutout, and shot some interior green on some of the parts. Now I can start assembling and detailing.

Eduards Rear Crew access door in place - I plan on having the door in the open position


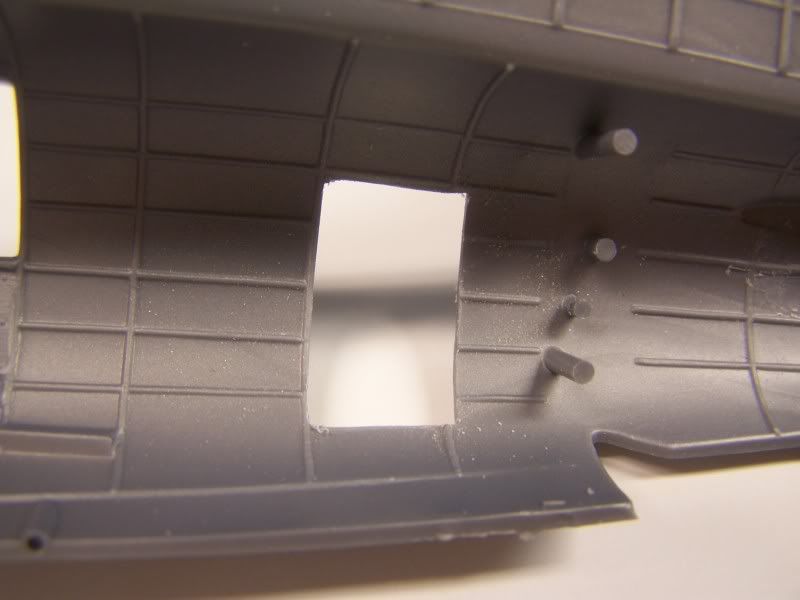
Rear crew access door opening in RH Fuselage


Rear crew access door opening from the inside


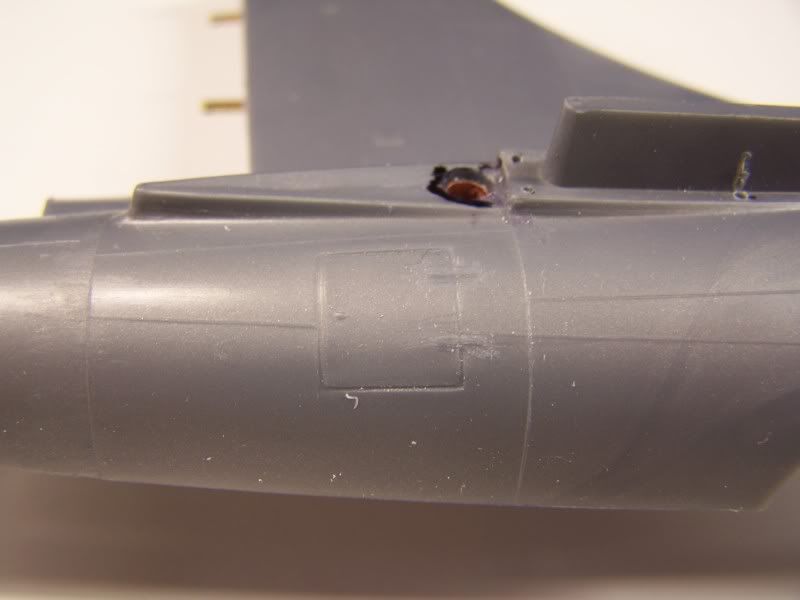
Tail gunner emergency exit door molded into the kit


Completed Eduards tail gunner door inside


Completed Eduards tail gunner door outside


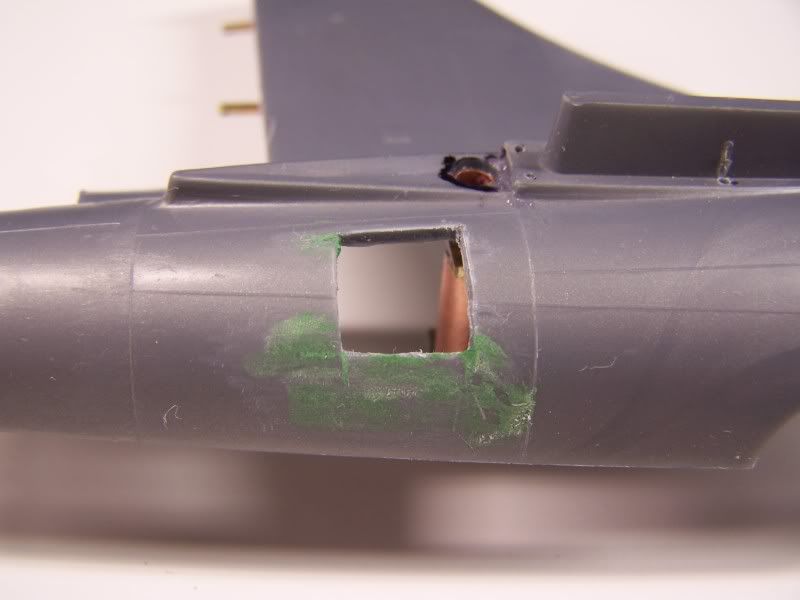
Tail gunner emergency exit door opening in RH Fuselage - This door will be in the open position


All parts painted interior green


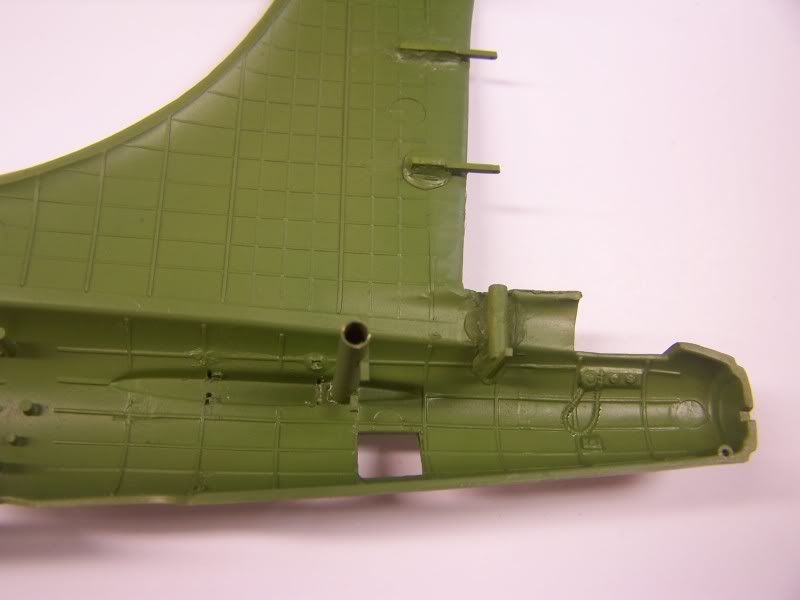
Right Hand tail painted


Tail Wheel assembly ready for detailing (this is for cbaltrin)Smile [:)]


Thanks again for looking. I hope I'm not overdoing it with the pictures and progress updates.  Confused [%-)]

Rob Byrnes

Novi, Mi

  • Member since
    September 2003
  • From: South Central Wisconsin
Posted by Daywalker on Wednesday, March 18, 2009 5:21 PM
 Lancair IV wrote:

...I hope I'm not overdoing it with the pictures and progress updates.  Confused [%-)]

Absolutely not!  Please keep 'em coming, I am really enjoying your progress pics. Approve [^]

Frank 


  • Member since
    December 2008
  • From: Goffstown, NH
Posted by New Hampshire on Wednesday, March 18, 2009 7:24 PM
 Daywalker wrote:
 Lancair IV wrote:

...I hope I'm not overdoing it with the pictures and progress updates.  Confused [%-)]

Absolutely not!  Please keep 'em coming, I am really enjoying your progress pics. Approve [^]

Sign - Ditto [#ditto] I am lovin this!!!!

Brian

  • Member since
    March 2003
  • From: Lafayette, LA
Posted by Melgyver on Wednesday, March 18, 2009 10:40 PM

Rob,

I dug out my old B-17 I had started on over 20 years ago and took a few pic's of some details, not as good as some of yours.  I didn't notice before, but your tail wheel assy looks to sit a little to far up into the wheel well.  I don't have a fork and tail wheel for my assy yet but it sit's futher out than yours.  Mine may not be sticking out far enough either according to the pic you had posted.  

Here is a shot of my assy without any retract mechanism.  I'll be adding that whenever I get back to working on it again.  Also in pic is scratch build radio fronts and nose entry door.

I'll be posting some other pictures in the post The Begining of a very Visible B-17.


Clear Left!

Mel

  • Member since
    October 2008
  • From: Windsor Ontario Canada
Posted by -Tiny- on Thursday, March 19, 2009 11:36 AM
Talk aboot over the top eh?  I thought I put a decent amount of work into my Fort...wow.  Are you going to do the visible half?  It would be a shame to cover up all of that PE.  Great work so far man...keep the pics comming.
On the go...Trumpeter 1/72 Tupolev Bear Soviet Heavy bomber...Tamiya 1/48 RAF DeHavilland Mosquiot Mk.II
  • Member since
    January 2007
  • From: Northern California
Posted by trexx on Thursday, March 19, 2009 11:50 AM

Pictures of models is what brought me here in the first place. And all you kindered spirits keep me coming back. I'm in the advertiseing business and there's a age old saying, "a picture is worth a thousand words". Post away!


Hey Melgyver, I've got a 1/48 Monogram B-17 in the same 20 year condition... I've committed to a GB for Mig Killers though. As soon as that one is knocked out, I think I won't be able to resist finishing the Fortress. There's a lot of inspiration in these here parts! (nice pun, eh?)


  • Member since
    June 2005
  • From: Novi, Mi
Posted by Lancair IV on Thursday, March 19, 2009 9:31 PM

Late model B-17G's had a design change from the others that allowed the waist gunners to have more room too move. Earlier versions had the right and left gunner stations directly opposite each other. Waist gunners sometime in the heat of battle, would accidental disconnect the others oxygen line. More times than one, they didn't realize there was a problem until it was too late. Staggering the windows eliminated this problem.

My model will reflect this and a new Cheyenne turret that I'm trying to locate.  If anyone has a 1/48 Cheyenne Tail they want to part with, please let me know.  I did order one from Revell, but I have my doupts they will send it.

Thanks Melgyver.........

Eduards Ammo Boxes - Will be painted to simulate wood


Eduards Ball Turret Ammo Boxes - Will be painted Aluminum


Eduards Waist Gunner Casing Bags - Will be painted Olive Drab to simulate a cloth bag


Right Hand Fuselage at Waist Gunner position.


Left Hand Waist Gunner relocated forward - Inside


Left Hand Waist Gunner relocated forward - Outside


Looking down onto the relocated Waist Gunner


Cheers


Rob Byrnes

Novi, Mi

  • Member since
    January 2009
  • From: hamburg michigan
Posted by fermis on Thursday, March 19, 2009 9:53 PM

 I have searched high and low for a cheyenne tail, to no availe, I believe ordering parts from revell is the only option, other than scratching.

This is coming along awesomely!!

  • Member since
    March 2008
  • From: Ohio
Posted by B-17 Guy on Thursday, March 19, 2009 10:23 PM

I'm tell'n ya, i'v ordered the parts my self from revell. I ordered 4 seperate times last year, and got all the parts I requested. You just cant order more than what comes in the kit at one time. I twice ordered the cheyenne tail parts, and got em, one time I ordered all 4 engines, cowls, props and spinners, and got em. They even send you a little monogram patch in the box with your parts, takes about a week to week and a half. They have you do a pay set up for shipping, but they have never charged me.

EDIT: Also....to the best of my knowledge, you have to chop 3mm of the non cheyenne tail to do the conversion, I'm not exactly sure where to measure from though.

  • Member since
    September 2006
  • From: Bethlehem PA
Posted by the Baron on Friday, March 20, 2009 11:18 AM

Hey, B-17 Guy, do you think that would work, to get that fret of figures from the Pro-Modeler boxing?  I wonder if they could still pop it.  Maybe they could, if those are the same figures included in the visible B-17 kit.

I know, I know, I shoulda bought the kit from that guy on Saturday...

The bigger the government, the smaller the citizen.


  • Member since
    March 2008
  • From: Ohio
Posted by B-17 Guy on Friday, March 20, 2009 6:58 PM

Yes it will work for that actually. Revell put the part tree from the pro mod B-17 that had the crew figures in the visible B-17 kit. It also includes the cheyenne tail and a few other pieces. You can only get parts to kits that are still in production, the visible kit is still in production so I took the opportunity to get the cheyenne tail parts.

Actually baron, I'm glad you didnt buy it, hopefully I'll be getting it from that guy. I emailed him, he emailed back, now I'm waiting to hear back from him again. We'll see. 

  • Member since
    June 2005
  • From: Novi, Mi
Posted by Lancair IV on Sunday, March 22, 2009 2:56 PM

The right waist gunners window is complete.  Built up the Eduards generator shelf and a scratch built generator.


Relocated window


Looking down onto the waist gunners positions


Eduards Generator Shelf


Scratch built generator


Cheers

Rob Byrnes

Novi, Mi

  • Member since
    July 2007
Posted by apprentice68 on Sunday, March 22, 2009 7:14 PM

Hello B-17 guy.

I also have a B-17 that I am started on over a year ago, I was scanning all the threads on FSM, when I saw this one.Looking excellent, by the way! I have every one of the detail sets that you have as well as the vacuum fomed "glass' as well.I had started rescribing the beast and I was wondering if you had done that as well. I am sorry I couldn't tell from the pics. At 1/48 scale, I was thinking about filling in the lines I had scribed and sanding smooth,I don't know how visible the panel lines would actually be in this scale, I do know that all the raised lines had to go! Any advice on rescribing? Thanks bud, Chris F.

  • Member since
    March 2003
  • From: Lafayette, LA
Posted by Melgyver on Sunday, March 22, 2009 7:28 PM

Chris,

You need to have panel lines, either raised or scribed.   You probably can't replicate every one but you need them to give a little definition to the surfaces.   Just look a pictures of the B-17 and in ones that are say 1/144 in the book you can still discern panels.  If you want test it on an old model or bottom of the wing.  Smooth versus panel lines.  Good luck!

Clear Left!

Mel

  • Member since
    March 2008
  • From: Ohio
Posted by B-17 Guy on Monday, March 23, 2009 4:38 PM

Hey chris.......This is lancair's thread, not mine, I'm on the GB thread. I havent even posted pics in a while (I know, I know, I need to get around to doing that). Welcome to the B-17 builds, the more the marier!

I'm not rescribing mine, I'm keeping it as is. The fuselage should not be recessed, wings maybe, but not the fuselage. I'm lazier, I have very little in the way of aftermarket, I like scratchbuilding, scribing is too much work.

 Baron......I should be having that pro-modeler B-17 kit coming my way, I'll let ya know how it goes via PM.

  • Member since
    July 2007
Posted by apprentice68 on Monday, March 23, 2009 5:00 PM

Hello Melgyver.

I remember talking to you quite some time ago about detailing up a Huey.I have already scribed the entire port side already, but the lines look a little heavy.But, after some debate I am gonna go ahead and contiue scribing until I am done.I have a great deal done on the cockpit and bombadier areas that I will post soon.I will post pics in the B-17 GB from this point on to avoid double posting.Thanks alot Melgyver.I see you have one in progress as well.I love this plane, but it is gonna be a long, long process, especially since I also have a 1/32 F-80C,1/32 F-86F AND the 1/48 B-17G in progress! Thanks buddy, Chris F.

  • Member since
    June 2008
  • From: Iowa
Posted by Hans von Hammer on Monday, March 23, 2009 5:10 PM
 apprentice68 wrote:

I do know that all the raised lines had to go! 

Ummm.. No.. The Fort was a straight-up 1930s design with plenty of exterior drag from over-lapping & butt-jointed panels, with LOTS of raised rivets... That's why that bird was so tough... If you smoothed it to take a bunch of recessed panel lines in hopes of it looking more like a "better quality, more modern" kit, should have researched just a skosh more, pard...

Monogram got it right way back in 1974...

Any advice on rescribing?

Better get a new 000 brush, a new bottle of Testor's Liquid, and start stretchin' sprue..Wink [;)] 


The "Super Scale Series" that Monogram started in '74 debuted the Fort as the "Flagship" of WW2 Heavies to follow... It's far and away my favorite model kit (I've built 4, have one WIP right now, and three more in the stash, lol..) Sure hope you can save it, Chris.. It'll be tedious work, but not difficult...  Gerald (aka Hawkeye Hobbies) is pretty good at putting on raised lines...

  • Member since
    July 2007
Posted by apprentice68 on Monday, March 23, 2009 5:42 PM

oops! Sorry 'bout that B-17Guy.Yeah that was my concern with rescribing, but I think IMHO it looks better than the raised lines.Again, just my opinion.I really like the work you have done on the

"G" and "F" .I will have some pics of the cabin area to post soon.I have really done alot of work on this area, that I want to show you guys.I will try and get 'em posted tonight on the GB thred. Chris F.

  • Member since
    July 2007
Posted by apprentice68 on Monday, March 23, 2009 6:01 PM

Hans,

I completely understand what you are saying, but I don't think raised lines duplicate the overlapping panels correctly either.At least not in all areas of the airframe.IMO, the engraved lines look better, especially where the panels are butt joints.Not correct either, but better in certain areas..Also, I am leaving certain areas raised, for instance the pic showing the raised areas on the nose, and certain other areas,where it is very obvious that they belong that way(raised).I guess it is in the eye of the beholder.To me the engraved lines look better to duplicate certain lines. I have alot of refernce materials, so its not like I haven't researched,but I think a combo of both can LOOK  authentic.I will take a look at adding some raised lines where panels overlap,but where they butt together it will be scribed.Thanks, Chris F.

  • Member since
    July 2007
Posted by apprentice68 on Monday, March 23, 2009 7:59 PM

Lancair,

Sorry for the confusion about who started this thread.Everything is looking good from all the builders.Glad you got this started. Thanks, Chris

  • Member since
    June 2005
  • From: Novi, Mi
Posted by Lancair IV on Monday, March 23, 2009 8:35 PM
 apprentice68 wrote:

Lancair,

Sorry for the confusion about who started this thread.Everything is looking good from all the builders.Glad you got this started. Thanks, Chris

No problem........

Rob Byrnes

Novi, Mi

  • Member since
    June 2005
  • From: Novi, Mi
Posted by Lancair IV on Monday, March 23, 2009 8:37 PM

Generator has been installed into the right fuselage, ammo boxes are painted as well as the ammo casing collection bags.

Installed generator


Looking at the generator thru the rear access door


Ammo boxes painted and ready to install


Ammo casing collection bags ready to install

Cheers

Rob Byrnes

Novi, Mi

  • Member since
    June 2005
  • From: Novi, Mi
Posted by Lancair IV on Tuesday, March 24, 2009 2:36 PM

Today I received access to the B-17 Erection and Maintenance Manual.  That's the good news.  Thumbs Up [tup]

The bad news is my tail wheel is not right.  Thumbs Down [tdn]

Back to the drawing board.  Do I make it operate?  I'm going to try.........Banged Head [banghead]

I also corrected the bad paint on the generator shelf this morning.

Cheers

Rob Byrnes

Novi, Mi

  • Member since
    November 2003
Posted by richter111 on Tuesday, March 24, 2009 2:46 PM
I have the visible B-17, and it contains the cheyenne turret and extra posed crew figures.  That and the resin should make for a great build!
  • Member since
    June 2005
  • From: Novi, Mi
Posted by Lancair IV on Wednesday, March 25, 2009 8:43 PM

New tail wheel is done less paint. It functioned for 2 retractions then it all broke. Trying to keep things to scale and still operate is almost impossible (for me). Anyway, the tail wheel does turn and rotate freely, so that's better than nothing I guess. The ammo casing bags are also installed and need detail added.

Taking a couple of days off to go to Chicago for my sons graduation from UTI.

Right hand ammo casing bag

WOW......After looking at the picture of the right fuselage where I moved the window, I still have a lot of clean up work to do.......Sign - Oops [#oops]Ashamed [*^_^*]


Left hand ammo casing bag


New tail wheel less paint


Cheers

Rob Byrnes

Novi, Mi

  • Member since
    July 2007
Posted by apprentice68 on Wednesday, March 25, 2009 10:15 PM

Looking good, Lancair!

JOIN OUR COMMUNITY!

Our community is FREE to join. To participate you must either login or register for an account.

SEARCH FORUMS
FREE NEWSLETTER
By signing up you may also receive reader surveys and occasional special offers. We do not sell, rent or trade our email lists. View our Privacy Policy.