SEARCH FINESCALE.COM

Enter keywords or a search phrase below:

Revell Pro-Modeler 1/32 Junkers Ju 88A-1 Bomber - "FINAL REVEAL!!" (3.18.16)

7336 views
94 replies
1 rating 2 rating 3 rating 4 rating 5 rating
  • Member since
    April 2015
  • From: New Hampshire, USA
Posted by UKguyInUSA on Wednesday, March 9, 2016 8:27 AM

Aggieman

You are doing a fantastic job on this Ju88.

I am amazed at your solution to a problematic area that I have struggled with on German aircraft - multi-colored spinners. I guess it is a case of not thinking outside the box, must use masking tape! We all know how frustrating that is.  So of course now that I see how you used the Vallejo paint cap to form the demarcation between yellow and dark green, it is so readily obvious and I cannot believe this or a similar solution has never before occurred to me.


Thanks Aggie, much appreciated! SmileYes


Sometimes, the blatantly obvious stares us in the face and we are none the wiser...I learned this from a good modeling friend when I had struggled with the spinners on a Ju 87b during my first year of modeling- 2014.


Cheers,

Martin

  • Member since
    April 2015
  • From: New Hampshire, USA
Posted by UKguyInUSA on Tuesday, March 15, 2016 3:50 PM

5-high

WOW ..UK fantastic job ...Yes...I have this one in stash. .after seeing yours done up ..I'm thinking of digging it out and starting it ..Hmm but first I have to find a spot for that BIG BIRD!!!!!Confused

5-high 


  Thanks 5-High, much appreciated! Have fun building yours, but yes, she is a HUGE bird...the biggest in my collection now!


Cheers,

SmileMartin

  • Member since
    April 2015
  • From: New Hampshire, USA
Posted by UKguyInUSA on Tuesday, March 15, 2016 3:52 PM

crown r n7

 One question  the wheels look great what color did you use for the tires?


Thaks Crown, much appreciated! I mix my own colors...it's a mix of flat black with some light grey to tone it down to a shade that I liked the look of.


Cheers,

Martin Smile


  • Member since
    April 2015
  • From: New Hampshire, USA
Posted by UKguyInUSA on Tuesday, March 15, 2016 3:53 PM

40.mm

WoW and double WoW! Outstanding work !!!


   Thanks 40.mm, greatly appreciated!


Cheers,

SmileMartin

  • Member since
    April 2015
  • From: New Hampshire, USA
Posted by UKguyInUSA on Tuesday, March 15, 2016 3:55 PM

Revell Pro-Modeler 1/32 Junkers Ju 88A-1 Bomber "Build Update #5" (3.15.16)


Hello Chaps, it's been 2 weeks today since my last update, but I managed to get my weathering and final assembly stages completed ready to move forward to a "Final Reveal" later this week.


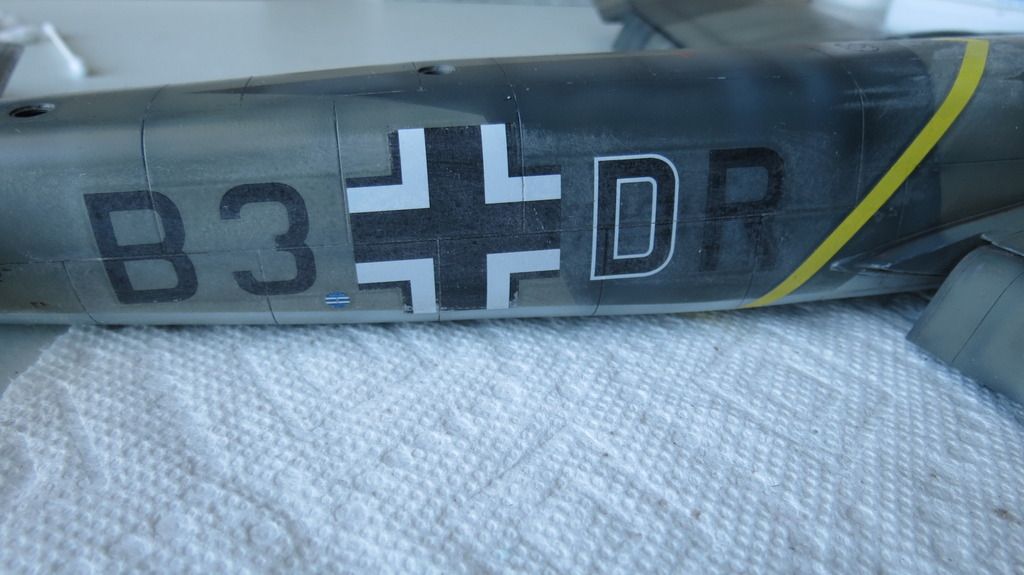
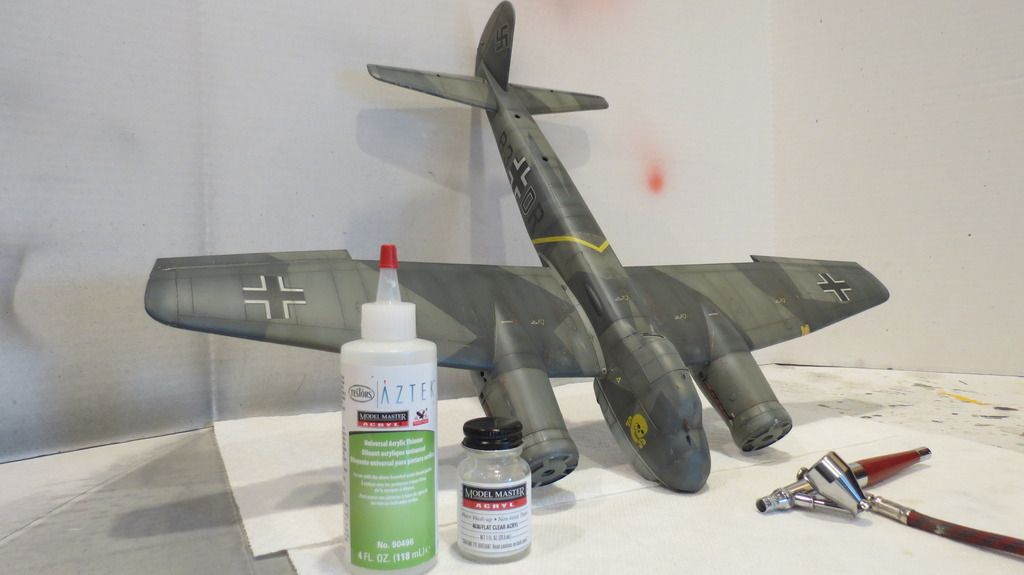
Starting from where we had finished in "Build Update #4", I had painted and decaled the plane, so, I needed to seal the decals with a gloss clear coat, along with the peripheral parts, to make them ready for weathering....


IMG_5696_zpsd3qahmhj.jpg


IMG_5697_zpsaem375s2.jpg


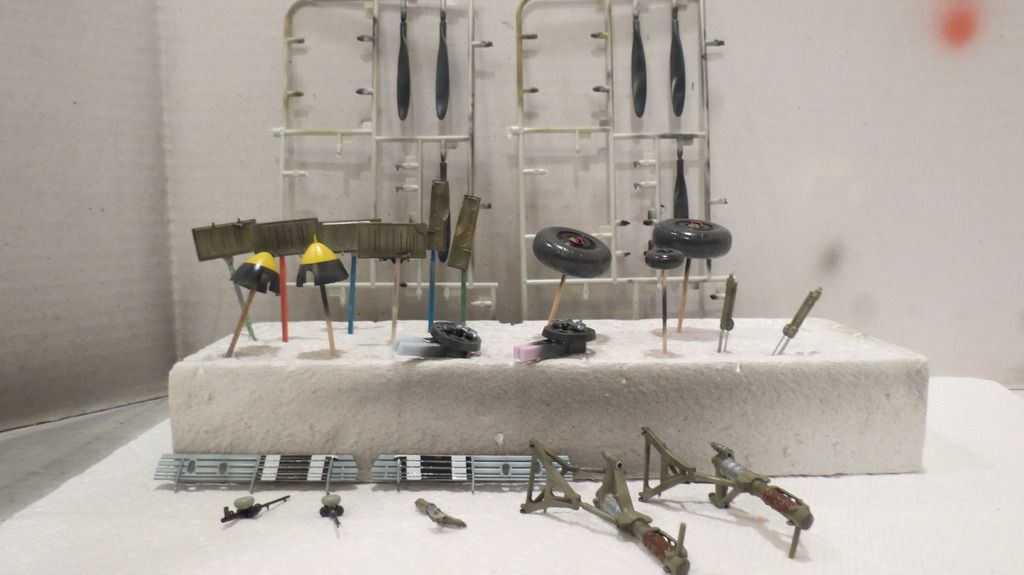
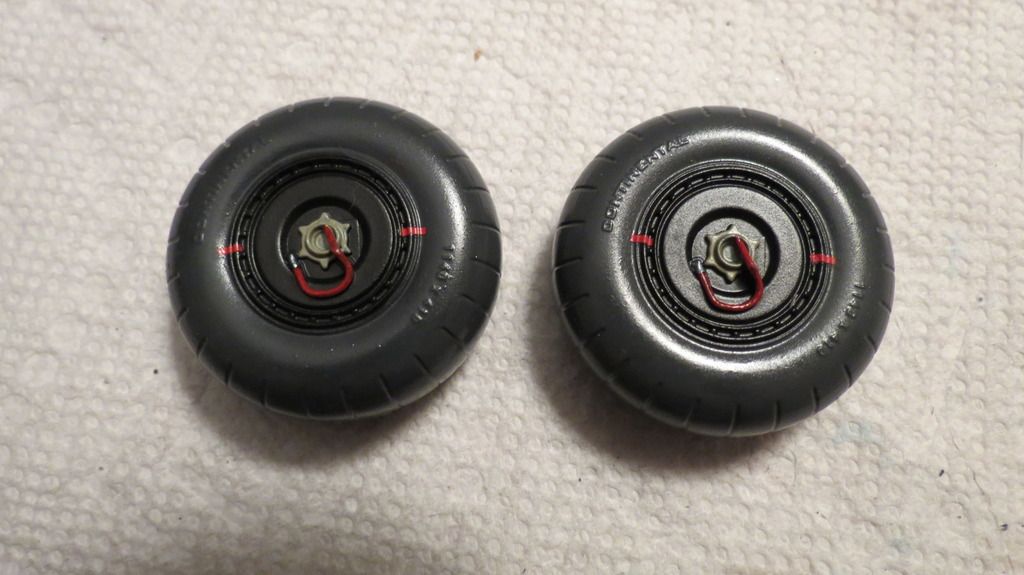
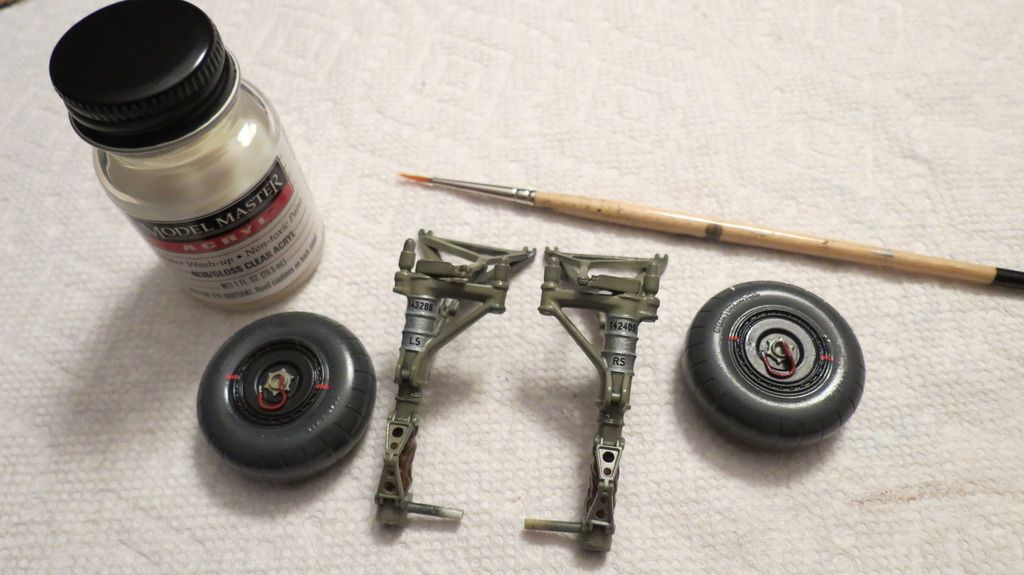
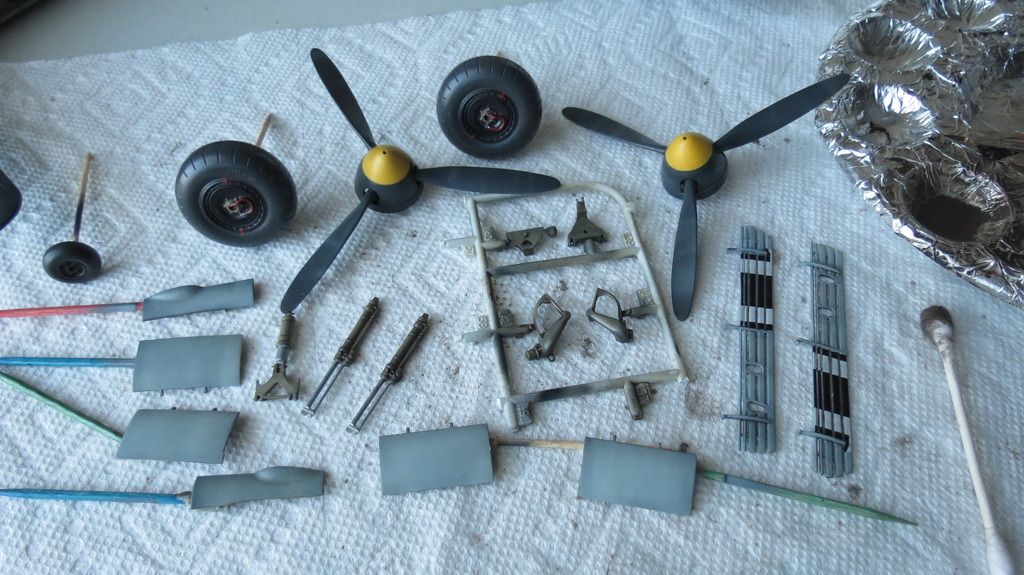
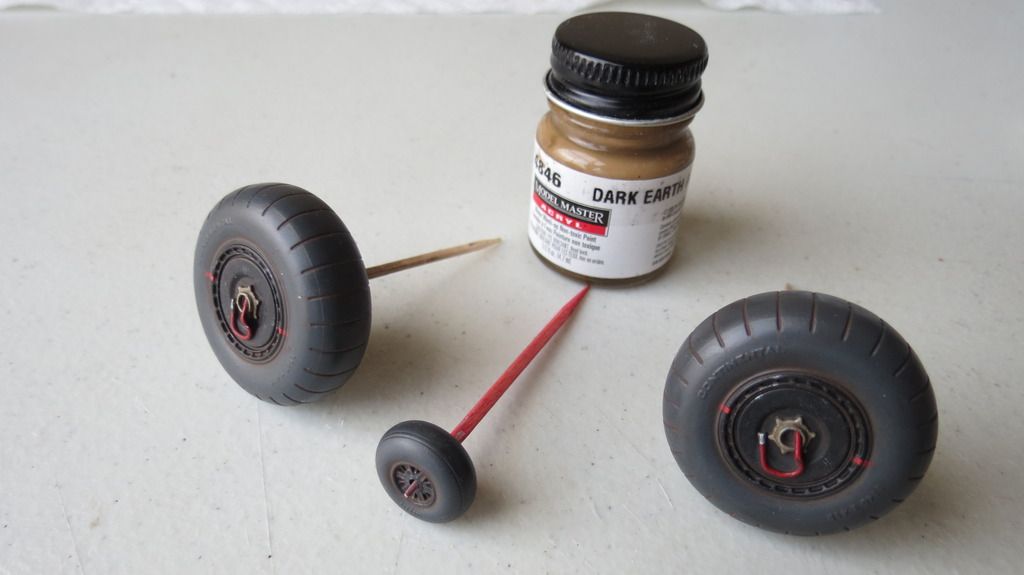
But, before I began the weathering stage, the wheels and their struts required the application of some small decals. So, they were applied and then sealed with some gloss clear coat...


IMG_5698_zpsyvz9x4kd.jpg


IMG_5699_zpsez52mn5m.jpg


IMG_5700_zpselkxwvup.jpg


IMG_5702_zpslqsxfd94.jpg


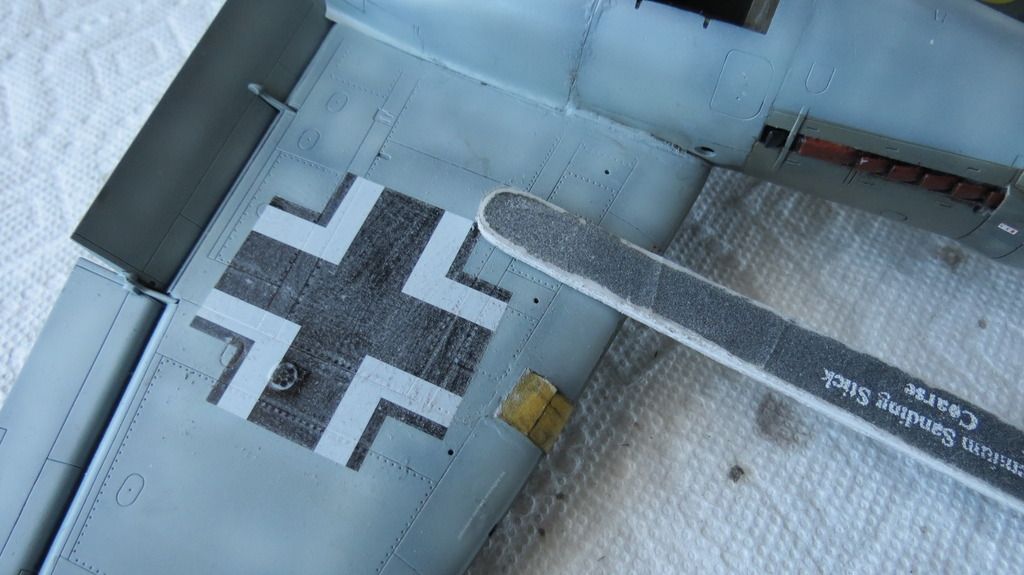
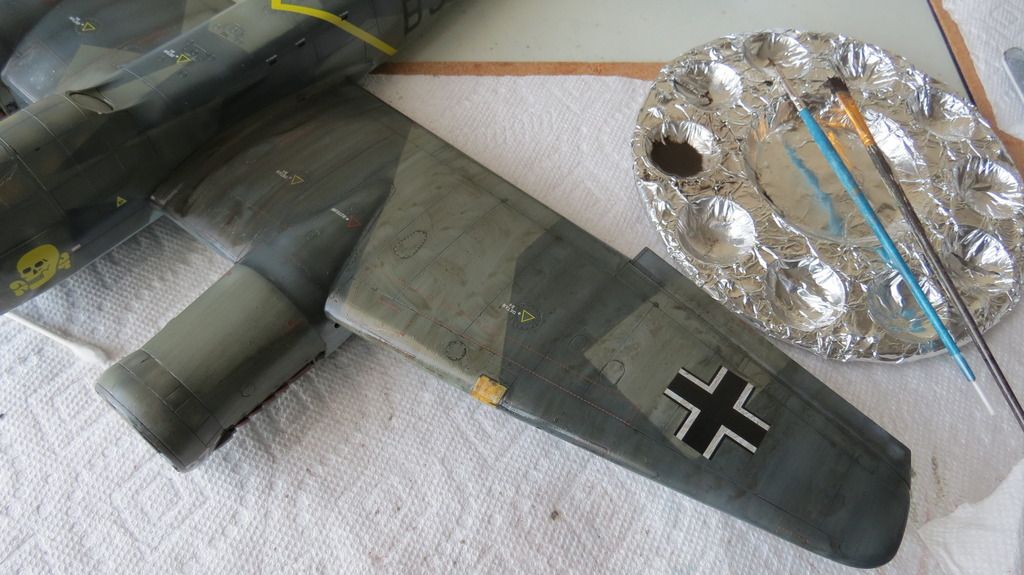
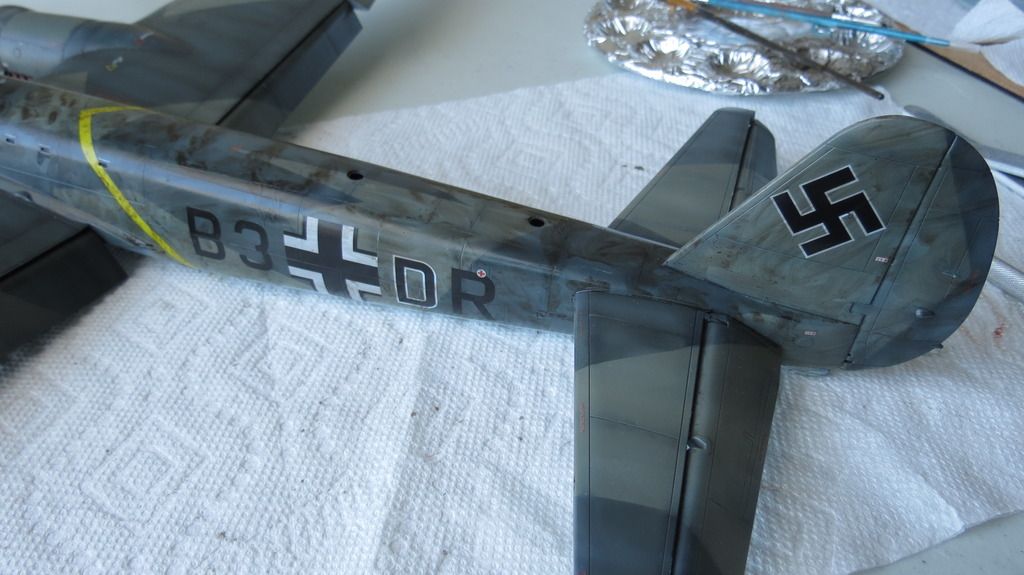
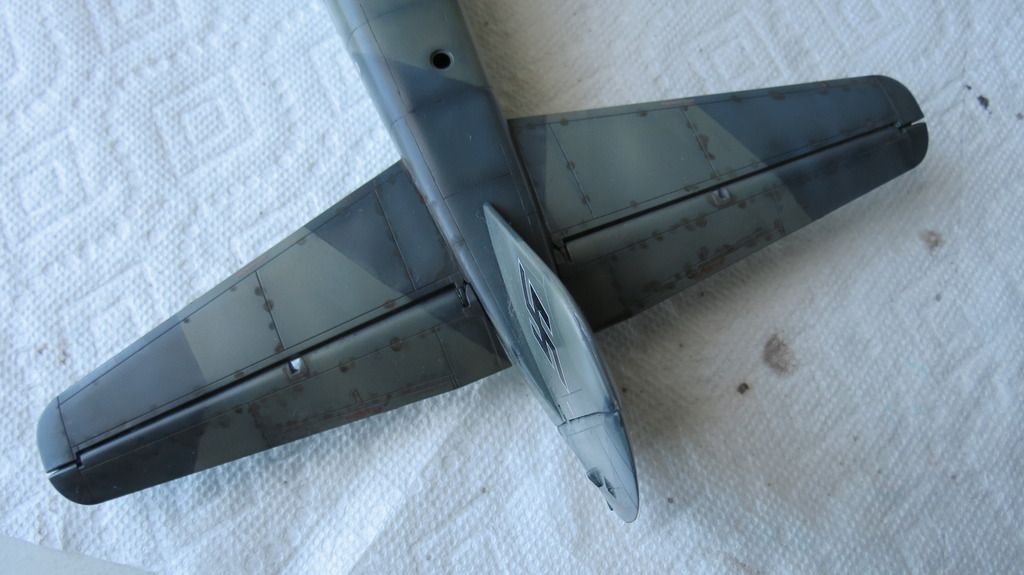
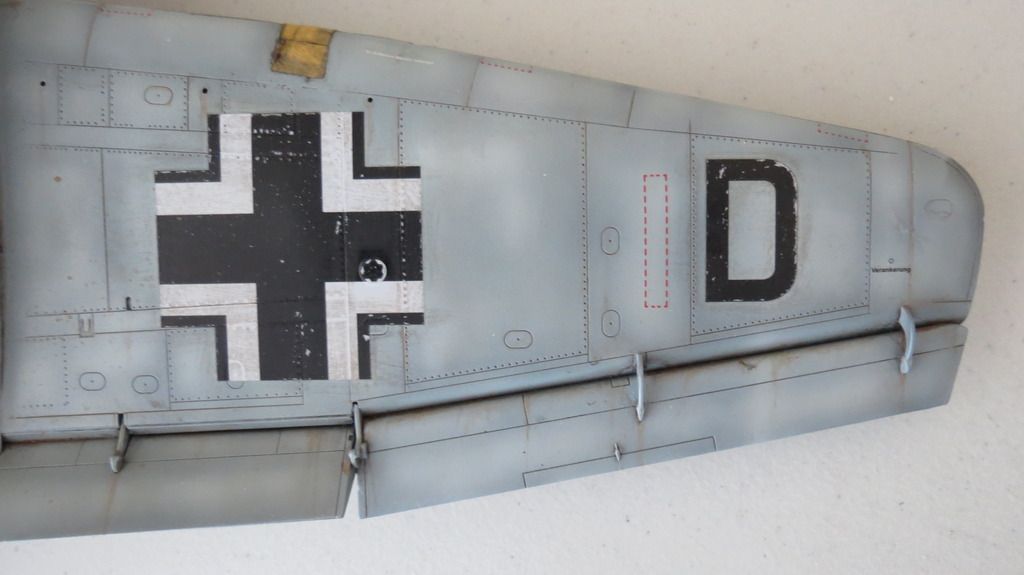
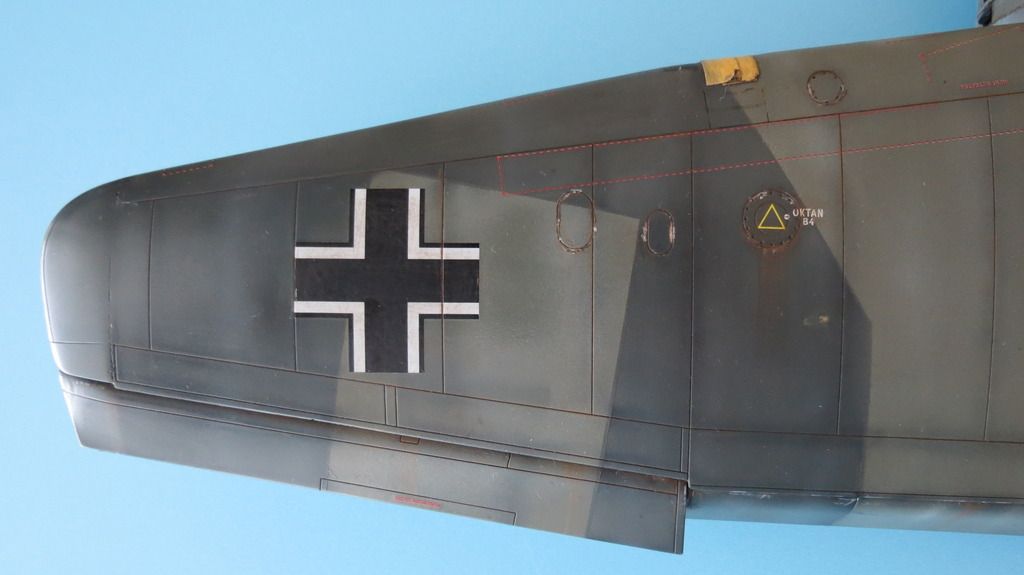
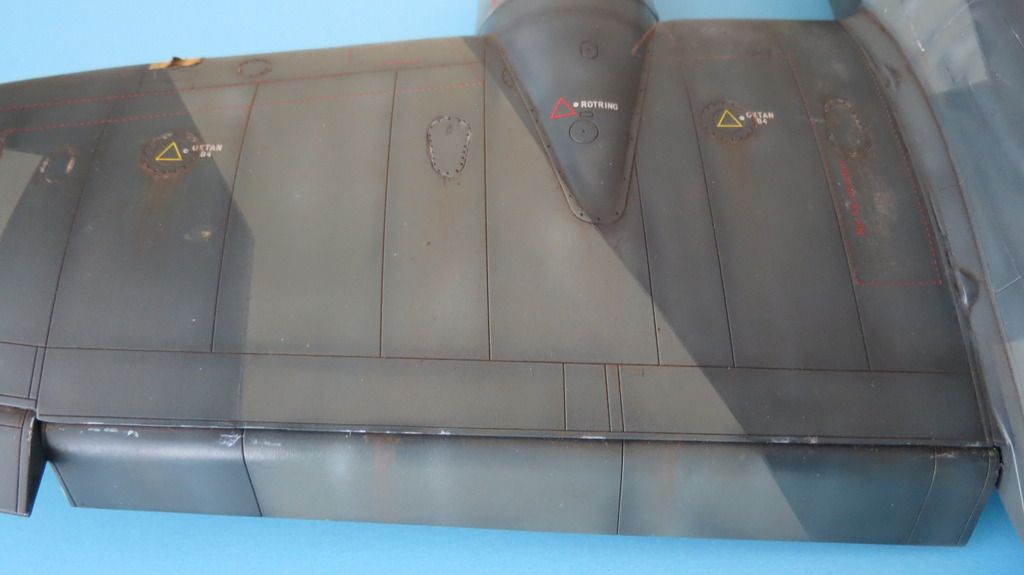
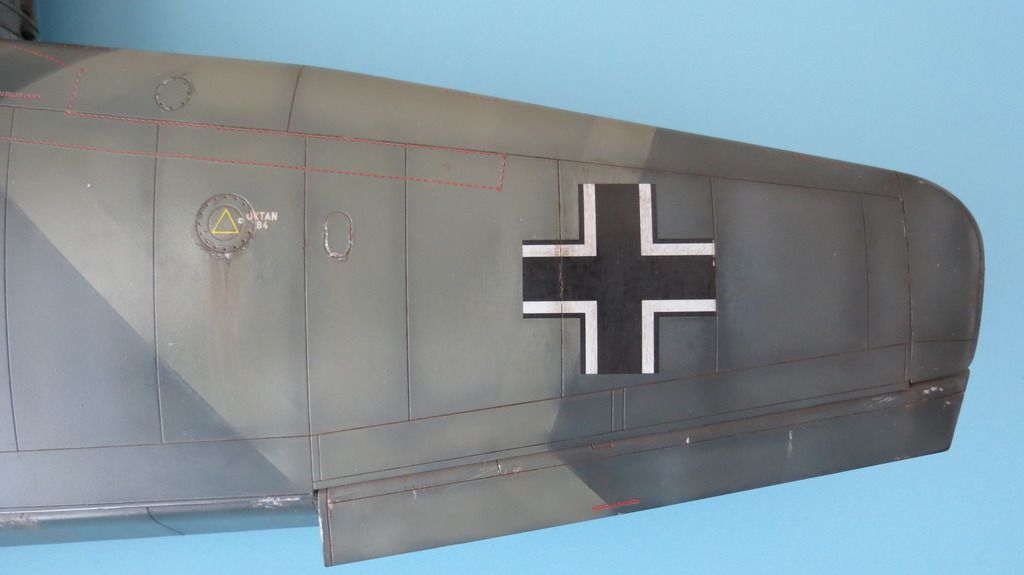
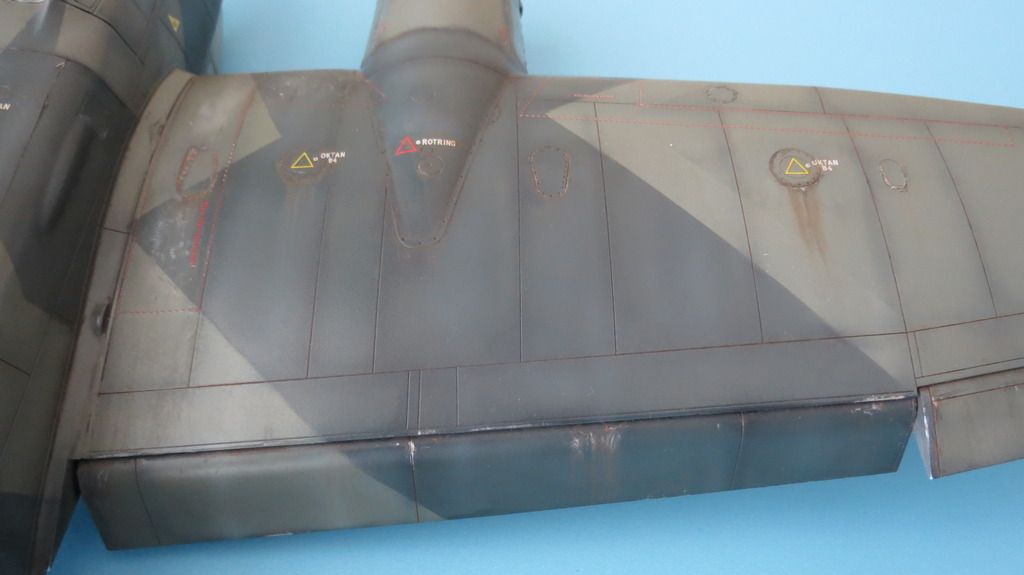
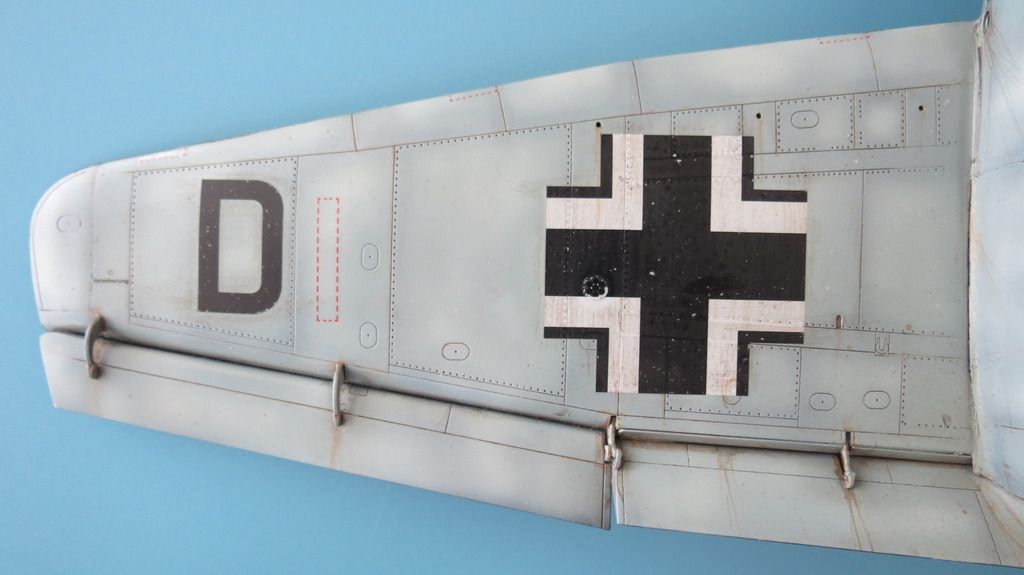
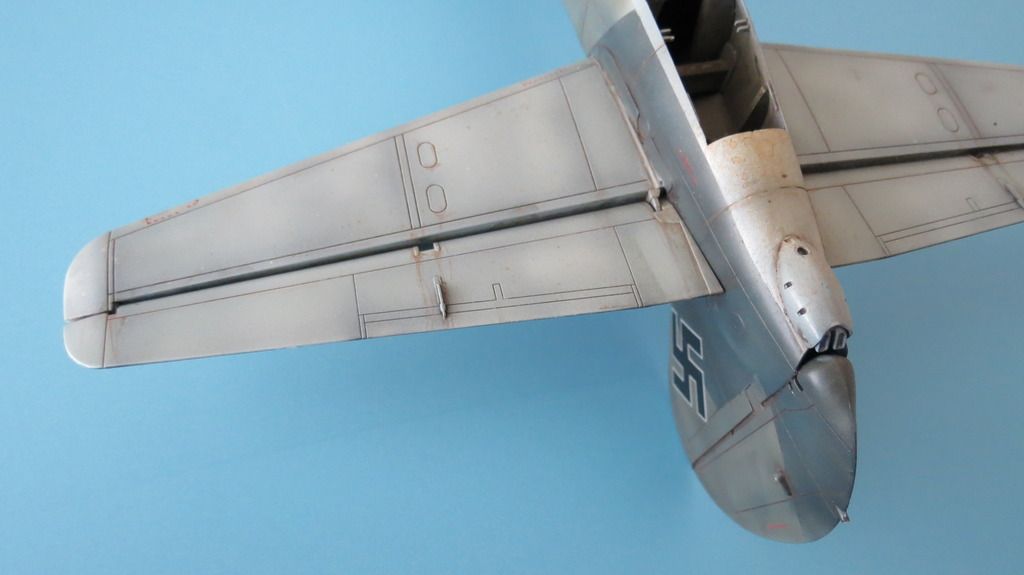
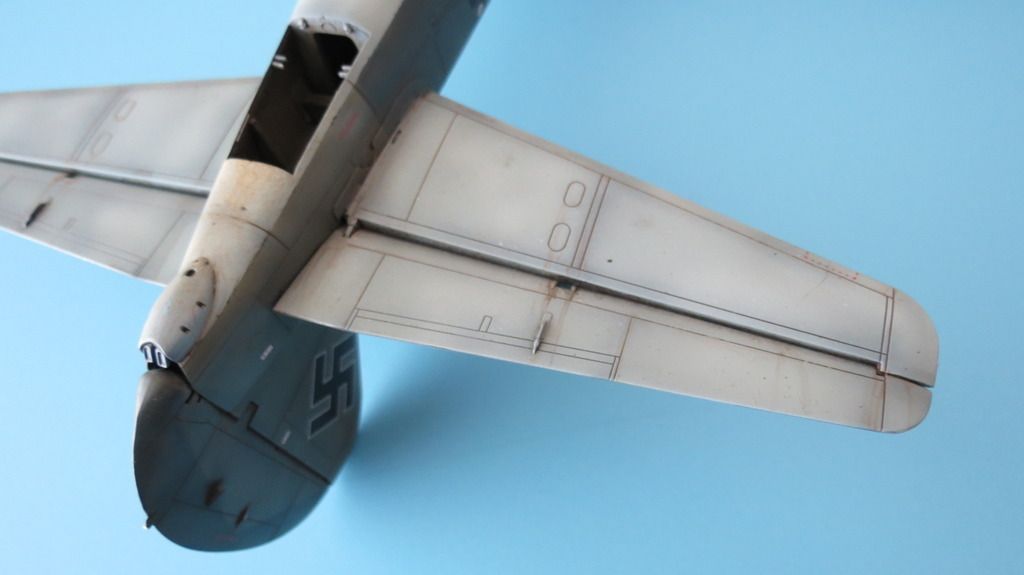
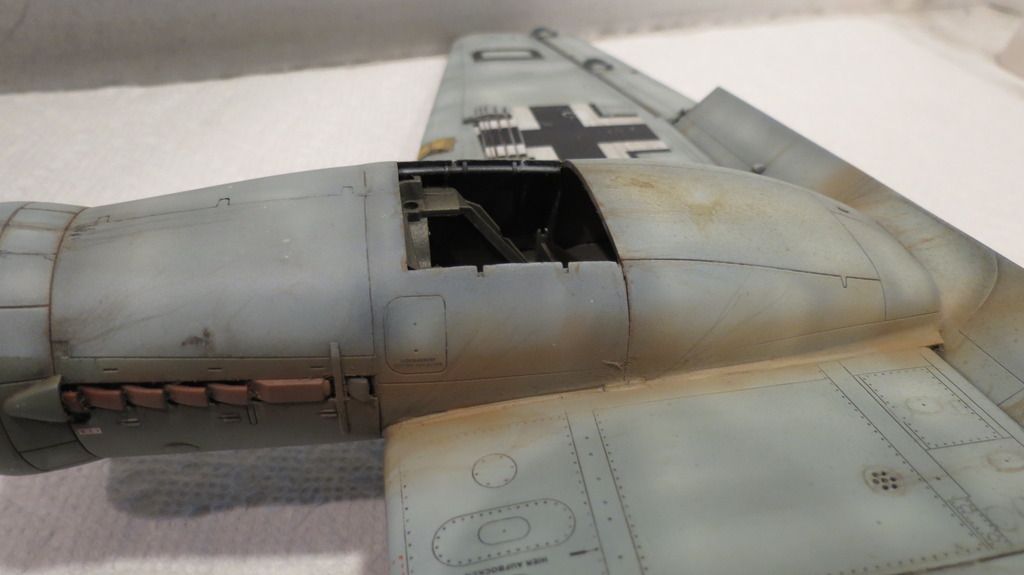
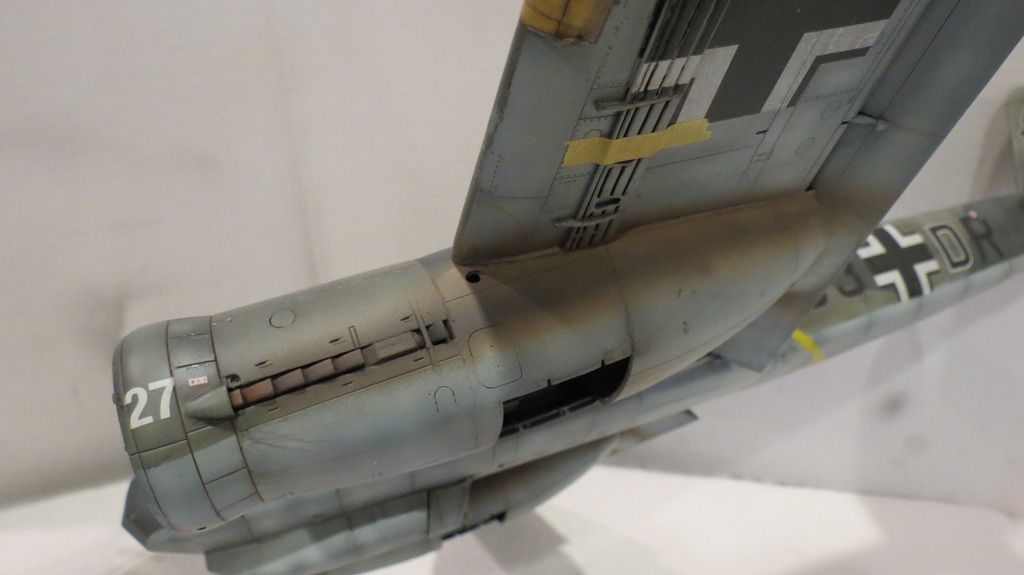
I started my weathering with chipping/scuffing and scratching using a sanding stick, some emery cloth and my scalpel blade to expose the silver paint beneath the top colors. I also scuffed the large decals so that the washes adhere to them better to help tone the bright white parts of the decals. I wasn't concerned about the appearance looking overdone or exaggerated, because with the application of washes, the scratches, scuffs and chips will be muted and blended...


IMG_5703_zpsyfdqv2jr.jpg


IMG_5704_zpsbtvfez21.jpg


IMG_5705_zpsc7yxlevc.jpg


IMG_5707_zps9g8kz2nr.jpg


IMG_5719_zps8nx5kjsq.jpg


IMG_5729_zpshyma21vl.jpg


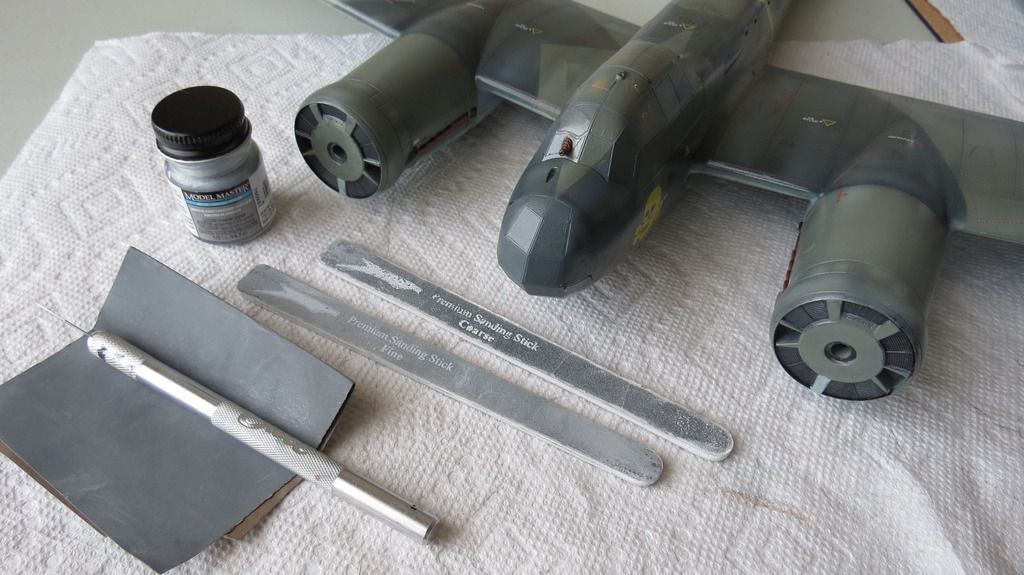
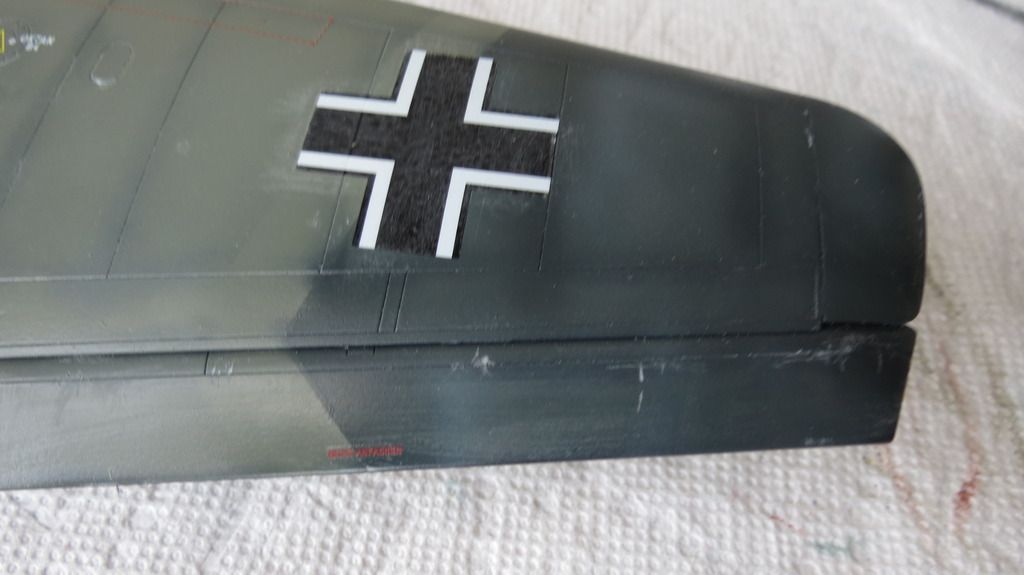
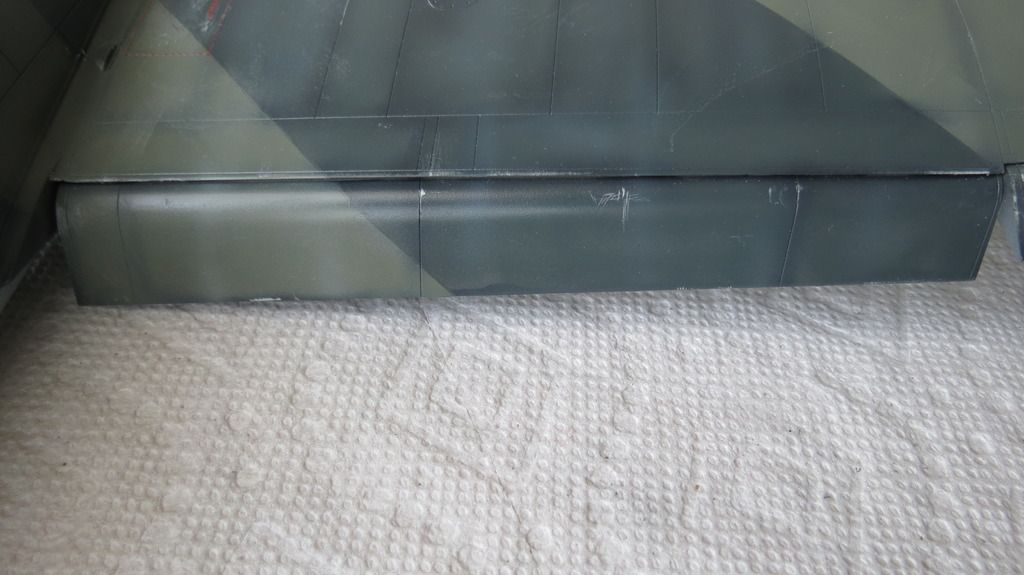
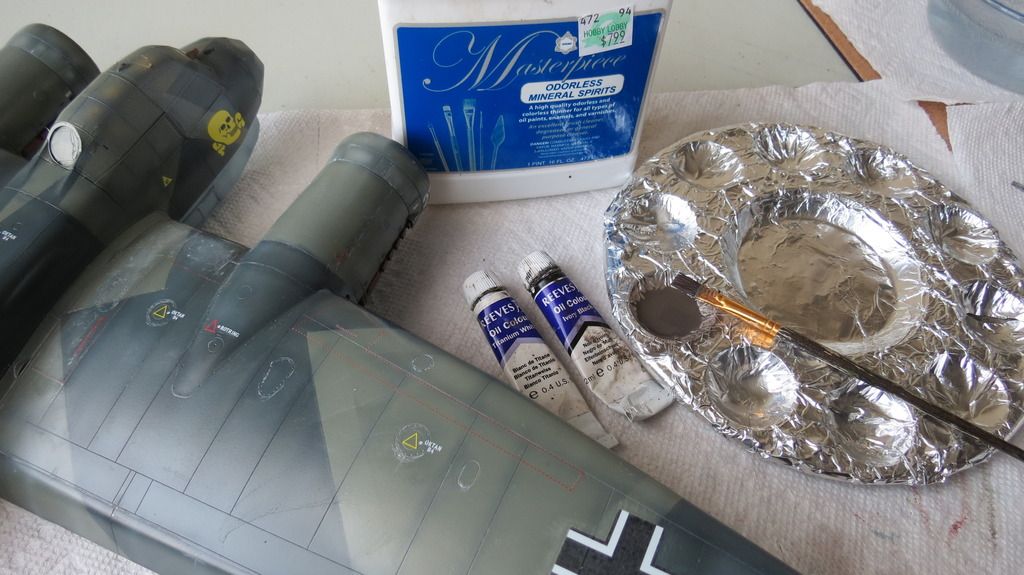
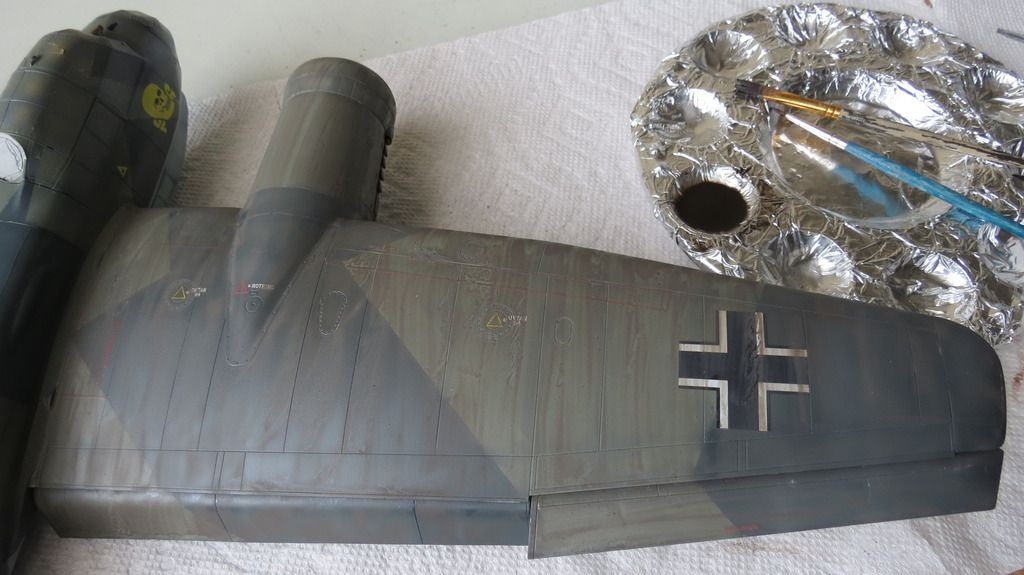
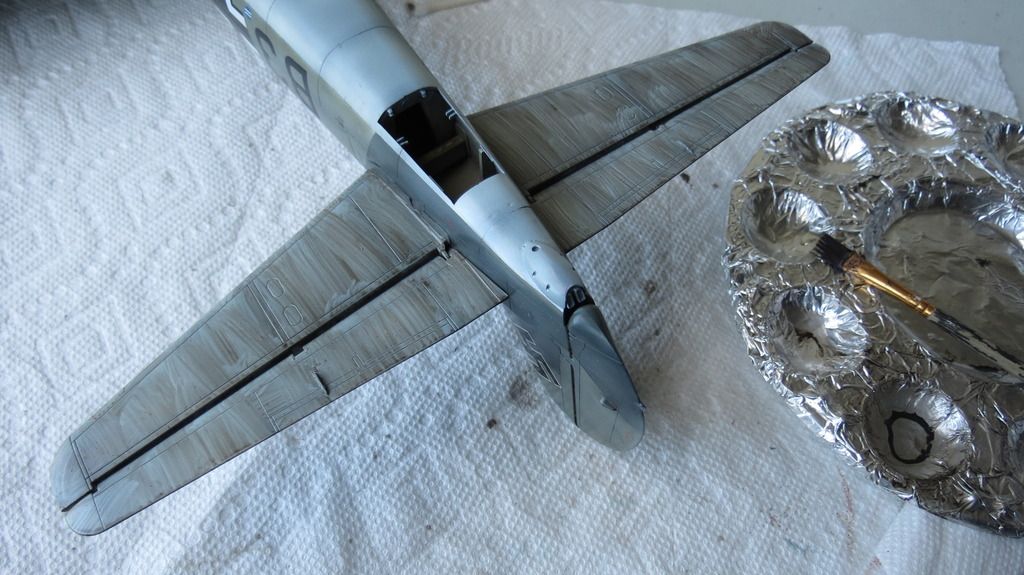
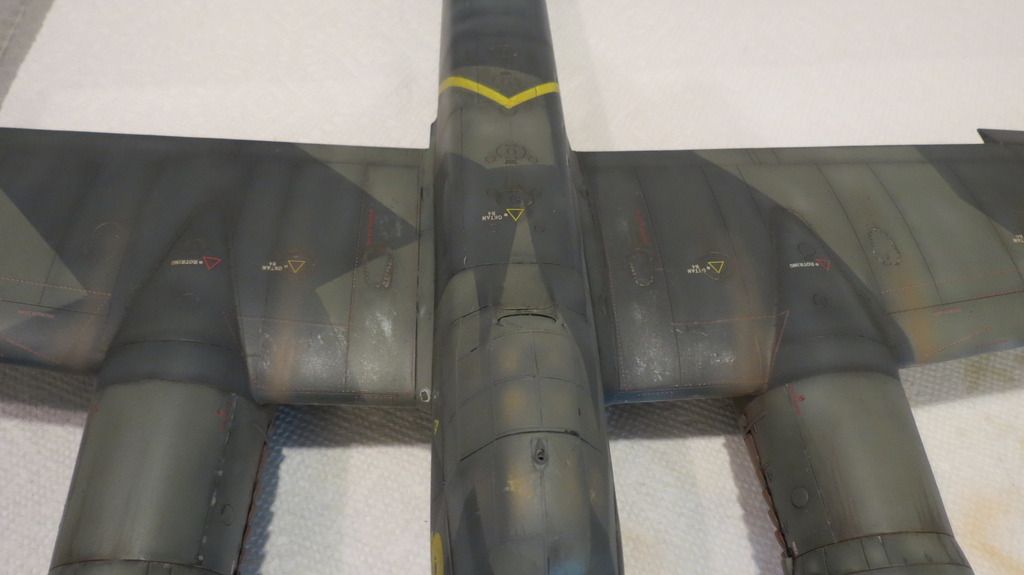
I then mixed a dark dirt wash using black oil paint with a little smidgeon of white and thinned down with odorless mineral spirits and applied it to the top side first, starting with the wings, the stabilizers and the fuselage. I allowed it to dry for 30 minutes, then used kitchen roll and cotton buds/-tips to wipe the excess off in the direction of air-flow, leaving on an amount that gave a desired effect...


IMG_5708_zps1esjyv0m.jpg


IMG_5710_zpsl84ggdq4.jpg


IMG_5713_zpsv5dwmfr5.jpg


IMG_5712_zps3nhfnuky.jpg


IMG_5718_zpsljqv6yqu.jpg


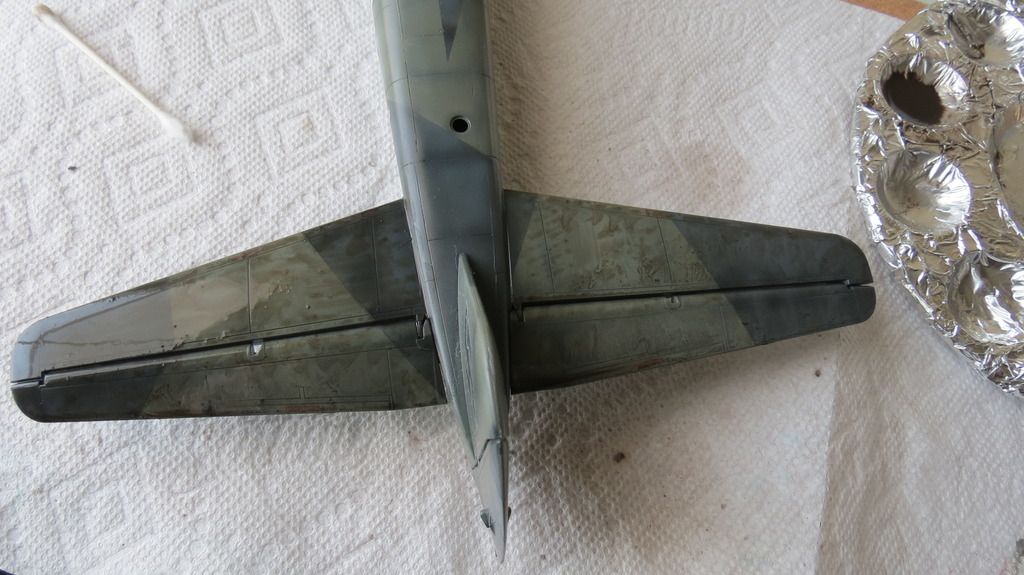
I then repeated this process for the underside...


IMG_5726_zps9pf31vw9.jpg


IMG_5722_zpszj2dgkgg.jpg


IMG_5727_zpsrkxbonkp.jpg


IMG_5728_zpsvydjvn7c.jpg


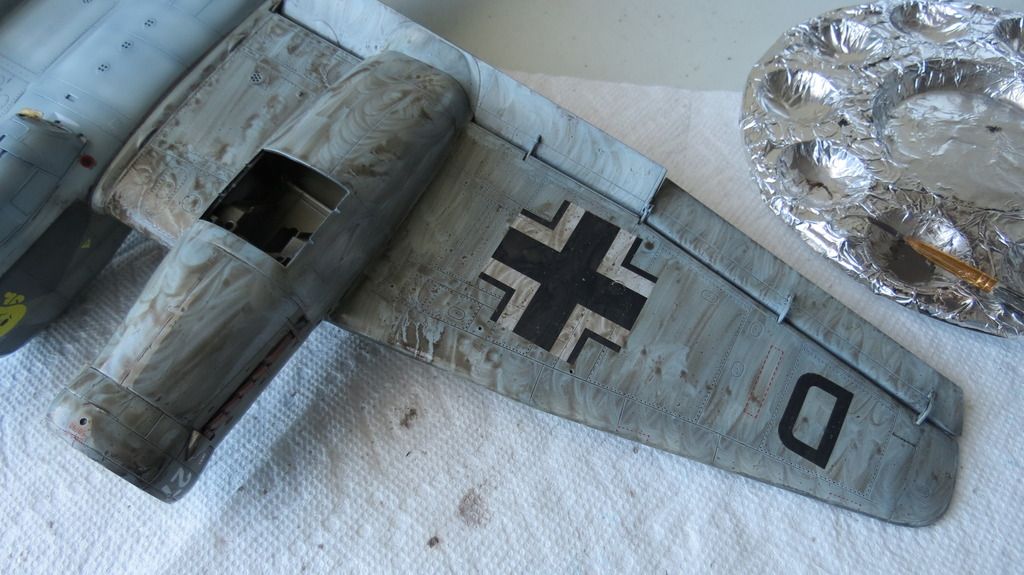
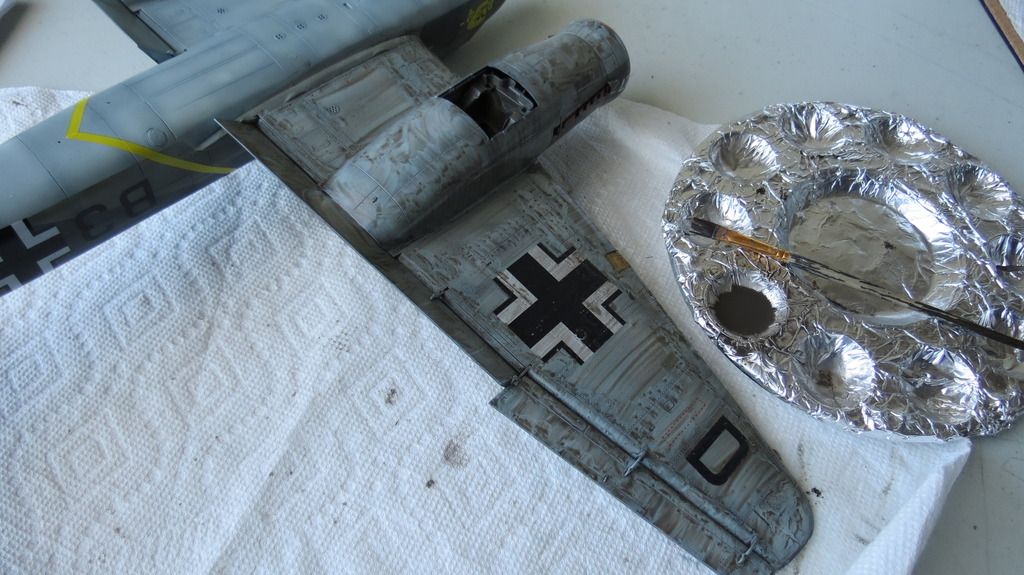
Some of the panel lines weren't highlighted enough for my liking, so, I mixed a pin-wash and applied it to all the panel lines to darken them more...


IMG_5711_zpsfypaceog.jpg


IMG_5717_zpshj41pzsg.jpg


IMG_5731_zpssjqcbqr3.jpg


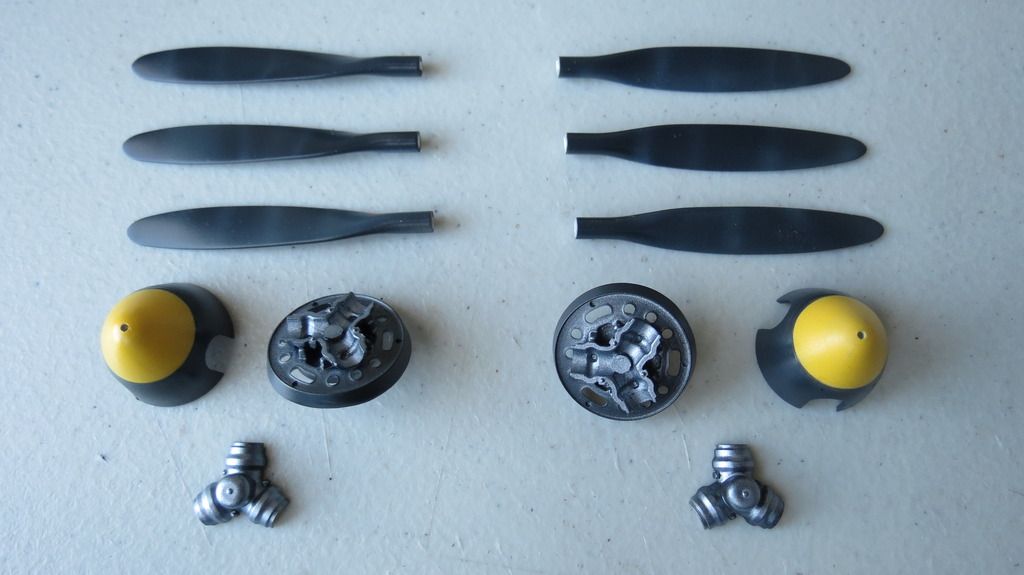
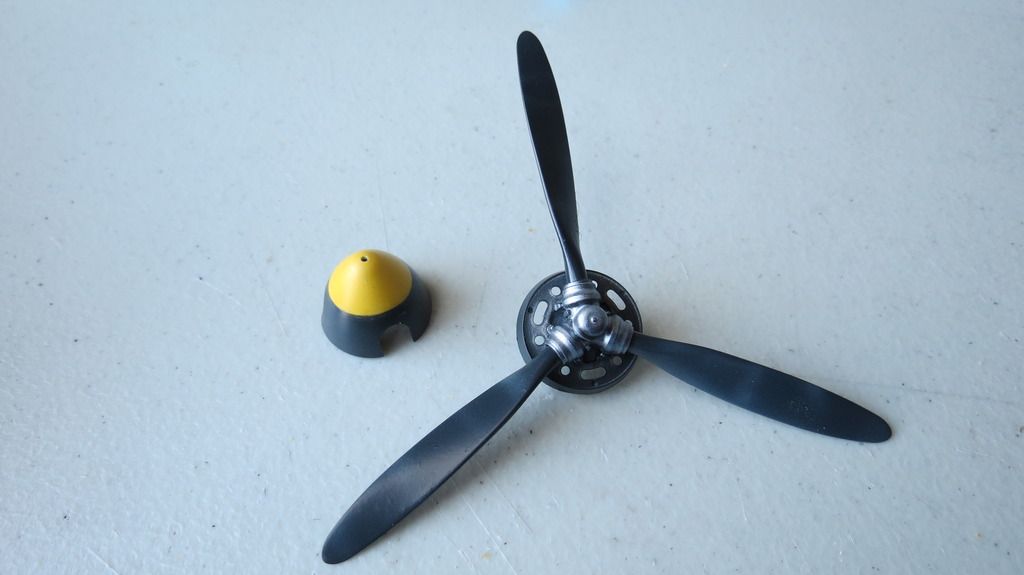
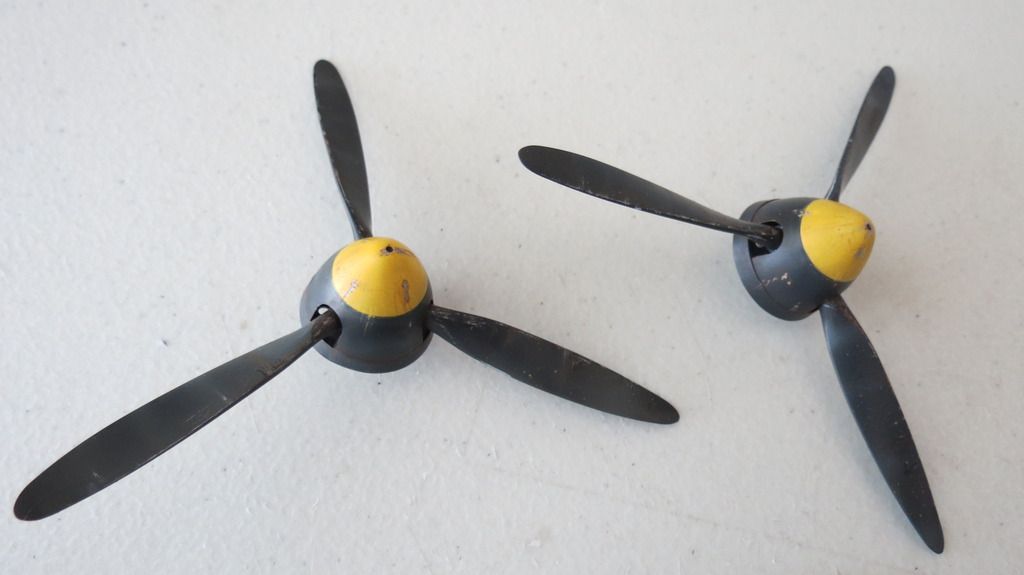
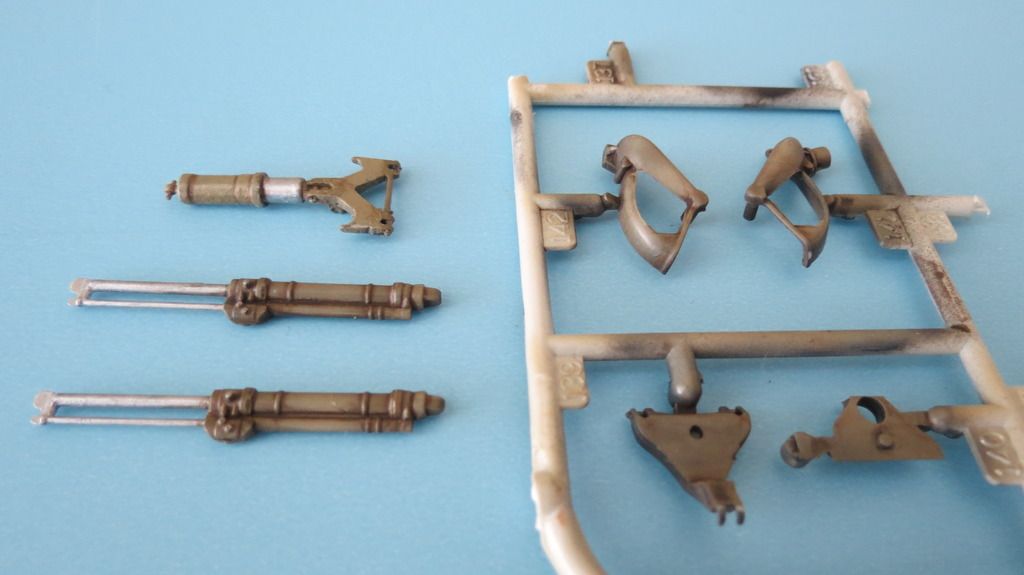
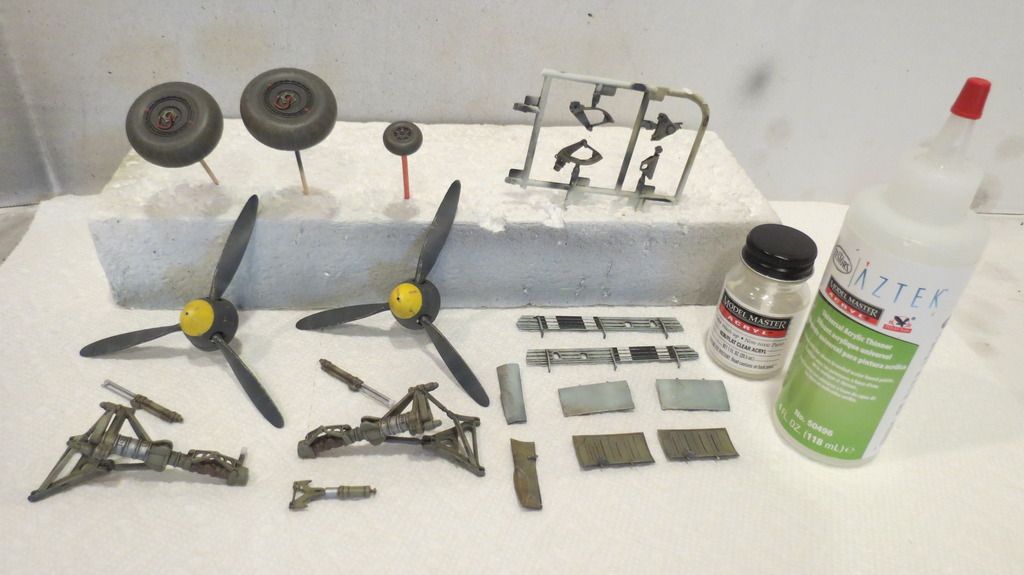
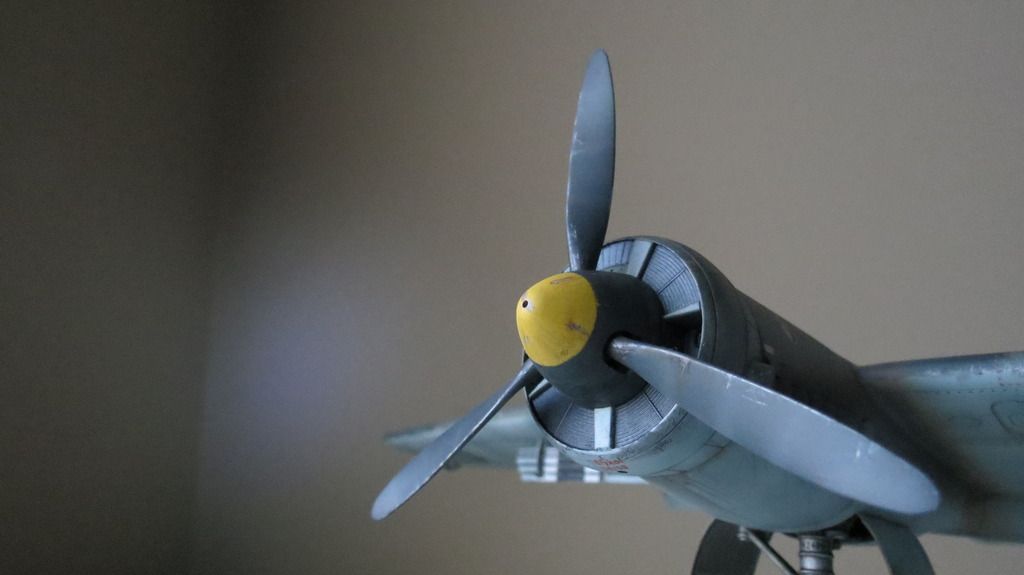
Next, I got together all the parts for the two propellers and assembled them...


IMG_5714_zps8clpsaar.jpg


IMG_5715_zpskj6epi3r.jpg


IMG_5716_zpsl8jfzuhc.jpg


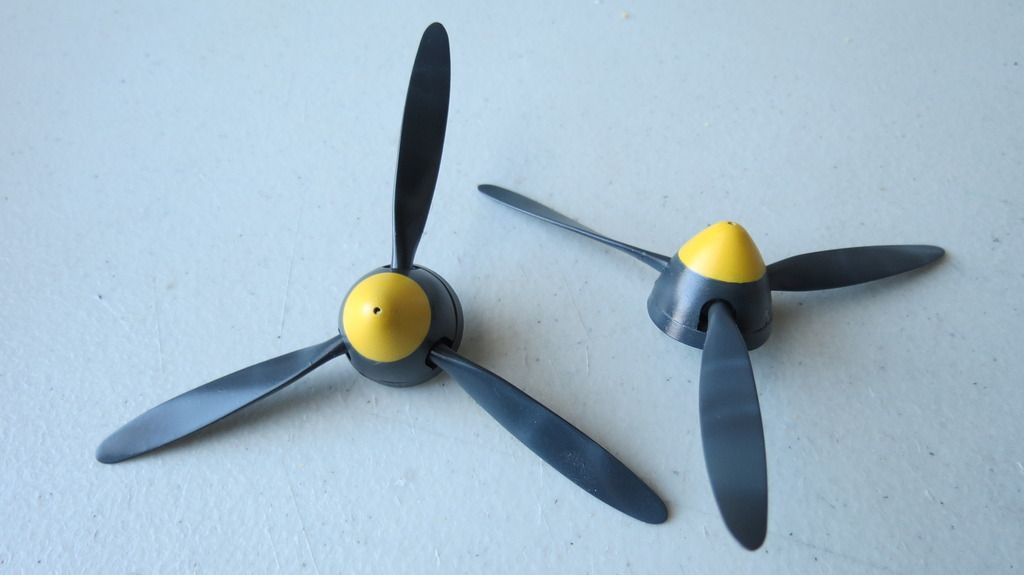
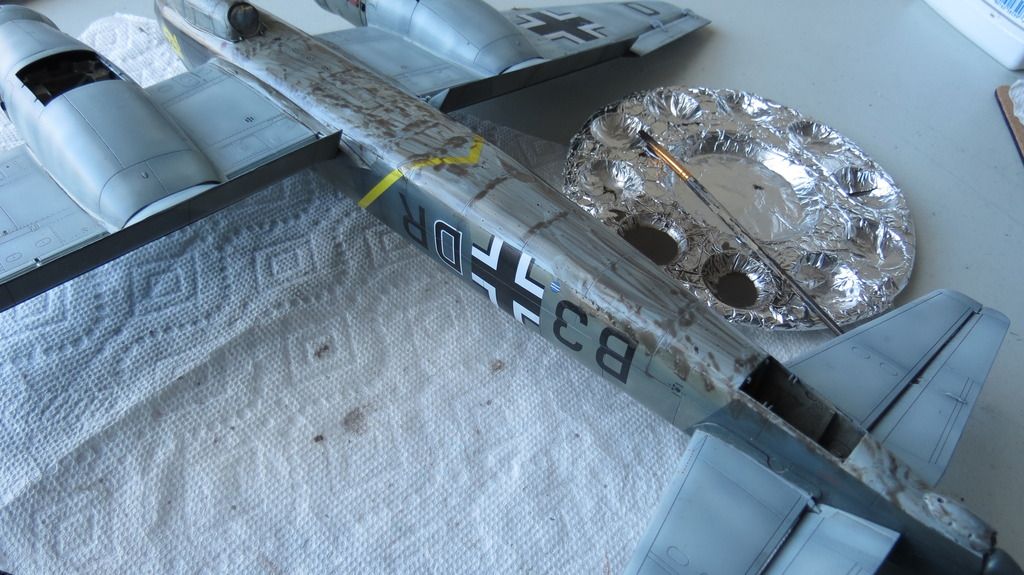
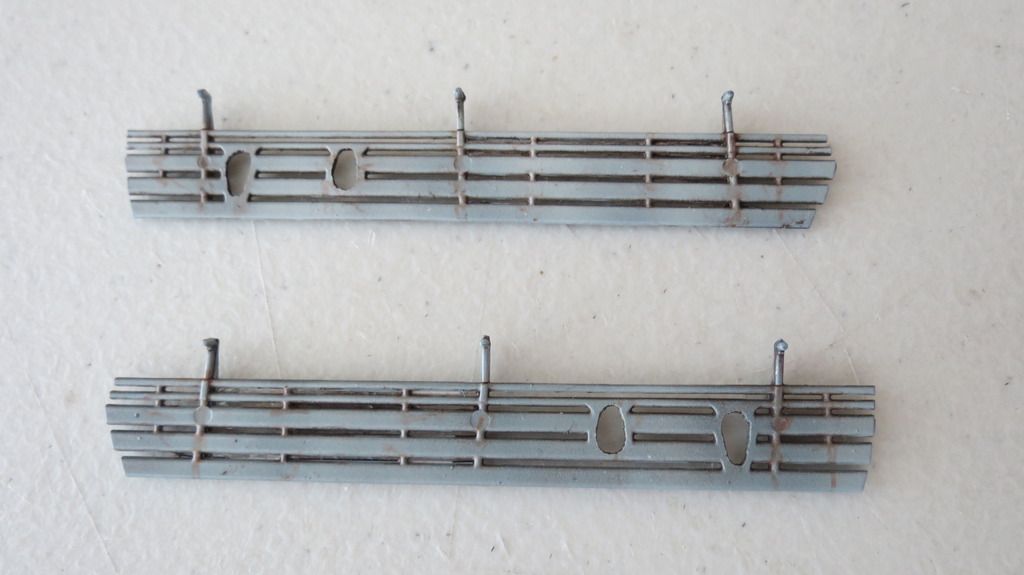
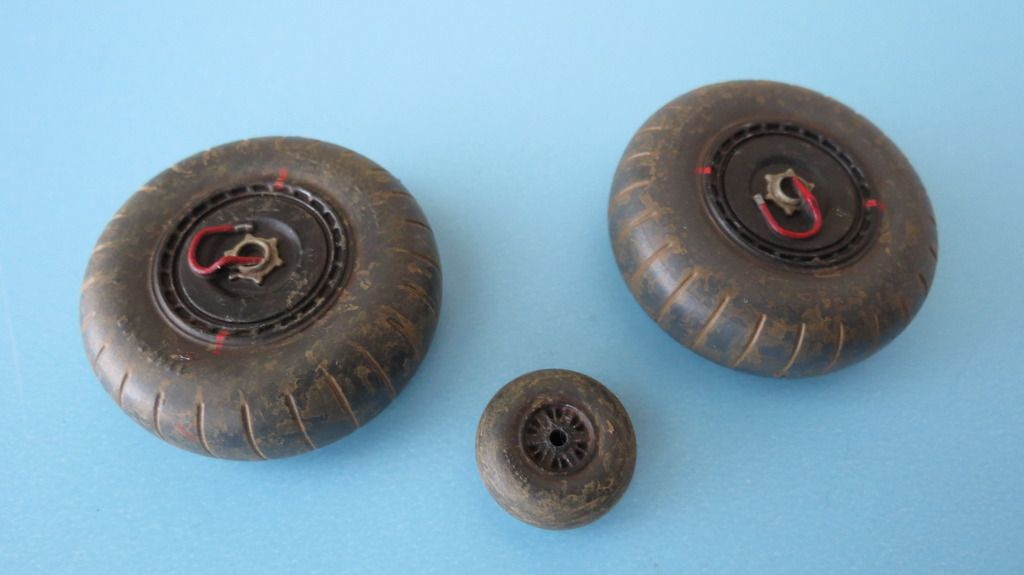
With the dark dirt wash complete on the plane, it was time to apply the dirt wash to the peripheral parts- the propellers, undercarriage, wheels and doors, allow it do dry for 30 minutes then rub it off using Q-Tips/Cotton Buds....


IMG_5733_zpsvk7txevu.jpg


IMG_5732_zpsdtbldxxh.jpg


I now  mixed a couple of acrylic washes to add some reddish-brown and blackish streaks and add some tones with the reddish brown acrylic wash....


IMG_5754_zps17zhth4i.jpg


IMG_5757_zpsid5kctwv.jpg


IMG_5763_zpsqbtdlcvv.jpg


IMG_5764_zpsqufzcsmk.jpg


IMG_5769_zps9eoljkhk.jpg


IMG_5771_zpsvvn2aczu.jpg


IMG_5774_zpsighfoqt3.jpg


IMG_5775_zpsi71xhzbs.jpg


IMG_5776_zpsj5rke1oh.jpg


IMG_5777_zpsyqqur8u4.jpg


IMG_5779_zps3y8tyehz.jpg


IMG_5780_zps0j4cxvgu.jpg


IMG_5781_zpswhdti4io.jpg


IMG_5782_zpshtienjkz.jpg


IMG_5784_zpsi9qh4wd2.jpg


IMG_5785_zpsfi1scljf.jpg


IMG_5788_zpsubs4x26u.jpg


IMG_5789_zpsmyt4fkpe.jpg


IMG_5790_zpsqugtmu36.jpg


IMG_5794_zpsjacsx580.jpg


IMG_5799_zpsruun1axx.jpg


IMG_5801_zpses5xfxqm.jpg


IMG_5805_zpsd1pmhrrv.jpg


IMG_5807_zps165elr1f.jpg


IMG_5810_zpsmthl1ba2.jpg


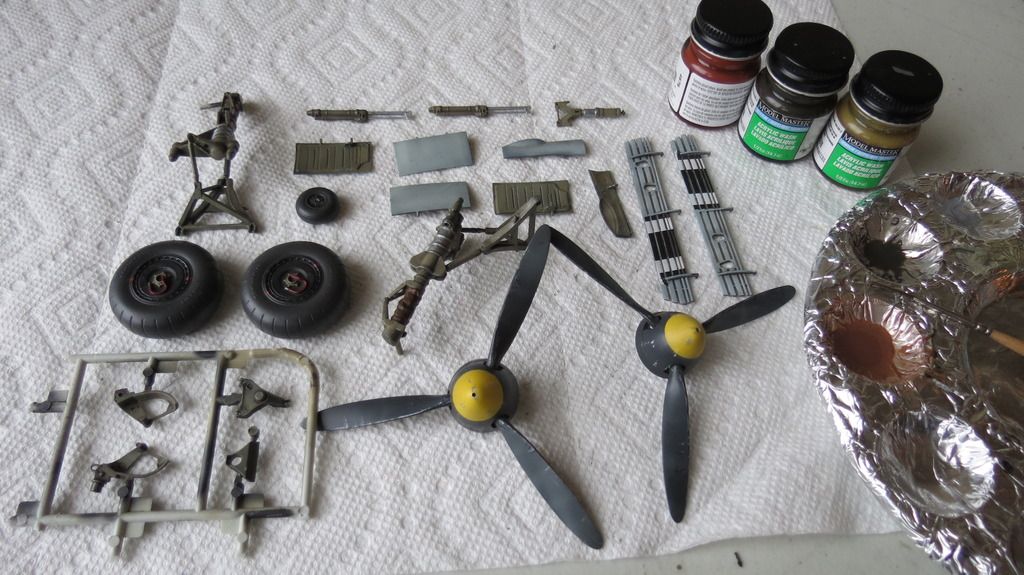
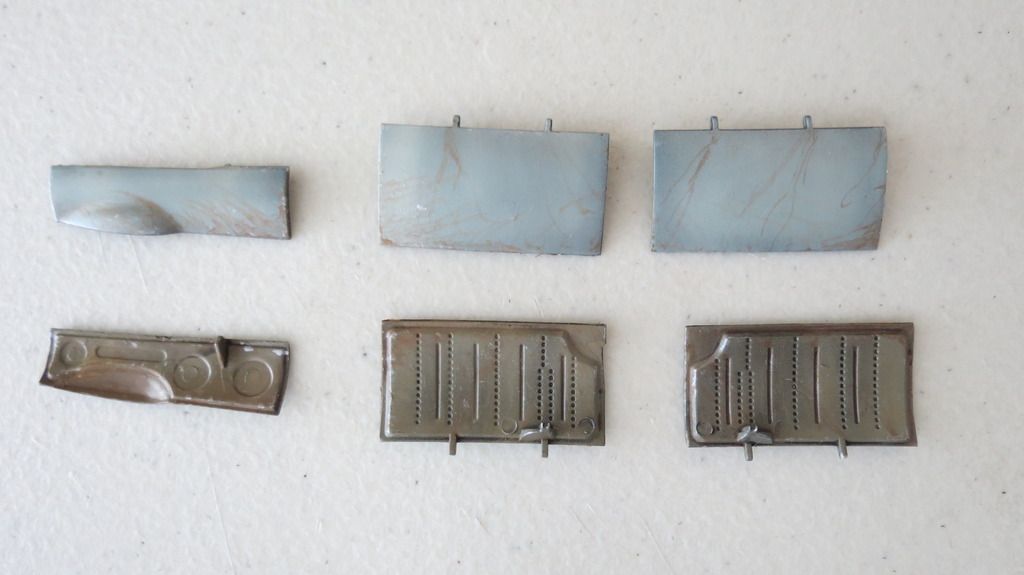
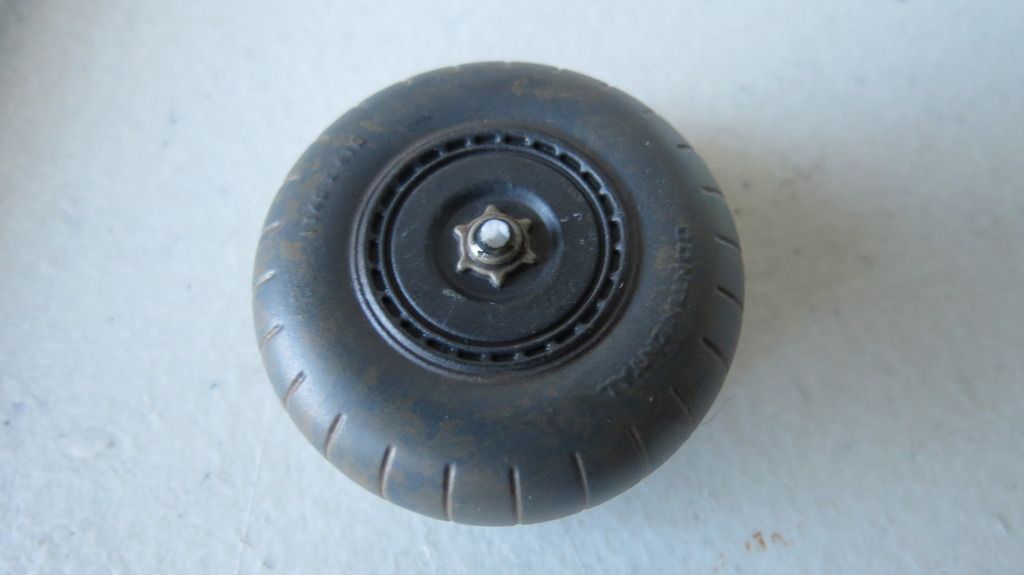
Lastly, I applied the reddish-brown wash to the wheels followed by dirtying them using some Dark Earth acrylic paint thinned down to a watery consistency...


IMG_5756_zpsrh1gjnfq.jpg


IMG_5791_zpsnyaj1u2s.jpg


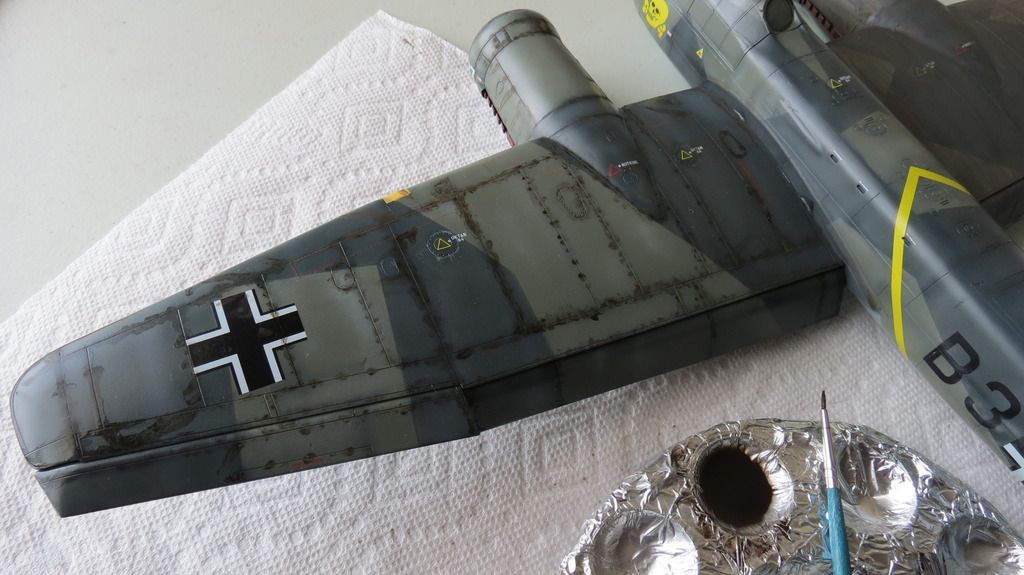
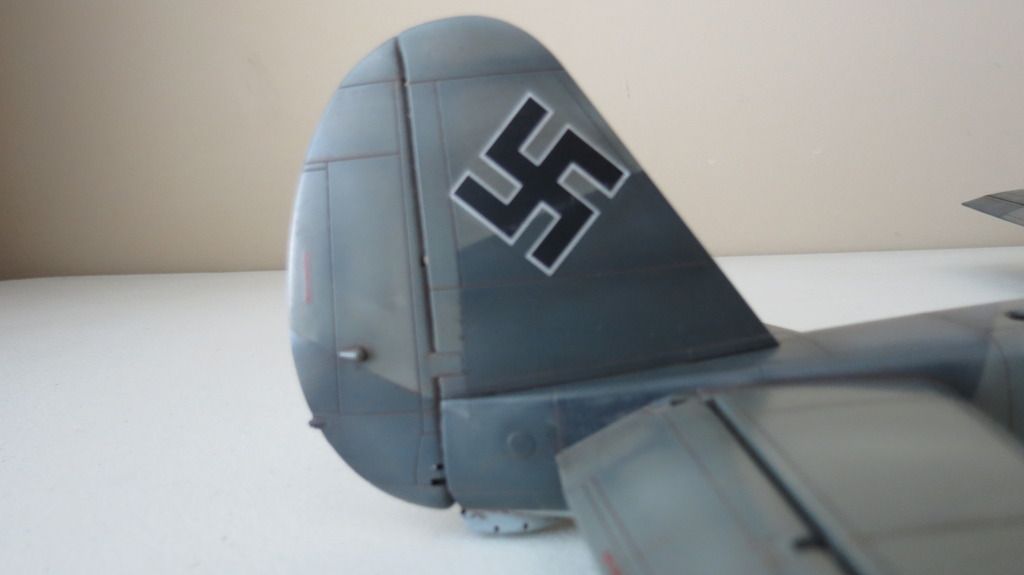
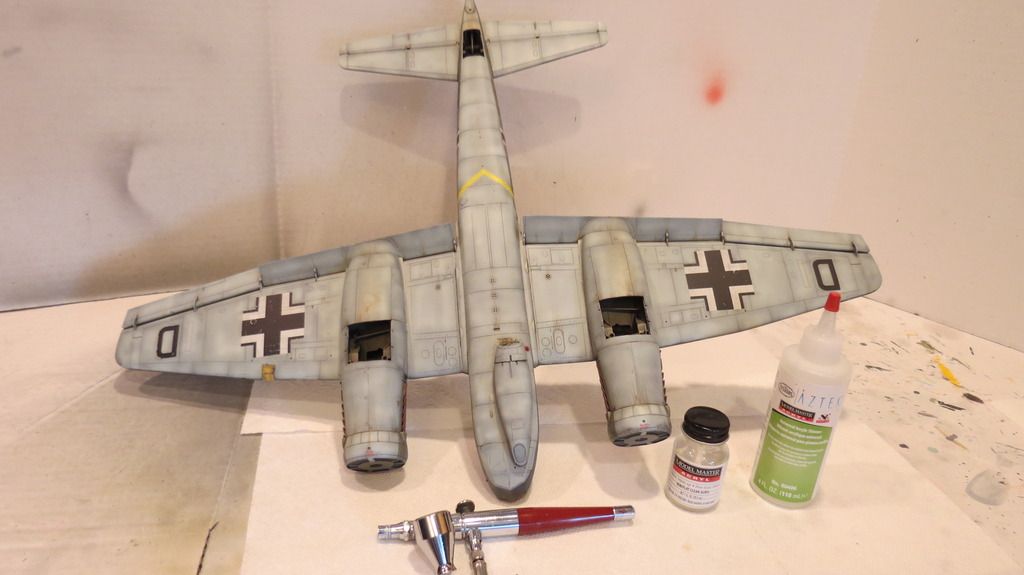
My weathering was now complete, and so, I sealed everything in with the final matt/flat clear coat...


IMG_5812_zpsqakuxfzi.jpg


IMG_5814_zps7gbkyjaf.jpg


IMG_5815_zpsaibpgwi3.jpg


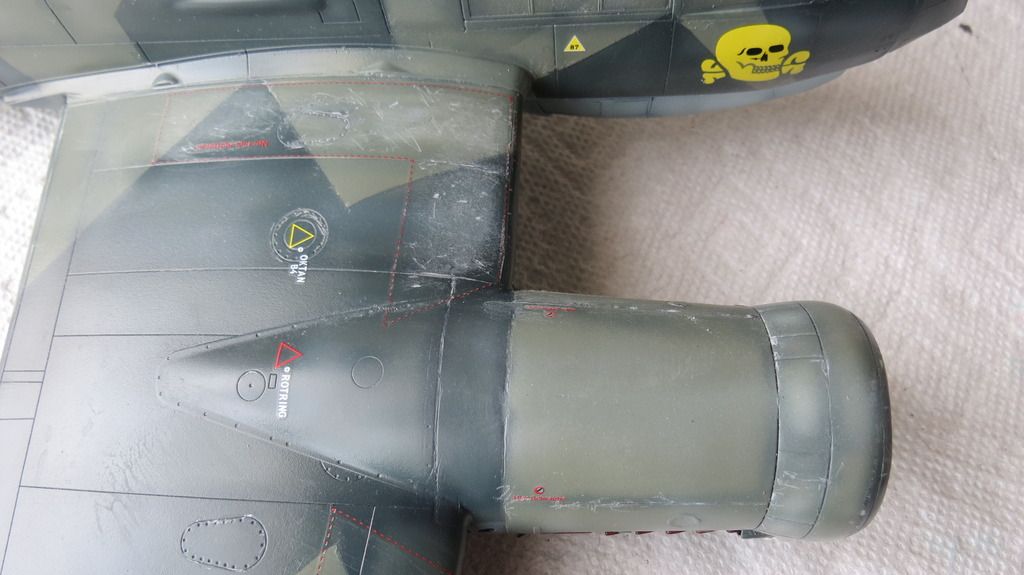
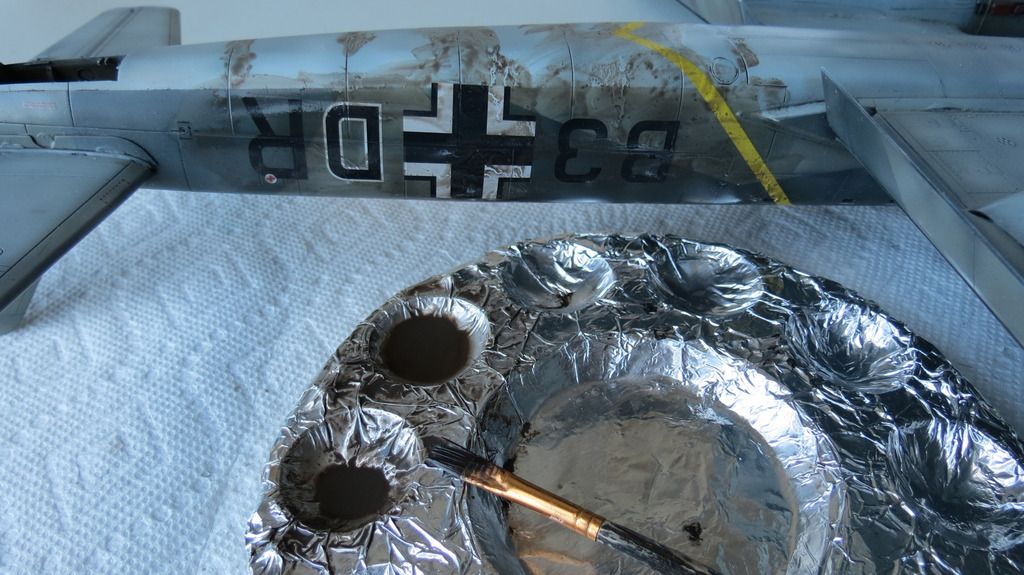
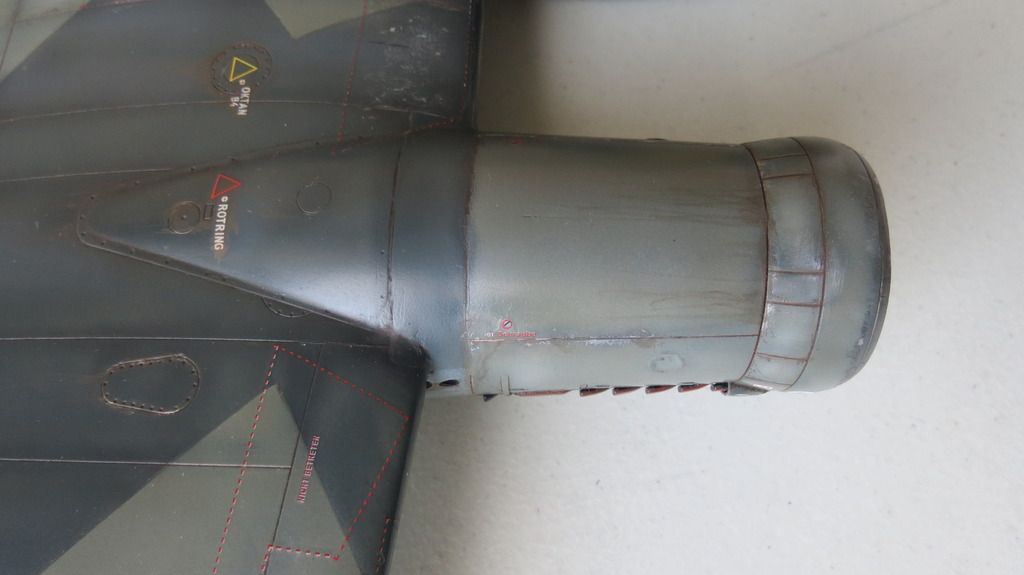
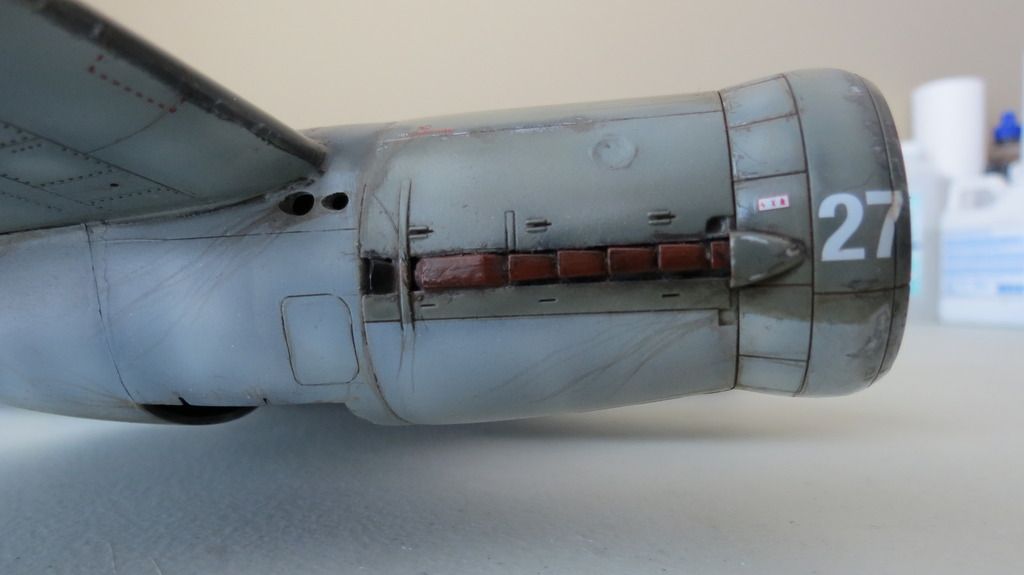
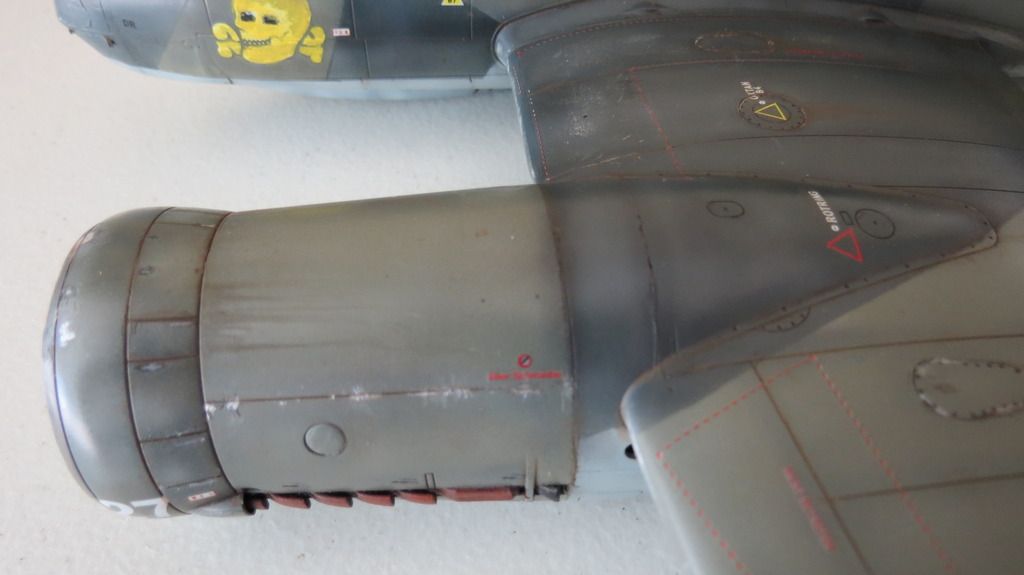
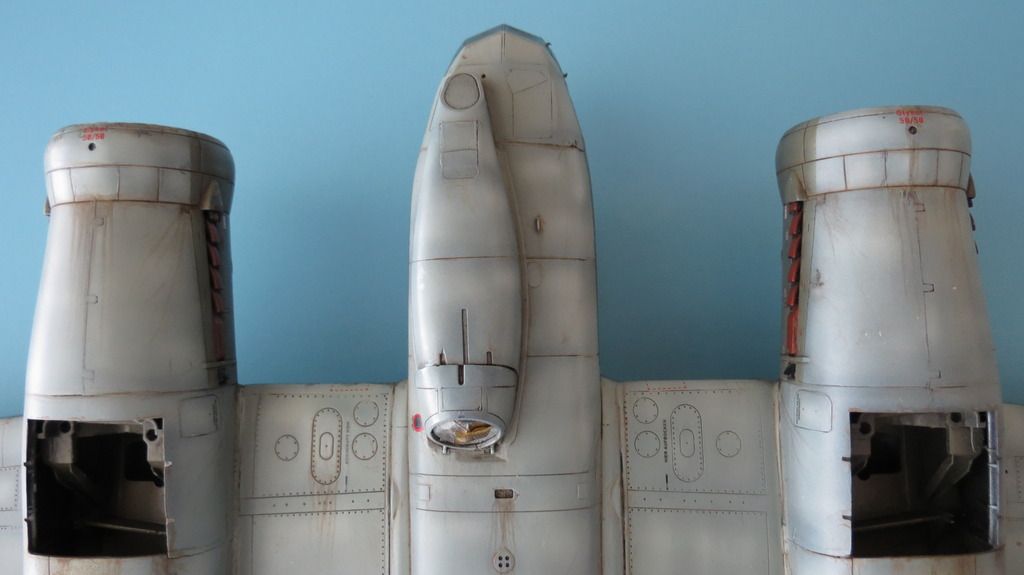
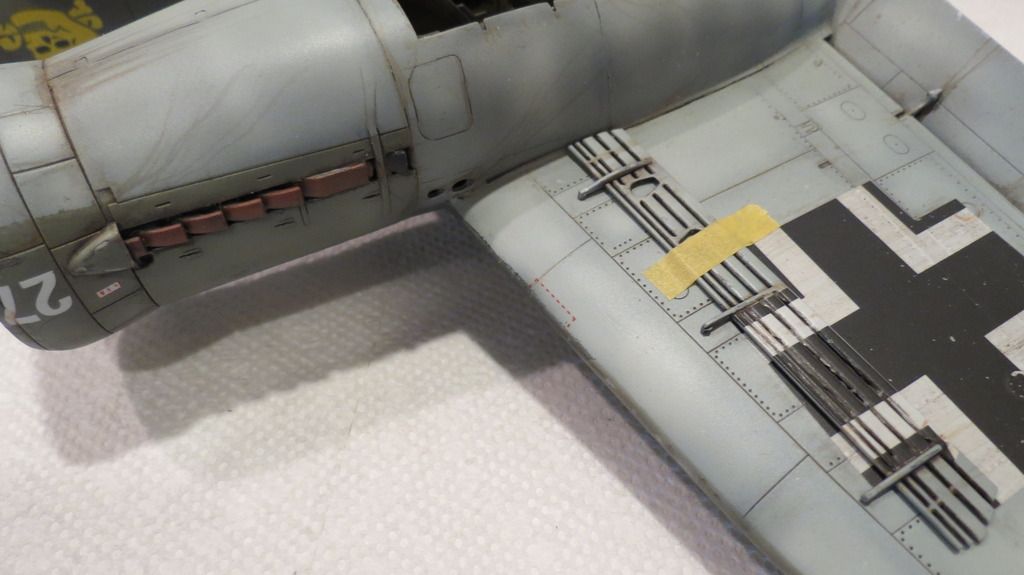
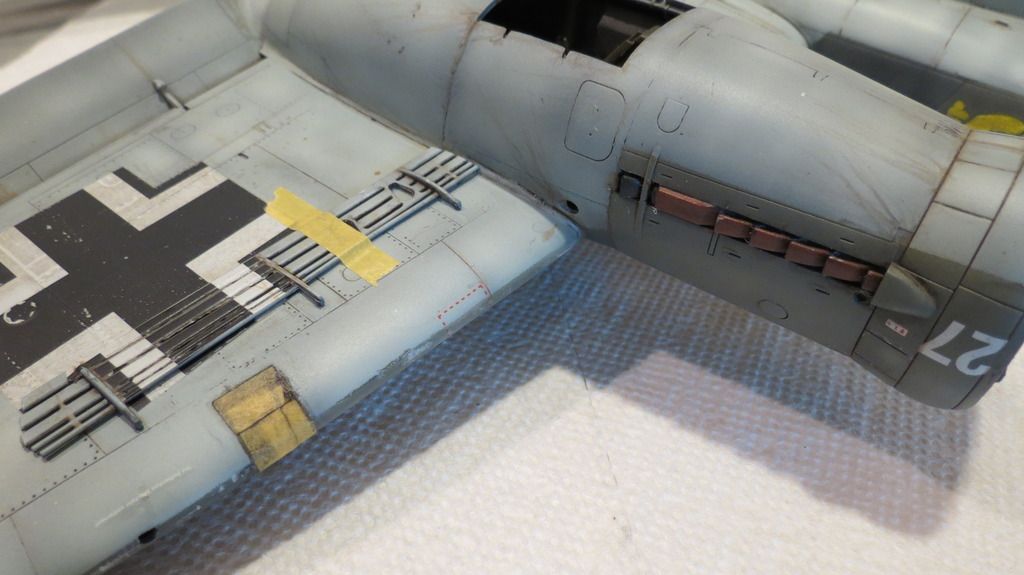
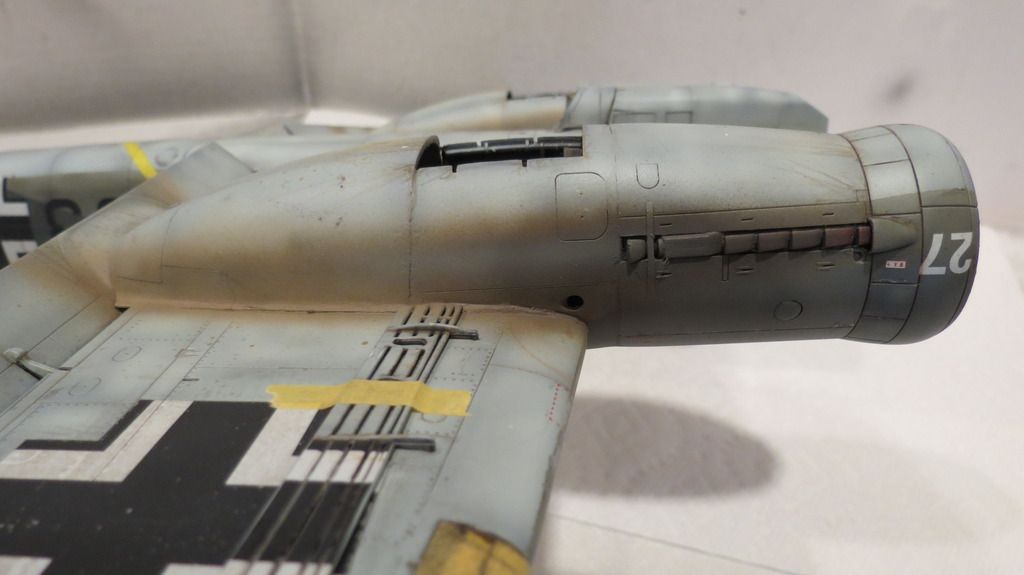
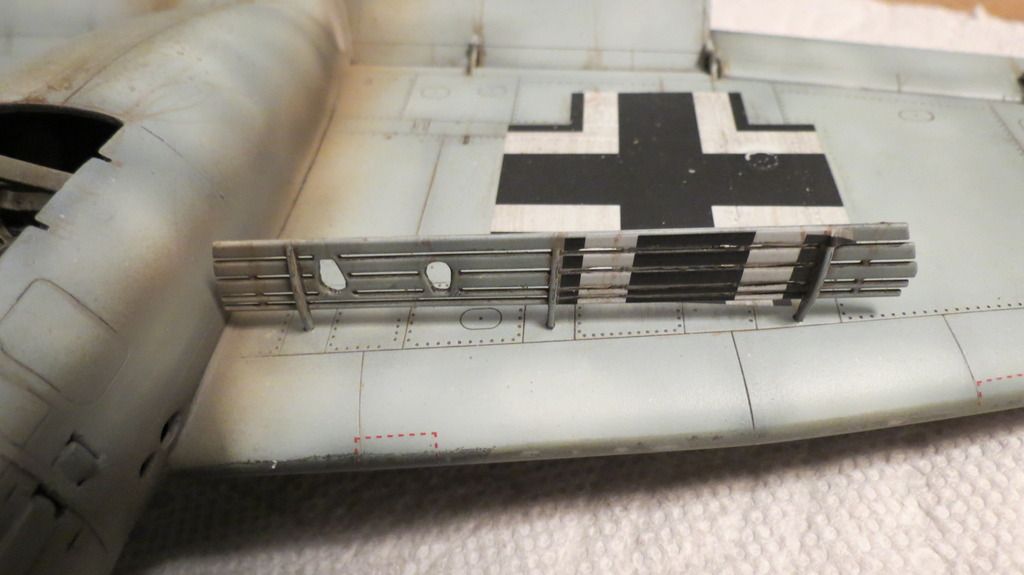
It was now time to add the exhaust stains, and to do this, I used 4 colors- rust, dark earth, white and black. But, before I applied the colors, I temporarily located the two air-brakes using Tamiya tape, because the ends closest to the exhaust would be effected by the staining also...


IMG_5824_zpsnbvzpuuy.jpg


IMG_5825_zps5zj1l43s.jpg


IMG_5826_zpsmwp84gse.jpg


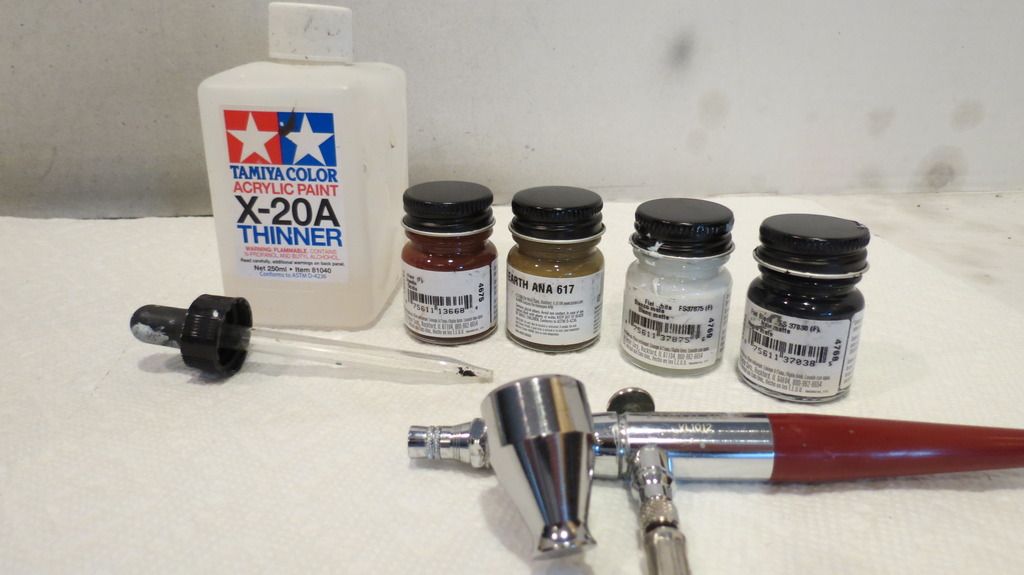
The first color I applied was dark earth mixed with a small drop of the rust and thinned down 80% with Tamiya X-20A....


IMG_5828_zpsifsijczy.jpg


IMG_5829_zpstvskqpq0.jpg


I then mixed some black with what was left in the cup, thinned that down by 80% and then carefully airbrushed some on top of the first color that was applied...


IMG_5832_zpsllki57ly.jpg


I then wanted to simulate lead deposits sitting on top of the staining, so, I mixed some white with a drop of the dark earth and thinned that 80% and carefully airbrushed it over the first few exhausts and just beyond them.....


IMG_5834_zpstvujldn1.jpg


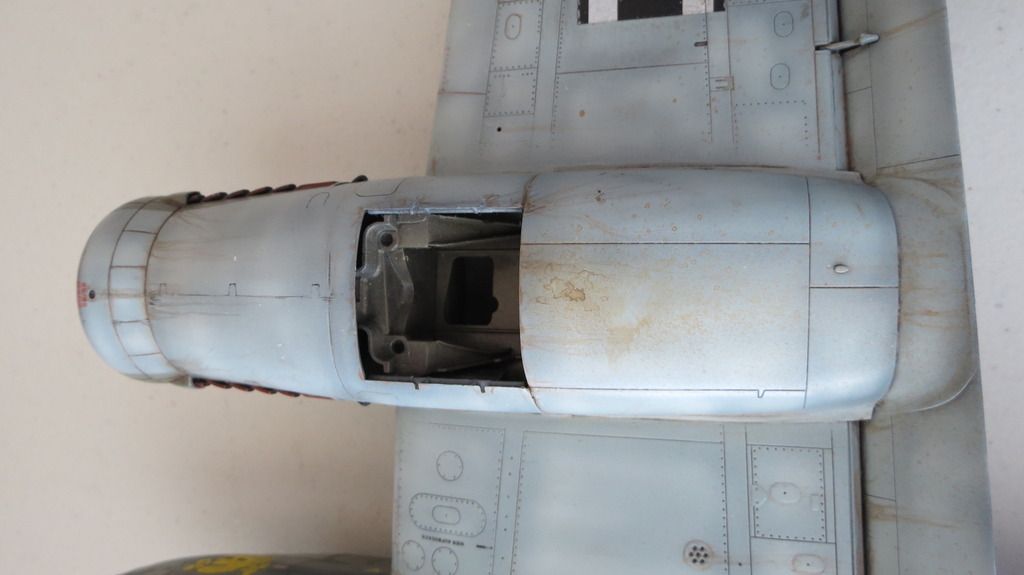
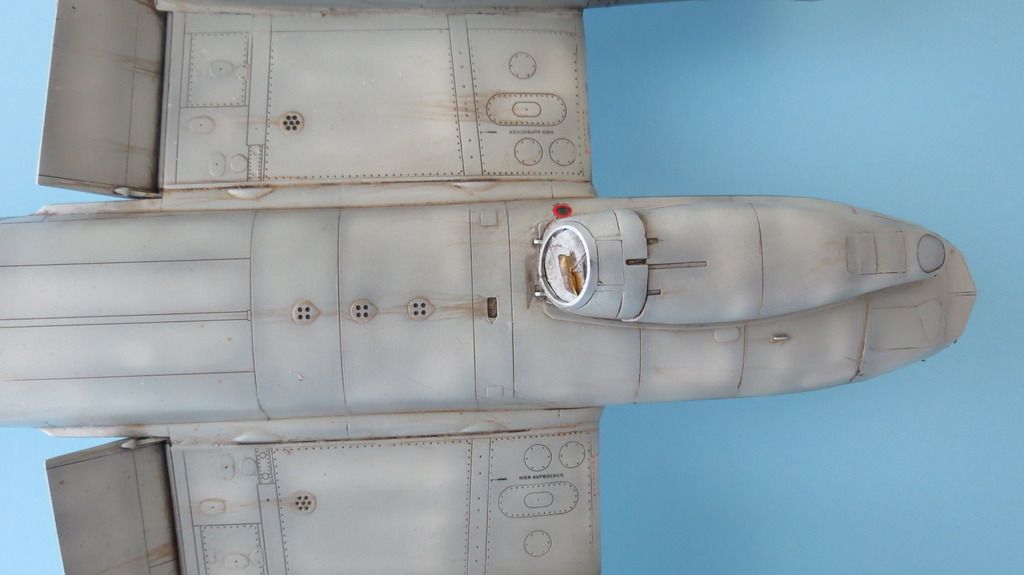
Next, I removed the masking from all of the cockpit and gondola windows as well as the engine indicator gauge windows...


IMG_5835_zps2h0ua39n.jpg


IMG_5836_zpsjm3vifnf.jpg


IMG_5837_zpslrxe3w3g.jpg


IMG_5840_zpsszqaybvu.jpg


IMG_5853_zps6l832iwh.jpg


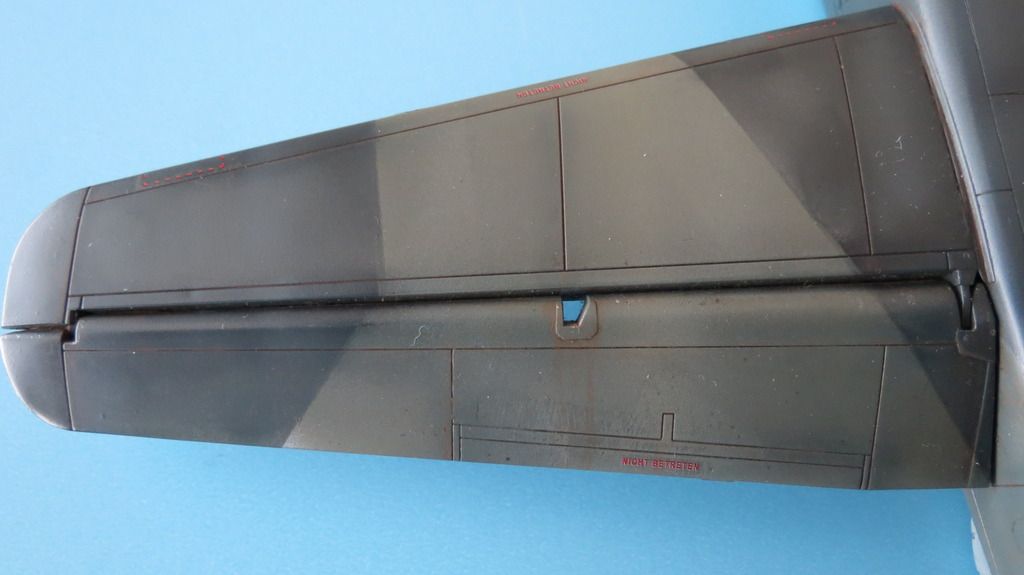
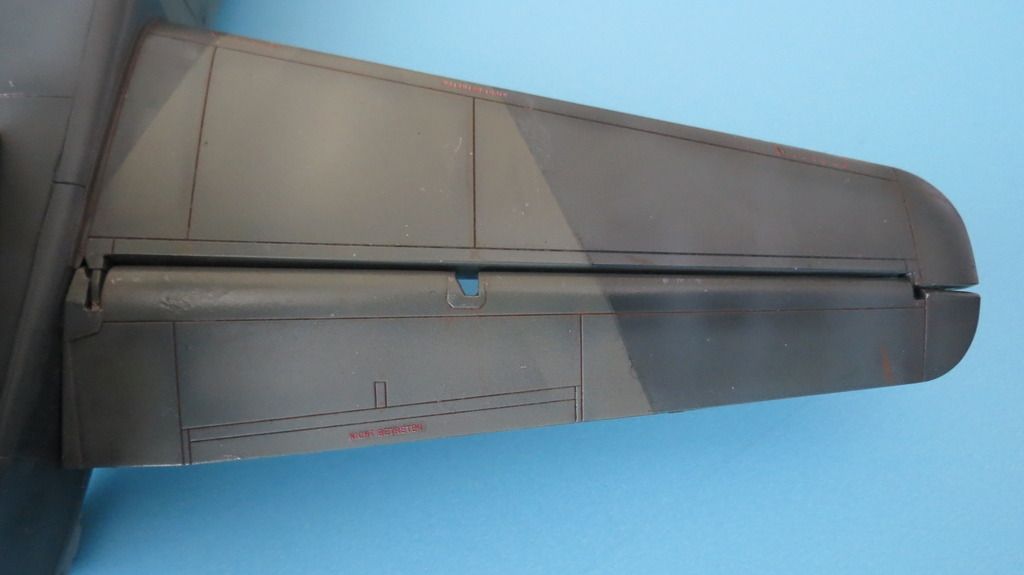
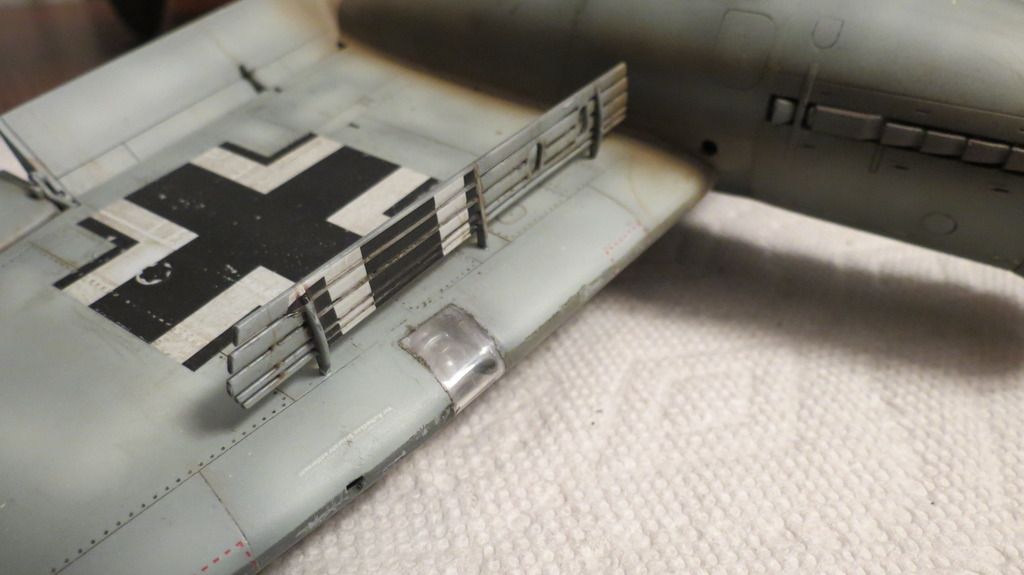
I now moved forward with the final assembly, and the first parts assembled were the two air-brakes. These were designed to be assembled in their retracted position, flat against the underside of their corresponding wings, but, I wanted them posed in their down position. Therefore, I cut off their location tabs to allow me to push the ends of the vertical struts into the location holes. I used CA glue to fix these in place...


IMG_5845_zpscyqsdwce.jpg


IMG_5848_zpsnoq42kjx.jpg


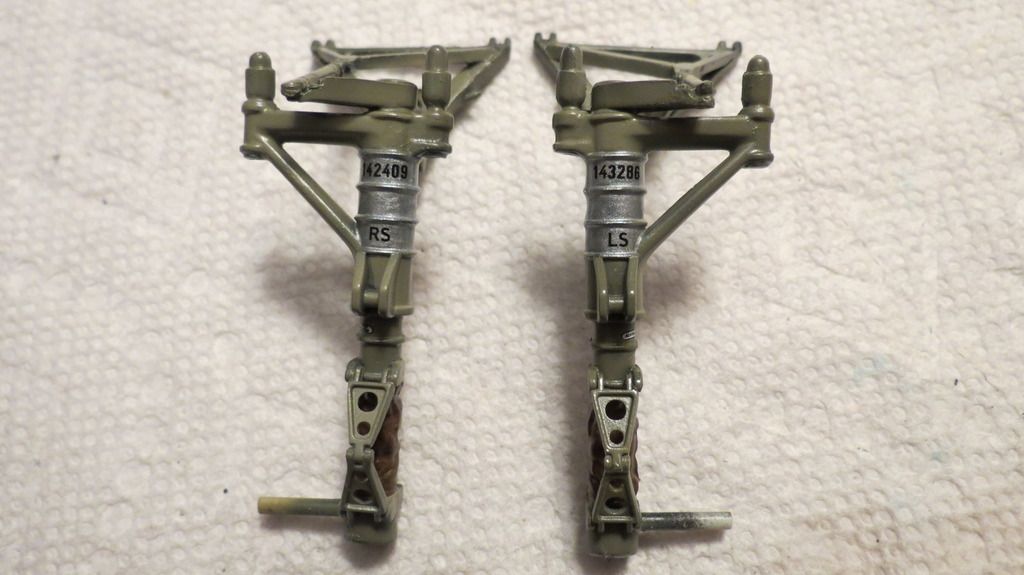
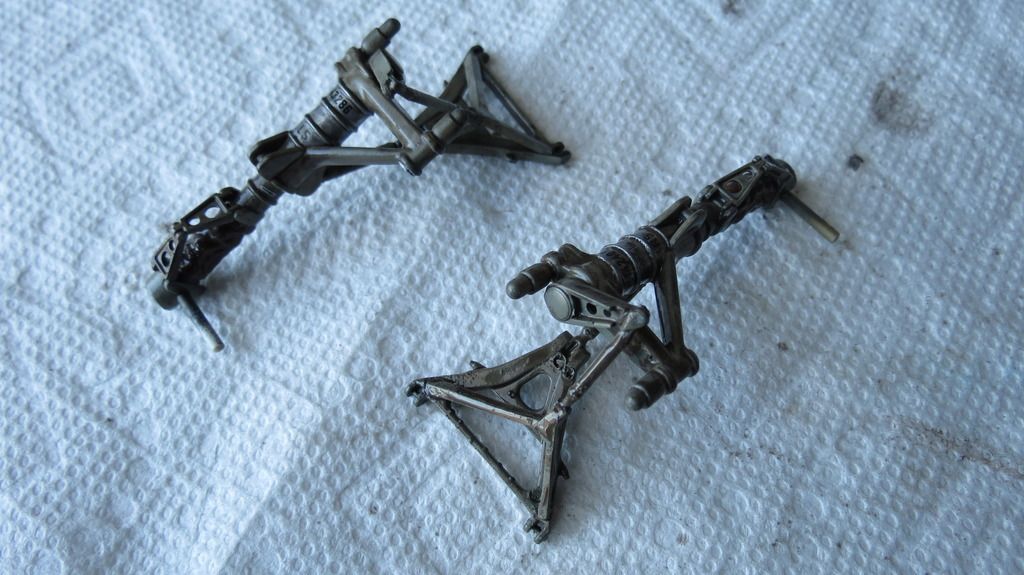
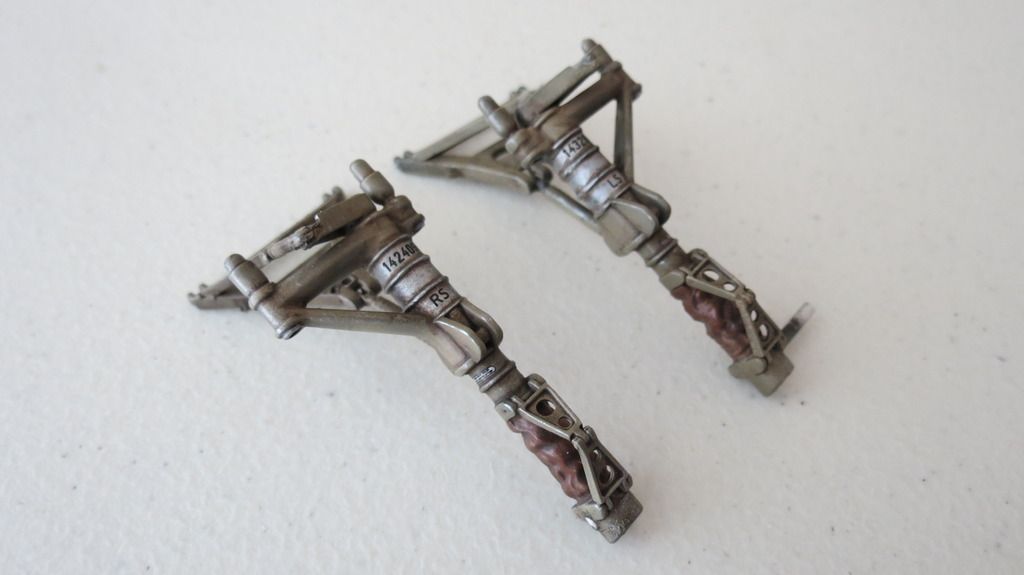
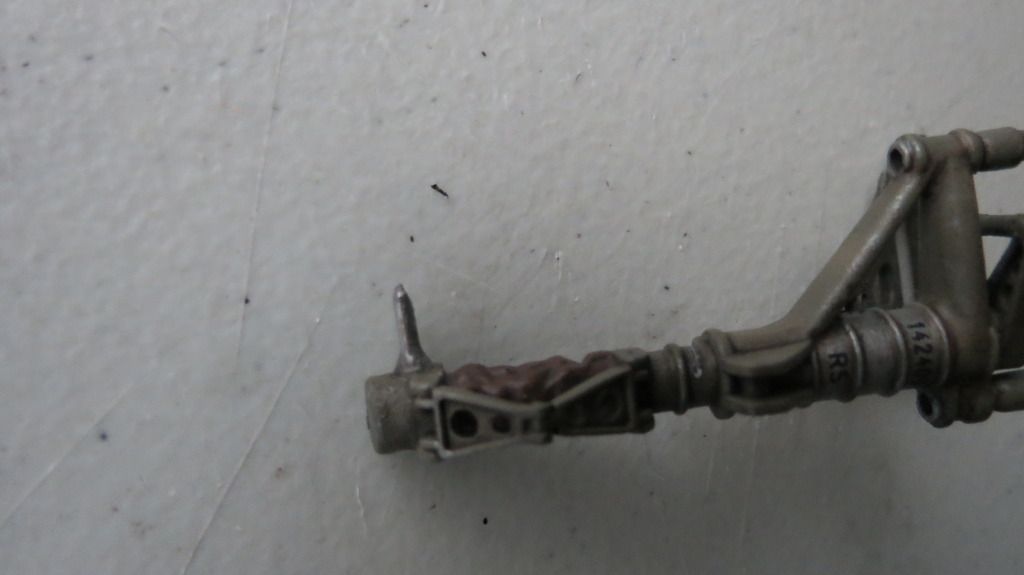
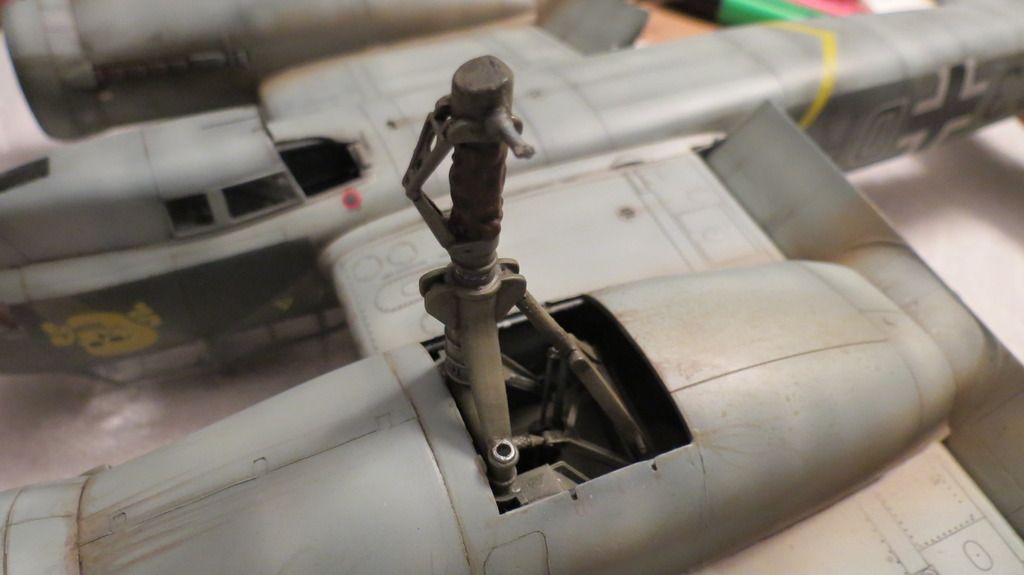
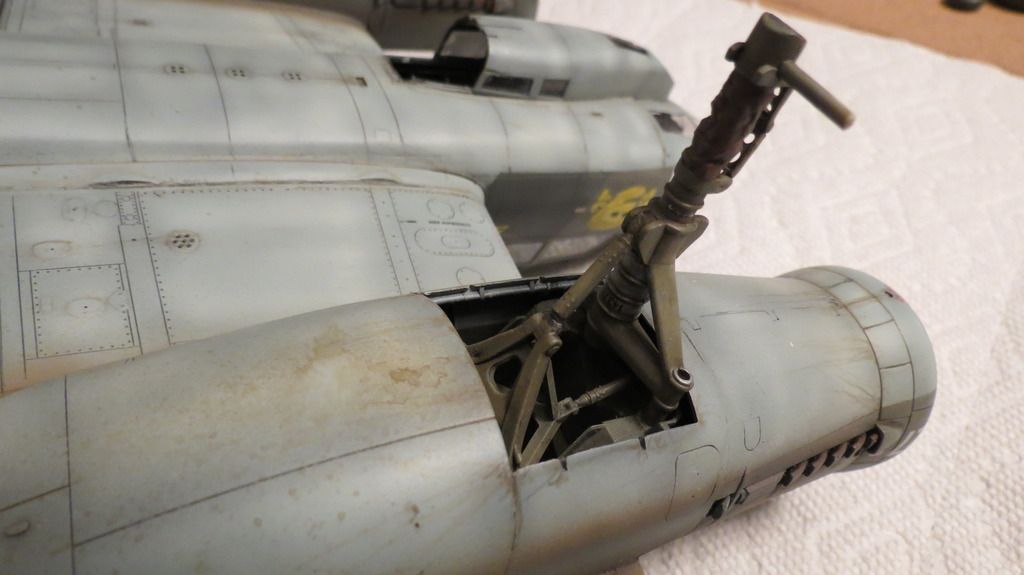
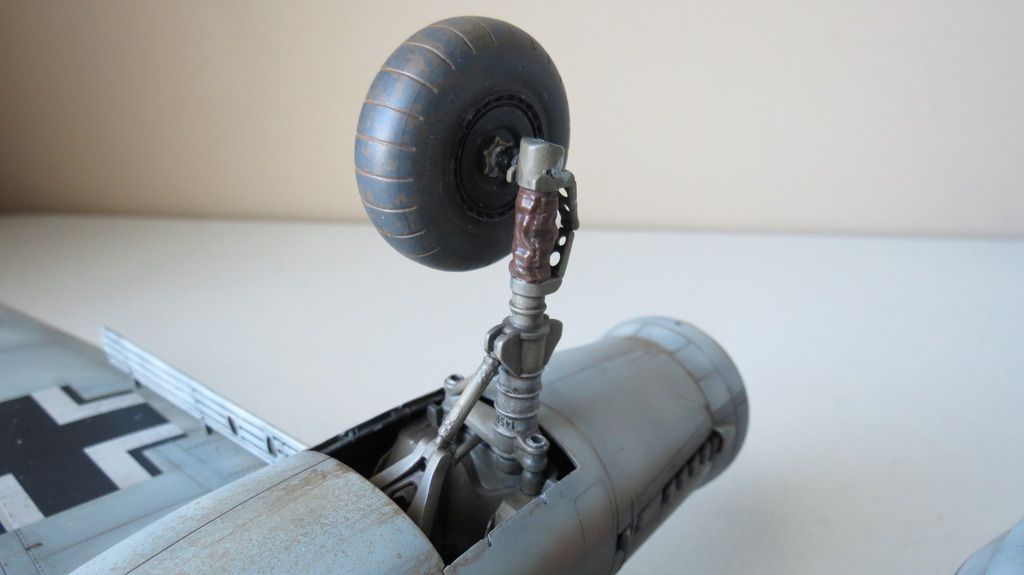
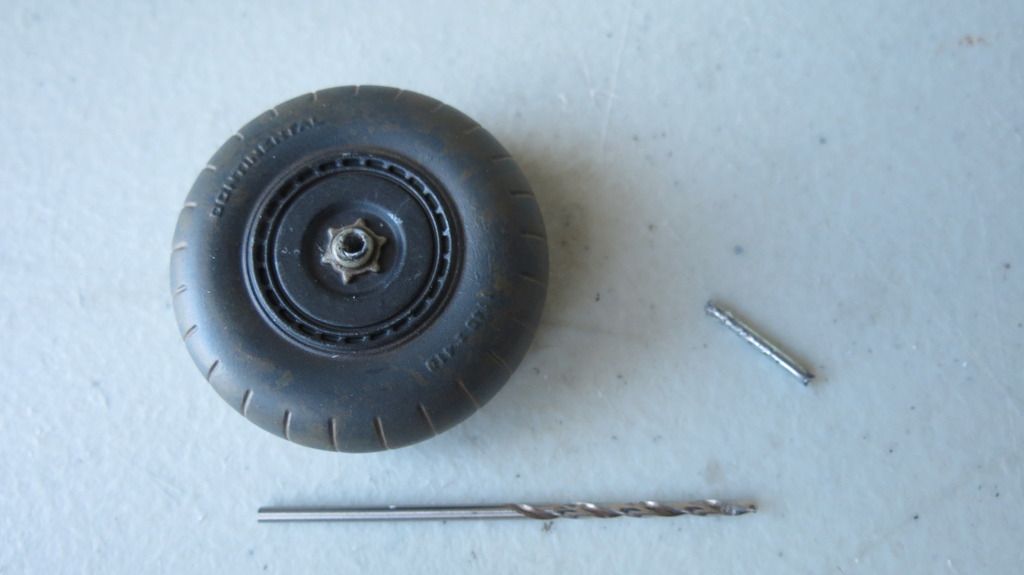
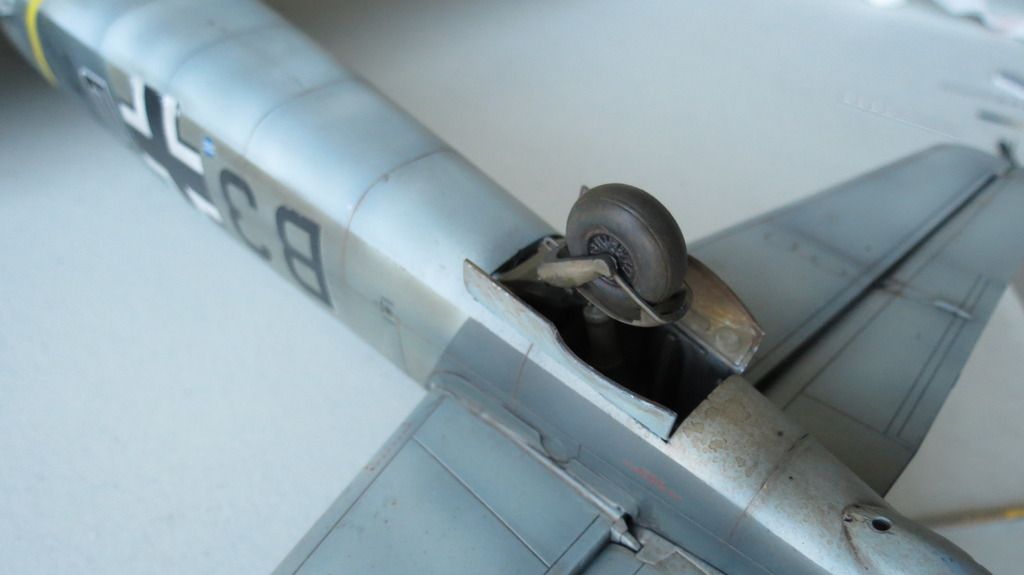
Next, I moved onto assembling the undercarriage together and fitting them into their corresponding wheel wells. But, when putting one of the wheels onto the starboard side strut, the axle sheared off very easily and remained inside the wheel. This is a weak spot in the molded wheel struts wherein internal shear-stressing has occurred at the 90` junction of the axle to strut location. If there are no vent pins located at the bottom of the deep axles to allow the internal compressed gases to escape out of the mold cavities, then this will further exacerbate the problem. I therefore drilled out the broken off axle strut from the wheel and drilled a corresponding hole into the wheel strut where the axle was located. I then made a steel pin and press fitted and CA glued this into the wheel strut...


IMG_5841_zpsmsjzuulv.jpg


IMG_5842_zpsjoiknt6c.jpg


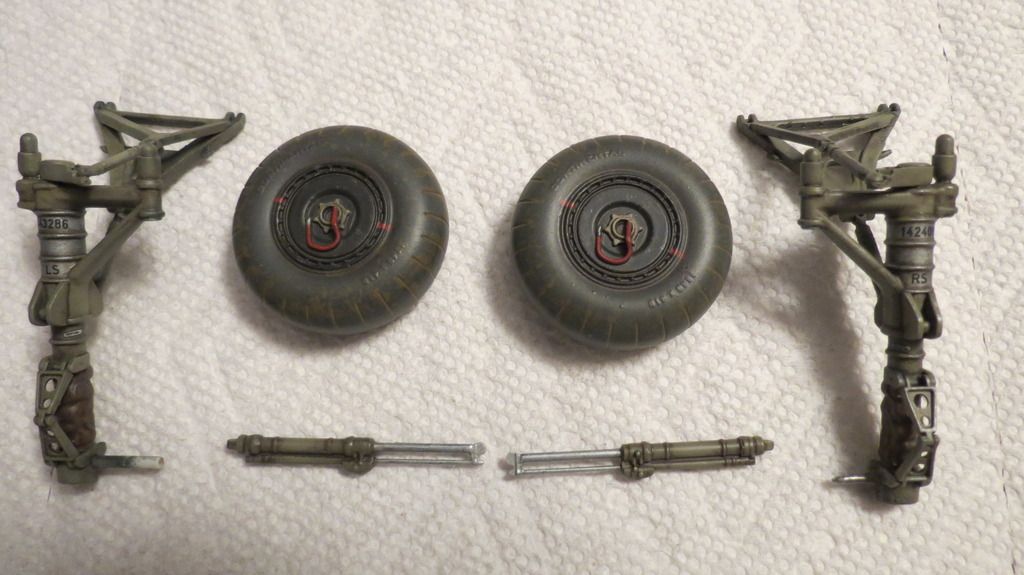
Following that little exercise, I then assembled the actuation cylinders onto the undercarriage assemblies, then fitted the assemblies into their corresponding wheel well locations...


IMG_5843_zpsbqfx2pbl.jpg


IMG_5844_zpsa5ntay8a.jpg


IMG_5846_zpsr3yyupbd.jpg


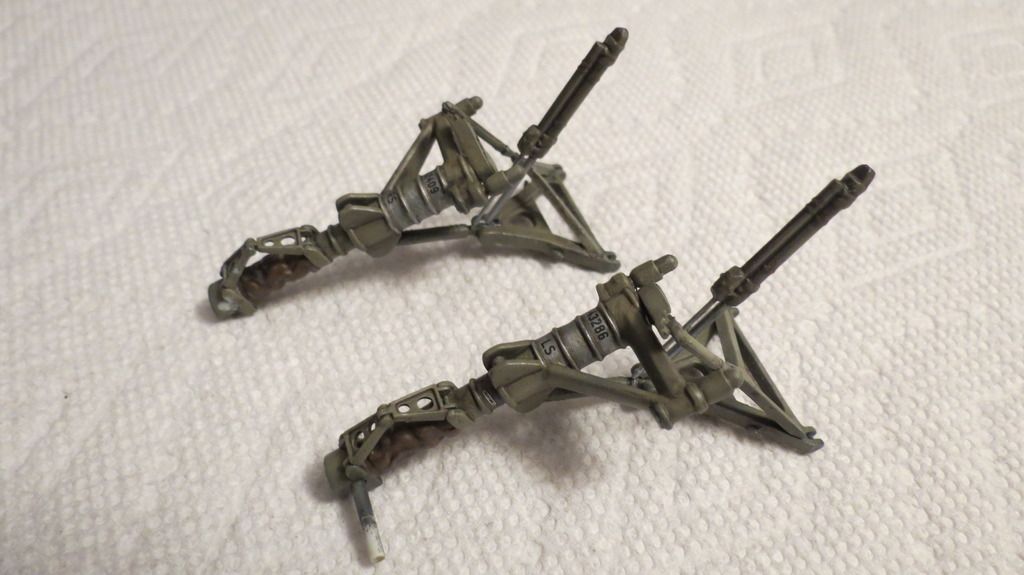
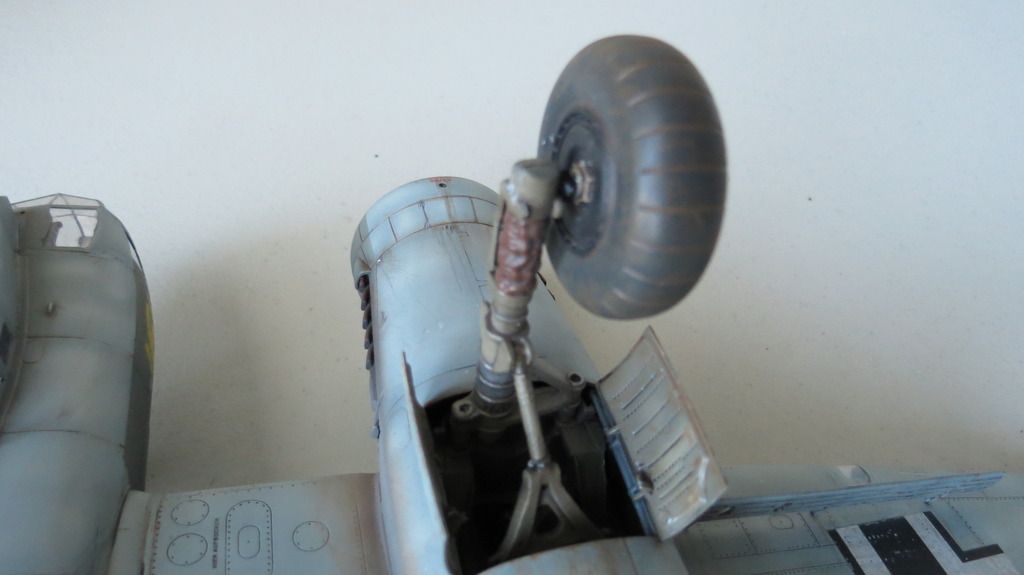
The starboard side wheel was glued onto its new steel axle pin followed by the portside wheel, but again, the portside axle sheared off easily, too. So, again, I drilled the broken axle out of the wheel, drilled a corresponding hole into the wheel strut and fitted a steel pin into the wheel strut. I then slid a Tamiya propeller bushing over the new steel axle and glued that into place. I cut the bushing down the middle so that it was only half as thick. When this had set, I slid the wheel onto the new steel axle and using CA glue fixed it in place, with the Tamiya propeller bushing providing some surface area for the wheel hub to bond to. The other half of the Tamiya propeller bushing was used on the starboard side axle, too....


IMG_5856_zpsnzcsuryd.jpg


IMG_5855_zpsr1ngi8oi.jpg


IMG_5857_zpsvx0vacct.jpg


IMG_5858_zpsozi0wpqm.jpg


IMG_5860_zps972kcwqb.jpg


Next, I assembled the components of the rear wheel assembly then glued that into the rear wheel well...


IMG_5861_zps2trfvepx.jpg


IMG_5865_zpsnavn0bri.jpg


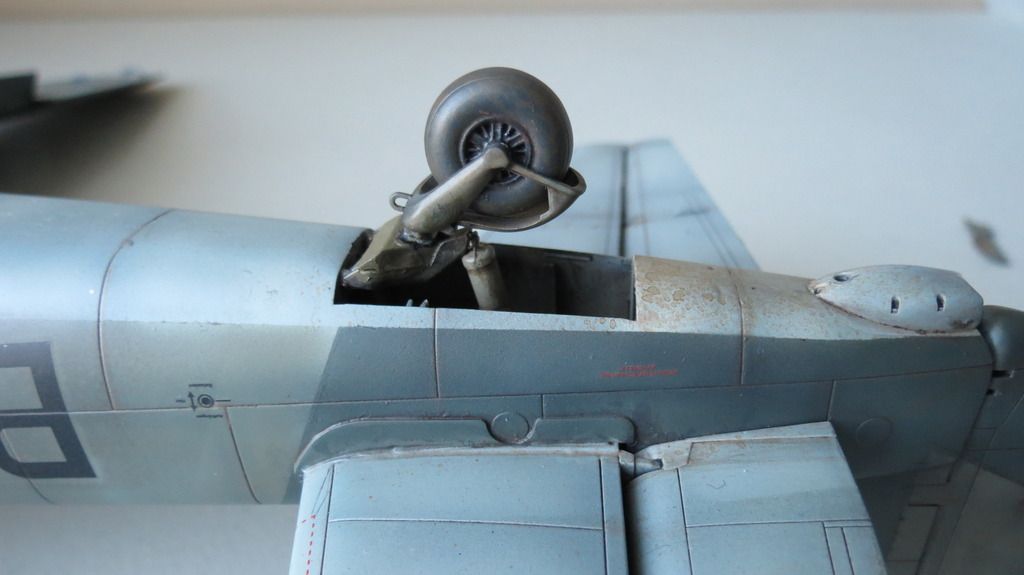
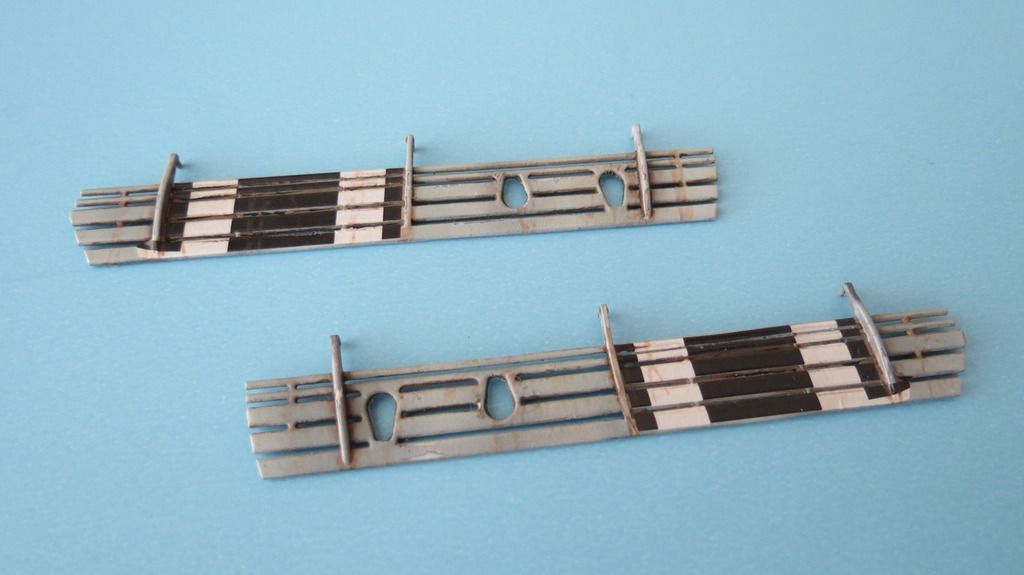
This was followed by gluing the undercarriage bay doors into location using CA glue...


IMG_5863_zpspgqzocl6.jpg


IMG_5866_zpsbppylhac.jpg


Next, I glued the propellers into place...


IMG_5867_zpspmurot0f.jpg


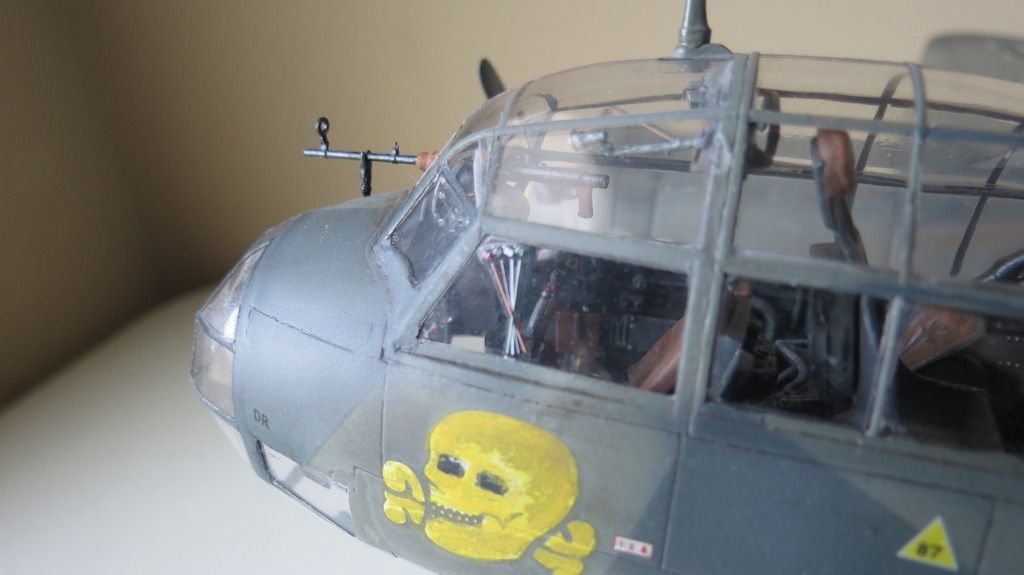
I then moved onto assembling the machine guns into their round windows, painting the windows and fitting them into their locations. I started with the upper rear machine gun...


IMG_5868_zpsnreoxmza.jpg


IMG_5872_zpswhcgvx3m.jpg


IMG_5873_zpsbw9p9m5s.jpg


IMG_5883_zpssw2dudfb.jpg


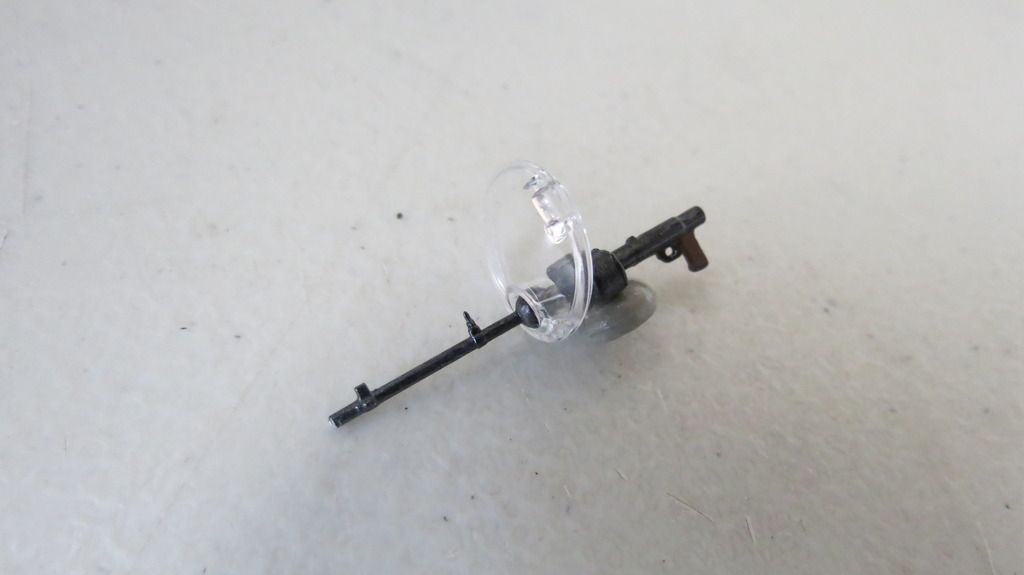
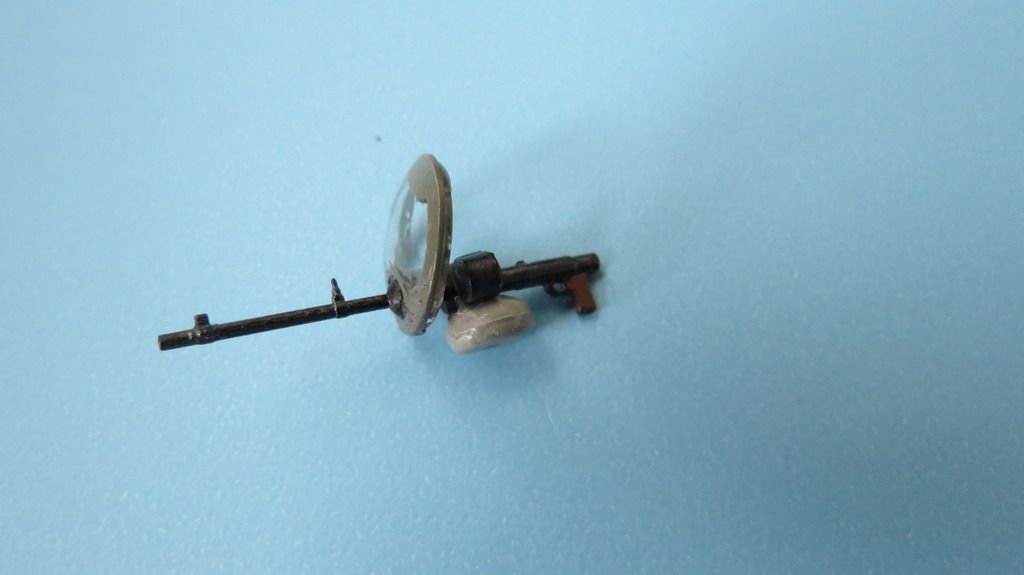
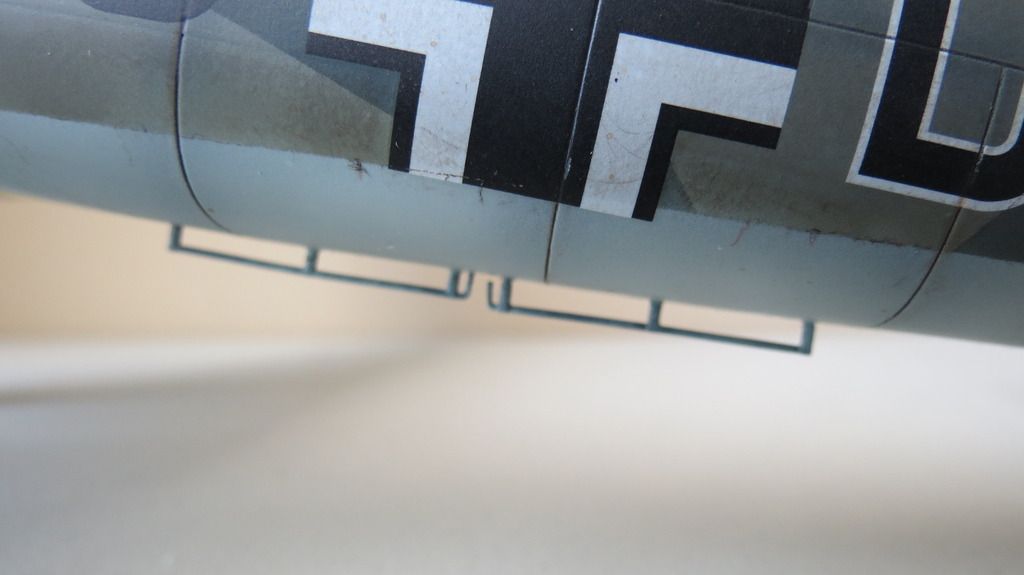
This was followed by the gondola hatch mounted machine gun on the underside of the aircraft and where the air-crew enter and exit the aircraft...


IMG_5869_zpsqhfx7mob.jpg


IMG_5876_zps4gblcdr1.jpg


IMG_5877_zpsfkd82blt.jpg


IMG_5881_zpsgwvr0rkw.jpg


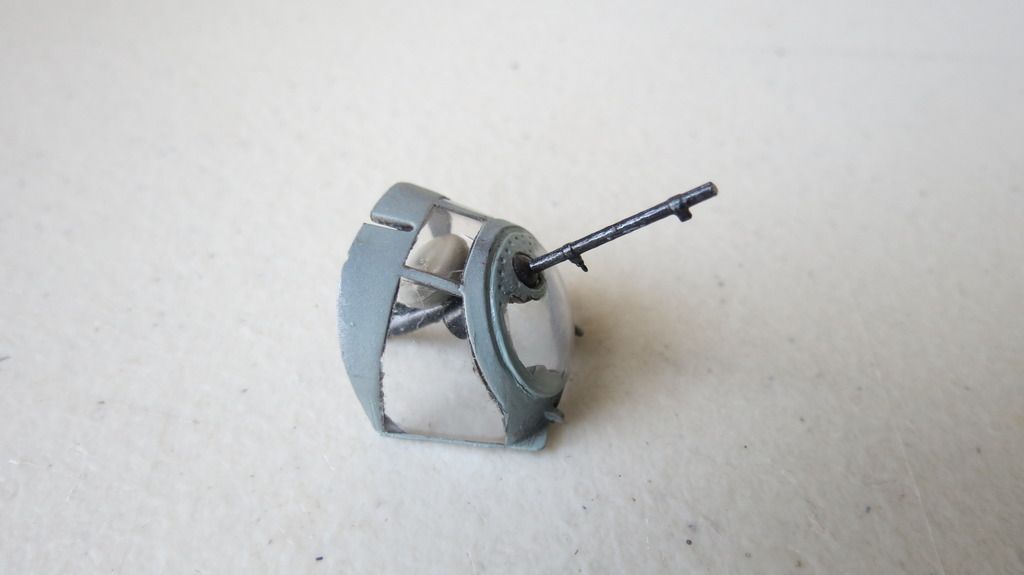
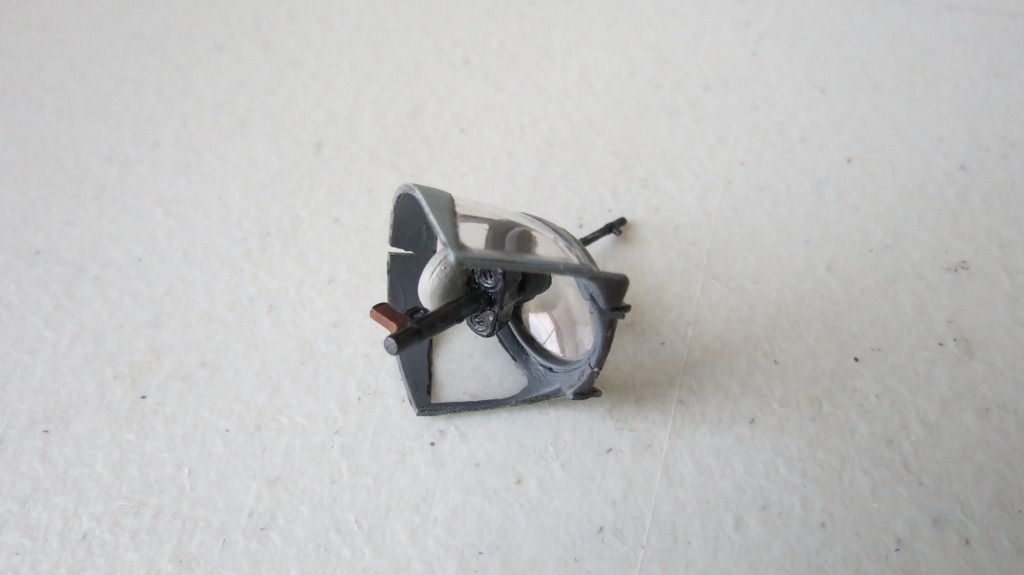
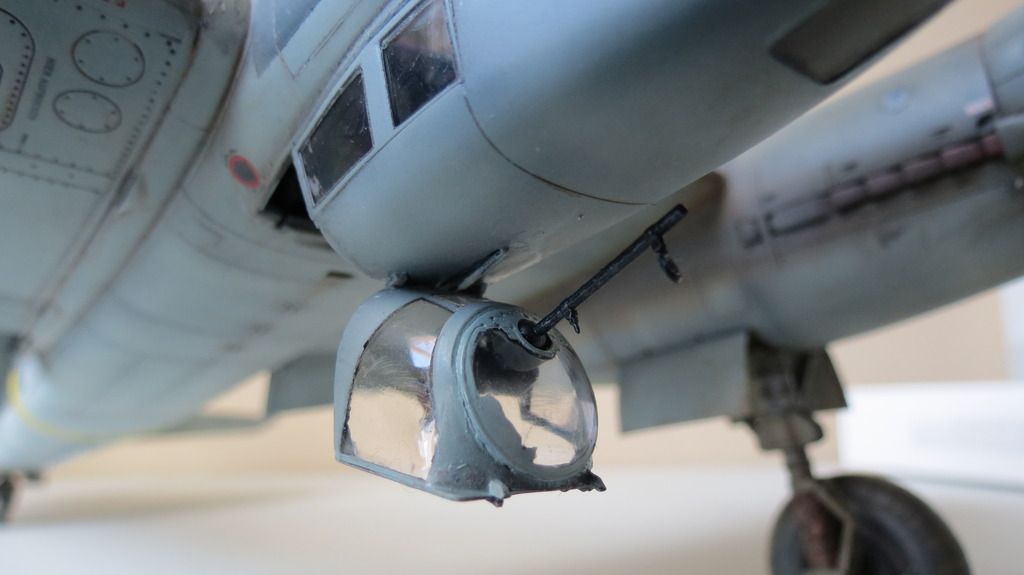
The last gun to be mounted was the forward facing machine gun and resting post...


IMG_5882_zpss6swuuli.jpg


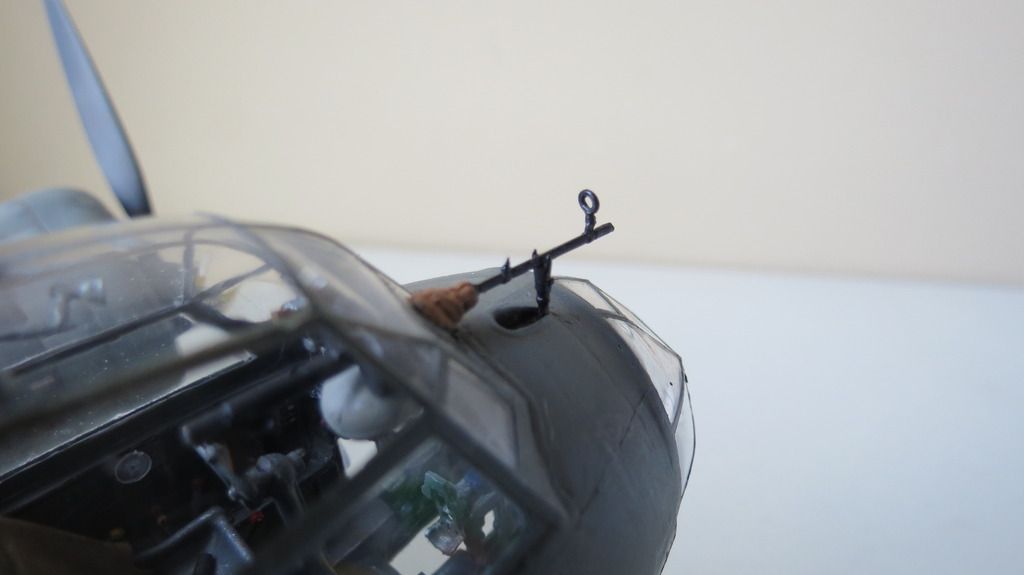
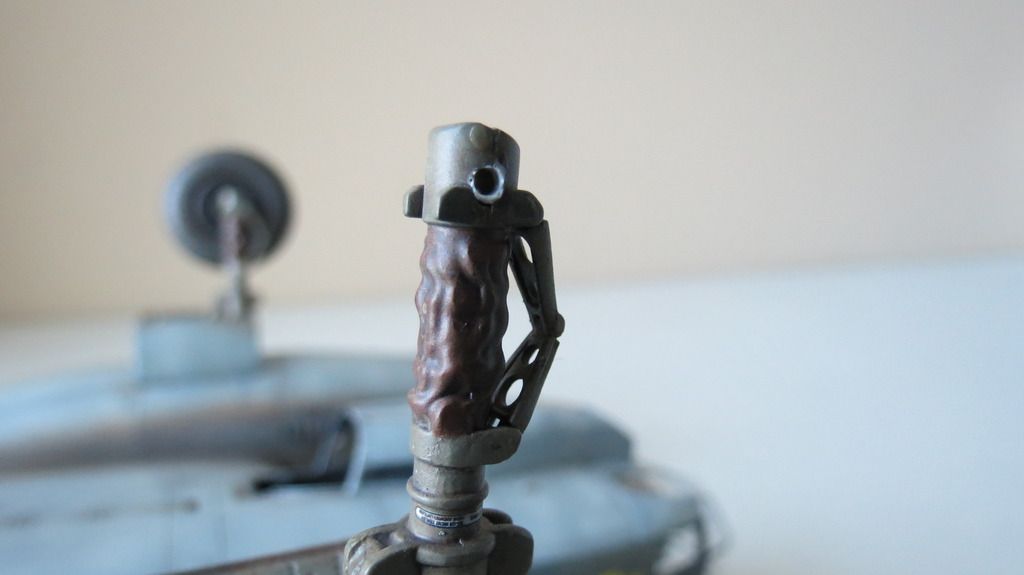
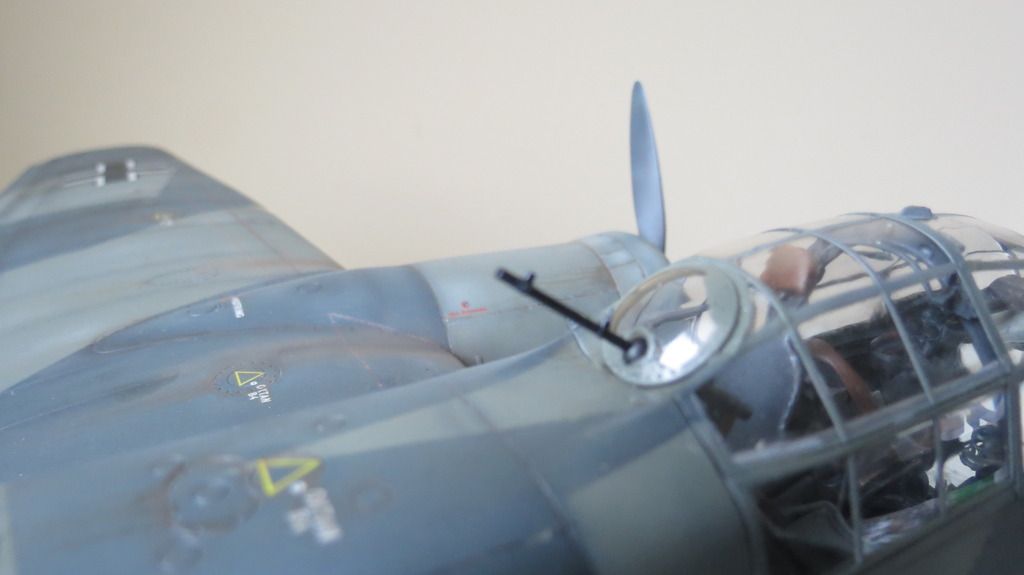
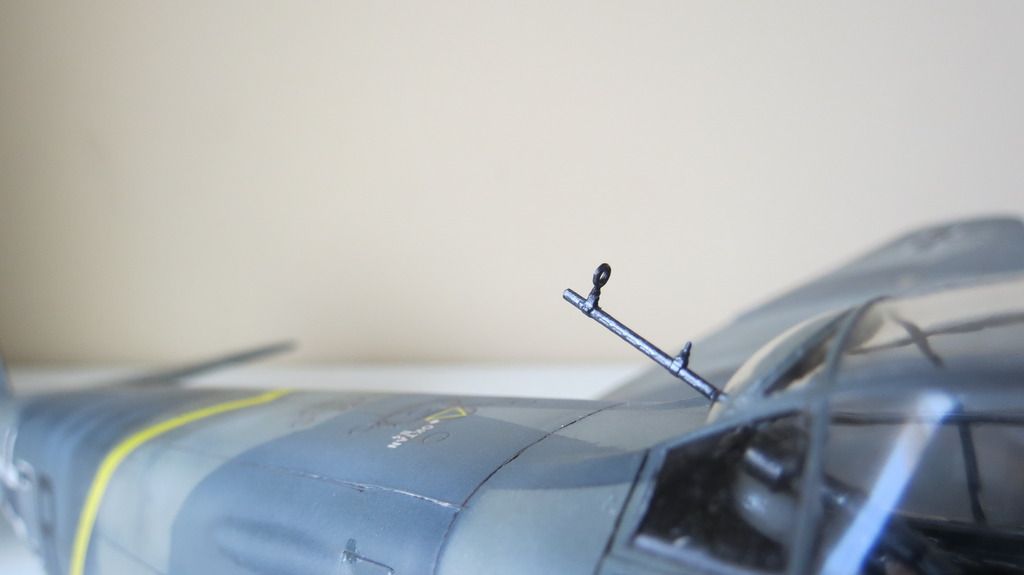
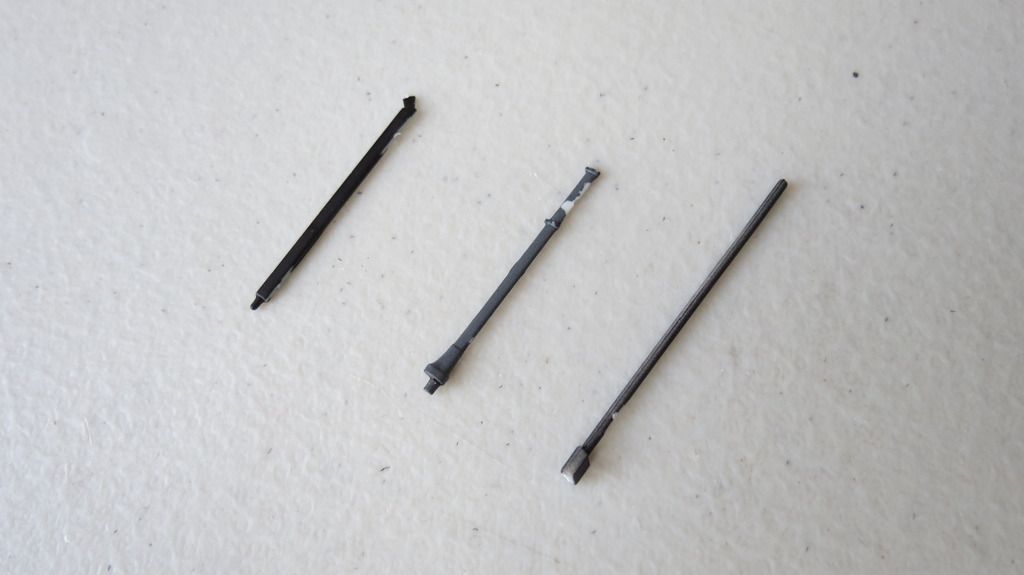
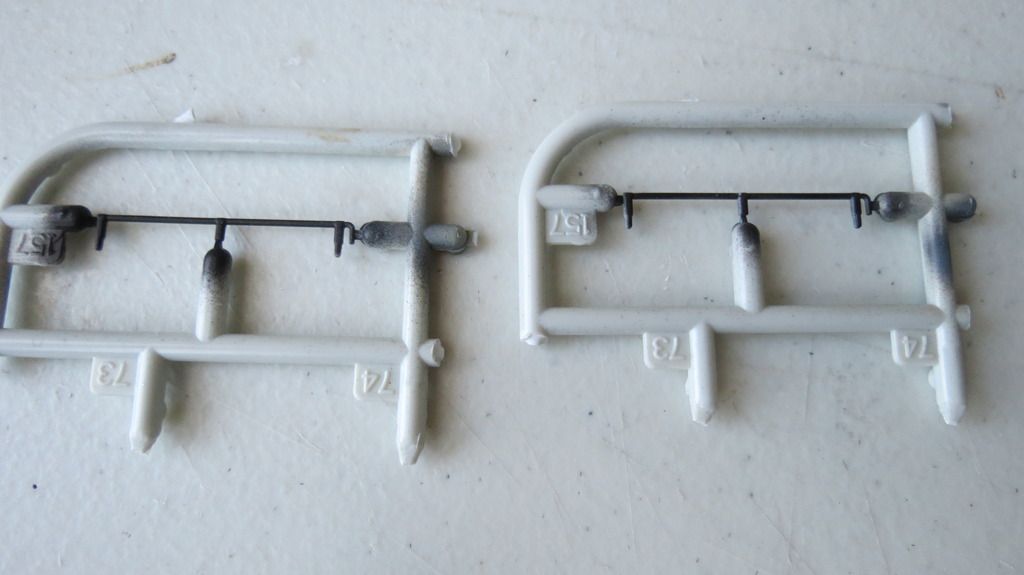
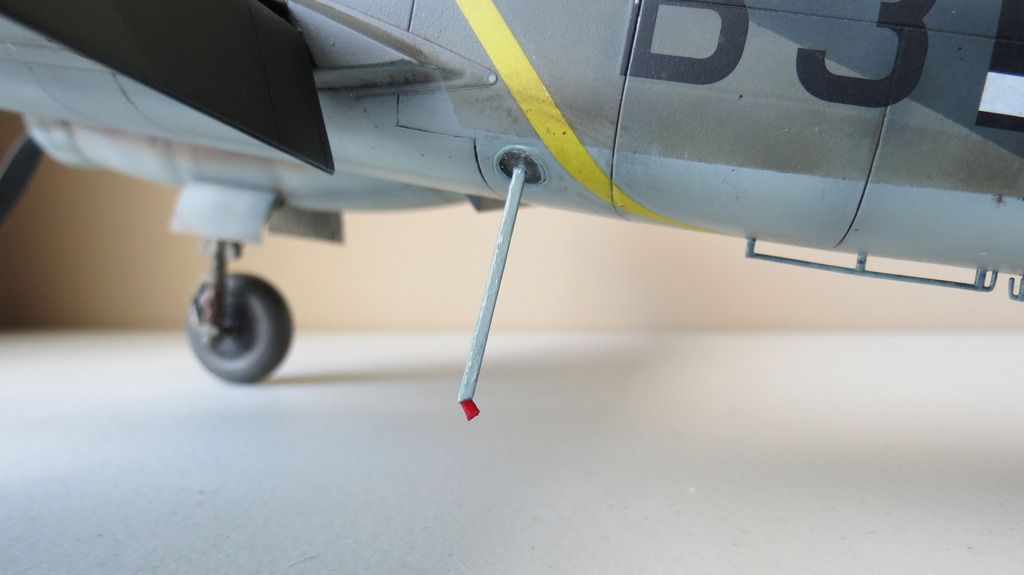
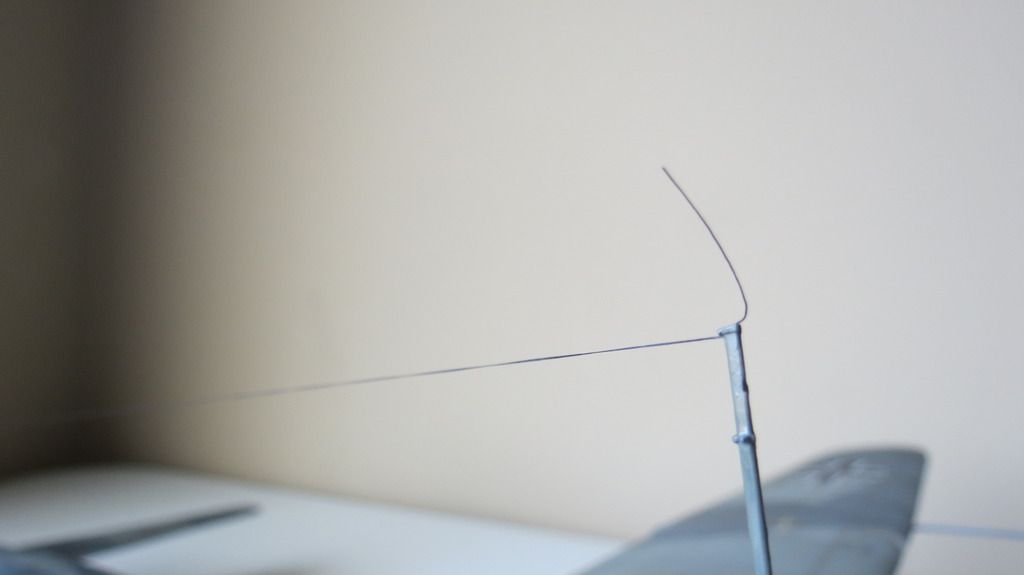
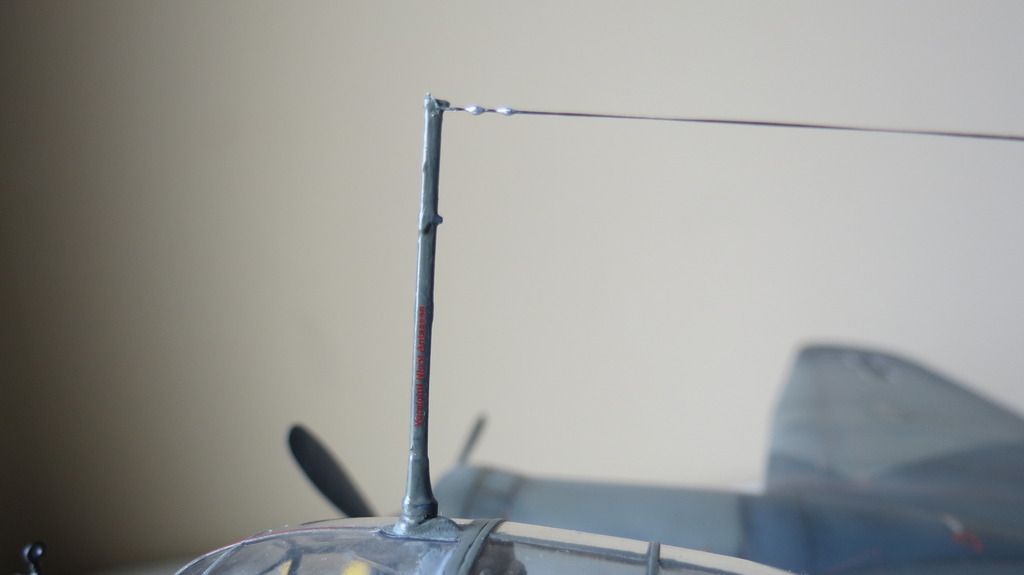
Next, I got together the antenna masts and pitot tube, painted them and fitted them into their corresponding locations. The pitot tube was fitted first, followed by the main antenna mast above the cockpit, then the Fug 10 Antenna mast into the portside antenna cover and the two FuBl 2 masts beneath the central/rear fuselage...


IMG_5884_zpsxexjqebv.jpg


IMG_5879_zpsec4pqjnt.jpg


IMG_5885_zpskuasypbz.jpg


IMG_5886_zpsog18crp7.jpg


IMG_5889_zpsdpeq30qx.jpg


IMG_5887_zpsilqqvtwv.jpg


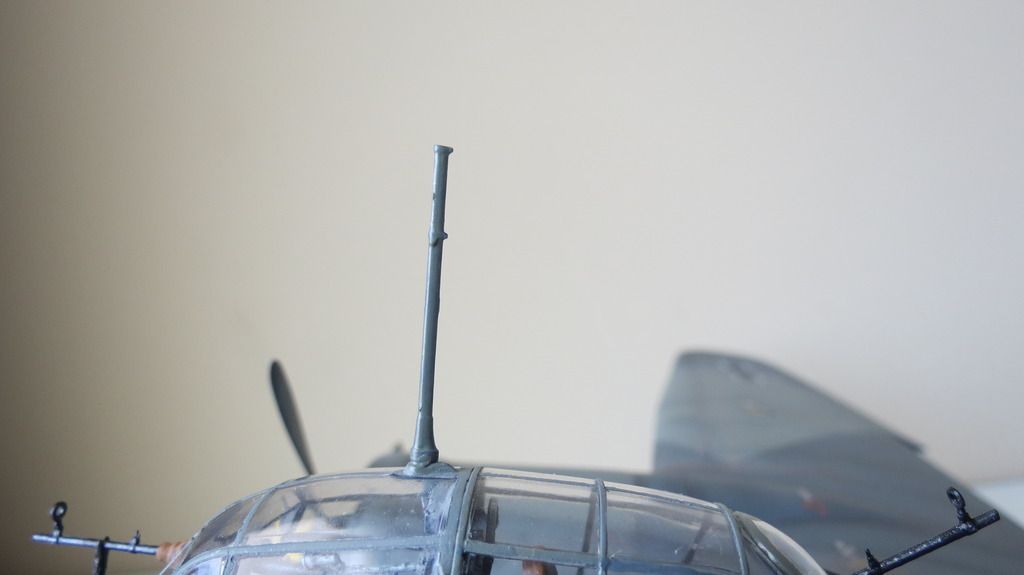
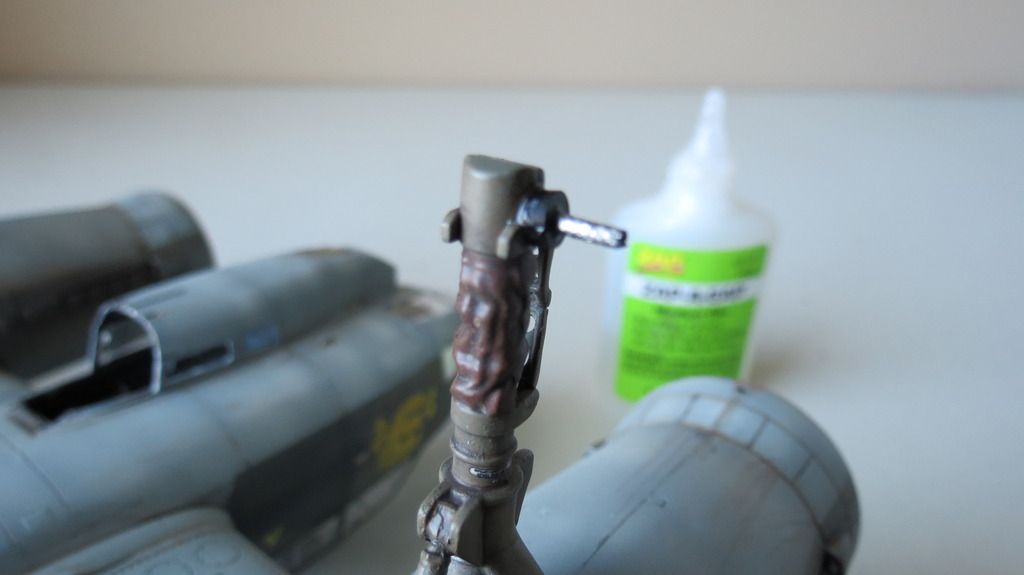
The main antenna mast above the cockpit has a decal on either side of it, and so, I applied a gloss clear coat to the antenna mast before applying the decals...


IMG_5893_zps7l1lfuqb.jpg


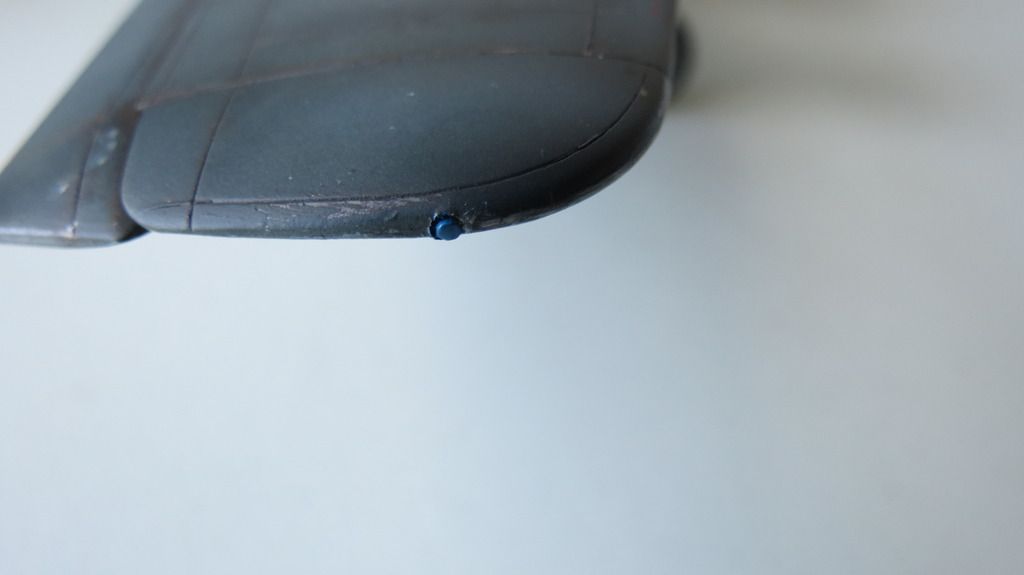
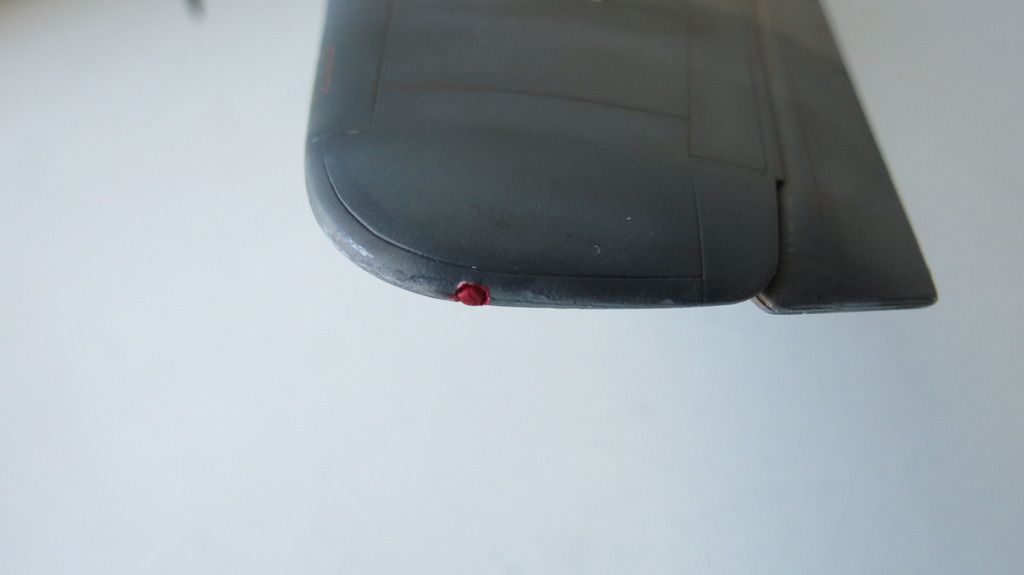
While that clear coat was drying, I fitted the wing tip lights into their locations and painted the starboard side blue and the portside red...


IMG_5891_zps7ca9yynw.jpg


IMG_5892_zps6oipzrrj.jpg


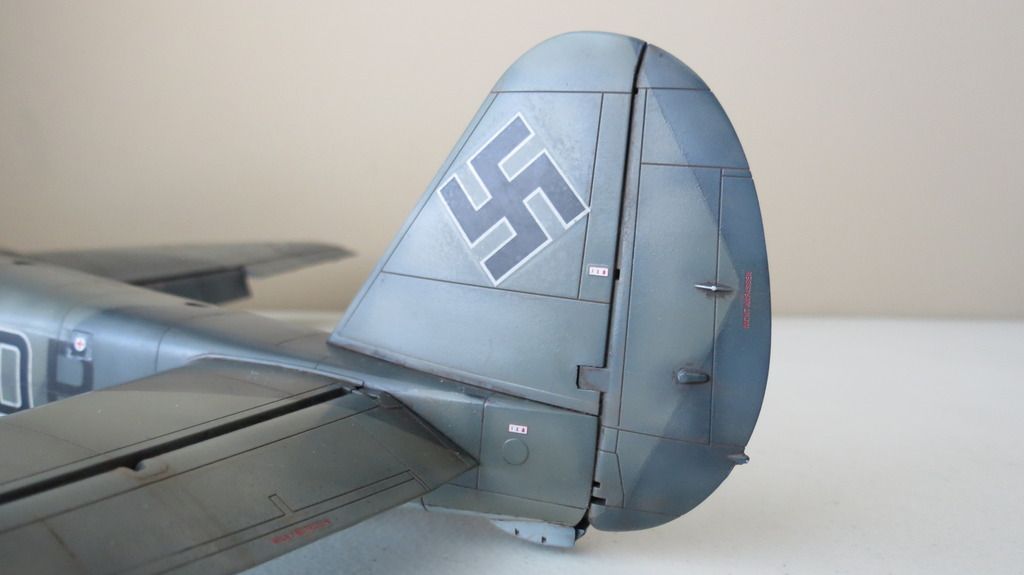
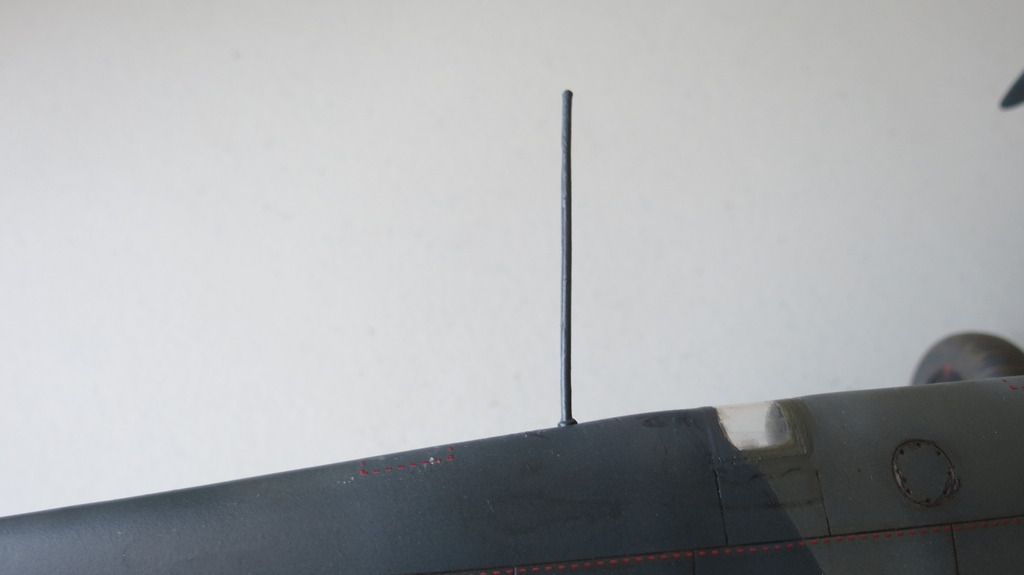
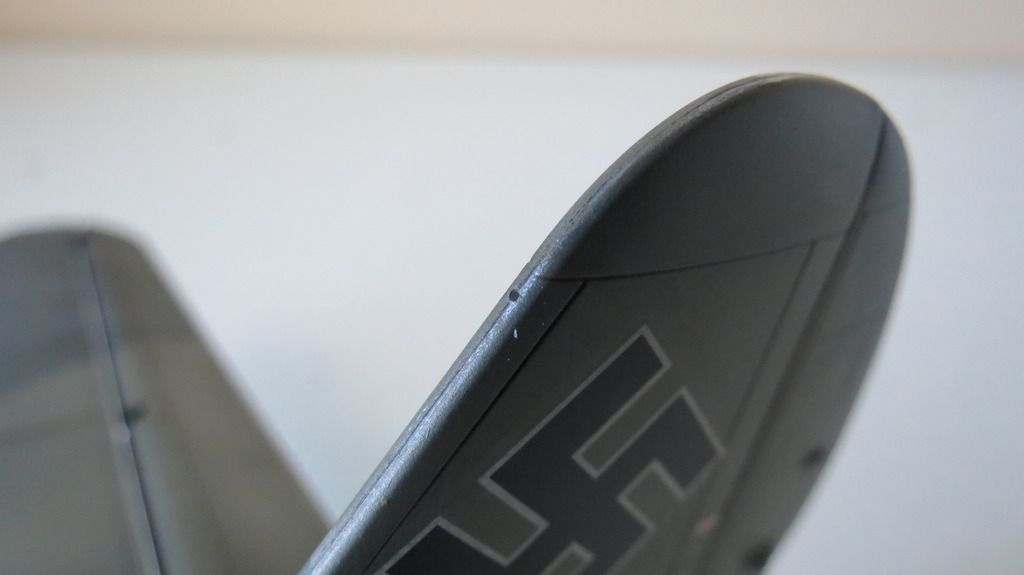
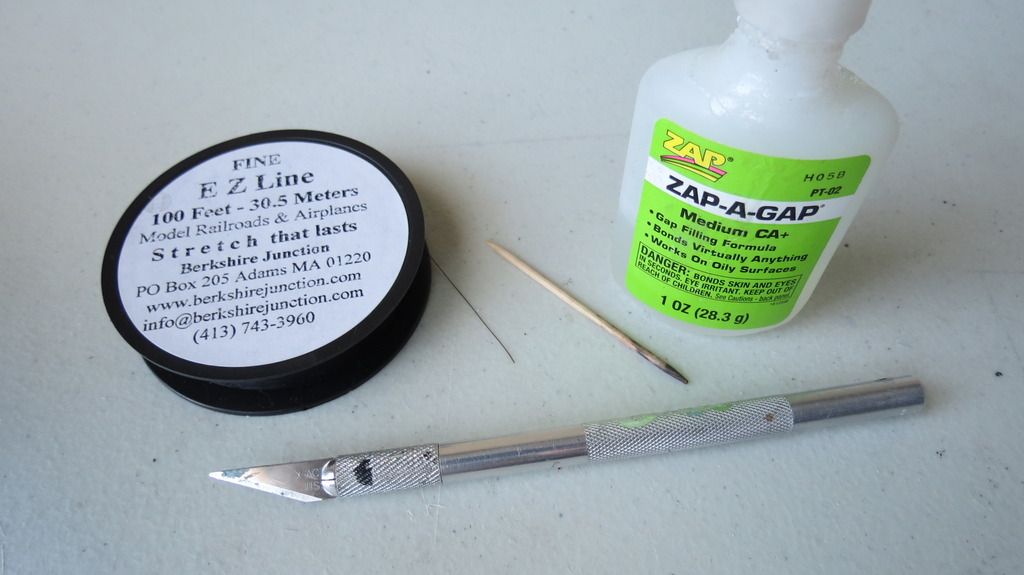
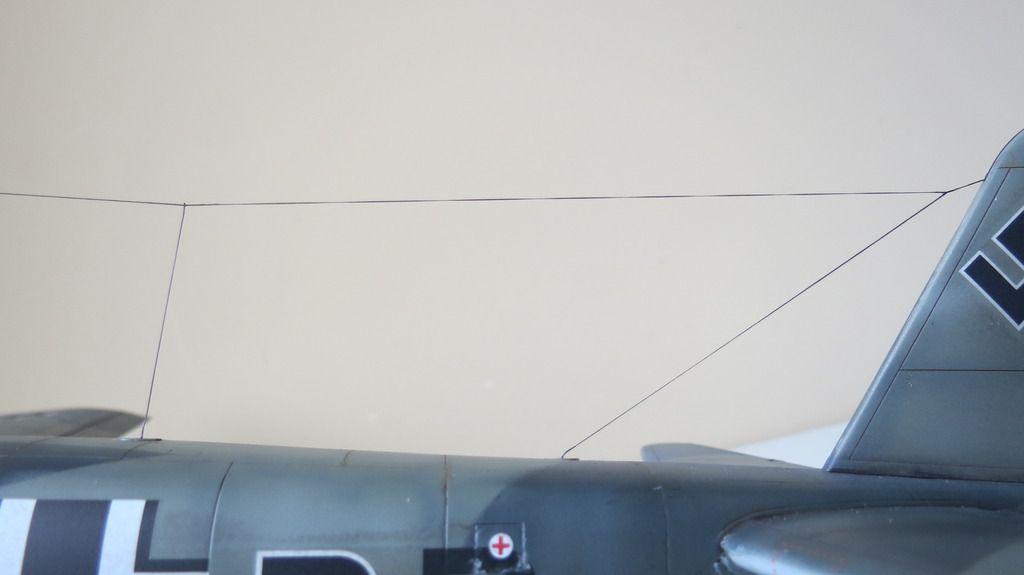
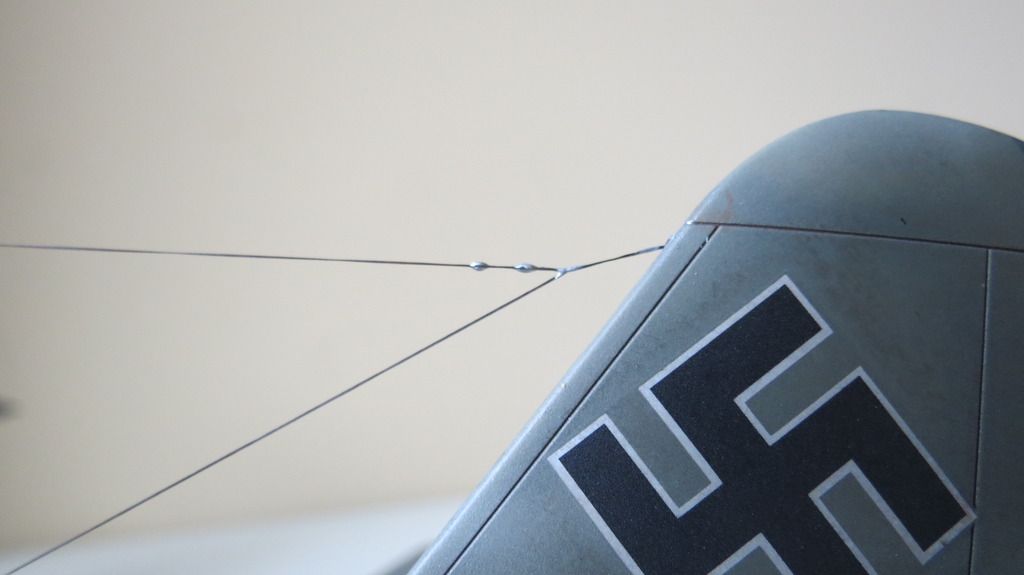
I then drilled a small 0.5mm hole into the front of the vertical stabilizer to create a location point for the antenna cable. I used 1.010" Fine Black EZ-Line and CA glue applied with the end of a toothpick,  starting by locating one end into the small hole drilled into the vertical stabilizer and securing with a small drop of the CA glue. When that had set, I put a small drop of CA glue onto the top of the Antenna mast and pulled the loose end of the EZ-Line over it, holding it in place until it was set (about 30 seconds). I then snipped off the overhanging excess length. I then located two pieces of the EZ-Line into the FuG10 and FuG16 antenna covers, fixed them with a small drop of CA glue, then fixed the opposite ends to the main antenna cable above. Again, I snipped off the excess to complete the cabling....


IMG_5894_zpsoloucy4e.jpg


IMG_5895_zpsvxytlmuq.jpg


IMG_5896_zpsexfhz5gx.jpg


IMG_5897_zps9xjbylju.jpg


IMG_5898_zpsnf8ko0lp.jpg


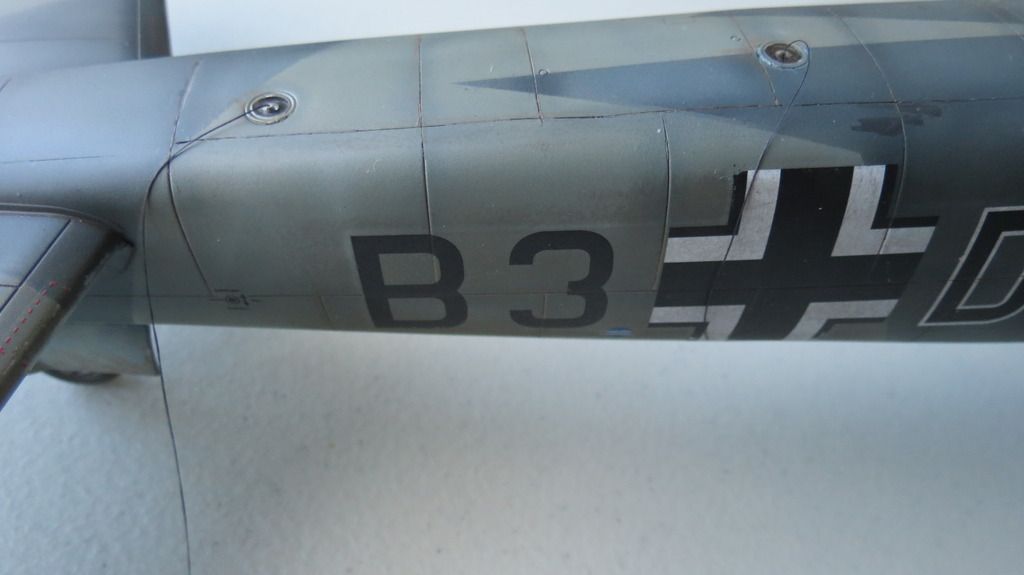
I then applied the decals to the sides of the antenna mast and two decals that went onto the portside and starboard side front windows. I then sealed the antenna mast decals with matt/flat clear coat...


IMG_5899_zps7pnvifob.jpg


IMG_5900_zpstnyakvoi.jpg


IMG_5902_zpsxdy7gspi.jpg


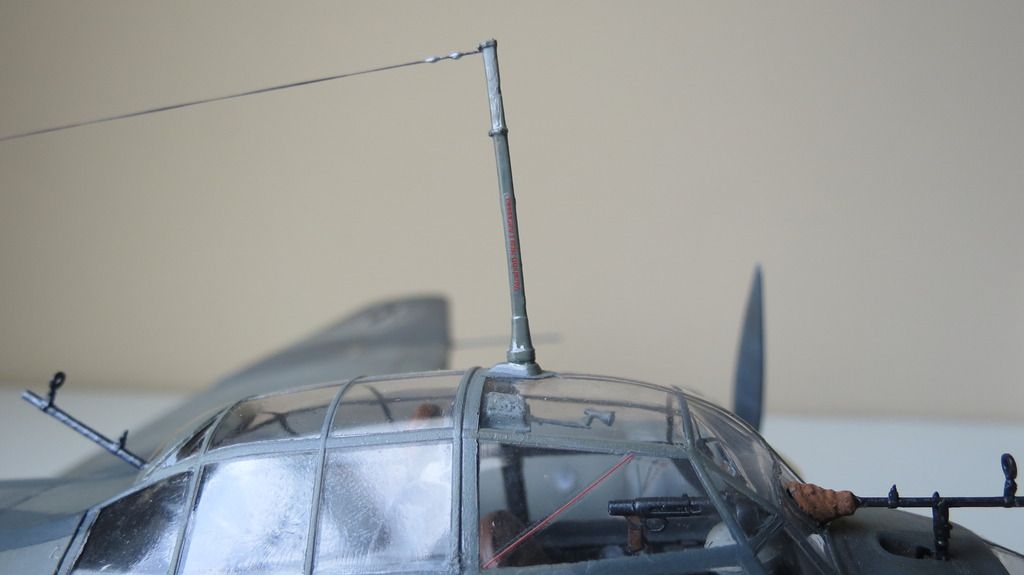
The last thing left for me to do to complete this build was to apply drops of PVA glue to the antenna cable to simulate the tensioners and then paint them aluminum....


IMG_5901_zps5yy5tusw.jpg


IMG_5903_zps4ghguwcs.jpg


Well, that's it for this final build update! With the model complete, the "Final Reveal" / "Ready for Inspection" will be following later this week.


In the meantime, if you'd like to watch my "Build Update #5" YouTube video, here is the link to that:


https://youtu.be/iSA7MYxwz8o


Thanks to everyone that has followed this build and left comments on this thread and my videos, it is greatly appreciated!


Until the "Final Reveal", take care and happy modeling!


Cheers,

Martin


  • Member since
    August 2015
  • From: the redlands Fl
Posted by crown r n7 on Tuesday, March 15, 2016 5:02 PM

Awesome !!! Beer


 Nick.

  • Member since
    February 2014
  • From: Michigan
Posted by silentbob33 on Tuesday, March 15, 2016 6:01 PM
Great work! I always enjoy your posts and learn quite a lot as well.

On my bench: Academy 1/35 UH-60L Black Hawk

  • Member since
    March 2013
Posted by patrick206 on Wednesday, March 16, 2016 4:35 PM

Martin -  A really remarkable job you made of it, all round quality build. Among the finest of details, quite a nice piece of work, perfect fit and finish. 

Thanks for the WIP text and photos. Great to have you here at FSM.

Patrick

  • Member since
    March 2015
  • From: Streetsboro, Ohio
Posted by Toshi on Wednesday, March 16, 2016 5:50 PM

I like how you did the wash in stages.  Fantastic job, I learned so much from your builds.

Toshi

On The Bench: Revell 1/48 B-25 Mitchell


Married to the most caring, loving, understanding, and beautiful wife in the world.  Mrs. Toshi


  • Member since
    February 2012
  • From: Olmsted Township, Ohio
Posted by lawdog114 on Thursday, March 17, 2016 12:31 AM
Outstanding.

 "Can you fly this plane and land it?...Surely you can't be serious....I am serious, and don't call me Shirley"


  • Member since
    April 2013
  • From: Eleva, Wisconsin
Posted by Greatmaker on Thursday, March 17, 2016 12:03 PM

Holy cow that's simply an amazing build. I have always done the lighter color first and then done the darker color over it, but i see how doing it your way brings out the color differences so much better and you preserve your pre-shading. Looks like alot more work but the result spreaks for itself.  I just bought a circle cutter so I'm anxious to see how that works for masking prop spinners.  Plus I just bought some EZ line so now I know to use it.....too bad I bought green instead of black so I'll have to do some coloring. I'll have to try the Badger primer. I've tried the model master acrylic primer and have had horrible luck with it Thanks for sharing!


  • Member since
    April 2015
  • From: New Hampshire, USA
Posted by UKguyInUSA on Friday, March 18, 2016 11:13 AM

lawdog114
Outstanding work Martin. I'm curious on your choice of cement to attach the clear parts. Perhaps you said what you used and I just missed it. Looks like you're in the home stretch bud.
 

  Thanks Joe, much appreciated! I always cement my canopies by taking a cocktail stick and dip the pointed tip into a drop of CA glue and rub it along the edge to be glued. When doing this, it is important to have the edge facing down, otherwise gravity can make the glue flow onto areas you don't want it to flow. I'll also carefully apply some to the mating surfaces. I let it take affect for 5-10 seconds then press the canopy into place and hold until the fast acting CA glue has set solid, usually around 30 seconds to a minute maximum.


Hope this helps?

Cheers,

Martin

  • Member since
    April 2015
  • From: New Hampshire, USA
Posted by UKguyInUSA on Friday, March 18, 2016 11:15 AM

crown r n7

Awesome !!! Beer


Thanks Crown, greatly appreciated! Smile

Cheers,

Martin

  • Member since
    April 2015
  • From: New Hampshire, USA
Posted by UKguyInUSA on Friday, March 18, 2016 12:33 PM

silentbob33
Great work! I always enjoy your posts and learn quite a lot as well.


Hello Bob, thanks for your kind comment, much appreciated! I'm glad to hear that you can take some things from my post and use them in your builds, it's a great compliment and also makes my efforts for creating these in depth build threads.

Have a great weekend!

Cheers Smile

Martin

  • Member since
    April 2015
  • From: New Hampshire, USA
Posted by UKguyInUSA on Friday, March 18, 2016 12:36 PM

patrick206

Martin -  A really remarkable job you made of it, all round quality build. Among the finest of details, quite a nice piece of work, perfect fit and finish. 

Thanks for the WIP text and photos. Great to have you here at FSM.

Patrick


Thanks Patrick, greatly appreciated and you're welcome for the in-depth posts, I hope they serve well for beginner modelers and those that are thinking about buying and building this kit, or those that have it in their stash.

The build is now complete and my "Final Reveal" post will be following shortly!

Have a great weekend!

Cheers Smile

Martin

  • Member since
    January 2016
  • From: A Galaxy Far, Far Away
Posted by Hunter on Friday, March 18, 2016 12:46 PM

Martin - 

WOW!! HOLY WOW!! What an amazing build and such awesome depth and detail in your paint job. I have really enjoyed watching this build and learned a lot at the same time. Outstanding build and thank you for sharing it with all of us. 

Hunter 


  • Member since
    April 2015
  • From: New Hampshire, USA
Posted by UKguyInUSA on Friday, March 18, 2016 1:29 PM

Toshi

I like how you did the wash in stages.  Fantastic job, I learned so much from your builds.

Toshi


Hello Toshi,

Thanks for following this build and your kind comments, much appreciated!


Cheers Smile

Martin

  • Member since
    April 2015
  • From: New Hampshire, USA
Posted by UKguyInUSA on Friday, March 18, 2016 1:30 PM

lawdog114
Outstanding.
 

Thanks, Joe, greatly appreciated!


Cheers Smile

Martin

  • Member since
    April 2015
  • From: New Hampshire, USA
Posted by UKguyInUSA on Friday, March 18, 2016 1:37 PM

Greatmaker

Holy cow that's simply an amazing build. I have always done the lighter color first and then done the darker color over it, but i see how doing it your way brings out the color differences so much better and you preserve your pre-shading. Looks like alot more work but the result spreaks for itself.  I just bought a circle cutter so I'm anxious to see how that works for masking prop spinners.  Plus I just bought some EZ line so now I know to use it.....too bad I bought green instead of black so I'll have to do some coloring. I'll have to try the Badger primer. I've tried the model master acrylic primer and have had horrible luck with it Thanks for sharing!


  Thanks for your kind compliment, Greatmaker, much appreciated!

If you paint the way you presently do, you could always paint straight onto the primer and then post-shade on top of your camouflage colors using a darker tone of the colors that is thinned with about 80-90% thinners and airbrush around the panels using your finest needle on your airbrush.

I don't have a circle cutter, but it is on my list of items to get. I want to start cutting out my own masks for airbrushing roundels onto aircraft instead of using the decals, so that they look more realistic.

I had always used Model Masters primer and never had any issue with it the two years that I have been modeling. I was just trying out the Badger Stynylrez, because I'd heard so many people raving about it. Plus...you get 4 times the amount for the money spent!

Cheers  Smile

Martin

  • Member since
    April 2015
  • From: New Hampshire, USA
Posted by UKguyInUSA on Friday, March 18, 2016 1:45 PM

Hello Chaps,

It's been a long haul build- 8 weeks in total, but that is because my wife and I are actively involved with contractors working on our new home that we will be moving to in mid-April....sorting out kitchen design, wood flooring, carpeting, tiles for kitchen and bathrooms, shower designs, paint colors for every room, new faucets for all sinks, choosing granite countertops and sinks for kitchen and bathrooms, new light fixtures and door handles etc etc....I hope this is the last time we have to move now, moving is a stressful and tiring event!


Anyway, enough of the waffle and lets get on with sharing photos of my completed build, which is built straight from the box, no after market additions, only using 1.010" fine black EZ-Line for the antenna cables. I hope you like....


IMG_5241_zpsp4glttnw.jpg


IMG_5420_zpsgcwwbr0o.jpg


IMG_5421_zpsviyhojs2.jpg


IMG_5511_zpsgakdkjv4.jpg


IMG_6287_zps8qhkqksu.jpg


IMG_6292_zps7pyvpyra.jpg


IMG_6293_zpssuxk0s4m.jpg


IMG_6298_zpsdifsskjo.jpg


IMG_6303_zpsjnlzdxnw.jpg


IMG_6320_zpsbqlp7tzy.jpg


IMG_6326_zpsx4sdpzxh.jpg


IMG_6327_zpsvjpckymx.jpg


IMG_5973_zpslasgqis8.jpg


IMG_6025_zps1pyudhs5.jpg


IMG_6247_zpsjye2rnpq.jpg


IMG_6251_zpsfh32mlcr.jpg


IMG_6297_zpscg6jvfre.jpg


IMG_6294_zpsekcijlab.jpg


IMG_6280_zpsem3clptj.jpg


IMG_6299_zpskj8eqwq5.jpg


IMG_6304_zpsyuvt56m0.jpg


IMG_5969_zpsw6ltchqj.jpg


IMG_5967_zps4bjigwxd.jpg


IMG_6288_zpsp00gvcjq.jpg


IMG_6324_zpsqiq40hhw.jpg


IMG_6322_zpsjakswaao.jpg


IMG_6319_zpsq2r8wsjl.jpg


IMG_6314_zpstf1wno2j.jpg


IMG_5924_zps1wnjaxef.jpg


IMG_6307_zpsnu6deuxi.jpg


IMG_6302_zpsemcnvmzc.jpg


IMG_6328_zpssuungggh.jpg


IMG_6329_zps2cyk6ijc.jpg


Regarding what I think of this kit: It's a great kit that goes together well, has some nice features such as a highly detailed cockpit, pose-able ailerons, flaps, elevators, rudder and air-brakes, recessed panel lines and other surface detail. The parts were all molded very well, with minimal flash and/or parting line miss-match that required clean up before painting.


It offers two sets of markings, I chose to do this version that was active in the "Battle of Britain", and the decals are excellent- they go down very well on a gloss clear coat with no silvering, and once the finishing matt clear coat was applied, they look painted on.


I did come across two issues during the build:


1) When fitting the engine nacelles to the undersides of the wings, I had a considerable gap between the mating areas of the front and rear nacelles. This is discussed in my "Final Reveal" video and can be seen in my "Build Updates" throughout this thread.

2) When fitting the wheels onto their axles, both axles sheared off very easily and remained inside the wheel mating holes. I drilled these out of the wheels and drilled corresponding holes into the wheel struts and fitted steel pins. I then took a black rubber Tamiya propeller bushing and cut it down the middle to create two thinner bushings. I slid these over the new steel axles and super glued them into place. These then provided some surface area for the wheel hubs to glue to. Again, I used CA glue to fit the wheels in place and it worked a treat, proving me with a very rigid and stronger undercarriage.


This kit would be superb if it came with two completely detailed Jumo 211B-1 engines, external bomb pylons and bombs and an open bomb bay with internal bomb racks and bombs!! That would make it super eye candy and a fabulous kit to work on.....I can dream!


In the meantime, if you'd like to watch my YouTube "Final Reveal" video, here is the link to that:


https://youtu.be/Un29hOf2diM


Thanks in advance for taking a look at this "Final Reveal", my video and for any comments left, they are greatly appreciated!

And, thank you to everyone who has followed this build through to the end and have left kind and encouraging comments!! YesYes


Until the start of my next build which won't be until we have moved and settled into our new home- probably the end of April, happy modeling and have fun! 


Cheers

Martin


  • Member since
    March 2015
  • From: Streetsboro, Ohio
Posted by Toshi on Friday, March 18, 2016 2:13 PM

That is one of the most fantastic builds here on FSM forum.

Toshi

On The Bench: Revell 1/48 B-25 Mitchell


Married to the most caring, loving, understanding, and beautiful wife in the world.  Mrs. Toshi


  • Member since
    December 2010
  • From: Salem, Oregon
Posted by 1943Mike on Friday, March 18, 2016 2:19 PM

Simply outrageously gorgeous!!

This will be my "Bible" for building my 1/48 Pro Modeler Ju 88A-4.

Thanks for the super WIP - an inspirational tutorial to be sure.

Mike

Mike

"Le temps est un grand maître, mais malheureusement, il tue tous ses élèves."

Hector Berlioz

  • Member since
    January 2016
  • From: A Galaxy Far, Far Away
Posted by Hunter on Friday, March 18, 2016 3:46 PM


IMG_5241_zpsp4glttnw.jpg


IMG_5420_zpsgcwwbr0o.jpg


IMG_5421_zpsviyhojs2.jpg


IMG_5511_zpsgakdkjv4.jpg


IMG_6287_zps8qhkqksu.jpg


IMG_6292_zps7pyvpyra.jpg


IMG_6293_zpssuxk0s4m.jpg


IMG_6298_zpsdifsskjo.jpg


IMG_6303_zpsjnlzdxnw.jpg


IMG_6320_zpsbqlp7tzy.jpg


IMG_6326_zpsx4sdpzxh.jpg


IMG_6327_zpsvjpckymx.jpg


IMG_5973_zpslasgqis8.jpg


IMG_6025_zps1pyudhs5.jpg


IMG_6247_zpsjye2rnpq.jpg


IMG_6251_zpsfh32mlcr.jpg


IMG_6297_zpscg6jvfre.jpg


IMG_6294_zpsekcijlab.jpg


IMG_6280_zpsem3clptj.jpg


IMG_6299_zpskj8eqwq5.jpg


IMG_6304_zpsyuvt56m0.jpg


IMG_5969_zpsw6ltchqj.jpg


IMG_5967_zps4bjigwxd.jpg


IMG_6288_zpsp00gvcjq.jpg


IMG_6324_zpsqiq40hhw.jpg


IMG_6322_zpsjakswaao.jpg


IMG_6319_zpsq2r8wsjl.jpg


IMG_6314_zpstf1wno2j.jpg


IMG_5924_zps1wnjaxef.jpg


IMG_6307_zpsnu6deuxi.jpg


IMG_6302_zpsemcnvmzc.jpg


IMG_6328_zpssuungggh.jpg


IMG_6329_zps2cyk6ijc.jpg

 Martin - 

Sir I cannot tell you how great it's been watching you build this immense kit, and how much I have learned from you. Such crazy decal detail. You sir have sit a very high bar for all of us. Aaron, if your looking in...here's a build for the magazine!!

Hunter 


fox
  • Member since
    January 2007
  • From: Narvon, Pa.
Posted by fox on Friday, March 18, 2016 9:56 PM

Outstanding!! Bow Down Bow Down Bow Down 

Ditto on the build for the magazine!!

Jim  Captain

 Main WIP: 

   On the Bench: Artesania Latina  (aka) Artists in the Latrine 1/75 Bluenose II

I keep hitting "escape", but I'm still here.

  • Member since
    June 2014
Posted by BrandonK on Friday, March 18, 2016 11:18 PM

Ditto on all the above and I am in awe. Simply awesome work. AWESOME !!

BK

On the bench:

A lot !! And I mean A LOT!!

2024 Kits on deck / in process / completed   

                         14 / 5 / 2  

                              Tongue Tied

  • Member since
    January 2015
Posted by BrandonD on Saturday, March 19, 2016 2:29 AM

Wow!!

-BD-

  • Member since
    December 2002
  • From: Whidbey Island, Washington
Posted by chukw on Saturday, March 19, 2016 10:18 AM

That's a real beauty, Martin- cheers!

  • Member since
    January 2015
  • From: Indiana USA
Posted by BlackTulip109 on Saturday, March 19, 2016 11:32 AM

Dear Martin


WHAT A SUPERB BUILD!!!!!!!!!!!!!!!!!!

You truly knocked this build "out of the park" as they say in Baseball!!

It is truly a privelge to be a witness to a build like that.

This Forum has so many generous builders with great skills, who have NO problem sharing their skills and you are without a doubt one of them. I believe ALL of us are so grateful as it inspires the rest of us to "carry on" in such a wonderful hobby.

That JU-88 is breathtaking to see and mega thank yous for sharing and for the enormous time and dedication to that build!!!

Thank you!!!!!!

  • Member since
    March 2015
  • From: Streetsboro, Ohio
Posted by Toshi on Sunday, March 20, 2016 4:12 AM

This is so in depth I almost can't believe it.  Outstanding job, just amazing.

Toshi

On The Bench: Revell 1/48 B-25 Mitchell


Married to the most caring, loving, understanding, and beautiful wife in the world.  Mrs. Toshi


  • Member since
    January 2015
  • From: Katy, TX
Posted by Aggieman on Monday, March 21, 2016 11:32 AM

Your 88 turned out beautifully.  This is truly a work of modeling art.

I have this same kit in the stash, so thank you for all the detail you give regarding its construction.

JOIN OUR COMMUNITY!

Our community is FREE to join. To participate you must either login or register for an account.

SEARCH FORUMS
FREE NEWSLETTER
By signing up you may also receive reader surveys and occasional special offers. We do not sell, rent or trade our email lists. View our Privacy Policy.