SEARCH FINESCALE.COM

Enter keywords or a search phrase below:

Improving the Revell 1:48 P-40B (Complete)

24310 views
109 replies
1 rating 2 rating 3 rating 4 rating 5 rating
  • Member since
    June 2013
Posted by bvallot on Thursday, December 11, 2014 8:58 PM

Thanks guys!!  I'm hoping to get the flaps done this weekend and having her mostly closed up so I can start painting. Fingers crossed. =]

On the bench:  

Tamiya F4U-1  Kenneth Walsh


  • Member since
    December 2013
  • From: Greenville, TX.
Posted by Raymond G on Thursday, December 11, 2014 9:27 PM

Wow, she's looking great Britt!  For me, the most lacking area of this model is the wheel wells and the flap area.  It looks like you've done a great job taking care of the wheel wells.  I can't wait to see how you tackle the flaps.  I've got a couple of group build projects coming up, but I think after that (and once I get this Hornet completed) I'm going to try my hand at this one again...  You've given me some ideas to look forward too.  Raymond

On the Bench:

U.S.S. Arizona (Revell)

P-51D Tribute (Revell)

57 Chevy Bel Air


  • Member since
    June 2013
Posted by bvallot on Thursday, December 18, 2014 11:34 PM

Thanks Ray. =]  I agree.  That was the one thing I wanted to fix most on this build.  None of this so far is too challenging...just takes some patience.

Back for an update.

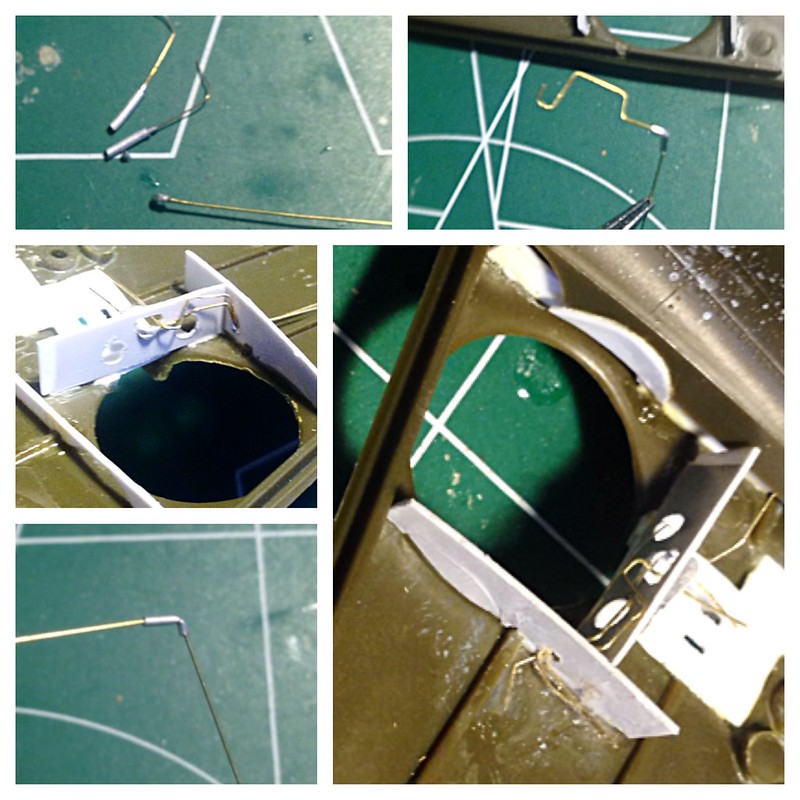
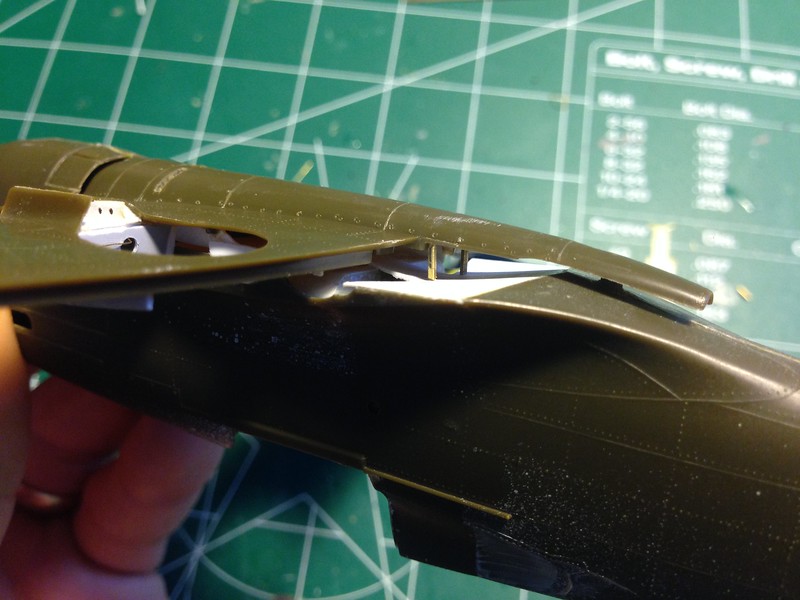
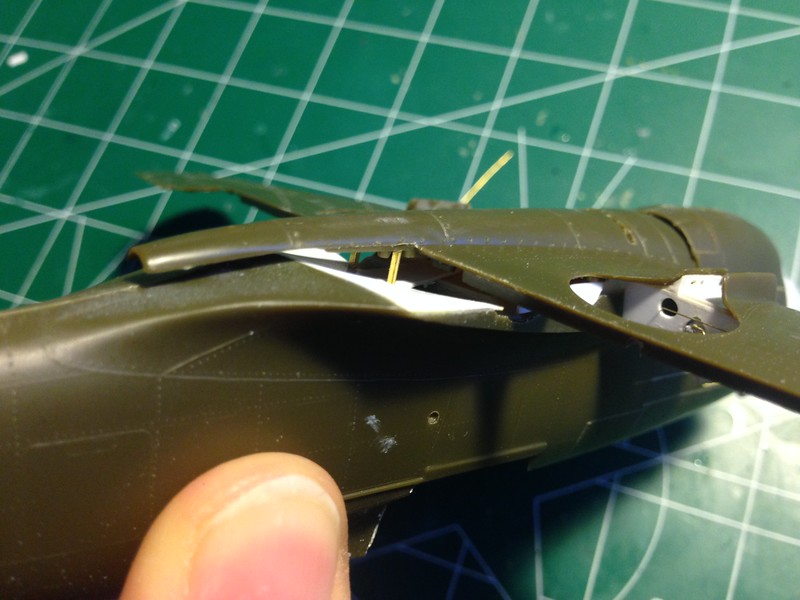
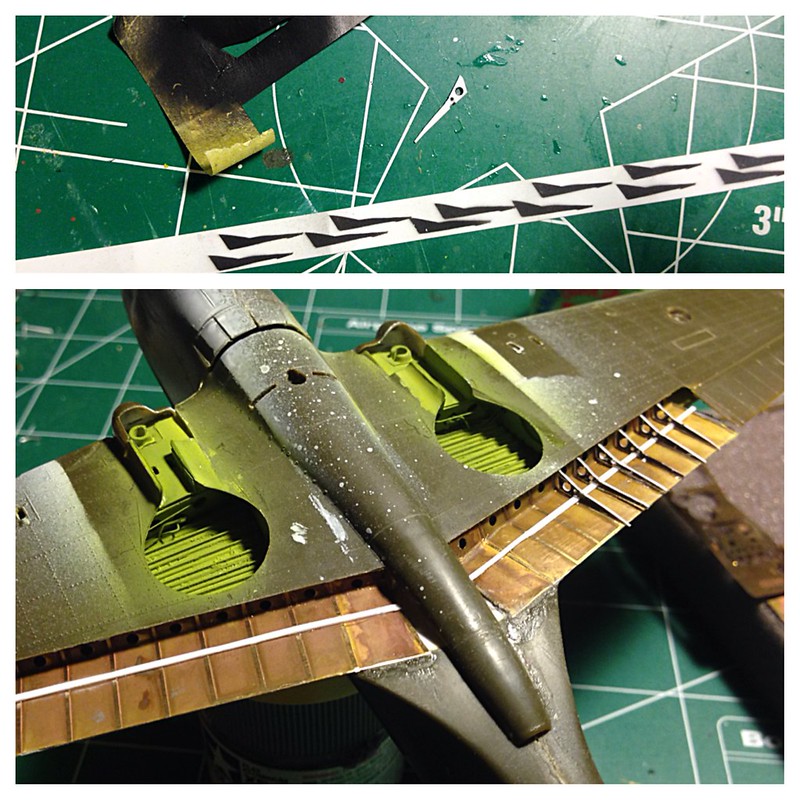
So this last part may not be necessary for all, but as I mentioned before, I want to include some of the various ongoings that are visible any chance I get.  I couldn't find this specific to the P-40B/C for certain, but within the family of Hawks this was all pretty much the same.  So here are some of the hoses and fittings reaching through the gear bay.

 Untitled by brittvallot, on Flickr

None of this is overly complicated.  Just some brass rods slid through an Albion tube and bent to shape.

Afterwards, I needed to secure the part of the box that runs perpendicular to the fuselage.  I Tenaxed the hell out of it and taped the wing edges up to ensure this fit.  I really wanted to have this extra piece connected to the fuselage as the wings don't provide much in the way of any attachment...especially considering the poor fit.

 by brittvallot, on Flickr

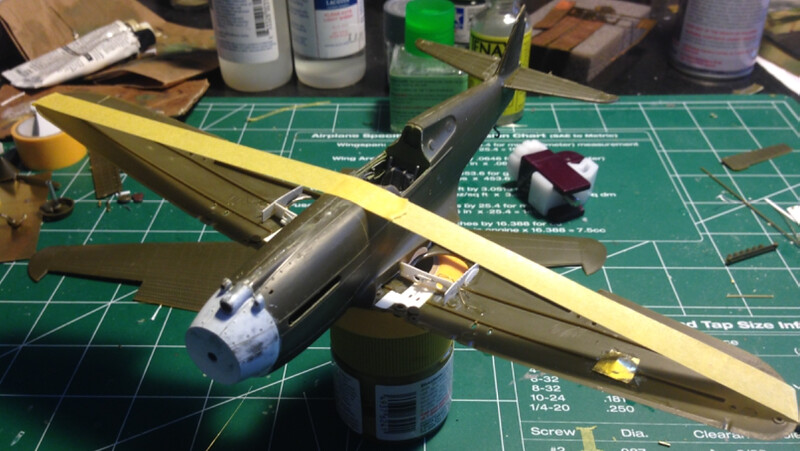
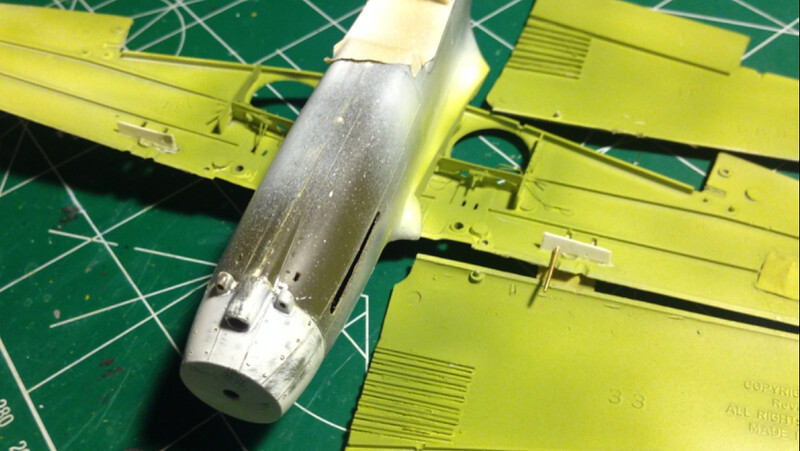
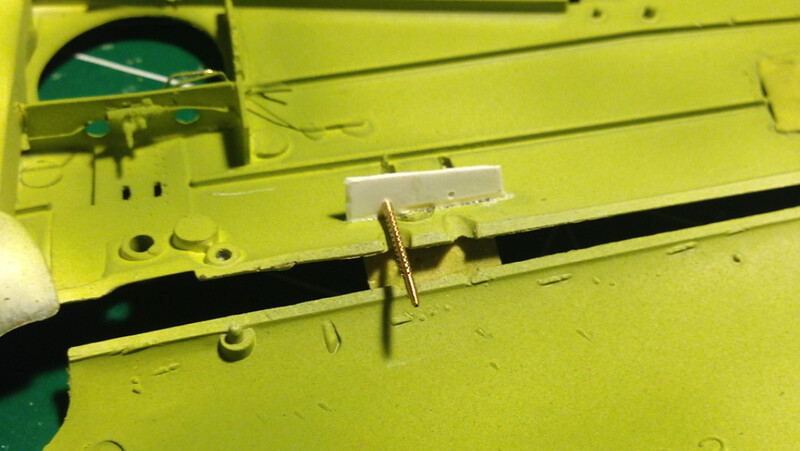
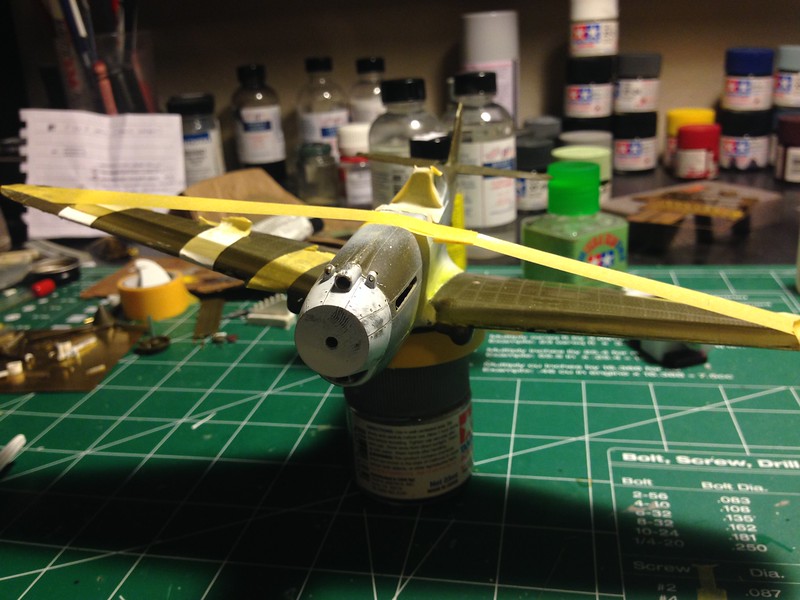
This was allowed to set up the remainder of the day.  Once that was out of the way, the interior was primed and painted as I'm ready to close this up.  One last thing I saw I needed to do was to place a makeshift shelf for the .30 MGs.  I was originally going to drill tiny holes in the plastic kit parts, but they were just too flimsy to pull it off well enough.  So I'm opting for the Model Master .30 machine gun brass barrels. I've checked the distance they need to extend out of the wing and set my shelf in place.  Eye-balled the holes, drilled them, and closed these wings up with some Tamiya ETC. Now I have a means of gluing my MG barrels after painting so there's no need to mask them.   =]

 Untitled by brittvallot, on Flickr

 Untitled by brittvallot, on Flickr

 by brittvallot, on Flickr

Next, I turned my attention to getting the flaps ready for installation.  This is another area that can be passed over for the most part.  I've almost never seen a P-40 parked with the flaps down unless it was under maintenance. The flaps I purchased off of Ebay were from 1992 by Eduard.  They require some minor tweaking to make this whole section look right.

The first thing I noticed was (on my particular kit at least) was that there was no room for the flaps to fit between the upper and lower wing joints.  I had noticed this before fitting the lower wings and decided to only CA the two main pins at the most forward point where the fuselage attaches to the wings.  That allowed some maneuvering on the back end to squeeze these flaps in.

I did come up with this as a solution

 by brittvallot, on Flickr

With the plastic piece I scratched out (I'll be back with a picture later--I can't seem to find it at the moment) to fit under the flaps as there is a terrible gap on the kit...I used a few clips of the L brackets to act as spacers to provide the necessary room.

 Untitled by brittvallot, on Flickr

This does little to throw off the shape or the join at the end of the belly near the fuel drain.  A few drops of CA and it's sitting right where it needs to be. =]

I didn't want to have ANY troubles with the PE coming up after gluing it, so I opted for a two-part epoxy to fix the upper portion to the wing.  I taped it down to better secure it and left it set for about 5 hours.  That SOB isn't going anywhere now! =D

 by brittvallot, on Flickr

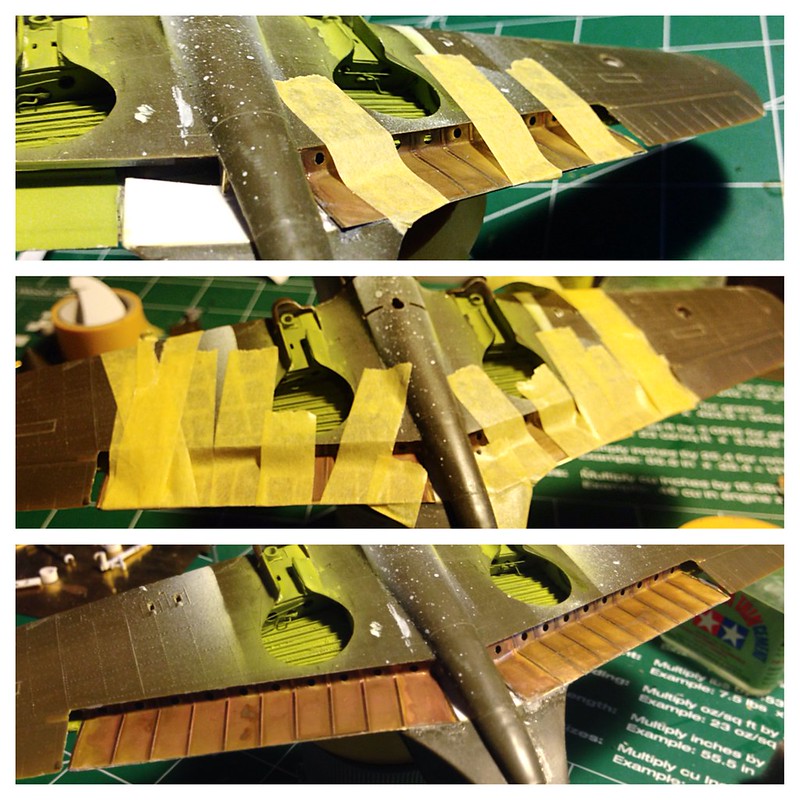
One trouble for me was that the Eduard PE didn't have any of the internal ribbing for the flaps.  So I had to build my own.  This is quite a time consuming task and a real PITA but great for a tutorial as it turns out.  So, I consulted my books and went to cutting.  Once I found my shape...I made a mask and sprayed out 22 of these bad boys to cut out.  I was mostly going for speed here and I'm not concerned about saving the plastic and making better thought out cuts.  I have plenty of this stuff anyway. =]  The plastic I'm working with here is about as thin as you're gonna get... about .01 in. 

Here's my progress

 by brittvallot, on Flickr

I've got this side done now and put a coat of primer on it and let it set over night.  I'll be dressing up the rods and turnbuckles to operate the flaps next.  =]

Questions, comments, or anything else are always welcomed. 

On the bench:  

Tamiya F4U-1  Kenneth Walsh


  • Member since
    February 2012
  • From: Olmsted Township, Ohio
Posted by lawdog114 on Saturday, December 20, 2014 1:50 AM

Impressive work Britt.  Loving the brass 30 cals.  I used Quickboost fifties for my P-40B(s).  I figured I would be the only one who could tell the size difference...lol.  I look forward to seeing more.

Joe

 "Can you fly this plane and land it?...Surely you can't be serious....I am serious, and don't call me Shirley"


  • Member since
    June 2013
Posted by bvallot on Tuesday, January 6, 2015 3:38 PM

Ha! Yeah, I noticed.  =]  I was thinking about doing the same thing as I already had a couple pair lying around...but they were just a little too big and slightly the wrong shape.  And I'm just too hardheaded to do it, so I went and found some a couple .30s real cheap on Ebay.  Had to do it!  But not to worry...I'll never tell. ;)

So things have been very slow moving lately with holiday business going on.  Very little bench time + very slow, tedious work = virtually no progress.

I have managed to finish the landing flaps...at least the top half of the assembly for now.  I want to move on and not get bogged down any more with this section.  I will come back to the lower half when it's time for all the fiddly bits to go on towards the end.

When it's all said and done concerning the flaps, All this can be achieved without the use of a PE kit.  In all honesty the only part I'm glad to have is the box cover over the upper flaps.  Nearly everything needed to be built up on its own.  It wasn't too terribly difficult, but it is time consuming.

Here goes:

Everything primed and ready to go.  The box cover is only just set as a reference of where it goes last.  It is not glued in yet.

 Untitled by brittvallot, on Flickr

You can also make out my actuating rod for the lower flaps.  This is what you will see put together a little later down the road.

A yellow-green zinc chromate color to go down

 by brittvallot, on Flickr

Gloss coat, The Detailer for weathering, and a flat coat to seal.  Next, comes the rod, the anchors, and the control arms to the lower flaps.

 by brittvallot, on Flickr

This was done from the outside in.  Since I've removed the upper ailerons from the top part of the wing, I am able to slip all this in.  It starts from the outside working in and one at a time I'll slip the mounts onto the rod. Again, I'm working with brass rod (I'll double check the size) and Albion aluminum tube.  The aluminum is a soft enough metal for me to drill a small hole into before assembling.  This will allow a better hold when I CA the lower flaps together.

 by brittvallot, on Flickr

Completed! =D  All of this will get touched up accordingly.  I encountered a few knicks along the way.

 by brittvallot, on Flickr

A little Tamiya Metallic Grey [XF-56] is thinly applied to rod.  The mounts themselves are left in Aluminum.

A detail of the upper flaps shows two cords/wires.  I have not been able to find out what they are or how they function...only how they look.  So...to represent them, I've used the very fine EZ line in black to string them up.  The tiniest drop of CA secures them perfectly.

 by brittvallot, on Flickr

With that out of the way, I moved on to puttying up all the awful gaps that need some TLC.  As far as scratching out the .50s for the nose, I wanted something simple that would slip in after painting.  I settled for this.  I marked where the rod would insert and drilled two tiny holes that would accept a backing for the extended tube that slid onto the .50 cal MG.  This is what the tube will adhere to.  Simple.

 Untitled by brittvallot, on Flickr

 by brittvallot, on Flickr

I let this set and sanded it down the next morning.  Next, I'll check my seams and if all's well...it'll be the right time for prime time! =]

On the bench:  

Tamiya F4U-1  Kenneth Walsh


  • Member since
    December 2003
  • From: Charleston, SC
Posted by sanderson_91 on Tuesday, January 6, 2015 8:24 PM

Bv, you're doing some awesome scratch building!!  Those flaps look great!  Can't wait to see more!

Steve


  • Member since
    December 2014
Posted by tacocat on Tuesday, January 6, 2015 8:50 PM

Ahh, this is great. After much hemming and hawing, I just picked up the HobbyCraft P-40B to do up as an AVG plane. But you are making a great case for the Revell build! Thanks for sharing - I'll be eagerly following along!

  • Member since
    August 2013
Posted by Jay Jay on Thursday, January 8, 2015 9:06 AM

Holy Cow !  I am following your build with much depression.


 I'm finally retired. Now time I got, money I don't.

  • Member since
    December 2013
  • From: Greenville, TX.
Posted by Raymond G on Thursday, January 8, 2015 6:11 PM

Wow Britt!  This is the first time I've been able to really sit down and get caught up, and I must say I'm impressed.  I really like how you've built up the wheal wells and that horrible gap Revell left in the flaps.  I guess I really need to figure out how to link this site to my page so I can use it as a guide later this year when I tackle Boyington's controlled crash.  Keep up the good work, Raymond

On the Bench:

U.S.S. Arizona (Revell)

P-51D Tribute (Revell)

57 Chevy Bel Air


  • Member since
    June 2013
Posted by bvallot on Thursday, January 15, 2015 5:38 PM

Thanks y'all.  Sorry that things are slow moving.  I've been on the road a lot with work, so it doesn't allow much for any bench time.  I'll be back with more soon enough.  I have a couple of issues to work out with seams and smoothing out some bumps, but I'll be moving on to the priming and painting before long.

=]

On the bench:  

Tamiya F4U-1  Kenneth Walsh


  • Member since
    June 2013
Posted by bvallot on Monday, January 26, 2015 5:41 PM

Okay here's a brief update.  I apologize if some of this falls out of the usual realm of steps for building.  I don't like to jump around too much.  I only mean to address the big things that need attention first from a structural/aesthetic sense first before moving on to the smaller bits and add ons. 

So here we are.  After lots of careful painstaking sanding and more sanding, I've finally got this bird back where I want her to be.  I'll say it again, Milliput is a dream to work with and it makes this build a whole lot better looking afterwards.  

 Untitled by brittvallot, on Flickr

The fairings for the .50s and the cowl panels have been sanded back nice and smooth and since the cowl panels are removable I've sanded off the raised panel lines and scribed new lines to place a wash with later.  I have left all the other raised detail on this model as I think it's really nice to have.  Some can argue it's to high off the surface and they may be right, but I think it offers just enough visual weight to convince the eye of what it's seeing.  The darker olive drab color on top will subdue some of this as well.

 by brittvallot, on Flickr

More seams corrected...

 by brittvallot, on Flickr 

...also the kit's hole for the drop tank has been filled.

While I had the Milliput out and ready I also took care of the propeller.

 by brittvallot, on Flickr

With just a few careful and judicious swipes I had everything just as pretty as the original.  One thing to note here is the line that the two kit parts makes is not the "panel line" for the cone of the spinner.  It's just the joint of the spinner that ought to be corrected.  Fill and sand. The actual line that can be seen sometimes is just forward of the prop blades.  I've also carefully carved out a small gap for the prop blades from the spinner with a dull exacto blade (no. 11--dull so as not to break the tip off a new one and also to not carve too deeply). The real thing has a space for the blades to fit through and since the kit blades are all one piece this isn't present.  Due to carving this gap out, it made a bit of a step that wasn't easy to sand.  I didn't want to risk breaking another blade again so instead I dropped the tiniest drop of Tamiya ETC to soften the plastic and with a blunt needle tool I smoothed the step down.  Here's a before and after.

 Untitled by brittvallot, on Flickr

 by brittvallot, on Flickr

I've also filled in this spot on the under side of the trim tabs.  The left side was originally only movable before take off and then it was later added in the cockpit to adjust with the B variant.

 Untitled by brittvallot, on Flickr

That's a wrap for now.  I have one last thing to address before moving onto the landing gear and doors and I need to make a stop at my LHS for that.

Questions, critiques, or comments...all are welcomed.  =]

On the bench:  

Tamiya F4U-1  Kenneth Walsh


  • Member since
    February 2012
  • From: Olmsted Township, Ohio
Posted by lawdog114 on Monday, January 26, 2015 6:15 PM

Excellent work so far.  That nose look like a nightmare fit-wise.  

Joe

 "Can you fly this plane and land it?...Surely you can't be serious....I am serious, and don't call me Shirley"


  • Member since
    June 2013
Posted by bvallot on Monday, January 26, 2015 6:37 PM

Ha!  It's definitely unsightly. =P  If you don't overwork it, it's not too bad.  It certainly needs some love though.  

On the bench:  

Tamiya F4U-1  Kenneth Walsh


  • Member since
    June 2013
Posted by bvallot on Wednesday, January 28, 2015 7:58 PM

Problem solved! =]  

Made a quick stop to pick up some plastic strip for the canopy railing.  I selected the .5mm x .5mm square to use.  Two pros right off the bat are the plastic will weld better to the fuselage with some Tenax or Tamiya ETC instead of a brass piece getting knocked off on day down the road, and I can sand the shape to suit my needs better than filing down a piece of metal.  My previous attempt was pretty good.  I used the tiniest T strip to fit the C channel, but it turned out to be just a bit too wide causing the canopy to bow out a little.  Had I checked before, I could've carved in a notch to allow the brass piece to sit a little deeper.  With the plastic, I don't even need to really worry about the fit the same...just sand it down a smidge more.  =]

So, incase you're wondering what I'm talking about... on the Revell kit fuselage part there is a railing already molded on.  The problem is that you can only position it with the canopy closed.  If you wanted an open canopy, then you'd have to sand down a portion of this and replace the tracking that the canopy glides over.

 Untitled by brittvallot, on Flickr

Here the strip is applied.

 by brittvallot, on Flickr

 by brittvallot, on Flickr

I used a first attempt Squadron canopy to provide an example of how this fits together.

 by brittvallot, on Flickr

This strip actually fits the C channel brass strip I've cut for the sliding canopy much better.  It's a tighter fit I should say.

That's that.  Next, I'll be moving on to the landing gear and getting her ready for paint.  

Tags: 1:48 , P-40B canopy

On the bench:  

Tamiya F4U-1  Kenneth Walsh


  • Member since
    June 2014
Posted by BrandonK on Friday, January 30, 2015 9:17 AM

Your attention to detail and scratch building skills just keep me in awe. This is another great piece of art. Can't wait to see the conclusion.

On the bench:

A lot !! And I mean A LOT!!

2024 Kits on deck / in process / completed   

                         14 / 5 / 2  

                              Tongue Tied

  • Member since
    February 2012
  • From: Olmsted Township, Ohio
Posted by lawdog114 on Friday, January 30, 2015 11:50 PM

What Brandon said....well done.  

 "Can you fly this plane and land it?...Surely you can't be serious....I am serious, and don't call me Shirley"


  • Member since
    June 2013
Posted by bvallot on Tuesday, February 3, 2015 3:21 PM

Here's another installment to wrap up all the work done to the body of the plane and begin tying up the landing gear.

I found I couldn't quite get over the kit molded fuel/oil caps.  They look fine of course, but I wanted just a bit more depth underneath to show their function coming on and off. So if you're anything like me and you just can't let it stand....here's how to go about fixing it.  =]

 by brittvallot, on Flickr

I drilled a hole through each about 3/32 in and CAed an aluminum tube (again 3/32 in width) making sure to leave only the tiniest bit protruding through the top.  I cut out two circles (1/8 in) out of the thin .10 in plastic sheet I used to make the ribbing of the landing flap assembly.  I carefully sanded the circles to look more round as my cuts were not quite perfect.  A drop of CA later and my caps are back on and I think it's a bit of an improvement.  Do be careful not to allow the tube to stick out passed the original top or it will crowd the glass that goes on top.  

The next thing I wanted is to show is all of the parts I've drilled out/scribed on the surface of the plane.  This includes:

Drilling out the lift points towards the tail of the plane, scribing panels just below the cockpit, drilling out fuel drain locations underneath the cockpit near the cowl flaps, drilling a space for nav lights below the canopy [I'm just realizing I left off the grip handle--I'll go back and add it], machine gun chutes and various maintenance access points, grease gun access point along the wall of the landing gear bay for the main gear strut, and the landing light and parachute panels for water landing that was included in the -B variant. =]

 Untitled by brittvallot, on Flickr

Moving onto the landing gear, I thought it would be easy to recap a little without having anyone clicking back and forth.  I basically snipped off the retracting arm to redo...there ought to be two of them anyway.  I sanded down the seam.  I snipped off the nub opposite of the arm that holds the tire, and I also drilled out the hole for the retaining clip.  I built up the surface of the strut with some Tamiya tape and included the band holding down the brake line.  In the bottom right picture, I cut a thin selection of a 1/8 in. plastic tube for the gearing that allows the main strut to turn as it fits into the gear bay.  I sanded the top half to bevel it downwards and did the same for the bottom but to a lesser degree.  With an exacto blade, I made notches into the plastic by cutting slightly into the surface and wiggling the blade a bit. And by moving around the cylinder in this fashion I'm approximating the cogs.  This effect comes out better with the Detailer to bring it out.  This was cut into fourths and were placed appropriately on the main strut.

 by brittvallot, on Flickr

I painted these in Alclad's Semi Flat Aluminum and washed them with black Detailer.  Great stuff to work with especially for Alclads.  It's water based which makes cleaning things up a breeze.  I painted on the placard for maintenance and sealed it with the Alclad Klear Koat.  

 by brittvallot, on Flickr

For a final touch, I tried my hand at something different for the chromed portion. I cut a small length of Aluminum foil (regular household stuff) and with the Micro brand of glues for clear parts I glued the shiny side up to reflect this part of the strut.  [pun intended]  =D  I don't mind it so much for now.  I hope to improve on something like this in the future.  It still looks like a step up to me.  I do apologize about the pictures...they aren't the best when I try to get in closer.  This will all appear much better at the end.

 by brittvallot, on Flickr

That's where I am for now.  Questions, comments, add on's...are all welcome.

On the bench:  

Tamiya F4U-1  Kenneth Walsh


  • Member since
    February 2012
  • From: Olmsted Township, Ohio
Posted by lawdog114 on Wednesday, February 4, 2015 8:07 PM

Looking great Britt.  I agree, the detailer works great on Alclad.  

Joe

 "Can you fly this plane and land it?...Surely you can't be serious....I am serious, and don't call me Shirley"


  • Member since
    December 2013
  • From: Greenville, TX.
Posted by Raymond G on Wednesday, February 4, 2015 8:22 PM

Looking good Britt!  I actually had the kit in hand a few days ago, thinking about starting it again.  I've got to many projects in front of it though.  It'll probably be later this year before I'll tackle it again, using this thread as a how to guide for sure.  Keep up the good work.  Raymond

On the Bench:

U.S.S. Arizona (Revell)

P-51D Tribute (Revell)

57 Chevy Bel Air


  • Member since
    June 2013
Posted by bvallot on Thursday, February 5, 2015 2:18 PM

Thanks Joe.  Yeah, I may borrow your idea on grabbing a couple extra bottles just in case they ever do go out of business.  Couldn't hurt!

Ray, c'mon!! I know you're dying to rip back into it.  Let me be your devil's advocate here...you've already taken it out for a spin once now...it'd be like riding a bike.  I had a familiar territory joke about ex-girlfriends but I'll save it for another time.  =]

On the bench:  

Tamiya F4U-1  Kenneth Walsh


  • Member since
    June 2013
Posted by bvallot on Friday, February 20, 2015 6:16 PM

I thought I'd get this next section out of the way now so as not to clutter up the next part of the build concerning the landing gear installation and canopy fit.

I chose to get some of this painting done so I can move onto the last few parts of construction.  Primarily, I needed the undersurface painted in order to remove the masking and work some of these fiddly bits.  For the underside of the aircraft I selected Tamiya JN Grey [XF-12] as a base coat.  I rarely use something straight out of the bottle, but in this instance I wanted more control of what I do when I come back to a color for later use. I used NATO Black [XF-69] for the panel line painting and I used it somewhat randomly and highly diluted.  The last color was Sky Grey [XF-19].  I'm looking to subdue the panel line painting as I agree with most that it's overdone to some extent.  I'll pick out some lines here and there with later weathering.

For the top surface, the base color is Olive Drab [XF-62] cut with Flat White [XF-2] about 2:1 to lighten this up a good bit.  It gives a nice warm brown tone.  I followed back over this with the NATO Black...randomly selecting lines...I meant to try this in a Dark Green, but as it happens it worked out rather well still.  Now for the top coat...it seems there is a considerable range of variation in the OD Green in the way in which it weathered.  Some stayed greener while others became more brown.  I don't want to make this particular thread about color so much as I do about construction, so to keep it simple I'll just describe what I decided to go with in this case.  My handy app I have for picking out colors didn't really serve too well this time around.  It had me picking Flat Brown [XF-10] 2:1 to OD but my gut figured it to be opposite.  I turned out to be right after mixing it the way the app began to suggest. So a mix of OD 2:1 to Flat Brown gave me a nice tone to put on top and really provides a nice start for whatever weathering one should decide to do later.  I sprayed this down quite heavily diluted so as to see the change happen subtly.

 Untitled by brittvallot, on Flickr

 Untitled by brittvallot, on Flickr

 by brittvallot, on Flickr

The top color was lightened up with some Flat White and used for the control surfaces as well.

I purchased a Montex Mask this time around to try out.  I don't think it gets any easier than this.  I spent a lot of time in the past making my own masks....drawing them out....patiently cutting them out...after a couple of tries...and I find it rewarding, but this gives great results in virtually no time at all.  For the -B variants, the US Air Corps switched the "US ARMY" label on the undersurface from Black to Insignia Blue some time in either '39 or '40.  I also elected to paint this now instead of later because any weathering I choose to do for the fuselage and wing will make the color appear different anyhow.  So I'm not too worried about continuity.  I used a 1:1 of Sea Blue [XF-17] and Flat Blue [XF-8]...well pretty much 1:1 =] and laid this down over the mask. For the insignia, I masked the red meatball first...toning the Flat Red down with some Hull Red, came back over the circle mask with Flat White and finally dropped the star shape mask on top of all of this to paint the Insignia Blue.  Red --> White --> Blue.   The Montex Masks are quite user friendly.  =]

 Untitled by brittvallot, on Flickr

Removed all the masking and found a couple of touch up areas that need some attention.

 Untitled by brittvallot, on Flickr

I'll be getting to that and after which will lead me to tying up the landing gear parts to complete.

 Untitled by brittvallot, on Flickr

More to come.  Questions...comments??  =]  

On the bench:  

Tamiya F4U-1  Kenneth Walsh


  • Member since
    November 2003
  • From: Naples, FL
Posted by tempestjohnny on Saturday, February 21, 2015 5:43 AM

I can't believe what you've done with this old kit. Looks amazing. One question is it the angle or is the meatball off center of the wing insignia. John


  • Member since
    June 2013
Posted by RobGroot4 on Saturday, February 21, 2015 2:43 PM

Your build looks really awesome!  I gotta find some of those Montex masks!

Groot

"Firing flares while dumping fuel may ruin your day" SH-60B NATOPS

  • Member since
    June 2013
Posted by bvallot on Saturday, February 21, 2015 3:09 PM

tempestjohnny: You're right about the mis-register.  But it's the star mask that got away from me a little bit.  I think I might have bumped it at the last moment. I didn't want them all the way secured down because I was a little cautious of it picking up the paint, but I'm not getting the impression they would do that anyhow.  So I left it snug, but it did sit a little high resulting in the meatball looking off.  =[  I may try to fix it.  It's actually not bothering me that much if you can believe it. lol.

RobGroot4:  Thanks.  I would recommend you try them at least once.  If you're smart about painting with them, they ought to last you a good while too.  =]

On the bench:  

Tamiya F4U-1  Kenneth Walsh


  • Member since
    February 2012
  • From: Olmsted Township, Ohio
Posted by lawdog114 on Monday, February 23, 2015 7:32 PM

Superb....i have to try those Montex masks.  Are they reuseable?

Joe

 "Can you fly this plane and land it?...Surely you can't be serious....I am serious, and don't call me Shirley"


  • Member since
    June 2013
Posted by bvallot on Tuesday, February 24, 2015 1:01 AM

They are in fact Joe. You'll get enough usually to do all six positions, but honestly if you want to stretch out your usage with them...just use one at a time. When the paint builds up on them after each use, just scrape them lightly to remove it. Tamiya paint comes off rather well as you might expect. I'd be willing to bet this set will last me quite a few years if I take care of it.

On the bench:  

Tamiya F4U-1  Kenneth Walsh


  • Member since
    June 2013
Posted by bvallot on Tuesday, March 3, 2015 5:09 PM

Here's the next series concerning the landing gear.  I'm doing this in two parts so I won't be stuck here writing for a straight hour.  =]  Part 1 will deal with getting the main bits and pieces into place with less fuss, and Part 2 will involve the hinges and actuating arms for controlling the doors and other delicate parts.

First off, I finished painting the upper surface so I can get a coat of Alclad's Klear Kote down and begin weathering the bottom next before installing the already finished landing gear.

 Untitled by brittvallot, on Flickr

The painted insignia went down with relative ease.  I took my time and added my own weathering and such which I can talk more about later for anyone who's interested.

Obligatory Clear coat shot:

 Untitled by brittvallot, on Flickr

Put my initial weathering down with oils to represent dirt and oil drips running down the plane.  I kept it light this time around.  Here's a quick shot of that after it's been sealed with Alclad's Klear Kote Flat.

 Untitled by brittvallot, on Flickr

 Untitled by brittvallot, on Flickr

With some of that out of the way, I can now turn my attention to the remainder of the landing gear parts.  I used the kit parts for the tires as they aren't too bad really, and I wanted to keep this kit as much OOB as possible outside of some personal scratch building.  They go together without any real difficulty.  I wanted a slightly weighted look to the tires as this is often overlooked.  After referencing enough -B variants on both the grass and on the tarmac, I came up with what you see below.  Normally, the tires will bulge to the sides as well as the rubber is displaced, but I wasn't seeing that too much with the tires I referenced.  So to compensate for some of this (as it's scaled down as well) was to paint the tire and wheel hub to trick the eye into believing it bulged.

I first painted the wheel hub in the Tamiya Sky Grey [XF-19] undersurface color and used an Eduard mask from a Tamiya Corsair I previously skipped over using.  The size matched up quite well.  For the outside ring of the hub painted in white, I took a couple of drops from the grey I just used and added it to a mix of Tamiya Flat White [XF-2] to dirty it up a tad and painted this next.  Once it dried, I used the outside ring mask and cut it at one point and used that to be at the bottom of where I've sanded the tire flat.  I've tapered the ends to encroach onto the ring at the bottom where the "bulge" would be so as to decrease how much white will show.  The intent is to use the colors present to trick the eye into believing the tire is creeping up into this area.  Just an easy way to suggest something without going into a lot of putty and sanding BS.

I also realized after sitting back and thinking about it...you could probably achieve the same thing with a slightly larger circle mask and dropping it down just off center.  However you go about doing it is up to you, but the effect is simple and I think it helps tell the story of what our eyes are seeing.

The tire itself was painted in NATO Black [XF-69] and I wanted to suggest some dirt and usage and opted for Taimya's Flat Earth [XF-52] to go on top.  This was highly diluted and went only on the top.  I will further weather these tires more later, but this is where I've stopped in terms of painting.  I really like the NATO Black as a  tire color.  I would definitely suggest it over only using a Flat Black.  Once this was clear coated to seal it, I brought out the Detailer in Brown and some Black to muck up of all this here.  After I was satisfied with the weathering, I put down a coat of Alclad's Klear Kote Light Sheen over the tires first, and then carefully sprayed a coat of their Flat onto the wheel hub itself....allowing for only the slightest overspray onto the edges of where the tire meets the wheel.  This gives the tire a little bit of shine to help represent the rubber.

Primed and painted the gear doors.  For the smaller doors, I reduced the nubs to something a little smaller.  I believe Revell intends on them being hinges.  These don't exactly exist on the real thing quite the same, but I left them to use in a functional sense of making a stronger attachment as they won't be very visible anyhow.

 Untitled by brittvallot, on Flickr

With this completed, I moved onto installing the main gears struts and to the control arms of the main gear.  I used THE smallest C channel brass that I could find since I couldn't get a hold of an I beam of a comparable width.  It works pretty well actually.  Measured my length, made my cuts, and primed and painted.  A drop of CA later and they're both in. A thin square strip of plastic (0.5mm x 0.5mm) makes up the hinge running the length of the larger door and it's carefully glued in place with Tamiya ETC.  Both doors get mated to the gear bay with the Tamiya ETC as well. And here we are:

 Untitled by brittvallot, on Flickr

That's where I've paused it for now.

Questions, comments... =]

On the bench:  

Tamiya F4U-1  Kenneth Walsh


  • Member since
    June 2013
Posted by bvallot on Sunday, March 8, 2015 12:24 AM

Here's pt. 2 to wrap up the main landing gear for this Hawk. 

To start, I've scratched out the gearing that operates the smaller door.  There's an arm with a joint near the door and a turnbuckle that attaches to the bottom of the door which closes it.  The turnbuckle was made from brass tube (0.4 mm) and a brass wire to slide through it to attach to both the door and the main gear strut. This was painted in the Tamiya Yellow-Green [XF-4] zinc chromate color.

 Untitled by brittvallot, on Flickr

Next, came the tab for the larger door.  I cut a small rounded, triangular piece out and drilled a small hole with my exacto knife (no. 11 blade).  I placed the small wire through it first and then softened up both the tab and the attachment site on the door with a few careful drops of Tamiya ETC.  Let the tab set up on the door...and drilled two holes for the brake lines to go into the wing...I had previously forgotten to =P.  Slapped the wheels on and cut the lower end of the brake lines to fit to the wheel hub.  A drop of CA on each and set the lines in place.  I touched up the brake lines with some NATO Black.

 Untitled by brittvallot, on Flickr

Weathered this with The Detailer in black and dropped a coat of flat on it.  Next, I'm moving on to the Tail Gear doors and Canopy/Windscreen.

Here's a progress pic of how all this looks so far.  =]

 Untitled by brittvallot, on Flickr

On the bench:  

Tamiya F4U-1  Kenneth Walsh


  • Member since
    February 2012
  • From: Olmsted Township, Ohio
Posted by lawdog114 on Monday, March 9, 2015 8:28 PM

Nice...diggin' the silver spinner.  Almost doen yeah? I have another Trumpy P-40 in the stash that may get a Pearl Harbor treatment. I must confess I hate my Frankenstein P-40 I did last year...

Joe

 "Can you fly this plane and land it?...Surely you can't be serious....I am serious, and don't call me Shirley"


  • Member since
    September 2011
Posted by fightnjoe on Monday, March 9, 2015 11:51 PM

Most impressed.  Jawdropping details with absolutely stunning overall.  Really a fantastic build.

Joe

Veterans,

Thank You For Your Sacrifices,

Never To Be Forgotten

Where you can find me:

Workbench on FaceBook  Google Plus  YouTube

JOIN OUR COMMUNITY!

Our community is FREE to join. To participate you must either login or register for an account.

SEARCH FORUMS
FREE NEWSLETTER
By signing up you may also receive reader surveys and occasional special offers. We do not sell, rent or trade our email lists. View our Privacy Policy.