SEARCH FINESCALE.COM

Enter keywords or a search phrase below:

OFFICAL NATURAL METAL FINISH GB IV 2012-2013

96803 views
710 replies
1 rating 2 rating 3 rating 4 rating 5 rating
  • Member since
    November 2009
  • From: SW Virginia
Posted by Gamera on Monday, June 11, 2012 7:28 PM

Mike: Wow that looks great! I'd almost swear I was looking at a real bike. IndifferentWow

"I dream in fire but work in clay." -Arthur Machen


  • Member since
    January 2012
  • From: East Peoria, IL
Posted by stoutfella on Monday, June 11, 2012 9:30 PM

Greetings,

Over the weekend, I tackled the metal finish on my P-51, using MM non-buffing aluminum and steel metalizers. First time using these and I gotta say, I'm really impressed with how beautifully this stuff sprays. I did the underside first and thought it looked pretty darn good. I let it dry for an hour or two, then sprayed the topside. Most of it also looked great, but the nose area and wing roots were unacceptably rough, almost orange-peeled. Apparently, the overspray from the 'primer' (just MM neutral gray enamel) I'd used underneath my second attempt on the anti-glare panel was a lot rougher than I realized. Out came the sandpaper and I was able to smooth out most of the problem areas. I resprayed and, while there are a few less-than-perfect areas, overall it turned out much better. I let this dry, then used post-it notes to mask off the panel around the engine exhaust and a couple of panels on the wings, spraying them with MM steel metalizer for some variation. However, I was a little disappointed at how subtle the effect was. I can't really see that much difference unless I look at it from certain angles. I don't feel like tempting fate by trying something else, so I'll call it good enough for a first effort. I held my breath as I pulled off the masking for the OD panel and the white I'd sprayed on the nose, and was extremely pleased that it came off smoothly, with a clean line, and didn't pull up any paint. I've read plenty of comments talking about how delicate the MM metalizers are, and I can tell how easily it rubs off, so I'm trying to be very careful handling the plane at this point. Next step is another first for me. I'll try spraying a Future coat to seal the finish before decaling. After my first, unsatisfactory experience with Tamiya decals (on my A6M2 Zero), I'll be interested to see how the kit's included Cartograph sheet for "Short Fuse Sallee" behaves. Stay tuned.

Cheers,

Stoutfella

On the bench: 1/48 Tamiya Bristol Beaufighter

On deck: 1/48 Tamiya P51-B

  • Member since
    June 2010
  • From: Austin, TX
Posted by DoogsATX on Monday, June 11, 2012 9:39 PM

Congrats on the 'Stang, stoutfella! Have to agree with you, MM metalizers do spray beautifully. If only they were tougher...

For more variation on your next P-51, I'd recommend using Magnesium on the exhaust panel. You can also mix metalizers to hit different shades.

Regarding decals, I've got that Tamiya 9th AF Mustang in the stash, and jacked it's decal sheet for the national insignia and stencils on my P-51 last summer. Wanted to do Petie 2nd, but didn't want to use any more of the Tamiya-printed sheet for that one than I had to, so ripped open the other kit and cannibalized the decals! The Cartograf-printed sheets are only 100 times better than the Tamiya-printed ones, and you'll love the way they go down!

On the Bench: 1/32 Trumpeter P-47 | 1/32 Hasegawa Bf 109G | 1/144 Eduard MiG-21MF x2

On Deck:  1/350 HMS Dreadnought

Blog/Completed Builds: doogsmodels.com


  • Member since
    November 2009
  • From: SW Virginia
Posted by Gamera on Monday, June 11, 2012 10:27 PM

SF: Looks good from what I can see!

"I dream in fire but work in clay." -Arthur Machen


  • Member since
    January 2012
  • From: East Peoria, IL
Posted by stoutfella on Tuesday, June 12, 2012 9:24 AM

Greetings,

Mike: I'd like to try the Alclad sometime, but I'd picked up some of the MM metalizers and wanted to try those for a first attempt at NMF. I'm pleased so far, but I know how delicate this stuff is. Fingers crossed.

Doogs: That's a beautiful Mustang. I'd be happy if mine turned out half as well. You've got me itching to get to those decals. And I'll keep the magnesium suggestion in mind.

Gamera: Thanks for the kind words. Always welcome.

Cheers,

Stoutfella

On the bench: 1/48 Tamiya Bristol Beaufighter

On deck: 1/48 Tamiya P51-B

  • Member since
    February 2006
  • From: Smithers, BC, Canada
Posted by ruddratt on Tuesday, June 12, 2012 10:13 AM

Stout - hard to tell it's your first attempt at a NMF. It looks great! The key to either medium, Alclad or the MM stuff, as we all know, is your base coats. Nail that and you've got a winner, as both do spray extremely well. I chose the Alclad only because I like its durability. My chrome and stainless steel should be arriving any day now, along with their copper (which I need for another project - the engine cylinder cooling jackets for my WnW Fe2b).

Cliff - thanks man! This thing is waaaaayyyyy out of my comfort zone. Being 1/12 scale, the wife says it'll be a nice kit to display with one of her doll houses - I said sure, you can park it in the living room! Cool

Mike

 "We have our own ammunition. It's filled with paint. When we fire it, it makes pretty pictures....scares the hell outta people."


  • Member since
    June 2010
  • From: Austin, TX
Posted by DoogsATX on Wednesday, June 13, 2012 9:44 AM

I've been mucking about with the B-25's R-2600s for the past few days. Base painting is more or less complete, at least for the main components. Tamiya Gloss Black, Tamiya Neutral Gray, Alclad Magnesium, Alclad Exhaust Manifold.

LOVE the way this thing goes together! Various bits (crankcase, mid-frame, rear exhaust) have notched tubes, for lack of a better word, that the engine slots down over. It's not unlike the keyed holes on so many 1/48 radials, but extending them out to tubes makes it possible to add things like the rings of pushrods. Also makes it super-easy to paint each element on its own, then bam, engine!

It's going to be fun from here...first kit engine I've ever encountered that provides individual ignition wires in styrene. 

On the Bench: 1/32 Trumpeter P-47 | 1/32 Hasegawa Bf 109G | 1/144 Eduard MiG-21MF x2

On Deck:  1/350 HMS Dreadnought

Blog/Completed Builds: doogsmodels.com


  • Member since
    November 2009
  • From: SW Virginia
Posted by Gamera on Wednesday, June 13, 2012 9:51 AM

Wow Doogs those look great!!! I assume you can remove the cowlings to see all that detail?

"I dream in fire but work in clay." -Arthur Machen


  • Member since
    June 2010
  • From: Austin, TX
Posted by DoogsATX on Wednesday, June 13, 2012 9:59 AM

Gamera

Wow Doogs those look great!!! I assume you can remove the cowlings to see all that detail?

Check this out...


On the Bench: 1/32 Trumpeter P-47 | 1/32 Hasegawa Bf 109G | 1/144 Eduard MiG-21MF x2

On Deck:  1/350 HMS Dreadnought

Blog/Completed Builds: doogsmodels.com


  • Member since
    November 2009
  • From: SW Virginia
Posted by Gamera on Wednesday, June 13, 2012 11:21 AM

DoogsATX

 Gamera:

Wow Doogs those look great!!! I assume you can remove the cowlings to see all that detail?


Check this out...

http://i780.photobucket.com/albums/yy86/doogsatx/Aircraft/HK%20B-25J%20Mitchell/file-43.jpg

http://i780.photobucket.com/albums/yy86/doogsatx/Aircraft/HK%20B-25J%20Mitchell/file-34.jpg


YOW! I wish I had somewhere to put one of those giant B-25s, the more you post the better this model kit looks IndifferentWow

"I dream in fire but work in clay." -Arthur Machen


  • Member since
    June 2009
  • From: Netherlands
Posted by kermit on Wednesday, June 13, 2012 12:51 PM

Doogs,

That B25 may be a heavy brute lump of platic but it sure packs a heck of alot of detail! I love every pic i see and i do hope i can hypnotize my wife enough in the future to allow me to purchase such a kit....No luck sofar hahaha

Stoutfella,

Beautiful and flawless finish! Nobody can resist the power of a shiny stang. Great work!Yes

Mike,

I can only agree with the falla's here.... incredible realistic paintwork on your part. I am very impressed.


Uhm....so......ya... I was working on a *cough* Academy Bearcat *cough*...Embarrassed. Assembly i must say was swift, without much trouble and hassle free as i expect from Academy with the exception of some seams at awkward or less expected places:

That was the biggest one: the front windshield doesnt entirely line up at the front but i hope i can correct this with some clever thinkwork...

That one shows you the tailfin... It comes in a two part assembly so it leaves you with a seam that needs careful filling and sanding as the real deal doesnt have this division. The kit offers two vareities of em just as the nosecone btw.... probably for creating a f8f1 or -2 .

Yes, the kit offers you a three part wing setup with the lower wing being one part together with a bit of fuselage. It always gives you that belly seam just aft of the wings i generally hate...it never lines up 100%.... Hope i filled it correctly there too.

Richard

"Success is the ability to go from one failure to another with no loss of enthusiasm." - Sir Winston Churchill

  • Member since
    September 2009
  • From: Guam
Posted by sub revolution on Wednesday, June 13, 2012 1:35 PM

Richard- my P39 I'm doing had similar fit problems with the canopy, looked a lot like what you have there! I just dabbled some clear part glue into the gaps until it looked good. I haven't pulled off the masks to check the inside yet, but I've been pretty lucky with clear part glue before. It likes to stay where you put it.

NEW SIG

  • Member since
    June 2009
  • From: Netherlands
Posted by kermit on Wednesday, June 13, 2012 1:43 PM

Sub,

Your idea is very workable and the glue shouldnt fog.... did a similar thing with waterbased wood glue too..... Sofar ive been thinking along the lines of putty and micro files/ sanding sticks since the bottom part of the windshield is unmasked.... I will give your idea some serious thinking (ouch) over though. Thank you.

Richard

"Success is the ability to go from one failure to another with no loss of enthusiasm." - Sir Winston Churchill

  • Member since
    January 2012
  • From: Hatfield
Posted by Misty on Wednesday, June 13, 2012 2:08 PM

Making a tentative start at last, removing and trimming the resin parts. Quite impreessed at the accuracy.


Image2 by omgpainful, on Flickr


Image5 by omgpainful, on Flickr

  • Member since
    February 2006
  • From: Smithers, BC, Canada
Posted by ruddratt on Wednesday, June 13, 2012 10:10 PM

Richard - man, that's some excellent progress you're making on your 'cat. I'm curious to hear how you plan on handling that issue with the windscreen.

Doogs - what can I say? Those engines are very cool, and it's good to know they won't be hidden when she's finished. Man, that thing is just packed with detail! ....and even including engine wiring?! My guess though is that you'll use a different medium instead? Cleaning any mold lines off those suckers would make me crazy!

talentless - those are some neat sets ya got there. They look spot on! Should look great once painted and installed! Yes


Well, I need to tell you all - I am super impressed with Great Hobbies in Ontario. They said my paints would be here on the 13th, and they were bang on! Now the hard part comes. That chrome and stainless steel Alclad is uber-shiny, and ultra smooth glossy finishes for the base are not exactly one of my strong points - man I hope I can pull this one off, because it's gonna make or break this build. Wish me luck fellas - I think I'm gonna need some.

Mike

 "We have our own ammunition. It's filled with paint. When we fire it, it makes pretty pictures....scares the hell outta people."


  • Member since
    June 2012
  • From: South Africa
Posted by Jolley Roger on Thursday, June 14, 2012 4:30 AM

I would like to join please.

Just started with an 1/72 Acadamy F-86E Sabre.

Will be 90% metal, planning to do it in foil and some Alclad.

PSP base in Alclad.

This will be my first experimenation with foil, hope to learn from the forum.

Here is my first attempt using plain old alu foil. PS - this is my first plastic model in 20 years!

I used Micro Metal foil adhesive. I did the opposite than the instructions, applying the adhesive to the plastic instead of the foil. I thought this worked better, as i can apply the adhesive to the individual panels, stick the alu on and then cut the panels out, without any pesky glue remaining on the surrounding plastic.

The results is encouraging, the glue dries very quickly and I was able to sand the alu with some 1000 grit without any of the edges lifting up.

Tags: F86 SABRE
  • Member since
    July 2008
  • From: USA California
Posted by vetteman42 on Saturday, June 16, 2012 12:23 AM

Stoutfella your first attempt at an NMF build is looking much better than my first try, very well done sir YesYes Keep the pictures comin. You are gonna fall in love with the Cartograph decals too, just take it easy with the setting solutions and dont dare use micro-sol of one like that on them. The result wasn't pretty at all

Doogs can't wait to see more pictures of this monster 25 build Eats all the fiddly detail parts are gonna pay off big time me thinks especially in your capable hands. Sweet engines !!!!!!!!!!

Kermit looks pretty darn good from here, and coming along quickly too. Gonna have to look into getting one of these kits.

I have tried a number of methods for windscreen troubles like the one you are having and haven't really been happy with any of them so far. Crystal Clear glue seem to work best for me, but I have been giving thought to using an elmers glue stick like putty for my next one. Using a hobby knife to fill in the gap with the stick glue then once filled dip the knife or maybe better yet a toothpick in water to shape and smooth the glue. Just an idea I have been toying with.

Talentless those detail parts look spot on man, will build into a great looking burner can.

Jolley Roger yes yes by all means your build is in. And welcome to the forums !!

I like to use foil and do use Microscales Adhesive and frankly I like your idea. The foil looks like it laid down perfectly and I know cleaning the excess glue is a PITA big time. IMHO the end result is worth it in the end though.

Randy So many to build.......So little time

  • Member since
    July 2008
  • From: USA California
Posted by vetteman42 on Saturday, June 16, 2012 12:37 AM

Ruddratt after having ridden a Virago, some years back mind you Wink Gotta tell you it looks great buddy, like the way you simulated the gold anodize on the rims and engine case. And yes removing the (couch) chrome really added to it. Lookin forward to seeing more of it.

Jolley Roger the front page has been updated with your build

Randy So many to build.......So little time

  • Member since
    December 2002
  • From: Bury St Edmunds, Suffolk, England
Posted by Bish on Saturday, June 16, 2012 3:40 AM

Is this really the 4th NMF, i must have missed one somewhere. Afraid i am going to have to pass on this again, just to much on. But i will be watching for some more great NMF builds and hoping for a NMF V.

I am a Norfolk man and i glory in being so


On the bench: Airfix 1/72nd Harrier GR.3/Fujimi 1/72nd Ju 87D-3

  • Member since
    January 2010
  • From: Nebraska, USA
Posted by CallSignOWL on Saturday, June 16, 2012 5:08 PM

decided on a build! Academy 1/48 p-47

------------------------

Now that I'm here, where am I??

  • Member since
    January 2012
  • From: East Peoria, IL
Posted by stoutfella on Tuesday, June 19, 2012 3:31 PM

HELP!

Need opinion/suggestions on a decal issue, please. Just started applying decals to my P-51 today.

No problems, until I got to looking at the invasion stripe decals, which I definitely plan to use. Looking at the underside, I realized that the stripe decals are supposed to go right over the drop-tank pylons:

Obviously, I wasn't thinking far enough ahead when I attached the pylons, which are pretty darn firmly affixed with Testors liquid cement. What are my options here? Do I pry the pylons up, creating who knows what kind of mess, or can I split and trim the decal around them?

With another finish, I probably would have just painted the stripes in the first place, but with the delicate MM metalizer finish, I've planned all along to use the decals. I could definitely use some advice before I plow ahead here. Thanks in advance for any guidance.

Cheers,

Stoutfella

On the bench: 1/48 Tamiya Bristol Beaufighter

On deck: 1/48 Tamiya P51-B

  • Member since
    June 2010
  • From: Austin, TX
Posted by DoogsATX on Tuesday, June 19, 2012 4:05 PM

My recommendation? Mask and spray the invasion stripes. Decals never line up right, IMO.

For the outer borders you could use something like parafilm or even damp newspaper to mask without necessarily pulling up the metalizer. Use Tamiya tape for the actual stripes (I believe 10mm is more or less = to the 18" width of the invasion stripes).


On the Bench: 1/32 Trumpeter P-47 | 1/32 Hasegawa Bf 109G | 1/144 Eduard MiG-21MF x2

On Deck:  1/350 HMS Dreadnought

Blog/Completed Builds: doogsmodels.com


  • Member since
    June 2012
  • From: South Africa
Posted by Jolley Roger on Wednesday, June 20, 2012 5:33 AM

The F-86 instrument panel done, using a mix of the Eduard Airfix and Fujimi photo etch frets. None of them is 100% accurate, but at this scale it's difficult. Thank goodness Eduard had the vision to put extra control levers on the fret, I lost a couple (first time doing PE workEmbarrassed).

Also a bit dissapointed with Acadamy, the wings is not that of the F86E but for the F86F, it can be modified, but I'll see if I want to go that far in this scale. More details later


  • Member since
    November 2009
  • From: SW Virginia
Posted by Gamera on Wednesday, June 20, 2012 8:22 AM

SF: Well what Doogs said will result in the best looking stripes and probably the least trouble. Still I'd be a little paranoid about spraying them with the other decals down, you can just put the stripes down around the pylons and then carefully paint the area around them with a brush. Won't look quite as good as what Doogs suggests but with less worries about over-spray or peeling something up.

JR: Looks great to me! Yeah love Eduard putting the extra parts in there, most of the time I use quite a few of them!  


"I dream in fire but work in clay." -Arthur Machen


  • Member since
    January 2012
  • From: East Peoria, IL
Posted by stoutfella on Wednesday, June 20, 2012 10:29 AM

Gamera

SF: Well what Doogs said will result in the best looking stripes and probably the least trouble. Still I'd be a little paranoid about spraying them with the other decals down, you can just put the stripes down around the pylons and then carefully paint the area around them with a brush. Won't look quite as good as what Doogs suggests but with less worries about over-spray or peeling something up.

JR: Looks great to me! Yeah love Eduard putting the extra parts in there, most of the time I use quite a few of them!  


Yeah, I know Doogs is right, and next time I have invasion stripes to deal with, I'll spray 'em, but at this point, I'm kinda all in with the decals:

I'm going to cut a small slit in the decal so I can work it around the pylon, then trim around it and hope I can keep the whole thing lined up and smooth. I'm goin' in. Wish me luck!

Jolley Roger: Looks great, especially in 1/72. I'm impressed.

Cheers,

Stoutfella

On the bench: 1/48 Tamiya Bristol Beaufighter

On deck: 1/48 Tamiya P51-B

  • Member since
    June 2010
  • From: Austin, TX
Posted by DoogsATX on Wednesday, June 20, 2012 10:38 AM

Gamera

SF: Well what Doogs said will result in the best looking stripes and probably the least trouble. Still I'd be a little paranoid about spraying them with the other decals down

It's totally doable:

On the Bench: 1/32 Trumpeter P-47 | 1/32 Hasegawa Bf 109G | 1/144 Eduard MiG-21MF x2

On Deck:  1/350 HMS Dreadnought

Blog/Completed Builds: doogsmodels.com


  • Member since
    January 2012
  • From: East Peoria, IL
Posted by stoutfella on Wednesday, June 20, 2012 12:27 PM

DoogsATX


 Gamera:


SF: Well what Doogs said will result in the best looking stripes and probably the least trouble. Still I'd be a little paranoid about spraying them with the other decals down


It's totally doable:

http://i780.photobucket.com/albums/yy86/doogsatx/P-47D%20-%20Hairless%20Joe/a2c51aae.jpg

http://i780.photobucket.com/albums/yy86/doogsatx/P-47D%20-%20Hairless%20Joe/file-56.jpg

Doogs: The Cartograph stripe decals aren't that bad to deal with on their own, but I vastly complicated the whole thing with my miscue on the pylons. Small mistakes leave big messes sometimes. I just didn't feel confident enough to tackle painting them after laying down the metal finish and already starting the decals. So I'm muddling through and am glad the problem area is on the underside.Hey, it's a learning experience.Smile

Next time I deal with invasion stripes will very likely be on the Academy P-47 in the Gabreski markings very similar to the Jug you show. And I expect I'll think everything through a little better and paint the stripes!

Cheers,

Stoutfella

On the bench: 1/48 Tamiya Bristol Beaufighter

On deck: 1/48 Tamiya P51-B

  • Member since
    January 2012
  • From: East Peoria, IL
Posted by stoutfella on Thursday, June 21, 2012 1:01 PM

Greetings,

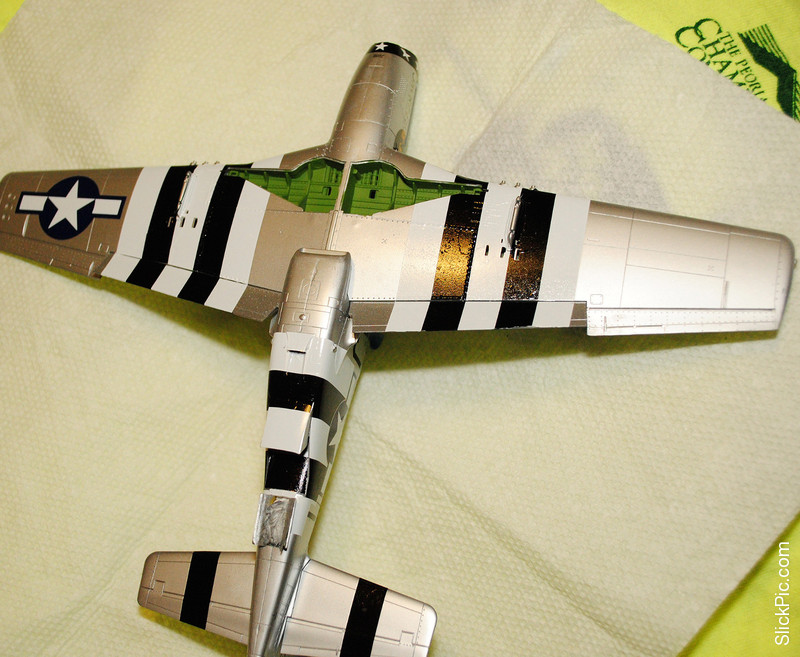
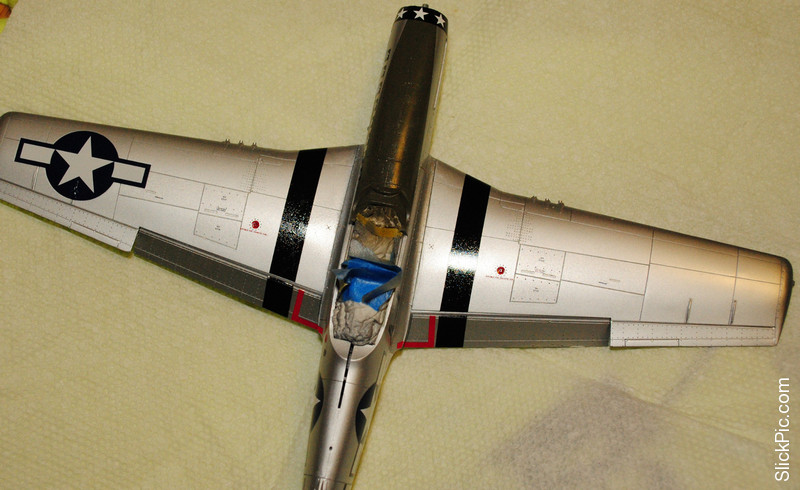
I think I'm done with decals on the Mustang and, whew, I've gotta say this was the most challenging decal project I've ever tried. I remember when I was a kid, I hated decaling simply because mine always looked like crap. I'd throw on the main insignia, which invariably bubbled and silvered, cuz all I knew to use was water. Tiny little stencils? Not a chance. So to tackle something like this on my fourth model since coming back to the hobby was a stretch. Toss in the metal finish and the stress levels were pretty high. Then factor  in trying to fit invasion stripe decals around the pylons I shouldn't have attached until later and, well, I was sweating for a while yesterday.

I must say I can't recommend the invasion stripe decal route, and I'll plan to paint them next time. All things considered, though, I'm OK with how it's turning out and it's definitely been a learning experience. I've got a few spots I may hit with Solvaset to try and smooth out a little more. While the decals on their own weren't that hard to deal with, my miscue with the pylons sure complicated the process. And Doogs was right about some of them not quite lining up exactly. And so many little pieces to fit around nooks and crannies.

Anyway, here are a few pics:

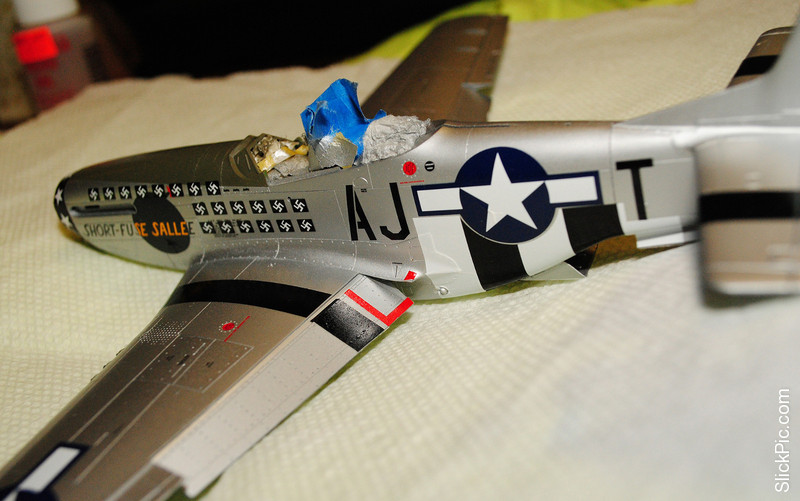
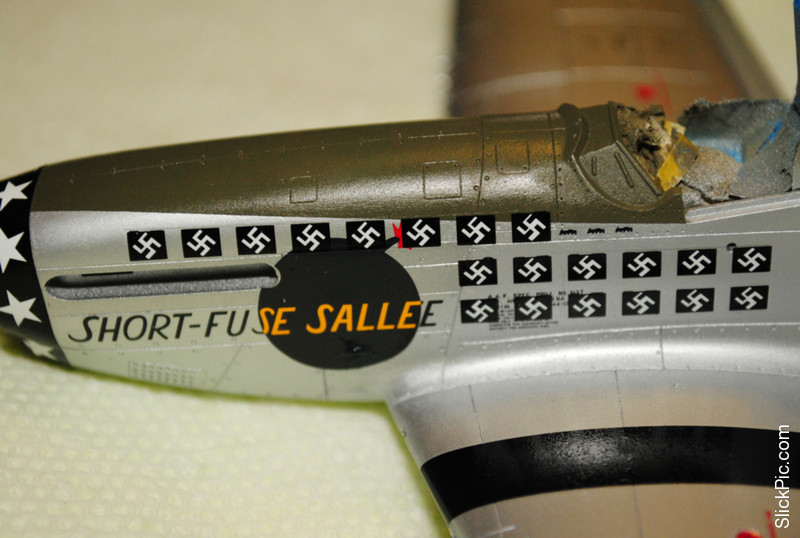
Despite obsessing over the stripes, the scariest part was actually the two-part swastika decals. The kill marks and the 'Short Fuse Salle' nose art are all one big piece. But, of course, Tamiya doesn't provide actual swastikas and doesn't show them anywhere on the box or the instructions, just these nasty looking black and white blobby things. I'd even ordered some separate kill markings before I took a really close look at the decal sheet and figured out that you have to lay down a black and clear overlay decal that magically transforms the blobby things into real swastikas. Well, you get once chance to line this sucker up exactly on top of the first decal, desperately hoping the whole thing doesn't start setting up and refusing to move. I almost had it when the front edge of decal No. 1 started peeling up, folding and sticking to decal No. 2. I'm still not sure what I did, but suddenly it smoothed out and all was well.

I feel like the hard part is behind me now. I'll still need to touch up some black and white spots in the stripes, do a panel wash and light weathering, apply a semi-gloss top coat, mask and paint the canopy and finish up wheels, prop, etc. The end is in sight.

Cheers,

Stoutfella

On the bench: 1/48 Tamiya Bristol Beaufighter

On deck: 1/48 Tamiya P51-B

  • Member since
    June 2009
  • From: Netherlands
Posted by kermit on Thursday, June 21, 2012 3:13 PM

Stoutfella,

Looking good from where i am sitting!!Yes


My Bearcat is coming along. I took my time to lay the NMF coating down with several misted coats. After three nights i am starting to get where i want it to go. The Talon delivers again! Pics soon


Richard

"Success is the ability to go from one failure to another with no loss of enthusiasm." - Sir Winston Churchill

  • Member since
    January 2012
  • From: East Peoria, IL
Posted by stoutfella on Thursday, June 21, 2012 3:28 PM

kermit

Stoutfella,

Looking good from where i am sitting!!Yes


My Bearcat is coming along. I took my time to lay the NMF coating down with several misted coats. After three nights i am starting to get where i want it to go. The Talon delivers again! Pics soon


Richard

Thanks! I use the Talon, as well. Had it for a couple of years, I think, but still feel like a rank beginner. I still have a lot of trouble getting the right consistency in my paint. One reason I liked spraying the MM metalizers. They seem perfect right out of the bottle.

Cheers,

Stoutfella

On the bench: 1/48 Tamiya Bristol Beaufighter

On deck: 1/48 Tamiya P51-B

JOIN OUR COMMUNITY!

Our community is FREE to join. To participate you must either login or register for an account.

SEARCH FORUMS
FREE NEWSLETTER
By signing up you may also receive reader surveys and occasional special offers. We do not sell, rent or trade our email lists. View our Privacy Policy.